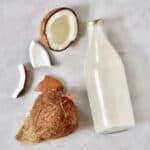
How-to: DIY Homemade Coconut Milk
A simple DIY for two-ingredient homemade coconut milk - a wonderful dairy-free milk option using fresh coconuts! You'll never want to buy store-bought again!
Servings: 3 cups
Ingredients
- 1 coconut – flesh
- 3 cups of filtered water
OPTIONAL:
- 1 vanilla pod or vanilla extract
Instructions
- First, you have to open your mature coconut, to remove the meat. There are a number of ways that you can open your coconut, but first, I like to make a hole (or 2-3) in the thin coconut' eyes' part at the top of the shell.I used a screwdriver for this, but any sharp tool will work. Be careful to place your coconut on top of a kitchen towel to stop it from shooting across the counter.
- Drain the coconut water from the coconut into a glass (you may need a small sieve). This is amazing to drink cold and fresh or add to smoothie recipes.
- With the coconut water removed, it's time to open the coconut. One of the easiest ways to open the coconut is to simply tap a hammer along the middle of the coconut a few times, spinning it as you go. The coconut will split in two fairly easily this way.(* read notes for alternative options)
- Next, Remove The Coconut Meat From The Shell carefully using a knife or special coconut tool. Place the coconut on a kitchen towel to keep it in place.
- Add the coconut flesh and water in a blender/high-power food processor. You could also add vanilla extract at this point and possibly some maple syrup, or dates, as a natural sweetener. Alternatively, leave as unsweetened coconut milk.
- Blend for around 2 minutes, until the mixture looks creamy and thoroughly mixed. Taste a spoonful and adjust the sweetness if wanted.
- Next, pour the mixture into a nut milk bag or through a cheesecloth to squeeze out all the liquid.**
Video
Notes
* There are actually a couple of (optional) methods for helping you to remove the coconut meat in a breeze.
Method 1: Place the coconut in your freezer overnight before making this recipe ( after draining the coconut water). When using the hammer, you'll find that the shell comes apart really easily from the coconut meat, and the whole process takes less than a minute.
Method 2: Place the drained coconut in the oven at 400F/ 200C for around 15 minutes. The heat should actually cause the coconut shell to crack, and you'll be able to easily finish off the job with the above hammer method. Plus, the heating won't affect the flavor or texture of the coconut.
** Don't throw away the coconut pulp as this can be used for tons of recipes: Chuck it into your smoothies, from wet. Alternatively, dry it out in the oven at a very low temperature and then use it in place of desiccated coconut in a variety of recipes ( listed in blog post above).
2 Alternative Ways To Make Coconut Milk
- If it's hard to source coconuts for you, then you can also make this recipe using unsweetened shredded coconut and follow the same process of blending for 2 minutes and straining.
- You can also make coconut milk using homemade coconut butter, for deliciously creamy results. Simply combine around 1/3 Cup coconut butter per 2 Cups of filtered water, blend as normal and then strain through a nut milk bag ( or not, if you don't mind the slight texture), voila!
- For a 'lite' version of coconut milk, all you need to do is increase the water ratio in the coconut milk. The coconut milk will separate as it sits in the fridge ( with thick coconut cream on top and the water content below). This is completely normal, and you just need to shake it well before using it.
- If you use fresh coconut and want to save the shell to make it into two bowls, then follow this process.
- Flavor Options: The flavor of coconut blends really well with a variety of other nut and plant-based milk recipes. So feel free to make a 1/2 and 1/2 blend, for example, with this rice milk, pistachio milk, or cashew milk.
- For Chocolate Coconut Milk: sweeten with two Medjool dates or a tbsp of maple syrup, 1/2 tsp vanilla extract, and 1-2 tbsp cacao powder, depending on how strong you want the flavor.
- Strawberry Coconut Milk: As above except 1 cup of strawberries instead of the cacao powder.
- You may also like this sweet Star Wars inspired Blue Bantha Milk. Alternatively, this soothing coconut based golden milk.
Nutrition
Serving: 0.5cup | Calories: 65kcal | Carbohydrates: 7g | Fat: 4g | Saturated Fat: 4g | Sodium: 45mg | Fiber: 1g | Sugar: 5g