How to Temper Chocolate (3 methods)
Everything you need to know on how to temper chocolate: what chocolate to use, the chocolate tempering temperatures, tabling, seeding, and sous vide methods with tips, and a bonus microwave method too!
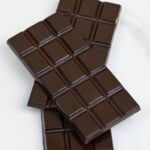
Servings: 3 chocolate bars (of 100 g each);
Ingredients
- 10 oz Chocolate Couverture (Callets) or high quality chocolate for baking
If using beta crystals method
- 0.10 oz Mycryo Cocoa Butter Powder
Instructions
METHOD ONE: THE TABLE TEMPERING METHOD
- This method requires you to use a marble or granite slab (or countertop) and is fairly messy but certainly looks impressive. It’s important to use the correct surface as they don’t retain heat in the same way as many other surfaces – which helps to control the temperature of the chocolate better.The way this method works is that you quickly agitate the melted chocolate on the cool marble slab, which will cool it down while the agitating stops the wrong crystals from forming until it reaches the wanted temperature.
- Melt the chocolate over a double boiler (a heatproof bowl set over a small pan with a little simmering water. Make sure the water doesn’t touch the bowl at all, or you’ll burn your chocolate) until it reaches 50ºC/122ºF (or 45ºC/113ºF for white and milk chocolate).
- Remove the bowl from the double boiler, making sure to carefully wipe the bottom of it (any steam or water that enters out chocolate at all can cause it to seize!)
- Pour 2/3 of the chocolate onto the marble slab and return the bowl to the double boiler (with the heat off).
- Use palette knives or bench scrapers, constantly agitate the mixture back and forth; spread it across the table, and then scoop it back in and spread again. This will allow the temperature to drop to 28ºC/82.4ºF (26-27ºC/79-80.6ºF for white or milk chocolate).This can take some time but check the temperature once it begins to thicken (don’t stop agitating it too much – it’s critical to stop the crystals from forming until it reaches the temperature we need!). When it’s ready, it should run in ribbons down from your spatula/bench scraper.
- Once it reaches the temperature, quickly scoop it back into the bowl with the remaining warm melted chocolate, stirring well. The aim is not to go above 32ºC/89.6ºF (28-30ºC/82.4-86ºF for white or milk choc). When it reaches that temperature, it should be smooth in consistency and texture and is ready to use (pour into your molds of choice, etc.)
METHOD 2: THE SEEDING TEMPER METHOD
- Melt 2/3 of your chocolate over a double boiler, often stirring until it reaches around 50ºC/122ºF (or 45ºC/113ºF for white and milk chocolate). Then remove the bowl from the double boiler. You could also melt the chocolate within a microwave at 15-second intervals until almost melted and around 115ºF.
- Using a clean, dry spatula, gradually add the remaining unmelted chocolate (as chunks or grated/shaved). Stir well until the temperature drops to 28ºC/82.4ºF (26-27ºC/79-80.6ºF for white or milk chocolate).This method can take quite some time; between 10-15 minutes, so be patient. You can place the bowl within a second bowl of cold water. But be VERY careful as even a drop of water in with your chocolate can cause it to seize.
- You can then briefly bring it back up to 30-32ºC/87-89ºF 28-30ºC/82.4-86ºF for white or milk choc) over the double boiler (literally 5-10 seconds) if needing a smoother consistency. Then it’s ready to use!
METHOD 3: SOUS-VIDE TEMPERING METHOD
- This is definitely the most precise method (in my opinion). All of the chocolate is evenly exposed to the correct temperature, the change in temperature is slow, and it’s fairly mess-free. You can even save any chocolate that you don’t use in the bag to re-use at another time. The main struggle is making sure to keep ALL WATER away from the chocolate, so it doesn’t seize.
- Heat the water to 50ºC/122ºF for dark chocolate (or 45ºC/113ºF for milk/white chocolate) using the sous-vide cooker tool.
- Place all of the chocolate into a waterproof bag. I used a reusable silicone bag and double-bagged. You could alternatively use a vacuum seal bag (often used with the sous vide method).
- Place the bag in the water until the chocolate is melted (this won’t take long at all). Then reduce the water temperature to 27-28ºC/80-82ºF (or 26ºC/79ºF for milk/white chocolate) – you can speed up this process by adding ice-cubes to the water. During this process, similarly to the previous methods, it can be a good idea to agitate the chocolate. I suggest removing the bag from the water every minute, squeezing it lightly a few times to agitate the melted chocolate. Then placing back in the water. Repeat this every minute until the water reaches the correct temperature. Then hold the temperature there for 2 minutes, agitating once per minute.I’ve had success not agitating it, but it’s best to do it to stop the wrong crystal forms building until it reaches the temperature we want.
- Bring the temperature back up to 32ºC/89ºF (30ºC/86ºF for milk/white) and allow it to sit there for a few minutes. Agitate it a couple of times in the first two minutes.
- Remove the bag from the water, wipe off the bag thoroughly and then use your tempered chocolate as you please.Note: You can easily keep the chocolate at temper by leaving the chocolate in the heated water bath for several hours. Great for larger chocolate projects.
BONUS METHOD: TEMPER WITH A MICROWAVE
- Place your chocolate in the bowl – either finely chopped, or you can use callets.
- Microwave for 20 seconds – then give it a good stir with a silicone spatula.
- Repeat this process, microwaving the chocolate for 10 seconds at a time, stirring well in-between (to help the chocolate melt evenly). Once it’s 3/4 melted, you usually don’t need to microwave it anymore. Stir it to encourage the remaining bits to melt. This will help to keep it from overheating.This method usually doesn’t require a thermometer – but to make sure you don’t break temper, feel free to check the temperature. Make sure it doesn’t go above 32ºC/89ºF (or 30ºC/86ºF for milk/white choc).
Notes
THE CHOCOLATE TEMPERING TEMPERATURES
Different types of chocolate have different minimum and maximum temperatures during the tempering process.
Read the blog post for answers to more FAQs and extra notes on how to temper chocolate!
- Dark Chocolate: Melt to 46-50°C (115-122ºF), cool to 28°C (82.4ºF), and reheat to 30-32°C (86-89.6ºF)
- Milk Chocolate & White Chocolate: Melt to 40-45°C (104-113ºF), cool to 26/7°C (79/80.6ºF), and reheat to 28-30°C (82.4-86ºF).
- I am not a professional chocolatier - all of the above information was gathered through research and LOTS of kitchen experimentation!
- When adding in any flavorings or add-ins to chocolate MAKE SURE they aren't water-based. Use oil-based flavorings rather than extracts, etc. Even a single drop of water can cause the chocolate to seize.
- If your chocolate has bloomed, you should still be able to temper it and get rid of the bloom. However, if it arrives to you bloomed, I would return it as it shows improper storing of the chocolate.
- If you want your chocolate to be particularly fluid while melted, you can buy chocolate specifically formulated to be fluid (couverture chocolate). This contains higher cocoa butter levels for a more liquid consistency. Certain brands, like Callebaut, list the fluidity level on their website.
- If you over-cool the chocolate during the cooling phase, this can encourage other crystal forms to grow and inhibit the form V ones. If this happens, reheat the chocolate to the highest temperature and start the process again.
- I suggest using a minimum of 10 oz (300 g) of chocolate when tempering. Unless you're using the sous vide method, in which case, there isn't a minimum.
Read the blog post for answers to more FAQs and extra notes on how to temper chocolate!