Candle Making for Beginners
A beginner's guide on how to make candles (with soy wax or beeswax) in a few simple steps. Plus, top tips, FAQs, and troubleshooting for successful DIY candles every time!
Equipment
- Double boiler
- Infrared Thermometer or another high heat thermometer
- scissors
- 2 chopsticks or pencils or a clothes peg
Ingredients
- 1 lb candle-making wax beeswax or soy wax flakes or pellets - or use as much as wanted
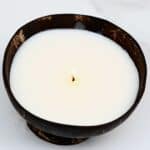
- 4 candle containers 4 oz each or bigger/smaller as wanted; use coconut shells or small jars or glasses; avoid plastic, terra cotta, or wood
- 4 candlewick twine or wood-based wick
- 4 adhesive stick glue dot OR glue gun
- few drops Essential oil (fragrance) optional, choose your favorite, eg. lavender essential oil
- few drops color optional; soy wax dye is best; see blog post for alternative options
Instructions
- Prepare the containers/ vessels, ensuring they’re thoroughly cleaned (with hot water and soap) and dry. If you want to make homemade coconut shell candles, prepare the shells using this method.Also, set up your working area - it's best to cover it with newspaper, parchment paper, or some towels.
Measure the Wax
- To measure how much wax you need for your container, fill it (leaving at least ½ inch at the top) with the unmelted wax, and then double that amount.You can also keep these measurements in mind:- 1 lb soy wax, once melted will be about 18 fl oz (in liquid form),- 1 lb beeswax, once melted will be about 16 fl oz (about 1 cup).To do this before purchasing wax, you can pour water into your vessel of choice to know the volume of the container. This is how much melted wax you’ll need (double this for the volume of wax flakes).
Melt the Wax
- Use the double boiler method. First, place a heat-proof bowl over a small saucepan filled with a couple of inches of water, simmering (ensure the water isn't touching the bottom of your bowl).
- Add the wax to the bowl and stir it frequently to help it melt evenly. The goal is to reach between 158ºF/70ºC and 175ºF/80ºC (use an instant-read thermometer to check). It might take about 10-15 minutes for the wax to melt, though time varies based on the batch size.Avoid overheating the wax (not above 200ºF/95ºC for soy wax), as it will affect the quality of your DIY soy candles. For example, it can cause yellow discoloration and cracking, weakened fragrance, frosting, etc.
Add Scent (Optional)
- After melting, allow the temperature of the wax to cool down to 135ºF/57ºC, then add your preferred essential oil. The amount needed will vary based on the candle size and how strong you wish the scent to be.As a general guideline: start with 6% (1oz) fragrance per 1lb soy wax. Don’t go above 10% fragrance load.Be aware that every wax has a maximum ‘fragrance oil load.’ Beyond that, it can cause separation in the wax and even lead to a potential fire hazard.
- Once the scent is added, stir the wax consistently for at least 1-2 minutes to properly distribute it throughout the wax.
Add Color (Optional)
- I recommend using soy dye (which comes in liquid, block, and flake form). I like to use around ¼ tsp per 1lb wax for a medium shade or ½ tsp for a darker shade. Add it when melting the candle wax and stir to incorporate fully. Alternatively, when making coconut candles, teacup candles, and other options where only the top is seen, you can sprinkle or brush the top of the candles with mica. You'll still get color that way and the pretty effervescence when it melts, but it’s far less likely to clog the wick.There are several ways to naturally infuse the wax with color too. I,e, with spices, flower petals, etc. (check the blog post for the full list of colorants and notes). How to test your candle color? Place a small amount of the colored wax onto a piece of paper and allow it to cool for a minute or two. You’ll then be able to see what the color will look like in the finished set candle.
Add The Wick
- There are several ways to adhere the wick to the bottom of the DIY candles. I used a small adhesive disk that I attached to the end of the wick and then in my container, where I wanted the wick to be.Alternatively, you could also use a few drops of melted wax, press the wick into it, and wait a few minutes for it to dry and harden. You could also use heat-proof glue.To ensure it stays upright and in position while pouring the candle/s, use a pair of chopsticks or pencils to hold it in place. Optionally secure it further by taping the two together (or using rubber bands). A clothes peg would also work.
Pour the Melted Wax
- Simply pour the melted hot wax slowly and carefully (to avoid air bubbles and splashes) into your container of choice and allow it to cool and harden naturally over several hours, but best overnight.Don’t be tempted to speed up the cooling process with a cold water bath or refrigerator, as it will affect adhesion and candle quality.
Trim the Wick
- Use scissors to trim the wick so it’s between 1/4-1/2 inch above your candle, and voila - the homemade candles are ready!As you burn the candle, you’ll need to continue to trim the wick, so it doesn't become a tall flame.
How to Store Handmade Candles
- It's best to light the candles within a year, especially if they are scented. However, if you've made them correctly and are storing them well (away from direct light and breezes), they won't lose their color or scent for several years.
Notes
- Add color before scent: That way, if you test the color and find it too light, you can add more and reheat the wax without losing its fragrance.
- Allow the candle to cure: Soy wax doesn't release fragrance as readily as paraffin wax and can take longer to bind. For that reason, many candle makers recommend a curing time (3-4 days minimum, up to 2 weeks) before burning the candle for the first time.
- Clean up: I recommend using isopropyl alcohol and paper towels to clean up any wax spills and messes. Hot soapy water is also great for candle-making clean-up.
- To use candle molds: I recommend using silicone molds and spraying them with a thin layer of nonstick cooking spray before pouring the wax.
- For better adhesion: When using a glass container, preheating it to 100-125ºF/38-52ºC can lead to better side adhesion. It can also prevent cracking from the candle cooling down too quickly.
- The wick: The wick size, length, and type you’ll need will vary based on the type of wax you’re using and the size of your candle. If it’s too small, the entire diameter of the candle won’t burn, and it can affect the scent throw, for example.
- Flowers: For jar candles, you could dip petals into the wax and press them against the side of the glass for decoration. You can also add dried flowers like lavender buds and roses to the sides of the jar and sprinkled within/on top. However, note they are flammable, so don’t go overboard.
- Coffee beans: Pour layers of wax with coffee beans into your container of choice OR pour in ¾ the candle, allow it to cool, and then pour in the remaining amount with coffee beans to coat the top of the candle. This smells amazing while burning.
- Experiment with pouring the candles at slightly higher or lower temperatures to see if there is an improvement (this may vary based on climate and temperature throughout the year).
- Preheat the glassware before pouring the soy wax and/or ensure the candles are kept in a draft-free area on a wire cooling rack to cool more slowly and evenly.
- Don’t use old wax flakes. It’s best to use them within one year of manufacture.
- Try stirring less when adding the fragrance to the melted wax.
- Some people add a small amount of fractionated coconut oil to the wax to reduce frosting and increase adhesion. Note that this will affect how much fragrance you can add, as it counts in the ‘oil load.’