A Step-by-Step Guide to Water Bath Canning
An easy step-by-step guide to water bath canning for beginners: an at-home canning technique perfect for preserving jams/jellies/preserves, fruits, pickles, and tomato products for up to a year of locked-in freshness & flavor!
Equipment
- NEEDED
- Glass jars with lids
- Water bath canner with wire rack/trivet
- Microfiber cleaning cloth or clean kitchen towel
- EXTRAS
Instructions
Sterilize Everything and Prepare the Canner
- PLEASE NOTE THAT THIS IS A SUMMARIZED VERSION OF THE METHOD - READ THE BLOG POST FOR A LOT MORE TIPS AND NOTES.Clean your workspace and sterilize the canning equipment (jars, lids, tongs, pot, inner rack, funnel, etc.) in hot soapy water. Then rinse them well.
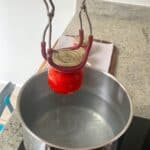
- Place the wire rack/trivet into the bottom of the canner and fill the pot about halfway with water. Then bring it to a boil over medium heat while you fill the jars. 10 minutes before needed (at least), boil the jars (lids on) in the prepared canning pot to kill off remaining germs and keep the jars warm (a must to avoid temperature shock).
Fill the Jars
- Fill each jar with your food item using a NONREACTIVE ladle or ladle and canning funnel (for cleaner transferring). Make sure to leave the correct amount of headspace in each jar.Rough guidelines are ¼ inch (0.5 cm) for jams/jellies/relish and ½ inch (1 cm) for fruits/pickles/tomato products. Don't leave too much headspace - it can form a "false seal" and become unsealed over time.
- Tap your jars on your counter to bring any air bubbles to the top, and use a bubble tool or sterilized chopstick/skewer/knife to press into all the corners/edges in the jar to release any hidden bubbles.
- Carefully wipe the rim/lip of the jar with a clean towel/napkin and close the lid band until finger-tight (securely screwed to the point of resistance, but not too tight that air can't escape during the processing).
Process the Jars
- Carefully transfer the jars (upright so no food touches the lid!) to the canner and make sure they are submerged under 1 inch of water (2 inches for processing times above 30 minutes) with at least 1/2 inch (1 cm) of space between them.
- Cover with a lid and bring back to a rolling boil over high heat. Once that's achieved, start your timer immediately and process for the time provided in the recipe. Check the water level occasionally so it's always high enough (keep a boiled kettle of water on standby!).
Leave the Jars To Cool
- Once processed, turn off the heat, remove the lid, and allow jars to sit in water for 5 minutes. Then carefully remove them (always upright) and transfer them to a heat-proof wooden board or clean kitchen-towel-lined work surface (to avoid temperature shock and jar breakage).
- Leave the jars undisturbed for 24 hours until fully dry and sealed. DON'T touch them before then, as it can interrupt the sealing process and cause a "false seal."
Check the Seal and Store The Jars
- Check the jars are properly sealed with a concave shape in the center (pulled inward). Button lids will "pop" at some point and will no longer be pressable in the middle. Canning lids can have their ring removed, then press the center of the lid - it should feel secure, with no give or wobble. If any jars haven't properly sealed, either re-process them with new lids (and a new jar if necessary) within 24 hours or transfer them to the fridge or freezer for short-term storage.
- Rinse, label, and store the jars in a cool, dark location (like a pantry/kitchen cupboard) for up to a year for fresh and delicious food. Don't store the jars above 95ºF/35ºC, near any furnace/range/hot pipes, or in any damp environment – this may break the seal and cause food spoilage.
Notes
- Use the best ingredients: Preserving food won't improve its quality, so select ingredients at their freshest, best in-season quality.
- Check the jar rims before using: Check for any chips/nicks around the rim that could compromise the sealing process.
- Make sure to sterilize EVERYTHING: Unwanted bacteria are the enemy of any long-term preservation method.
- Ensure the jars and lids are 100% dry before filling: Excess moisture can cause bacteria to flourish.