How To Make a Cheese Board - Standard Cheese Platter
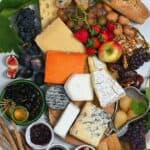
How to make a standard cheese board (two layout methods included) for your next party or special event. This cheese platter post combines several types of cheese, fruit, nuts, jams/preserves, and extras ready to impress.
Ingredients
- cheese - mixture or soft, semi-firm, and firm (5-6 for medium/large cheese board); add 2-3oz cheese per person. Emmental, Comté, goat cheese, Stilton, Brie (or Camembert), cheddar (or Gouda)
- breads - crackers, chips, bread (2-4 types) A selection of hard crackers and chips
- fruit (dried 1-2, fresh 2-3) grapes, apple/pear, stuffed dates (with almonds/walnuts)
- nuts (1-2 types) walnuts, almonds
- dips/sauces (3-5 types) onion chutney/marmalade, fig jam (or other jams), cranberry sauce
- other olives, pickled ingredients
Check the blog post for all the ingredient possibilities/categories! The ingredients above are just an example cheese board.
Instructions
- The unofficial first step of preparing any board/platter is to choose the board. The options for this are plentiful, with slate and wooden boards being my favorite options for any simple cheese platter. You can use square, round, rectangular boards, etc. If you plan to transport the fruit and cheese platter or have lots of tiny elements, I recommend using a "tray" – that way, the elements won"t risk rolling off the board and can easily be covered for transportation.There's no need to buy a specific "cheese board" if you have a good cutting board or serving tray at home. Even a sheet pan can work in a pinch!
- Then it's time to assemble the cheeseboard. There are two main styles for doing this, the first is in the style of a charcuterie board – with items varied across the board. The second is a cheese-centric cheese platter.
Method One: Mixed Board
Step 1: Place Any Bowls/Jars
- I like to place these first to get an idea of a layout for my remaining ingredients. I make sure to place bowls and jars of different shapes/heights in areas around the board (place the tallest items towards the center of the board so they don't get in the way of grabbing other items). These will be filled with pickled items, sauces, spreads, olives, etc.You can fill them immediately and cover them with plastic wrap until you're ready to serve or add the items just before serving.
Step 2: Place the Cheese
- Place the cheeses. Make sure to spread them across the board and separate them in terms of shape and size, too. You can keep the cheeses as whole wedges/wheels or slice some or all of the cheese.You might also want to add certain cheeses besides certain complimentary spreads. For example, brie can go beside honey. Aged cheddar would work next to most jam/jellies, etc.
- Note: if you're adding and charcuterie meats, then add them now too. I like to experiment with different shapes for better visual appeal by rolling and folding the meats. You can also prop them up against bowls/plates to prop them up for extra height.
Step 3: Place the Fruits and Bread
- Place the fruit. I like to add the largest items first, like grapes still attached to the stems, etc. If you're using any sliced fruits like apple/pear that will brown, then make sure to "treat" them first (check the method in recipe notes). Next, spread out the fruit, so no fruit is directly next to another, spread out the colors, sizes, etc.
- After placing the fruits, it's time to lay down the "bread." Since these can take up a lot of space, I usually fan out some crackers and then keep a separate platter nearby with extra bread and crackers for guests to grab.Make sure not to place the bread/breadsticks/crackers next to wet ingredients like fruit slices/pomegranate – or anything that can cause them to go "soggy" over time.
Step 4: Add the Nuts/Seeds and Garnish
- Fill in any remaining gaps on the board with dried nuts/seeds, other small items, and garnish.I first add the nuts/seeds. Spread the different kinds in different areas of the boards.Then, you can fill in any remaining blank spots on the board with a garnish: fresh herbs (like rosemary sprigs) or greenery will work well in these spaces.
Step 5: The Finishing Touches
- Make sure to label the cheeses (and optionally spreads/sauces if you're not serving them from their jars). You can do this with cheese "markers" or a simply DIY setup with toothpicks and labels.
- And lastly, but very importantly, add any utensils to the board. It would be best to have toothpicks for pickled and smaller items, cheese knives, spoons for dips, etc. Make sure you have spares, just in case.
Method Two: Cheese Platter
- For this method, the idea is to keep all the cheese on a single board/tray in the center of the display. You can then build up the other ingredients around that – either keeping them together or spreading them apart. That way it's easy to replenish items without having to overly worry about the visual appeal and placement of each individual item.I find this works best for large "buffet" style events rather than smaller dinner parties. However, feel free to also use this method for smaller events and simply scale it down.Don't keep a cheeseboard sitting out for more than 2-3 hours, when possible. While any leftover hard cheese is usually OK to wrap and refrigerate, you should discard softer cheeses.
Notes
- It’s all about balance and contrast: choose a combination of ingredients that play with different textures (soft, crumbly, hard, crunchy) and flavors (sweet, savory, tangy, spicy) for the best results and flavors that contrast and balance.
- Label please: if you don't want to spend all evening repeating yourself, it's a great idea to label the various cheese and spreads/sauces on the board. You can purchase specific "markers" for this or use a toothpick and label or other DIY options.
- Balance the cheese amount: rather than making a fruit and cheese platter with tons of different cheese varieties in tiny amounts; it's better to use fewer types in larger portions (then you're less likely to run out of any of the cheese!)
- Serve the cheese at room temperature: remove the cheese from the fridge 30 minutes before serving to allow the cheese to come to room temperature for the optimal texture and flavor. You can wrap it in plastic wrap/beeswax wrap to stop them from drying out.
- Visit a cheesemonger: all the above information/tips have been compiled from experience and research over the years. However, for the best advice, you may want to visit your local cheesemonger. Let them know your event and themes, and they're usually more than happy to curate a cheese selection within your theme and budget.
- Serve the cheese incrementally: as a general rule, they say you should have the cheese out for longer than 2-3 hours. However, many events will go on for longer than that. For that reason, it can be a good idea to only place a portion of the cheese on the cheese board. Top it up when you notice ingredients getting low. That way, the cheese stays fresh, and you don’t end up with any unnecessary waste. Alternatively, make two smaller platters instead or one large and leave one in the fridge until the first starts to run out.
- To avoid waste: plan out the amount of each ingredient you need. Check the FAQs for my suggestion cheese amount per person. As a general guide, supply a "handful" of extra "bits n' bobs" with the cheese and a couple of tablespoons of sauces. You can keep some extras in the fridge if needed.
- Have fun: lastly, and most importantly, don't let this process stress you out. Experiment with different pairings and have fun. Use what you think will work together and provides lots of tasty elements for all your guests. I rarely make the same platter two times in a row. I've been known to get "creative" with the rules and guidelines!