Chicken Brine Recipe (For Perfectly Juicy Chicken)
How to brine chicken for the most perfectly succulent and juicy roast chicken you've ever had! This chicken brine recipe is simple to follow, requires minimal effort, and simultaneously draws out the flavor in the meat while locking in the moisture for roasting, grilling, smoking, frying, etc.
Servings: 6
Ingredients
- 4.4 lb whole chicken
- 1.6 oz salt 1/3 cup kosher salt (not table salt)
- 16 cups water divided
Optional For The Brine
- 5.9 oz celery 2 sticks
- 4.5 oz carrots 2 medium
- 3.9 oz shallot or onion, 1 large
- 1.1 oz ginger 1 large piece
- 0.8 oz garlic 4 cloves
- 2 lemons zested and white part removed from the segments
- 1.3 oz sugar 3 Tbsp
- 0.3 oz thyme handful
- 0.2 oz rosemary few sprigs
- 0.2 oz whole black peppercorns or whole allspice; 1 Tbsp
- 3 bay leaves
Instructions
- Select a pot/dish large enough to fit the chicken (and in your fridge). If you're brining a whole chicken, you may need to shuffle around fridge shelves to make it fit.
- Prepare any ingredients you plan to add to the brine. Zest the lemons, removing the bitter white pith (to discard), then chop the remaining lemons in half. Also, rinse and roughly chop the carrot, ginger, shallot, celery, and garlic.
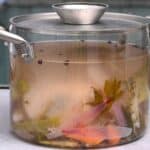
- To prepare the brine mixture, combine half the water and all the brine ingredients in a large saucepan and bring the mixture to a boil, stirring often until the salt and sugar dissolve.
- Once boiling, reduce the heat to allow the mixture to simmer for 15-20 minutes. This will infuse the brine with the various ingredients.
- Remove the mixture from the heat and leave it to cool down entirely. To help it cool down, pour in the remaining water (ice cold).
- Once cooled (make sure the brine is not warm at all) place the chicken breast-side down in the pot, ensuring it's fully submerged (add more water if necessary). Then cover the pot and transfer it to the fridge.
Brine the Chicken
- For the best results, leave the chicken to brine in the saline solution for 12 hours (minimum for whole chicken) or between 18-24 hours for optimal results (but no longer than 24hrs). Discard the brine after using it.As a general rule, brine the chicken for at least one hour per pound of meat. If you plan to brine and marinate the meat, I recommend brining it for the minimum time, so you can leave it to marinate afterward.
Rinse the Chicken
- If you want to remove excess sodium from the brined whole chicken before cooking it, carefully rinse it inside and out with cold water. Though, in general, there's no need to rinse it.
- Use paper towels to thoroughly pat the meat dry (important if you want crispy skin).
- Below is my recommended method for cooking the brined chicken, but you can also use an air fryer, fry it, etc.
Roast the Brined Chicken
- For a simple seasoning, brush the meat with softened butter and sprinkle it with either lemon pepper or poultry seasonings. Alternatively, brush it lightly with oil (for extra crispy skin).You can optionally also stuff the chicken cavity with carrots, celery, and shallots.
- Transfer the chicken to a large, high-sided roasting pan and cook it in a preheated oven at 350ºF/180ºC for 50-60 minutes, or until a meat thermometer inserted into the thickest part of the meat (avoiding bones) reads 165ºF/74ºC.
- Remove the meat from the oven and allow it to rest for 10-15 minutes for all the juices to settle and redistribute. Then, carve and enjoy!
Storage Instructions
- You can store any cooled chicken (within 2 hours of cooking) in an airtight container in the fridge for 3-4 days or in the freezer for up to 3 months.
Video
Notes
- Make ahead brine: You can prepare it up to 2 weeks in advance, storing it in an airtight container in the fridge.
- For large chickens: You may find it easier to use a brining bag rather than search for a pot large enough.
- Experiment with flavorings: Swap out the herbs, veggies, etc., for different flavors.
- Leave the brine to cool: For food safety reasons, only put the chicken in the liquid once it's completely cooled.
- The cooking time varies: Based on the size of the chicken, how long you brined the meat, and your oven. Use a meat thermometer to ensure it's properly cooked (checking for an internal temperature of 165ºF/74ºC).
- Leave it to rest for 10 minutes: If you don’t, you’ll lose lots of that moisture you’ve worked to maintain.
- Save the drippings: To make a delicious (and quick) chicken gravy!
- Alternative brine ingredients: If you want to make a simple combination, use just garlic, lemons, peppercorns, sugar, bay leaves, and herbs. For more umami flavor, replace a portion of the salt with soy sauce (tamari if you’re gluten-free). For spice, add some dried chilies, etc.
Nutrition
Calories: 423kcal | Carbohydrates: 20g | Protein: 32g | Fat: 25g | Saturated Fat: 7g | Polyunsaturated Fat: 5g | Monounsaturated Fat: 10g | Trans Fat: 0.2g | Cholesterol: 120mg | Sodium: 3117mg | Potassium: 624mg | Fiber: 4g | Sugar: 10g | Vitamin A: 4001IU | Vitamin C: 28mg | Calcium: 124mg | Iron: 4mg