Homemade Walnut Butter Recipe
How to make walnut butter with just ONE ingredient: raw, soaked, or roasted walnuts – and a high-speed food processor. This nutritious silky smooth nut butter is perfect for spreading, adding to baked goods, or even as an edible gift! Best of all, this homemade walnut butter is oil-free, refined-sugar-free, gluten-free, Paleo, and Whole30!
Servings: 32 servings
Equipment
Ingredients
- 3 cups walnuts
- salt optional
Read the "Add-ins" section of the blog post for tons of flavored options!
Instructions
For Sprouted Walnut Butter (aka Soaked Walnuts)
- Soak the walnuts: add the nuts to a bowl and cover with water then leave to soak overnight. In the morning, drain the water, and rinse the nuts.
- Dry the walnuts: pat them dry with a clean kitchen towel. Then spread them across a baking tray and bake in the oven at 350ºF/180ºC for 15-20 minutes, or until dry, lightly toasted (fragrant), and slightly darker in color. Allow the nuts to cool for several minutes before processing. Alternatively, if you want to keep the recipe "raw", use a dehydrator at 40ºC/104ºF to dry the nuts. This can take up to 24 hours (check at 12h and every couple hours after until fully dry). It's important that the nuts are completely dry before processing (keep reading below for processing steps).
For Regular Walnut Butter (Roasted or Raw)
Step1: Roast the walnuts (optional but recommended)
- Roasting the walnuts not only enhances their flavor but helps to extract the natural oils from the nuts making them easier to blend, no extra oil necessary.
- Spread the walnuts in a single layer on a baking tray and toast in a pre-heated oven at 165ºC/325ºF for 8-10 minutes, or until fragrant and slightly darker in color. Then remove them from the oven and allow them to cool until just slightly warm (this will help them blend easier, but too hot and they can ruin the blades in your machine and cause it to overheat).
Step 2: Process the Walnut Butter
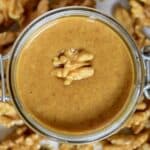
- Transfer the walnuts to your food processor (or blender, but a processor is best) and blend until it reaches your desired consistency. This can take as little as 3 minutes up to 15, depending on what nuts (raw vs. roasted) and your machine. For me, it took 10 minutes for super smooth and runny walnut butter (breaks included). Make sure to give your machine a break every two minutes, scrape down the sides with a spatula, and then process for longer. The nuts will first break into a crumb-like consistency, then a thick chunky paste, smoother paste, before becoming soft, drippy, and silky smooth!If you're using raw walnuts: these will take longer to process, since the roasting process causes the oils to start releasing from the nuts. For these, you'll have to be patient and give your machine lots of breaks. If it won't go past the thick crumb/ball stage, then you may need to add 1-2 tablespoons of your desired oil (like coconut oil, avocado oil, or a mild olive oil).
- Once blended to your desired consistency, you can then pulse in any add-ins OR transfer it to an airtight jar.
How to Store
- Store: store the walnut butter in an airtight glass jar in the fridge for between 6-8 weeks. Make sure to use a clean utensil any time you use the nut butter and give it a stir if separated (the oils can settle on the top - this is normal). Note that if you've added in any sweetener or other add-ins, the shelf life will be impacted and I recommend using it within 1-2 weeks!Freeze: you can also freeze the walnut butter for up to 4 months. Either store it in a freezer-safe container (with headspace) OR save it in portions in an ice cube tray.
Video
Notes
- Use enough nuts: make sure that you're using enough nuts in your food processor to comfortably completely cover the blade (3 cups is the minimum for me). If you want to make a very small amount, you could use a coffee/spice grinder.
- Adjust the thickness: the easiest way to do this is simply by processing it for a shorter vs. longer time.
- Be patient: every nut butter goes through several stages when blending into nut butter. Unfortunately, it can sometimes seem like the nuts don't want to move past the thick paste/pre-paste stage. But give your machine breaks and keep trying. If, after another 3-4 minutes, it still hasn't budged - it's time to rely on a tablespoon of oil. You shouldn't need this though (especially when using roasted walnuts).
- Use a food processor when possible: I’ve found they work best unless you have a very powerful blender.
- Use any add-ins at the end: make sure the walnut butter is the consistency you want before pulsing/folding in any extra flavorings/add-ins. And remember to enjoyed flavored walnut butter within 2 weeks!
- To remove some fat: if you want to reduce some of the fats in the walnut butter, you can wait until the oils and nut pulp separate as it sits and then simply scoop some of the oil out of the jar. Just note that this will make the nut butter thicker/not as smooth.
Nutrition
Serving: 0.5Tbsp | Calories: 72kcal | Carbohydrates: 2g | Protein: 2g | Fat: 7g | Saturated Fat: 1g | Polyunsaturated Fat: 5g | Monounsaturated Fat: 1g | Sodium: 1mg | Potassium: 48mg | Fiber: 1g | Sugar: 1g | Vitamin A: 2IU | Vitamin C: 1mg | Calcium: 11mg | Iron: 1mg