
Easy Homemade Brioche Bread Recipe
Authentic French brioche bread is a lot easier to make than you think. Turn your kitchen into a proper cuisine with this easy French bread classic.
Servings: 8
Equipment
- Stand mixer or you can mix and knead by hand
Ingredients
- 12.4 oz flour all-purpose flour, bread flour, or a 50:50 combination
- 1/4 cup heavy cream (double cream)
- 1 egg large
- 1 tsp salt
- 2/3 cup milk
- 2 Tbsp butter unsalted
- 3 Tbsp sugar
- 1/4 oz active dry yeast usually 1 individual packet
Egg wash
- 1 Tbsp milk
- 1 egg or use honey mixed with milk or butter, or simple milk and melted butter mixture
Instructions
Step 1: Activate the yeast
- Melt the butter either in the microwave in 10-15 second increments or over a double boiler.
- Combine the butter, milk, sugar, and yeast and set aside for 5 minutes for the yeast to activate. (See notes below if using instant yeast as it doesn't need activating.)
Step 2: Make the dough
- You can mix the dough manually or with a stand mixer. Combine the yeast mixture, flour, salt, egg, and cream into a bowl (or mixer bowl) and mix into a sticky dough. Then knead until smooth and tacky. This is a moist dough, so stickiness is normal.By hand, it may need up to 30 minutes of kneading, though I find it takes closer to 15-20 minutes. When it's ready, the dough should be smooth and velvety. If you're using a stand mixer, knead at medium speed for 10-12 minutes with a dough hook attachment. It'll be ready when you can lift the dough hook and the dough lifts cleanly from the bowl.
Step 3: Leave the dough to rise
- The dough needs to proof for about 1 hour.Method One: Leave the dough to rise in the bowl for an hour in a warm location. Keep it well covered with plastic wrap or a kitchen towel.Method Two: If it's winter or you live somewhere cold, preheat your oven to its lowest temperature. Switch off the oven, then leave the dough to rise for 30-60 minutes. During this time, it will double (or even triple) in size.
- Towards the end of the proofing time, prepare your loaf tin by greasing it with a little oil, butter, or cooking spray.
Step 4: Shape the loaf
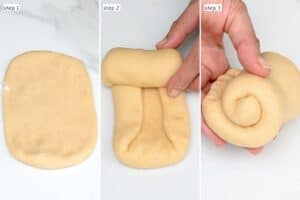
- Transfer the risen dough to a lightly floured surface and cut into 4 equal pieces. You can do it by eye or measure it precisely with a kitchen scale.
- Flatten each piece until it’s about a couple of inches wider than your loaf tin and an even thickness throughout. You’ll end up with a rectangular piece (see image).To shape each piece, fold in about an inch on both sides (so it will fit your loaf tin) and then roll it up.Check the blog post for alternative shapes like Nantaise loaf, braided loaf, or dinner rolls.
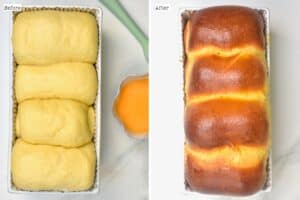
Step 5: Second proofing
- A second proof will give you the fluffiest brioche. Arrange the four pieces into the tin and brush with a bit of milk or water to stop the dough from drying. Leave to rise again for 30 minutes or until it doubles in size.This second proof can take up to two hours, depending on the temperature and climate, so just keep an eye on it and try to keep it in a warm location. To test that it’s ready, lightly poke one side of the dough. When it’s ready, it should only bounce back slightly (if at all). If it bounces back completely, it needs more proofing.
- When the brioche looks just about ready, preheat the oven to 350ºF/175ºC.
Step 6: Bake the brioche
- Brush the top of the dough liberally with egg wash (milk and egg) - this will give it a lovely shiny crust.
- Bake in the oven at 350ºF/175ºC for between 25-30 minutes until golden brown and puffed up.If the bread looks like it’s browning too quickly on top, then you can place a baking sheet on the rack above your tin or even cover the loaf with some foil.
- Remove the brioche from the oven and allow to cool fully on a wire rack before slicing or tearing.
How to store
- Store: store it in an airtight container/bag for 3-4 days. Alternatively, store it in the refrigerator for up to a week.Freeze: To freeze baked brioche, wrap tightly in foil while still slightly warm and place in a freezer-safe bag, removing any air. Seal and freeze for up to 2 months. To defrost, leave it in the fridge overnight to thaw or place the bread in the microwave for a few seconds so it doesn't get dense.
Notes
- Test the yeast: if you haven't baked in a while, it's always a good idea to check your yeast to make sure it's still active. Do this by combining a little yeast with water and sugar, then let it rest for a few minutes. If it's active, it should start to foam and become bubbly.
- If using Instant Yeast: you will need 25% less than active dry yeast (that would be 3/16 oz or 5 g). Also, it doesn't need activating so you can skip the first step and add those ingredients to the bowl with the rest.
- It's best to use a stand mixer: while it's technically possible to make it by hand, it takes much longer - sometimes up to 30 minutes!
- Don't open the oven door: when baking brioche, it's important to leave the oven door closed until the loaf has a developed crust and is fully risen. Otherwise, you may end up with a flat loaf.
- Vanilla: scrape the seeds of a vanilla pod into the dough when mixing.
- Extra sugar: if you want a sweeter loaf, feel free to add in a little extra sugar - just be careful, as extra sugar will also make the dough slacker.
- Orange zest: you can then make fresh orange juice with the oranges.
- Poppy seeds: sprinkle over the egg-washed bread before baking.
- Dried fruit: like raisins, sultanas, apricots, etc. Soaked in hot water or even rum.
- Chocolate: chocolate chips are an easy (and delicious) addition. I recommend adding chocolate chips AND orange zest.
- Cinnamon: add some directly into the dough or sprinkle a pearl sugar and cinnamon mix over the loaf before baking.
- Glaze: if you’re making a sweet brioche, feel free to create a simple glaze to drizzle over the baked loaf. Combine powdered sugar with a bit of milk and lemon juice until it reaches the desired consistency.
Nutrition
Calories: 251kcal | Carbohydrates: 40g | Protein: 6g | Fat: 7g | Saturated Fat: 4g | Polyunsaturated Fat: 1g | Monounsaturated Fat: 2g | Trans Fat: 1g | Cholesterol: 40mg | Sodium: 336mg | Potassium: 96mg | Fiber: 1g | Sugar: 6g | Vitamin A: 259IU | Vitamin C: 1mg | Calcium: 39mg | Iron: 2mg