Canning Tomatoes (An Easy Step-by-Step)
Simple step-by-step instructions on canning whole tomatoes in a hot water bath or pressure canner to lock in the fresh taste of summer all year long!
Servings: 7 jars
Equipment
- Pressure canner -OR-
- 7 Glass jars quart size each
Ingredients
- 21 lb tomatoes
- 7 fl oz bottled lemon juice not fresh; use 2 Tbsp per quart jar
-OR-
- 3.5 tsp citric acid use 1/2 tsp per quart jar
- 7 tsp salt use 1 tsp per quart jar
Instructions
- Prep and SterilizeWash jars, lids, tongs, funnel, and counter with soapy water and rinse them well. Air-dry items (except jars) on a towel.Sterilize the jars in the oven at 320-355ºF/160-180ºC for 10 mins or in the water bath canner for 10 mins.
- Prep the CannerPlace trivet in water bath/pressure canner. Then for a water bath canner, fill about halfway with water, or enough so the filled jars are fully submerged by at least two inches of water. OR for a pressure canner, add 3 inches of water.Bring the water to a boil over high heat while preparing the tomatoes, then drop it to a simmer to stay warm until needed.
- Blanch and Peel TomatoesWash and score the tomatoes with a shallow crisscross (X shape) at the bottom.Blanch the tomatoes in boiling water (enough to cover them) for 30-60 secs. Then transfer them to an ice bath for at least 5 minutes. Peel the skin and,th optionally, core/halve the tomatoes.
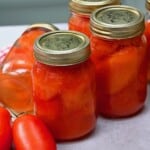
- Pack the JarsWorking one at a time, remove a jar from the oven/water and pack it. First, add the lemon juice OR citric acid and, optionally, 1 teaspoon of salt per quart.For raw-pack method: Pack the tomatoes in the jar tightly, squeezing in as much as you can, and pour in either boiling water or boiling tomato juice (using a ladle and/or funnel will be easiest), leaving ½-inch headspace. I usually do the raw-pack method - as per the photo below.For hot-pack method: Add the tomatoes back to the pot of water on the stove (or use tomato juice, if preferred). Adjust the amount of liquid, if needed, so the tomatoes are just barely covered. Bring to a boil, then reduce to a gentle boil for 5 minutes. Then pack the tomatoes in the jars tightly, leaving ½-inch headspace. Optionally, cover them with the liquid they simmered in.
- Close the Jars Once filled, use your tool of choice to run along the inside of the jar/press down on the tomatoes to remove any excess air bubbles. If the liquid level goes down, top it up to the correct headspace level. If needed, wipe the jar rims with a clean, hot, damp kitchen towel. Then add the lid and screw the bands until they're finger-tight (screwed until the point of resistance, but not too tight that air can't escape during processing).
- Fill the CannerUsing the canning tongs, carefully transfer the filled jars to the pot, ensuring they remain vertical and aren't touching the sides of the pot or each other.Then process the tomatoes using either the water bath canning method or the pressure canning one.
- Water Bath CanningCover the canner with a lid and bring the water back to a rolling boil. Only then start the timer for 45 minutes for quart jars (adjust the time for higher altitudes). Check the water level occasionally to ensure not too much water has evaporated. The jars should be completely submerged at all times. Add more water if necessary.After processing, switch off the heat immediately, remove the lid, and allow the jars to sit in the water for 5 minutes. This stabilizes the pressure and prevents siphoning (leaks).
- Pressure CanningClose and lock the lid of the pressure canner, ensuring the pressure vent/petcock is open. Heat the stove at its highest setting until you notice steam escaping the vent/petcock in a steady stream. Then, start a timer to allow it to vent for 10 minutes.Close the vent/petcock and allow the pressure to build in the canner to 10 PSI using a weighted gauge canner or 11 PSI using a dial gauge canner. This can take up to 10 minutes and, if using a weighted gauge canner, will result in the weight beginning to jiggle/rock.Reduce the heat slightly and set a timer to process the jars for 15 minutes.After the processing time, remove the canner from the heat and let it naturally depressurize to 0 psi. Don't force-cool the canner! Then, remove the weight from the vent port/open the petcock, and leave it for 10 minutes. Finally, carefully release and remove the lid, facing it away from you so hot steam flows away from you.
- Cool and Check SealsUse the canning tongs/jar lifter to carefully remove the jars from the canner, ensuring they remain upright, to a heat-proof surface (like a wooden board) or a clean kitchen towel-lined worktop. Leave an inch between each jar.Leave the jars to cool at room temperature for at least 12 hours (up to 24 hours) before handling them.Before storing them, inspect the jars to ensure they’re all sealed. First, remove the screw bands. Then, inspect the flat lid. It shouldn't wobble/move and will look slightly concave with no flex or popping noise when pressed.
- Label and StoreLabel jars with content and "use by" date. Store them in a cool, dark place for 12-18 months. Check the seals before opening.
Notes
Adjust the water bath canning time based on altitude: Most recipes are initially formulated for locations at sea level (0 feet) up to 1000 feet above sea level. If you are canning at an altitude outside this range, you may need to make adjustments to the recommended processing time.
- 1001-3000 feet = Increase by 5 minutes
- 3001-6000 feet = Increase by 10 minutes
- 6001-8000 feet = Increase by 15 minutes
- 8001-10,000 feet = Increase by 20 minutes
Nutrition
Serving: 1jar | Calories: 252kcal | Carbohydrates: 55g | Protein: 12g | Fat: 3g | Saturated Fat: 0.4g | Polyunsaturated Fat: 1g | Monounsaturated Fat: 0.4g | Sodium: 2427mg | Potassium: 3257mg | Fiber: 16g | Sugar: 37g | Vitamin A: 11337IU | Vitamin C: 198mg | Calcium: 139mg | Iron: 4mg