
This post may contain affiliate links. Please read our disclosure policy.
Simple step-by-step instructions on canning whole tomatoes in a hot water bath or pressure canner to lock in the fresh taste of summer all year long!
There is never a time when I don’t have at least 4 jars of peeled tomatoes in my pantry. Not only is it an incredibly versatile ingredient (perfect for marinara sauce, soups, homemade salsa, stews, and more), but canning whole tomatoes when they’re in season is the best way to lock in that delicious, fresh, peak flavor as a shelf-stable product to enjoy all year.
If you’re new to home food preservation, water bath canning and pressure canning can seem incredibly intimidating (click the links for beginner guides to both). Luckily, following a few tips and simple step-by-step instructions, you’ll quickly learn how to can whole tomatoes, using whichever method works best for you.
Want to save this recipe?
Canning tomatoes: raw pack vs. hot pack
Raw Packing/ cold packing tomatoes: This version can ONLY be done with a pressure canner. It involves packing the warm jars with uncooked tomatoes and covering them with boiling water or tomato juice (or nothing- however, this version requires them to be TIGHTLY packed so they release their own juices).
The extra air in raw tomatoes means the tomatoes may discolor and won’t be as vibrant over time compared to hot-packed tomatoes. They can also float/separate from the liquid – which doesn’t look great but is safe in fully-sealed jars.
Hot-packing tomatoes: The hot pack method can be done using a pressure canner or water bath canner. It involves covering the peeled tomatoes in water or tomato juice, bringing the mixture to a boil, then allowing it to simmer for 5 minutes before transferring it to the jars.
Par-cooking the tomatoes softens and reduces their volume (so they’re easier to pack into less jars), and excess air is removed, which helps preserve overall color and flavor.
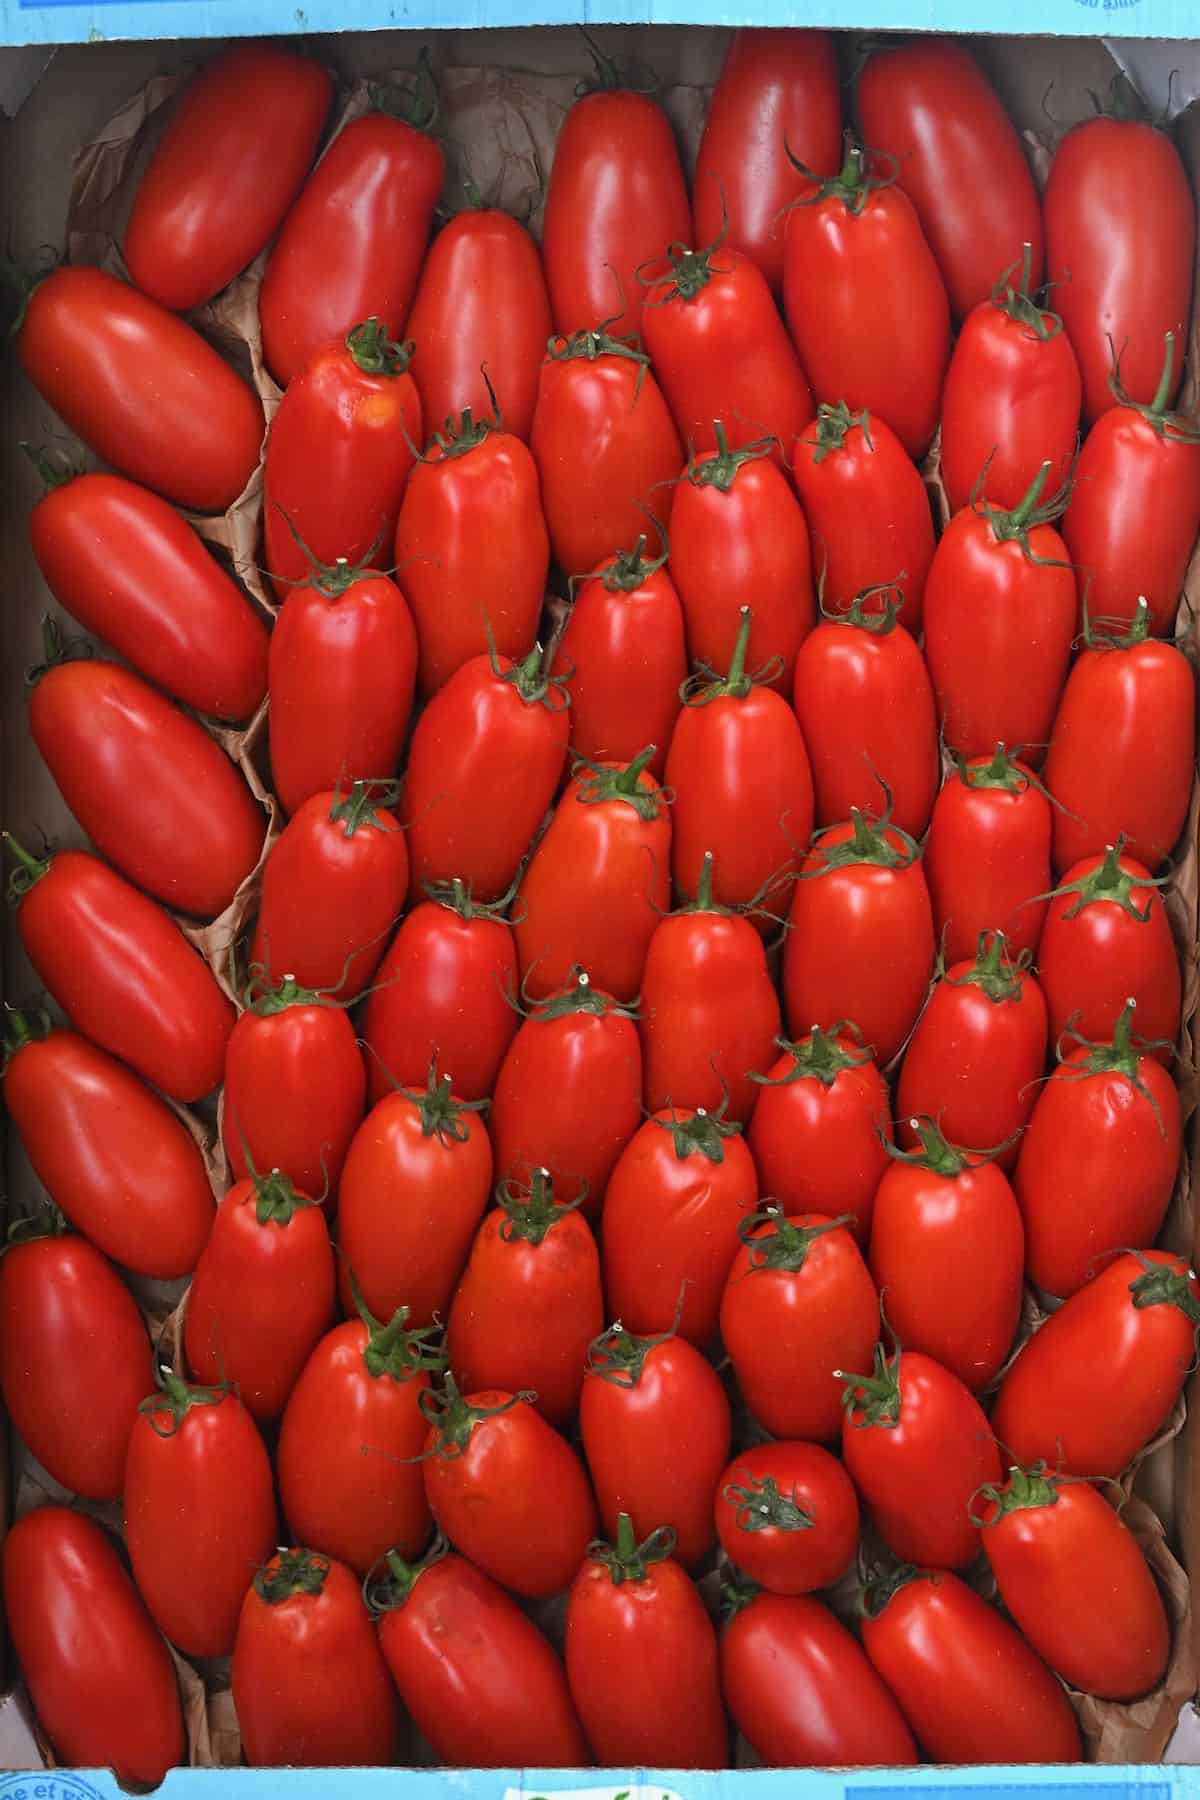
What are the best tomatoes for canning?
Like any canning project, use the best produce you can find to preserve that flavor all year long. With tomatoes, this means ripe, summery, in-season tomatoes- preferably low-moisture varieties. Some of my favorite options for canning tomatoes include:
- San Marzano tomatoes: San Marzano tomatoes are known as some of the highest quality store-bought canned tomatoes, and the same goes for home canning. This variety of tomato has a rich, sweet flavor with dense, meaty flesh.
- Roma tomatoes: Another high-quality tomato with delicious flavor, not overly seedy inside, and a great size for canning.
- Amish paste tomatoes: These are meaty with a great flavor, though fairly large, so may require halving/quartering.
Use a combination of tomatoes for flavor and texture variation. Other tomatoes work, too, like heirloom tomatoes, other plum tomatoes, and even grape or cherry tomatoes.
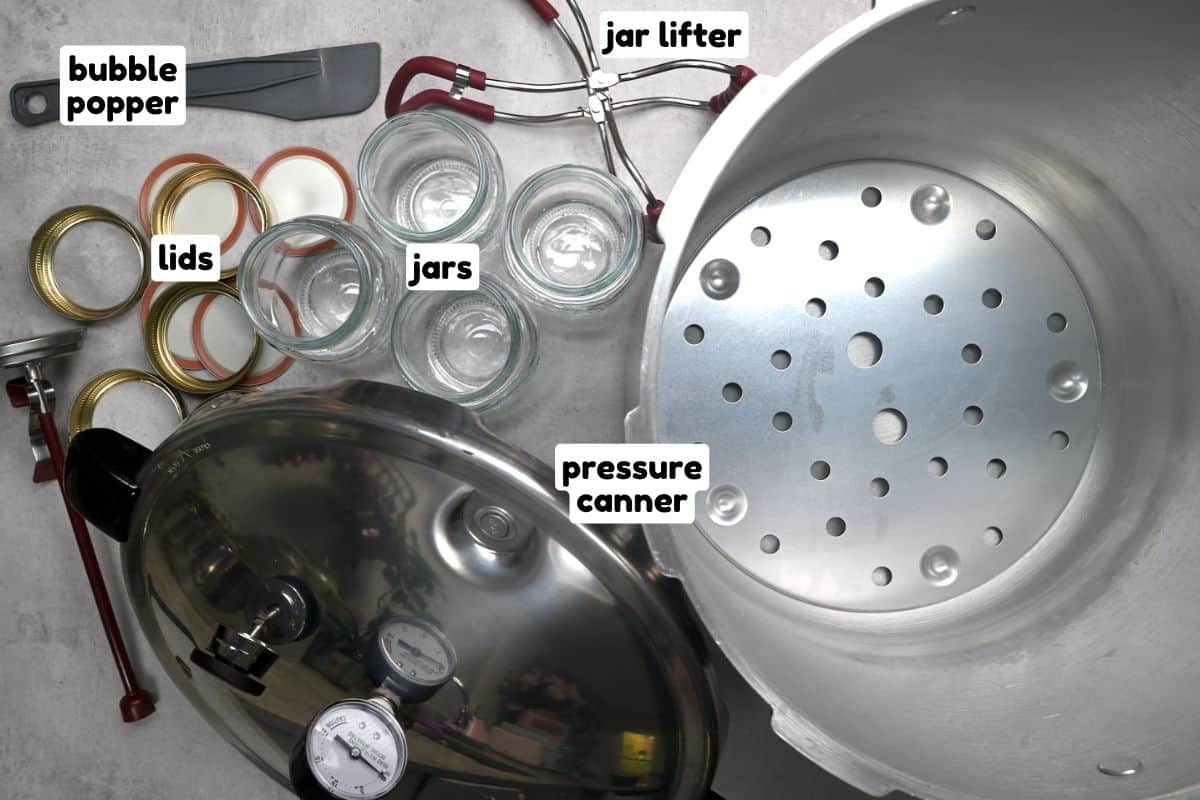
Ingredients and canning equipment
- Tomatoes: About 3 pounds per quart jar; a total of 21 lbs. for 7x 1-quart jars.
- Bottled lemon juice: 2 tablespoons per quart jar. OR Citric acid: 1/2 teaspoon per quart jar. Don’t use fresh lemon juice, as it has varied acidity levels. This ensures they have a pH of 4.6 or lower for safe canning (whether water bath or pressure canning.)
- Canner: You can use a pressure canner (NOT a pressure cooker) – either a dial-gauge pressure canner or a weighted-gauge pressure canner or water bath canner for this canned whole tomatoes recipe. For the latter, a tall, large, lidded, heavy-based pan (like a stock pot/soup pot) works too.
- Trivet: Either a heat-proof metal wire rack or silicone trivet to place in the canner so the jars don’t have direct contact with the bottom of the pan.
- Canning jars: Mason jars (Kilner in the UK) are very popular for canning. Use wide-mouthed jars for easier packing.
- Lids: There are two main lid options, including reusable dimpled lids or two-piece lids with a screw-top band (reusable) and a flat “lid” (which are single use).
- Funnels/ladles.
- Clean kitchen towels.
- Air bubble remover: E.g., a bubble popper/headspace tool or sterile chopstick, skewer, plastic knife, etc.
- Jar lifter: (aka canning tongs) The shape and design of these tongs make them perfect for gripping onto jar lids safely when inserting/removing them from the canner to reduce the risk of droppage.
- Slotted spoon.
- Large bowl + Ice: For the ice water bath when blanching/peeling the tomatoes.
- Paring knife
- A Timer: This can be a kitchen timer or your phone.
How to can whole tomatoes
You need to do the same prep work regardless of which canning method (water bath or pressure canning) you choose. So here are the detailed steps.
Prep work
Step 1: Sterilize the equipment and prepare the canner: First, wash everything (the jars, lids, tongs, funnel, and kitchen counter) with hot soapy water and rinse them well. Then, place everything (except jars) to dry on a clean kitchen towel. To fully sterilize the jars and keep them warm until ready to fill, do one of the following:
- Transfer the jars upright to a clean baking tray, not touching each other, and place them in a preheated oven at 320-360ºF/160-180ºC for 10 minutes – or until you’re ready to fill them.
- Prepare the water bath canner with the trivet and enough water to cover the jars. Add the jars and bring the water to a boil, maintaining it for 10 minutes, and simmer (about 180ºF/82ºC for hot-packing, 140ºF/60ºC for cold-packing) until the jars are ready to fill.
If you live in an area with hard water, optionally add ¼-⅓ cup of vinegar to the water to prevent calcification to the outside of the jars.
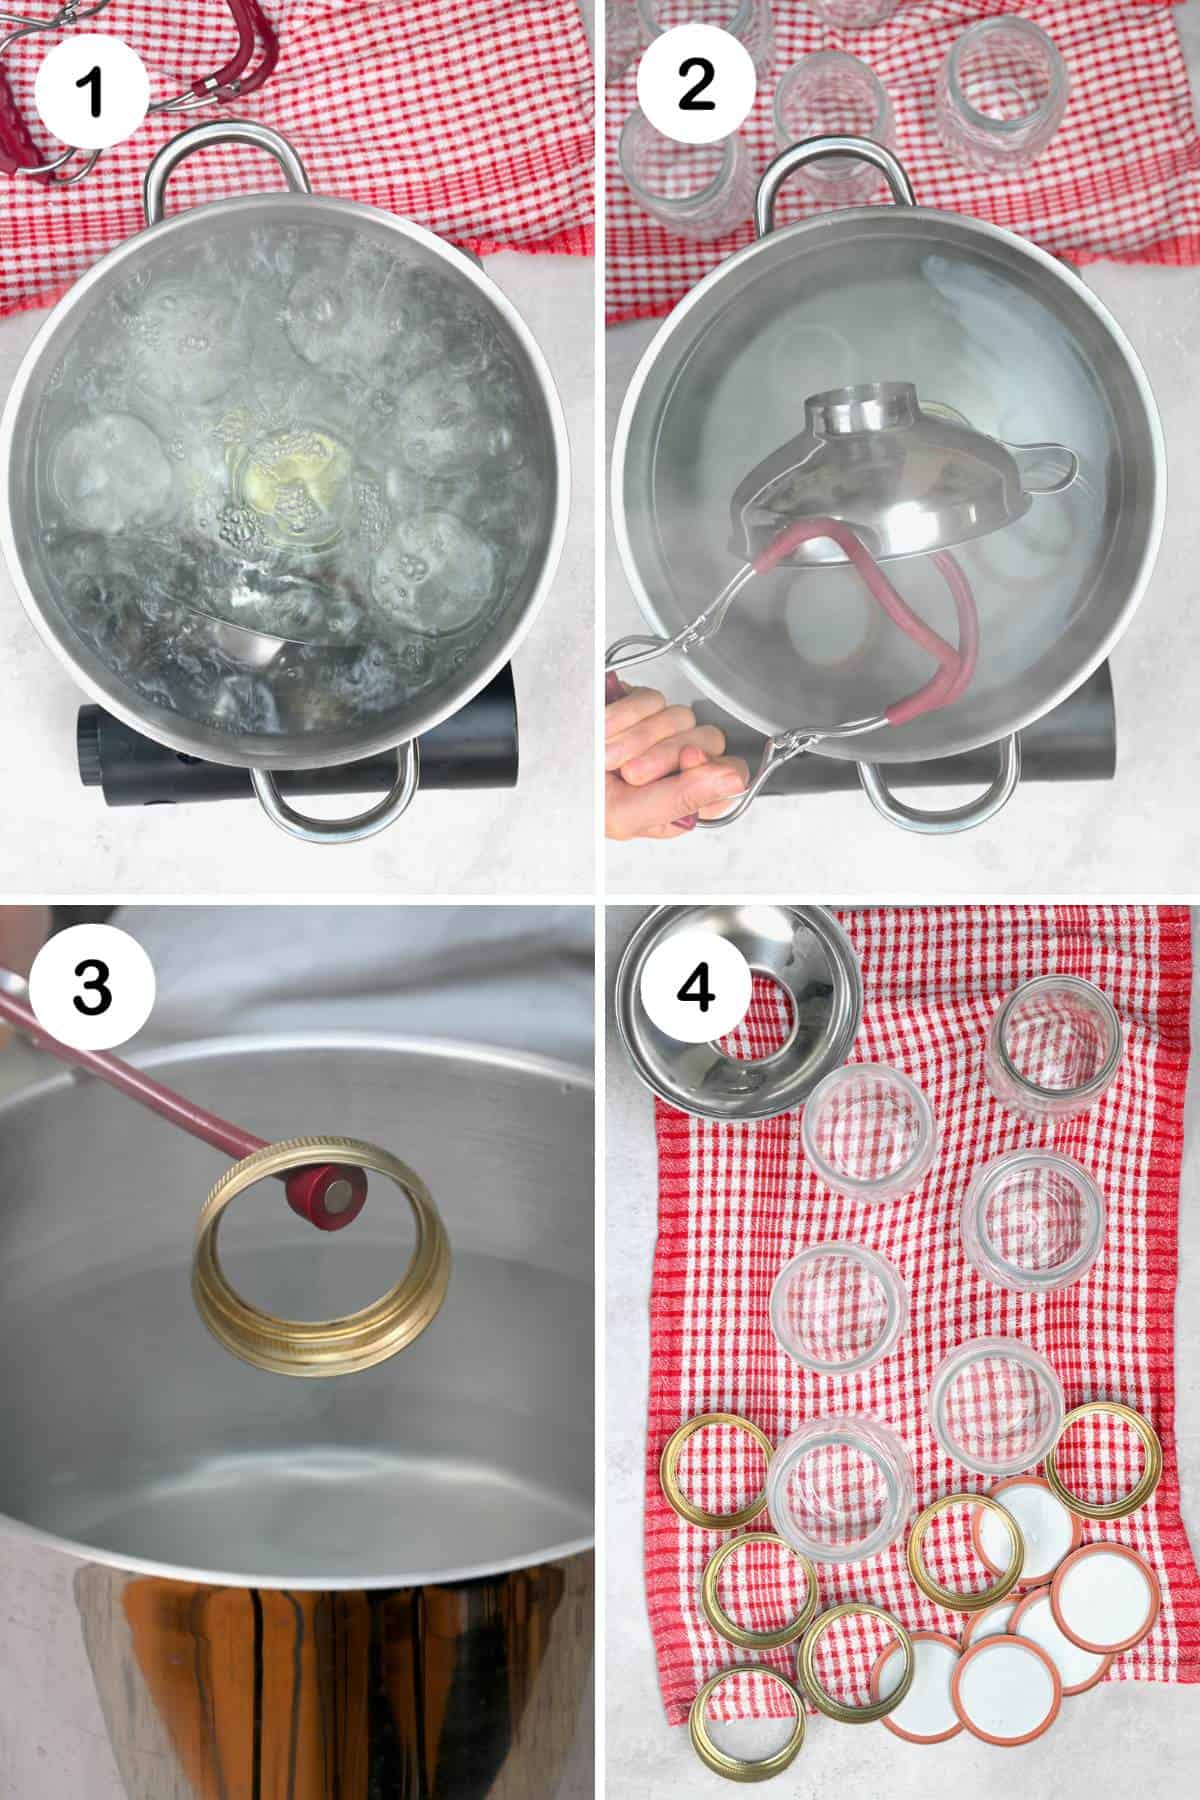
Step 2: Prepare the canner: First, place the wire rack/trivet in the bottom of the water bath/pressure canner.
- For a water bath canner: Fill the pot about halfway, or enough so the filled jars are fully submerged by at least two inches of water.
- For a pressure canner: Add 3 inches of water to the canner.
Bring the water to a boil over high heat while preparing the tomatoes, then drop it to a simmer to stay warm until needed.
Step 3: Blanch and peel the tomatoes: First, wash the tomatoes and score each one with a shallow crisscross (X shape) at the bottom using a small paring knife.
Meanwhile, bring a large saucepan of water (enough to cover a layer of tomatoes) to boil over high heat. Once boiling, carefully transfer a layer of tomatoes to the large pot and blanch them for 30-60 seconds until the peel loosens near the crisscross.
Use a slotted spoon to quickly transfer them to an ice bath for at least 5 minutes, then peel away the skins. Optionally, core and/or halve the tomatoes if preferred, too.
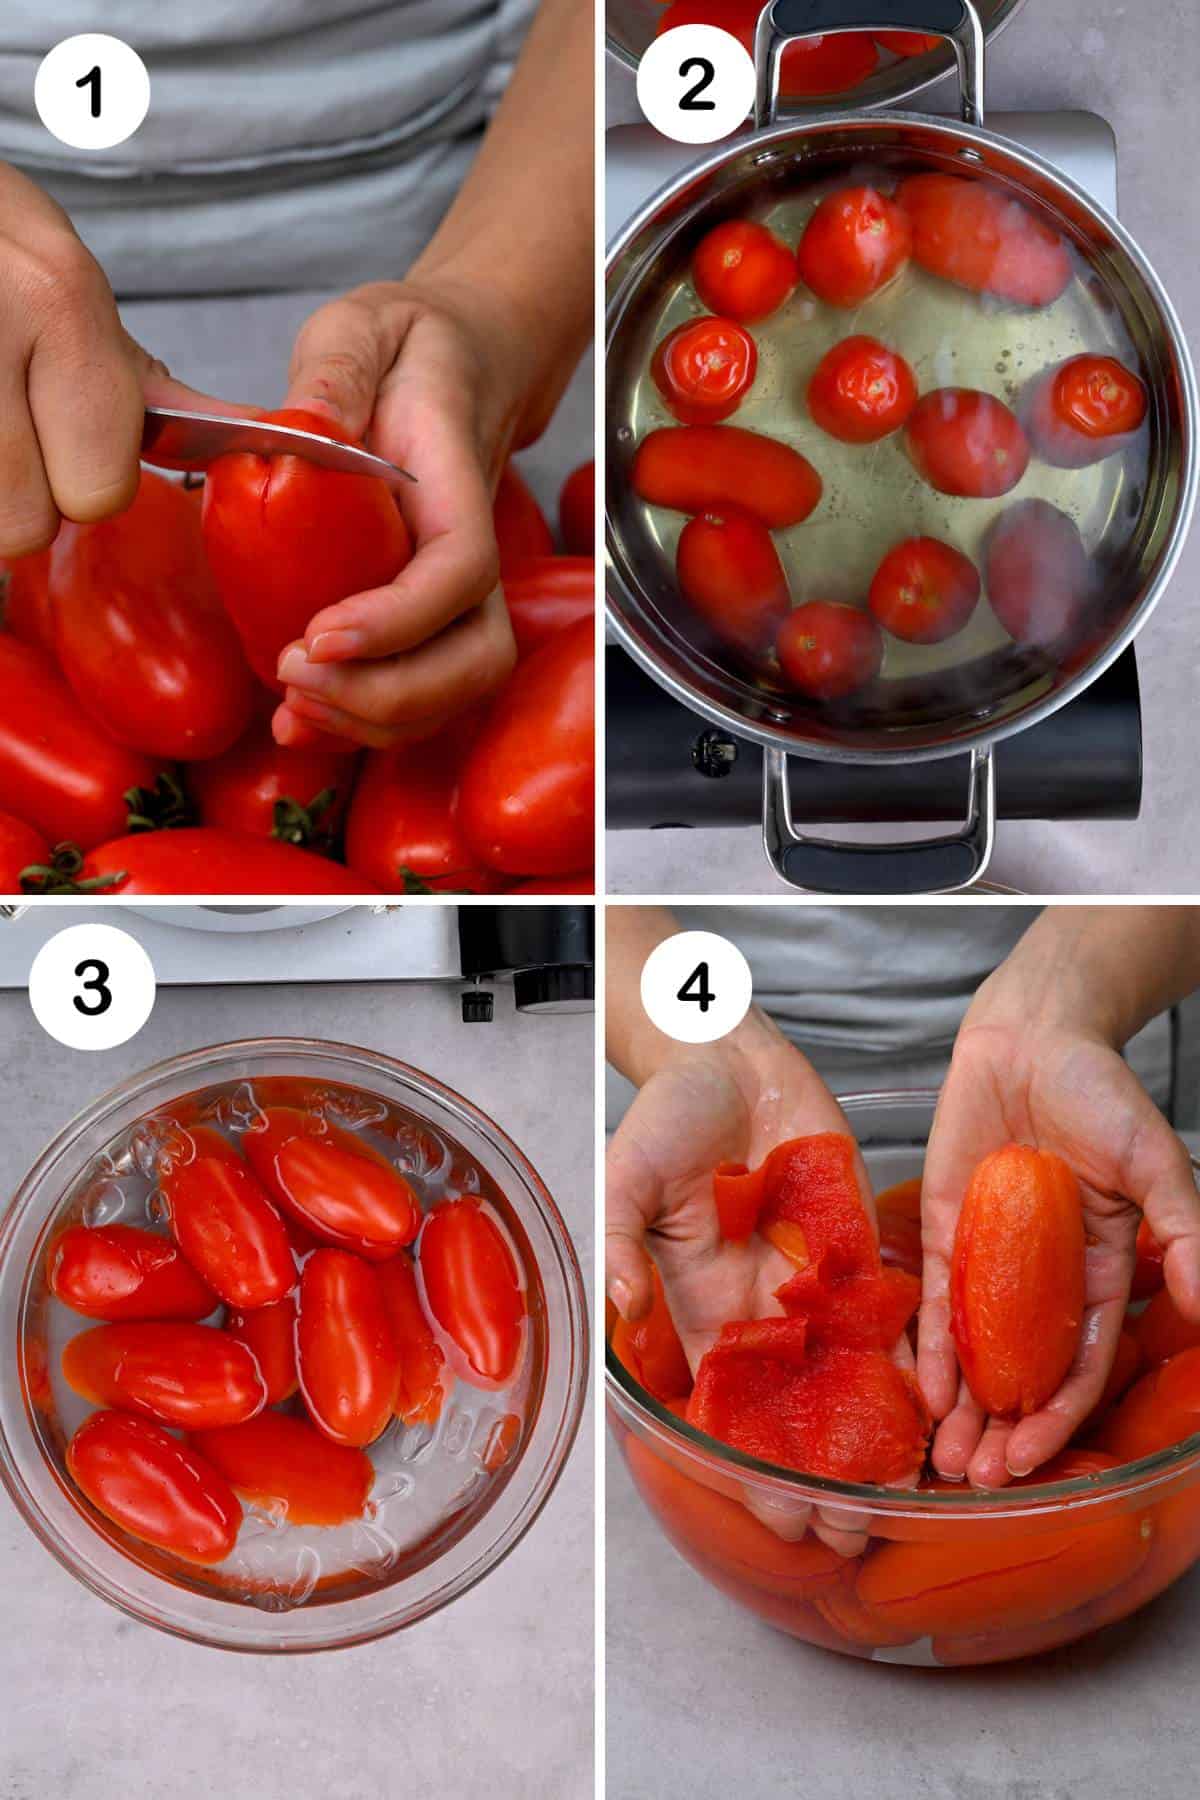
Why Peel Tomatoes for Canning? Removing the peel reduces the bacteria assuring longer shelflife. Also, tomato skins can become tough/chewy and even a little bitter while canning/when cooked, so removing them helps for better texture/flavor.
Step 4: Pack the jars: Working one at a time, remove a jar from the oven/water and pack it. First, add the lemon juice OR citric acid and, optionally, 1 teaspoon of salt per quart.
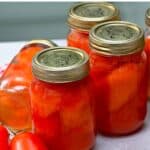
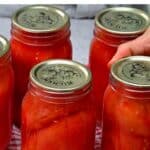
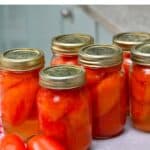
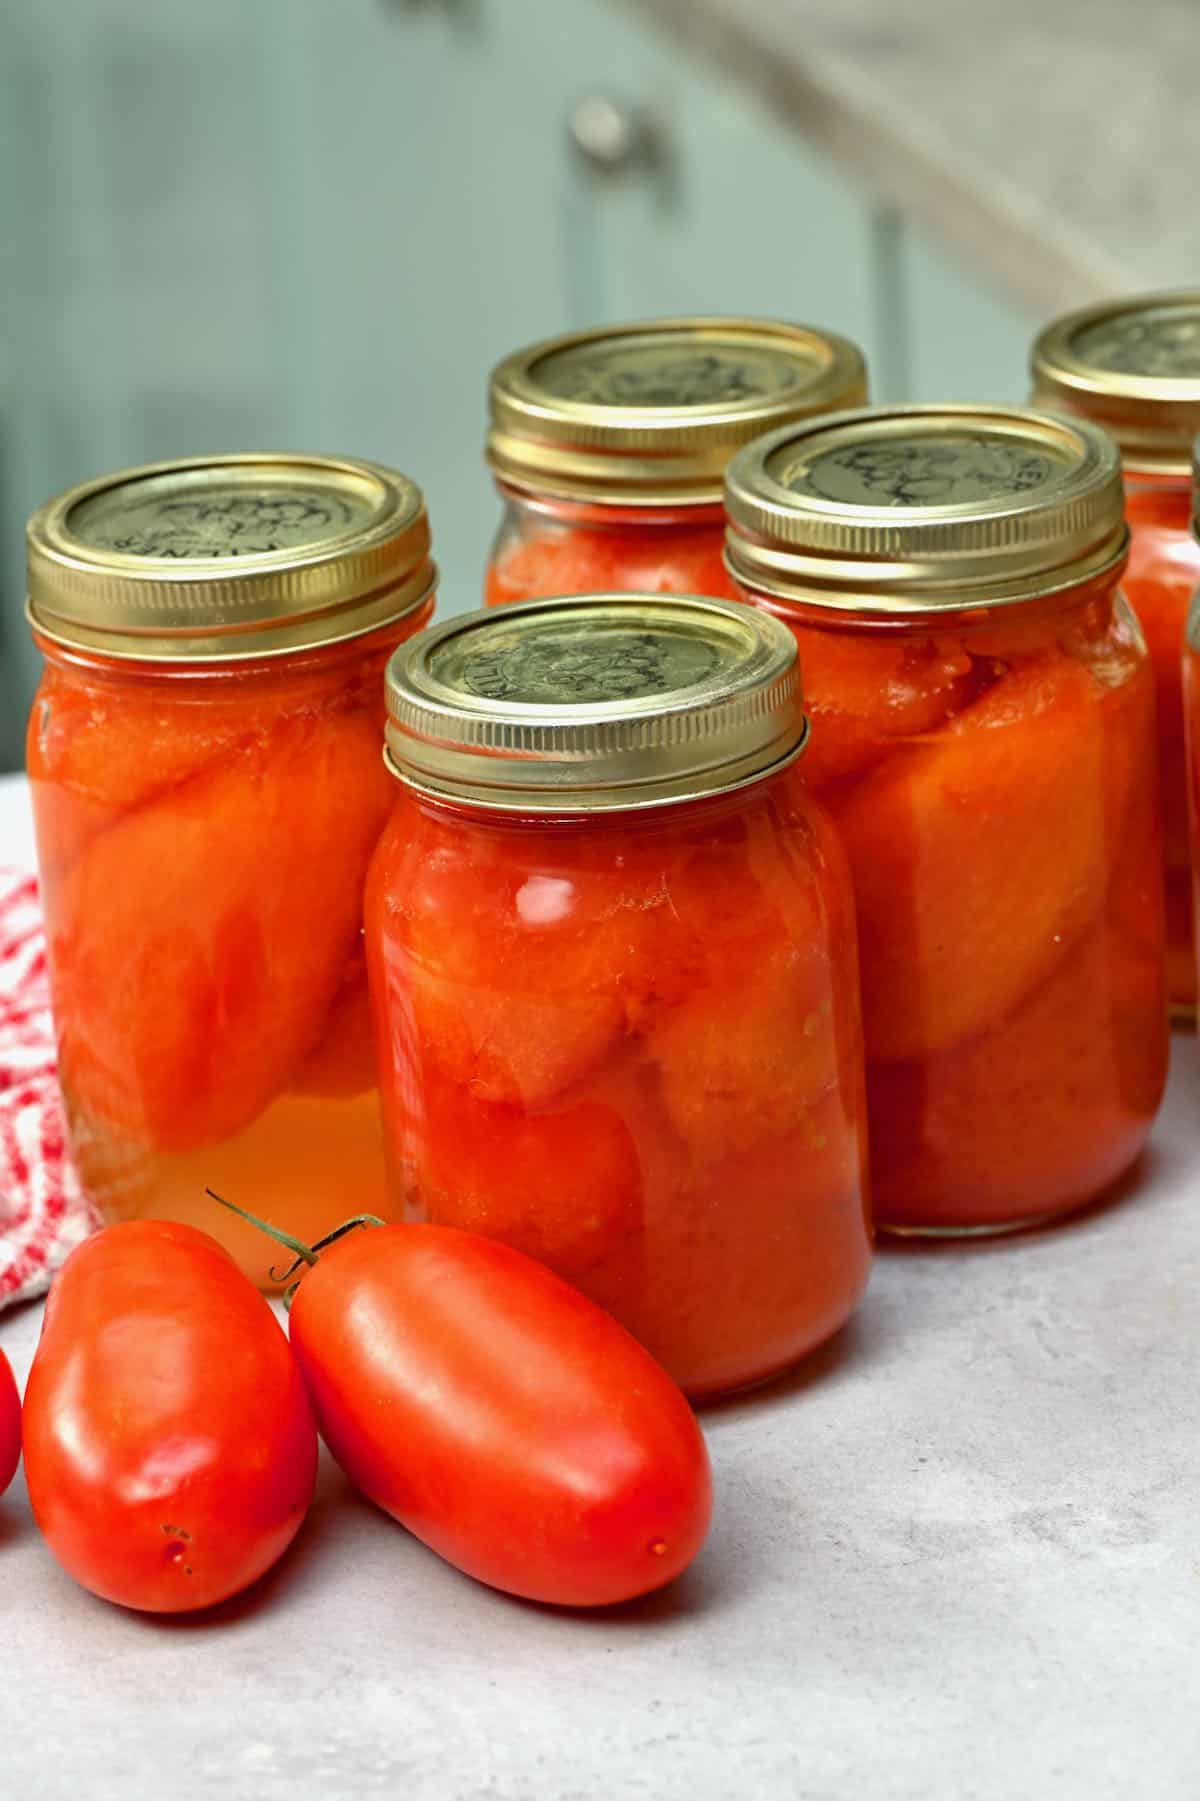
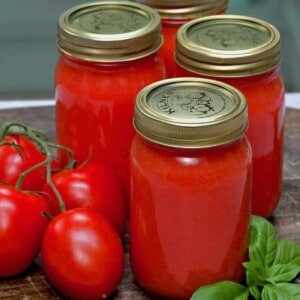
- For raw-pack method: Pack the tomatoes in the jar tightly, squeezing in as much as you can, and pour in either boiling water or boiling tomato juice (using a ladle and/or funnel will be easiest), leaving ½-inch headspace. I usually do the raw-pack method – as per the photo below.
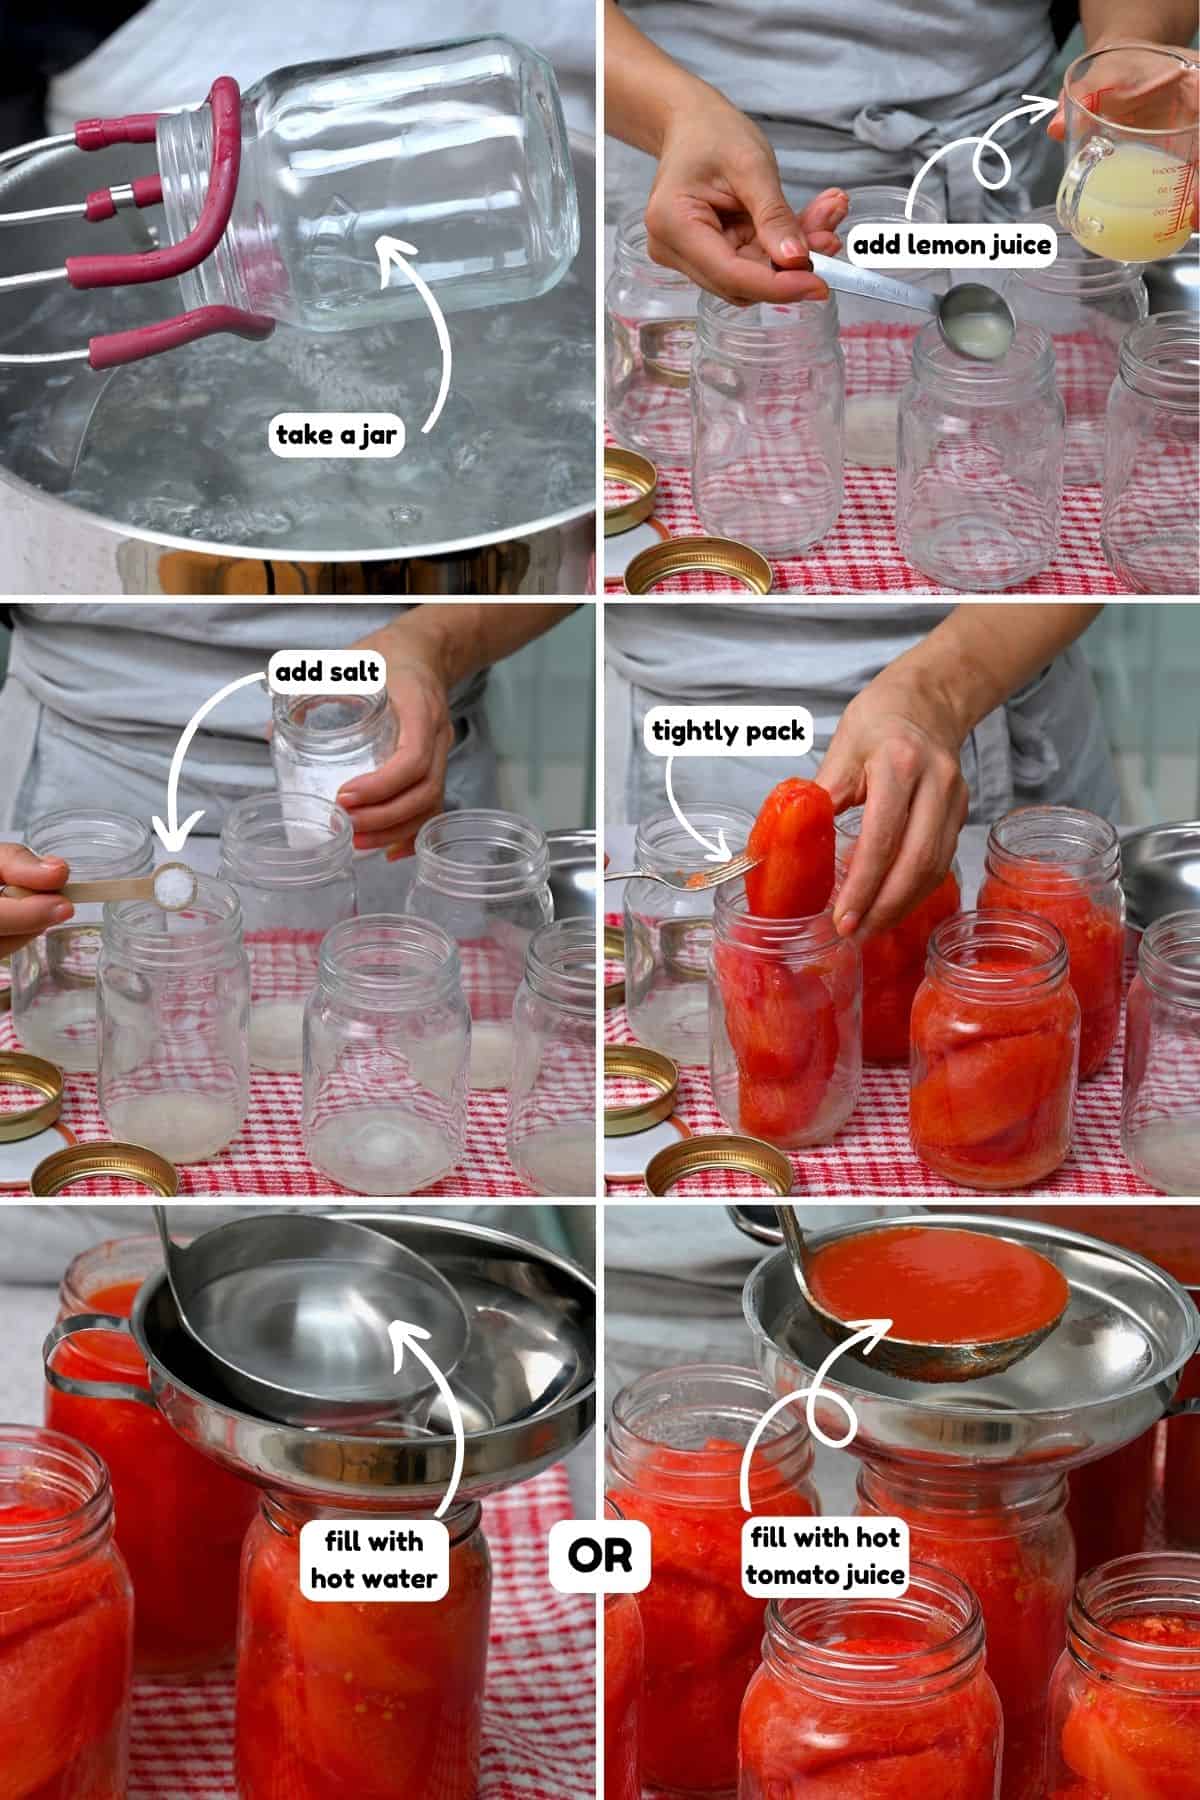
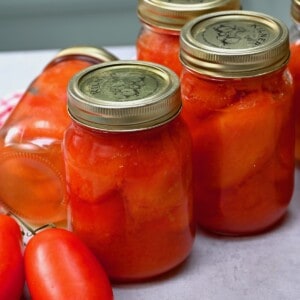
- For hot-pack method: Add the tomatoes back to the pot of water on the stove (or use tomato juice, if preferred). Adjust the amount of liquid, if needed, so the tomatoes are just barely covered. Bring to a boil, then reduce to a gentle boil for 5 minutes. Then pack the tomatoes in the jars tightly, leaving ½-inch headspace. Optionally, cover them with the liquid they simmered in.
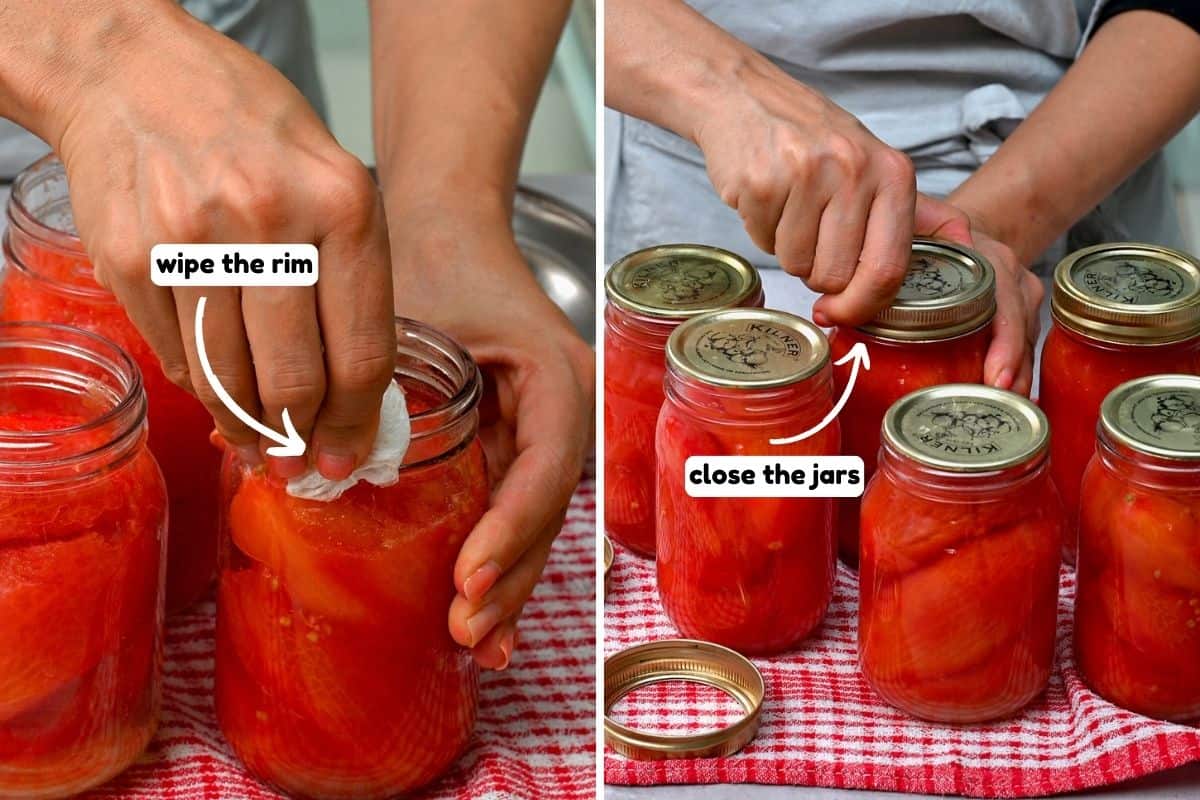
Close the jars: Once filled, use your tool of choice to run along the inside of the jar/press down on the tomatoes to remove any excess air bubbles. If the liquid level goes down, top it up to the correct headspace level. It’s important to check the accurate amount of headspace to leave, as too much can form a “false seal” and become unsealed over time. Too little may cause leaks (aka “siphoning”).
If needed, wipe the jar rims with a clean, hot, damp kitchen towel. Then add the lid and screw the bands until they’re finger-tight (screwed until the point of resistance, but not too tight that air can’’t escape during processing).
Step 5: Fill the canner and process the jars: Using the canning tongs, carefully transfer the filled jars to the pot, ensuring they remain vertical and aren’t touching the sides of the pot or each other. Then proceed with Step 6: Processing the tomatoes. Use either the water bath canning method or the pressure canning one (both methods are described below).
Water bath canner whole tomatoes
Cover the canner with a lid and bring the water back to a rolling boil. Only then start the timer for 45 minutes for quart jars (read below for how to adjust the time for higher altitudes). Check the water level occasionally to ensure not too much water has evaporated. The jars should be completely submerged at all times. Add more water if necessary.
After processing, switch off the heat immediately, remove the lid, and allow the jars to sit in the water for 5 minutes. This stabilizes the pressure and prevents siphoning (leaks).
To adjust the time based on altitude: Most recipes are initially formulated for locations at sea level (0 feet) up to 1000 feet above sea level. If you are canning at an altitude outside this range, you may need to make adjustments to the recommended processing time.
- 1001-3000 feet = Increase by 5 minutes
- 3001-6000 feet = Increase by 10 minutes
- 6001-8000 feet = Increase by 15 minutes
- 8001-10,000 feet = Increase by 20 minutes
Pressure canner whole tomatoes
First, close and lock the lid of the pressure canner, ensuring the pressure vent/petcock is open. Heat the stove at its highest setting until you notice steam escaping the vent/petcock in a steady stream. Then, start a timer to allow it to vent for 10 minutes to remove excess air from the canner and create a “vacuum.” This is crucial for obtaining the correct temperatures.
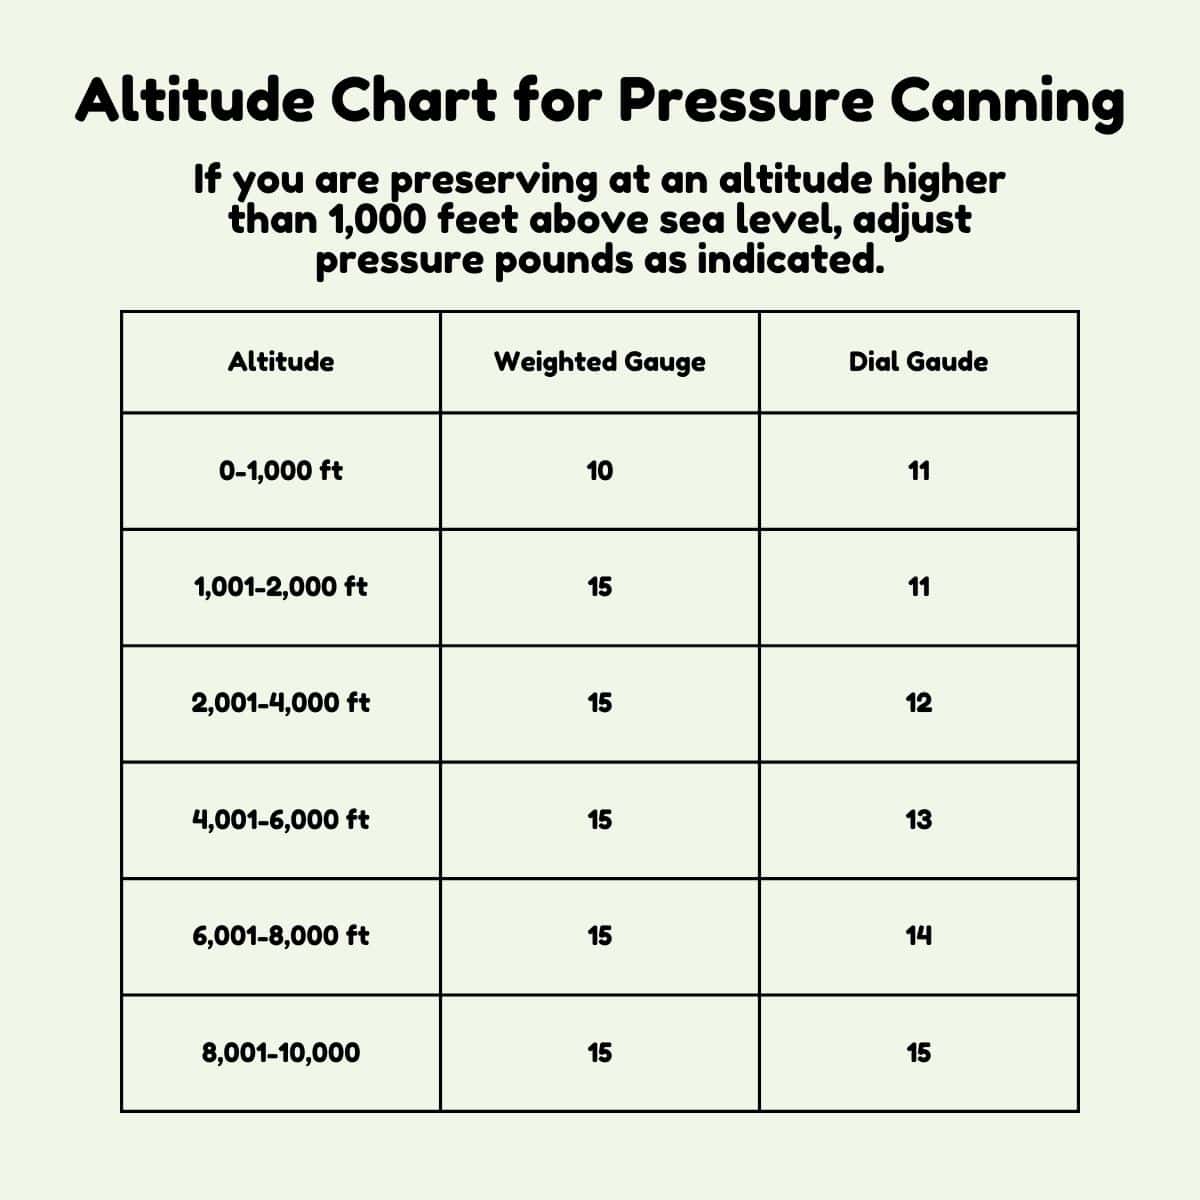
Next, close the vent/petcock and allow the pressure to build in the canner to 10 PSI using a weighted gauge canner or 11 PSI using a dial gauge canner. This can take up to 10 minutes and, if using a weighted gauge canner, will result in the weight beginning to jiggle/rock.
Then, reduce the heat slightly and set a timer to process the jars for 15 minutes.
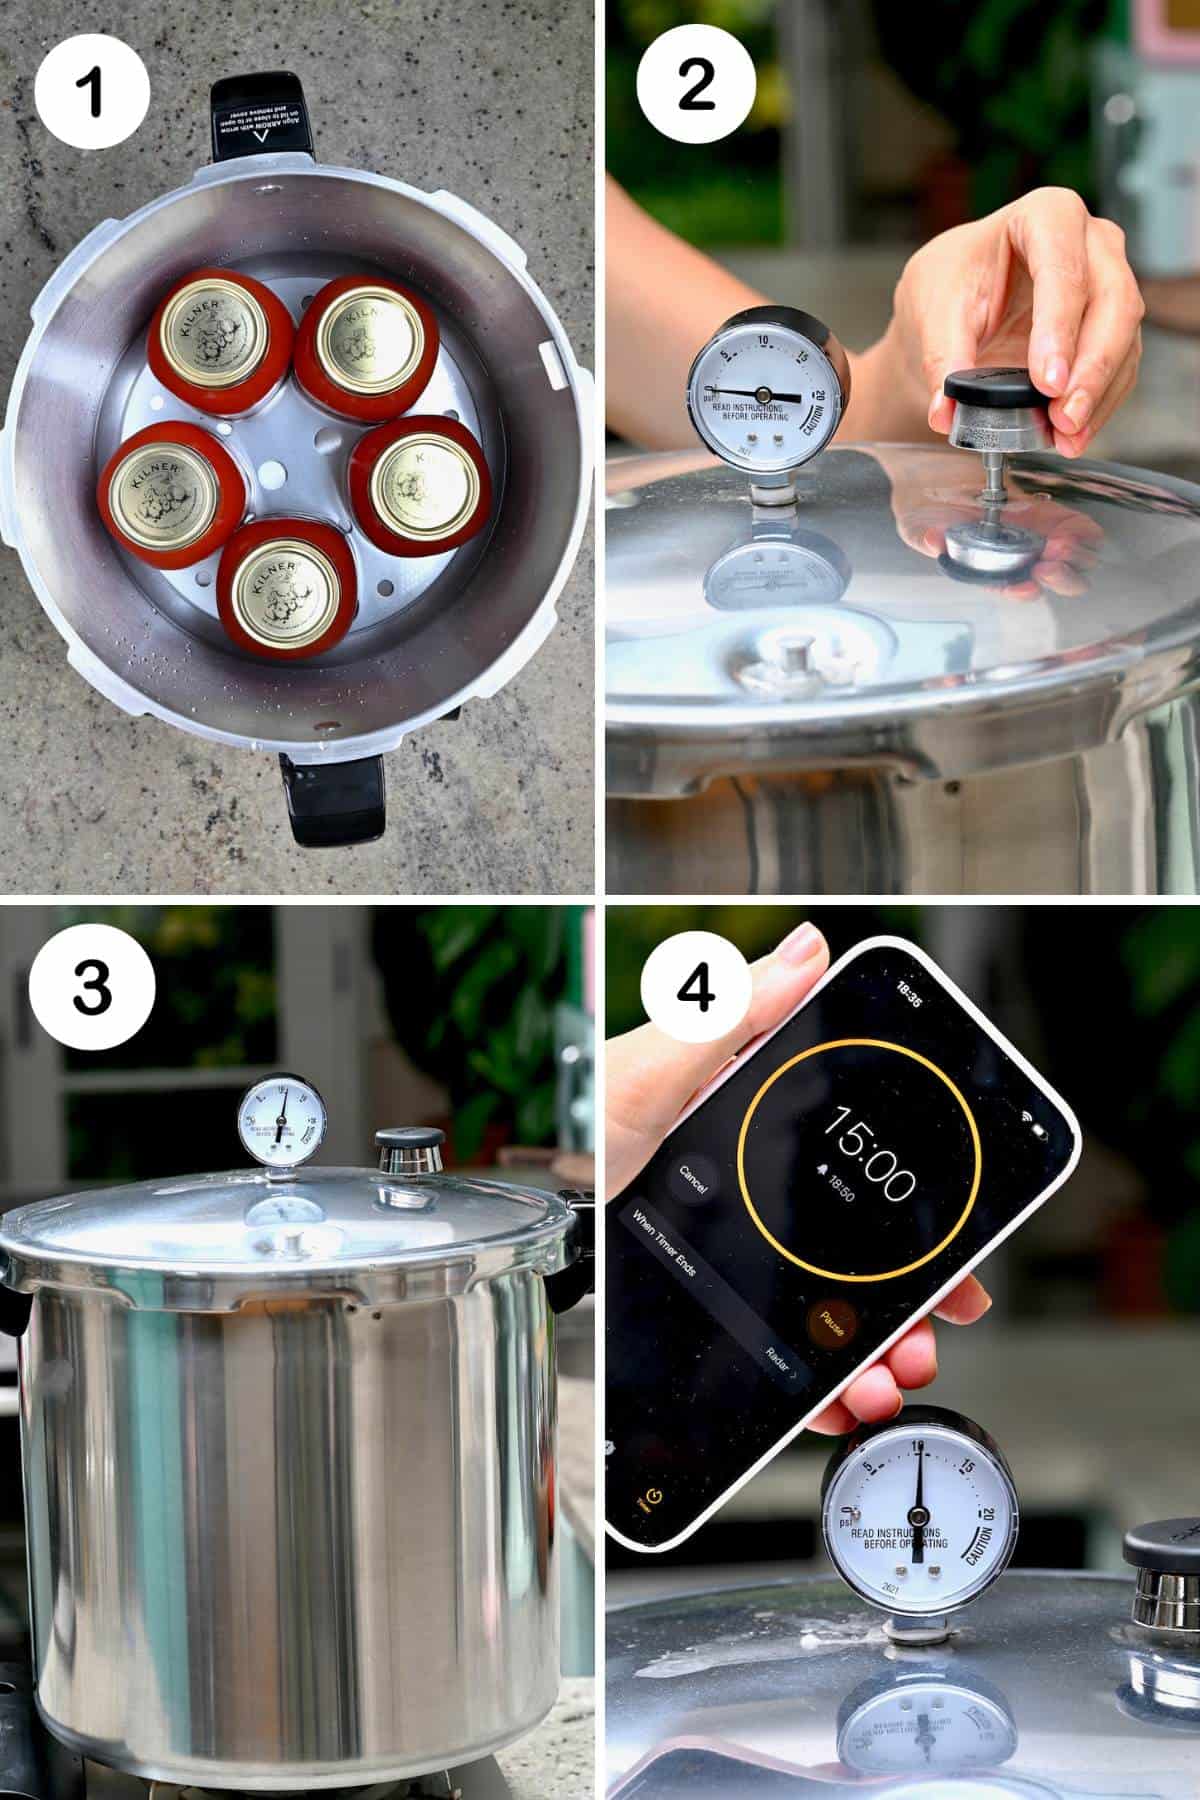
If you’re using a dial gauge canner, you must monitor the heat to ensure the pressure remains at the correct level (or just above it, but never below). If it drops below the required amount, you’ll need to raise it and start the processing time from the beginning.
To adjust the time based on altitude: Most recipes are written for 0-1000 Feet altitude. Canning beyond this range requires adjustments.
Depressurize the canner: Following the required processing time, remove the canner from the heat and let it naturally depressurize to 0 psi. Don’t force-cool the canner, or it can lead to food spoilage. Then, remove the weight from the vent port/open the petcock, and leave it for 10 minutes. Finally, carefully release and remove the lid, facing it away from you so hot steam flows away from you.
Final inspection
Step 7: Cool and check the seals: Use the canning tongs/jar lifter to carefully remove the jars from the canner, ensuring they remain upright, to a heat-proof surface (like a wooden board) or a clean kitchen towel-lined worktop. Leave an inch between each jar.
Leave the jars to cool at room temperature for at least 12 hours (up to 24 hours) before handling them. During this time, the jars will properly seal. You may even hear “pops” as they do so. It’s important not to handle them and risk creating a ‘false seal’/ ruin the seal.
Before storing them, inspect the jars to ensure they’re all sealed. First, remove the screw bands. Don’t store the jars with the rings; leaving them on them can cause rust and a “false seal.” Without them, it’s easier to see if the lids are properly sealed. Then, inspect the flat lid. It shouldn’t wobble/move and will look slightly concave with no flex or popping noise when pressed.
If any jars haven’t properly sealed, re-process them within 24 hours with a new jar/lid if necessary (if there are chips/defects) OR transfer them to the fridge to use within a few days.
Step 8: Label and store the jars: Label the jars of canned whole peeled tomatoes with their content and a guideline “use by” date. I recommend storing them for 12-18 months in a cool dark, dry location (between 50-70ºF/10-20ºC is ideal, no higher than 95ºF/35ºC),
When you open a jar, make sure the seal is still intact (it should “pop” when opened), and watch out for any visible mold, funky smells, or odd tastes. Separation of the tomatoes and liquid is normal.
If you’re having difficulties removing the disk-type lid, use a spoon or blunt knife to insert between the lid and jar and twist it to release the lid. Alternatively, make a small hole in the lid to break the vacuum seal.
Once opened, transfer any leftovers to the refrigerator to consume within a week.
Refer to the National Center for Home Food Preservation’s guide for more information on canning tomatoes.
How to use canned whole tomatoes
You can use these delicious home-canned whole tomatoes in all the same ways you’d use store-bought canned tomatoes (whole, crushed, or chopped):
- Tomato sauces – like pasta sauce, marinara sauce, spaghetti sauce, etc.
- Creamy tomato soup or other soups, like vegetarian minestrone, etc.
- In homemade chili, slow-cooker beef stew, and curries
- For tomato salsa
- In shakshuka and one one-pot or casserole-style dishes
More canning recipes

If you try canning tomatoes at home, let me know how it goes in the comments below. I’d appreciate a recipe card rating and would love to see your recipe recreations – tag me on Instagram @Alphafoodie!
Canning Tomatoes (An Easy Step-by-Step)
Equipment
- Pressure canner -OR-
- 7 Big glass jars (32 oz) quart size each
Ingredients
- 21 lb tomatoes
- 7 fl oz bottled lemon juice not fresh; use 2 Tbsp per quart jar
-OR-
- 3.5 tsp citric acid use 1/2 tsp per quart jar
- 7 tsp salt use 1 tsp per quart jar
Instructions
- Prep and SterilizeWash jars, lids, tongs, funnel, and counter with soapy water and rinse them well. Air-dry items (except jars) on a towel.Sterilize the jars in the oven at 320-355ºF/160-180ºC for 10 mins or in the water bath canner for 10 mins.
- Prep the CannerPlace trivet in water bath/pressure canner. Then for a water bath canner, fill about halfway with water, or enough so the filled jars are fully submerged by at least two inches of water. OR for a pressure canner, add 3 inches of water.Bring the water to a boil over high heat while preparing the tomatoes, then drop it to a simmer to stay warm until needed.
- Blanch and Peel TomatoesWash and score the tomatoes with a shallow crisscross (X shape) at the bottom.Blanch the tomatoes in boiling water (enough to cover them) for 30-60 secs. Then transfer them to an ice bath for at least 5 minutes. Peel the skin and,th optionally, core/halve the tomatoes.
- Pack the JarsWorking one at a time, remove a jar from the oven/water and pack it. First, add the lemon juice OR citric acid and, optionally, 1 teaspoon of salt per quart.For raw-pack method: Pack the tomatoes in the jar tightly, squeezing in as much as you can, and pour in either boiling water or boiling tomato juice (using a ladle and/or funnel will be easiest), leaving ½-inch headspace. I usually do the raw-pack method – as per the photo below.For hot-pack method: Add the tomatoes back to the pot of water on the stove (or use tomato juice, if preferred). Adjust the amount of liquid, if needed, so the tomatoes are just barely covered. Bring to a boil, then reduce to a gentle boil for 5 minutes. Then pack the tomatoes in the jars tightly, leaving ½-inch headspace. Optionally, cover them with the liquid they simmered in.
- Close the Jars Once filled, use your tool of choice to run along the inside of the jar/press down on the tomatoes to remove any excess air bubbles. If the liquid level goes down, top it up to the correct headspace level. If needed, wipe the jar rims with a clean, hot, damp kitchen towel. Then add the lid and screw the bands until they're finger-tight (screwed until the point of resistance, but not too tight that air can't escape during processing).
- Fill the CannerUsing the canning tongs, carefully transfer the filled jars to the pot, ensuring they remain vertical and aren't touching the sides of the pot or each other.Then process the tomatoes using either the water bath canning method or the pressure canning one.
- Water Bath CanningCover the canner with a lid and bring the water back to a rolling boil. Only then start the timer for 45 minutes for quart jars (adjust the time for higher altitudes). Check the water level occasionally to ensure not too much water has evaporated. The jars should be completely submerged at all times. Add more water if necessary.After processing, switch off the heat immediately, remove the lid, and allow the jars to sit in the water for 5 minutes. This stabilizes the pressure and prevents siphoning (leaks).
- Pressure CanningClose and lock the lid of the pressure canner, ensuring the pressure vent/petcock is open. Heat the stove at its highest setting until you notice steam escaping the vent/petcock in a steady stream. Then, start a timer to allow it to vent for 10 minutes.Close the vent/petcock and allow the pressure to build in the canner to 10 PSI using a weighted gauge canner or 11 PSI using a dial gauge canner. This can take up to 10 minutes and, if using a weighted gauge canner, will result in the weight beginning to jiggle/rock.Reduce the heat slightly and set a timer to process the jars for 15 minutes.After the processing time, remove the canner from the heat and let it naturally depressurize to 0 psi. Don't force-cool the canner! Then, remove the weight from the vent port/open the petcock, and leave it for 10 minutes. Finally, carefully release and remove the lid, facing it away from you so hot steam flows away from you.
- Cool and Check SealsUse the canning tongs/jar lifter to carefully remove the jars from the canner, ensuring they remain upright, to a heat-proof surface (like a wooden board) or a clean kitchen towel-lined worktop. Leave an inch between each jar.Leave the jars to cool at room temperature for at least 12 hours (up to 24 hours) before handling them.Before storing them, inspect the jars to ensure they’re all sealed. First, remove the screw bands. Then, inspect the flat lid. It shouldn't wobble/move and will look slightly concave with no flex or popping noise when pressed.
- Label and StoreLabel jars with content and "use by" date. Store them in a cool, dark place for 12-18 months. Check the seals before opening.
Video
Notes
- 1001-3000 feet = Increase by 5 minutes
- 3001-6000 feet = Increase by 10 minutes
- 6001-8000 feet = Increase by 15 minutes
- 8001-10,000 feet = Increase by 20 minutes
Nutrition
Nutrition information is automatically calculated, so should only be used as an approximation.


