Easy Apricot Jam Recipe (No Pectin Required)
How to make apricot jam without pectin and just 3 ingredients. A sweet, tangy, fruity preserve using fresh or dried apricots and stored in the fridge, freezer, or pantry (after canning)!
Servings: 9 jars (8 oz each)
Equipment
- 9 Small jars 8 oz each (250 ml)
- Large, shallow heavy-based saucepan
- Silicone spatula or wooden spoon
- Canning funnel optional
- Bubble remover optional
- Magnetic lid wand optional
Ingredients
- 4.8 lb apricots 12 cups; use "just ripe" and ripe fruit; a few underripe will add more pectin and acidity, too
- 3.3 lb sugar 7.5 cups
- 1/3 cup lemon juice from 2 small lemons; bottled works fine, too
Instructions
Prepare the jars
- Sterilize everything (jars, tools, counter). Wash the jars (I like half-pint jars), lids, and bands in hot soapy water, rinse them well, and leave them to drain and dry. Also, place 2-3 small plates in the freezer (for testing the jam gelling later on).If you’re planning to can the jam, prepare the canner now, too, by adding the trivet/rack to the bottom of the canner and filling it with enough water to submerge the cans.
Make the jam
- Wash, dry, and pit the apricots (slice them in half and pull out the pit), removing any spoiled fruit. Also, juice the lemons.
- Transfer the halved apricots, lemon juice, and sugar to a large, deep, heavy-based stainless steel saucepan (for even heat/to prevent scorching) and bring it to a boil over medium heat. Stir constantly to dissolve the sugar.
- Boil the jam mixture until the fruit breaks down and the mixture thickens enough to coat the spoon (about 25-30 minutes). Stir constantly to prevent burn/scorching, only stopping to scoop away the foam from the top of the pan as it forms.
Test the jam is ready
- There are two ways to test if the homemade jam is ready and will gel properly.Using a candy thermometer: Insert the thermometer vertically into the center of the jam, ensuring it doesn’t come into contact with the saucepan. The temperature should have reached 220ºF/104ºC.Using the Frozen Plate method: Remove the saucepan from the heat, place about a teaspoon of the jam on the frozen saucer, and place it back in the freezer for 1 minute. To test it, press the edge of the jam with a fingertip – it should be set and wrinkle when pressed. If it's reached the gel stage, it's ready to jar. If not, return the pan to heat and cook, stirring constantly, for an additional 5 minutes, then repeat the plate test again with another plate (that's why I always put 3 in the freezer).
Fill the jars
- Heat the jars up in the water bath canner (with the lids on) or in the oven (without the lids). This is needed so they don't crack when adding the hot jam.
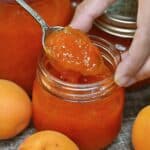
- Ladle or pour the hot jam into the jars, leaving about ¼-inch (0.5 cm) of headspace at the top.
- Tap the jar against your kitchen surface and/or use a knife to remove any air bubbles in the jam.
- Wipe the rims of the jars with a clean kitchen towel and place the lid on the jar. Screw the bands until they are fingertip-tight (if you plan to water bath can the jam- or fully sealed if not).
Can the jam (optional)
- Place the filled jars in the prepared canner, submerging them under at least 1 inch of water.
- Bring the water to a boil over medium-high heat, add a lid, and allow them to process for 10 minutes (adjust the time based on the altitude of where you live).
- Remove the canner lid and allow it to sit for 5 minutes before using canning jar tongs to place jars onto a clean kitchen towel to drain and cool undisturbed for 24 hours.
- Once cooled, check the seal (the middle part of the lid shouldn't pop up/down when pressed). Any unsealed jars can be reprocessed with new lids or transferred to the fridge to use sooner.Note that if you reduce the amount of sugar or lemon too much, the jam recipe will become unsafe for water bath canning.
Storage
- Fridge: If you haven't water bath canned the jam, place it in the refrigerator and aim to use it within a month. Freezer: Use freezer-safe jars or bags and store the jam for 4-6 months.Canned: Store the (labeled!) jars in a cool, dark location, like a pantry, for up to a year. Once opened, transfer to the fridge and use within 3-4 weeks.
Video
Notes
- Select the best apricots: They should be "just ripe" or "ripe," but not overripe, with a sweet to sweet-tart flavor. Avoid using overripe, blemished, or bruised fruit. A few slightly unripe apricots will work to add more pectin and acidity.
- Use sterilized jars: This is important to avoid premature spoiling.
- Use nonreactive tools: I.e., a nonreactive saucepan (stainless steel, glass, enamel-coated), spoons (silicone or wooden), etc. Avoid aluminum, copper, etc.
- Stir constantly: To avoid the apricots scorching to the bottom of the pan.
- If you have one, use a thermometer: It needs to reach 220ºF/104ºC for a good gel stage.
- Adjust the jam consistency: If you’ve accidentally made the jam too thin or evenly overly solid, don't worry. Just reheat the mixture and either add more pectin (to thicken it) or some water and lemon juice (to thin it).
- To peel or not peel: The peel contains pectin, which will help the jam set, so I recommend keeping it on.
- The sugar content: It's best not to reduce the sugar content in this recipe, as the sugar also helps with the setting and acts as a natural preservative. Low-sugar jam may require added pectin and must be eaten sooner.
- Vanilla: Stir in about 1 tsp vanilla extract (or paste) at the end, off the heat.
- Almond extract: Stir in a little off the heat at the end for a subtle nutty flavor.
- Lavender: Add about 1 tsp dried edible lavender for a subtle floral taste.
- Rosemary: Add a single 3-4-inch sprig to the saucepan, removing it before jarring the jam.
- Alcohol: A splash of Amaretto, Bourbon, peach schnapps, or orange liqueur creates a more complex, full-bodied flavor.
- Chili: Like apricot jalapeño jam or apricot habanero jam. Finely dice the chili and remove the seeds. Add as much as you'd like for a subtle or big kick.
- Ginger: Use finely grated ginger to taste, starting with about ½ teaspoon.
- Spiced apricot jam: Experiment with cinnamon, nutmeg, cloves, cardamom, black pepper, etc. Add to taste.
Nutrition
Serving: 2Tbsp | Calories: 95kcal | Carbohydrates: 24g | Protein: 0.4g | Fat: 0.2g | Saturated Fat: 0.01g | Polyunsaturated Fat: 0.02g | Monounsaturated Fat: 0.1g | Sodium: 1mg | Potassium: 80mg | Fiber: 1g | Sugar: 24g | Vitamin A: 582IU | Vitamin C: 3mg | Calcium: 4mg | Iron: 0.1mg