Classic Persian Crispy Rice (Tahdig)
This tahdig is a Persian crispy rice made with saffron, yogurt, and egg, and cooked until it develops a wonderfully deep, caramelized, golden crust!
Servings: 4
Ingredients
- 2 cups rice Basmati is best, but other long-grain white rice should work
- 2 Tbsp salt to soak the rice
- pinch saffron 10-20 threads
- 2 tsp water to dilute the saffron
- 1 Tbsp yogurt Natural/Greek or plain vegan yogurt if preferred.
- 1 egg yolk omit for a vegan version
- 1/3 cup oil any neutral cooking oil
- 1/3 cup butter melted, or clarified butter/ ghee
Check the blog post for optional add-ins and recipe variations!
Instructions
Step 1: Prepare the Rice
- Rinse the rice well (until the water runs almost clear) and transfer it to a large bowl. Add some water to the bowl to cover the rice with an extra 1-2 inches of water PLUS 2 Tbsps salt and stir. Then leave it to soak for 3-6 hours.
- Once it's ready, bring a pot of salted water to a boil and, after rinsing the soaked rice, add it to the pan to boil for 2 minutes. To know if the rice is ready, you can test a couple of grains - they should be soft on the outside with a bit of bite on the inside. If needed, boil the rice for 30-60 seconds longer. Then, drain, and rinse the rice once more with lukewarm water.Alternatively, you can choose not to soak the rice and instead par-boil it for 5 minutes, but the final texture of the dish is better when pre-soaking.
Step 2: Prepare the Remaining Ingredients
- To prepare the saffron, first, crush the threads gently into a powder and add them to 2 tsp of warm water, stirring well to dissolve it and allow it to steep/bloom for 5-10 minutes.Alternatively, you can add the saffron to an ice cube and allow it to naturally melt. This will yield better color extraction AND taste but take far longer.
- Combine the yogurt, saffron liquid, and egg yolk in a separate small mixing bowl. Stir well until thoroughly combined.
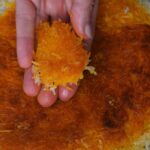
- Finally, add 1/4-1/3 of the rice to the mixture and stir it until well coated in the mixture.
Step 3: Cook the Tahdig
- Heat the oil in a large, wide and deep, non-stick skillet (I used 7 in/18cm one, with a volume of about 10 cup/2 l). Then add the saffron rice mixture, using a spatula to even it across the entire pan base (this will become the fantastic crust!).Obviously, the wider the pan, the more crispy rice you'll have, but the thinner it'll be!
- Allow it to cook for several minutes (4-5) untouched before adding the remaining rice on top.
- With the handle of a wooden spoon, poke holes in several places across the top of the rice (pressing it right down into the rice until the bottom) to allow steam to escape.
- Then, cover the pot with a clean kitchen towel and a lid and cook it over low-medium heat for 30 minutes, or until the rice on top is tender, while the rice underneath and on the sides has formed a wonderfully golden, crispy crust.I like to wrap the lid with a kitchen towel for the easiest (and safest) method. This will help to absorb the steam from the rice to allow the crispy golden crust to form and the rice on top not to become ‘wet.’ To check on the level of the rice, use a spatula or other flat utensil to slide between the side of the pan and the rice and gently lift it to check on the color of the rice at the bottom of the pot.
- To serve, carefully flip the pan over onto a dish, so the crispy layer is now on top, and enjoy! Garnish if preferred with your toppings of choice (see the blog post for options and serving recommendations)!
How do you flip the rice?
- I first run a spatula along the sides of the pan/rice to loosen it up slightly, if needed. Then, place your serving dish over the top of the pan, holding it in place. Then, carefully flip them over together, and the rice should drop down onto the pan. If some sticks, just use your spatula to help scrape it out and patch up the top.
Storing Instructions
- Store: unsurprisingly, the crispy tahdig layer is best enjoyed immediately and won’t store well. However, the rice beneath it can be stored in the refrigerator for 3 days in an airtight container.Freeze: as above, you can freeze the leftover rice, but not the tahdig. I like to portion mine into freezer-safe containers or bags and store for 3-4 months.Reheat: to reheat from frozen, add a splash of water to the rice and microwave it until heated through. From chilled, follow the same method or reheat it on the stovetop over low/medium (with a splash of water) until warmed.
Notes
- The cooking time may vary: based on the depth of your pan and the exact heat levels, etc. So check on it at 25 minutes to begin, then increase the time as needed (you can then keep the accurate time in mind for next time- though if you use a different pan, heat, etc., this can once again affect the timing). No two batches are exactly the same!
- To avoid sticking: A non-stick pan can do a lot of the work for you. However, I’ve also heard a tip where people scrunch up a circle of parchment paper (cut to fit the bottom of your pan size) and place it before the rice and butter. However, I’ve never tried the method.
- If it sticks: fill your kitchen sink with an inch or two of cold water and set the pot inside it for a few seconds. If that still doesn’t work, don’t worry; it’ll still taste delicious. And, if you want to make the mistake look purposeful, then chip up all the crispy tahdig into smaller pieces, voila!
- Don’t skip the holes: it's particularly important to poke plenty of holes through to the bottom layer of rice when cooking as they’ll allow steam to escape, which is imperative to a wonderfully crispy, golden crust.
- For even browning: if you have a stovetop/pan with hotspots, you can rotate your pan a quarter turn every 5 minutes for more even browning. If you're working over a flame, using a "flame tamer" can help to disperse the heat evenly.
- Practice makes perfect: Tahdig is one of those dishes that people perfect over many years and tweaking, so if it doesn’t go 100% the very first time, try again!
Nutrition
Calories: 372kcal | Carbohydrates: 13g | Protein: 2g | Fat: 36g | Saturated Fat: 13g | Polyunsaturated Fat: 3g | Monounsaturated Fat: 18g | Trans Fat: 1g | Cholesterol: 90mg | Sodium: 3674mg | Potassium: 18mg | Sugar: 6g | Vitamin A: 543IU | Vitamin C: 1mg | Calcium: 31mg | Iron: 1mg