
This post may contain affiliate links. Please read our disclosure policy.


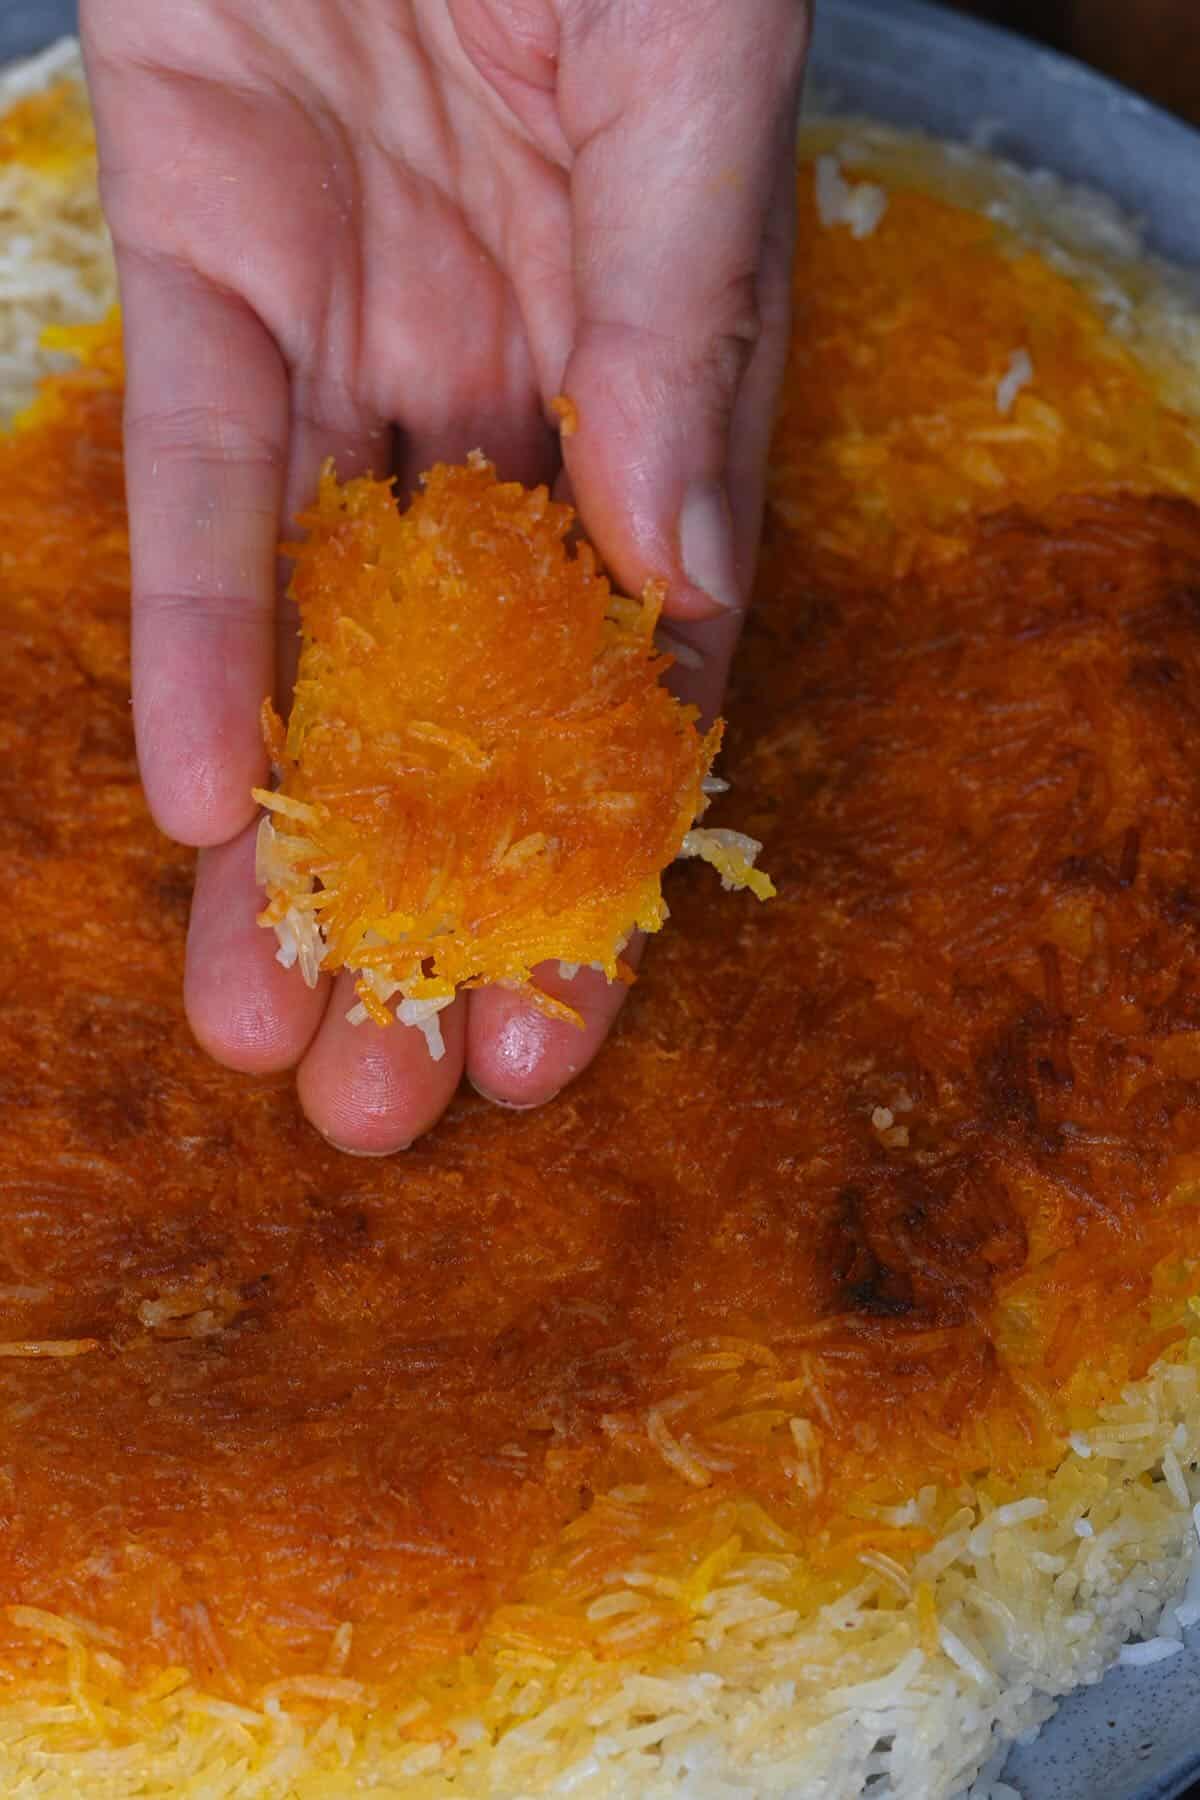
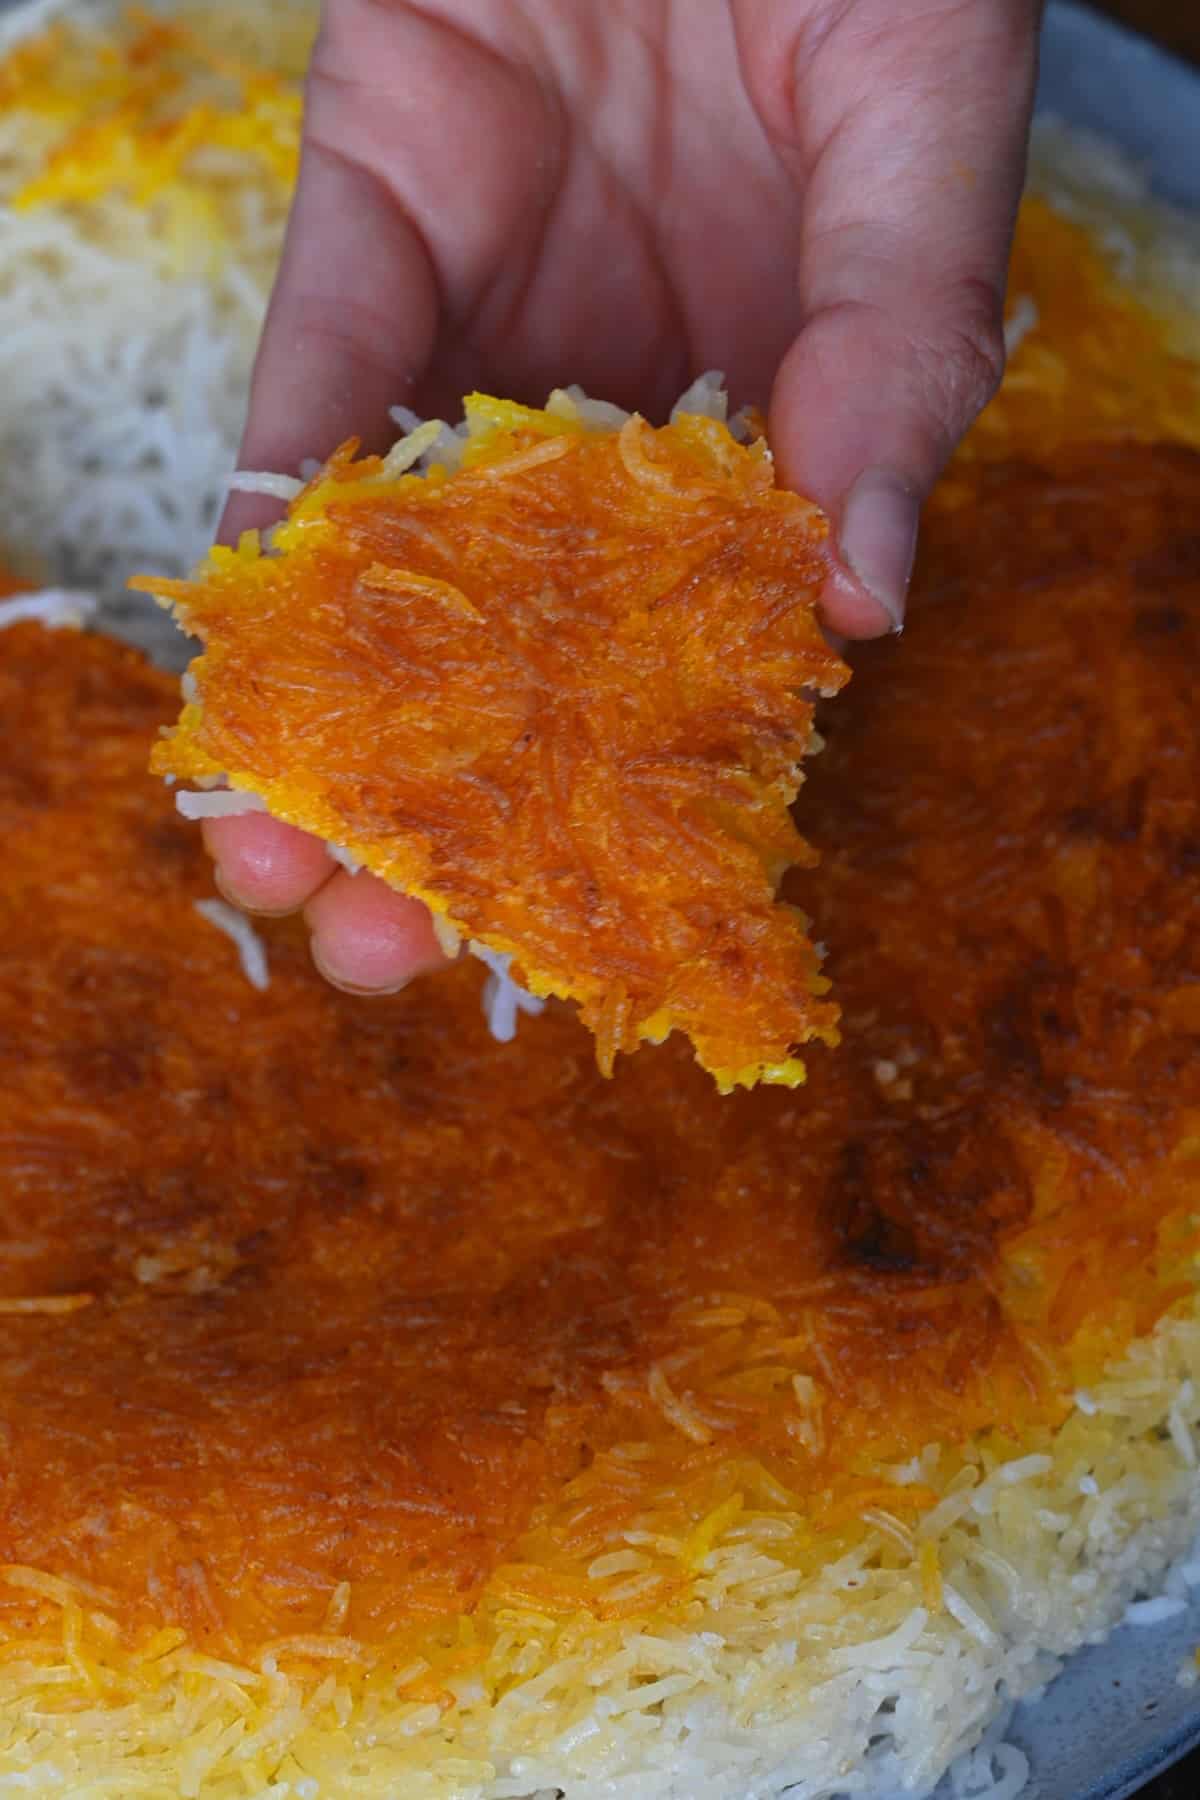
This tahdig is a Persian crispy rice made with saffron, yogurt, and egg, and cooked until it develops a wonderfully deep, caramelized, golden crust!
You know how often the best part of many baked and cooked foods are the little super-crispy bits around the edges or on top (like in a lasagna!)? Well, Persian crispy rice (aka tahdig/tahdeeg) knows precisely how you feel and is here to cater to your crisp-loving dreams! With just 7 ingredients (oil and salt included), one pan, and a simple process, you can cook the most amazingly crispy rice dish to serve as a side or main!
Want to save this recipe?
What Is Tahdig?
Tahdig (“tah” meaning bottom and “dig” meaning pot; pronounced tah-DEEG) is a type of scorched rice dish popular in Persian cuisine. This Persian crispy rice primarily combines rice, yogurt, egg, and saffron, but the beauty isn’t in the ingredients. It’s in the cooking method!
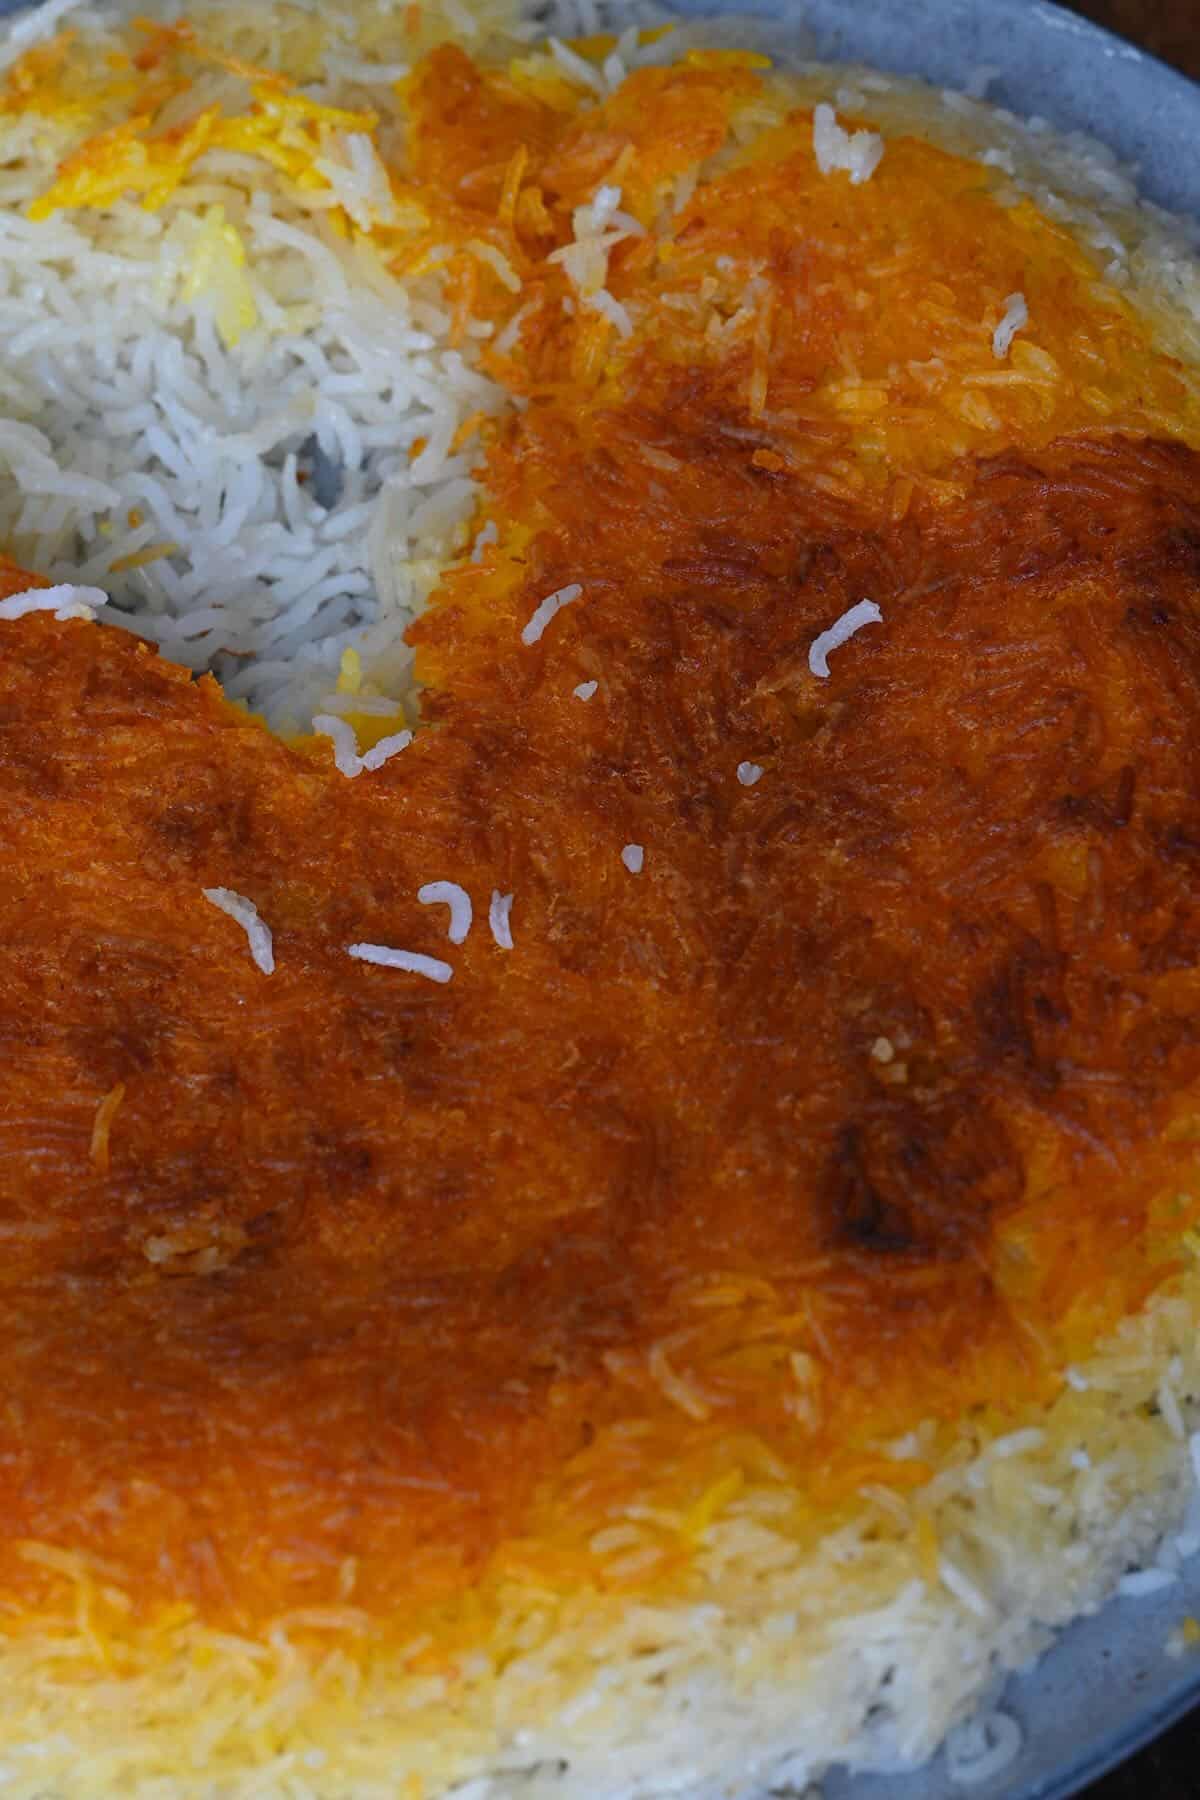
By cooking this Iranian rice dish directly onto a heat source (i.e., a flame/stovetop), you’re able to get a thin crust of browned, crisp, caramelized rice at the bottom of the pan, which is where this dish shines! Meanwhile, cooking the rice while covered allows it to steam the rest of the rice until tender.
While there are several versions of this dish, the most popular ones add either vegetables (like potato or tomato) to the tahdig recipe, some bread, OR meat like chicken (which technically then turns this dish to tahchin). No matter which method you use, the ingredient placed on the bottom (i.e., the potatoes, bread, rice) that crisps up is what we refer to referred to as the “tahdig” and not always just the rice alone!
For this version, I’m sharing a recipe for classic Persian saffron rice, but I’ve included a list of my favorite optional add-ins and variations below too! And, if you’re looking for more delicious rice dishes, you may also enjoy easy egg-fried rice, vegetable pilaf, or Maqluba (upside-down layered rice).
The Ingredients
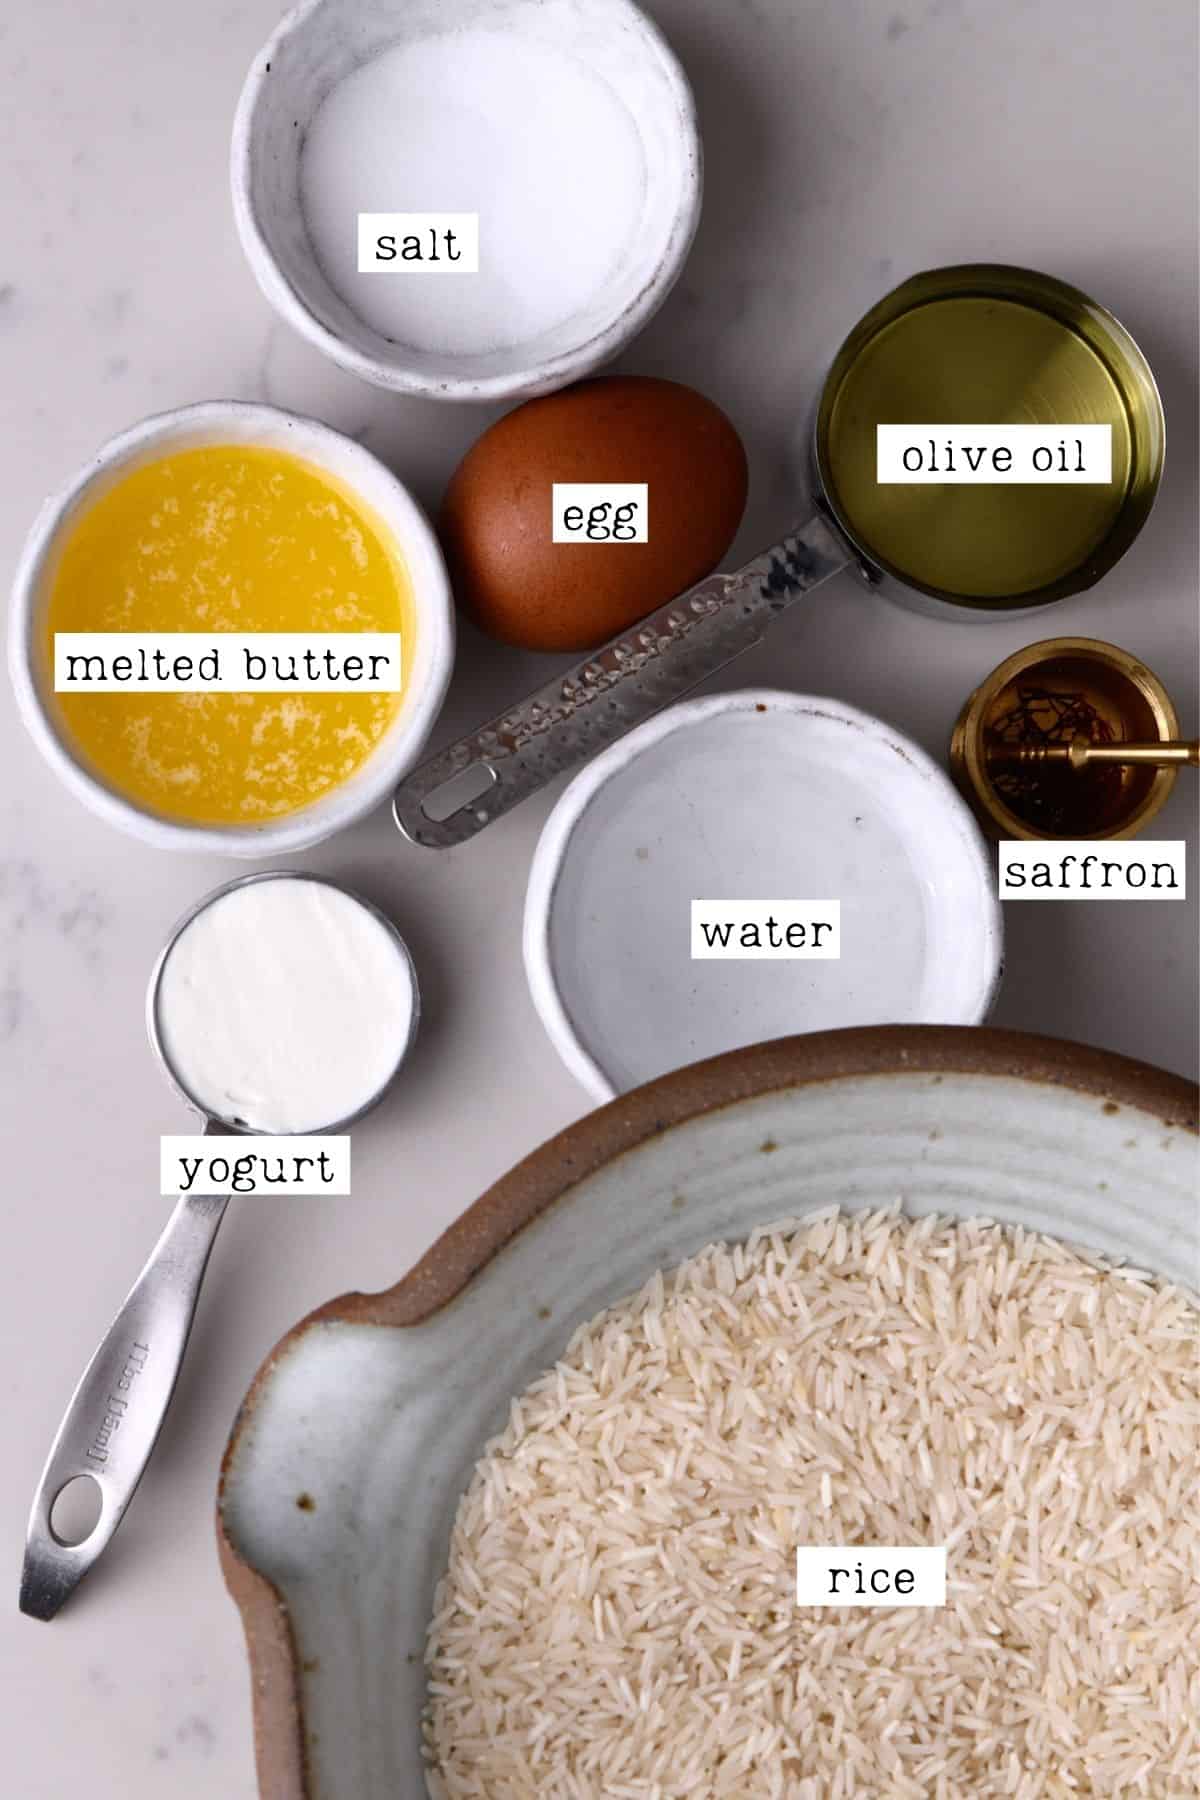
You require just a handful of ingredients to make this Iranian crispy rice recipe, including:
- Rice: it’s best (and traditional) to use basmati rice for this Persian crispy rice. Another long-grain white rice should also work, though.
- Saffron: this delicately scents the rice and provides a gorgeous golden color to the tahdig. It may be expensive, but the flavor is well worth it in this dish instead of cheaper substitutes (like turmeric).
- Yogurt: use plain natural or Greek yogurt. I used full fat, but a lower fat version should also work. For tahdig without yogurt, use full-fat milk instead. Though I find yogurt achieves the crispiest results.
- Oil: use any neutral cooking oil like vegetable oil, canola oil, etc. Alternatively, you could use a combination of butter and oil.
- Egg: all that’s needed is the egg yolk. The whites can be saved for other recipes like meringue, an omelet, etc.
- Butter: either use regular melted butter or clarified butter/homemade ghee. I use the latter as it’s least likely to burn during the cooking process.
- Salt: to season the rice.
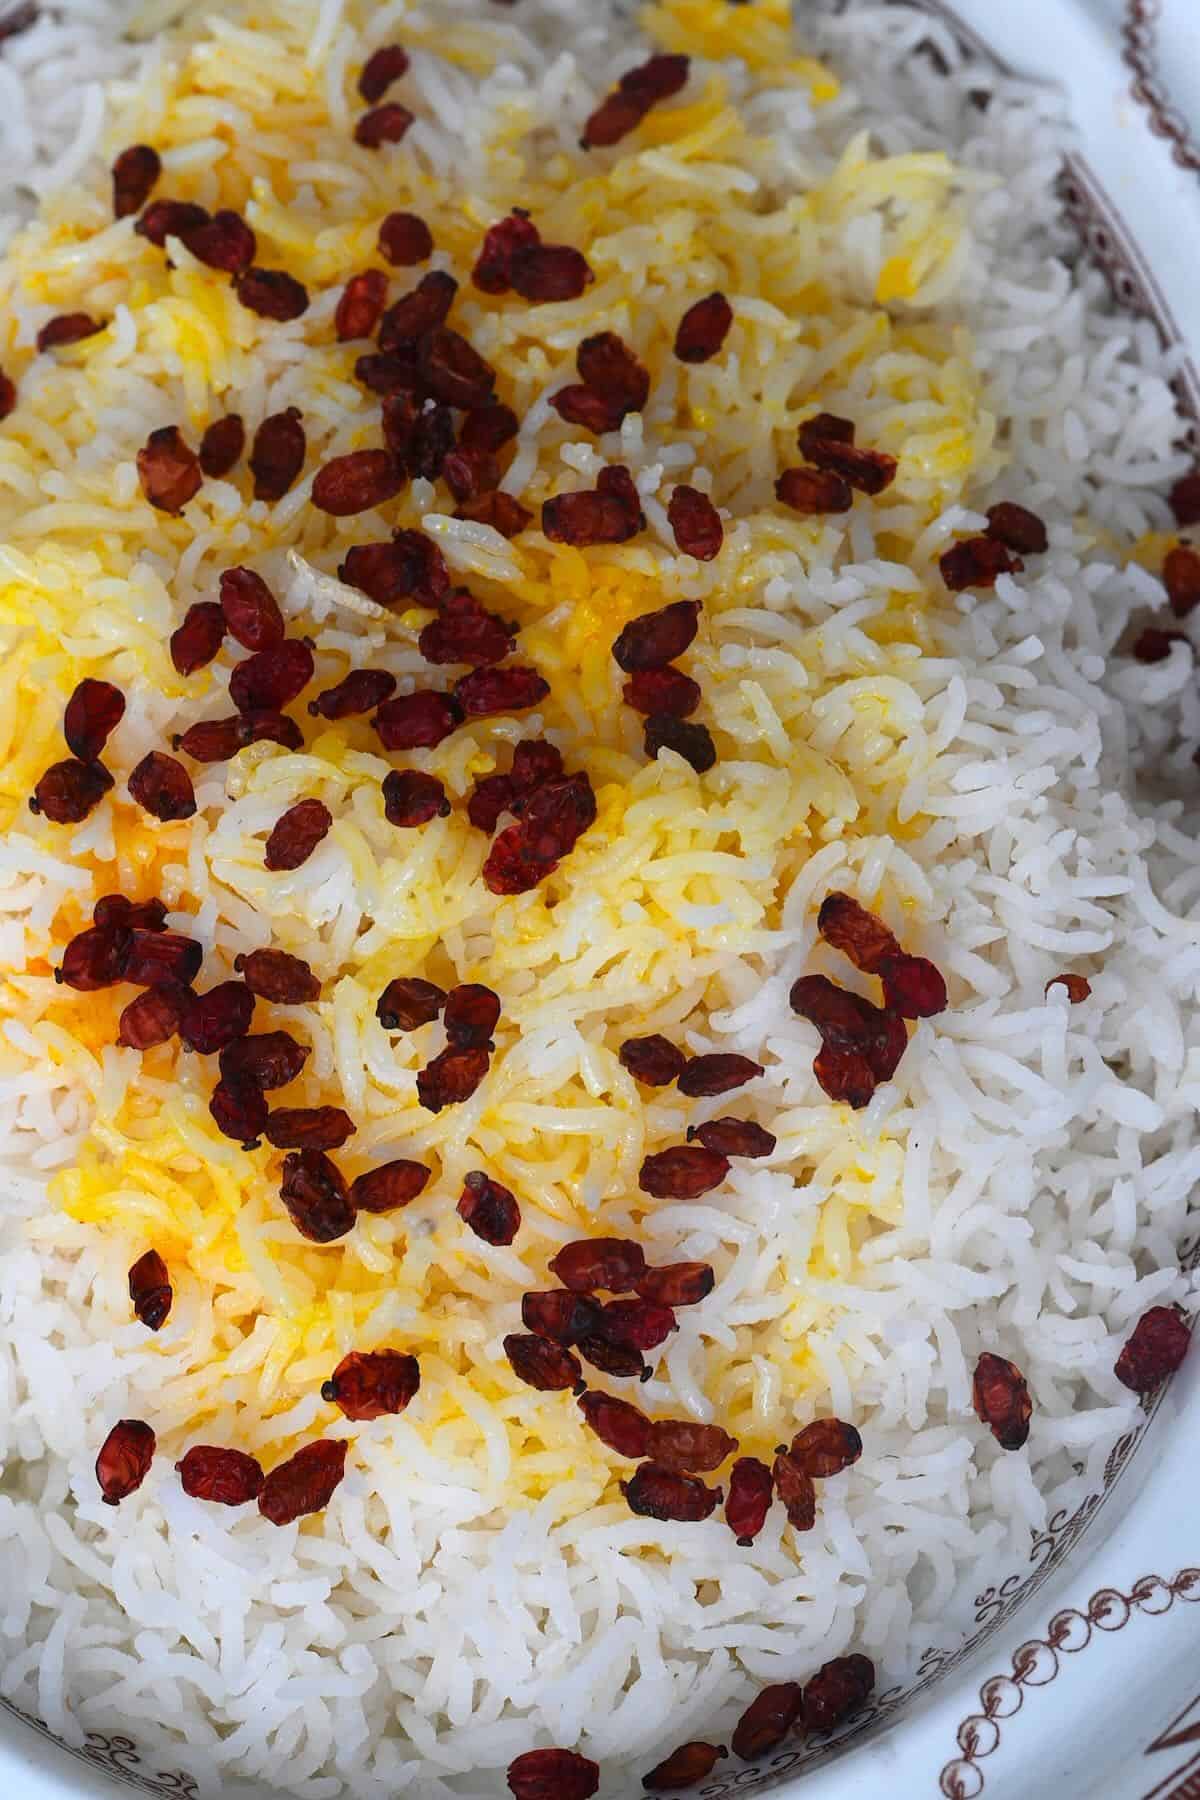
- Optional topping: you can prepare some additional saffron liquid with melted butter and drizzle over the Persian rice tahdig. Then sprinkle it with sautéed barberries (sautéed with butter, a tablespoon of sugar, and a few drops of rose water).
Optional Add-ins and Variations
- Vegan: to make a vegan version of this Persian tahdig, use soy yogurt or another plain vegan yogurt and skip the egg entirely.
- Orange zest: add subtle aromatic flavor to the Iranian rice dish with 1-2 Tbsp orange zest.
- Cinnamon: a pinch of cinnamon will add a subtle but delicious flavor to the scorched rice.
- Other spices: you could also experiment with cardamom, cumin, and/or cilantro seeds.
- Additional butter: for rich and buttery rice, add a few pats of butter (salted or unsalted) to the top of the rice before adding the lid to cook.
- Lavash bread: add the bread to the pan before the rice for a bread tahdig recipe. Pita bread may also work.
- Sliced potatoes: alternatively, thinly sliced potatoes (something all-purpose like Yukon Gold or russet) can be added to the bottom of the pan. Par-cook them for 5 minutes before adding the rice on top.
- Turmeric: if you want this crispy saffron rice to be entirely yellowed without spending a bomb on saffron, you could use a pinch of turmeric when par-cooking the rice.
- Meat: ground beef (or vegan ground beef/mince) or shredded chicken could be added to the middle of the rice “cake.”
- Vegetables: several types of cooked veggies work with this Persian rice tahdig recipe, including eggplant, lettuce, cabbage, sweet potato, carrot, pumpkin, onion, beets, etc.
- Lemon: a squeeze of fresh lemon juice before serving will add brightness.
- Rosewater: add a tablespoon or two of rose water to the rice for a delicately floral scent.
- Dried fruit: barberries, mulberries, dried cherries, cranberries, or even dates work.
- Pistachios: work as a wonderful garnish for extra flavor and crunch.
- Herbs: for extra flavor, feel free to add some finely chopped parsley or cilantro to the rice.
For more of a full meal, this tahdig recipe can be transformed into tahchin with layers of cooked chicken or other meat. For a meat-free version, you could use eggplant/spinach.
When adding extra ingredients, you can layer them within the rice, use them as the base (though certain ingredients work best for this, like potato and bread), OR as a topping before serving.
How to Make Tahdig?
While achieving the perfect crispy tahdig may seem like it’d be overly complicated, the process is fairly simple.
Step 1: Prepare the Rice
First, rinse the rice well (until the water runs almost clear) and transfer it to a large bowl. Add some water to the bowl to cover the rice with an extra 1-2 inches of water PLUS 2 Tbsps salt and stir. Then leave it to soak for 3-6 hours.

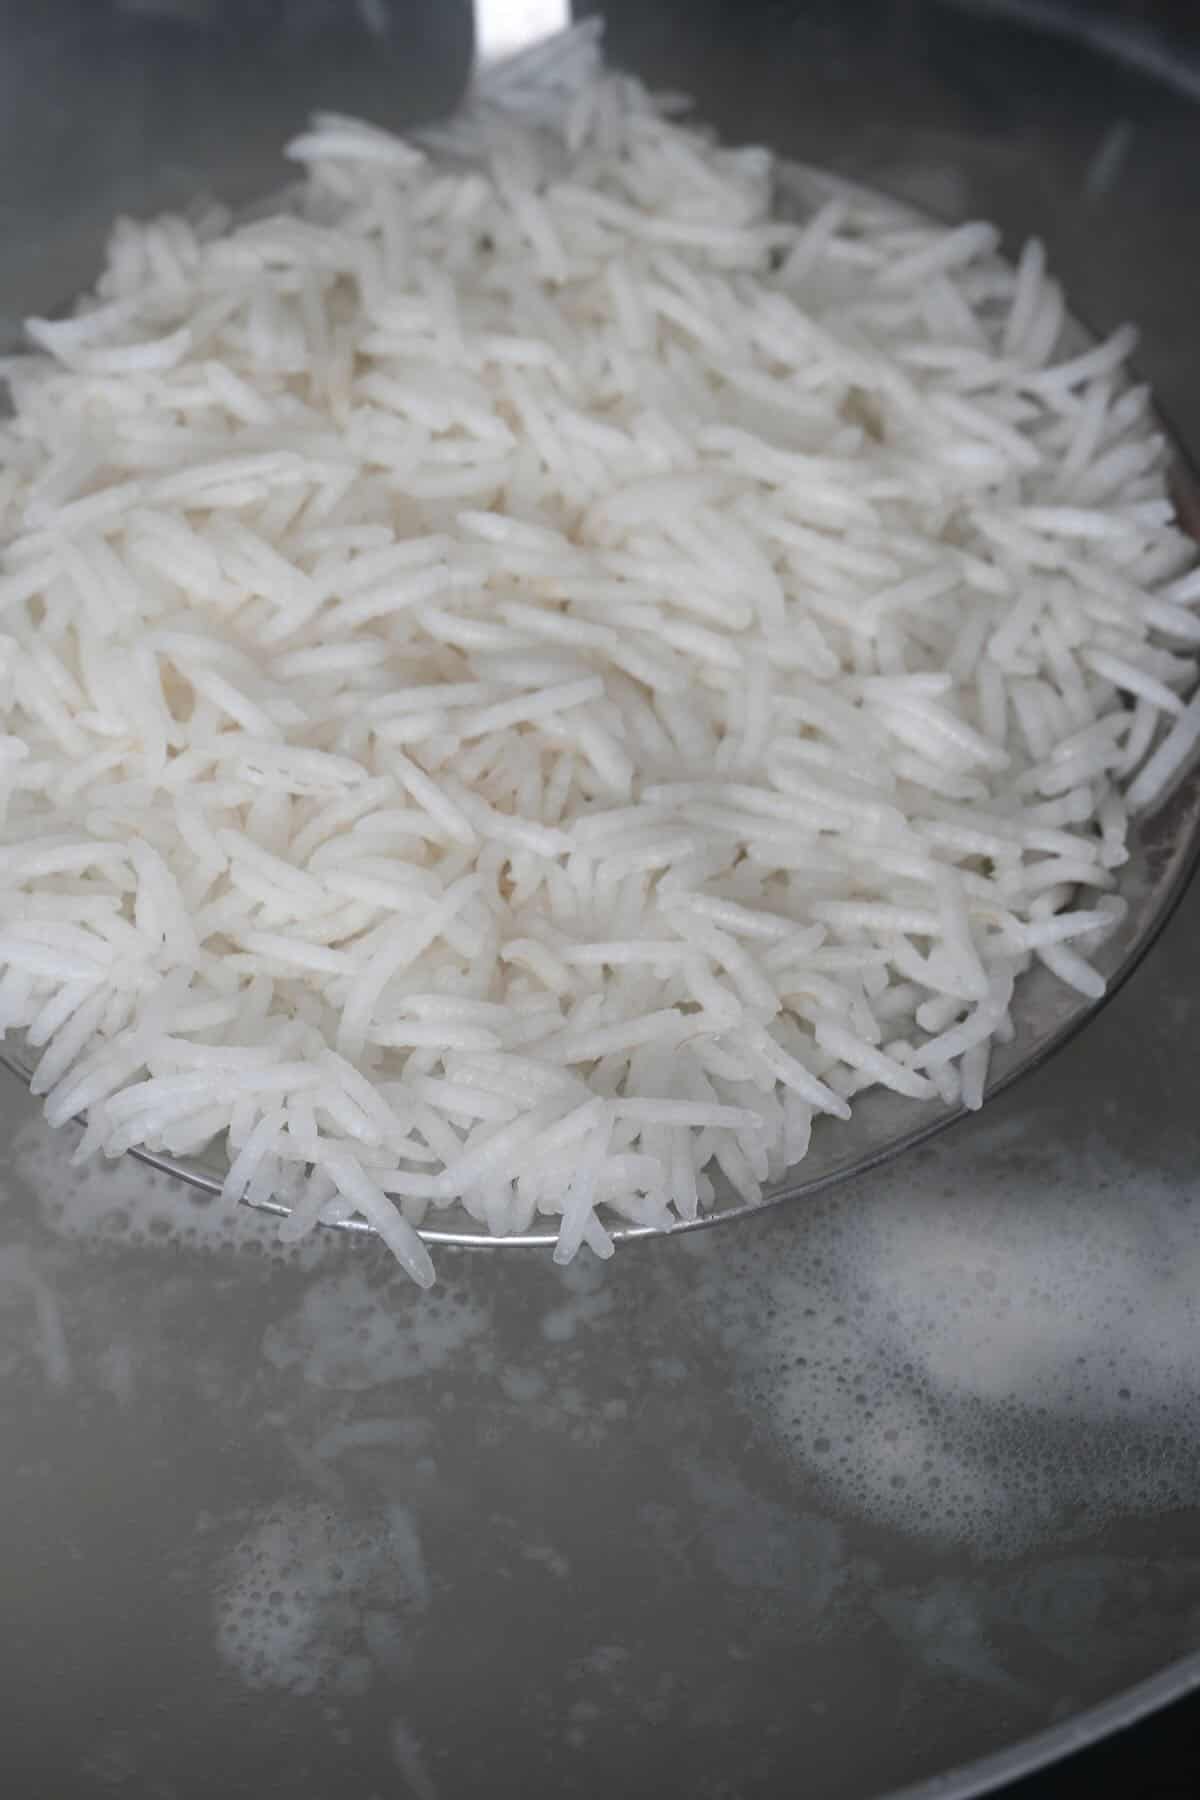
Once it’s ready, bring a pot of salted water to a boil and, after rinsing the soaked rice, add it to the pan to boil for 2 minutes. To know if the rice is ready, you can test a couple of grains – they should be soft on the outside with a bit of bite on the inside. If needed, boil the rice for 30-60 seconds longer. Then, drain, and rinse the rice once more with lukewarm water.
Alternatively, you can choose not to soak the rice and instead par-boil it for 5 minutes, but the final texture of the dish is better when pre-soaking.
Step 2: Prepare the Remaining Ingredients
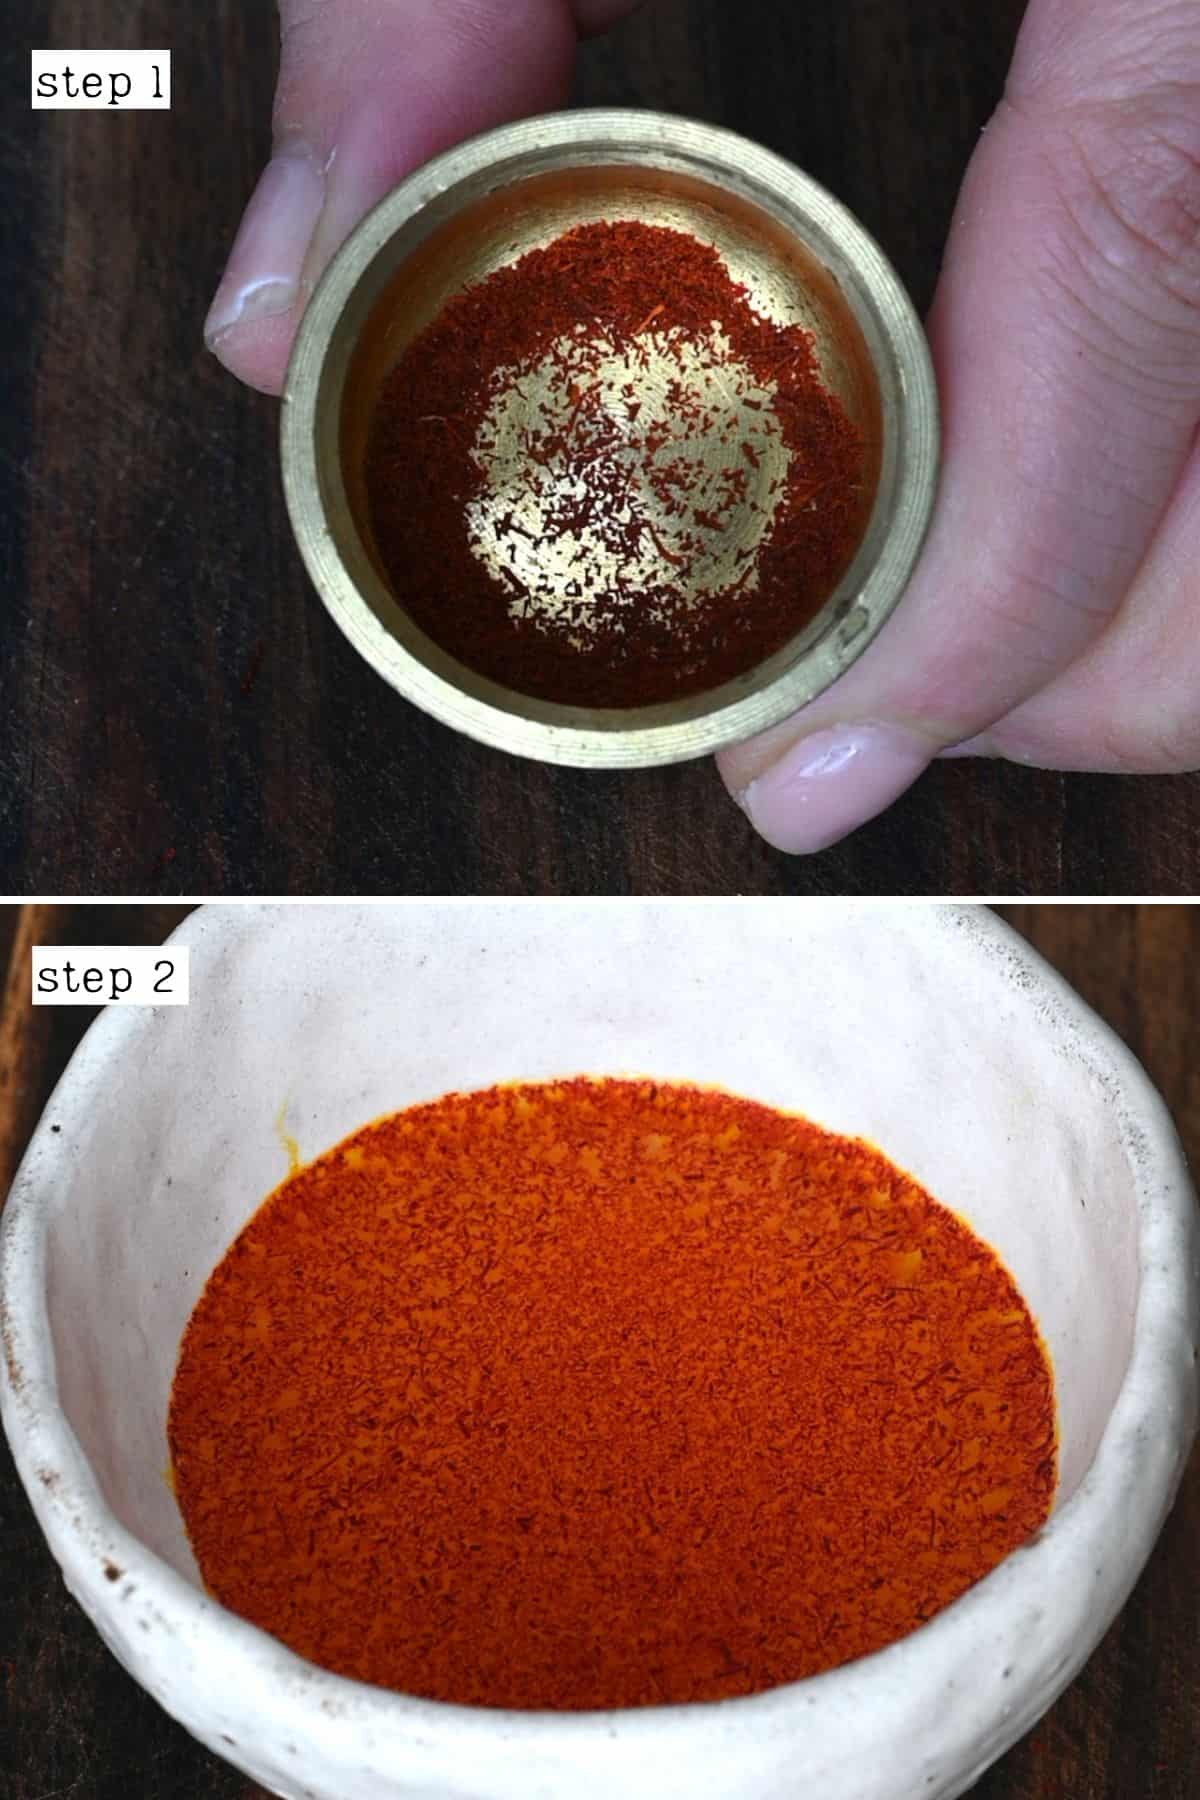
To prepare the saffron, first, crush the threads gently into a powder and add them to 2 tsp of warm water, stirring well to dissolve it and allow it to steep/bloom for 5-10 minutes.
Alternatively, you can add the saffron to an ice cube and allow it to naturally melt. This will yield better color extraction AND taste but take far longer.
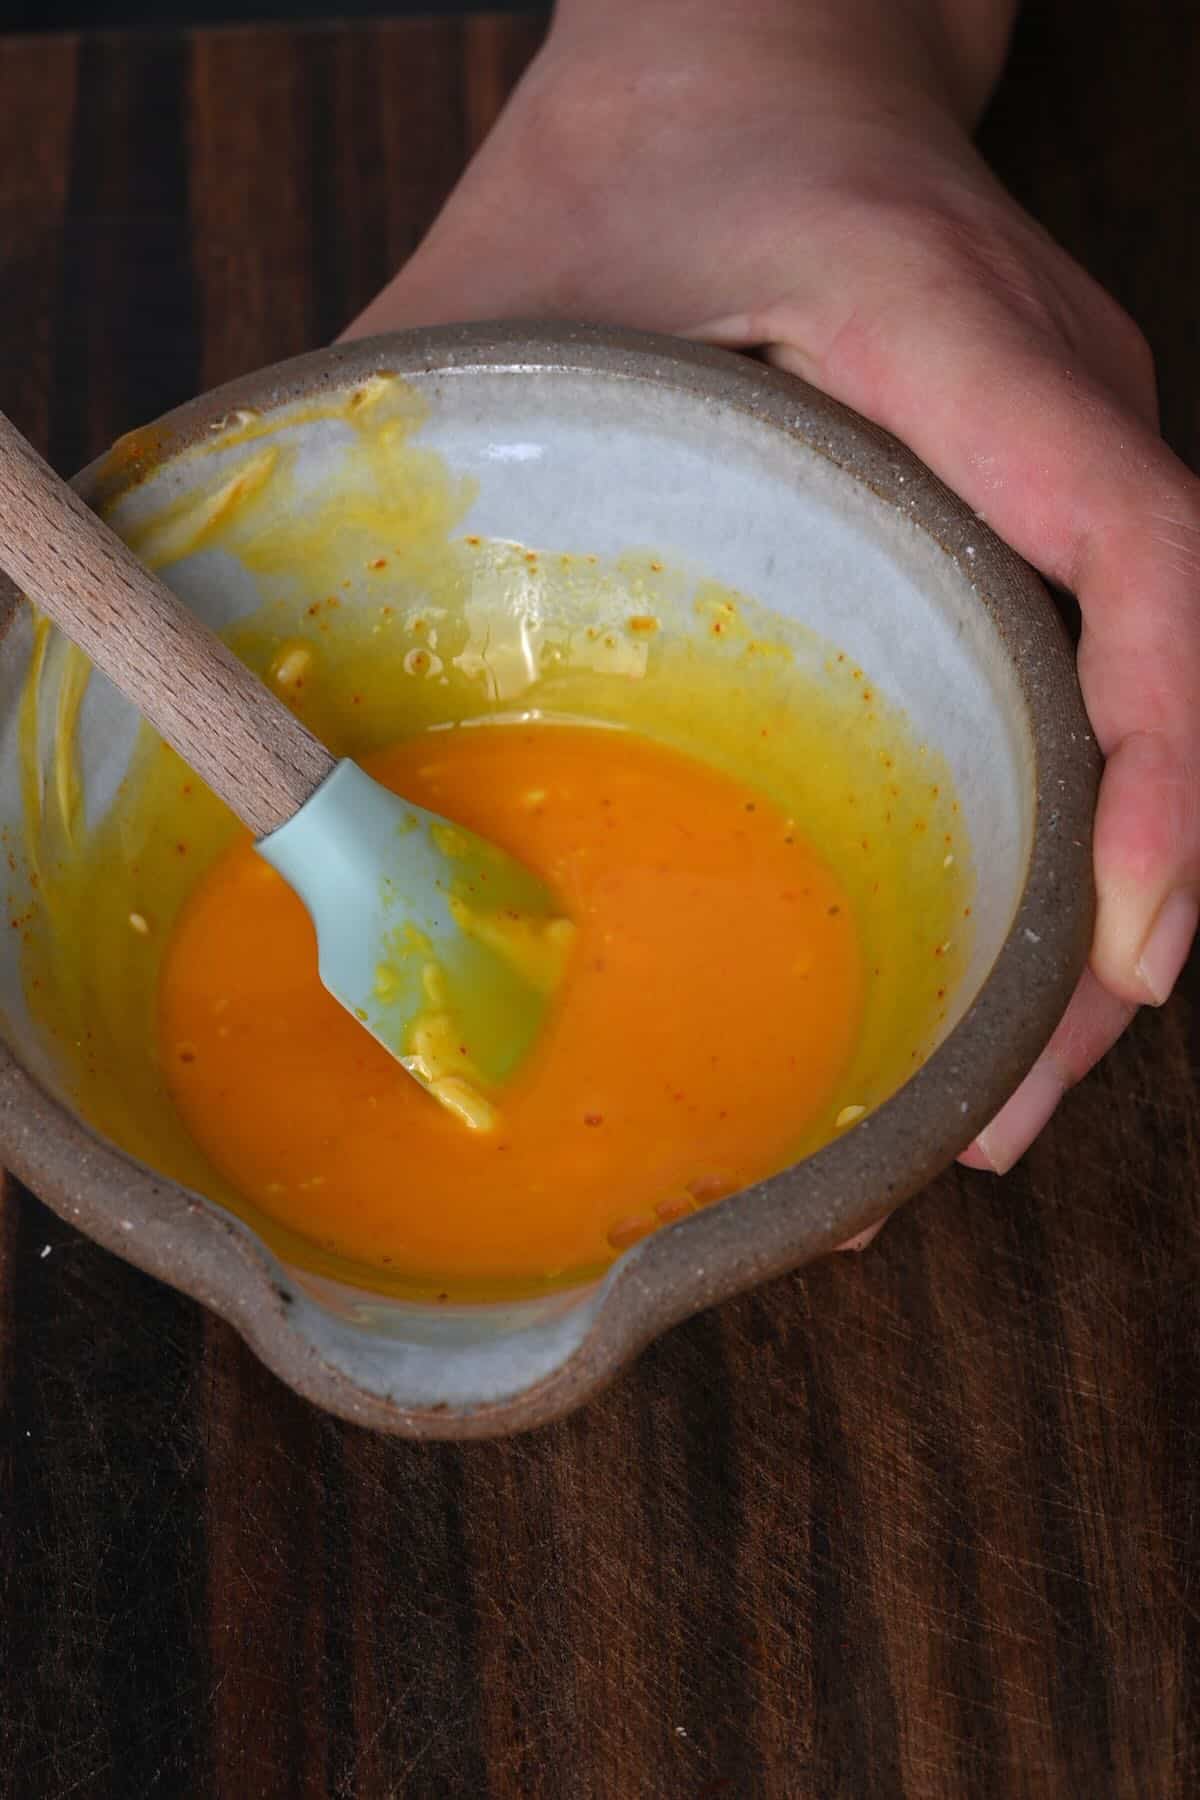
Combine the yogurt, saffron liquid, and egg yolk in a separate small mixing bowl. Stir well until thoroughly combined.
Finally, add 1/4-1/3 of the rice to the mixture and stir it until well coated in the mixture.
It’s also possible to add the entire amount of rice to the dish for a delicately scented saffron rice throughout.

Step 3: Cook the Tahdig
Heat the oil in a large, wide and deep, non-stick skillet (I used 7 in/18cm one, with a volume of about 10 cup/2 l). Then add the saffron rice mixture, using a spatula to even it across the entire pan base (this will become the fantastic crust!).
Obviously, the wider the pan, the more crispy rice you’ll have, but the thinner it’ll be!
Allow it to cook for several minutes (4-5) untouched before adding the remaining rice on top.
With the handle of a wooden spoon, poke holes in several places across the top of the rice (pressing it right down into the rice until the bottom) to allow steam to escape.
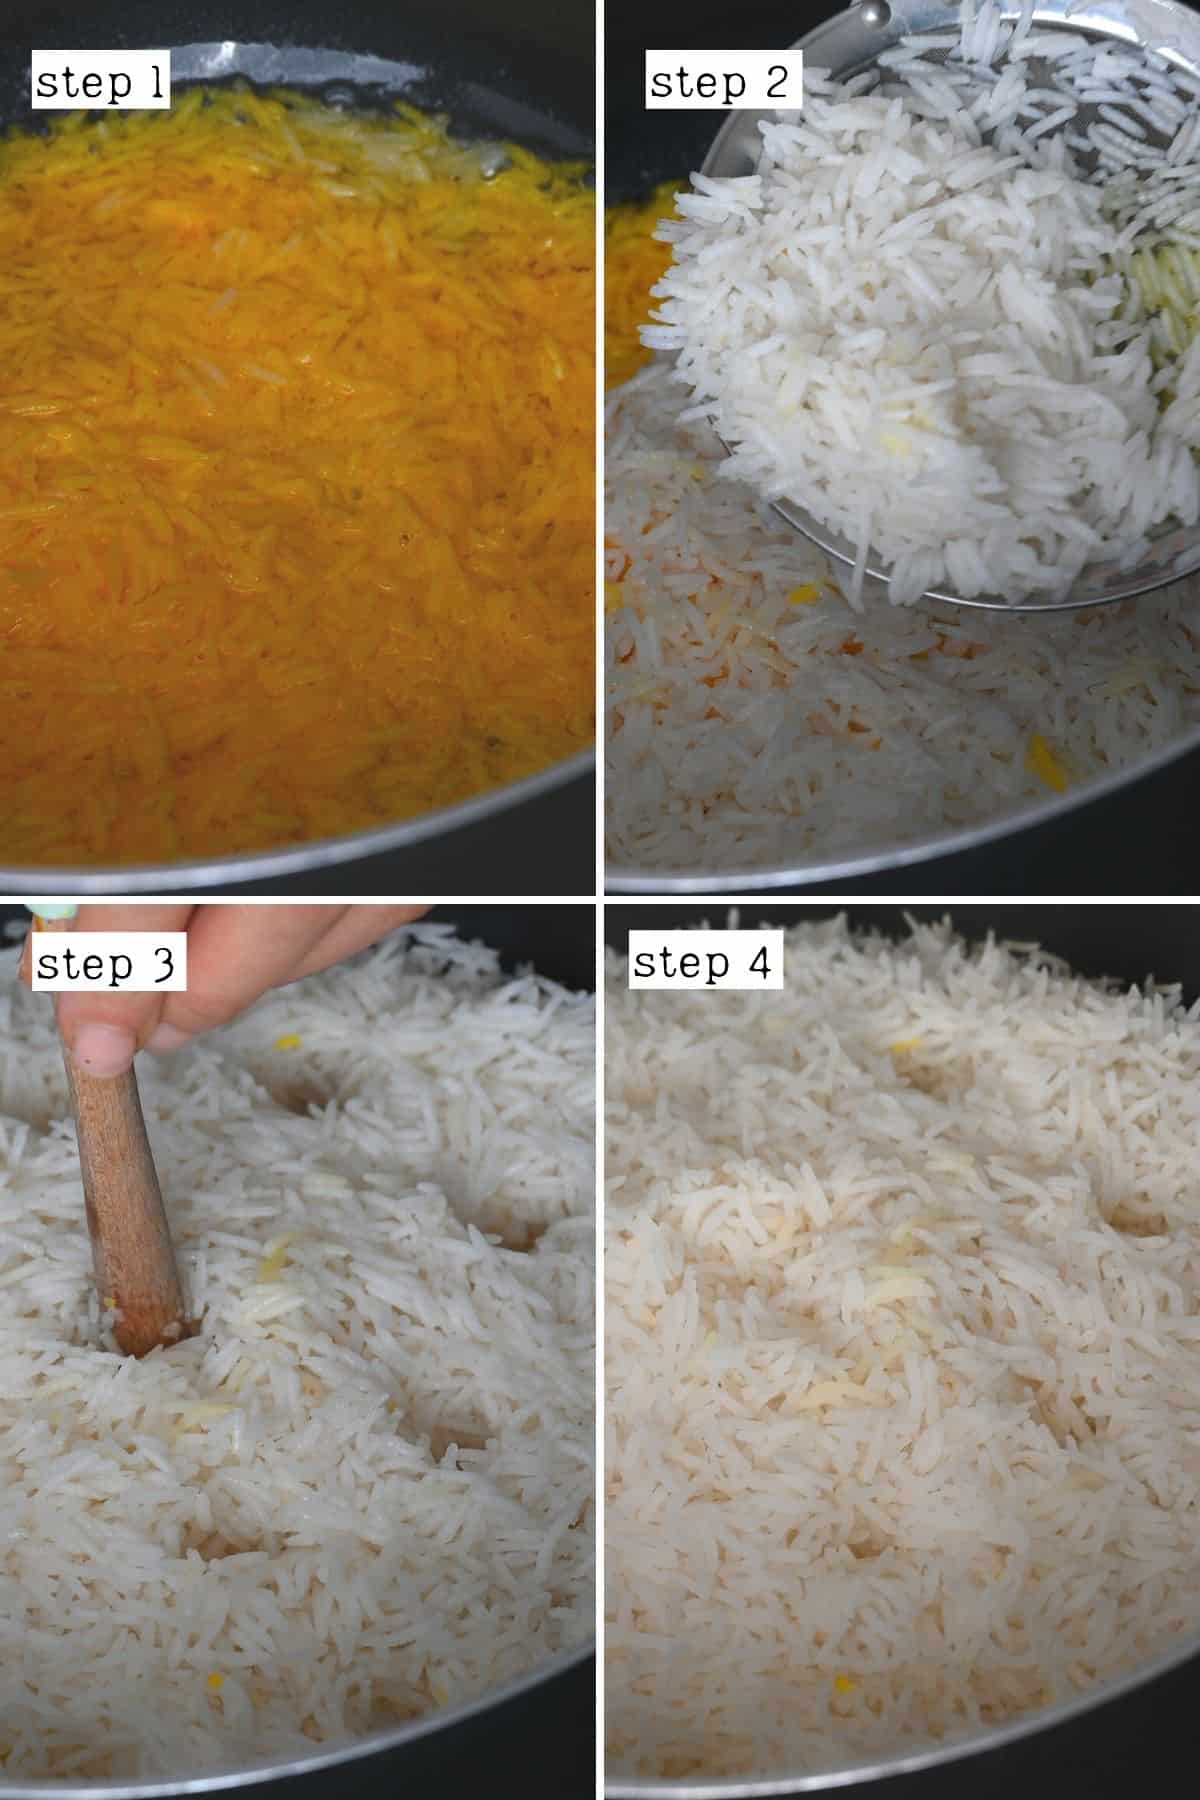
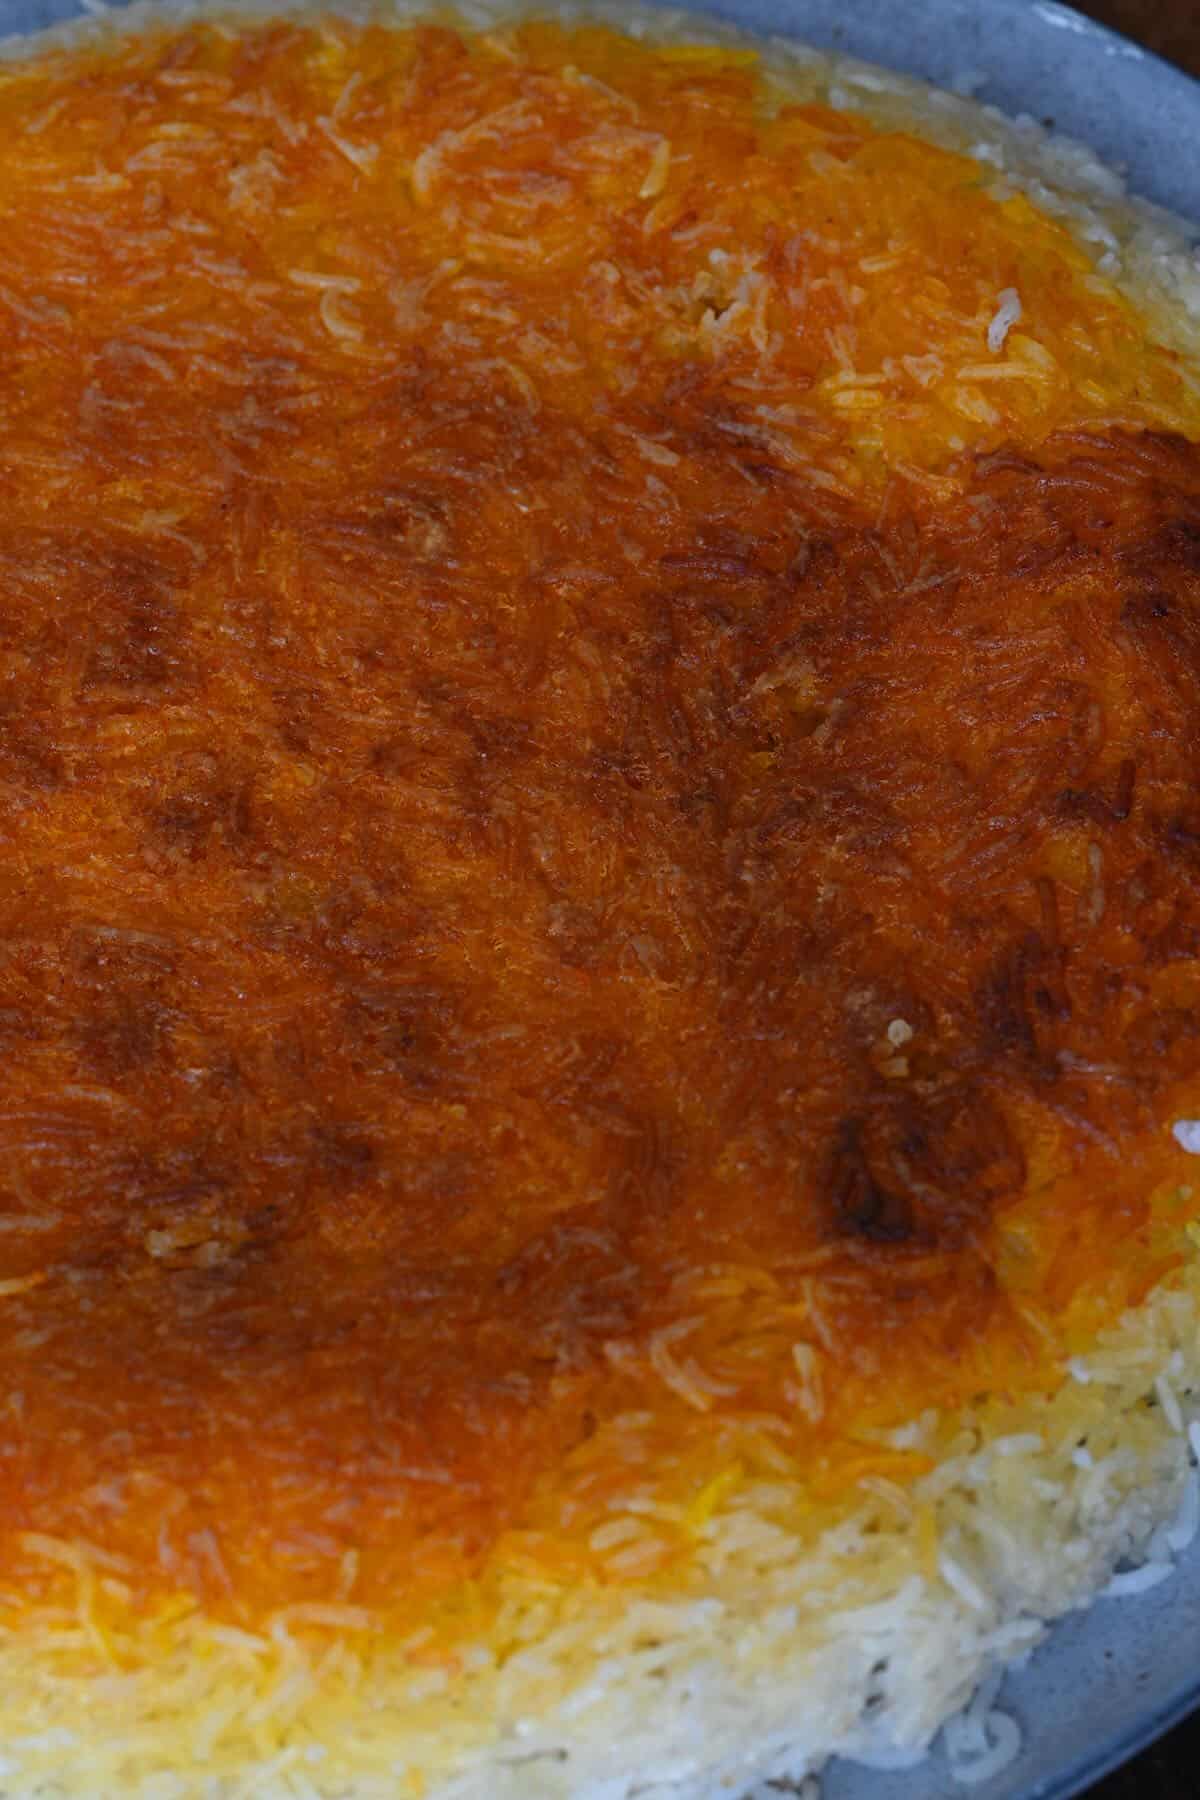
Then, cover the pot with a clean kitchen towel and a lid and cook it over low-medium heat for 30 minutes, or until the rice on top is tender, while the rice underneath and on the sides has formed a wonderfully golden, crispy crust.
I like to wrap the lid with a kitchen towel for the easiest (and safest) method. This will help to absorb the steam from the rice to allow the crispy golden crust to form and the rice on top not to become “wet.”
To check on the level of the rice, use a spatula or other flat utensil to slide between the side of the pan and the rice and gently lift it to check on the color of the rice at the bottom of the pot.
To serve, carefully flip the pan over onto a dish, so the crispy layer is now on top, and enjoy! Garnish if preferred with your toppings of choice (options above)!
How do you flip the rice?
I first run a spatula along the sides of the pan/rice to loosen it up slightly, if needed. Then, place your serving dish over the top of the pan, holding it in place. Then, carefully flip them over together, and the rice should drop down onto the pan. If some sticks, just use your spatula to help scrape it out and patch up the top.
What is Served with Tahdig?
Enjoying the tahdig recipe as written above makes it a delicious side for several dishes, including:
- Roast whole chicken
- Kofta kebab
- Chicken shish tawook
- Fried or grilled fish
- Stews – like this comforting pea stew (bazella) or fasolia butter bean stew
- Roasted/Grilled vegetables
- Yogurt cucumber sauce (traditionally Mast-o Khiar, but I’ve used a Lebanese version).
You can also layer the rice with meat/veggies while cooking it, and turn it into a hearty one-pan meal!
How Make Ahead and Store?
Store: unsurprisingly, the crispy tahdig layer is best enjoyed immediately and won’t store well. However, the rice beneath it can be stored in the refrigerator for 3 days in an airtight container.
Freeze: as above, you can freeze the leftover rice, but not the tahdig. I like to portion mine into freezer-safe containers or bags and store for 3-4 months.
Reheat: to reheat from frozen, add a splash of water to the rice and microwave it until heated through. From chilled, follow the same method or reheat it on the stovetop over low/medium (with a splash of water) until warmed.
FAQs
While it is possible, it would have to be very well seasoned, and, even then, it will require longer to cook and may have some issues with sticking. However, feel free to experiment.
Avoid doing this excessively. However, if you want to check on the rice once part-way through to make sure it’s crisping/not burning, just do so quickly and replace the lid – it shouldn’t ruin the dish!
While leftover cooked rice is freezable, the tahdig layer won’t freeze well.
Absolutely, though, make sure to still include yogurt (or dairy-free yogurt) to help bind the tahdig.
Recipe Tips and Notes
- The cooking time may vary: based on the depth of your pan and the exact heat levels, etc. So check on it at 25 minutes to begin, then increase the time as needed (you can then keep the accurate time in mind for next time – though if you use a different pan, heat, etc., this can once again affect the timing). No two batches are exactly the same!
- To avoid sticking: a non-stick pan can do a lot of the work for you. I’ve also heard a tip where people scrunch up a circle of parchment paper. Cut to fit the bottom of your pan size and place it before the rice and butter. However, I’ve never tried the method.
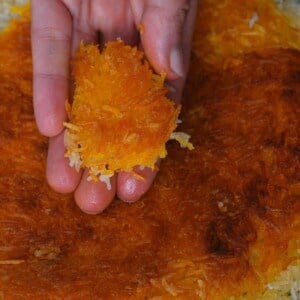
- If it still sticks: fill your kitchen sink with an inch or two of cold water. Set the pot inside it for a few seconds. If that still doesn’t work, don’t worry; it”ll still taste delicious. And, if you want to make the mistake look purposeful, then chip up all the crispy tahdig into smaller pieces, voila!
- Don’t skip the holes: It’s particularly important to poke plenty of holes through to the bottom layer of rice when cooking as they’ll allow steam to escape, which is imperative to a wonderfully crispy, golden crust.
- For even browning: if you have a stovetop/pan with hotspots, you can rotate your pan a quarter turn every 5 minutes for more even browning. If you’re working over a flame, using a “flame tamer” can help to disperse the heat evenly.
- Practice makes perfect: Tahdig is one of those dishes that people perfect over many years and tweaking, so if it doesn’t go 100% the very first time, try again!
More Rice Recipes
- Simple Persian fluffy dill rice
- Lebanese rice with vermicelli
- Fluffy, perfect jasmine rice
- How to make sushi rice
- Indonesian Nasi Uduk (coconut milk rice)
- Cilantro lime rice
- How to cook brown rice perfectly
- Simple coconut rice
- Filipino Garlic Fried Rice (Sinangag)
If you try this Persian crispy rice (tahdig) recipe, I’d love to hear your thoughts and questions below. Also, I’d appreciate a recipe card rating below, and tag me in your recipe recreations on Instagram @Alphafoodie!
Classic Persian Crispy Rice (Tahdig)
Ingredients
- 2 cups rice Basmati is best, but other long-grain white rice should work
- 2 Tbsp salt to soak the rice
- pinch saffron 10-20 threads
- 2 tsp water to dilute the saffron
- 1 Tbsp plain yogurt Natural/Greek or plain vegan yogurt if preferred.
- 1 egg yolk omit for a vegan version
- 1/3 cup oil any neutral cooking oil
- 1/3 cup butter melted, or clarified butter/ ghee
Check the blog post for optional add-ins and recipe variations!
Instructions
Step 1: Prepare the Rice
- Rinse the rice well (until the water runs almost clear) and transfer it to a large bowl. Add some water to the bowl to cover the rice with an extra 1-2 inches of water PLUS 2 Tbsps salt and stir. Then leave it to soak for 3-6 hours.
- Once it's ready, bring a pot of salted water to a boil and, after rinsing the soaked rice, add it to the pan to boil for 2 minutes. To know if the rice is ready, you can test a couple of grains – they should be soft on the outside with a bit of bite on the inside. If needed, boil the rice for 30-60 seconds longer. Then, drain, and rinse the rice once more with lukewarm water.Alternatively, you can choose not to soak the rice and instead par-boil it for 5 minutes, but the final texture of the dish is better when pre-soaking.
Step 2: Prepare the Remaining Ingredients
- To prepare the saffron, first, crush the threads gently into a powder and add them to 2 tsp of warm water, stirring well to dissolve it and allow it to steep/bloom for 5-10 minutes.Alternatively, you can add the saffron to an ice cube and allow it to naturally melt. This will yield better color extraction AND taste but take far longer.
- Combine the yogurt, saffron liquid, and egg yolk in a separate small mixing bowl. Stir well until thoroughly combined.
- Finally, add 1/4-1/3 of the rice to the mixture and stir it until well coated in the mixture.
Step 3: Cook the Tahdig
- Heat the oil in a large, wide and deep, non-stick skillet (I used 7 in/18cm one, with a volume of about 10 cup/2 l). Then add the rice mixture, using a spatula to even it across the entire pan base (this will become the fantastic crust!).Obviously, the wider the pan, the more crispy rice you'll have, but the thinner it'll be!
- Allow it to cook for several minutes (4-5) untouched before adding the remaining rice on top.
- With the handle of a wooden spoon, poke holes in several places across the top of the rice (pressing it right down into the rice until the bottom) to allow steam to escape.Use the butter to dot over the top layer of rice for extra richness and enhanced crispiness.
- Cover the pot with a clean kitchen towel and a lid and cook it over low-medium heat for 30 minutes, or until the rice on top is tender, while the rice underneath and on the sides has formed a wonderfully golden, crispy crust.I like to wrap the lid with a kitchen towel for the easiest (and safest) method. This will help to absorb the steam from the rice to allow the crispy golden crust to form and the rice on top not to become ‘wet.’ To check on the level of the rice, use a spatula or other flat utensil to slide between the side of the pan and the rice and gently lift it to check on the color of the rice at the bottom of the pot.
- To serve, carefully flip the pan over onto a dish, so the crispy layer is now on top, and enjoy! Garnish if preferred with your toppings of choice (see the blog post for options and serving recommendations)!
How do you flip the rice?
- I first run a spatula along the sides of the pan/rice to loosen it up slightly, if needed. Then, place your serving dish over the top of the pan, holding it in place. Then, carefully flip them over together, and the rice should drop down onto the pan. If some sticks, just use your spatula to help scrape it out and patch up the top.
Storing Instructions
- Store: unsurprisingly, the crispy tahdig layer is best enjoyed immediately and won’t store well. However, the rice beneath it can be stored in the refrigerator for 3 days in an airtight container.Freeze: as above, you can freeze the leftover rice, but not the tahdig. I like to portion mine into freezer-safe containers or bags and store for 3-4 months.Reheat: to reheat from frozen, add a splash of water to the rice and microwave it until heated through. From chilled, follow the same method or reheat it on the stovetop over low/medium (with a splash of water) until warmed.
Notes
- The cooking time may vary: based on the depth of your pan and the exact heat levels, etc. So check on it at 25 minutes to begin, then increase the time as needed (you can then keep the accurate time in mind for next time- though if you use a different pan, heat, etc., this can once again affect the timing). No two batches are exactly the same!
- To avoid sticking: A non-stick pan can do a lot of the work for you. However, I’ve also heard a tip where people scrunch up a circle of parchment paper (cut to fit the bottom of your pan size) and place it before the rice and butter. However, I’ve never tried the method.
- If it sticks: fill your kitchen sink with an inch or two of cold water and set the pot inside it for a few seconds. If that still doesn’t work, don’t worry; it’ll still taste delicious. And, if you want to make the mistake look purposeful, then chip up all the crispy tahdig into smaller pieces, voila!
- Don’t skip the holes: it’s particularly important to poke plenty of holes through to the bottom layer of rice when cooking as they’ll allow steam to escape, which is imperative to a wonderfully crispy, golden crust.
- For even browning: if you have a stovetop/pan with hotspots, you can rotate your pan a quarter turn every 5 minutes for more even browning. If you’re working over a flame, using a “flame tamer” can help to disperse the heat evenly.
- Practice makes perfect: Tahdig is one of those dishes that people perfect over many years and tweaking, so if it doesn’t go 100% the very first time, try again!
Nutrition
Nutrition information is automatically calculated, so should only be used as an approximation.


SO GREAT – it came out perfectly. We used to live with an Iranian roommate and missed the amazing crispy rice. Did this in a le creuset dutch oven – perfection.
COMMENT: we were not sure where the butter went – it’s not in the directions? We guessed and dumped it in the spoon holes because that’s what our friend always did.
Thank you so much for your sweet comment, Kim. You can use the butter to dot over the top layer or as you’ve done, pour it in the holes. 🙂
When does the butter go in?
Hi Lynne! The butter is dotted over the rice before cooking. I’ve adjusted the recipe to make this clearer—thanks for your feedback!
WHAT WAS THE BUTTER FOR!!???
Hi John! The butter is used to dot over the top layer of rice before cooking, helping to add richness and enhance the crispy tahdig layer at the bottom. If it wasn’t mentioned clearly in the instructions, I’ll make sure to update that—thanks for pointing it out!