
This post may contain affiliate links. Please read our disclosure policy.
A simple whole-wheat bread (brown bread) recipe for beginner bread makers – super simple and just a few ingredients needed for a delicious, fresh loaf of bread
It’s official, I’ve now spent so much time at home that I’m fully investing in becoming a dough-making goddess. If you follow me on Instagram you’ll notice that I’m now doing live cook-alongs and have previously done one for this homemade pita. I also have a Neapolitan pizza dough cook-along coming up. Now it’s time to share this simple bread recipe; delicious whole wheat bread.
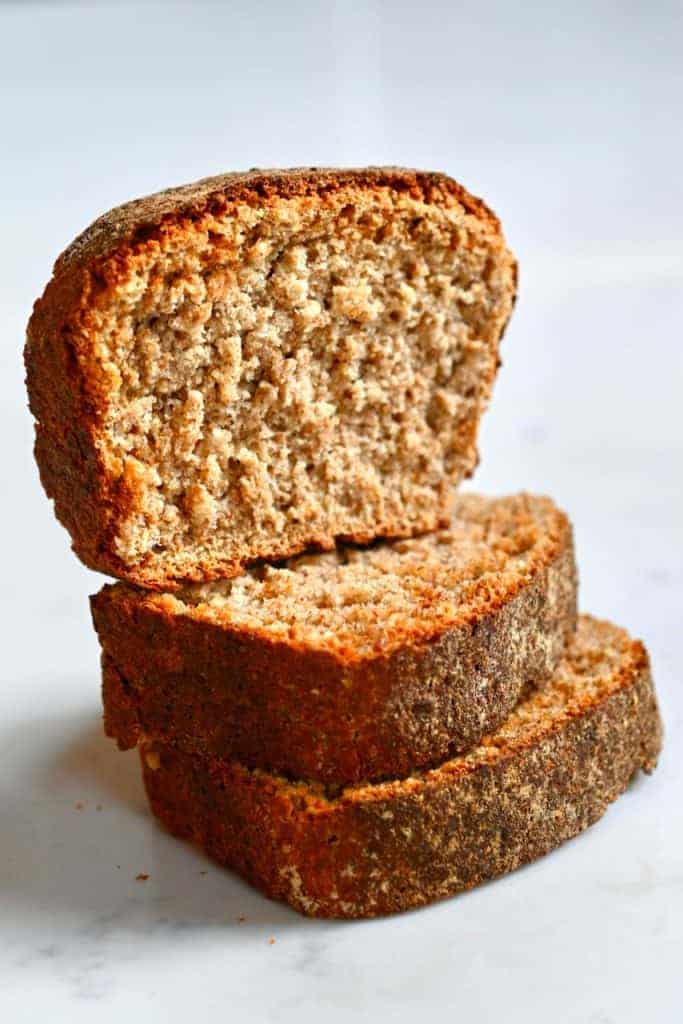
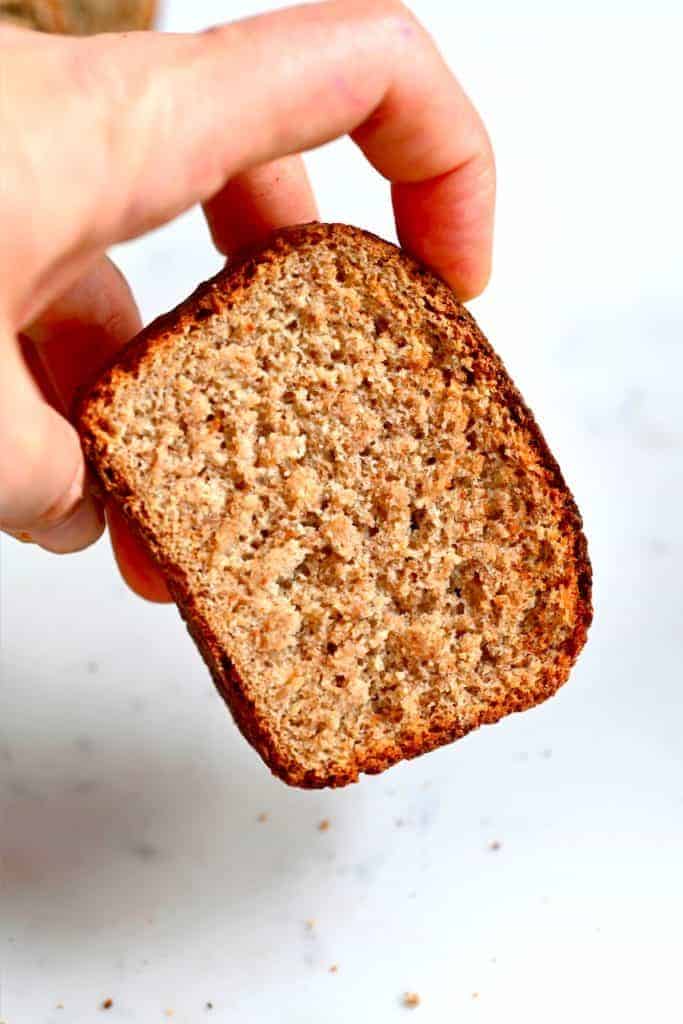
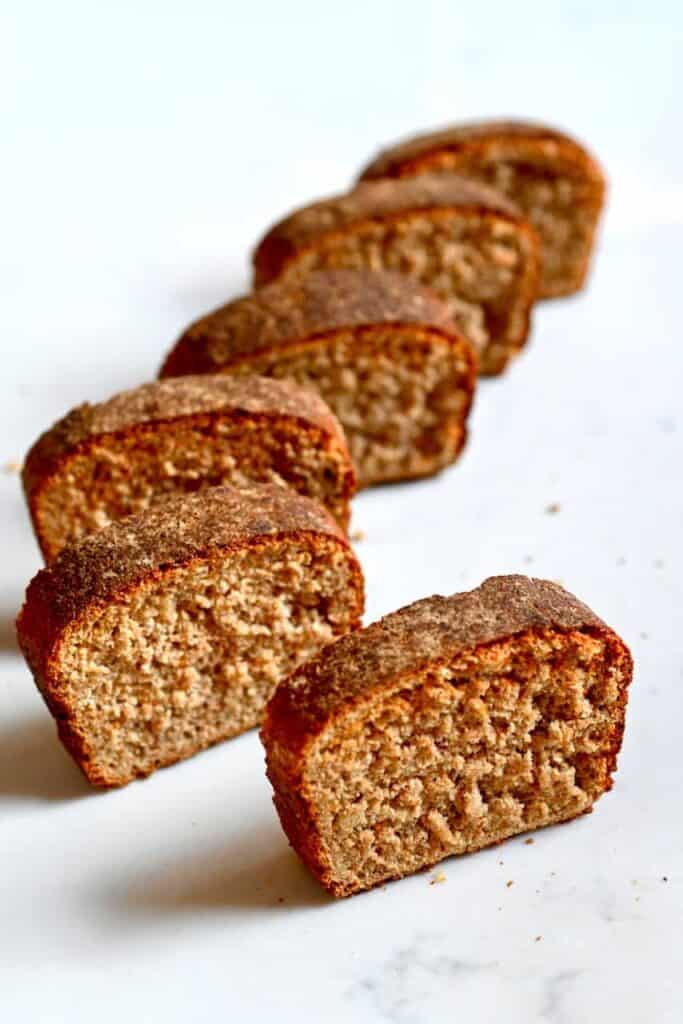
With grocery slots becoming harder and harder to find and popping out to the shops becoming more worrisome as the ‘peak’ of this situation is set to hit the UK any day now, I thought it would be the perfect time to make some delicious homemade bread. This golden-brown loaf is great as a sandwich bread or for toasting etc.
As bread recipes go, I’ve tried to keep things as simple as possible – we’re all beginners here (or maybe not) so I want to make the bread-making process as straightforward as I can. I know the prospect of actually making bread can seem really daunting to those who may never have tried it before, but I’ve actually realized that it’s something I really enjoy and there are definitely simple methods out there for all levels of baker (no bread machine needed!).
You won’t catch me churning out technical bread-making terms or discussing my sourdough starter just yet, anyway. Give it another couple of weeks of being indoors and we’ll see…
Want to save this recipe?
A few benefits of making homemade bread
Aside from the aforementioned issues above with actually getting a shop done these days, there are a few reasons why homemade bread is a winner.
- When making homemade bread, you’re able to experiment with flavors and toppings and get really creative.
- Bread making is also incredibly cost-efficient. Especially when you are able to customize them.
- There’s honestly nothing better than a slice of warm, just-baked bread from the oven with some dairy-free butter – yumm!
- You don’t have to worry about there being any odd preservatives or ‘extra ingredients’ in your creations
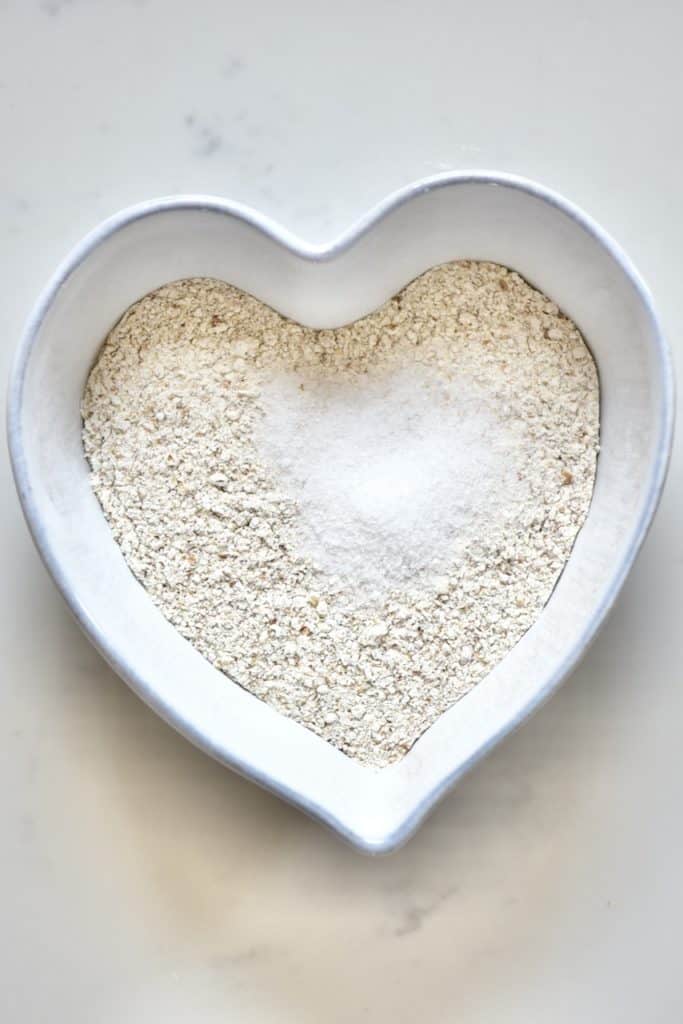
- Plus, you can also be in charge of the nutrients going into your bread- whether this is by controlling the salt level, adding protein with seeds, etc.
You are also in charge of the exact fermentation and rising method – which can result in different bread textures and tastes. For example, with this wholewheat bread, I decided to use a poolish method.
What is poolish?
If you haven’t already seen my recent Pizza dough recipe, then you may not know what a poolish is – but don’t worry it’s nothing scary.
Poolish is a preferment for your bread using a mixture of yeast, warm water, and flour. This is left to ferment over a long period of time then added to your bread dough ingredients and provides a richer flavor and crustier crust.
If you have fresh yeast then, of course, I say go for using that. There are lots of arguments about fresh vs active dry yeast vs instant dry and which is better for what and why. Like I said though, we’re all beginners here and I used dried instant yeast for this recipe, as it’s more readily available to all and incredibly easy to use.
A Few Additional Notes
- This recipe is for a small tin loaf. for a larger loaf then simply double the ingredients.
- This bread is incredibly freezer friendly and can be stored at the best quality for about 3 months, but will be okay to consume for far longer. When storing bread in the freezer, I like to slice my bread, with parchment paper between each slice, so I can take out exactly how much I need at a time. Make sure to tightly wrap your bread in a freezer-safe wrap or freezer bag.
- When storing homemade bread at room temperature, then it will last between 4-5 days when stored in a bread box or in a sealable bag.
- In terms of toppings, I left this loaf bare. However, you could add a variety of toppings including mixed seeds; black sesame, flaxseed, chia, pumpkin etc. Oats also work very well and whole wheat bran.
- Wholewheat bread, by nature, is dense. If you’re wanting a lighter bread then you can mix half white flour and half whole wheat instead of just wholewheat.
The Whole Wheat Bread How-To
Ingredients
For the poolish:
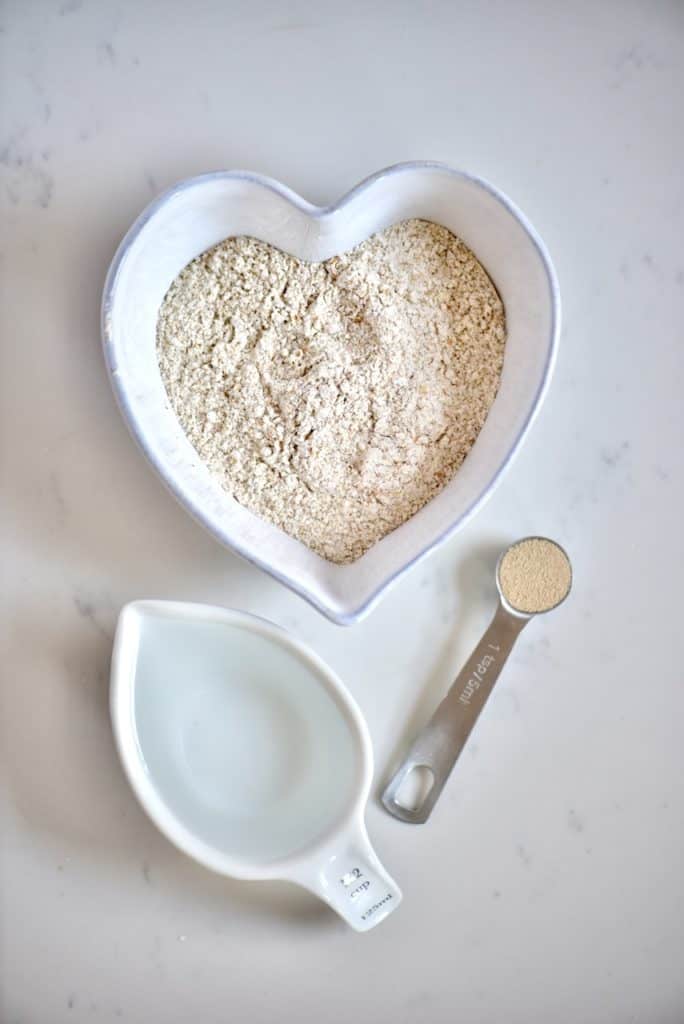
- dried yeast, warm water, wholewheat flour
For the dough:
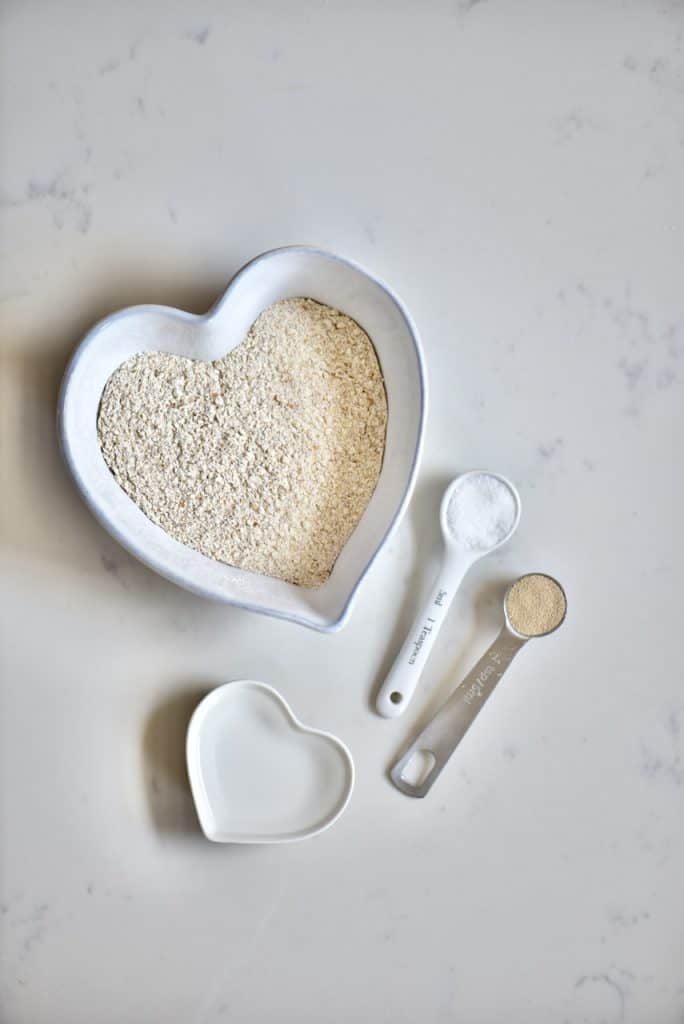
- water, dried yeast, wholewheat bread flour, salt
- olive oil for greasing the loaf tin
The Steps
Begin by preparing the poolish. First mix the yeast and the lukewarm water. Make sure the water is not too hot so it doesn’t kill the yeast.
Then, mix the flour into the yeast and water. Cover with a tea towel and set aside in a warm place for about 3 hours.
You can alternatively make the poolish the night before, for an extra-long fermentation (for more flavor).
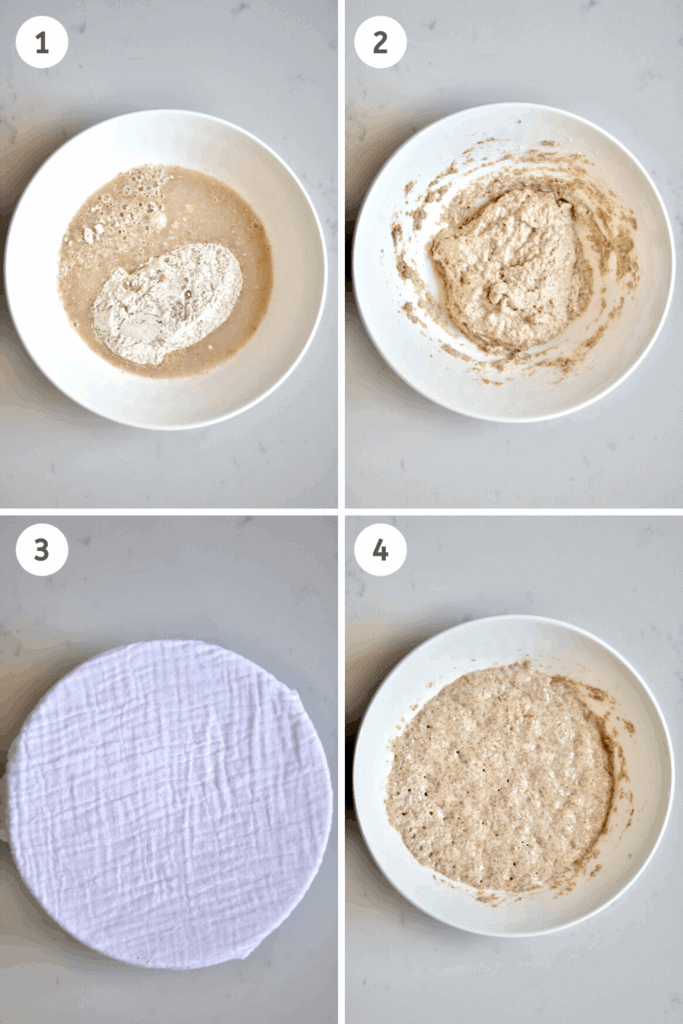
The poolish will be sticky and stretchy when it is ready.
For the main dough preparation, mix the yeast with the lukewarm water. Again, make sure the water is not too hot.


In a separate large bowl, mix the dry ingredients; flour and salt.
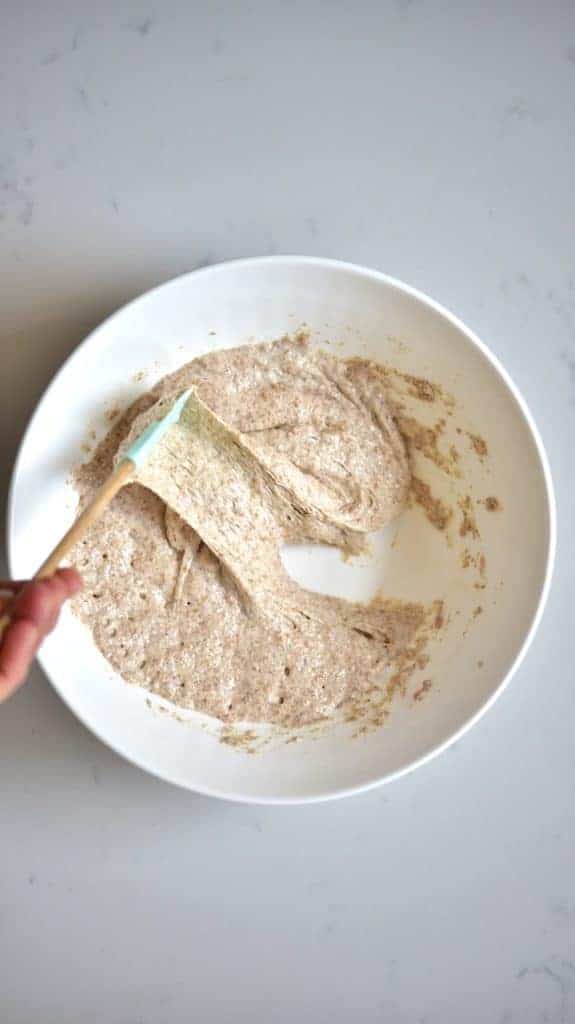
Add the yeast to the flour and then add the poolish. Combine well until you get a sticky dough – making sure to work round the sides of the bowl, to collect all the dough together.
Knead the dough for 10-15 minutes until it becomes soft and elastic.
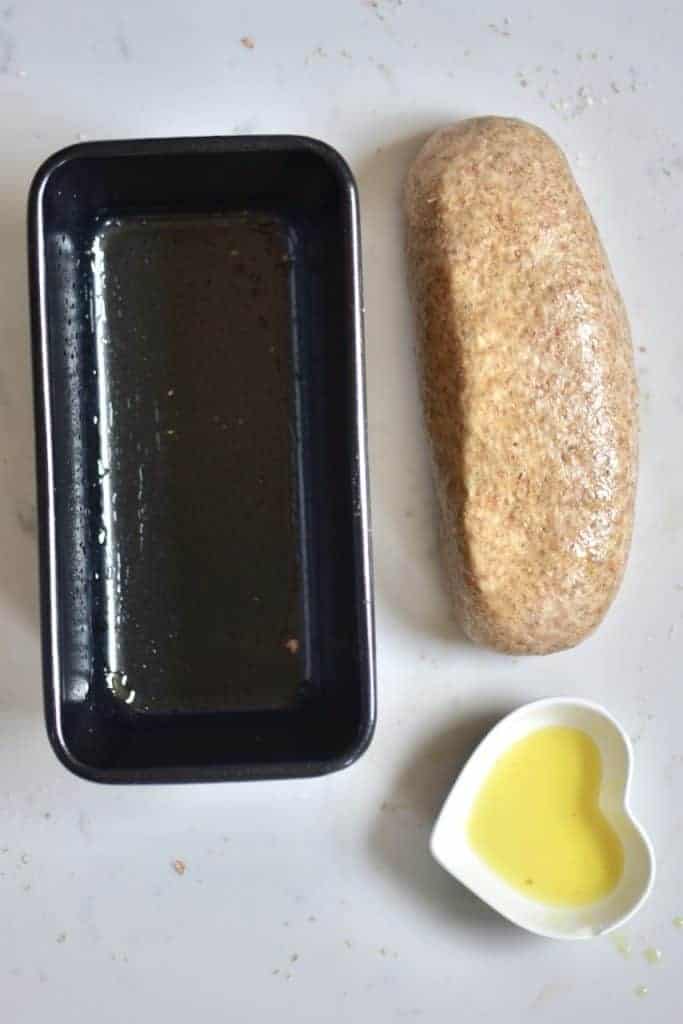
Place on a greased bowl (I used olive oil for greasing). Brush the dough with some olive oil, then cover with a tea towel. Make sure it well tucked, so no air gets in. You could even use some cling film under the towel.
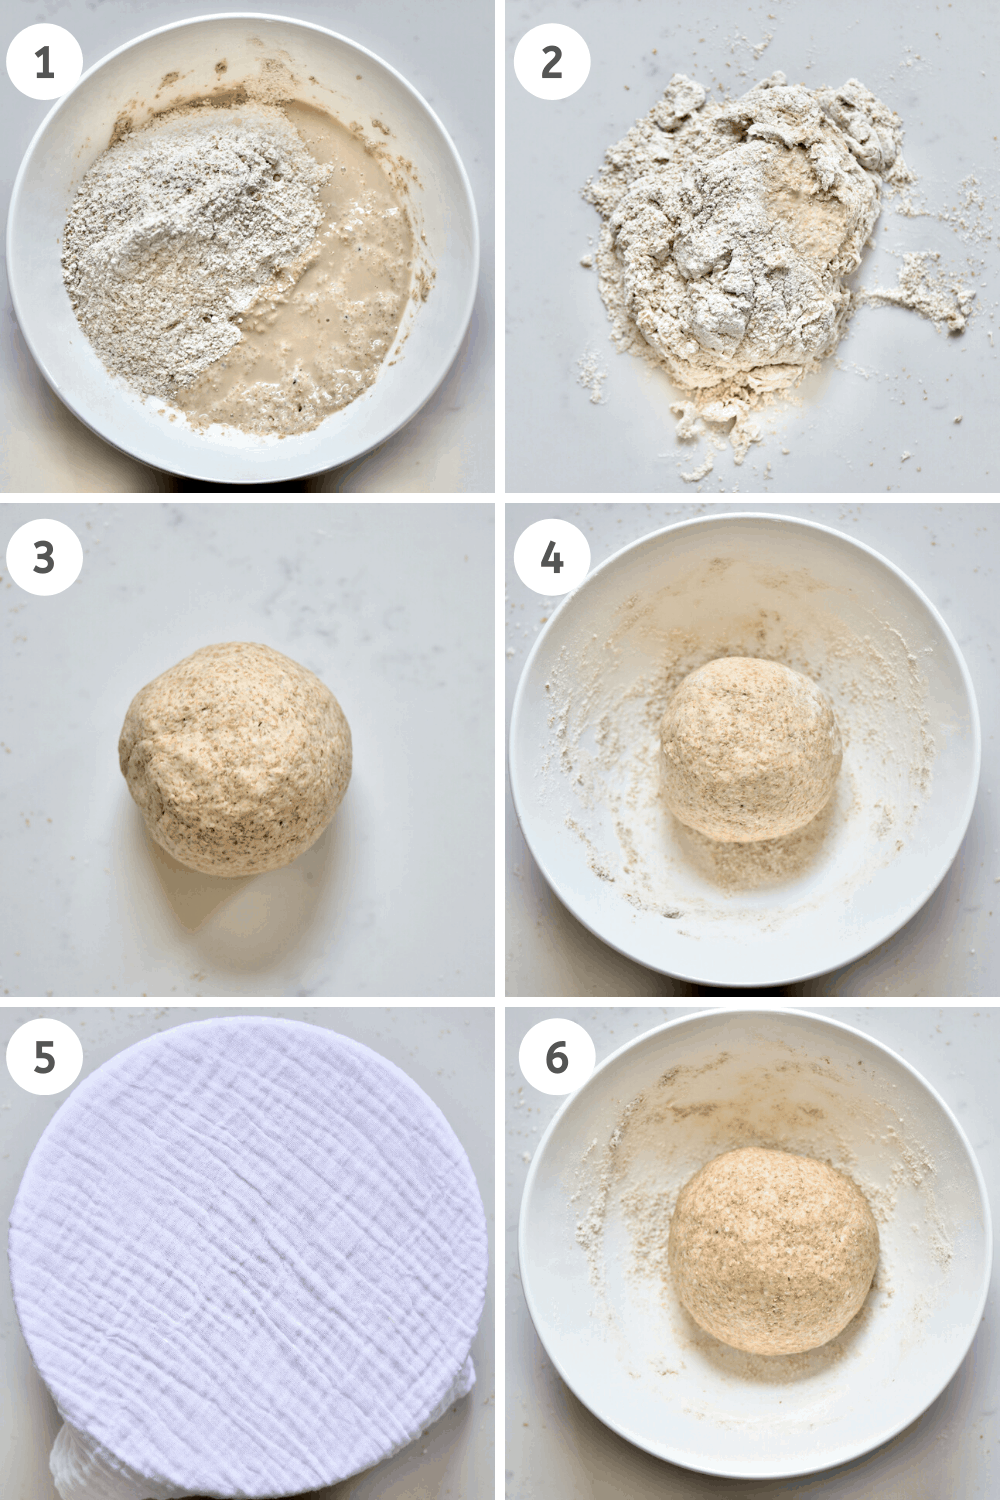
Allow the dough to rest in a warm environment for 1 hour- I usually place it in the oven (switched off!).
The dough will rise and will almost double in size but do note that wholewheat rises less than white flour dough.
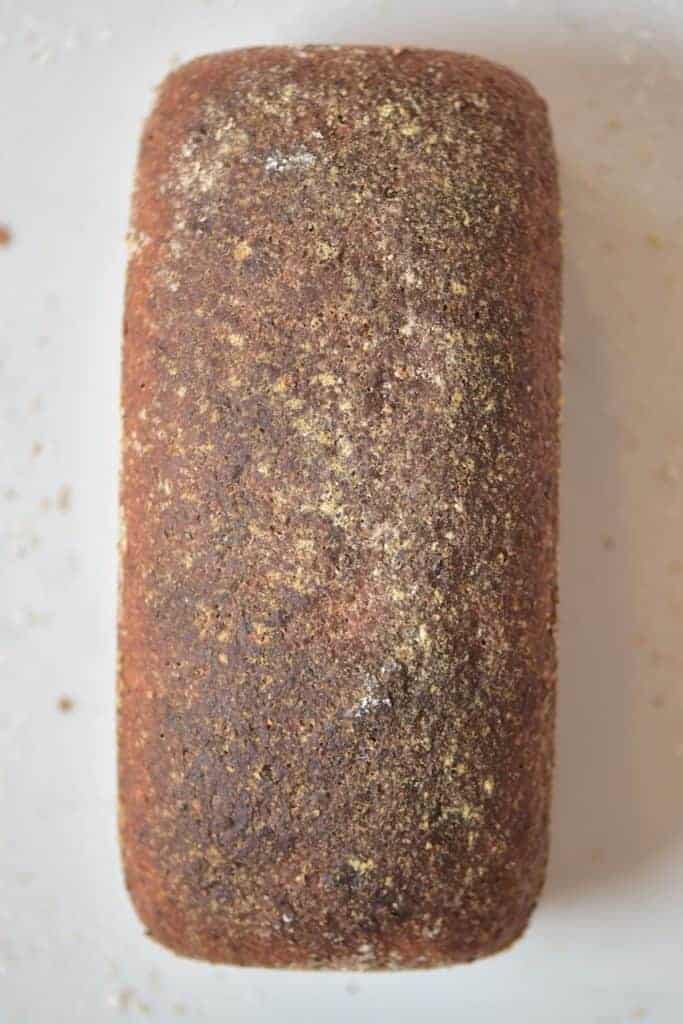
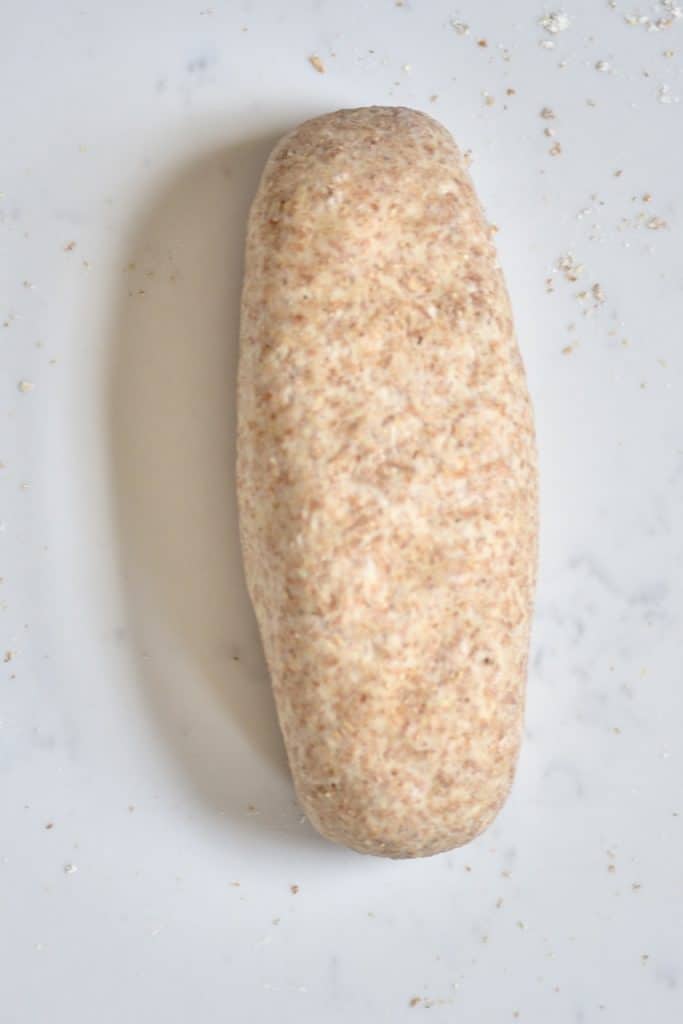
Roll the risen dough into a loaf shape, the size of your tin.
Note* If you’re wanting to add any ‘topping’ then place the dough top-side down in the topping of your choice then place top-side up in the loaf tin.
Then place it in a pre-greased loaf tin.
Dust with wholewheat flour and cover with the tea towel.
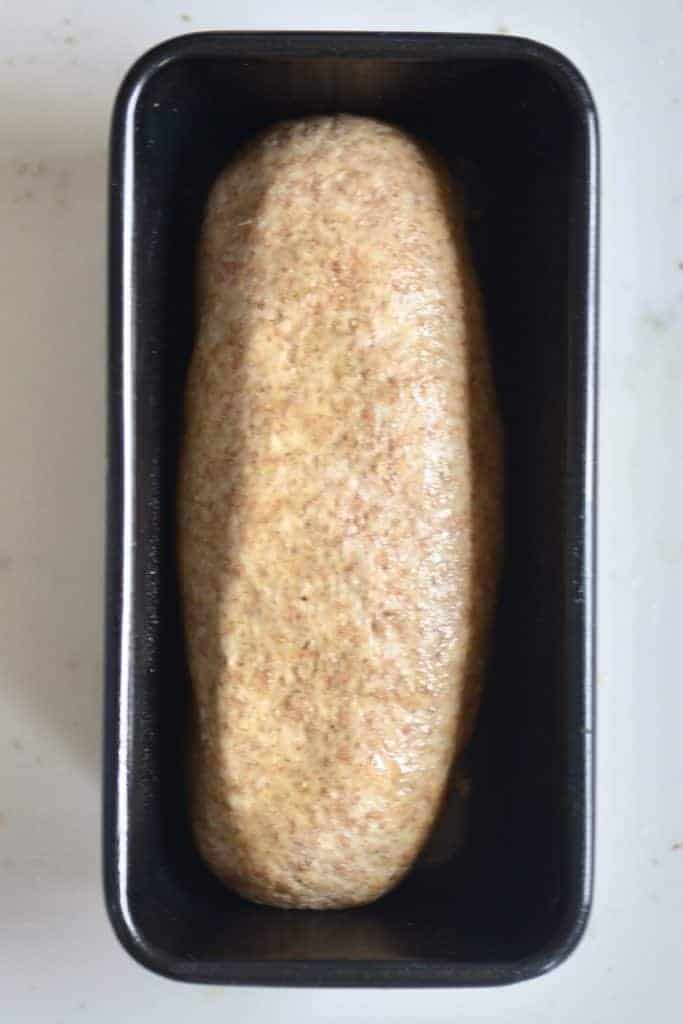
Set aside to rest for another 30 minutes.
In the meantime, preheat the oven. First place 2 baking trays as follows:
- One tray in the middle of the oven – this is where the bread loaf tin goes
- One tray in the bottom of the oven – this is where a bit of hot water goes just before baking the bread. The water helps keep the environment moist and will create a nice crispy crust.
Preheat the oven to 250ºC. Once the oven has reached the temperature, carefully pour a cup of water in bottom tray. Be careful as some of it will turn to steam instantly so make sure to protect yourself (hands and face).
Next, place the bread loaf tin with the dough on the middle shelf and bake for 25-30 minutes.
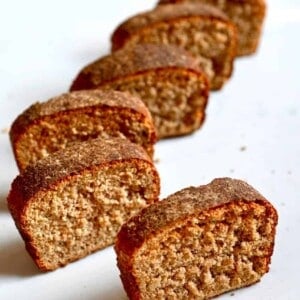
Once the bread is ready, allow it to cool down on a cooling rack. Then you can cut ( and eat) the bread.
Store in an airtight container at room temperature for 4-5 days. For freezer bread storage options then check my notes section above.

If you have any questions, leave a comment below Also, I love seeing your recreations so feel free to tag me on Instagram @AlphaFoodie.
Also, let me know if you’d like me to do a DIY for white bread too.
How to Make Wholewheat Bread at Home
Ingredients
For the poolish:
- 1 tsp yeast
- 1/2 cup warm water
- 3/4 cup whole-wheat flour
For the main part
- 3 tBsp water
- 1 tsp dried yeast
- 3/4 cup whole-wheat flour
- 2 tsp salt
- olive oil for greasing the loaf tin
Instructions
- Begin by preparing the poolish. First mix the yeast and the lukewarm water. Make sure the water is not too hot so it doesn’t kill the yeast.
- Then, mix the flour into the yeast and water. Cover with a tea towel and set aside in a warm place for about 3 hours. You can alternatively make the poolish the night before, for an extra-long fermentation (for more flavor). The poolish will be sticky and stretchy when it is ready. Check what the poolish looks like in the video on the blog.
- For the main dough preparation, mix the yeast with the lukewarm water. Again, make sure the water is not too hot.
- In a separate large bowl, mix the dry ingredients; flour and salt.
- Add the yeast to the flour and then add the poolish. Combine well until you get a sticky dough – making sure to work round the sides of the bowl, to collect all the dough together.
- Knead the dough for 10-15 minutes until it becomes soft and elastic.
- Place in a greased bowl (I used olive oil for greasing). Brush the dough with some olive oil, then cover with a tea towel. Make sure it well tucked, so no air gets in.
- Allow the dough to rest in a warm environment for 1 hour. I usually place it in the oven (switched off!). The dough will rise and will almost double in size but do note that wholewheat rises less than white flour dough.
- Roll the risen dough into a loaf shape, the size of your tin.* Then place it in a pre-greased loaf tin.
- Dust with wholewheat flour and cover with the tea towel. Set aside to rest for another 30 minutes.
- In the meantime, preheat the oven. First place 2 baking trays as follows:
-One tray in the middle of the oven – this is where the bread loaf tin goes
-One tray in the bottom of the oven – this is where a bit of hot water goes just before baking the bread. The water helps keep the environment moist and will create a nice crispy crust. - Preheat the oven to 250ºC. Once the oven has reached the temperature, carefully pour a cup of water in the bottom tray. Be careful as some of it will turn to steam instantly so make sure to protect yourself (hands and face).
- Next, place the bread loaf tin with the dough on the middle shelf and bake for 25-30 minutes.
- Once the bread is ready, allow it to cool down on a cooling rack. Then you can cut ( and eat) the bread.
- Store in an airtight container at room temperature for 4-5 days. For freezer bread storage options then check my notes section above.
Video
Notes
- This recipe is for a small tin loaf. for a larger loaf then simply double the ingredients.
- This bread is incredibly freezer friendly and can be stored at the best quality for about 3 months, but will be okay to consume for far longer. When storing bread in the freezer, I like to slice my bread, with parchment paper between each slice, so I can take out exactly how much I need at a time. Make sure to tightly wrap your bread in a freezer-safe wrap or freezer bag.
- When storing homemade bread at room temperature, then it will last between 4-5 days when stored in a bread box or in a sealable bag.
- In terms of toppings, I left this loaf bare. However, you could add a variety of options including mixed seeds; black sesame, flaxseed, chia, pumpkin, etc. Oats also work very well and whole wheat bran.
- Wholewheat bread, by nature, is very dense. If you’re wanting a lighter bread then you can mix half white flour and half whole wheat instead of just wholewheat.
Nutrition
Nutrition information is automatically calculated, so should only be used as an approximation.


Nice one, please can i use only salt and water with yeast to make wheat bread
Hi,
You shouldn’t add salt to the yeast – that will kill it. The salt is added to the flour after the poolish and second yeast mix are ready. I hope this helps.
I tried your simple multigrain bread loaf recipe and am absolutely in love with how easy it is to make bread at home! Thank you!
Now I’m super interested in this recipe because of the poolish – absolutely love the recipe for the possibility of deeper and more well developed flavours, however wanted to double check some stuff.
When you say to leave the poolish overnight for extra-long fermentation, is that in the fridge or can it also be in room temp (say, 27C)?
Also, I use instant yeast, and 6g total of yeast for 200g of wholewheat flour sounds a tad much – is the quantity right?
I’m wondering if it’s possible to use 1g of yeast in the poolish and 3g in the bread making part?
Hi Joyce,
I’m so happy to hear.
You will have to leave it at room temperature to ferment overnight.
Yes, the quantity is correct.