
This post may contain affiliate links. Please read our disclosure policy.


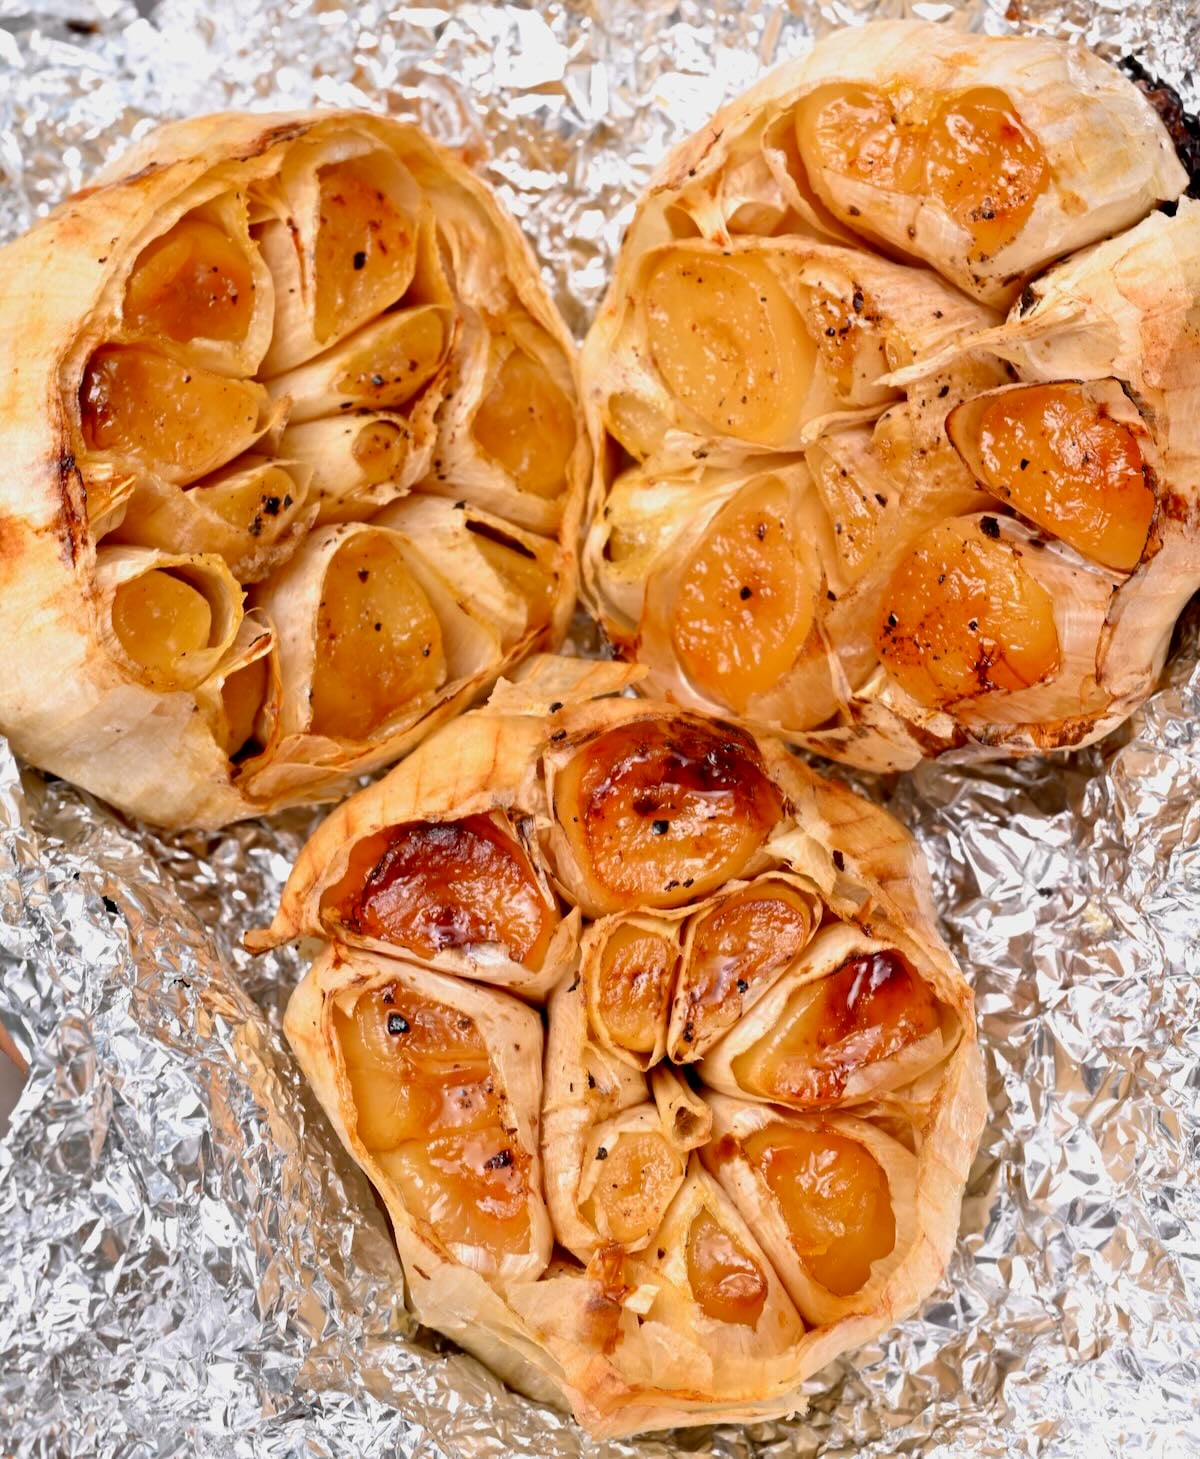
Roasted garlic is one of those small things that makes everything taste better. The cloves turn soft, sweet, caramelized, and almost buttery. They’re perfect for spreading on warm bread, mashing into potatoes, or stirring into soups, sauces, and dips.
I recently retested this post and tried a few different methods, including the classic whole-head oven version, the air fryer, and a faster peeled-clove option. If you’re wondering how to roast garlic, I’m sharing the main oven method below, along with the quicker tested variations, storage tips, and my favorite ways to use roasted garlic.
Roasted garlic is the one I keep coming back to when I want something sweet, soft, and deeply caramelized with very little oil. If you’re a garlic fan like me, you might also fall in love with garlic confit or Lebanese garlic sauce (toum).
Table of Contents
Ingredients
You only need a few simple ingredients to make roasted garlic:
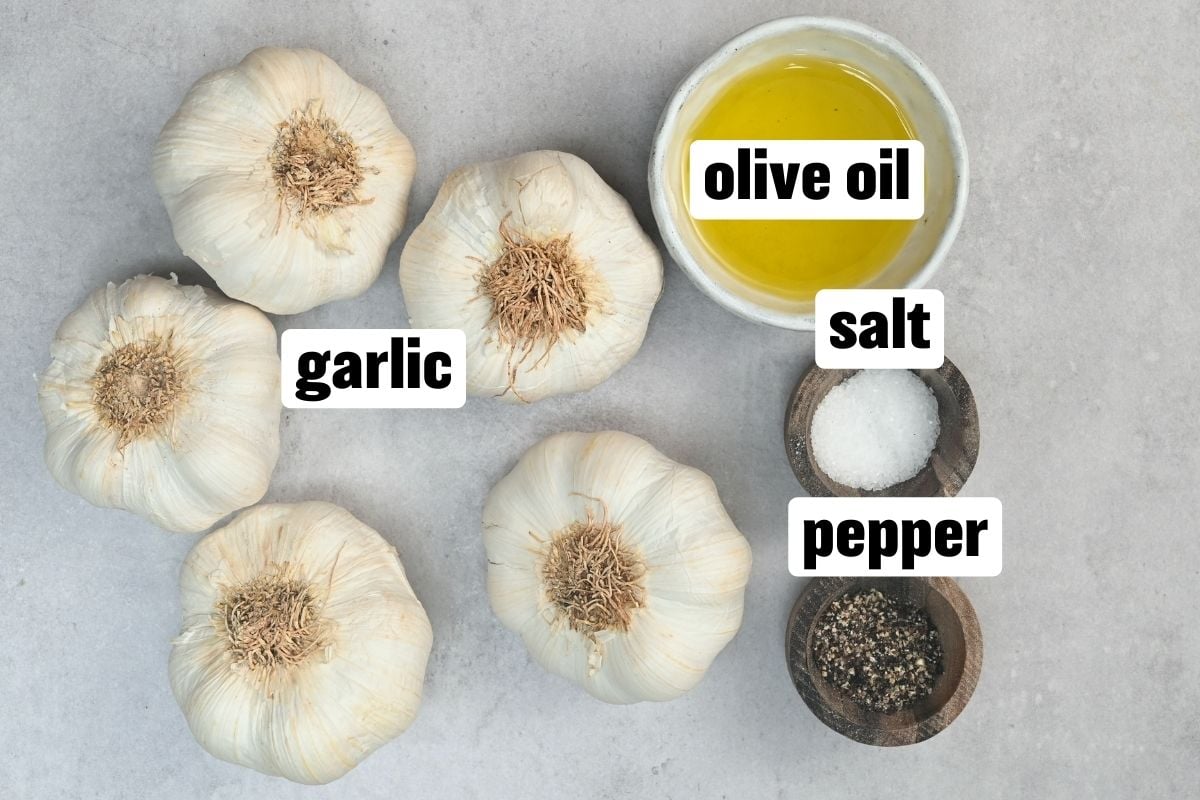
Garlic: Use whole garlic heads that feel firm and heavy for their size, with no soft spots or mold. If possible, choose bulbs that are similar in size so they roast evenly.
Olive oil: A little olive oil helps keep the exposed cloves from drying out as they roast and helps them turn soft, golden, and caramelized.
Salt and black pepper: I like adding a light sprinkle for extra flavor. It’s optional, but it makes the roasted garlic especially delicious if you want to spread it on bread or enjoy it straight from the cloves.
Optional herbs: A sprig of fresh thyme or rosemary can be added to the foil packet for extra flavor, though I usually keep it simple so the roasted garlic stays versatile.
See the printable recipe card below for the full ingredients list and quantities.
How to roast garlic in the oven
This is the classic method I use when I want soft, sweet, caramelized roasted garlic with almost no effort.
 trim the top
 season
 roasted garlic
 brush with oil
 foil packet
 squeeze out the cloves
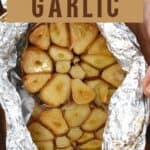
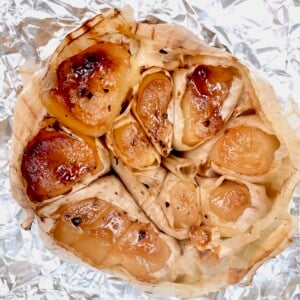
Prep the garlic: Preheat the oven to 400ºF/200ºC. Peel away any loose outer papery layers from the garlic bulb, but keep the head intact. Using a sharp knife, slice about ¼ inch off the top (the stem end, not the root end) to expose the tops of the cloves.
Season it: Place the garlic cut-side up on a piece of foil. Drizzle the exposed cloves with a little olive oil and, if you like, sprinkle lightly with salt and black pepper. You can set the garlic in a small ramekin, baking dish, muffin cup, or just directly on the foil to help it stay upright.
Wrap and roast: Wrap the garlic loosely in the foil so it’s enclosed but not pressed tightly against the cloves. Roast until the cloves are soft, golden, and spreadable, usually 40 to 50 minutes, depending on the size of the bulb and your oven. Start checking around the 35-minute mark. For deeper color, open the foil for the last 5 to 10 minutes so the tops can caramelize a little more.
Cool and squeeze: Let the garlic cool just enough to handle, then squeeze the roasted cloves out of their skins. They should be soft, creamy, and easy to mash into a paste.
Tested note: I also tested quicker variations in the air fryer and with peeled cloves, which I’ve included below. This whole-head oven method is still the one I’d use when I want the most classic roasted garlic result.
Air fryer roasted garlic


If you want roasted garlic faster, the air fryer works really well. In my tests, it gave a very similar result to the oven, just about 10 to 15 minutes faster. It’s a great option when you want roasted garlic without turning on the oven.
Trim about ¼ inch off the top of the garlic head to expose the cloves. Peel away any loose outer papery layers, keeping the bulb intact, then place it cut-side up on foil. Drizzle the exposed cloves with a little olive oil and lightly season with salt and black pepper, if using.
Wrap the garlic loosely in the foil to make a packet. Air fry at 370°F/190°C for 25 to 30 minutes, or until the cloves are soft and easy to squeeze from their skins. If you want deeper color, carefully open the foil for the last 3 to 5 minutes so the tops can turn more golden.
Let the garlic cool just enough to handle, then squeeze the cloves out and use as desired.
Roasted garlic cloves
 oil the cloves
 roasted cloves
If you want roasted garlic even faster, this peeled-clove method is a great option. It’s especially useful when you want a smaller amount for soups, sauces, dips, dressings, or mashed potatoes.
Place the peeled garlic cloves on a piece of foil or in a small baking dish. Drizzle with a little olive oil and lightly season with salt and black pepper, if using.
Fold the foil into a loose packet, or cover the dish loosely with foil. Roast at 400°F/200°C for 20 to 25 minutes, or until the cloves are soft, lightly golden, and tender. If you want a little more color, open the foil for the last few minutes.
Let the cloves cool slightly, then use them whole or mash them into a soft paste with a fork.
How to roast garlic in bulk
If you want to roast a larger batch of garlic, for example to freeze later, place multiple prepared garlic heads cut-side up in a baking dish. Drizzle with olive oil, cover tightly with foil, and roast until the cloves are soft and golden.
In my tests, this worked well, but it took about 10 to 15 minutes longer than roasting a smaller batch. For more color, remove the foil for the last 5 to 10 minutes, if needed.
")
")
")
How to store roasted garlic
Once cooled, transfer the roasted garlic to an airtight container and refrigerate within 2 hours.
In the fridge: Roasted garlic keeps well in an airtight container for up to 4 days.
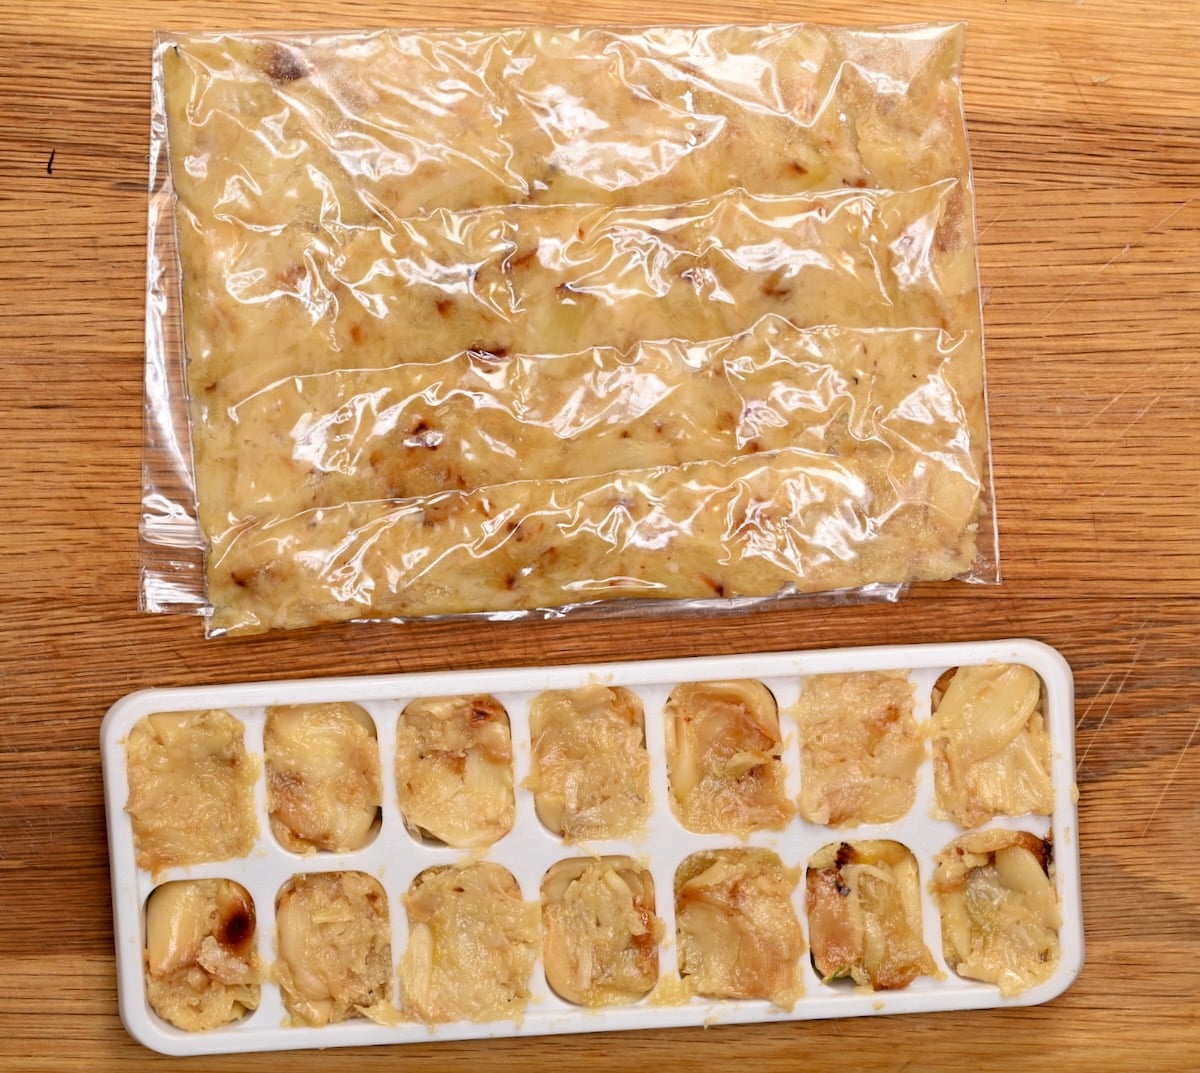
In the freezer: For longer storage, I prefer mashing the roasted garlic and freezing it in small portions for up to 3 months. An ice cube tray is especially handy for this, since you can pop out just what you need. You can also spread the mashed garlic in a zip-top bag, flatten it into a thin layer, and divide it into portions before freezing.
To use from frozen: Thaw a portion in the fridge or let it sit at room temperature for a few minutes, then use it as usual. You can also add frozen roasted garlic straight to hot soups, sauces, or mashed potatoes.
How to use roasted garlic
Roasted garlic is one of those ingredients that instantly makes a dish taste deeper, sweeter, and more savory. Because it’s much mellower than raw garlic, you can spread it, mash it, or stir it into all kinds of recipes.
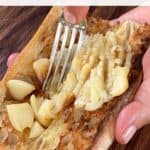
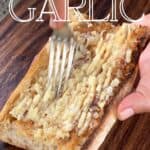
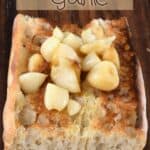
- Spread it on bread: Mash the cloves onto warm bread, toast, or focaccia, or use them to make roasted garlic bread.
- Stir it into mashed potatoes: Roasted garlic melts right in and adds rich flavor without the sharpness of raw garlic. I especially love it in creamy mashed potatoes.
- Add it to soups and sauces: It’s especially good in creamy soups and blended sauces. I love it in roasted garlic potato soup, tomato soup, marinara, and other smooth sauces.
- Mash it into butter or dressings: Roasted garlic makes an amazing roasted garlic butter and works beautifully in creamy dressings like this roasted garlic dressing, as well as in dips and spreads.
- Blend it into dips: Try it in roasted garlic white bean dip, whipped ricotta, labneh-based dips, or aioli-style sauces.
- Spread it on sandwiches: Roasted garlic is delicious in sandwiches and wraps, either spread onto the bread or tucked into the filling.
Since roasted garlic is much milder than raw garlic, you’ll usually want to use a little more when swapping it into a recipe.
More garlic recipes
I’ve made more garlic recipes than I can count, but if I had to point you to a few favorites, I’d start with these:
If you make this roasted garlic, let me know how you use it in the comments. And if you enjoy the post, a quick rating on the recipe card really helps.
Best Roasted Garlic
Ingredients
- 3 whole garlic heads
- 1 tablespoon olive oil
- Fine salt and black pepper optional
Instructions
- Preheat the oven to 400°F/200°C.
- Peel away any loose outer papery layers from the garlic bulbs, but keep the heads intact. Slice about 1/4 inch off the top of each bulb to expose the cloves.
- Place each garlic head cut-side up on a piece of foil. Drizzle the exposed cloves with olive oil and lightly season with salt and black pepper, if using.
- Wrap the garlic loosely in the foil to make packets. Roast for 40 to 50 minutes, or until the cloves are soft, golden, and spreadable. Start checking around the 35-minute mark.
- For deeper color, carefully open the foil for the last 5 to 10 minutes, if desired.
- Let the garlic cool just enough to handle, then squeeze the roasted cloves out of their skins and use as desired.
Video
Notes
- Air fryer variation: Prep the garlic the same way, then air fry at 370°F/190°C for 25 to 30 minutes. If you want deeper color, open the foil for the last 3 to 5 minutes.
- Peeled-clove variation: For a faster option, roast peeled garlic cloves with a little olive oil at 400°F/200°C for 20 to 25 minutes, until soft and lightly golden.
- Storage: Refrigerate roasted garlic for up to 4 days or freeze in small portions for up to 3 months.
Nutrition
Nutrition information is automatically calculated, so should only be used as an approximation.


Wil be using as a spread for toasted bread in a hallowed out chicken sandwich with cucumber strips, thinly sliced tomatoes and sautéed red peppers and onions with Munster cheese.
Hi Lisa! Oh that sandwich sounds absolutely incredible, roasted garlic spread with Munster, sautéed peppers and onions, and those fresh cucumber and tomato slices. You’re making me hungry! 😊 Thanks for sharing, enjoy every bite!
Simple, tried, and true. Appreciate the thoughtful details and information.
Thank you so much for your comment!
The vertical video was hard to watch –
Hi Jeff, thanks for the feedback! 😊 I’ll pass that along, I know a vertical format isn’t everyone’s preference. In the meantime, the full written step-by-step is in the recipe card so you can follow along without the video. Hope the roasted garlic turned out great!