
This post may contain affiliate links. Please read our disclosure policy.
This crispy fried chicken breast takes just minutes to prepare and pan-fry to perfection. When marinated, the results will be even more flavorful and tender in the middle. Perfect for potlucks, picnics, cookouts, game days, and more!

If you want to ditch the fast-food restaurants but still enjoy super crispy fried chicken breast at home (aka comfort food at its best), it’s the perfect time to learn how to fry chicken breast. This buttermilk chicken breast is super tender and juicy in the middle with a perfectly crispy coating for finger-licking good chicken the entire family will love.
My method relies on all the top tips I’ve learned to make delicious Southern-style buttermilk fried chicken in a flavorful, smoky, spicy batter. I’ve used a simple spiced marinade and dry batter for premium flavor and texture with layers of flavor.

Want to save this recipe?
Watch the video tutorial
Ingredients
You only need simple, easy-to-find, and pantry-friendly ingredients:

- Chicken breasts: I use boneless skinless chicken breasts, but you can use skin-on chicken, too.
- Seasonings: You’ll need paprika (regular or smoked), garlic powder, chili powder (or cayenne pepper), dried oregano, black pepper, and salt. You can also experiment with seasonings for different flavors. I.e., dried basil, onion powder, Italian seasoning, Cajun seasoning, etc. You can even use pre-blended spice mixes from a grocery store.
- Buttermilk: The acidity in buttermilk helps to make super tender deep fried chicken breasts. If you don’t have buttermilk, you could make a buttermilk alternative (using milk and lemon juice).
- Egg: It will help maintain moisture and add richness.
- Flour: Regular all-purpose flour works fine. Use a gluten-free, if necessary.
- Cornstarch: This will help make a super crispy fried chicken batter. Potato starch could also work as a substitute.
- Baking powder: Baking powder helps to draw out excess moisture from the surface of the chicken for crispier, browner, battered chicken. It also creates little air bubbles for a fluffier, crispy crust. If you don’t have it, omit it (don’t replace it with baking soda).
- Oil for frying: My top recommendations are vegetable oil, canola oil, or peanut oil. Lard will also work.
See the recipe card for full information on ingredients and quantities.
How to make fried chicken breast
Prepare the chicken: The first step is to slice the chicken breasts in half lengthwise for thinner pieces. If they are uneven, use a mallet to flatten one or both until even. I find these thinner pieces much more manageable within sandwiches, burgers, etc. Note that the thickness of the chicken will affect the cooking time.

Marinate the chicken breasts: In a small bowl, combine all the spices (except the salt) or just use your seasoning of choice. Then, add half of the seasoning blend to a large dish (large enough to fit your chicken pieces). Add the buttermilk, egg, and 1 tsp of salt to the dish, whisk well, and then place the prepared chicken breasts into the marinade. Allow the chicken to marinate covered in the fridge for at least 30 minutes, up to 6 hours total.

Prepare the crispy coating: Combine the baking powder, 1 tsp salt, cornstarch, flour, and the remainder of the seasoning mix in a large shallow bowl or plate and mix well. This makes a “dry” batter. Once the chicken has marinated, allow it to return to room temperature for a few minutes. Then, dip one piece of chicken at a time into the flour mixture. Coat well, firmly pressing the seasoned flour into the chicken to ensure it adheres well. Set aside on a plate and repeat with the rest of the pieces.

Fry the chicken breasts: First, add several inches of oil to a large heavy-bottomed saucepan or Dutch oven (or use a deep-fat fryer) and heat it over medium heat until it reaches 350ºF/176ºC (up to 375ºF/190ºC maximum).
Carefully lower the chicken (just 3-4 pieces, depending on the size of the pan) into the hot oil using a slotted spoon or tongs. Make sure the pieces are fully submerged. Fry in the oil for about 4-5 minutes.
How long to fry chicken breast will depend on the thickness of the pieces and whether they’re boneless or bone-in. Pieces that are left whole (not halved lengthwise) can take up to 10-15 minutes to cook, and bone-in chicken also takes longer. So monitor and check for doneness. Insert a meat thermometer into the thickest part of the chicken. It should have an internal temperature of 165º/74ºC to be safe to eat.

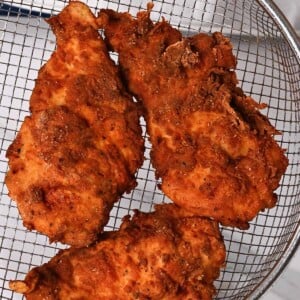
Place the cooked chicken pieces on a cooling rack and allow them to rest for 5 minutes before serving. Finally, season the fried chicken breasts with additional salt and pepper if preferred, and enjoy!
How to serve fried chicken breast
There are plenty of side dishes to enjoy with this delicious crispy fried boneless chicken breast:
- Corn on the cob or corn ribs
- Coleslaw and potato salad
- Fries or potato wedges (including sweet potato fries), mashed potatoes or mashed sweet potato
- Pasta or rice
- Steamed, grilled, baked, or air-fried vegetables
- To make delicious chicken burgers, wraps, or chicken sandwiches. I love to add lettuce, mayo, and pickles.

Crispy fried chicken breast tips
- Always brine or marinate the chicken: Either method tenderizes the meat, keeping it juicy. Marinating also adds depth of flavor.
- Fuse batter: A well-made batter means a super crispy fried chicken breast recipe. This can be a wet or dry batter.
- Don’t overcrowd the chicken. Doing so will reduce the oil temperature and result in soggy fried chicken. Instead, fry it in batches.
- Ensure the oil is at the right temperature: Keep an instant-read thermometer nearby to monitor the temperature and adjust it if needed. 350ºF/176ºC is ideal, and it shouldn’t go below 325ºF/163ºC.
- Allow the chicken to drain correctly: Ditch paper towels, which can cause steaming and soggy fried chicken. Instead, set the fried chicken on a wire rack, allowing air to circulate. To keep it warm, tent the cooling rack loosely in foil and/or pop it in a low oven (200ºF/95ºC).
How to store and reheat
The deep-fried chicken breast will always be crispiest directly from the fryer. However, you can still store leftovers for later.
To Store: Either store the chicken in shallow, airtight containers or wrap it tightly with foil and store it in the refrigerator for 3-4 days. Make sure to store it within 2 hours of cooking.
To Freeze: Spread the chicken breast across a tray, not touching, and freeze it solid. Then, transfer to a Ziplock bag and freeze for up to 4 months.
To reheat: Reheat it for 15-20 minutes at 350ºF/175ºC on a rack. If frozen, cook in the oven for 15-20 minutes at 450ºF/230ºC.
Recipe FAQs
Cornstarch is great for achieving a super puffy, crackly, crispy coating with an added golden brown color. A 50/50 combination of cornstarch and all-purpose flour will be crunchy and beautifully brown, though 100% all-purpose flour or starch also works.
The ideal is between 350-375ºF/176-190ºC. Too cold, you’ll end up with a soggy, oil-laden mess. Too hot, and it may smoke and cause burned chicken on the outside and raw inside.
If you don’t have a thermometer, you can test the correct temperature by dipping the end of a wooden spoon or chopstick into the oil. When it starts to bubble around the wood steadily but not vigorously, the oil is ready.
Rubbery or dry chicken is due to overcooking the chicken.
Thighs and legs will fry similarly to thick fried chicken breast (12-18 minutes at around 350ºF/176ºC). But chicken wings will take less (8-11 minutes) at around 350-375ºF/176-190ºC.
To ensure they’re properly cooked, an instant-read thermometer inserted into the thickest part of the chicken (avoid touching bone if there is any) should read 165 degrees F /74ºC.
More chicken breast recipes


If you try this fried chicken breast recipe, let me know how it goes in the comments below. I’d appreciate a recipe card rating and would love to see your recipe recreations – tag me on Instagram @Alphafoodie!
Crispy Fried Chicken Breast
Ingredients
- 13 oz chicken breast 2 pieces skinless and boneless; use skin-on if preferred; bone-in chciken requires longer to cook
- 6 cups vegetable or canola oil for frying – adjust the amount based on the size of your pot
Seasoning mix (or use 2.5 Tbsp of your favorite seasoning)
- 1 Tbsp paprika
- 1/2 Tbsp black pepper
- 1/2 Tbsp garlic powder
- 1 tsp dried oregano
- 1/2 tsp chili powder
For the buttermilk marinade
- 3/4 cup buttermilk
- 1 egg
- 1 tsp salt
For the flour breading
- 3.7 oz flour 1 cup; or a gluten-free all-purpose flour
- 1.3 oz cornstarch 1/3 cup
- 1 tsp baking powder
- 1 tsp salt
Instructions
- Slice the chicken breasts in half lengthwise for thinner pieces. If they are uneven, use a mallet to flatten one or both until even.
Marinate the Chicken
- In a small bowl, combine all the spices (except the salt), then add half of the seasoning blend to a large dish (large enough to fit your chicken pieces).
- Add the buttermilk, egg, and 1 tsp of salt. Whisk well, and then add the prepared chicken breasts to the marinade.
- Allow the chicken to marinate, covered, in the fridge for at least 30 minutes, up to 6 hours total.
Prepare the Dry Batter
- In a large shallow bowl or plate, combine the baking powder, 1 tsp salt, cornstarch, flour, and the remainder of the seasoning. Mix well.
- Once the chicken has marinated, allow it to return to room temperature. Then, dip one piece at a time into the flour mixture. Coat well, firmly pressing the flour into the chicken to ensure it adheres well. Set aside on a plate and repeat with the rest of the pieces.
Fry the Chicken Breast
- Add several inches of oil to a large heavy-bottomed saucepan or Dutch oven (or use a deep-fat fryer). Heat over medium heat until it reaches 350ºF/176ºC (up to 375ºF/190ºC maximum).
- Carefully lower the chicken into the hot oil using a slotted spoon or tongs. Work in batches, cooking just 3-4 pieces at a time (more or less depending on your pan size).
- Fry in the oil for about 4-5 minutes. Thicker pieces and bone-in chicken will take longer to cook fully (10-15 minutes). Monitor and check for doneness.Insert a meat thermometer into the thickest part of the chicken. To be ready, it should have an internal temperature of 165º/74ºC.
- Place the cooked chicken pieces on a cooling rack and allow them to rest for 5 minutes before serving. Enjoy!
Video
Notes
- Reheat it for 15-20 minutes at 350ºF/175ºC on a rack (to allow for airflow).
- Alternatively, try 5-7 minutes in an air fryer at 375ºF/190ºC, flipping halfway.
- If you’re reheating it from frozen, allow it to cook in the oven for 15-18 minutes at 450ºF/230ºC.
Nutrition
Nutrition information is automatically calculated, so should only be used as an approximation.


This recipe was amazing, mother said not to put eggs in marinade though… also where are the breadcrumbs, sorry if stupid question
Hi Omar,
In my original recipe there’s no breadcrumbs – I use flour and cornstarch for the breading. I hope this helps!
Excellent! My kids and husband loved this one I will definitely be making it again. Great flavor I got a crispy and juicy chicken outa this recipe. THANKS
So great to hear you enjoyed this recipe and the chicken turned out juicy and crispy. Thanks so much for leaving feedback 🙂
Holy Cow! The fried chicken is flavorful and delicious! My family always asks for this specific recipe for fried chicken. Thank you for sharing it!
Hey Tricia! So glad to hear you and your family love the recipe! It’s a favorite around here too. Thank you so much for sharing your feedback
Breading didn’t stick. Any tips?
Otherwise, I don’t know how to fry chicken and I followed your recipe. Husband was thrilled except my breading sliding off.
Hey Shelley!
Sorry to hear that your breading didn’t stick. A couple of tips: make sure the chicken is dry before breading it, and try pressing the breading onto the chicken a bit to help it stick better. You can also let it sit for a few minutes after breading before frying. Hope that helps!
Happy frying!
Just like country fried steak ! Awesome
Hey Julie! I’m so glad you think it’s awesome! Country fried steak is such a comfort food, and I’m happy you enjoyed the chicken breast too. Thanks for sharing your thoughts! 🙂
2 questions:
1. Alternatives for butter milk?
2. Don’t have a meat thermometer
Hi Mariam,
You can make buttermilk at home with 3/4 cup of regular milk and 2 tsp fresh lemon juice or white vinegar. This post has more details: https://www.alphafoodie.com/how-to-make-buttermilk-substitute/
If you don’t have a meat thermometer, don’t worry! Just make sure the chicken is cooked through and golden brown. You can check if it’s cooked by cutting into the thickest part of the chicken and making sure the juices run clear. I hope this helps!
I’ve made this twice now and the flavor is amazing! Chicken is well seasoned and juicy! It comes out if the fryer absolutely beautiful and crunchy, but by the time we eat it, the breading is coming off. What am I doing wrong??
Hey Stephanie! It sounds like you’re really loving the recipe!There are a few reasons why the breading might be falling off when frying. First, make sure to pat the chicken dry before breading, as excess moisture can prevent the coating from sticking. Also, following the proper dredging steps helps create a stronger bond. Letting the breaded chicken rest in the fridge for 15-30 minutes before frying can also make a big difference! Lastly, be sure your oil is hot enough (around 350-375°F) and avoid flipping the chicken too soon. Hope this helps!
The best fried chicken recipe my husband loves this and had to make it again will be my go to from now on super delicious crunchy and full of flavor I make mashed potatoes and gravy with salad paired with this
Thank you for your comment, Annette. Glad you both enjoyed it. Pairing the chicken with potatoes and gravy sounds delicious!
Love it! Thank you didn’t have any corn starch but it tasted great and fried beautifully
Glad you liked it, Lisa. Thank you for your comment!
My fried chicken was delicious! Thank you
Thank you for your comment, Tara-Lynn. Glad you enjoyed it!