
This post may contain affiliate links. Please read our disclosure policy.


Learn how to make the BEST homemade chili recipe with ground beef, beans, simple pantry ingredients, and homemade chili seasoning. It’s packed with flavor, protein, & fiber for a cozy, comforting, satisfying meal!
Chili is a classic meal perfect for chilly evenings, potlucks, game days, and when you’re craving a little comfort. Now, you can learn how to make the best homemade chili recipe with simple pantry ingredients and minimal prep.
There’s just a little chopping and sauteing before you can leave it to slowly simmer on the stovetop into a complex, full-bodied, crowd-pleasing meal everyone will love – especially when topped with all their favorite toppings. Optionally serve alongside rice, cornbread, a baked potato, and/or a side salad for a truly satisfying dinner.
If you love hearty, one-pan meals like this, my ground beef and potatoes skillet is another family-friendly favorite.
Want to save this recipe?
Homemade Chili Ingredients
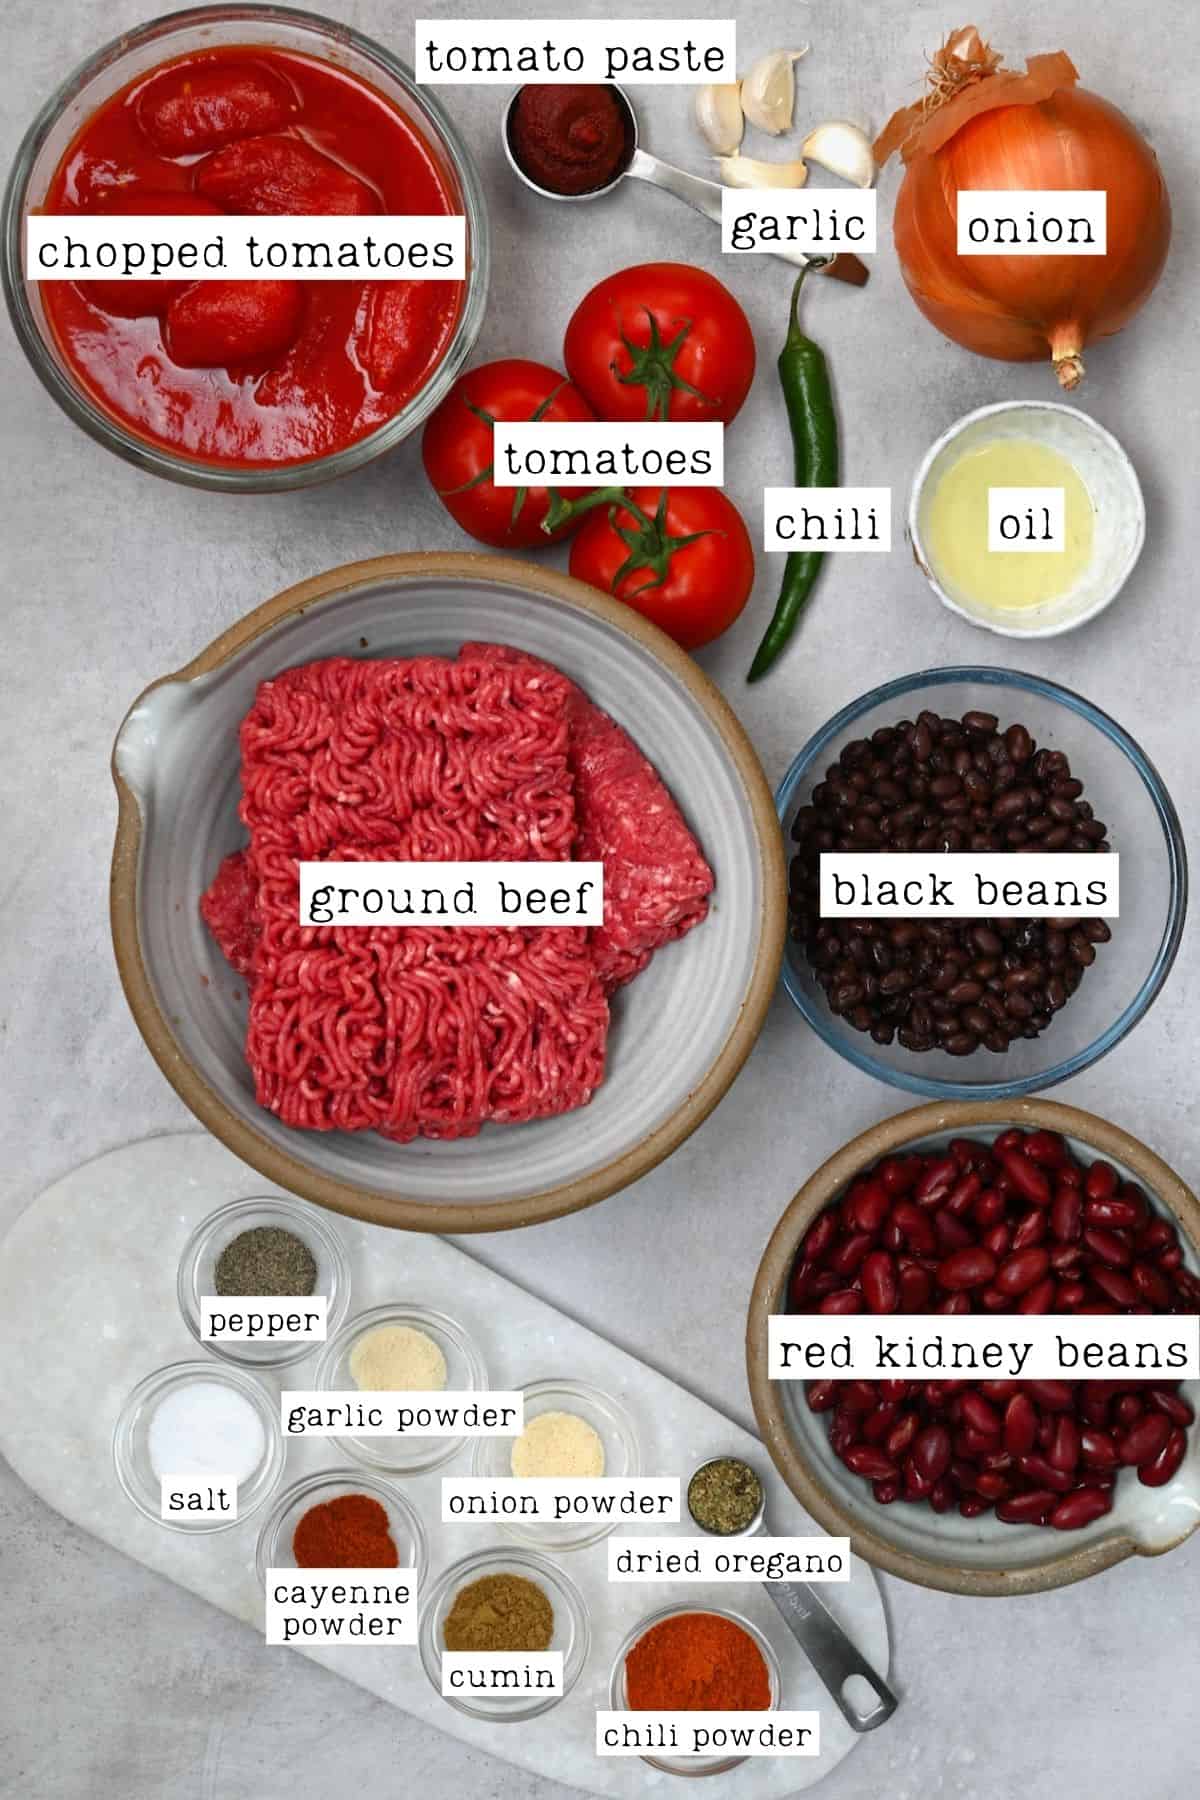
- Ground beef: I prefer using lean ground beef, around 5% fat for this recipe. Ground turkey or ground chicken will also work.
- Aromatics: This easy recipe relies on onion (yellow or white) and garlic for flavor.
- Oil: Use a neutral cooking oil, like vegetable oil, avocado oil, etc.
- Beans: I used red kidney beans and black beans (home-cooked or canned – use low-sodium if preferred), though pinto beans or cannellini beans also work. The beans add heaps of extra protein and fiber for satisfying, filling goodness.
- Tomatoes: The best chili recipe combines high-quality canned chopped tomatoes (fire-roasted for a subtle smoky flavor), fresh tomatoes (or tomato sauce), and tomato paste for flavor and texture depth.
- Green chili: I use fresh green chili, though canned diced green chilies work too.
- Chili seasoning: You can use store-bought or homemade chili seasoning, though I highly recommend the latter since it allows you 100% control over heat and flavor.
- Dried oregano: If the seasoning doesn’t already include it, dried oregano (best if it’s Mexican oregano) will add a citrusy, herby flavor and depth to this classic recipe.
Spices in Chili Seasoning
I love using homemade spice blend as the best seasoning for chili. This blend of chili seasoning combines chili powder, cayenne pepper, cumin, onion powder, garlic powder, salt, and black pepper.
How to Make Chili
First, finely dice the onion and tomatoes, slice the chili, and mince the garlic. Also, drain and rinse the beans (if using canned).
If you don’t have pre-made chili seasoning, gather the spices.
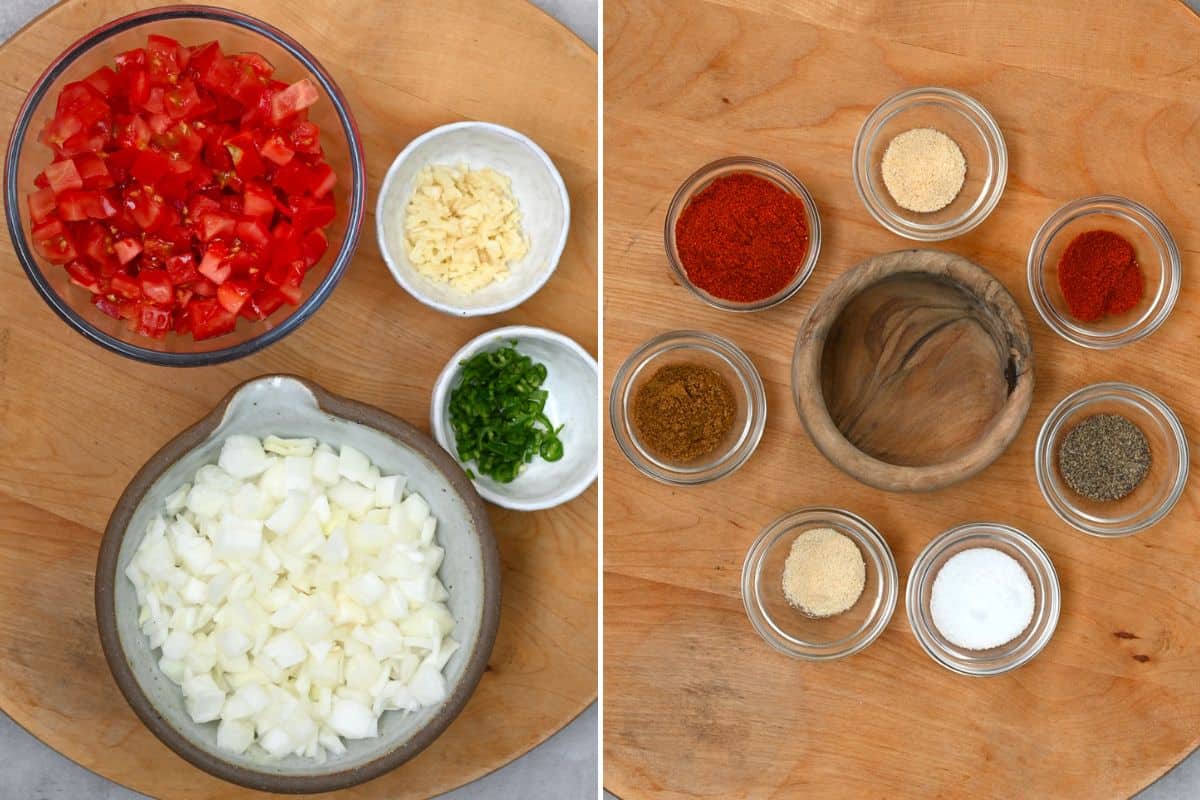
Then, heat the oil in a large skillet over medium-high heat. Once hot, add the onions, garlic, and chili, and sauté for 2 minutes.
Add the beef and cook it for 4-5 minutes, using a spatula or wooden spoon to break it into crumbles as it cooks and browns.
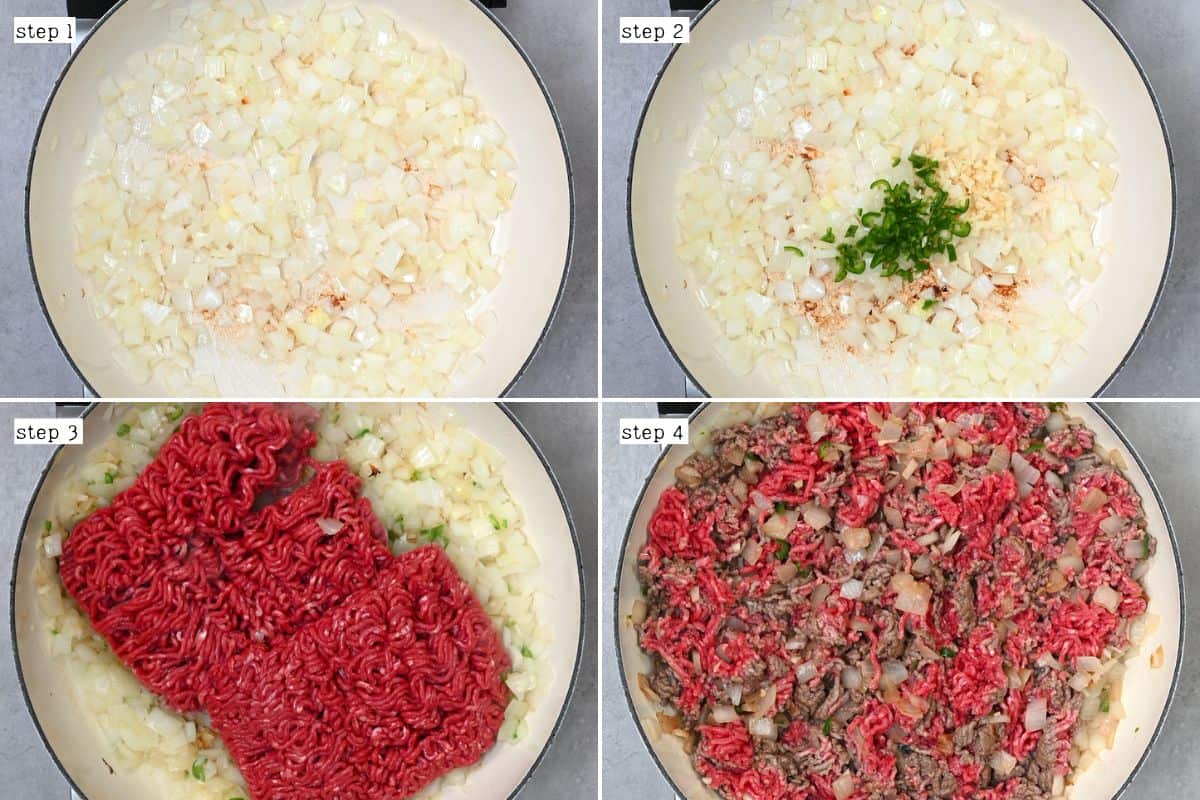
If you’re using fattier meat, drain any excess fat before moving on to the next step.
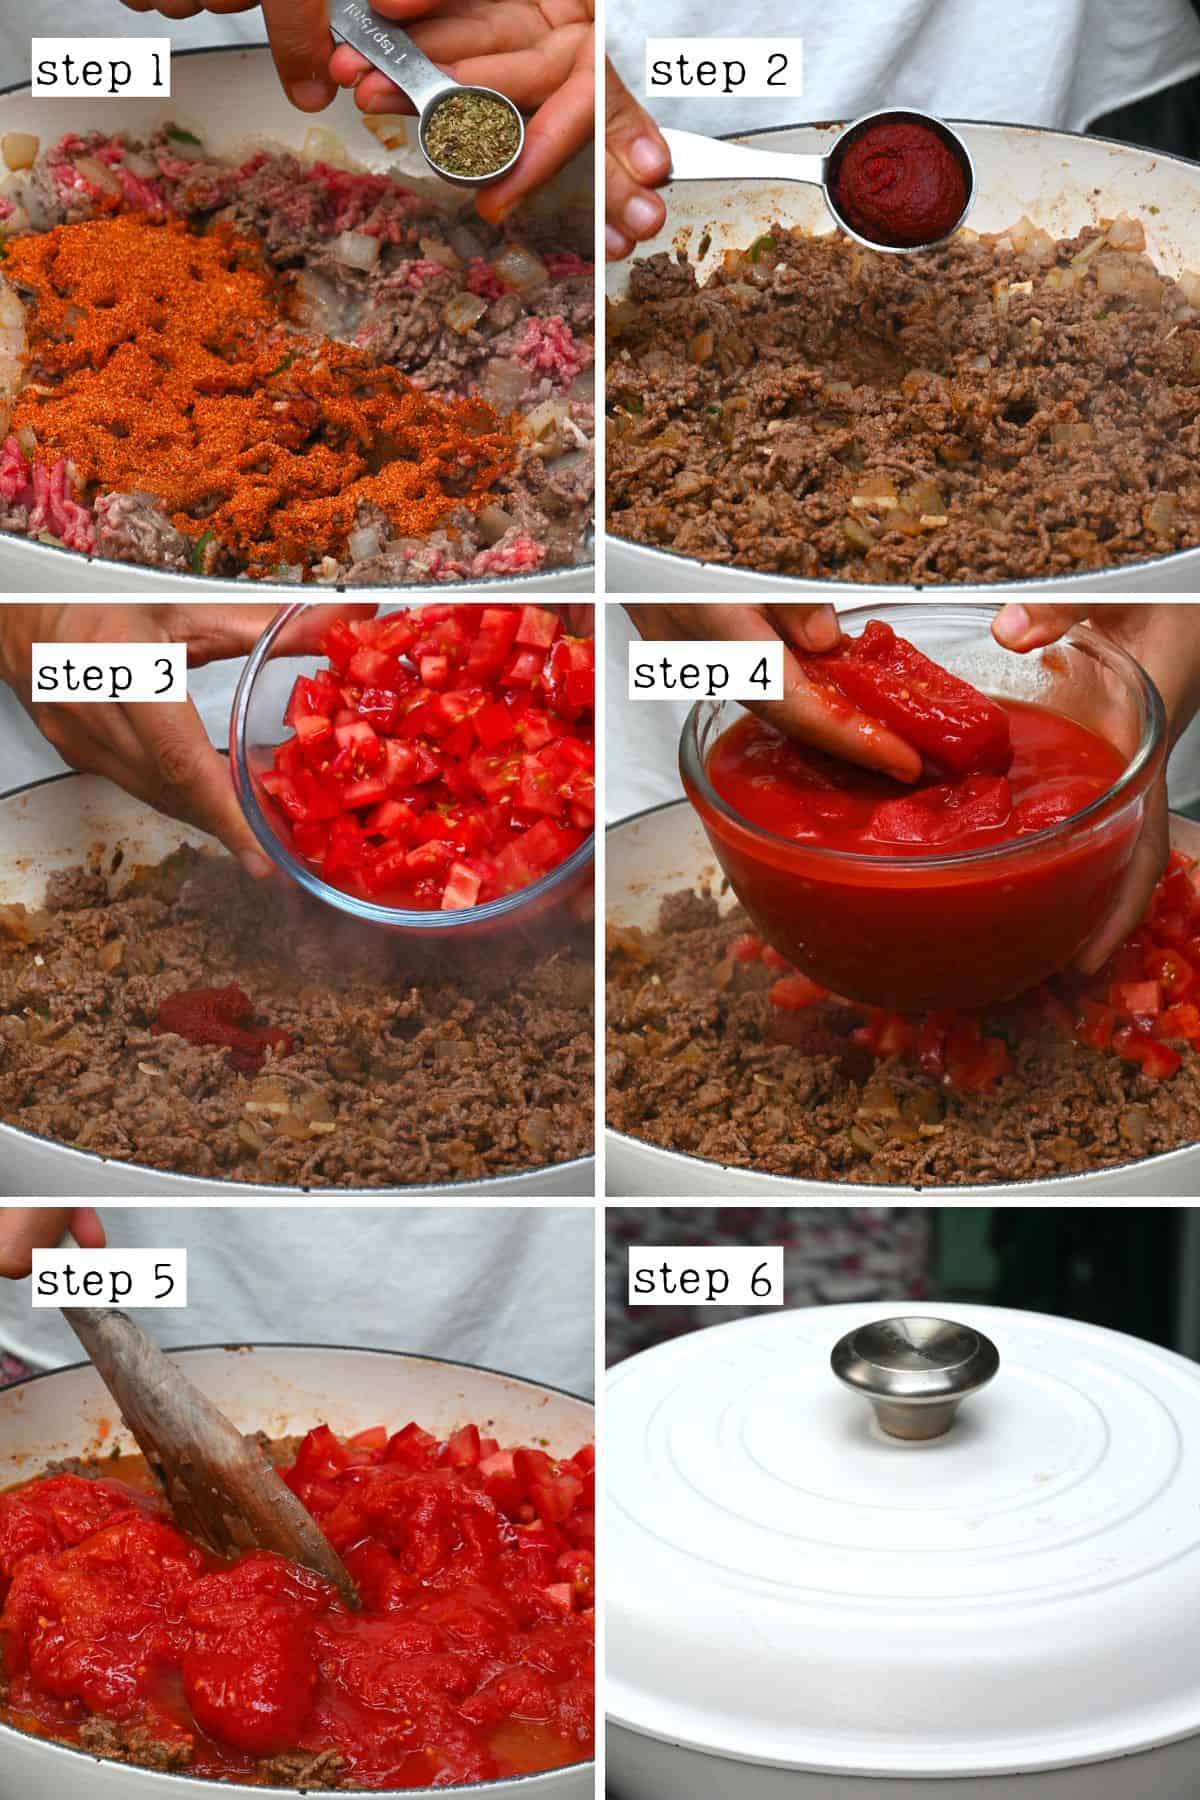
Next, add the chili seasoning and dried oregano to the pot and stir well.
For a better flavored recipe, sauté it for a minute to allow the spices to “bloom”.
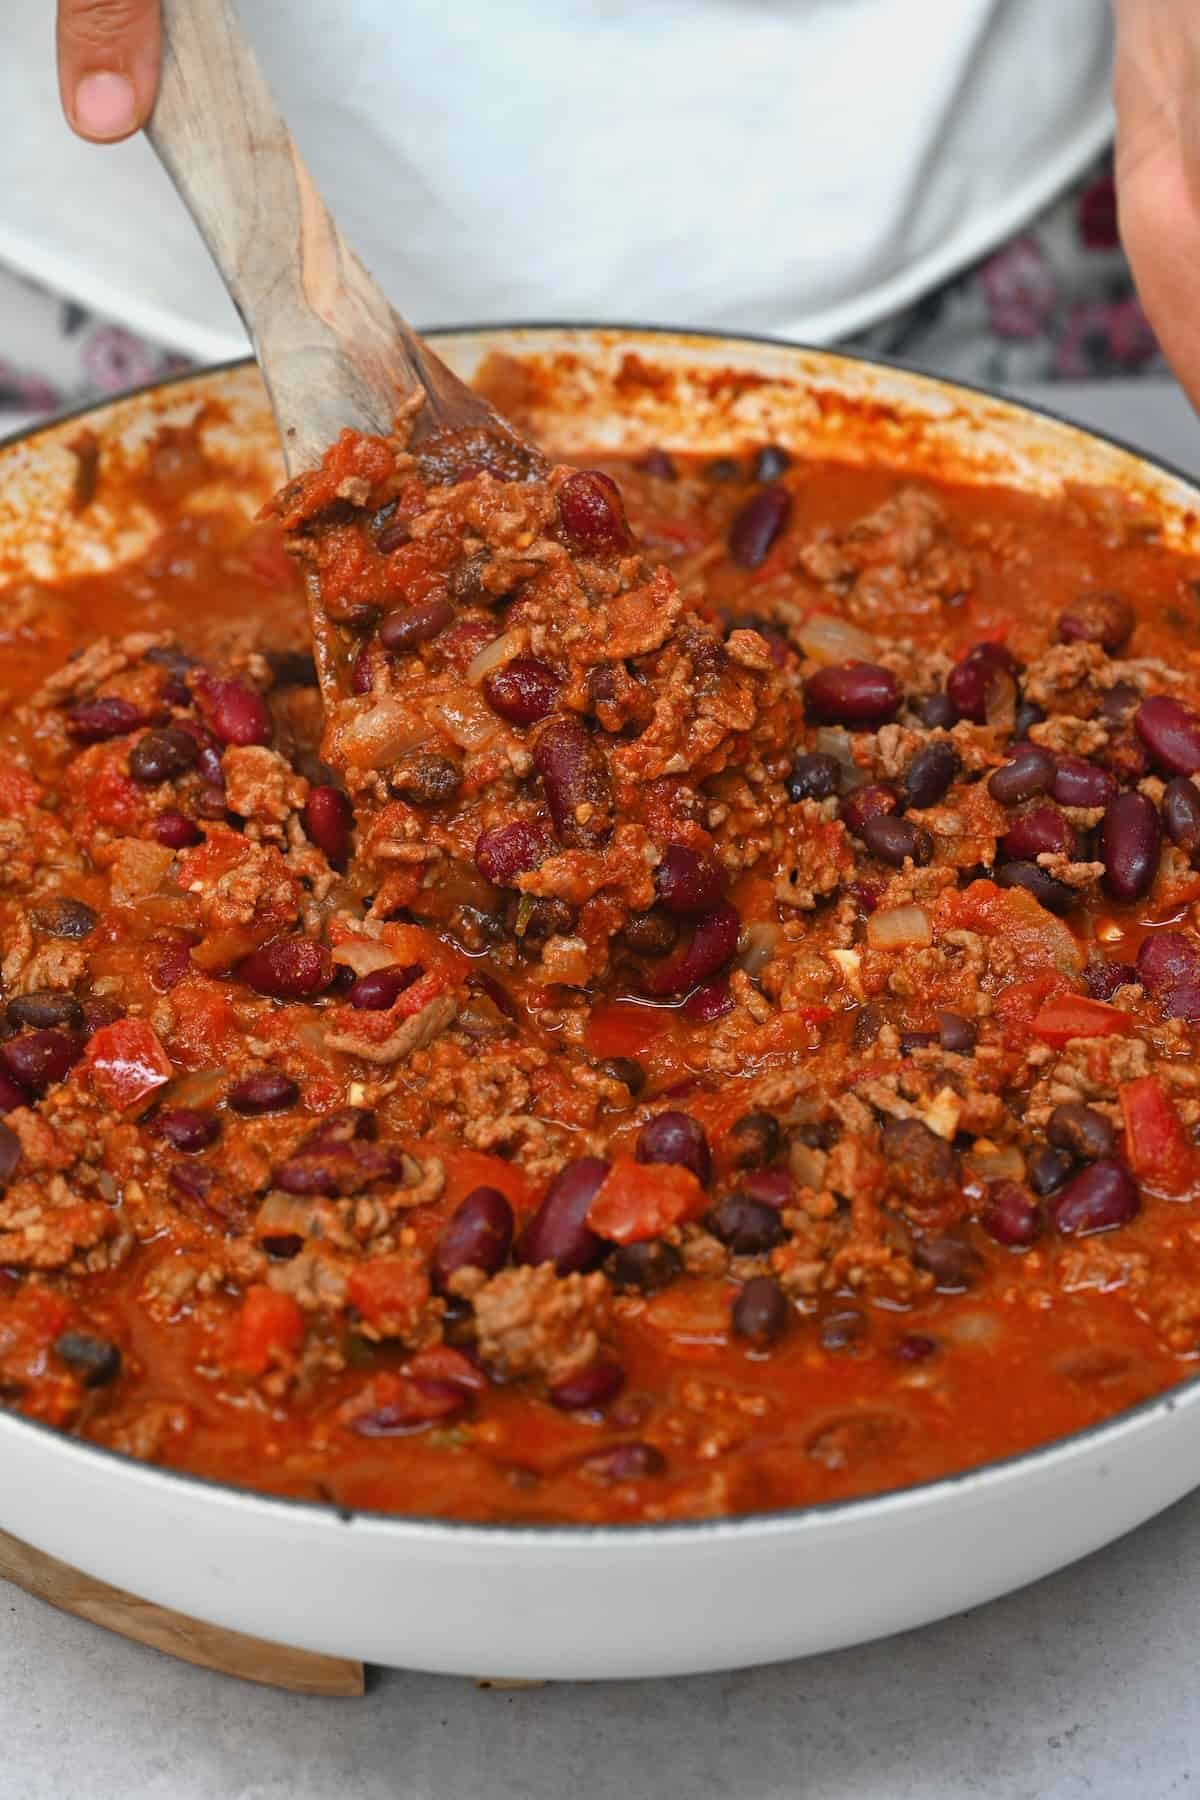
Stir in the tomatoes (canned tomatoes, freshly diced tomatoes, and tomato paste), stir well, cover, and allow the mixture to simmer for about 20 minutes.
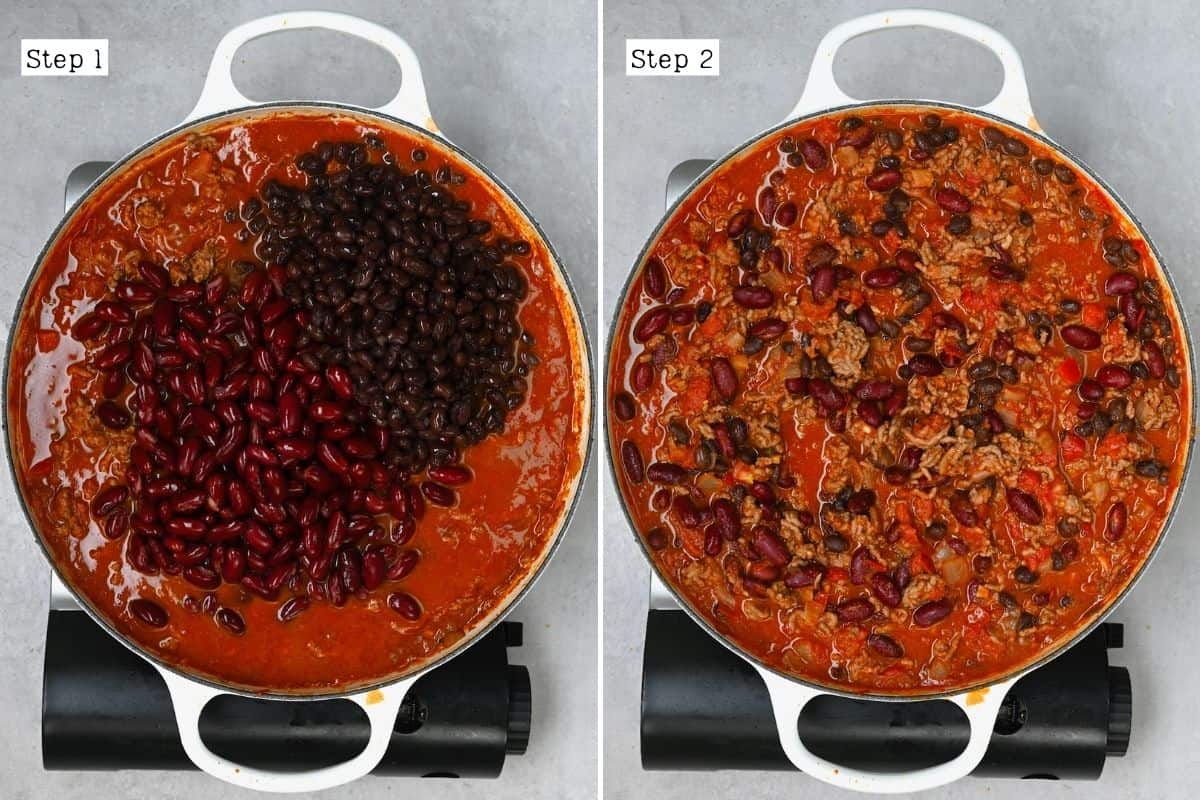
Stir in the beans and simmer for a further 30 minutes or until the chili reaches your desired thickness and flavor profile.
If it becomes too thick, add a little water or beef broth/vegetable broth.
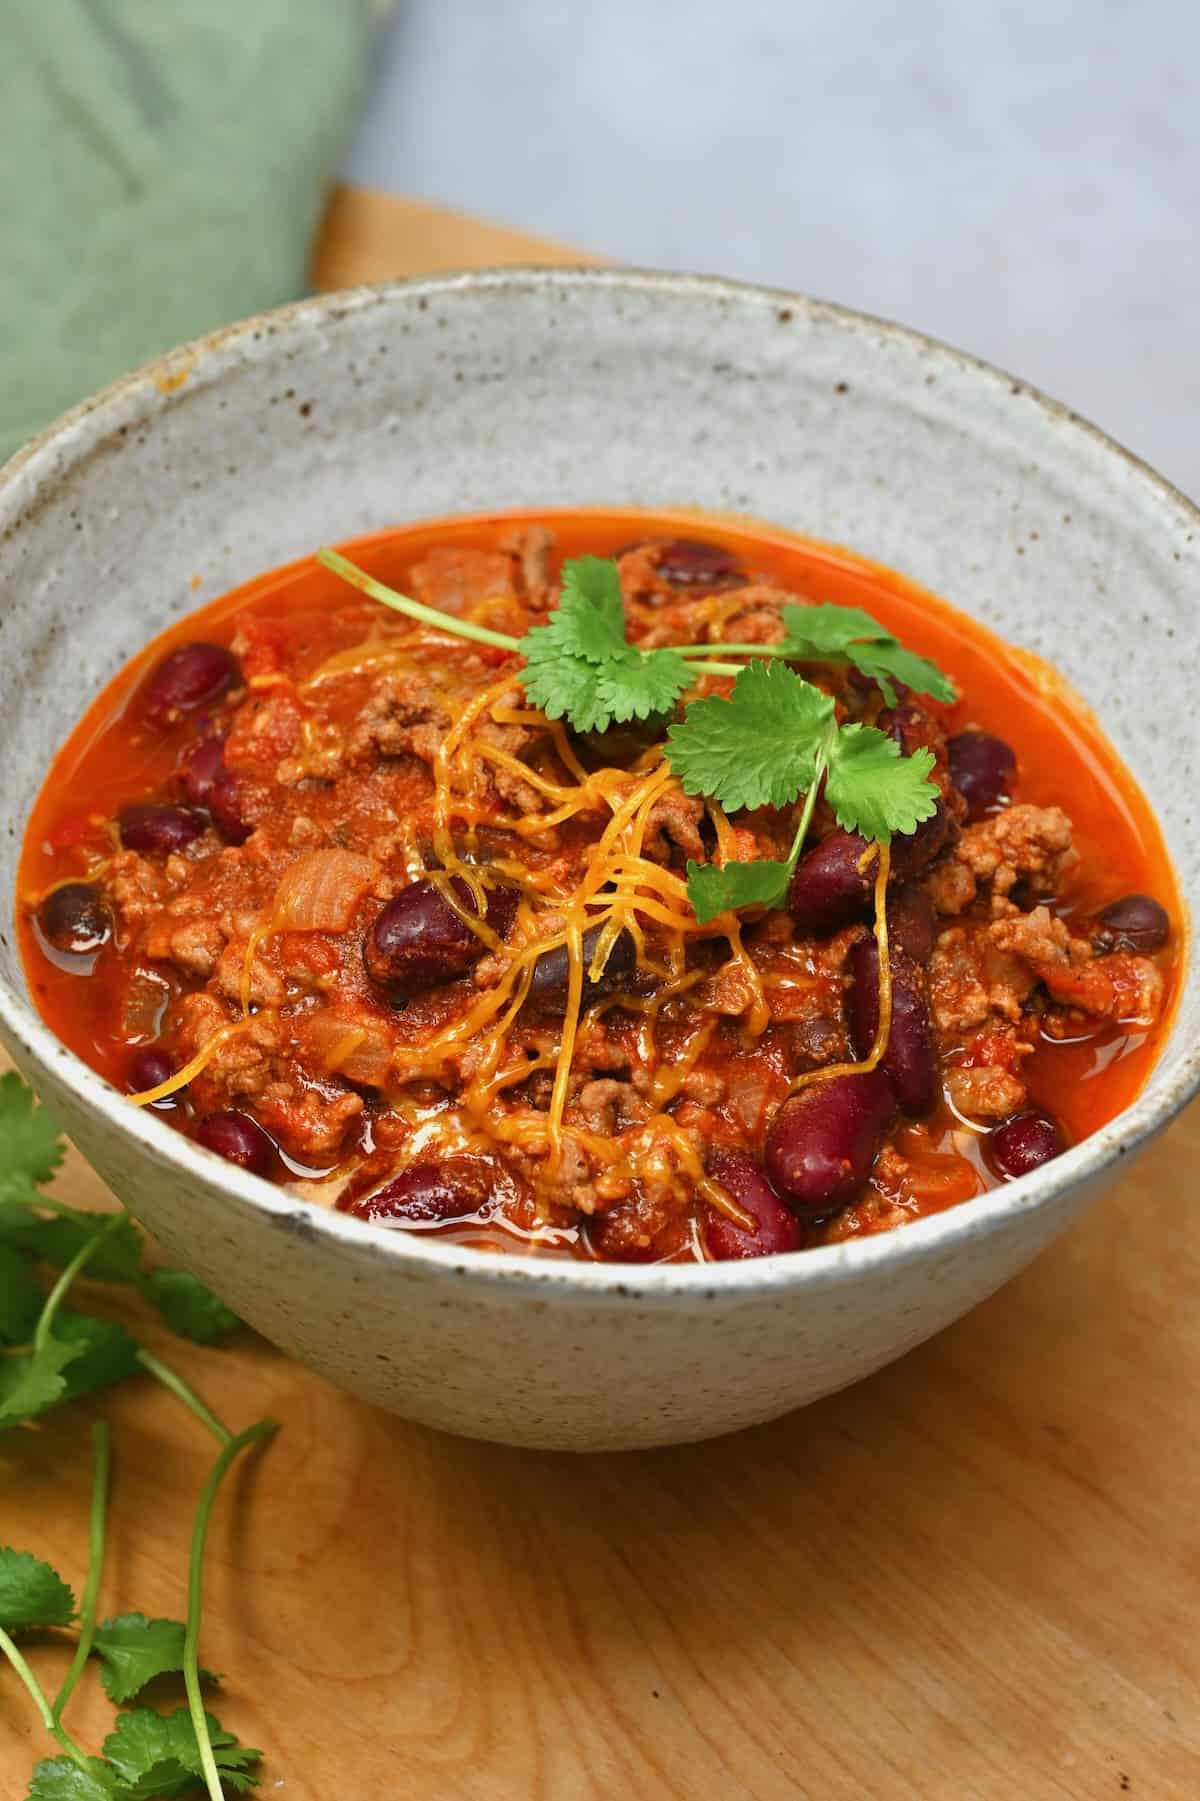
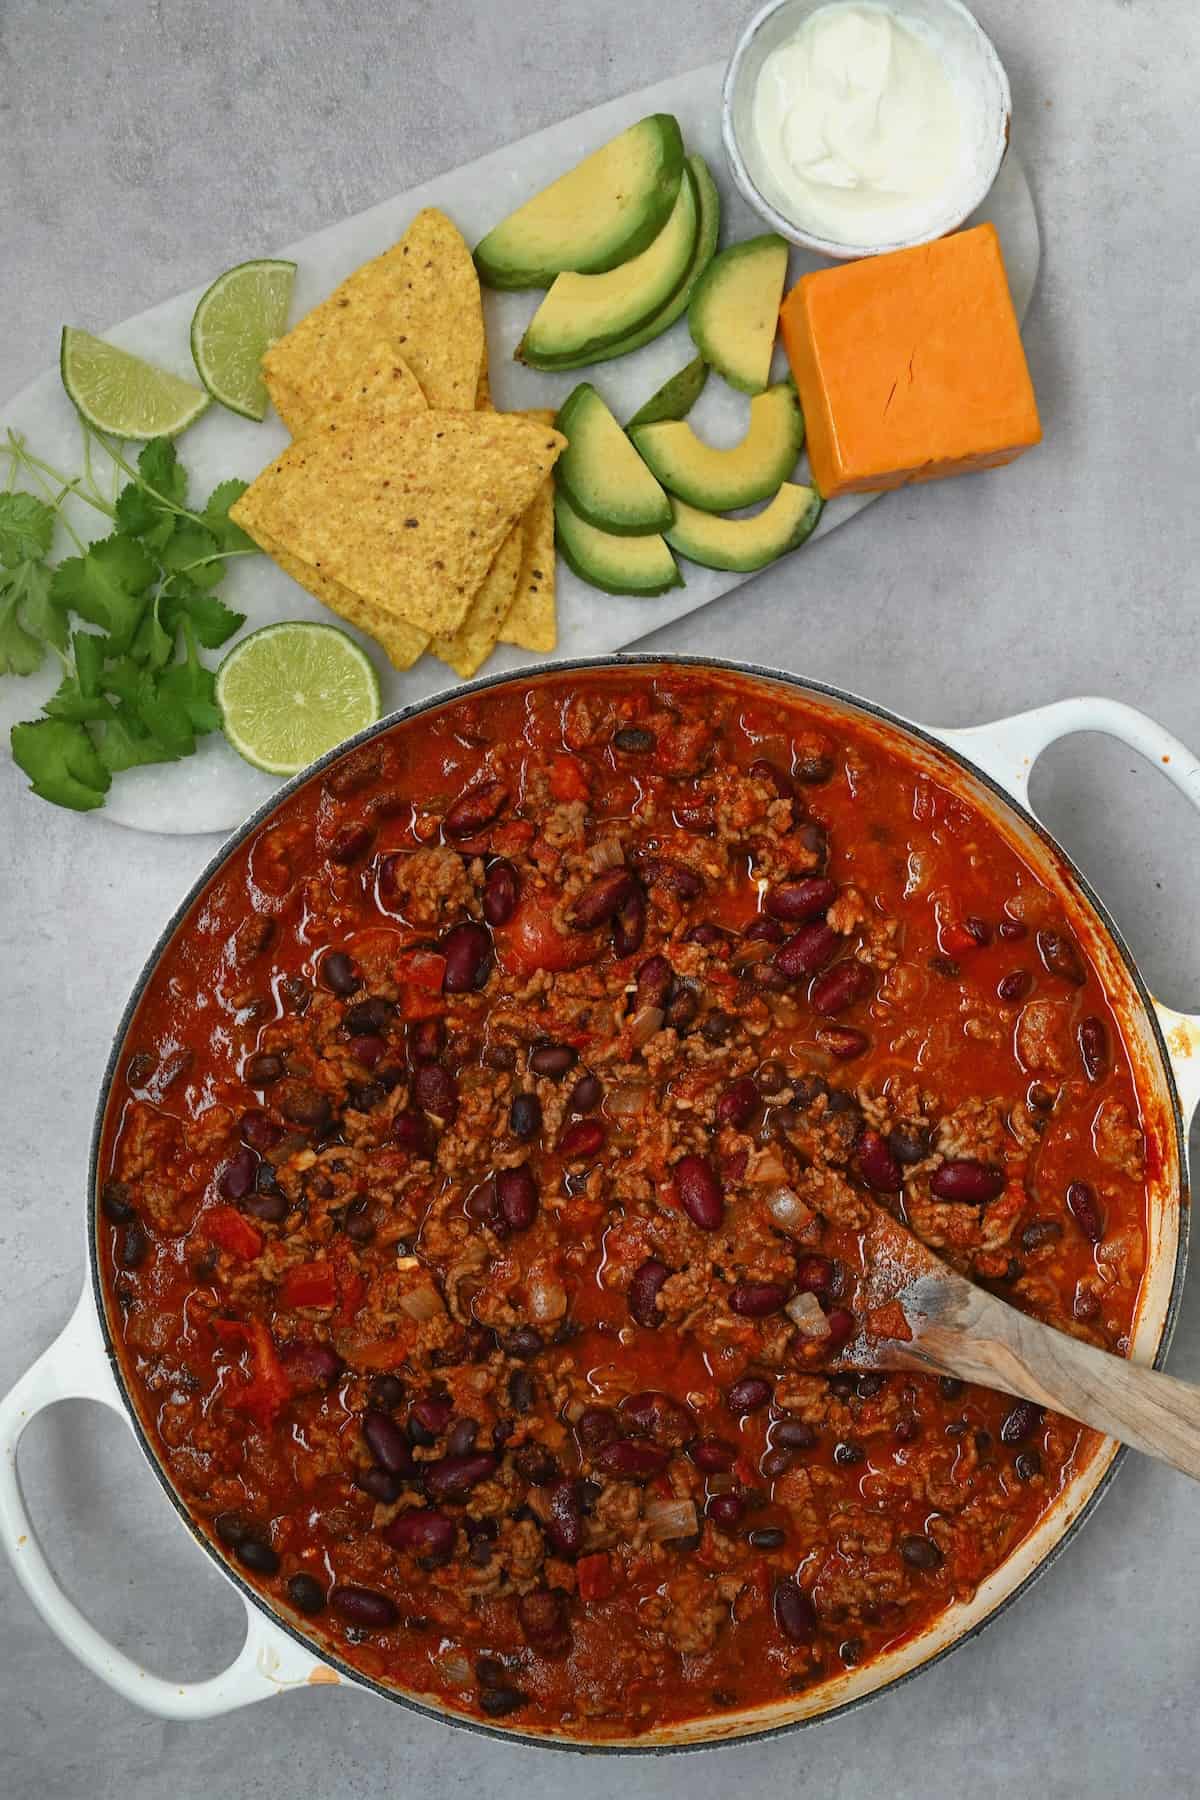
Leave the chili to rest for just 5-10 minutes, then serve it with all your favorite toppings and enjoy!
The Best Classic Chili Toppings
Like tacos, this beef chili dish can easily be customized with all your favorite toppings, allowing everyone at your dinner table to build custom chili bowls.
- Sour cream, or another Mexican crema/Greek yogurt,
- Cheese – Monterey jack, a Tex-Mex blend, mature cheddar cheese, or crumbly cotija,
- Fresh herbs – like cilantro, parsley, and/or green onions,
- Lemon or lime wedges – to add brightness and amazing complex flavor depth,
- Sliced jalapeño – fresh or pickled,
- Red onions – finely diced fresh red onions OR pickled pink onions,
- Chips – tortilla chips or Fritos for crunch,
- Avocado – sliced or diced,
- Salsa – like Pico de Gallo or another fresh salsa,
- Hot sauce – like sriracha to drizzle over the top for an extra heat boost.
What Goes with Chili
Enjoy a bowl of this homemade beef chili with all your favorite toppings, or make an even heartier meal with the addition of:
- Mexican rice, cilantro lime rice, brown rice, or quinoa,
- Cornbread or garlic bread,
- Regular or sweet potato fries/wedges,
- Mexican street corn, roasted corn on the cob, or spiced corn ribs,
- A simple leafy green side salad with tangy vinaigrette adds wonderful flavor contrast,
- A fresh, crisp coleslaw.
You can also serve it over nachos, in a burrito bowl/burrito, over a baked potato, over mac and cheese, in lettuce wraps, to stuff peppers, etc.

How to Freeze and Reheat Chili for Later
First, allow the chili to cool (no longer than 2 hours), then transfer it to an airtight container/freezer-safe Ziplock bag (spread flat with excess air squeezed out).
Store it in the refrigerator for 3-4 days or in the freezer for up to 3 months (labeled with a use-by date). Thaw it in the fridge overnight before enjoying it as is or reheating it.
To reheat, I prefer to use low heat on the stovetop, though a microwave will also work (in 30-second increments, stirring in between). Add a little broth/water if it’s a little dry.

More Beef Recipes
- Ground beef tacos
- Hamburger casserole
- Slow cooker beef brisket
- Easy slow cooker beef stew
- Delicious sloppy joes
If you try the easiest chili recipe with beans, let me know how it goes in the comments below. I’d appreciate a recipe card rating and would love to see your recipe recreations – tag me on Instagram @Alphafoodie!

The Best Ever Homemade Chili Recipe
Ingredients
- 2 lb ground beef lean, I used 5% lean; ground turkey or chicken also work
- 9 oz onion 1 large white or yellow
- 0.6 oz garlic 4 cloves
- 2 Tbsp vegetable oil or anothr neutral cooking oil
- 1 tsp dried oregano Mexican oregano works best
- 30 oz red kidney beans 2 cans of 15 oz each, drained and rinsed
- 15 oz black beans 1 can of 15 oz, drained and rinsed, or other beans like pinto beans, cannellini, etc.
- 30 oz chopped tomatoes 1 can of 15 oz
- 13 oz tomatoes 3 medium or 15oz tomato sauce can
- 2 Tbsp tomato paste
- 0.4 oz green chili pepper 1 medium or canned diced green chilies
- 4 Tbsp chili seasoning I used homemade
Instructions
- Finely dice the onion and tomatoes. Slice the chili. Mince the garlic. Drain and rinse the beans (if using canned). If you don't have pre-made chili seasoning, gather the spices.
- Heat the oil in a large skillet over medium-high heat. Once hot, add the onions, garlic, and chili, and sauté for 2 minutes.
- Add the beef and cook it for 4-5 minutes, using a spatula or wooden spoon to break it into crumbles as it cooks and browns.If you're using fattier meat, drain any excess fat before moving on to the next step.
- Add the chili seasoning and dried oregano to the pot and stir well.For better flavor, sauté everything for a minute to give the spices a chance to "bloom" before moving on.
- Stir in the tomatoes (canned tomatoes, freshly diced tomatoes, and tomato paste), stir well, cover, and allow the mixture to simmer for about 20 minutes.
- Stir in the beans and simmer, uncovered, for a further 30 minutes or until the chili reaches your desired thickness and flavor profile.If it becomes too thick, add a little water or beef broth/ vegetable broth
- Leave the chili to rest for just 5-10 minutes, then serve it with all your favorite toppings and enjoy!
Video
Notes
- Chipotle pepper in adobo sauce: (finely chopped) will add a spicy, smoky flavor.
- Bay leaves:1-2 for extra aromatic depth. Remove them before serving.
- Vegetables: e., diced red or green bell peppers, zucchini, carrots, mushrooms, celery, or corn kernels, etc.
- Beer: Just a splash of beer will enhance and add depth and richness to the chili flavor.
- Worcestershire sauce: Just a splash adds a tangy, umami-rich flavor that complements the flavors in this easy chili recipe.
- Cocoa powder: Just a teaspoon or so adds a subtle bitter, rich, earthy depth.
- Coffee/espresso powder: Just a little will work similarly to the cocoa powder, enhancing and adding an earthy, bitter depth but in a more robust way.
- Smoked paprika: for a subtle smoky flavor.
- Cinnamon: Just a pinch for warm flavor without spice.
- An acid: I usually serve it with lime wedges. Otherwise, I highly recommend adding a splash of lemon/lime juice or apple cider vinegar just before serving for a brightened and enhanced overall flavor.
Nutrition
Nutrition information is automatically calculated, so should only be used as an approximation.


Wonderful recipe
Thank you, Chris. Glad you liked it!
The best chillie ever thank you
Thank you so much for your comment, Margaret! 🙂