
This post may contain affiliate links. Please read our disclosure policy.
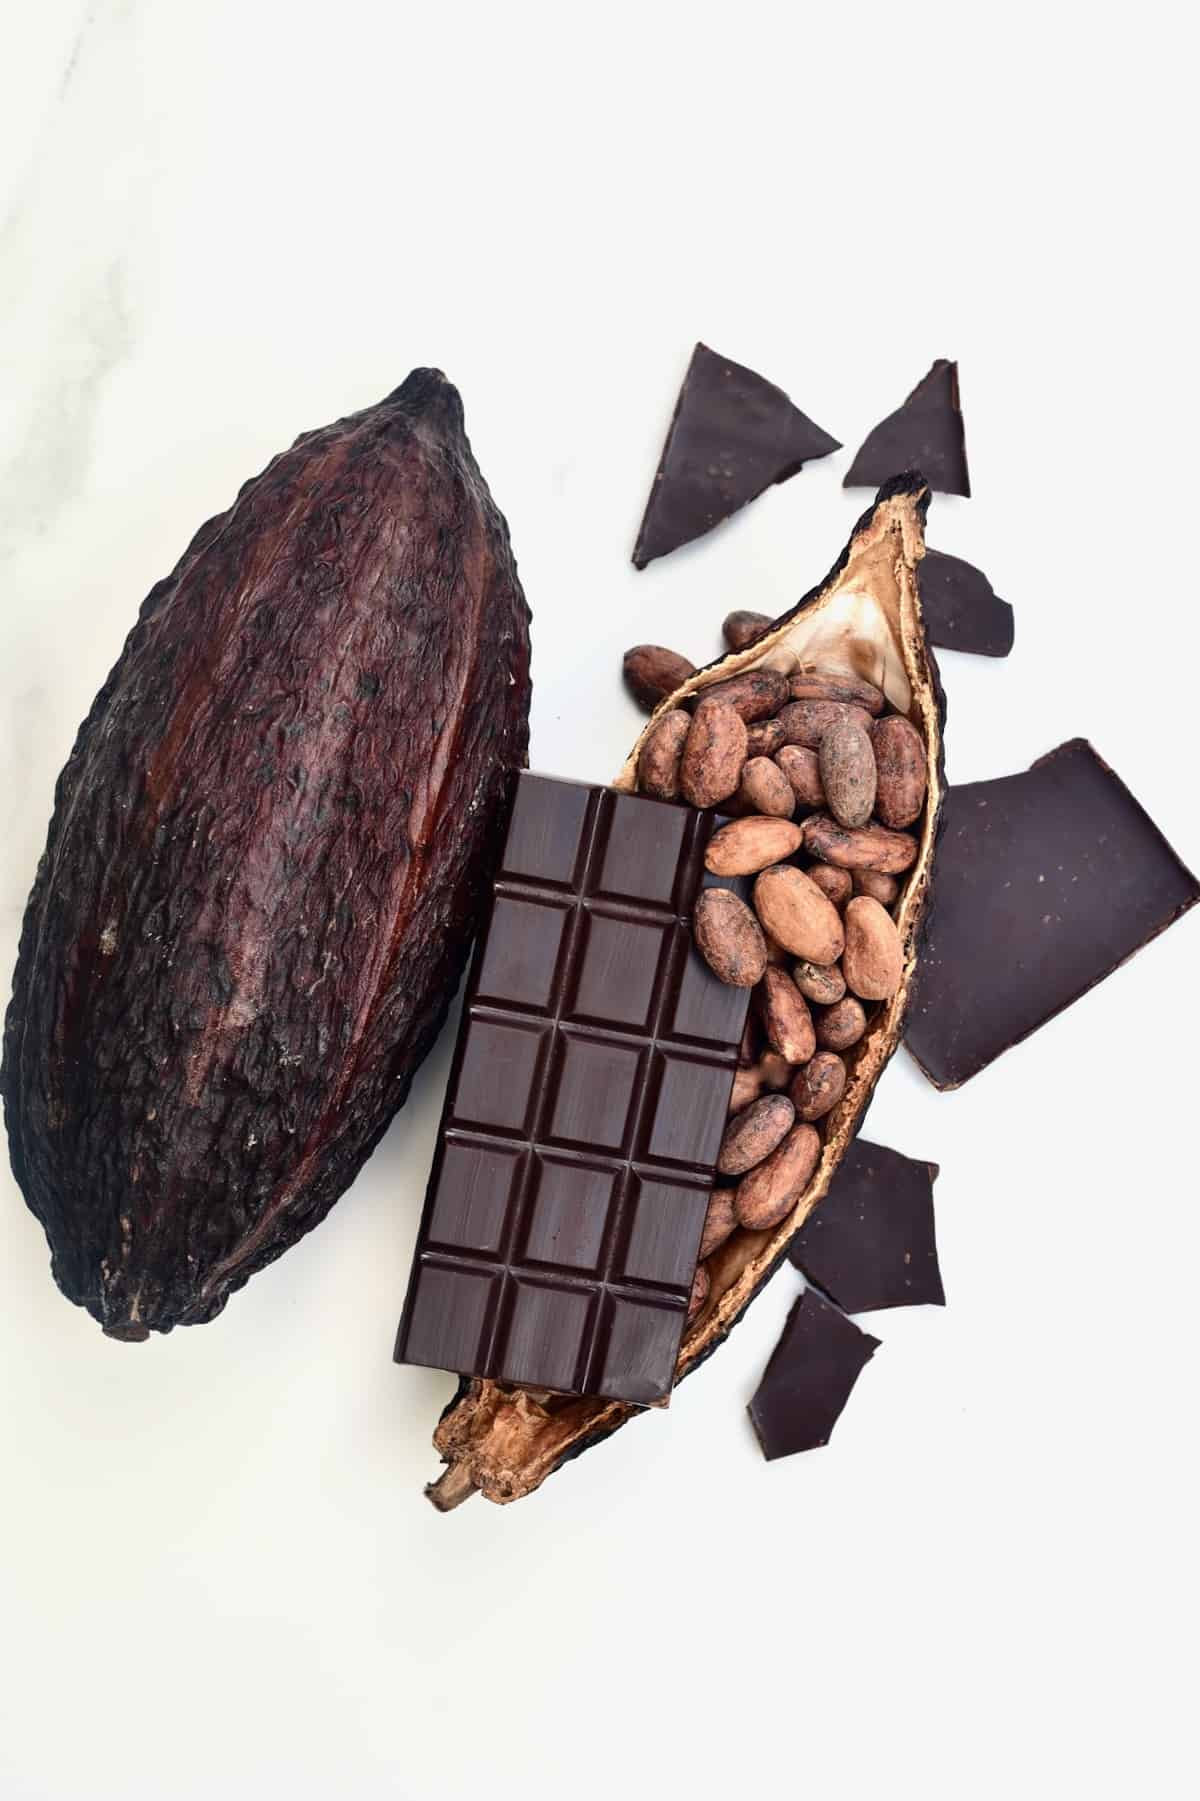
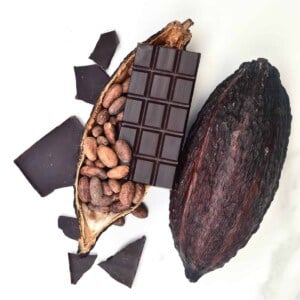
How to make chocolate from cocoa beans – the full 7-step process done at home for delicious bean to bar chocolate every time! Each step is thoroughly explained with a step-by-step process to do it at home.
I’ve previously shared methods for making ‘cheat’ homemade milk chocolate, dark chocolate, and white chocolate. However, these methods require combining store-bought cacao/cocoa powder and butter. Having done so, I wanted to learn how to make chocolate from the cocoa beans to a bar!
Following a 7-step process of harvesting, fermenting (and drying), roasting, grinding, blending, tempering, and molding – you can make delicious homemade chocolate from cocoa beans. Best of all, this method is super easy to tweak. Whether you want milk vs. dark chocolate and what percentage chocolate to sugar- no problem!

This is going to be a long one so let’s get straight to it!
Want to save this recipe?
How To Make Chocolate From Scratch
Step 1: Growing and harvesting
These two steps are the only ones that I have no part in, but I thought I’d include them in the process for full transparency.
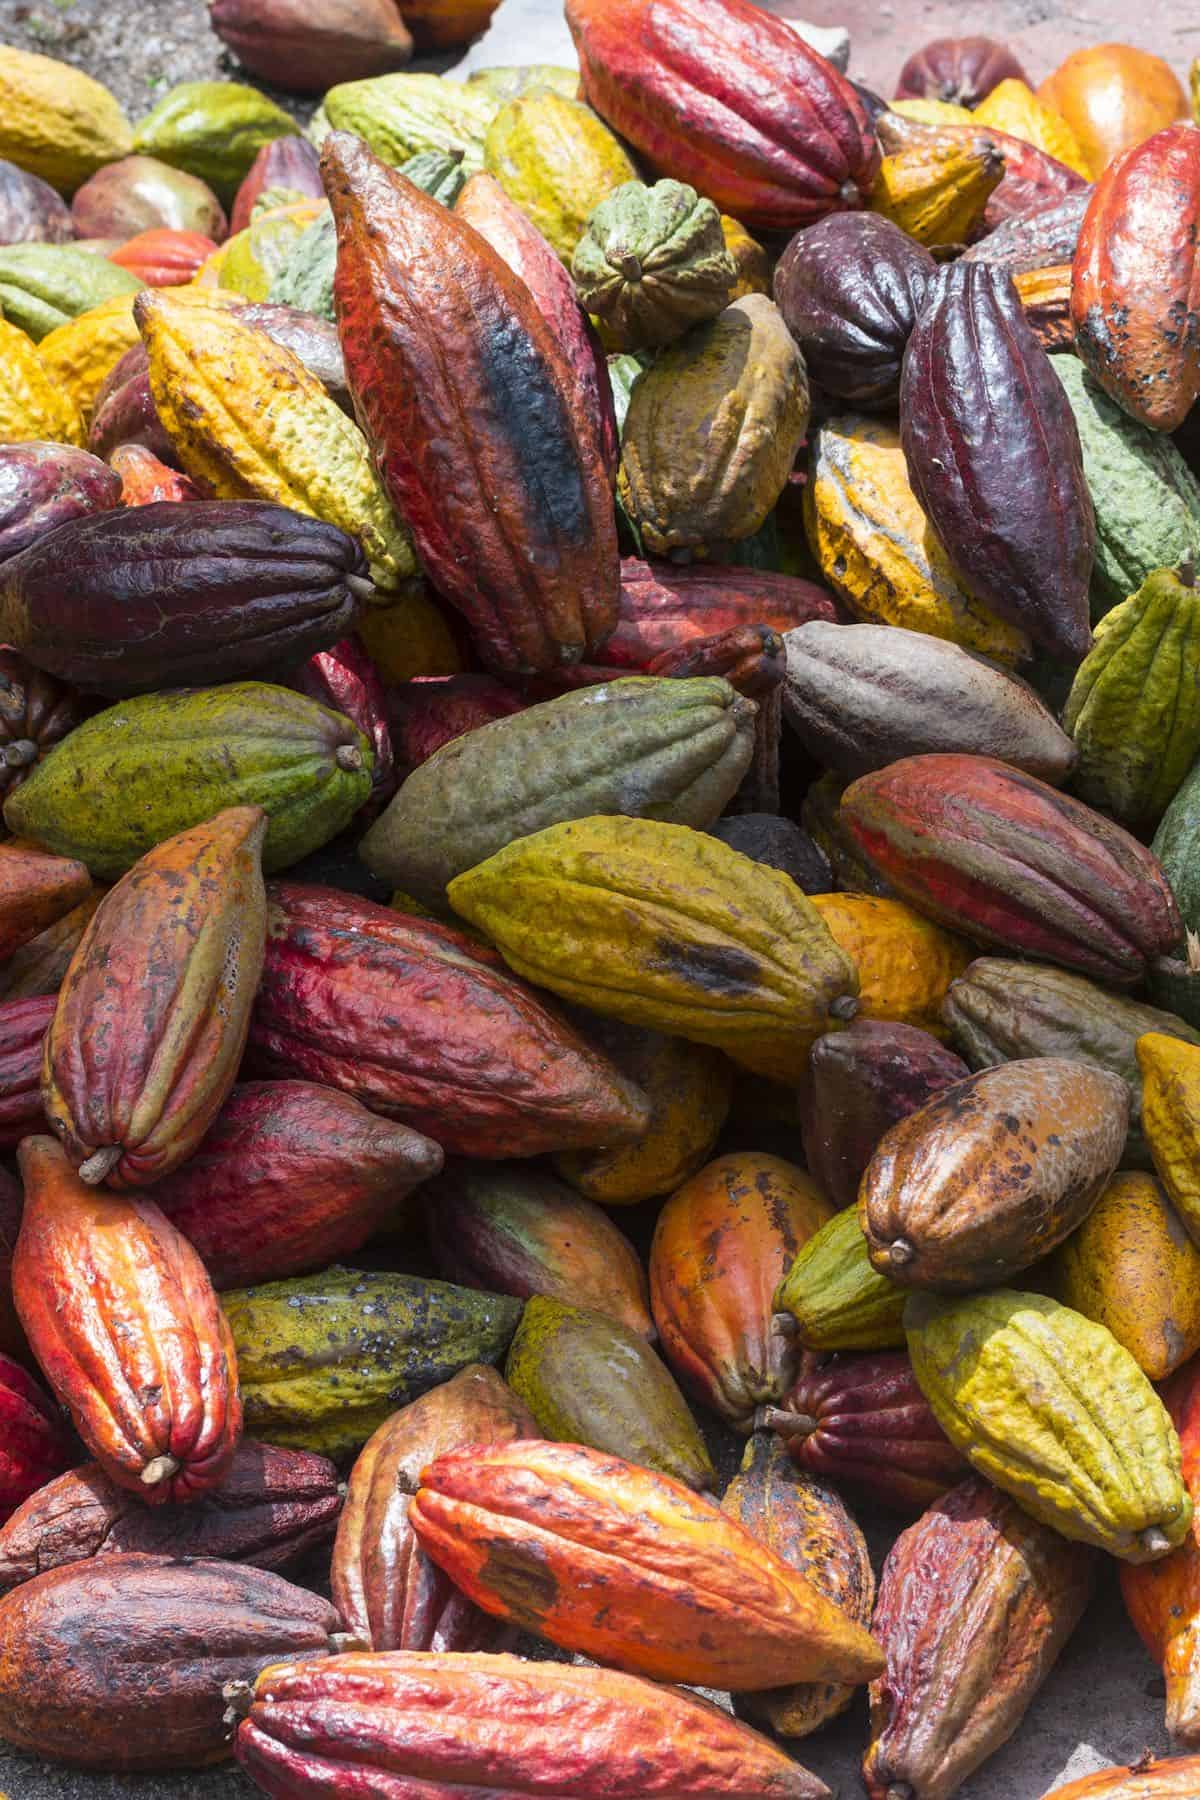
The cacao tree (also called Theobroma Cacao) is grown in tropical climates across the globe. These trees produce a fruit which is the cacao pod that grows on the branches and trunk of the tree.
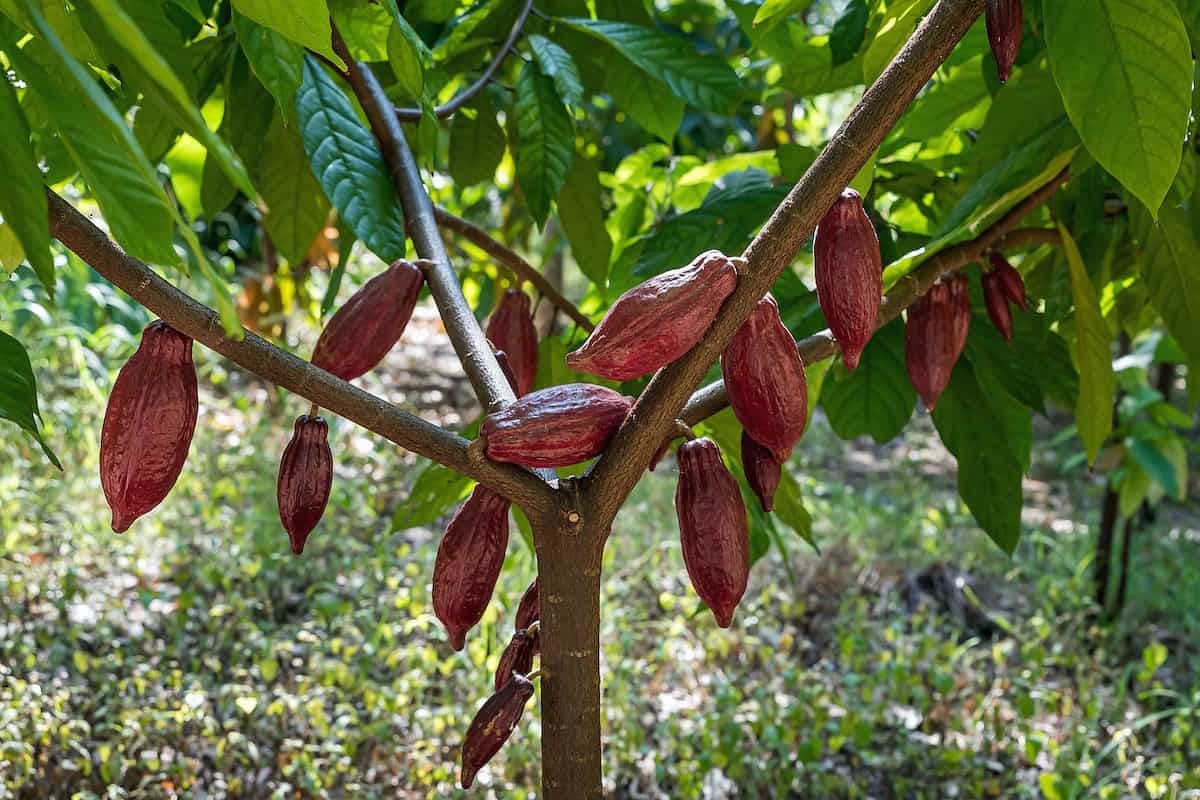
Interestingly, the pods don’t all ripen simultaneously. They also grow in different colors and shapes depending on the variety of the plant. So it takes a certain level of expertise in harvesting the pods at the correct time.
To harvest the pods, a machete is used to remove them from the tree without damaging the tree’s flowers. This ensures more pods can continue to grow.
To begin the process of making chocolate the first step is to open the cacao pod. When doing this at home I find it easiest to hit the shell with something like a wooden muddler or hammer, if you have one.
If you want to save the pod to be repurposed into cups/bowls then it may be easiest to carefully cut the shell with a hand saw so it has an even slice that can be further refined/sanded. For more information on how to dry and seal the pod to become safe for food usage, you can see the method I used for these coconut bowls.
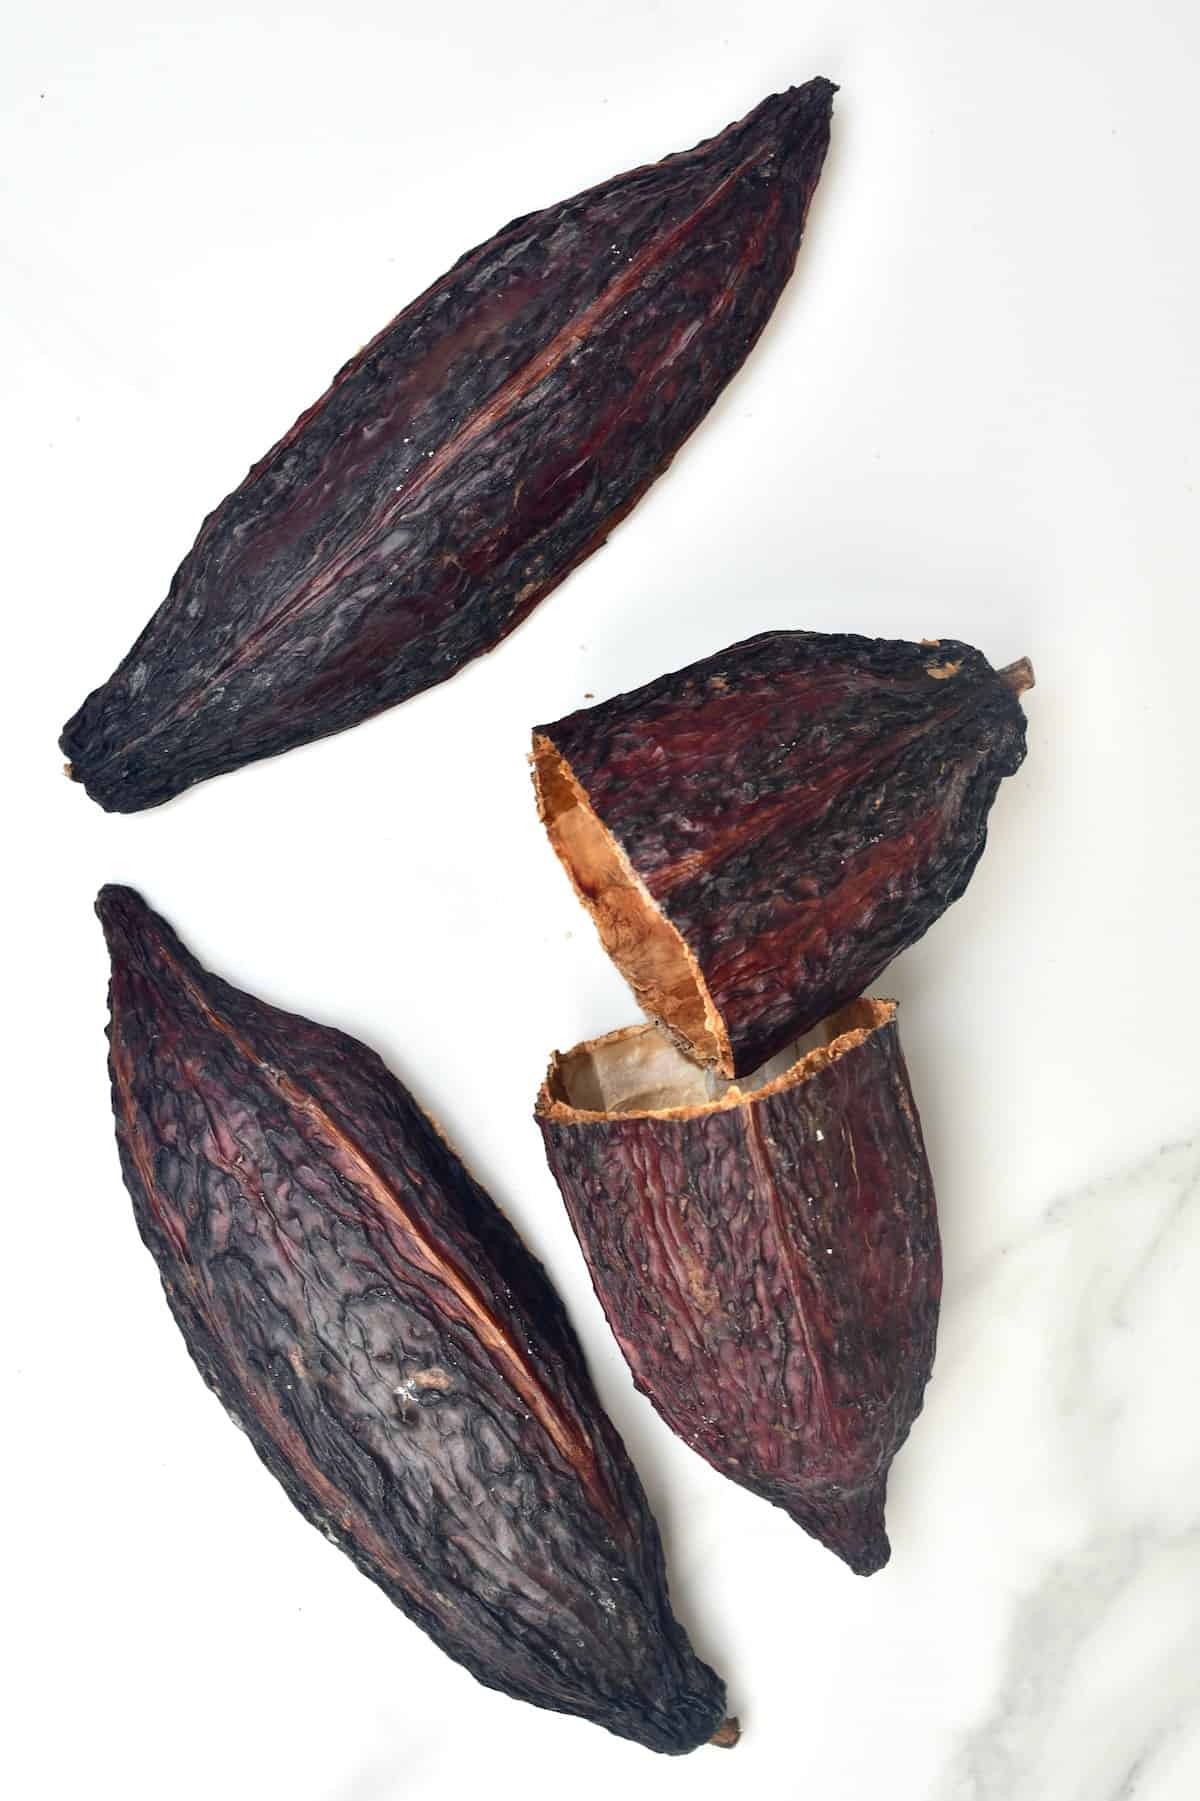
Once you cut open the cacao pods, you’ll see the cacao beans, which are covered in a viscous white ‘mucilage’ coating. Definitely not what we think about when thinking about chocolate.
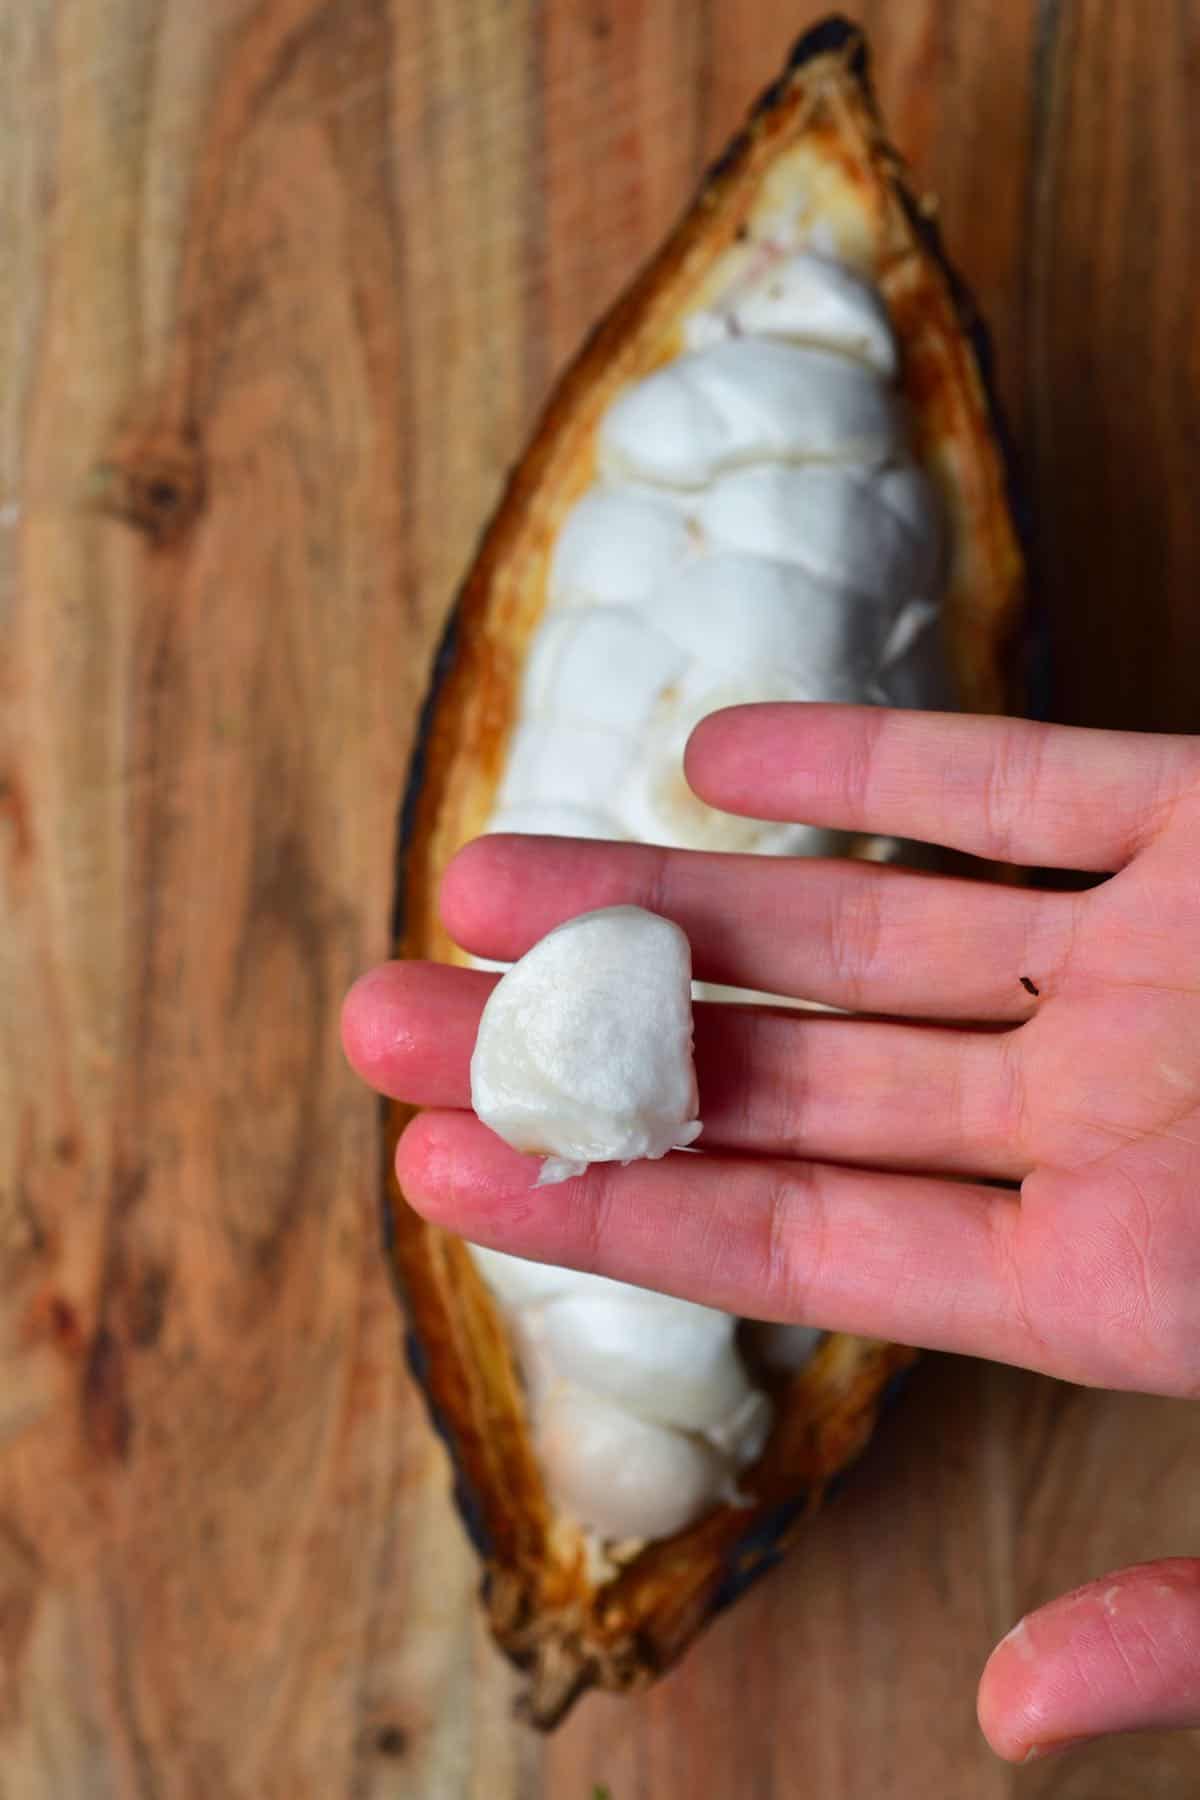

The white jelly pulp/coating is actually edible too. Traditionally its eaten as-is or blended with water into a juice ‘cacao juice’. The flavor is sweet-tart/acidic and has similarities with soursop.
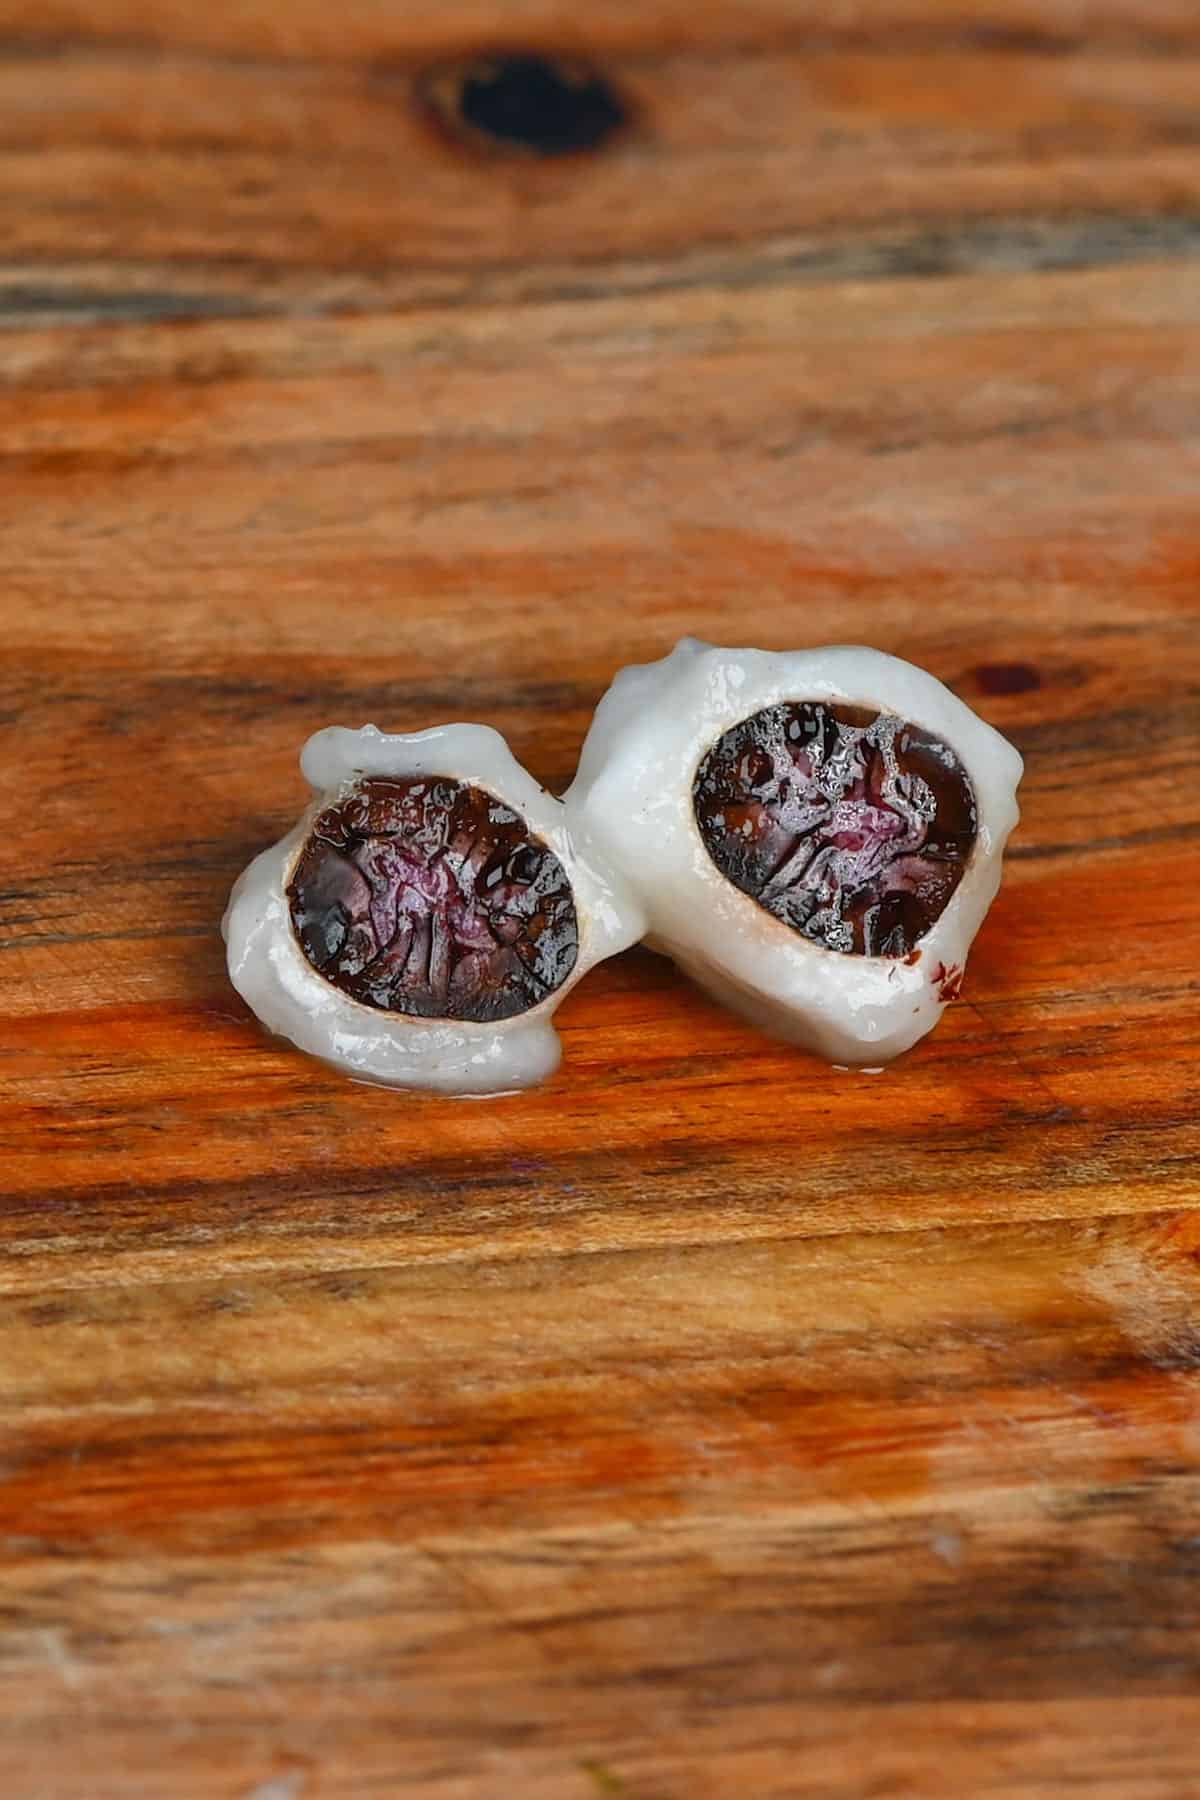
The hard bean inside is the cacao bean. At this point we have yet to ferment or roast is so it’s fairly ‘wet’ looking with a purple color and brain like appearance when you cut into it due to all the individual nibs inside.
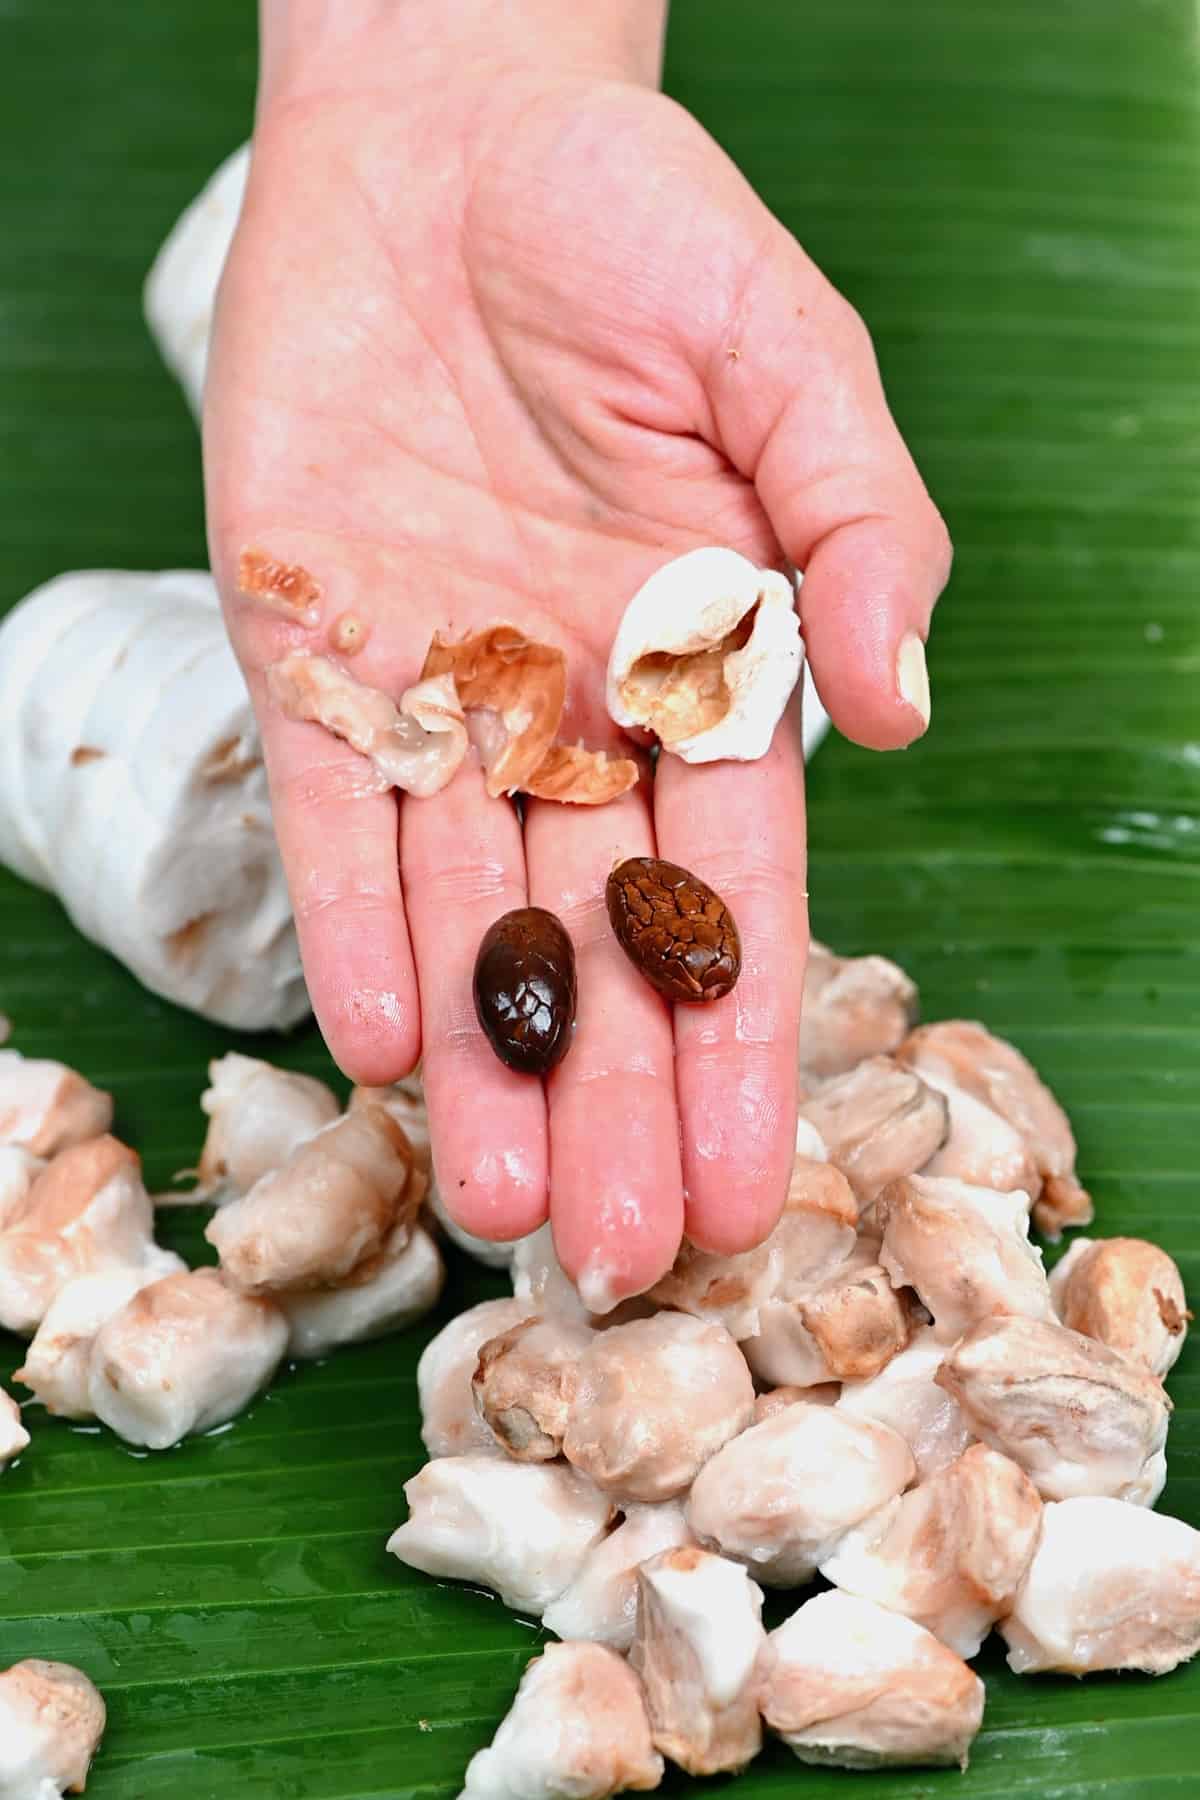
It’s not recommended to eat the raw cacao beans as they will be very bitter and unpleasant – instead, we need to process them first.
Step 2: Fermenting the cacao beans
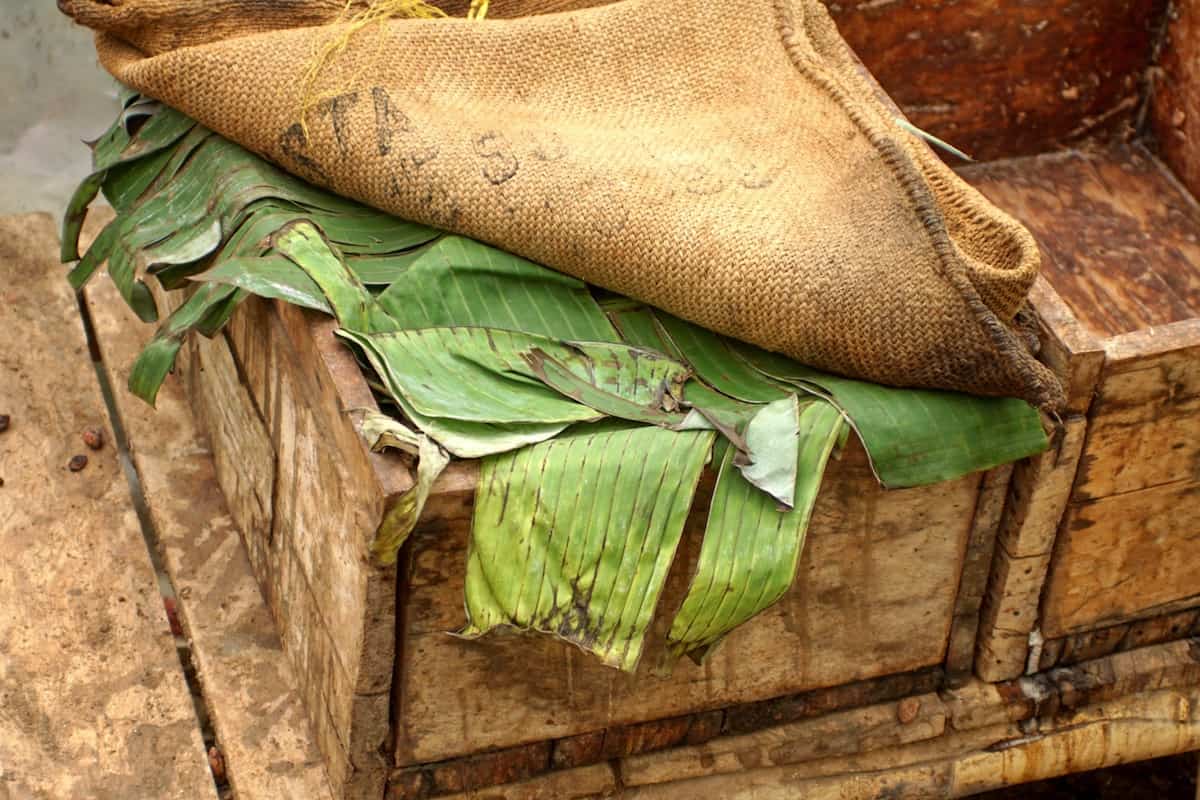
Once the beans are exposed to oxygen, the fermentation process can begin – done in a very similar way to making tempeh. Traditionally, the beans are contained within banana leaves or perforated wooden boxes (for airflow) topped with banana leaves, mixed and turned occasionally. As they ferment, the temperature of the beans will naturally rise to between 104-122ºF/40-50ºC, thus encouraging the fermentation process.
Following this step, the beans are then further dried – often in the sunlight. However, I use a dehydrator for this step which ferments and dries them at the same time.
This stage can take up to eight days to fully complete (depending on the type of bean used) and is critical in developing the cacao flavor and reducing the astringency. Chocolate made with unfermented beans won’t have the same richness or ‘body’ to it.
When doing the process at home there are two methods; the first is a way that mimicks the traiditonal version, and the second uses a dehydrator.
Method 1: With banana leaves
- I lined a large bowl with banana leaves then filled it with the beans, topping it with a layer of banana leaves.
- Just like when allowing bread to rise, this now needs to be placed somewhere warm. Between 40-50ºC is the optimal temperature. This can be helped by placing them next to a heat source or even placing a hot water bottle within the container you use (that can be removed and replaced 1-2 times a day if needed).
- As the beans heat, they will start to produce their own heat too (usually after a couple of days), which helps the process along. As the beans ferment the white layer will break down into a juice so it’s a good idea to drain this once per day (or twice if possible) and mix the beans.
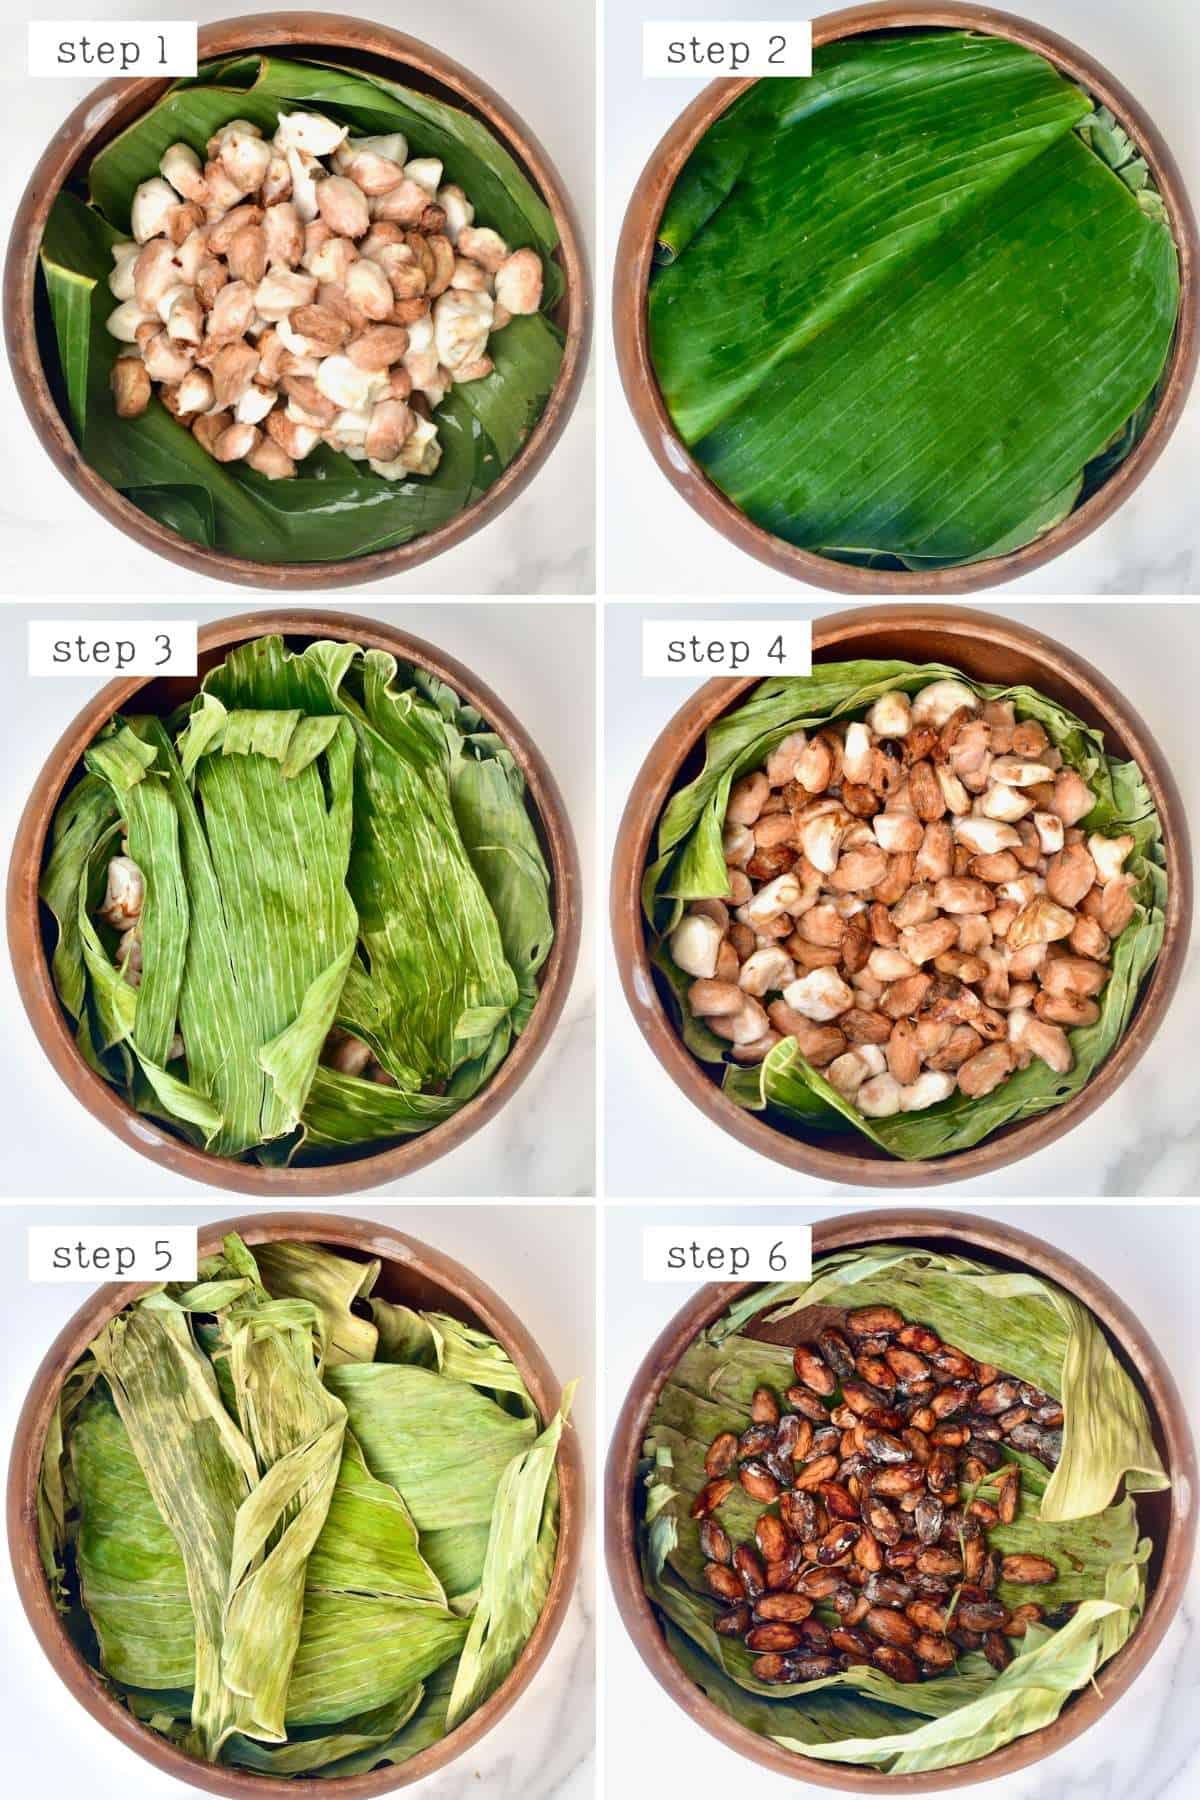
- Check the beans a few times during the process in case there are any that look moldy – remove these and continue with the process.
- This process takes around 5 days but can take slightly longer depending on the heat, humidity, and individual beans. I allowed my beans to ferment and dry all while wrapped in the banana leaves – some methods may change the process for drying but I find it unnecessary.
Method 2: With a dehydrator
- Place the beans in a single layer across the dehydrator trays, leaving space between the beans for airflow.
- Run the dehydrator at 104ºF/40ºC for several days. This can take between 5-10 days; I did it for 5 days.
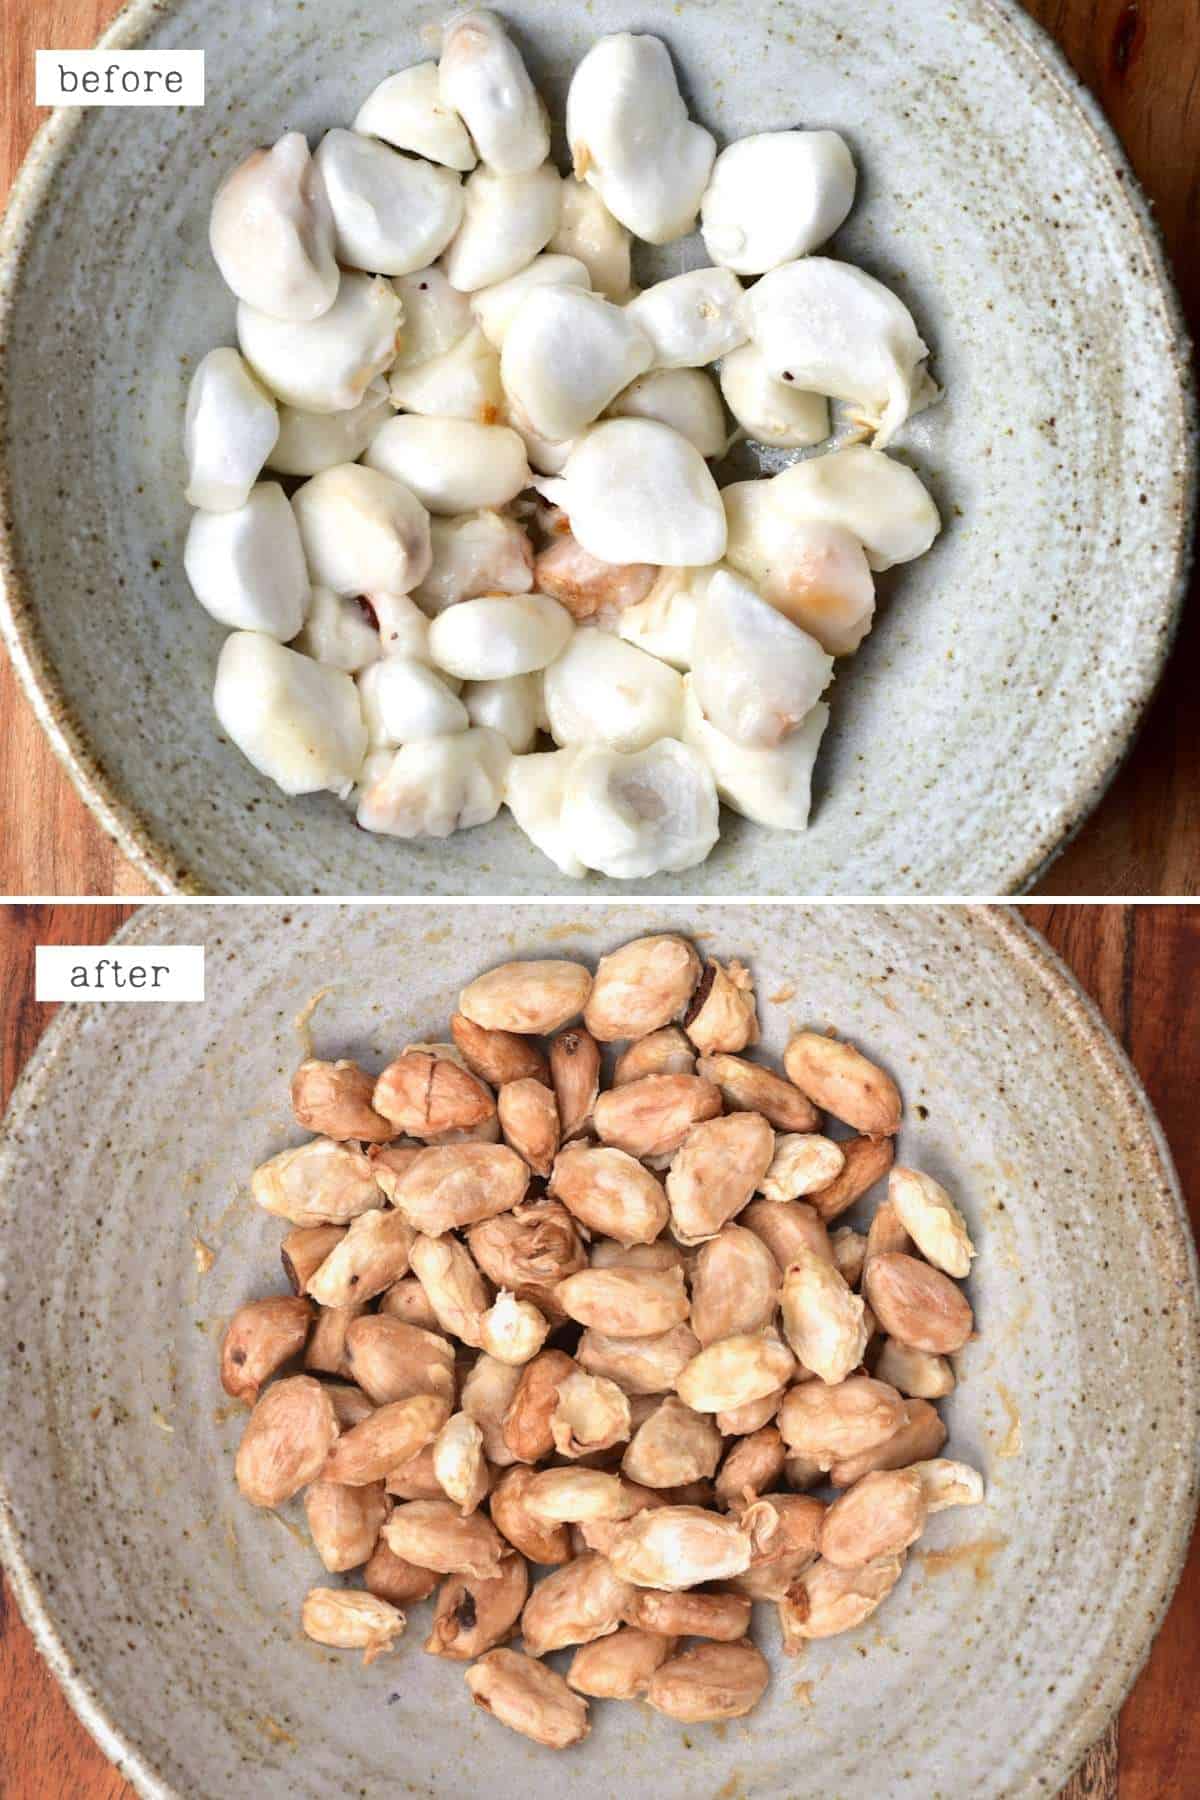
During this process, the beans will turn from a purple color to a pink/reddish-brown to a darker brown and will massively reduce the liquid content of the beans. It doesn’t work quite as well as the traditional method but will work.
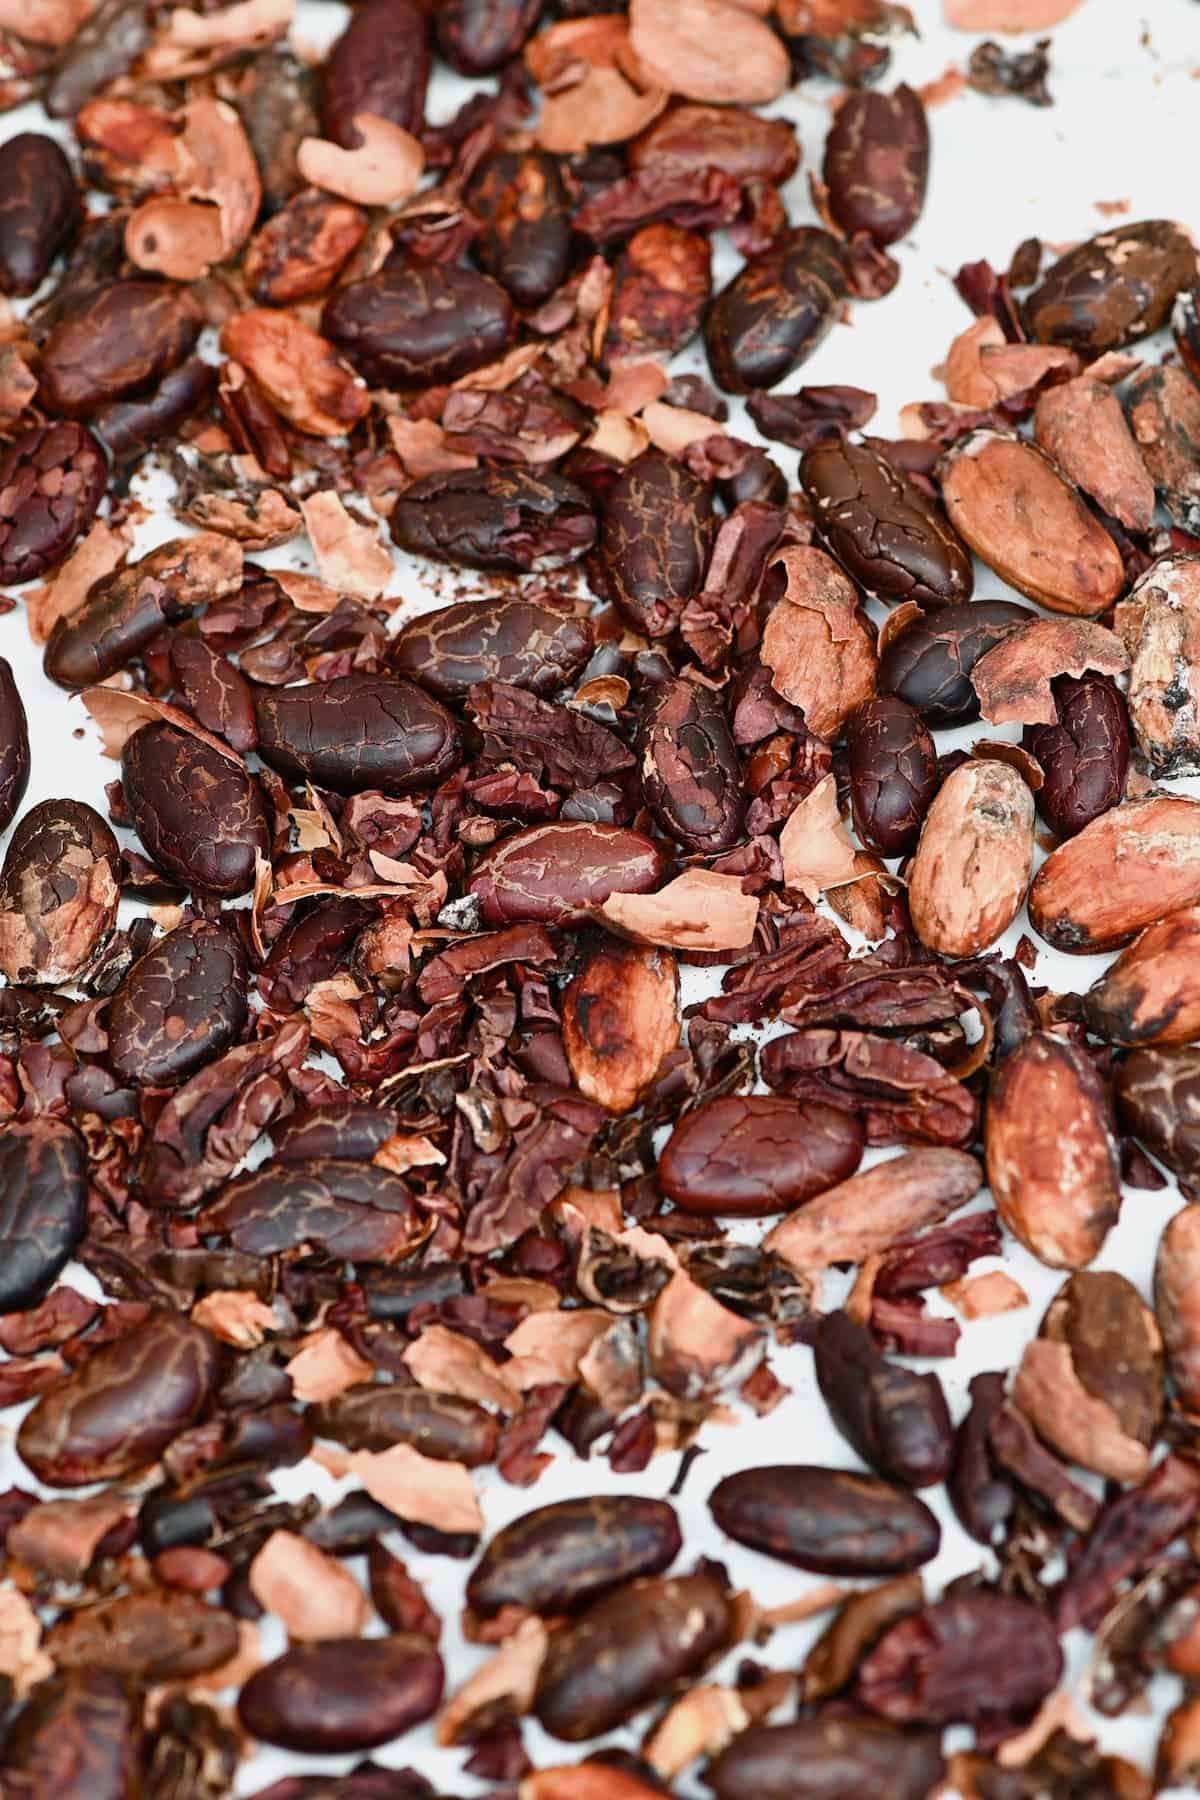
Step 3: Roasting the beans
Roasting the beans is important to get rid of any remaining liquid content from the beans. However, it also develops flavor and kills any bacteria on the beans. Most importantly, it helps separate the outer husk (shell) from the inner bean (cacao nibs).
No matter how this is done, it tends to follow a similar technique: heating the beans at high temperature (which will help separate the husk and nibs within) then slowly reducing the temperature (to continue the roasting without burning the beans) until they begin to ‘pop,’ without burning. However, at home you can really experiment with this and changing temps.
- Before roasting the beans, you’ll first need to remove any beans that are broken and/or smell moldy, etc.
- Then, lay the beans in a single layer on parchment-lined oven tray/s. You can roast the beans whole then peel them or peel them first before roasting.
If you peel the husk first then you can break the bean into the nibs and have more surface area while roasting. That way they roast faster and more evenly. However, it is much easier to peel them after roasting so the preference is up to you.
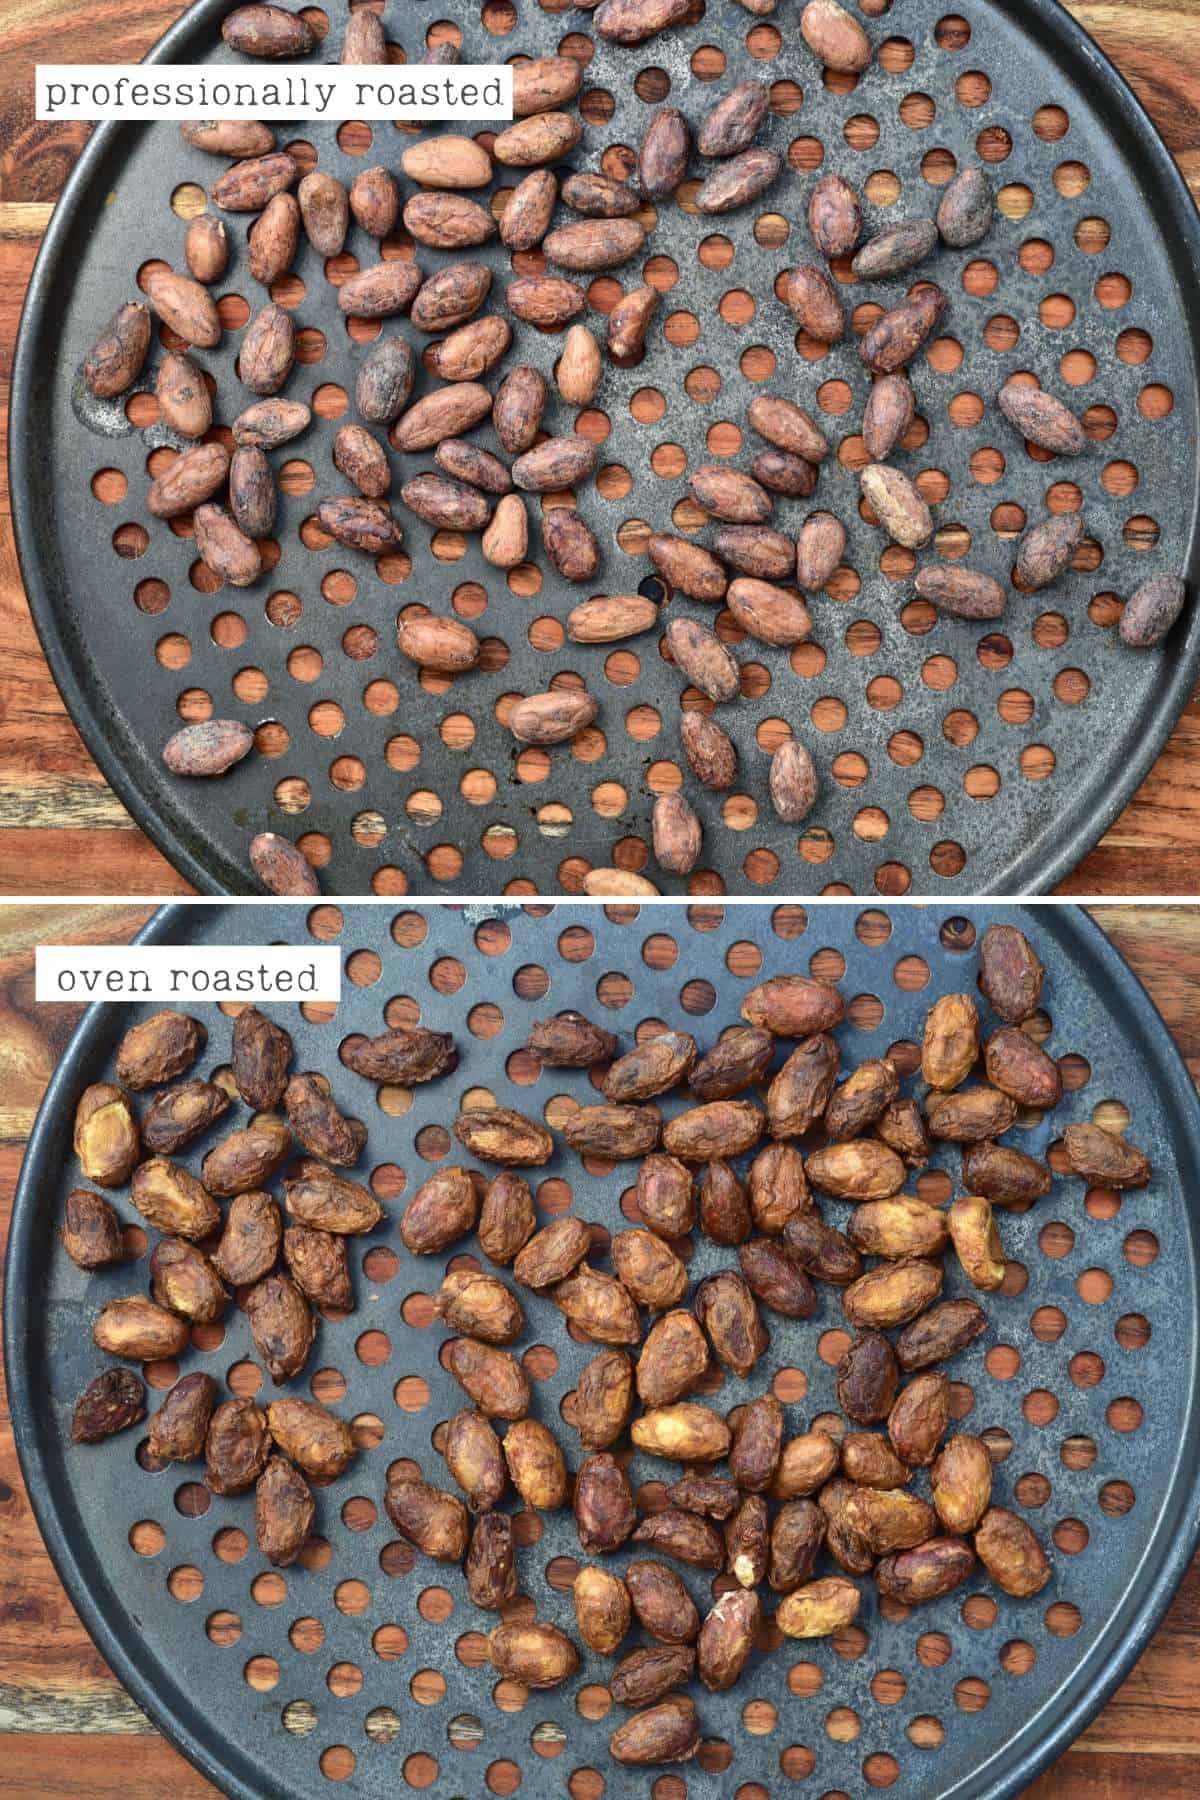
- Roast the beans in the oven at 120ºC/250ºF fan-assisted for between 15-20 minutes for a fairly light roast.
The way you roast the beans will have a big impact on flavor and you can choose to do a light, medium, or dark roast. This is something I’m still experimenting with and will update over time.
During the end of the roasting step (if roasting as whole beans), air pockets will escape the beans, making popping sounds – this is normal. When they’re almost done, you may also smell a ‘brownie’ smell. The husk should also come off the beans easily.
Step 4: Cracking & Winnowing
The title makes this process sound complicated; however, what cracking and winnowing of chocolate actually means is just removing the cocoa bean from the shell to reveal the cacao nibs inside. If you’ve done this before roasting then – skip this step!
While commercial chocolate will do this process with machines, it can be done by hand.
- There are several ways to do this, but pressing the beans between your fingers should be enough to loosen the shell. Do this with all of the beans putting the shells in a separate bowl from the beans (nibs).
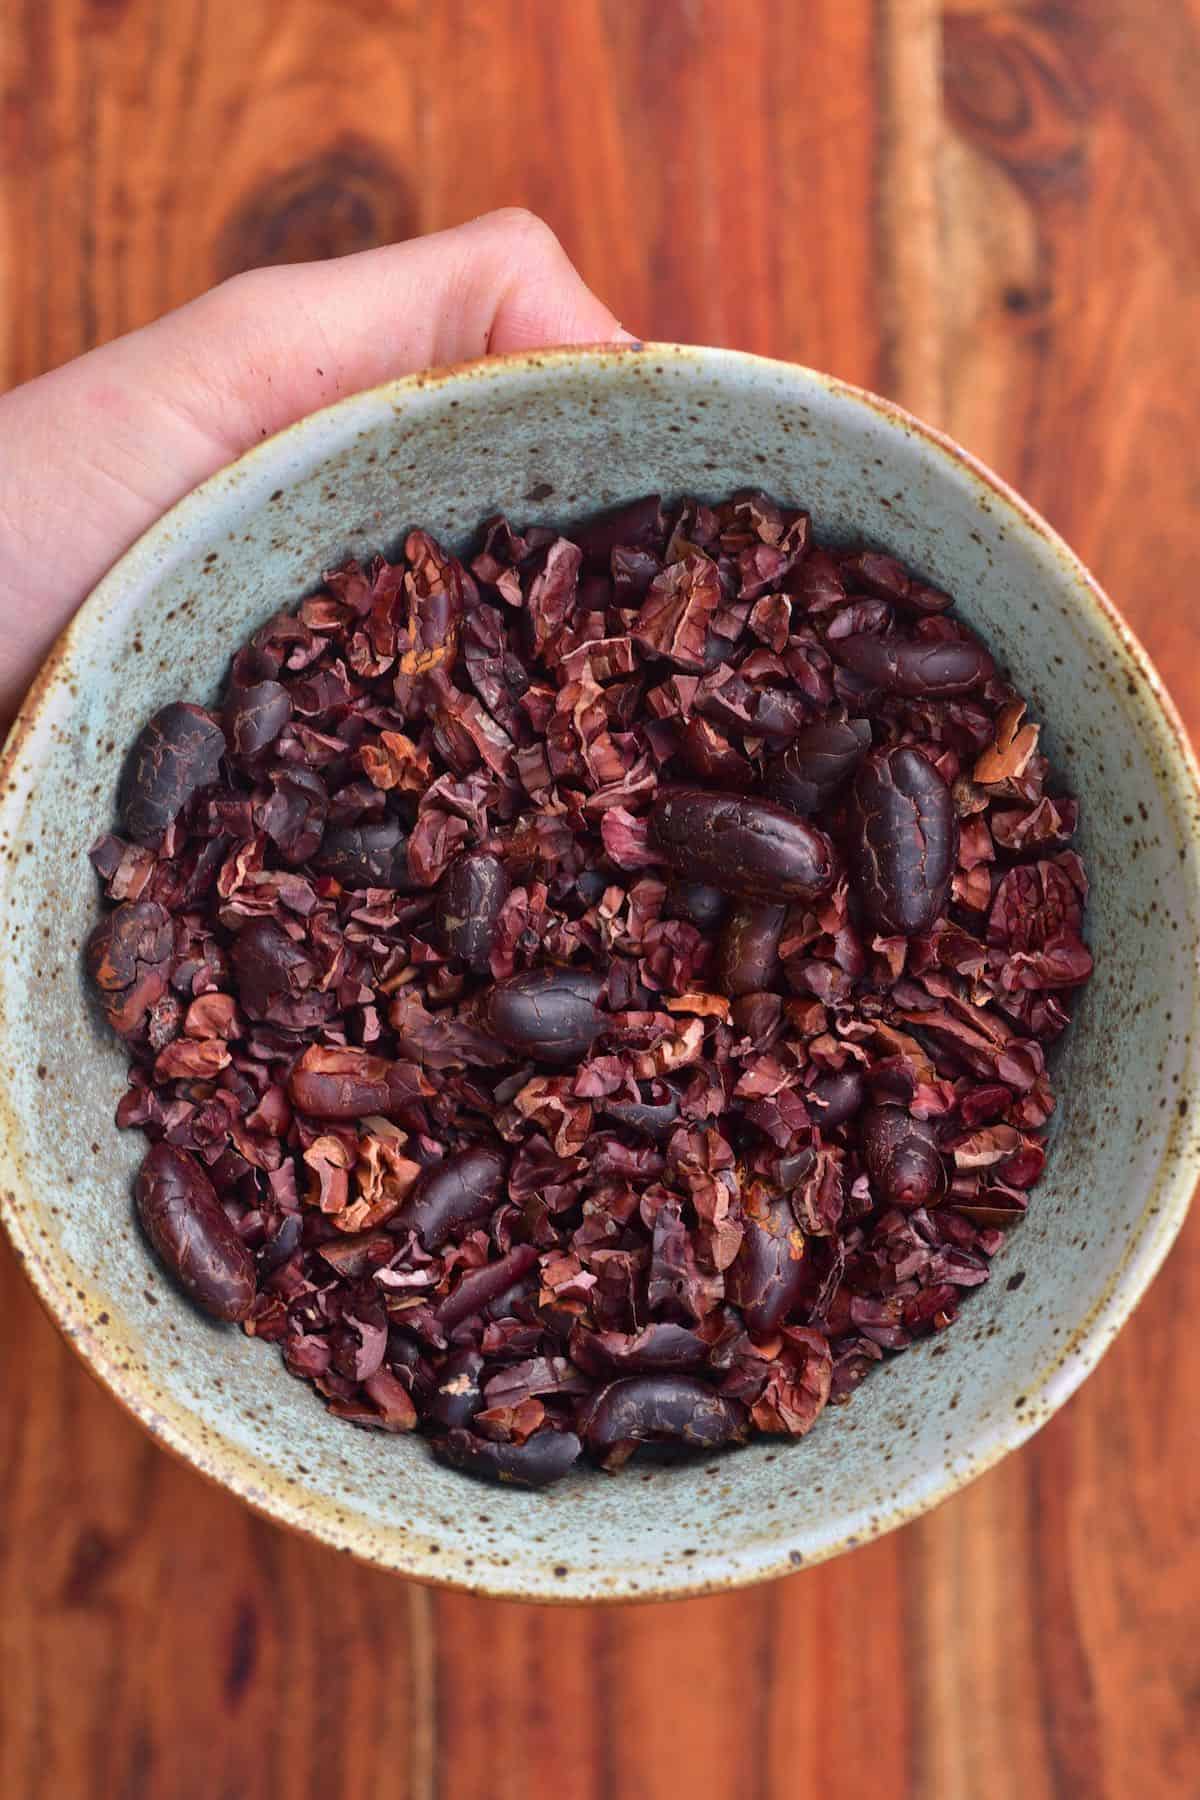
- Next, break the beans down into individual nibs. You can do this by hand or place all the beans into a bag and bash with a rolling pin.
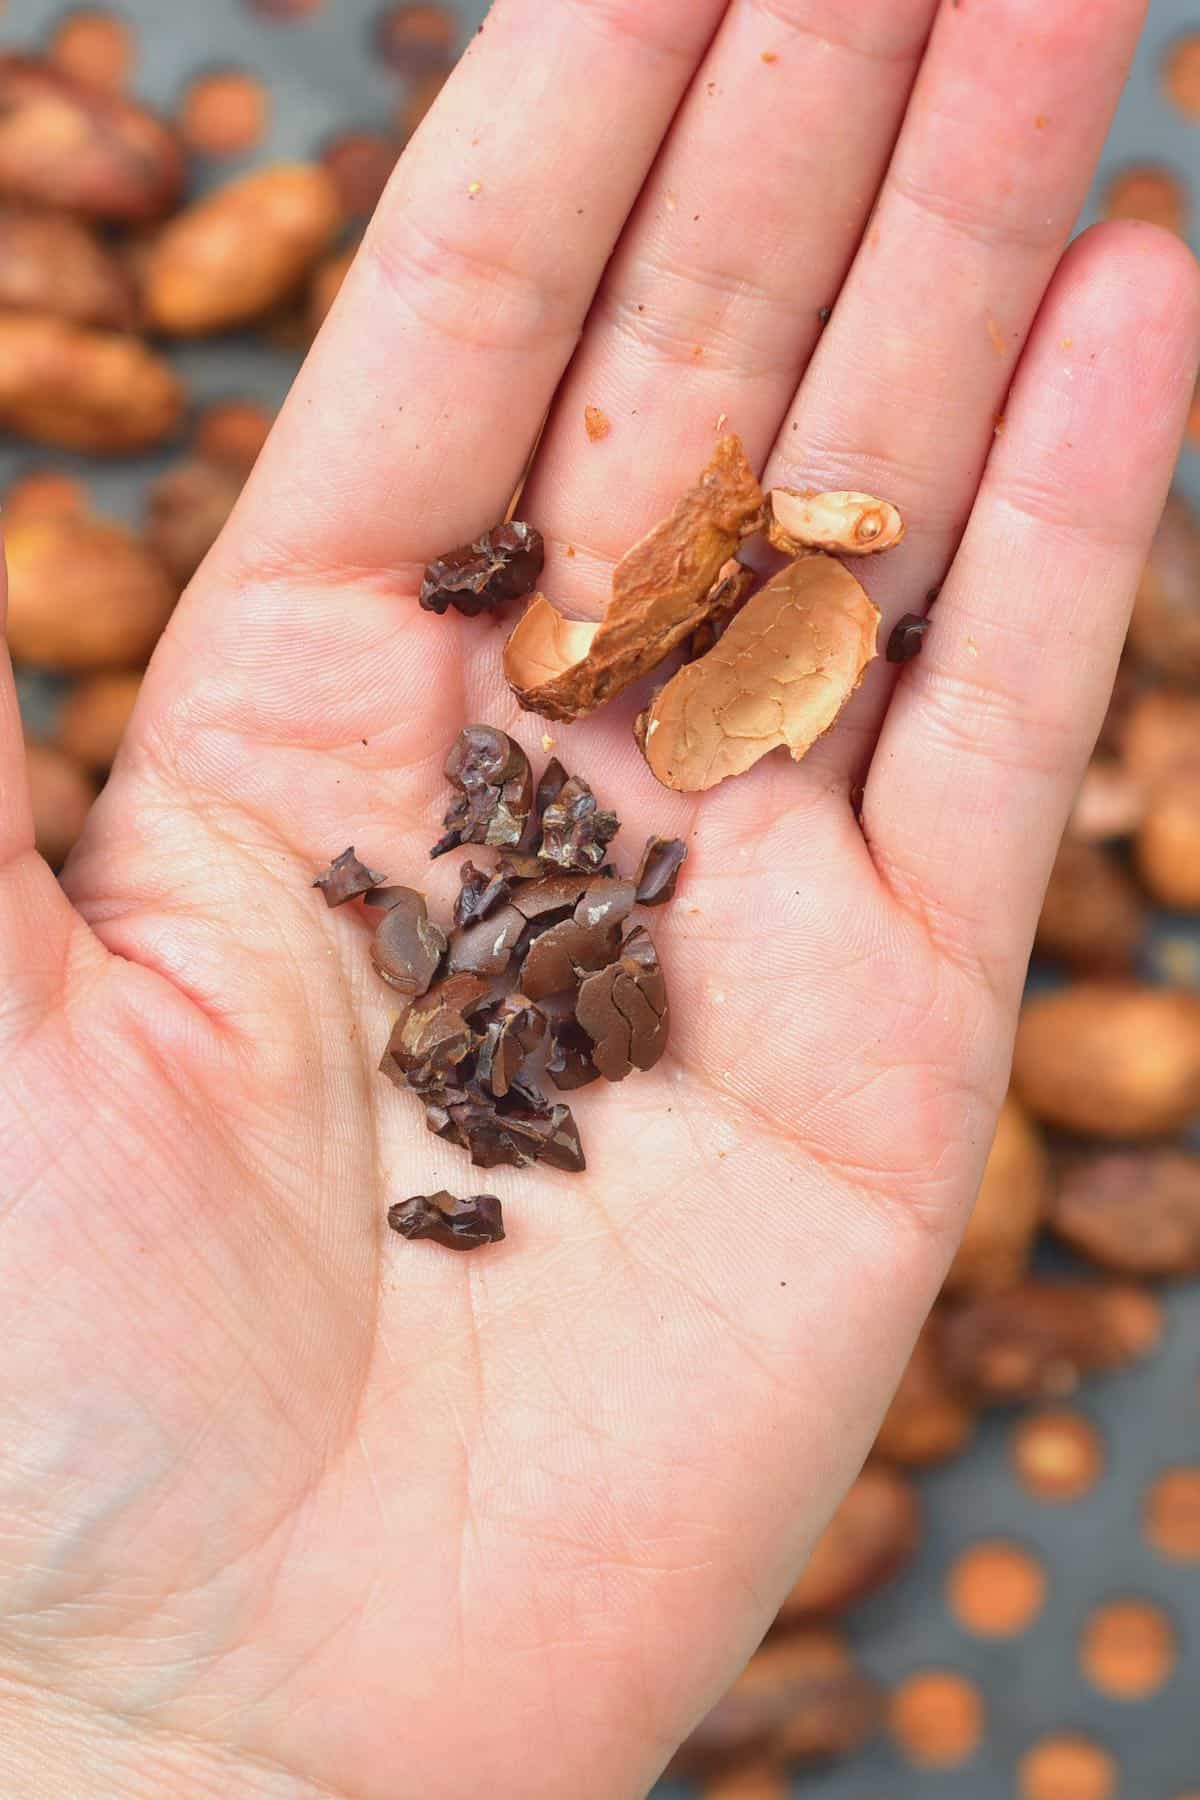
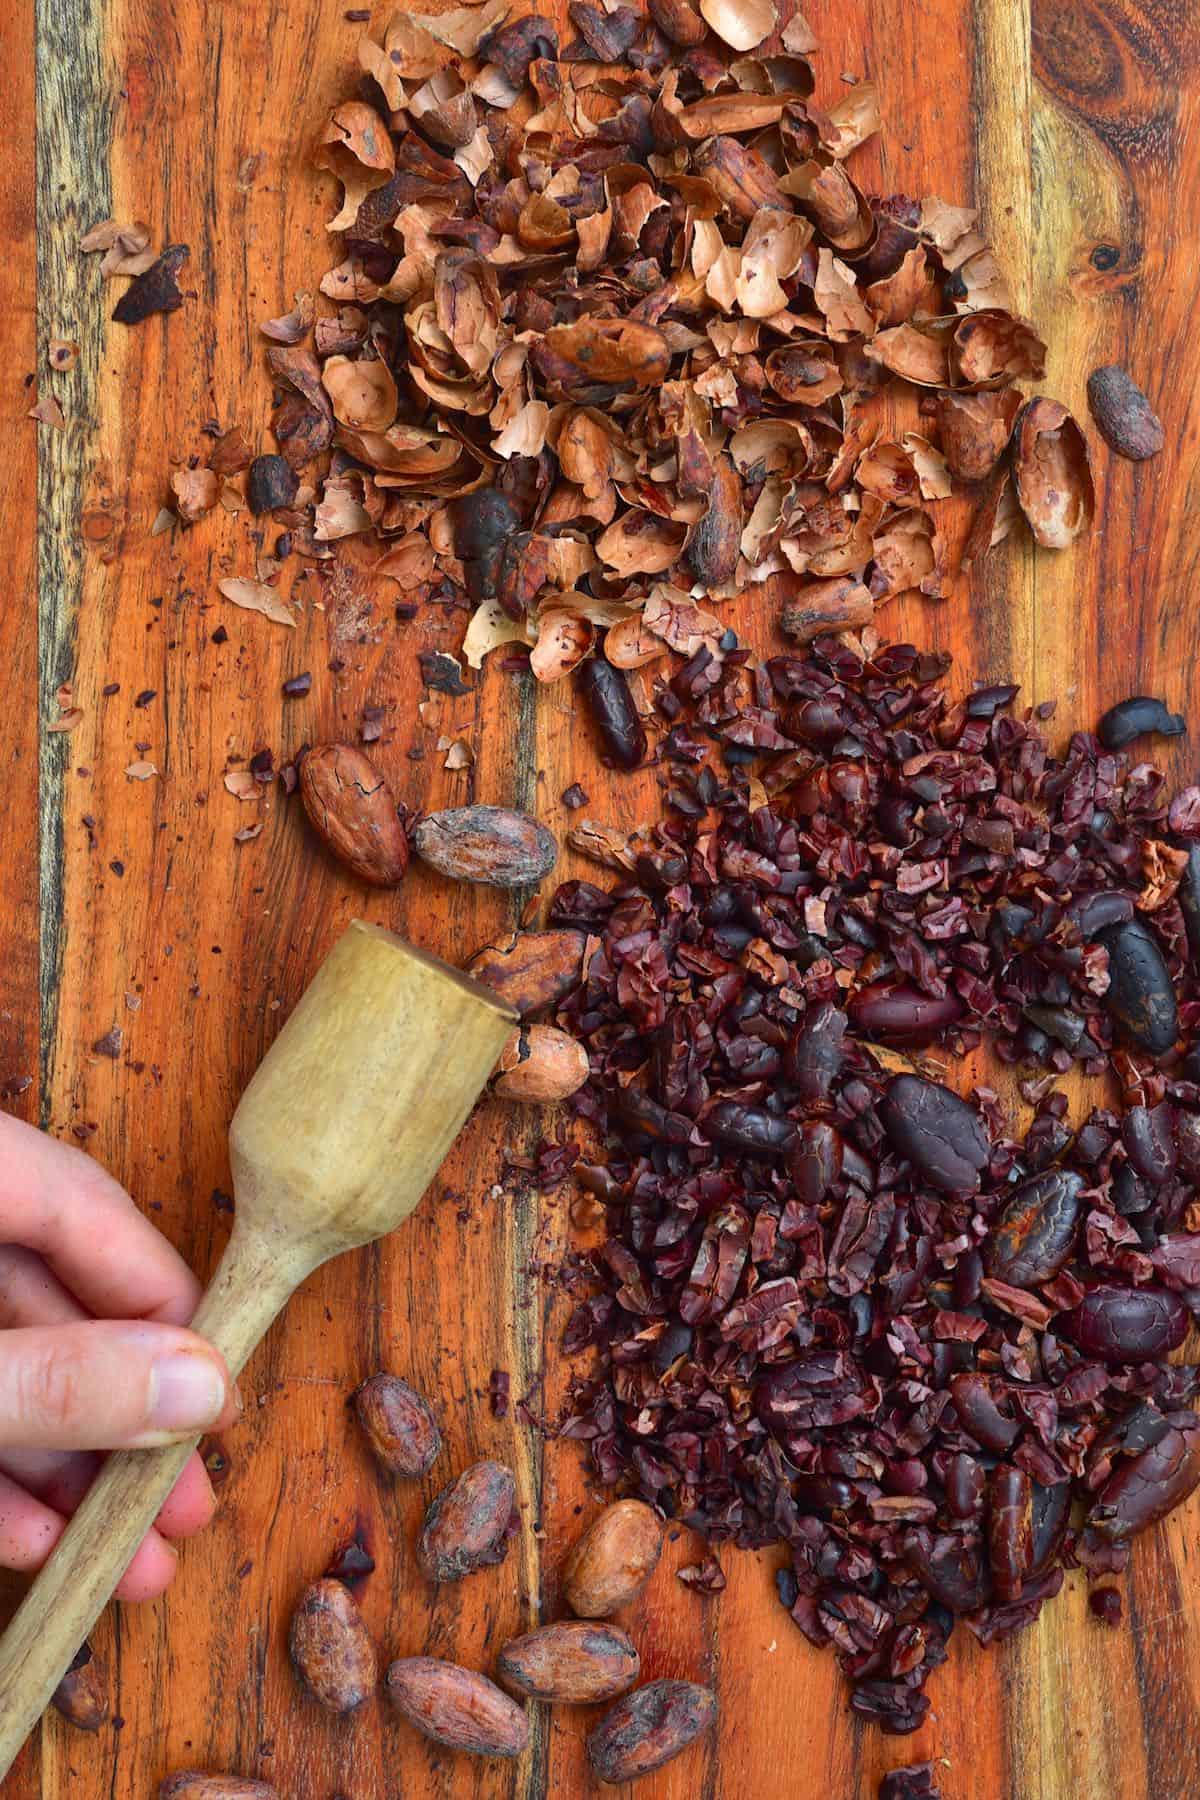
These cacao nibs can now be eaten as is or further processed into chocolate. Interestingly these nibs are made up of around 50% cacao solids (what will become cocoa powder) and 50% cacao butter.
Step 5: Grinding and Conching
If you grind the beans as they are now then you will end up with something that looks similar to cocoa powder. Except that it has a higher fat content as the beans haven’t been processed to separate the cacao butter from the solids.
However, when making chocolate at home you can create the chocolate without separating the two. You can add extra cacao powder or butter to further tweak exact ratios if preferred. What you do need is a piece of equipment called a chocolate melangeur (melanger), i.e., a stone grinder. This is used to grind the cocoa bean nibs to a paste called chocolate liquor before undergoing a process called ‘conching.’ There’s no alcohol involved, it’s called this due to its liquid form.
This step removes certain unwanted ‘volatiles’ within the mixture as it heats and leads to evaporations and distillation of these elements – like acetic acid, for example. It also helps to coat the cocoa solids with fat to reduce the viscosity of the molten chocolate. This process is also important for developing flavor within our chocolate. Higher-quality chocolate often has a higher conching time – for a richer, milder taste.
This is also the stage where (in commercial operations) the chocolate liquor could be separated into cacao butter and solids.
To do this, a hydraulic press would be needed to separate the cacao mass into the butter and powder (like we can buy from stores). If you’re wanting to make chocolate from cacao/cocoa powder and cocoa butter then you can follow a method like I used for this dark chocolate.
Using A Chocolate Grinder
Even if you’re using a grinder, it’s still a good idea to pre-grind the nibs into smaller pieces.
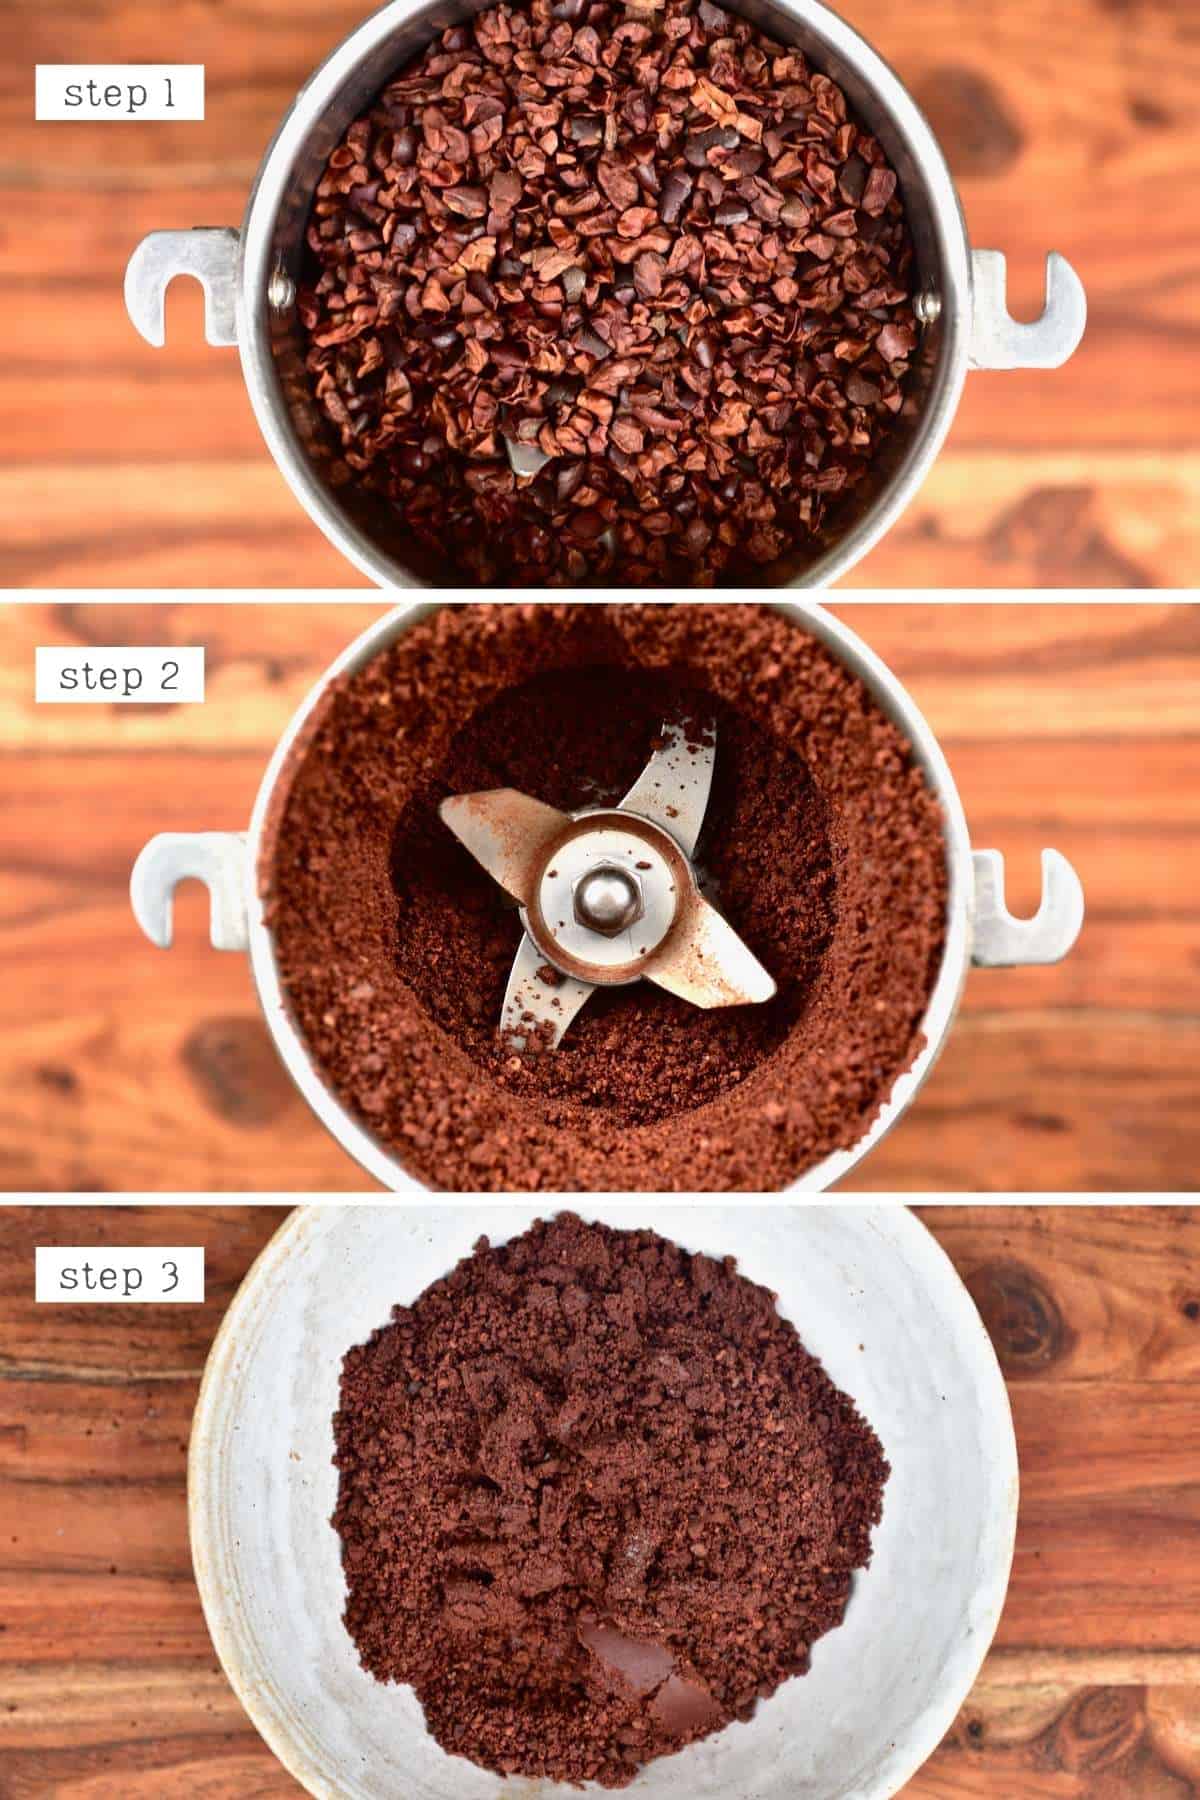
- You can do this in a high-speed blender, food processor, or electric coffee/spice grinder. If using a small grinder, then do this in batches.
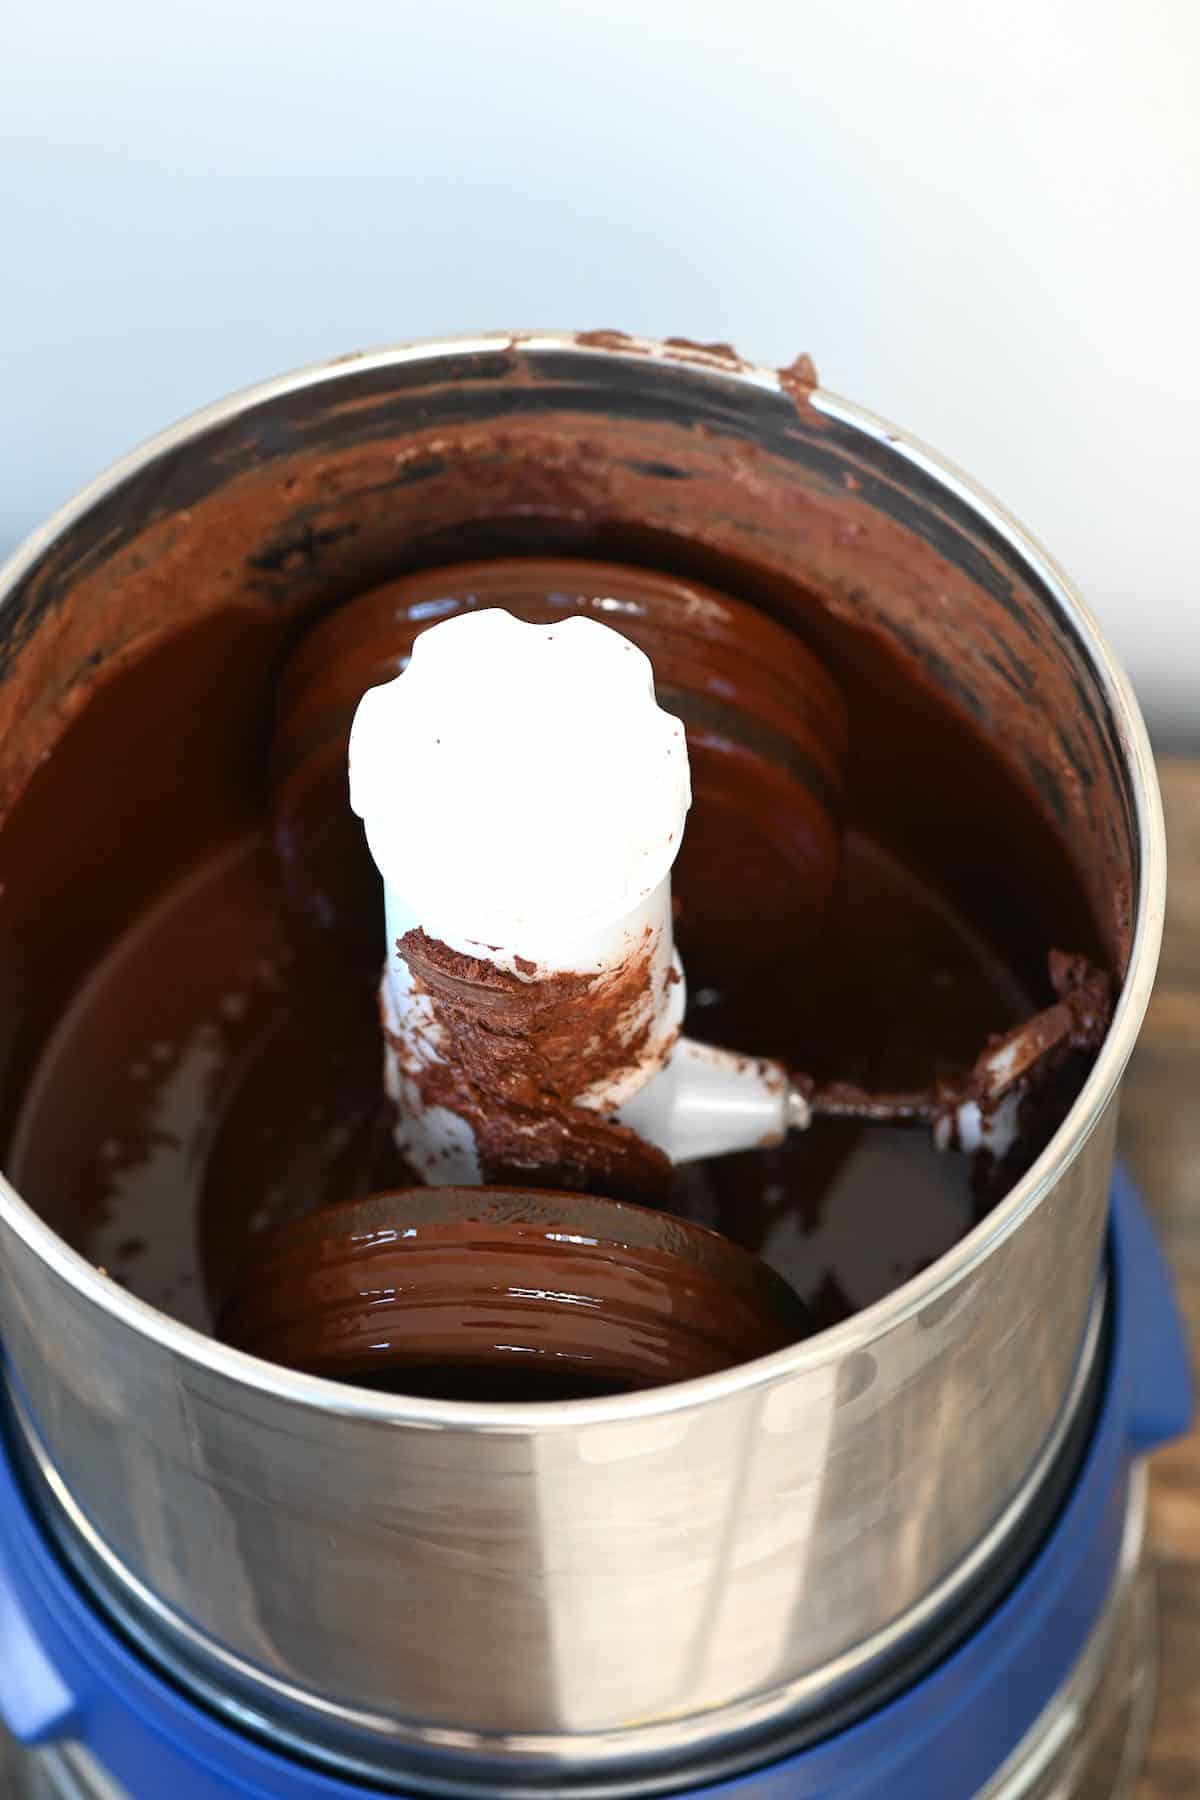
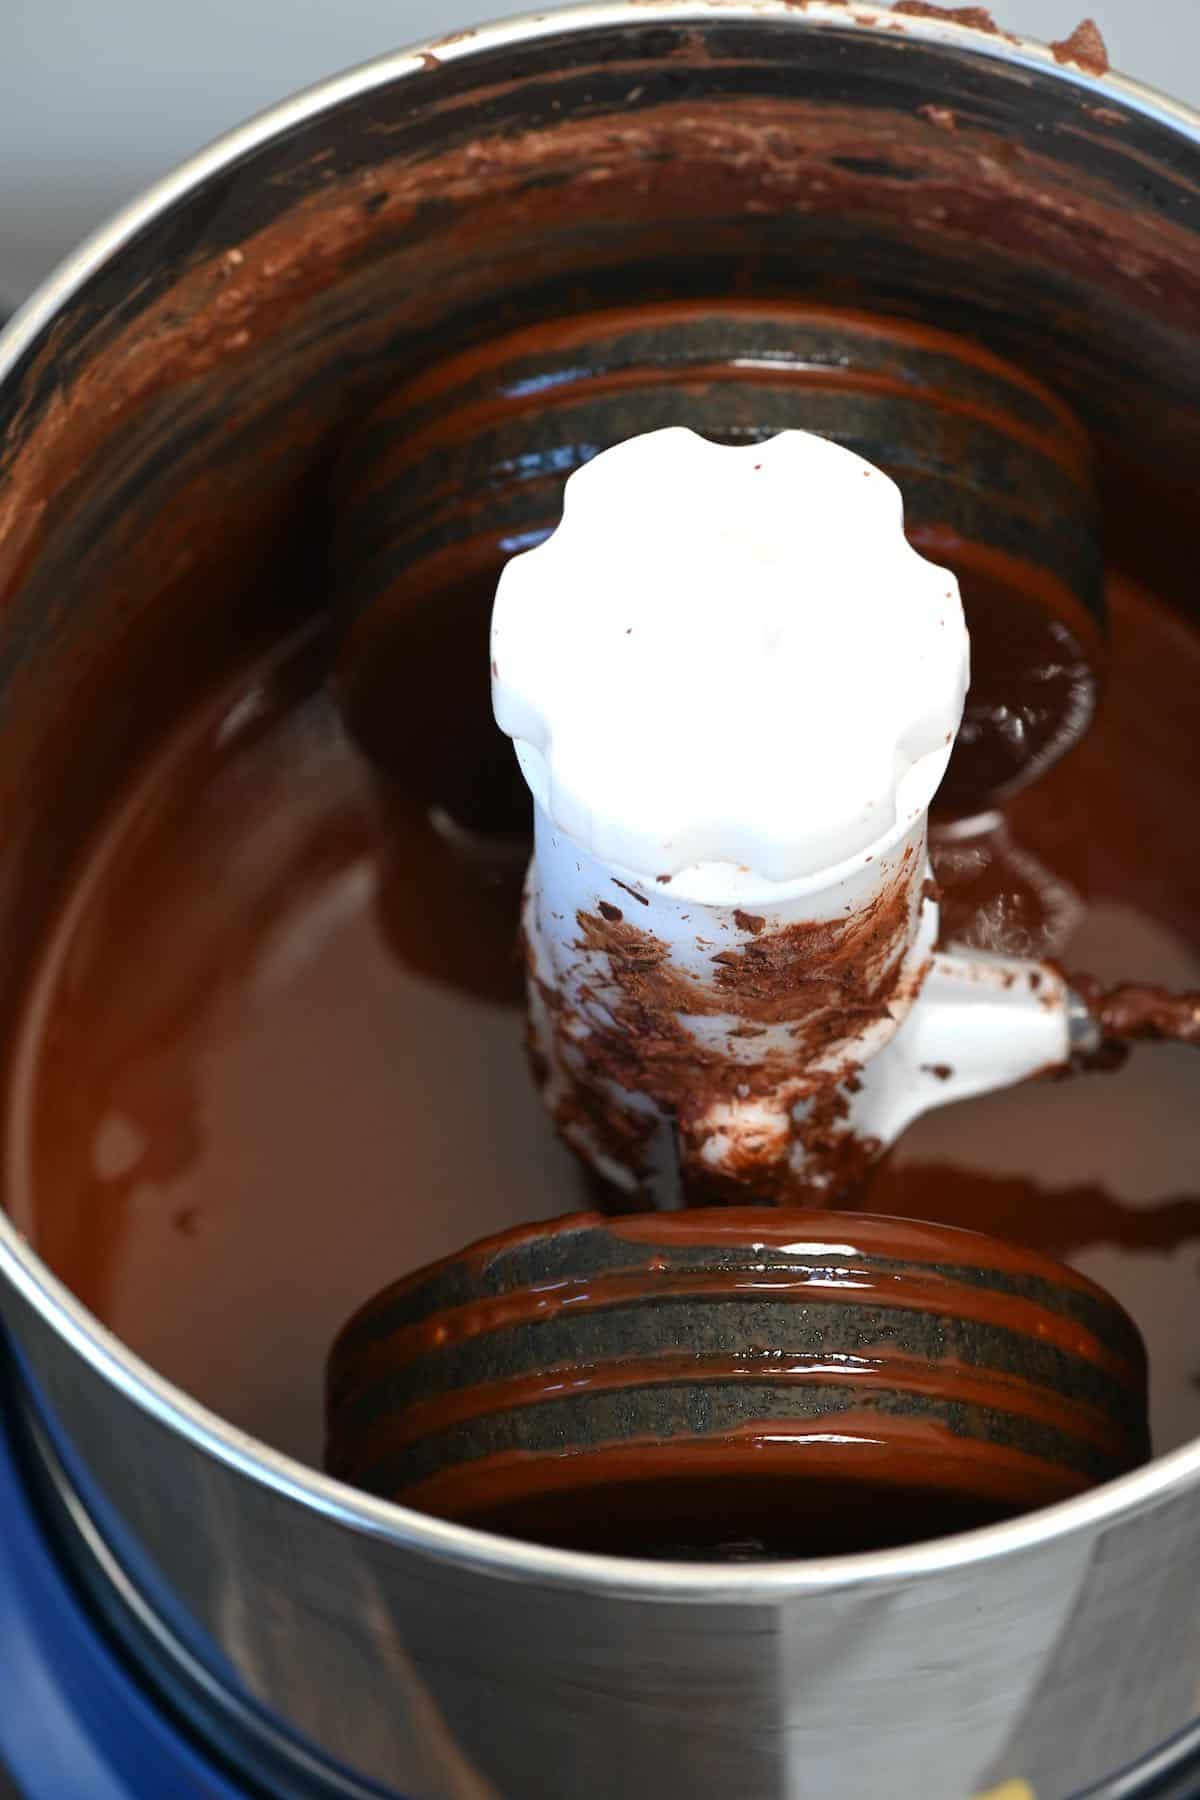
- Then add the ground nibs to the chocolate grinder (melangeur) and allow it to run for about 12 hours.
The Manual Method
Like above, it’s best to use a high-speed blender, food processor, or electric coffee/spice grinder to start this process. However, the best results are with the small grinder.
- With a grinder: Add the nibs in small portions to the grinder and grind into a paste. The cacao butter will start to extract from the nibs (similar to when making nut butter), and the powder will become wetter and more paste-like.
This process can take several minutes, so I suggest allowing the machine a break after every minute or so.
- With a high-speed blender: first, blend the beans into a powder until the point they are just starting to look slightly wet. Then, transfer them to the microwave for 20-30 seconds (depending on how powerful your microwave is). This will help to encourage the extraction of the cacao butter. Finally, add the nibs back to the blender and process into a paste.
At this point, no matter which method you used, you can add the powdered sugar (never liquid!) to your grinder/blender (you can use granulated if using a mortar & pestle, but it will help to use powdered sugar for best texture) and continue to process slightly more. Next, it’s time for the ‘conching’ step.
- Heat a mortar and pestle in the oven for just a few minutes (until warm but not too hot to touch).
- Then add the cocoa liquor and use the mortar and pestle to manually grind this until you can no more. This will never get as smooth as it will with a chocolate grinder, but every little bit helps and will change the flavor and texture.
When doing it this way, you need to add additional cacao butter as it will never get as smooth as it will with the wet grinder/conching method. So the extra butter will help with consistency – for a smoother, creamier, glossier texture. Don’t add more than 10% of the total chocolate weight, though (i.e., 10g per 100g bar chocolate)
- Taste the chocolate every 5-10 minutes. When you are happy with the flavor, the chocolate is ready for the next step.
Note: If you’ve made a large batch of chocolate (around 1 lb/500g), you can conch it using a stand mixer with the paddle attachment. Whip it on low speed for around an hour.
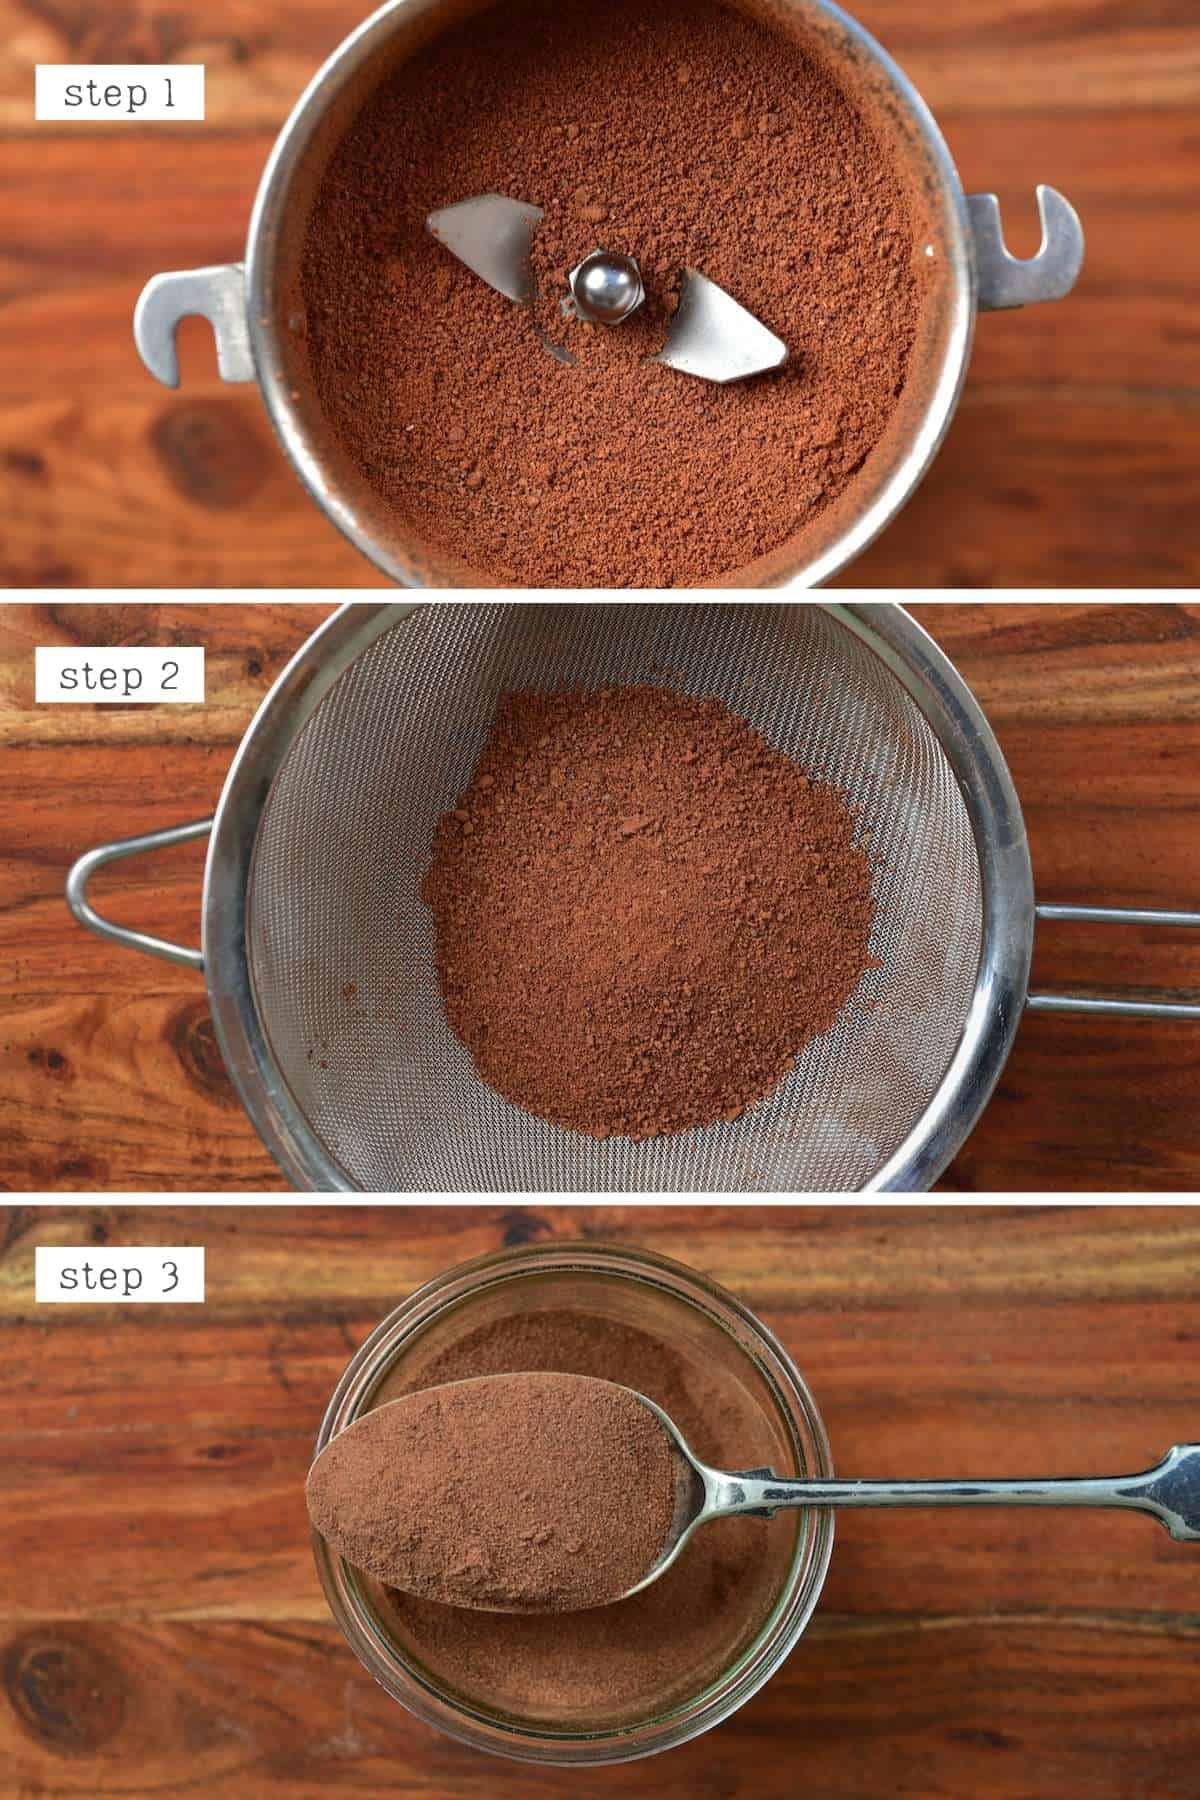
Chef’s note: To obtain raw cacao powder with the fat inside, you just need to grind the nibs. Sieve a few times so the powder is fine.
Step 6: Temper the chocolate
Tempering chocolate is the process of strategically raising and lowering the temperature of the chocolate to form a specific crystal structure. Once temepered, this yields shiny, glossy, snappable chocolate that holds its’ shape at room temperature.
You don’t have to do this process at all if preferred. You can also mold the chocolate for now to temper at a different time.

There are three main methods for tempering chocolate, which I discuss in a separate post.
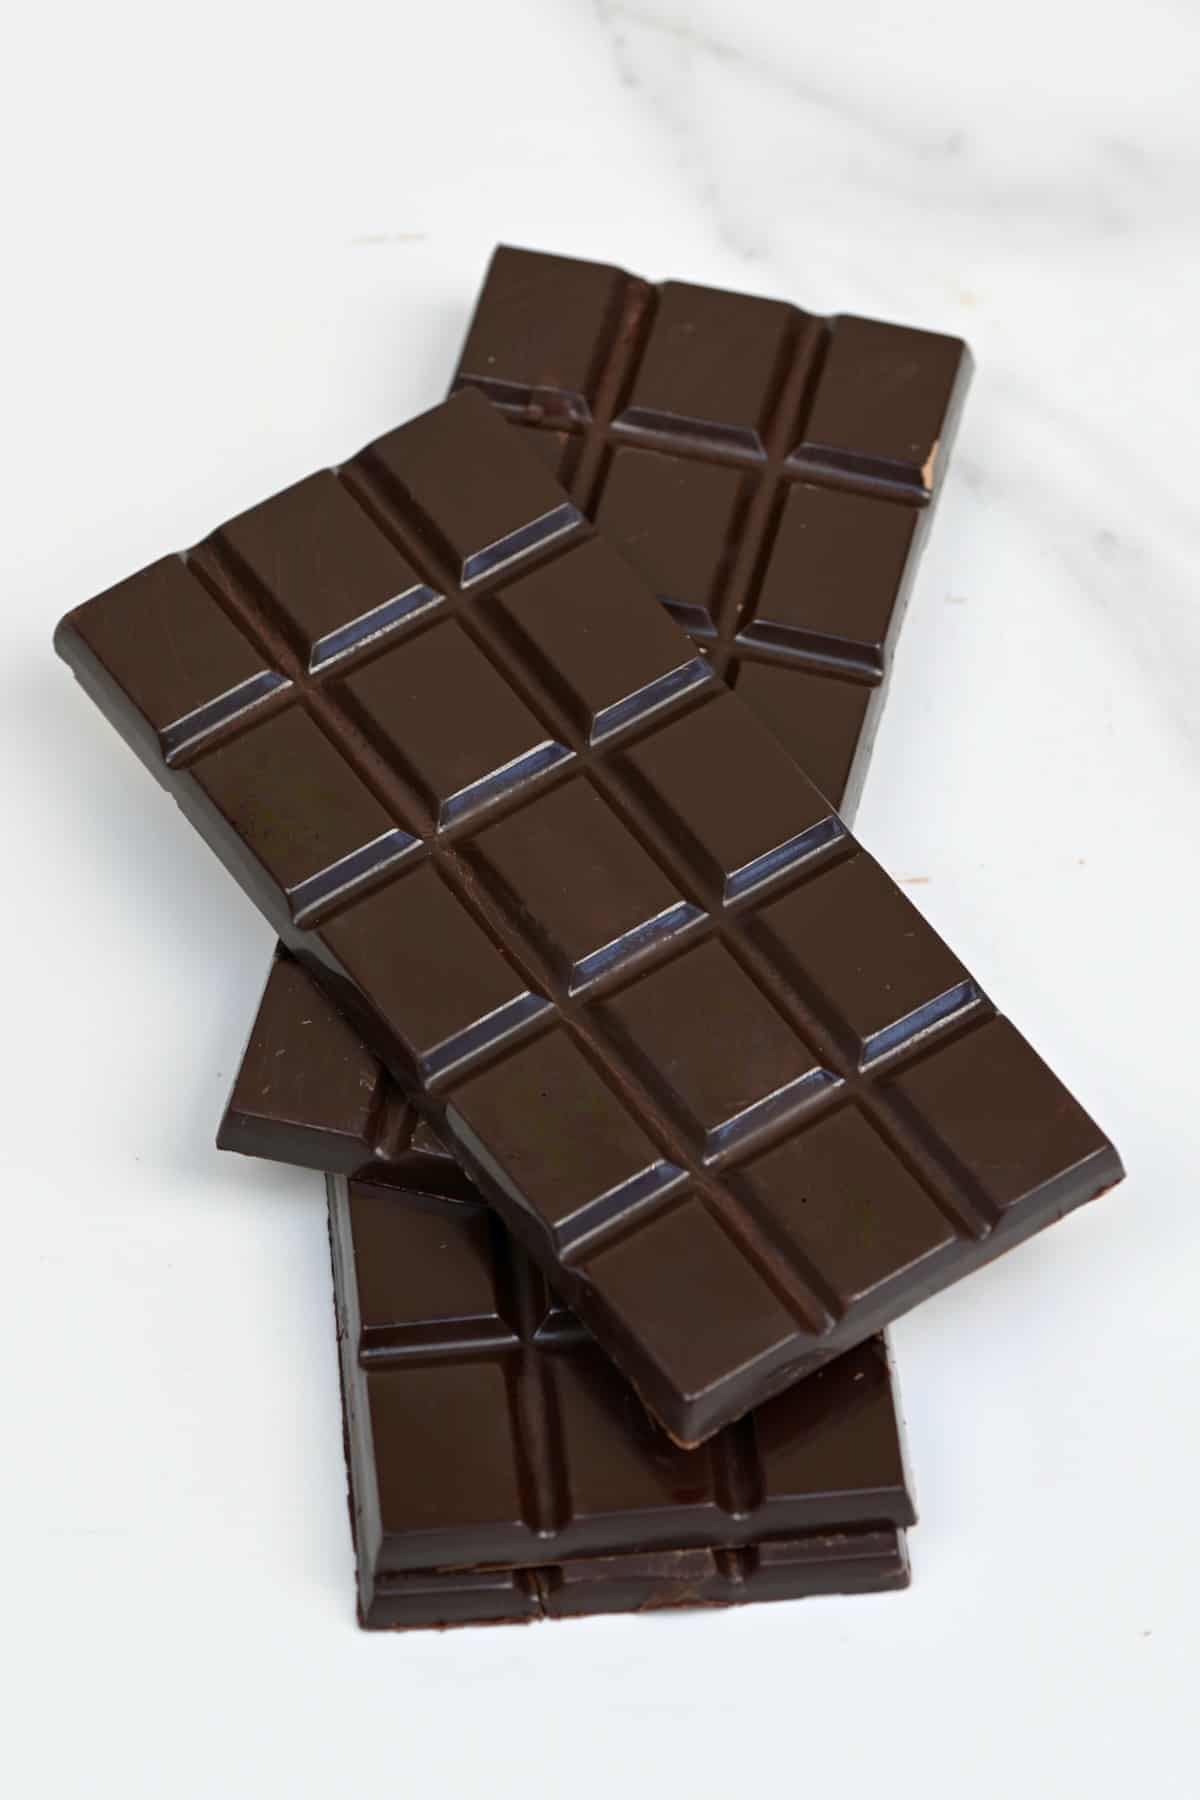
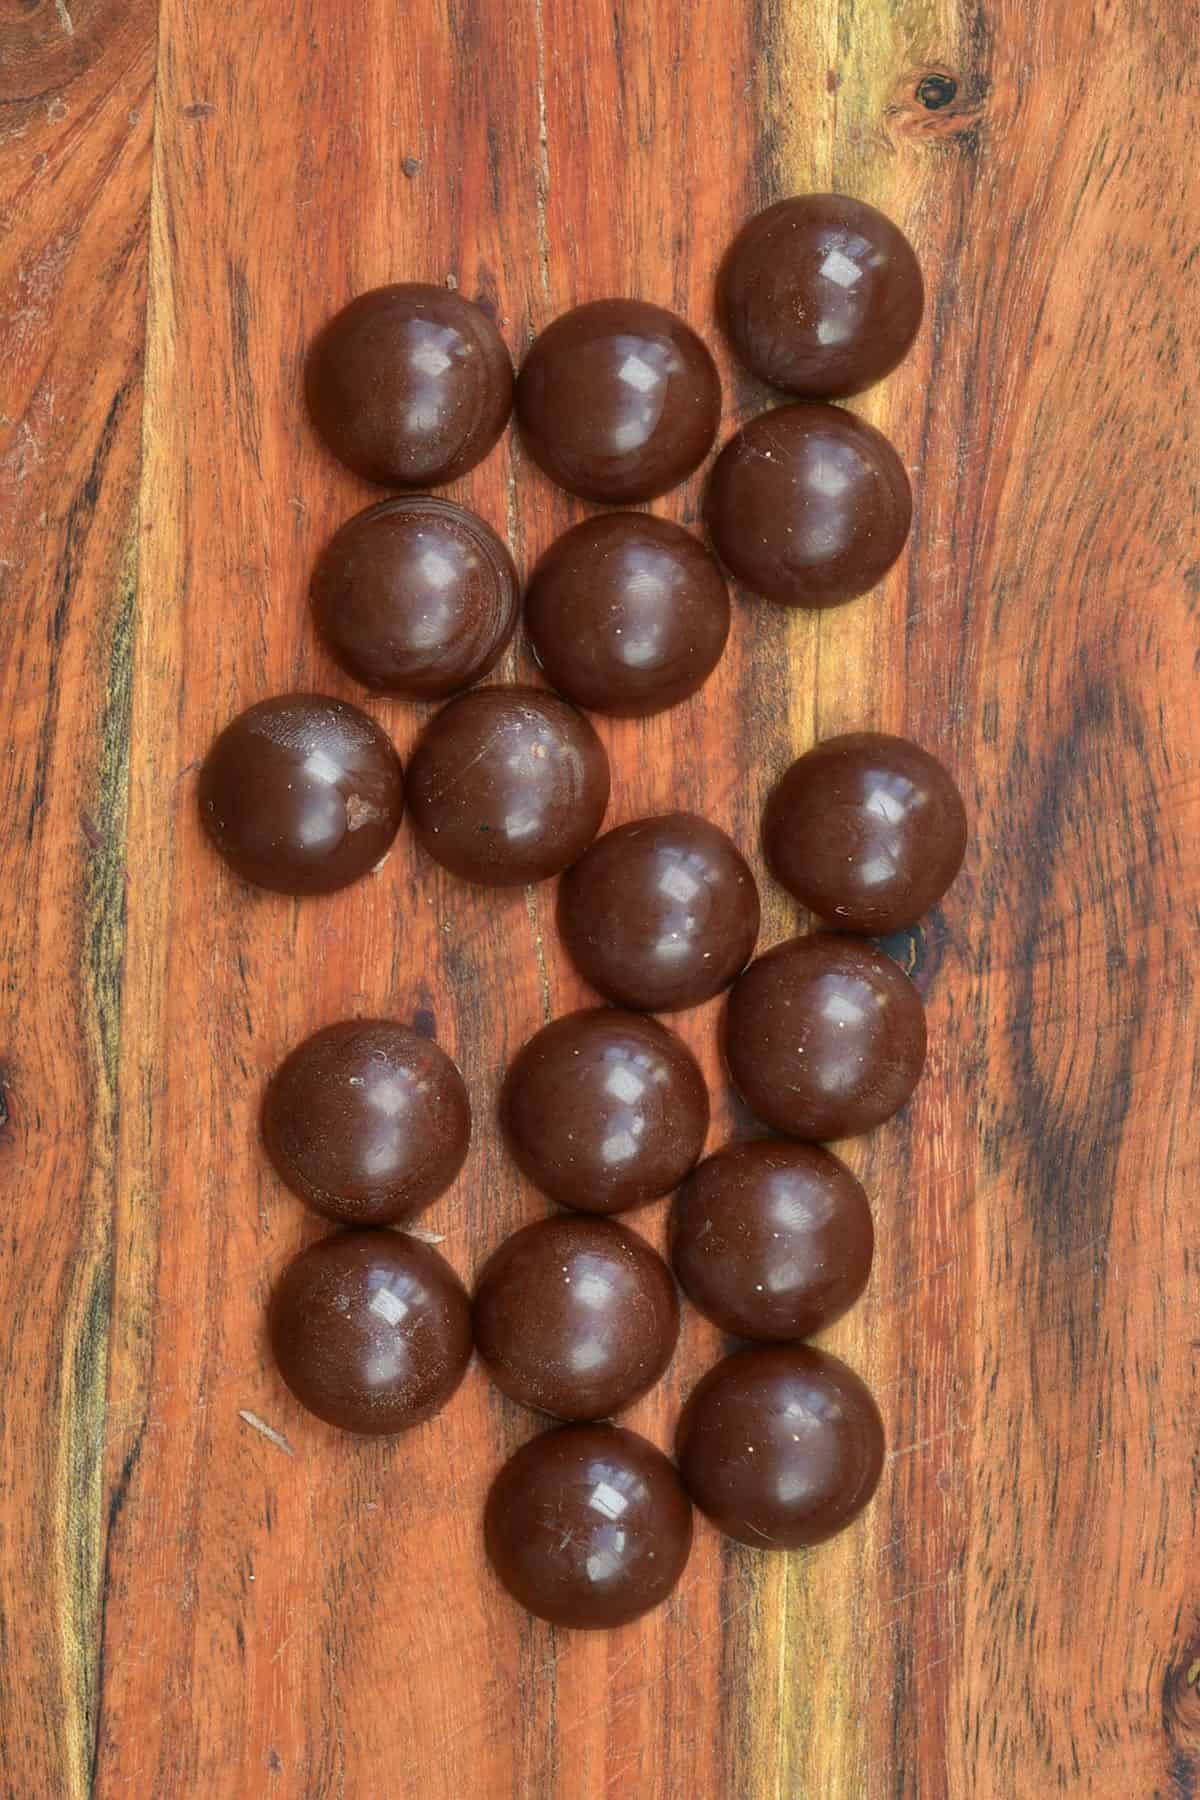
Step 7: Molding the chocolate
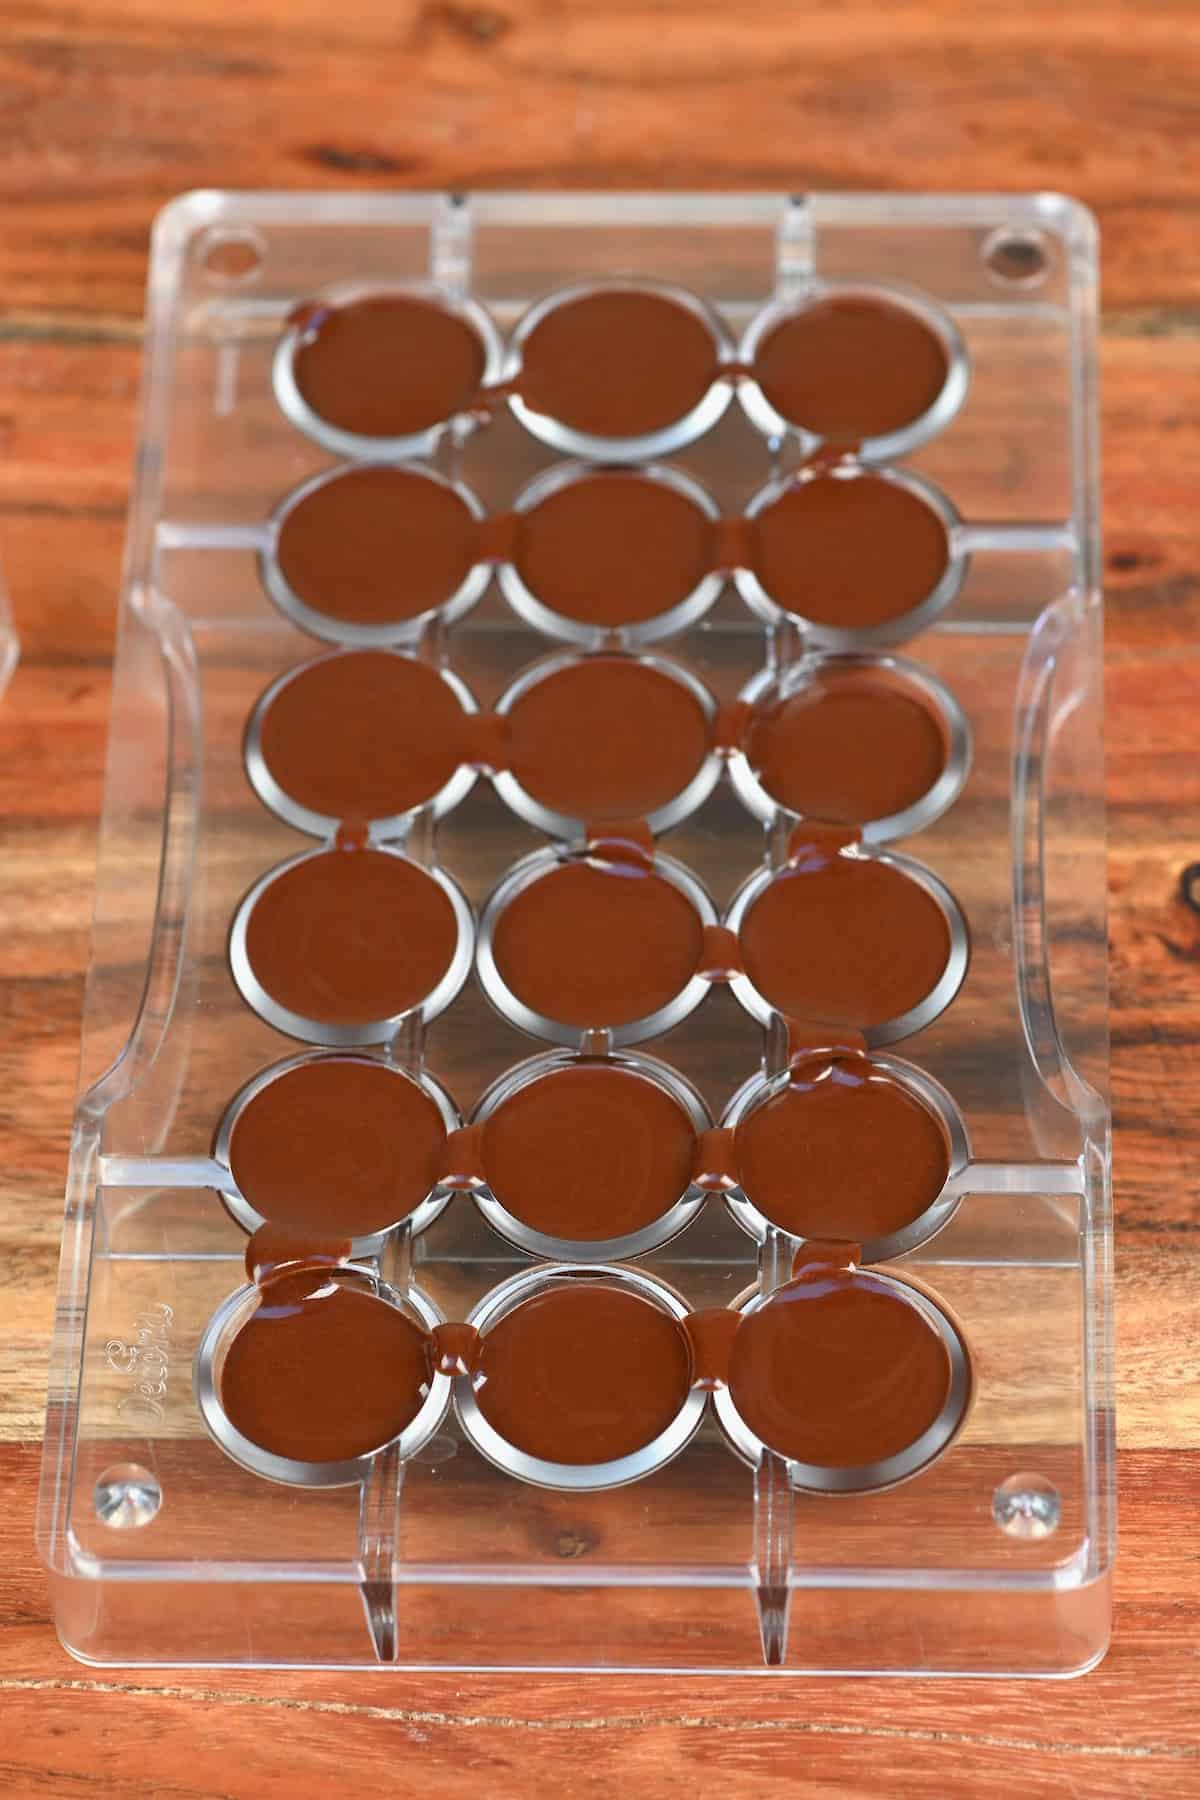
Finally, it’s time to pour the chocolate into your mold of choice to set it into the final chocolate product.
- Pour the prepared chocolate into your mold of choice, tapping it against your kitchen counter to remove any air bubbles and help it settle.
- Allow the chocolate to set fully (best done at room temperature) before de-molding and wrapping.
- I find that polycarbonate chocolate molds work best, even better than silicone molds. To prep polycarbonate molds it’s best to use cotton balls and a type of fat-soluble sanitizer. Water can leave marks and a sponge can create micro scratches that will affect the shine.
How To Store Chocolate
The rules for storing chocolate will change somewhat depending on whether or not you’ve tempered it.
Untempered chocolate is best kept in the fridge or freezer, wrapped tightly.
It’s important to note that chocolate absorbs other flavors and aromas, so it’s important to either wrap it carefully or store it within an airtight container (no one wants chocolate with a garlic-y aftertaste!)
For tempered chocolate, it’s actually best to avoid refrigerating the chocolate. This is because temperature fluctuations can cause the chocolate to bloom (where it has white sugar crystals on the chocolate giving it a moldy/dusty appearance) and will affect the taste and texture.
Instead, store the chocolate in a cool, dry place away from sunlight.
Either way, the chocolate will last for months this way!
FAQs
In my attempt to avoid waste as much as possible, I took to Google to find out if anything can be done with the usually discarded cocoa bean shells. I’ve turned to several sources with differing advice.
Some research shows that the shells are a rich source of dietary fiber and protein and contain several valuable bioactive compounds, including caffeine, flavonoids, and theobromine. For this reason, they are potentially usable within cosmetic, pharmaceutical, and agricultural uses.
I’ve seen most evidence towards using the shells as garden fertilizer and within gardening uses.
The chocolate percentage is worked by comparing the amount of chocolate (including cocoa solids and cocoa butter) vs. sugar used within a recipe.
For example, for 70% dark chocolate, you’d use:
70% cocoa liquor (which contains both the solids and butter)
30% sugar (dried – NOT liquid).
OR, if you’re using the manual grinding process and adding extra cacao butter to the mortar and pestle:
65% cacao nibs
5% cacao butter
30% sugar (dried – NOT liquid).
65% is neither sweet nor bitter; it’s that lovely middle range. 70% is the beginning range of a good dark chocolate ‘bittersweet’ flavor.
You can use a combination of the cocoa nibs and cocoa powder/ cocoa butter to finely tune the % you want the chocolate to be.
You sure can – to make milk chocolate, you just need to add the special ingredient, powdered milk (or powdered coconut milk for vegan chocolate).
This would be added when you add sugar to the chocolate (during the grinding/conching process).
Recipe Notes
- To speed up the process, you can purchase raw cacao beans, usually from local bean-to-bar chocolate makers (for smaller quantities). It’s best to buy raw beans and roasting them yourself. It can be hard to remove the beans’ shell in pre-roasted ones.
- To speed it up even further, you could use cocoa nibs. If they’re raw, you’ll still need to roast them; if not, then you can get straight to grinding.
- Depending on where you source the cocoa beans from, the flavor can vary massively, so it’s worth experimenting with.
- When using a mortar and pestle to grind the beans, it’s impossible to achieve the same smooth mouthfeel as machine-ground chocolate. So, you’ll be able to detect some slight texture in the bar.
- The particles within chocolate are measured in microns (1 micron = 1 millionth of a meter). Our tongues can feel the grain of anything about 25 microns; thus, most chocolate aims to be between 15-25.
- Cacao nibs are made up of around 50% cacao butter and 50% powder – which is why many homemade chocolate recipes (like my own dark and milk chocolate methods) combine prepared powder and cacao butter for a super-quick chocolate process.
- Don’t use liquid sugar or add-ins: These can cause the chocolate to seize. Instead, use powdered sugars and candy/chocolate-specific flavorings when flavoring the chocolate bar.
Related Recipes
If you try this bean-to-bar chocolate process , I’d love to hear your thoughts/questions below. Also, I’d really appreciate a recipe card rating below, and feel free to tag me in your recipe recreations on Instagram @Alphafoodie!
Please note that all information included within this post has come from lots of research and personal experience. I am not a professional chocolatier and not an ‘expect’ in chocolate making.
How To Make Chocolate From Cocoa Beans (Bean to Bar Chocolate)
Ingredients
- cacao pods
Instructions
Step 1: Growing and harvesting
- These two steps are the only ones that I have no part in, but I thought I'd include them in the process for full transparency.To begin the process of making chocolate the first step is to open the cacao pod. When doing this at home I find it easiest to hit the shell with something like a wooden muddler or hammer, if you have one.Once you cut open the cacao pods, you'll see the cacao beans, which are covered in a viscous white 'mucilage' coating:The white jelly pulp/coating is actually edible too. Traditionally it's eaten as-is or blended with water into a juice 'cacao juice'. The flavor is sweet-tart/acidic and has similarities with soursop.The hard bean inside is the cacao bean. At this point, we have yet to ferment or roast is so it's fairly 'wet' looking with a purple color and brain-like appearance when you cut into it due to all the individual nibs inside.
Step 2: Fermenting the cacao beans
Method 1: With banana leaves
- I lined a large bowl with banana leaves then filled it with the beans, topping it with a layer of banana leaves.
- Just like when allowing bread to rise, this now needs to be placed somewhere warm. Between 40-50ºC is the optimal temperature. This can be helped by placing them next to a heat source or even placing a hot water bottle within the container you use (that can be removed and replaced 1-2 times a day if needed).
- As the beans heat, they will start to produce their own heat too (usually after a couple of days), which helps the process along. As the beans ferment the white layer will break down into a juice so it's a good idea to drain this once per day (or twice if possible) and mix the beans.Check the beans a few times during the process in case there are any that look moldy – remove these and continue with the process.This process takes around 5 days but can take slightly longer depending on the heat, humidity, and individual beans. I allowed my beans to ferment and dry all while wrapped in the banana leaves – some methods may change the process for drying but I find it unnecessary.
Method 2: With a dehydrator
- Place the beans in a single layer across the dehydrator trays, leaving space between the beans for airflow.
- Run the dehydrator at 104ºF/40ºC for several days. This can take between 5-10 days; I did it for 5 days.During this process, the beans will turn from a purple color to a pink/reddish-brown to a darker brown and will massively reduce the liquid content of the beans. It doesn't work quite as well as the traditional method but will work.
Step 3: Roasting the beans
- Before roasting the beans, you'll first need to remove any beans that are broken and/or smell moldy, etc. Then, lay the beans in a single layer on parchment-lined oven tray/s. You can roast the beans whole then peel them or peel them first before roasting.If you peel the husk first then you can break the bean into the nibs and have more surface area while roasting. That way they roast faster and more evenly. However, it is much easier to peel them after roasting so the preference is up to you.
- Roast the beans in the oven at 250ºF/120ºC fan-assisted for between 15-20 minutes for a fairly light roast.The way you roast the beans will have a big impact on flavor and you can choose to do a light, medium, or dark roast. This is something I'm still experimenting with and will update over time.During the end of the roasting step (if roasting as whole beans), air pockets will escape the beans, making popping sounds – this is normal. When they're almost done, you may also smell a 'brownie' smell. The husk should also come off the beans easily.
Step 4: Cracking & Winnowing
- The title makes this process sound complicated; however, what cracking and winnowing of chocolate actually means is just removing the cocoa bean from the shell to reveal the cacao nibs inside. If you've done this before roasting then – skip this step!There are several ways to do this, but pressing the beans between your fingers should be enough to loosen the shell from the bean. Do this with all of the beans putting the shells in a separate bowl from the beans (nibs).
- Next, break the beans down into individual nibs. You can do this by hand or place all the beans into a bag and bash with a rolling pin to separate the nibs.These cacao nibs can now be eaten as is or further processed into chocolate. Interestingly these nibs are made up of around 50% cacao solids (what will become cocoa powder) and 50% cacao butter.
Step 5: Grinding and Conching
Using A Chocolate Grinder
- Even if you're using a grinder, it's still a good idea to help the process by pre-grinding the nibs into smaller pieces. You can do this in a high-speed blender, food processor, or electric coffee/spice grinder. If using a small grinder, then do this in batches.
- Then add the ground nibs to the chocolate grinder (melangeur) and allow it to run for about 12 hours.
The Manual Method
- Like above, it’s best to use a high-speed blender, food processor, or electric coffee/spice grinder to start this process. However, the best results are with the small grinder.
- With a grinder: Add the nibs in small portions to the grinder and grind into a paste – the cacao butter will start to extract from the nibs (similar to when making nut butter), and the powder will become wetter and more paste-like.This process can take several minutes, so I suggest allowing the machine a break after every minute or so.With a high-speed blender: first, blend the beans into a powder until the point they are just starting to look slightly wet. Then, transfer them to the microwave for 20-30 seconds (depending on how powerful your microwave is). This will help to encourage the extraction of the cacao butter. Finally, add the nibs back to the blender and process into a paste.
- At this point, no matter which method you used (grinder/blender), you can add the powdered sugar (never liquid!) to your grinder/blender (you can use granulated if using a mortar & pestle, but it will help to use powdered sugar for best texture) and continue to process slightly more. Next, it's time for the 'conching' step.
- Heat a mortar and pestle in the oven for just a few minutes (until warm but not too hot to touch).Then add the cocoa liquor and use the mortar and pestle to manually grind this until you can no more. This will never get as smooth as it will with a chocolate grinder, but every little bit helps and will change the flavor and texture.When doing it this way, you need to add additional cacao butter as it will never get as smooth as it will with the wet grinder/conching method, so the extra butter will help with consistency – for a smoother, creamier, glossier texture. Don't add more than 10% of the total chocolate weight, though (i.e., 10g per 100g bar chocolate)Taste the chocolate every 5-10 minutes, and when you are happy with the flavor, the chocolate is ready for the next step.Note: If you've made a large batch of chocolate (around 1 lb/500g), you can conch it using a stand mixer with the paddle attachment, whipping on low speed for around an hour.
Step 6: Temper the chocolate
- Tempering chocolate is the process of strategically raising and lowering the temperature of the chocolate to form a specific crystal structure within the chocolate that yields shiny, glossy, snappable chocolate that holds its' shape at room temperature.You don't have to do this process at all if preferred. You can also mold the chocolate for now to temper at a different time. There are three main methods for tempering chocolate, which I discuss in a separate post.
Step 7: Molding the chocolate
- Pour the prepared chocolate into your mold of choice, tapping it against your kitchen counter to remove any air bubbles and help it settle.
- Allow the chocolate to set fully (best done at room temperature) before de-molding and wrapping.I find that polycarbonate chocolate molds work best, even better than silicone molds. To prep polycarbonate molds it's best to use cotton balls and a type of fat-soluble sanitizer. Water can leave marks and a sponge can create micro-scratches that will affect the shine.
How To Store Chocolate
- The rules for storing chocolate will change somewhat depending on whether or not you've tempered it.Untempered chocolate is best kept in the fridge or freezer, wrapped tightly.It's important to note that chocolate absorbs other flavors and aromas, so it's important to either wrap it carefully or store it within an airtight container (no one wants chocolate with a garlic-y aftertaste!)For tempered chocolate, it's actually best to avoid refrigerating the chocolate. This is because temperature fluctuations can cause the chocolate to bloom (where it has white sugar crystals on the chocolate giving it a moldy/dusty appearance) and will affect the taste and texture.Instead, store the chocolate in a cool, dry place away from sunlight.Either way, the chocolate will last for months this way!
Notes
- To speed up the process, you can purchase raw cacao beans, usually from local bean-to-bar chocolate makers (when getting smaller quantities). It’s best to buy raw beans and roasting them yourself, as it can be hard to remove the beans’ shell in pre-roasted ones.
- To speed it up even further, you could use cocoa nibs. If they’re raw, you’ll still need to roast them; if not, then you can get straight to grinding.
- Depending on where you source the cocoa beans from, the flavor can vary massively, so it’s worth experimenting with.
- When using a mortar and pestle to grind the beans, it’s impossible to achieve the same smooth mouthfeel as machine ground chocolate, so you’ll be able to detect some slight texture in the bar.
- The particles within chocolate are measured in microns (1 micron = 1 millionth of a meter). Our tongues can feel the grain of anything about 25 microns; thus, most chocolate aims to be between 15-25.
- Cacao nibs are made up of around 50% cacao butter and 50% powder – which is why many homemade chocolate recipes (like my own dark and milk chocolate methods) combine prepared powder and cacao butter for a super-quick chocolate process.
- Don’t use liquid sugar or add-ins: These can cause the chocolate to seize. Instead, use powdered sugars and candy/chocolate-specific flavorings when flavoring the chocolate bar.


When would you add in powdered herbs or powdered flavors? Thank you! I’m so inspired to try this!!
Hi Rachel! You can add powdered herbs or flavors during the refining or melting process of the chocolate. If you’re using a melanger, you can add them towards the end of the grinding stage so they incorporate smoothly. If you’re melting the chocolate, just mix them in once it’s fully melted and silky. This helps the flavors distribute evenly without affecting the texture. <3
Great post! If I don’t have access to extra cacao butter, do you think it will be okay to add regular butter as the extra fat source?
Hi Katie,
To make chocolate, you need cacao butter. Regular butter won’t crystalize like cocoa butter and it won’t make a chocolate bar. I hope this helps.
I haven’t tried your method yet; however, your highly detailed instructions and illustrative photos give me confidence that you know what you’re talking about. I will be using your methods for both dark and milk chocolate.
Thank you for posting these instructions, Best Wishes!
Thank you so much for your comment, Kurt. Much appreciated. Hope you gave this a try.
I attended a cacoa to chocolate making workshop recently and this post fills in some gaps. Well written and clear!
Thank you for you comment 🙂
Thank you for all these! Amazing detailed work!
Glad you liked it, Charina!
Hey just a question, it is jot possible to sweet the chocolate with honey? Will it stay soft because honey is more liquid?
Hi Tess,
I advise against using liquid sweeteners (like honey or maple) as they can cause the chocolate to seize. It’s better to use powdered sugar. I hope this helps.
Dear fellow cacao enthusiasts,
I hope this message finds you well. I am writing to request some guidance and advice regarding cacao processing. I have recently ventured into the exciting world of growing, fermenting, drying, roasting, and winnowing my own cacao beans with the ultimate goal of creating delicious cacao nibs. While the process has been a rewarding and educational experience, I have encountered a slight issue that I am hoping you can help me with.
It appears that my cacao nibs have been turning out slightly more acidic than I would prefer. I am uncertain whether this is a result of a misstep in my processing techniques or if there’s something else I should be considering. Given the wealth of knowledge and experience within this community, I thought it would be the perfect place to seek guidance.
I would greatly appreciate any advice or suggestions you may have to help me improve the flavor profile of my cacao nibs. Perhaps there are specific fermentation or drying techniques I should be mindful of, or maybe I need to adjust my roasting parameters. Any insights or personal experiences you can share would be immensely valuable to me.
Thank you in advance for taking the time to read this and for any guidance you can provide. I am eager to learn from your expertise and enhance my cacao processing skills. Together, we can create truly exceptional cacao nibs!
Hey Maria! It’s amazing that you’re going through the full bean-to-bar process—such a rewarding journey! If your cacao nibs are turning out too acidic, the main factors to consider are fermentation, drying, and roasting, as they all influence acidity levels.
• Fermentation: Acidity develops naturally during fermentation as lactic and acetic acids form. The duration and aeration process play a role in balancing flavors. Longer fermentation (around 5-7 days) with proper aeration (stirring occasionally) may help reduce excess acidity.
• Drying: If beans dry too quickly, some acidity can get trapped. Traditional sun-drying over several days (typically 5-7 days) with regular turning helps mellow flavors.
• Roasting: Adjusting your roasting temperature and duration can also impact acidity. A slower roast (e.g., 120-140°C / 248-284°F for 20-30 minutes) often helps reduce sharp acidic notes and enhance chocolatey flavors.
Since each batch is different, tweaking these steps slightly can help refine the flavor. If you’re able to experiment, keeping notes on small adjustments can be really helpful! Let me know how it goes—I’d love to hear about your results!
Hi this is a great article but I am still a bit lost. I have a ecuadorian chocolate paste. It’s a very dark chocolate nuggets. Do I still need to use the coconut butter or is this it? So I can start adding sugar and most likely a bit milk as it is quite bitter even with the sugar. And one additional question. Does it need to be POWDERED milk for milk chocolate? I would like to use as natural ingredients as possible.
Thank you for your response. Sylvie
Hey Sylvie! Thanks so much! If your Ecuadorian chocolate paste is pure cacao (just ground cacao beans with no added ingredients), you don’t need to add cocoa butter unless you want a creamier texture. You can go ahead and add powdered sugar directly to sweeten it, and if you’d like to make milk chocolate, you’ll need a dry milk powder rather than liquid milk.
Powdered milk is actually a natural product! Most store-bought powdered milk is made by spray-drying or freeze-drying fresh milk to remove moisture while preserving its nutrients. If you prefer the most natural option, look for powdered milk with only “milk” listed in the ingredients, without additives or stabilizers.
Hope that helps!
This was a huge help to us in making chocolate from some trees we planted 5 years ago! Was a lot of fun making our own chocolate using your guide. We do not have a melangeur so used a couple of different food processors (a Ninja smoothie blender which likely got too hot and a Oscar food processor which took longer but did not overheat the chocolate). Hoping to get a melangeur to create a smoother chocolate in the future. Also, we loved the Sous Vide tempering method. Thank you!
Thank you for your feedback, Beth. Happy to hear you enjoyed it!