
This post may contain affiliate links. Please read our disclosure policy.
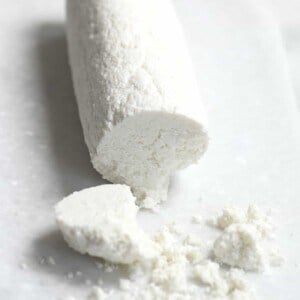
I absolutely love fresh cheese, and for years, I’ve been on a mission to master how to make mozzarella cheese perfectly at home.
If you’ve been searching for a homemade mozzarella recipe recently, you’ve probably seen the viral “2-ingredient” hacks claiming you can make perfect mozzarella using just milk and vinegar. I’ll be completely honest with you: I tested that viral vinegar method extensively. Out of six attempts, it failed five times. Instead of a beautiful, stretchy ball of mozzarella, I was left with a gooey, mascarpone-like blob and a lot of wasted milk.
If you’re tired of wasting good milk on scammy viral hacks, you are in the right place. After plenty of trial, error, and deep dives into the science of cheesemaking, I am sharing my ultimate, no-fail traditional method. By using a tiny bit of rennet and citric acid, you will get consistent, perfectly stretchy, and delicious homemade mozzarella every single time.
Once you get the hang of cheesemaking, you might also enjoy my easy homemade cream cheese, how to make cottage cheese, or how to make goat cheese.
Table of Contents
Why the “Vinegar Hack” Fails (And What Actually Works)
While white vinegar will curdle milk quickly, it doesn’t create the strong protein structure required for a good stretch. Using both rennet and citric acid ensures precise coagulation. This combination results in the ideal separation of curds and whey, which is absolutely essential for creating that iconic, stretchy mozzarella texture.
Mozzarella Success Checklist

- Use whole milk (not UHT/ultra-pasteurized)
- Use a thermometer (90°F set, 105–106°F cook)
- Stretch in water 170–180°F (76–82°C) (refresh hotter if needed)
- Stop stretching when glossy (overworking = tough)
“Thanks so much for sharing this recipe. I really appreciated the detailed steps as it was my first time making mozzerella. It turned out so well! …”
What you’ll need
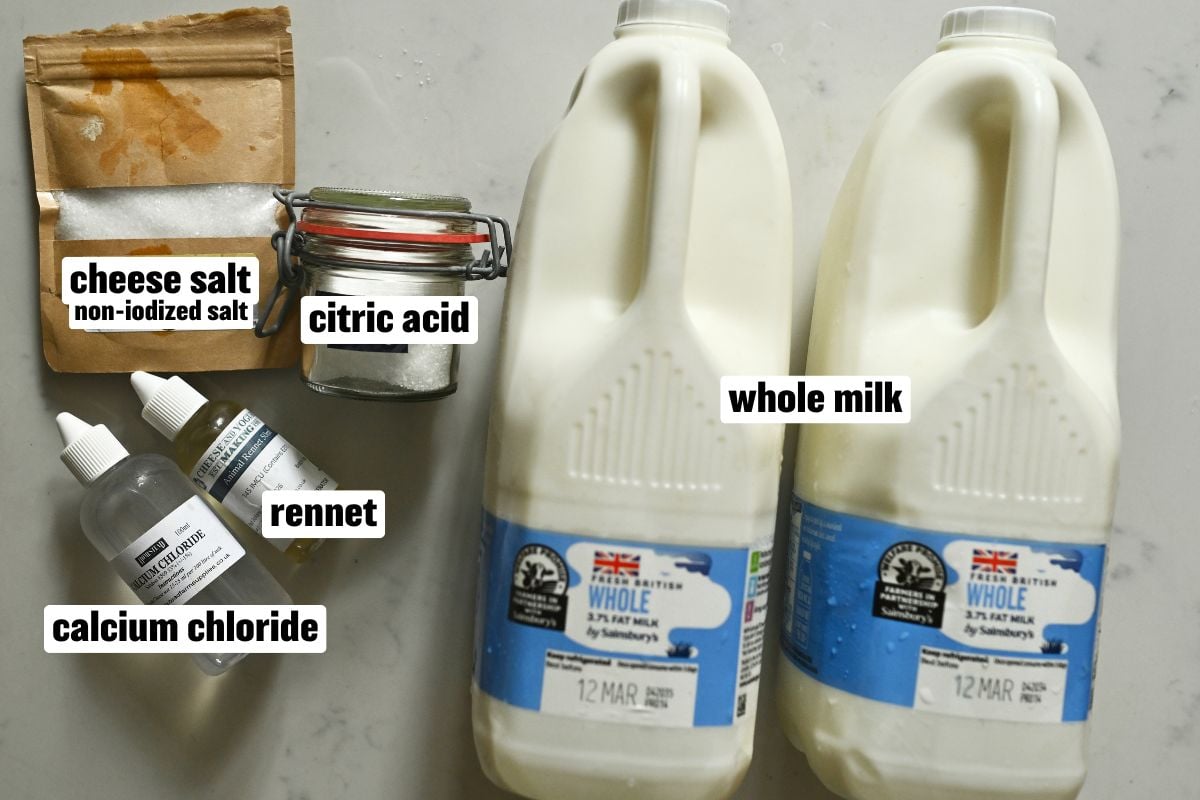
The Ingredients
- Milk: Milk quality is everything! Use whole milk (pasteurized is fine), and avoid ultra-pasteurized/UHT milk – those proteins often won’t set or stretch properly. Non-homogenized milk can give a slightly nicer texture if you can find it, but regular supermarket homogenized whole milk also works (especially with calcium chloride). I don’t recommend semi-skimmed/low-fat milk.
- Calcium Chloride (Optional but recommended): Most supermarket milk is pasteurized and homogenized, which can weaken curd formation. Adding a little calcium chloride helps create a firmer, cleaner curd and often improves stretching—especially with store-bought milk.
- Citric Acid: This provides the acidity needed for a reliable set and helps the curds stretch properly in this same-day method.
- Rennet (Liquid or Tablet): Rennet is the setting enzyme that gives mozzarella its structure. You only need a tiny amount to set a full gallon of milk. (I test this method with liquid rennet for consistency; tablet strength can vary by brand.)
- Cheese Salt: Use a non-iodized salt such as cheese salt, kosher salt, or fine sea salt. Iodized table salt can taste harsher and isn’t typically recommended for cheesemaking.
- Water (not pictured): Use cool, non-chlorinated water to dilute the citric acid and rennet. You’ll also need hot water for stretching and cold water (ice bath) to set the final mozzarella.
The Equipment
- Instant-Read Thermometer: Cheesemaking is all about temperature—this makes the process far more reliable.
- Large Pot: A thick-bottomed pot (stainless steel or non-stick) helps prevent scorching and keeps temperatures steadier.
- Long Knife: For cutting the set curds into a grid.
- Slotted Spoon: For gently lifting and moving curds without breaking them.
- Colander (or Fine-Mesh Strainer): A regular colander works well for mozzarella curds. Fine mesh is optional.
- Heat-Safe Bowl: For the hot water stretching step, plus another bowl underneath for catching whey while draining.
- Heat-Resistant Gloves: Stretching involves very hot water—protect your hands.
See the printable recipe card below for the full ingredients list and quantities.
How to make mozzarella cheese
Prep the milk-setting ingredients: Dissolve citric acid in water in one bowl. Dissolve rennet in water in another bowl. (Optional: dissolve calcium chloride in water in a third bowl.)
 1. Dissolve citric acid in water
 2. Dissolve rennet in water
") 3. Dissolve calcium chloride in water (optional)
3. Dissolve calcium chloride in water (optional)Heat the milk: Add the citric acid mixture to the milk (and calcium chloride, if using). Warm gently until it reaches 90°F (32°C).
 4. Heat milk with citric acid
 5. Reach 90ºF
Add rennet and set the curd: Remove from heat. Stir in rennet with an up-and-down motion for 20–30 seconds (avoid swirling), then cover and rest until set and you get a clean break.
Cut the curds: Cut into a grid pattern, slicing all the way to the bottom.
 6. Add rennet and rest
 7. Cut the curds
Heat the curds: Warm slowly, gently lifting/stirring, until curds reach 105–106°F (40–41°C). Turn off heat and let curds settle for 5 minutes.
 8. Heat the curds
 9. Reach 105ºF
Drain (don’t overdo it): Scoop curds into a colander and drain 2–3 minutes. Gently press together. (If curds seem very wet/mushy, you can squeeze a little more.)
 10. Drain the curds
Stretch in hot water: Heat water to 170–180°F (76–82°C). Submerge curds until soft and stretchy. If they won’t stretch, refresh with hotter water closer to 180°F/82°C.
Salt, stretch, and shape: Sprinkle with salt, then stretch/fold just a few times until glossy. Shape into a smooth ball, re-warming briefly if it stiffens.
 11. Add hot water
 13. Stretch the curds
 12. Fold the curds
 14. Shape into balls
Set the shape: Chill in cold water 5–10 minutes to set.
 15. Chill in cold water
Tips for success
- Use a thermometer. Mozzarella is temperature-sensitive—being even a little off can mean weak curds or curds that won’t stretch.
- Drain well (but don’t over-squeeze). Too much whey left inside can cause a soft, gooey center, but over-squeezing can make the cheese dry and tougher than it needs to be.
- If it won’t stretch, it usually isn’t hot enough. Curds only become elastic within a hot range—refresh with hotter water (about 170–180°F / 76–82°C) until the cheese turns pliable and glossy.
- Do not overwork the curds. Once it’s smooth and shiny, stop—over-stretching makes mozzarella dense and rubbery.
- Salt at the right moment. Salt incorporates best while the cheese is warm and soft, so adding it during the stretch gives you even seasoning without gritty spots.
FAQs and troubleshooting
Most often it’s the milk or the rennet (not you). Make sure you’re using whole milk that is not UHT/ultra-pasteurized. Also, check that your rennet is fresh and diluted in cool, non-chlorinated water. Tip: If the curd looks “almost there,” simply cover and rest 2–3 minutes longer before cutting.
Nearly always: it isn’t hot enough yet. Stretching works best when the curds are heated to around 160–180°F (71–82°C). If the curds cooled down, pop them back in the microwave for a few seconds or refresh with new hot water. Wait until the outer layer turns pliable and glossy, then fold and stretch gently.
You likely overworked it or stretched it too much . Stop stretching as soon as it turns smooth, glossy, and cohesive—usually only 2–4 folds. Over-kneading it will squeeze out too much moisture and leave you with a tough, rubbery ball.
Don’t throw it away! If it won’t stretch or turns too soft, treat it like a delicious soft cheese:
Stir it into hot pasta sauces.
Dollop it onto a pizza right after baking.
Layer it into a lasagna or baked ziti.
Mix it into scrambled eggs or spread it on toast.
Storage
Best on day one: Fresh mozzarella is at its best the same day.
Fridge: Store in an airtight container in whey or a lightly salted brine for 3 days.
Freezer (best for cooking): Freeze in a freezer-safe container for up to 6 months. Thaw overnight in the refrigerator.
After freezing: Previously frozen mozzarella is usually best for melting in cooked dishes.
More ways to use homemade mozzarella
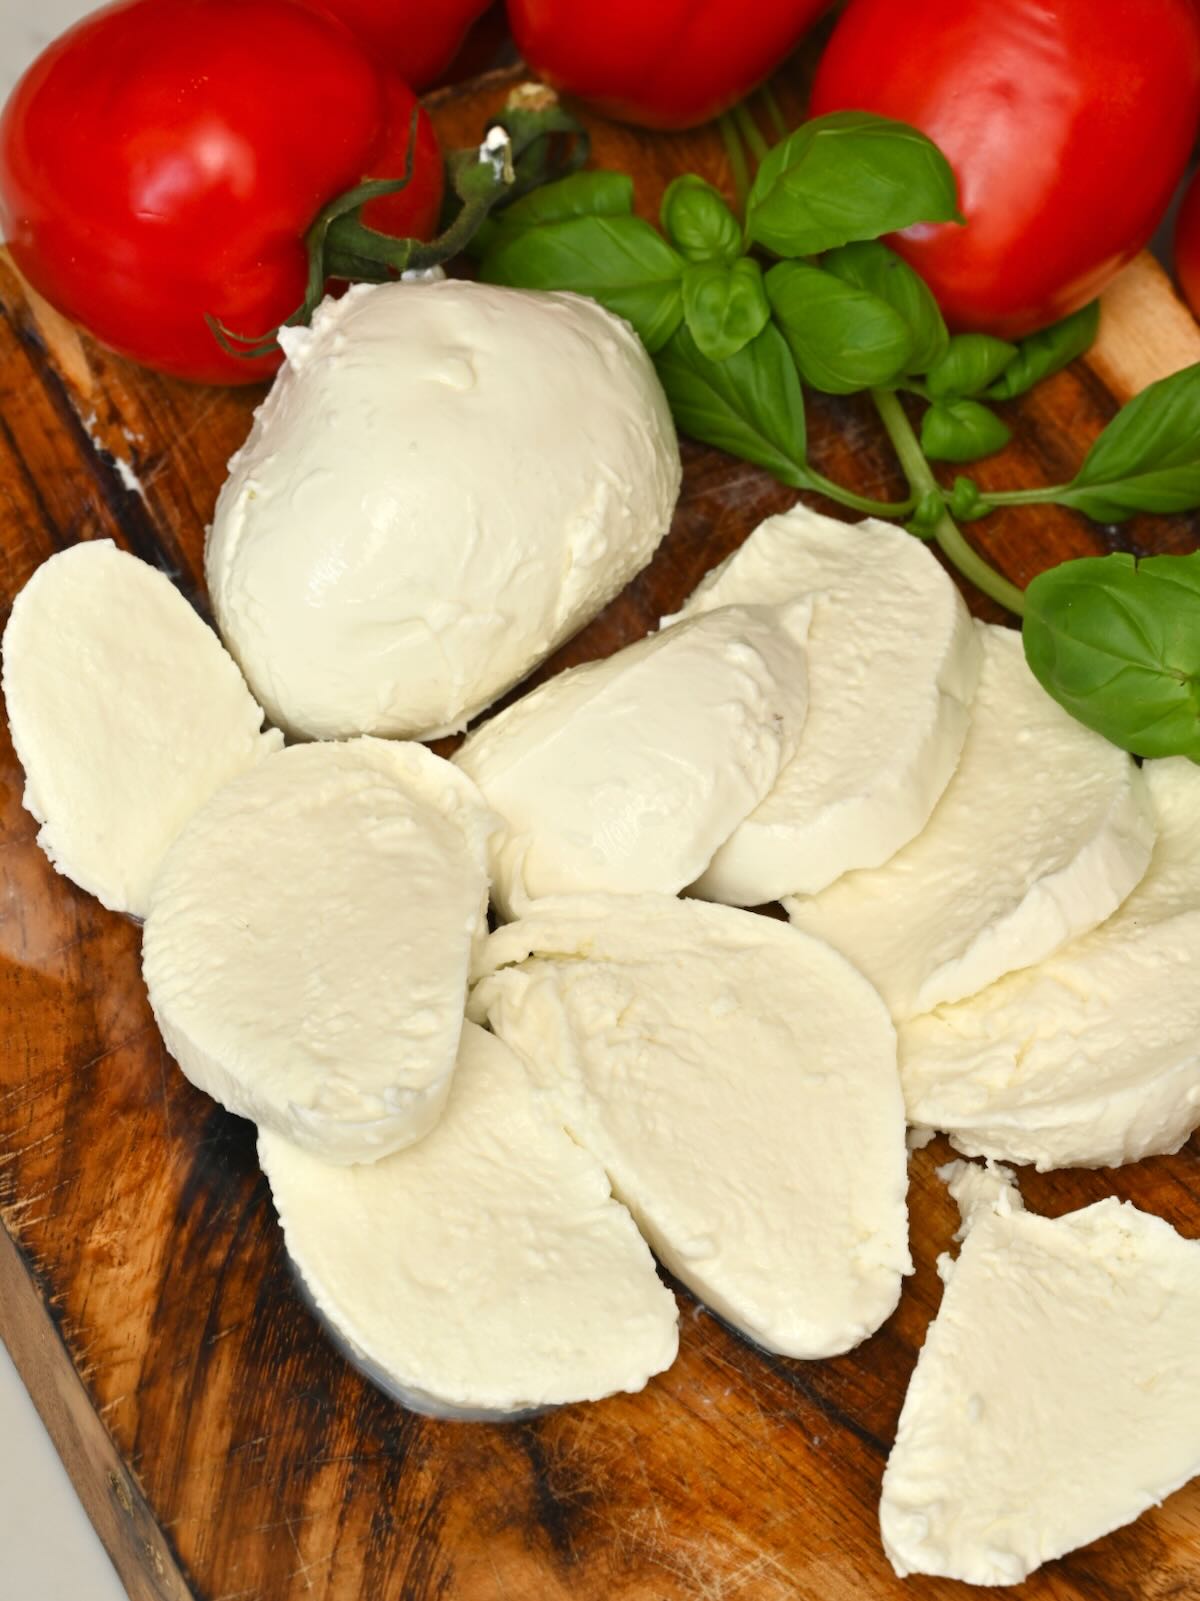
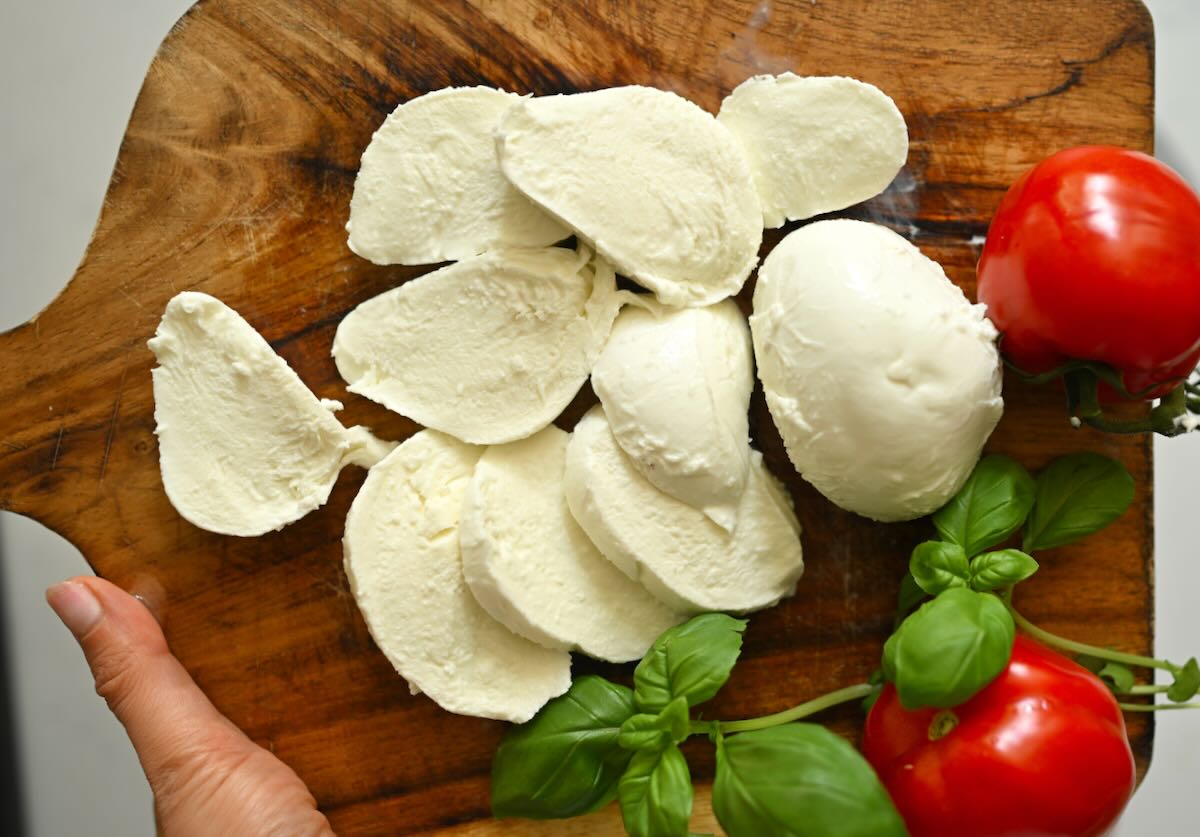
Once your mozzarella is shaped and still beautifully fresh, use it right away while it is at its softest: slice it up for a simple Caprese salad with tomatoes, basil, and olive oil, or tear it over a quick pizza night (especially good with this quick pizza sauce recipe).
If you are craving comfort food, it also melts into creamy, stretchy pockets when layered into baked pasta – try it in a homemade lasagna recipe, or any oven-baked dish where you want that fresh, milky melt.
More homemade cheese recipes

If you made this recipe, please leave a rating and a quick comment. Your feedback supports the blog and helps other readers.

Homemade Mozzarella Cheese (The Foolproof Method)
Equipment
- Colander or a fine mesh strainer
Ingredients
- 1 gallon whole milk not ultra-pasteurized
- 1 teaspoon cheese salt (or non-iodized kosher salt)
- 1.5 teaspoons citric acid dissolved in 1 cup water
- 1/4 teaspoon liquid rennet (single strength), diluted in 1/4 cup cool water; OR 1/4 rennet tablet dissolved in 1/4 cup cool water
- 1/4 teaspoon calcium chloride (optional but recommended), dissolved in 1/4 cup cool water
Yield: 1 pound mozzarella (16 oz / 450 g)
Instructions
- Heat milk + citric acid: Pour the milk into a large pot. Stir in the dissolved citric acid (and calcium chloride if using). Warm gently over medium-low heat until it reaches 90°F (32°C).
- Add rennet + set: Remove from the heat. Stir in the diluted rennet using an up-and-down motion for 20–30 seconds (avoid swirling). Cover and rest for 5–8 minutes until the curds set and you get a clean break.
- Cut curds: Cut the curds into a grid pattern, slicing all the way down to the bottom of the pot. Rest 5 minutes.
- Heat curds: Warm slowly, gently lifting/stirring, until the curds reach 105–106°F (40–41°C). Turn off heat and let the curds settle 5 minutes.
- Drain: Scoop curds into a colander and drain for 2–3 minutes. Gently press together (don’t over-squeeze).
- Heat water: Heat fresh water to 170–180°F (76–82°C).
- Soften curds: Place curds in a heatproof bowl and pour hot water over them. Rest 30–45 seconds until pliable.
- Salt + stretch: Sprinkle with salt, then gently fold/stretch 2–4 times until glossy and cohesive. Re-warm briefly in hot water if it stiffens or tears.
- Shape + set: Shape into a smooth ball and place in cold water for 5–10 minutes to set.
Video
Notes
Drain well (don’t over-squeeze): Too much whey can cause a soft center, but squeezing too hard can make mozzarella dry.
If it won’t stretch, it isn’t hot enough: Refresh with hotter water within 170–180°F / 76–82°C.
Do not overwork: Stretch only until glossy and cohesive—overworking makes it tough. Check the blog post for more tips and troubleshooting.
Nutrition
Nutrition information is automatically calculated, so should only be used as an approximation.


Hi, it seems I can buy double or single strength rennet. Which do I need for this recipe please. If a recipe calls for single strength and only double strength is available do you just halve the quantity or is it not that simple? thank you!
Hi Rona,
It would be easier to use single strength for smaller quantities and double strength for larger quantities. If you don’t plan on making cheese on a large scale, then rather stick to the single strength. I hope this helps.
The recipe was easy to follow. My mozzarella turned out looking like an Italian one!
I almost went with the vinegar one but thought that this must be more rrliable.
Thank you for your comment, Jari!
hi i love this recipe and cant wait to try it out but i cant seem to see in the recipe when the salt is added ?
Hi Lotus,
You will find the instructions on when to add the salt under Stage 3 – Shaping the mozzarella nr.2 (right before you stretch and fold the curds).
Hi Samira,
Thank you for the detailed instructions. It’s good to learn from others trial and error. I’ve made mozzarella cheese several times using store bought curd. It’s always come out ok at best, usually rubbery. Maybe water too hot or over worked. I’ll be attempting your method, but was wondering where the video is / went.
I’m sure watching your video would be very helpful.
Hi Wayne,
Yes, I have a video for this method. An easy way to find the video on my blog would be to look for the icon that says “Jump to Video” right at the top when you open this recipe, it will take you directly to the video when you click on it. Alternatively, you can scroll down to the bottom of the recipe, you will see the video above “Notes” underneath “How to Store”. I hope you give this recipe a try. 🙂
0.01 ounce of rennet converts to 0.06 teaspoons, which I upped to 1/8 teaspoon double strength vegetable rennet. It clearly was not enough rennet because the curds never gave me a clean break. Do you have a suggestion for measurement in teaspoon?
Hi there,
I’m sorry I know it is hard to measure rennet. You can shop online for a measuring spoon called: Pinch Dash Smidgen measuring spoons – they measure small quantities. I hope this helps 🙂
Just how much kosher salt do you use in your cheese? How do you get it distributed evenly into the cheese? I made the cheese – fairly successful I’d say, but kind of on the bland side since I didn’t see just how much salt to use. Will try it on homemade pizza tonight!
Hi April,
I use about 1/4 to 1/2 tsp. I recommend adding it to taste.
Hi Samira,
Would you know if this traditional method of making mozzarella would work with a plant based milk?
I’ve read your tutorial on vegan mozzarella, but I would like something more tangy and bold like the dairy counterpart – but without the dairy haha
So I was wondering if following a more traditional recipe would yield that result (given that the vegan recipe doesn’t call for citric acid or [vegetarian] rennet).
If you have any thought on it please share them with me, even if you haven’t tried it yourself. I’m willing to take risks 🙂
Also, any suggestion on which plant milk to use?
Thank you very much!
Lissa
Hi Lissa,
I don’t think the traditional method would work with plant-based milk, that’s why there is the vegan mozzarella recipe. 🙂
Maybe you could add a bit more lemon or nutritional yeast to boost the flavor of the vegan recipe. I hope this helps.
I want to start making this but I am having a hard time finding milk that is not homogenized. All of the milk I see in store are pasturized and homogenized. What can I use instead?
Hi Angela,
You can always try to find out if a local dairy farm sells fresh raw milk. Alternatively, for a less creamy/rich cheese, you can use skimmed milk (2%, etc.), or pasteurized milk. Homogenized and ultra-pasteurized milk won’t work. I hope this helps.
Hi, can we use white vinegar or lemon juice instead of citric acid?
Hi Rania,
In general, yes, you can use white vinegar or lemon juice. However, I’ve experimented with other options but have yielded the best, most consistent results only when using citric acid. I hope this helps.
When I took my cheese out of the fridge to use it the outside was slimy. Is that normal? If not, can you tell me what I did wrong?
Hi Dawn, Sorry to hear that! This normally points to the brine and level of salts there, maybe try experimenting with another salt type? and did you use filtered water? Tap water is not great for this.
I live in Europe and don’t have access to the above itmes so wanted to share my consistent mozzarella 1 ingredient recipe. I get 1.5 liter fresh whole organic milk daily and most times it is too much so about every third day I make it into mozzarella. I don’t have a temp gauge so, I heat the milk on high heat until I can still place my finger in it before it is boiling hot. At that “temp” (finger hot) I add 3 tablespoons of white vinegar and stir until I get curds and whey. I mix the curds so they come together and are not floating around. I drain the curds in a collander and work them with my hands pressing to remove excess whey and milk. I then place them in hot water and work them to remove more whey/milk while “washing the cheese. I do this process twice. And voila mozzarella. it results in a hand sized ball (about the size of a small baseball) of cheese. We use it so quickly that I don’t store it in water mixture and we don’t salt it either.
Hi Vaska,
Thank you for sharing your method, I will have to give it a try. 🙂
Hello! can we substitute citric acid for white vinegar or lemon? I have all the ingredients except citric acid!
Also, I am working with tablet rennet, how to get the needed measure of 0.3 gr from one tablet?
Thanks!
Hi Rania,
As I mentioned in my other comment, using citric acid yielded the best results for me. Regarding the rennet tablets – doesn’t the packaging say how big each one is? Or for how much milk they can be used?
Let me know 🙂
Use a pill cutter for the rennet tablet. 1 tablet usually makes 4 batches, so cut into quarters.
Hi Belinda,
Thanks for the tip!
I have followed many different ways. but I really want my cheese to look like it from the store. is chopped to bake pizza. it’s drier and harder than fresh cheese. please help me
Hi Trần,
I managed to grate the cheese and it looked just like the one from the store. And it melts great on pizza. I hope you give this recipe a try.
You can use lemon juice – it contains a lot of citric acid. If you have a pH meter, add lemon juice to pH 5.8 ish
Thank you for your tip, Fenwick.
Hi Samira, I love your site alot. Helped me in making my diy coconut oil. I would love to make mozzarella cheese too but the only issue is that I can’t follow this method of yours cause where am from I have no access to rennet, have been on YouTube and tried the other method of using vinegar twice but still it ended up a failed experiment. Mined you I used fresh non pasteurised milk. So please would you mind making a DIY on making the cheese with vinegar. Would be much appreciated. Thanks
Hi Suleiman,
Thank you so much for your comment. I haven’t tried making the cheese with vinegar but it is on my list – I am curious as well to give it a try 🙂
At the risk of sounding like a moron, how do you measure 0.01 oz (or, 0.06 tsp) correctly? What do you use that has measurements small enough, an eyedropper? Thank you.
Hi Elissa,
You may be able to find a spoon called “Dash, Pinch and Smidgen”. You can also find a digital scale that will measure small quantities like the rennet. You should be able to find both online. I hope this helps
Thank you for sharing…yours is much dependable and i am sure it will worked fine per your instruction and ill be able to create it myself and will no longer have the problem where i could buy or get it not to mention it being expensive…thank you so much…its a big help really.
Thank you for your comment. Glad you are trying this recipe.
To make cheese you have to coagulate milk. For rennet to work the milk must be acidified which is the point of the citric acid. Milk will coagulate with just acid but it takes 24 hrs and produces a very weak curd. Small bottles of rennet are available from Dairy Connection in Madison Wi. They have a great website.
Thank you for your feedback, Terry.