
This post may contain affiliate links. Please read our disclosure policy.
A light and fluffy red velvet cake with a subtle cacao flavor, naturally colored, and filled with cream cheese frosting. It is the perfect way to celebrate any special occasion. You should definitely give it a try!

Red velvet cake has always really intrigued me; is it vanilla, is it chocolate? Why does it seem to look and taste so different no matter where you get it from? What makes the red color? And how can I make a moist, light, and fluffy homemade red velvet cake that is sure to impress? Well, I have the answers to those questions here and more.
Table of contents
What makes the red color?
Traditionally, red velvet cake gets its color from a reaction between cocoa powder, buttermilk, and vinegar, which historically resulted in a “rust” hue. With the introduction of food colorings, the color spectrum has expanded from deep mahogany to vibrant red.
However, it’s very rare to come across a red velvet cake these days that doesn’t have some sort of red food coloring or other edible dyes.
Ingredients

For the Sponge
- All-purpose flour
- Sugar
- Buttermilk
- Unsalted butter, softened
- Eggs
- White wine vinegar
- Cacao powder
- Natural red food coloring
- Salt — just a pinch
- Baking soda
- Vanilla
For the Cream Cheese Frosting
- Cream cheese
- Unsalted-Butter, softened
- Powdered sugar
- Vanilla
Decorative toppings such as chocolate hearts, berries, edible flowers, or your favorite fruit.
How to make the best red velvet cake
Begin by sifting all of the dry ingredients into a bowl and mix to combine. In a separate large bowl, lightly cream the butter and then beat the butter and sugar, gradually adding in the eggs. Beat until smooth and fluffy.
Next, add the vanilla extract and the red food coloring. I suggest starting with just one teaspoon and then adding more if needed until you achieve the color you prefer. Just be aware that if you add too much, then it can add a hint of flavor.
First, add half of the dry ingredients to the bowl of wet ingredients and mix well. Then add half of the buttermilk and mix well again. Repeat those last two steps until both mixtures are thoroughly combined into the cake batter. Finally, add the white wine vinegar and mix well.

Grease or line a cake tin (8″/20cm) and add the cake batter. Bake for about 30 minutes at 350ºF/180ºC. The center of the cake should be a little springy to the touch. A toothpick inserted into the center of the cake should also come out dry (crumbly is fine- but not wet).
Remove the red velvet from the pan and let it cool on a wire rack. It must be at room temperature before decorating.
Make the Cream Cheese Frosting: In a large bowl of a handheld or stand mixer, beat the cream cheese and butter until smooth. Add powdered sugar, vanilla extract, and a pinch of salt; start on low speed and increase to high, mixing until creamy. The frosting should be creamy and hold its shape.

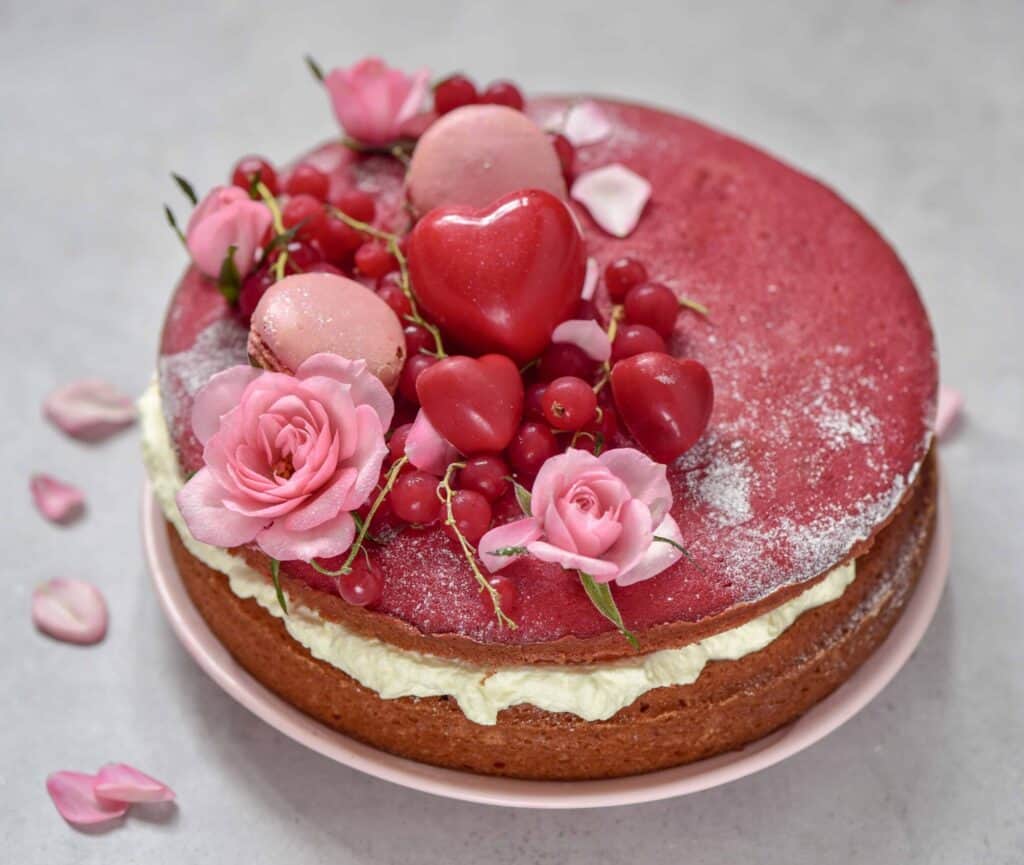
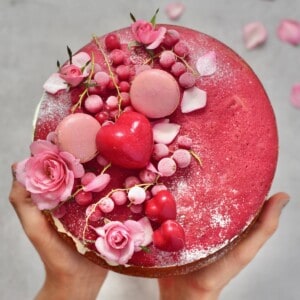
To Decorate The Red Velvet Cake: Slice the red velvet in half for a two-layer dessert. Then spread the frosting on the bottom cake layer and top with the other layer. I used the cream only in the middle, but you can choose to cover the top or even the entire cake. You’ll need double the amount of cream, though.
Finish off the cake decorations how you’d like. Some people like to use leftover red velvet crumbs. I love to top it with berries, edible flowers, and chocolate heart bonbons.
Any leftover red velvet cake can be stored in an airtight container in the fridge for 3-5 days.
More cake recipes

If you try this recipe, let me know how it goes in the comments below. I’d appreciate a recipe card rating and would love to see your recipe recreations – tag me on Instagram @Alphafoodie!
The Best Red Velvet Cake
Ingredients
- 2 cups all-purpose flour
- 1.5 cup sugar
- 1 cup buttermilk
- 1 cup unsalted butter softened
- 2 eggs
- 1 Tbsp white wine vinegar or white vinegar or apple cider vinegar
- 2 Tbsp cacao powder
- 1 Tbsp Natural red food coloring liquid gel works best
- 1 tsp salt
- 1/2 tsp baking soda
- 1 tsp vanilla extract
Cream Cheese Frosting and Decoration:
- 1/2 cup cream cheese
- 1 cup unsalted butter softened
- 1 cup powdered sugar
- 1/2 tsp vanilla
- chocolate hearts, berries, edible flowers or any of your favorite fruit or toppings
Instructions
- Preheat the oven to 350ºF/180ºC.
- Sift all of the dry ingredients (except the coloring powder) into a bowl and mix, to combine.
- In a separate large bowl, lightly cream the butter and then beat the butter and sugar, gradually adding in the eggs. Beat until smooth and fluffy.
- Add the vanilla extract and the coloring powder. I suggest starting with just one teaspoon and then adding more if needed, until you achieve a color you prefer. Just be aware that if you add too much, then it can add a hint of flavor.
- Add half of the dry ingredients into the bowl of wet ingredients and mix well. Then add half of the buttermilk and mix well again. Repeat until both mixtures are thoroughly combined into the cake batter.
- Add the white wine vinegar and mix well.
- Grease or line a cake tin (8"/20cm) and add the cake batter.
- Bake for about 30 minutes at 350ºF/180ºC. The center of the cake should be a little springy to the touch. A toothpick inserted into the center of the cake should also come out dry (crumbly is fine but not wet).
- Remove the red velvet from the pan and leave to cool down on a wire rack. You need it to cool to room temperature before decorating.
Make The Cream Cheese Frosting
- Beat cream cheese and butter on medium-high until smooth (2 mins). Mix in powdered sugar, vanilla, and salt on low (30 secs), then high until creamy (about 3 mins).
Decorate
- Slice the red velvet in half for a two-layer dessert. Then spread the cream cheese frosting on the bottom cake layer and top with the other layer. I used the cream only in the middle. But you can choose to cover the top too, or even the entire cake. You'll need double the amount of cream though.
- Finish off the cake decorations how you'd like. Some people like to use leftover red velvet crumbs. I love to top with berries, edible flowers, and chocolate heart bonbons.
Notes
Nutrition
Nutrition information is automatically calculated, so should only be used as an approximation.


I love the taste of this cake. I wanted to ask you if is possible to change to nondairy ingredients? I used creamy coconut yogurt and vegan butter and my cake turned out very moist, the toothpick came out clean. It was moist even at the edges. Do you think I over beat (I used a mixer)or is it the swap of ingredients? Thank you for your help I ate the whole cake.
Hi there,
So happy to hear that! Yes, you can! Moist is fine, as long as the toothpick comes out clean. I hope this helps 🙂