
This post may contain affiliate links. Please read our disclosure policy.
A simple multigrain bread recipe for beginners – whole wheat and spelt bread recipe topped with seeds, using a simple process for beginner bread makers.

If you’ve been following my Instagram stories recently, then you’ll have noticed that I’ve been up to my elbows with home baking, did live cook-along, and other fun kitchen-based activities to pass the time. That includes teaching how to make homemade bread – and this simple multigrain bread recipe using whole wheat and spelt flour- which is naturally vegan.
If you’re late to the party (or don’t follow me on Instagram), then have no fear as I save all my DIYs/recipes in my Instagram highlights for you to peruse. I often actually show my recipes there first, before they even make it to the blog. In fact, I’ve currently been working on showing you how to make your very own sourdough starter for the sourdough recipe, coming soon.

Learning how to make homemade bread loaves had been on my ‘list’ (along with at least 750678 other things) for months, so with the extra indoor time I’ve been having, I thought now would be the perfect time to get started with it.
Now, I’m not going suddenly to become the next top blogger for turning out artisanal bread loaves or anything. However, that’s also not ever going to be my goal. I aim to provide you all with simple homemade bread recipes that anyone can make – in fact, I’ve already got up recipes for these Authentic Homemade Pita Bread, and a Delicious Homemade Neapolitan pizza dough, and even a simple Whole Wheat Bread recipe.
All you need for this whole wheat and spelt bread recipe are a few simple pantry ingredients, methods, and some loaf pans (no dutch oven needed here!), and you’ll be churning out delicious bread loaves and feeling like a pro. After all, there’s nothing quite like a slice of warm bread fresh from the oven to make you wish you’d taken up bread-making years ago.
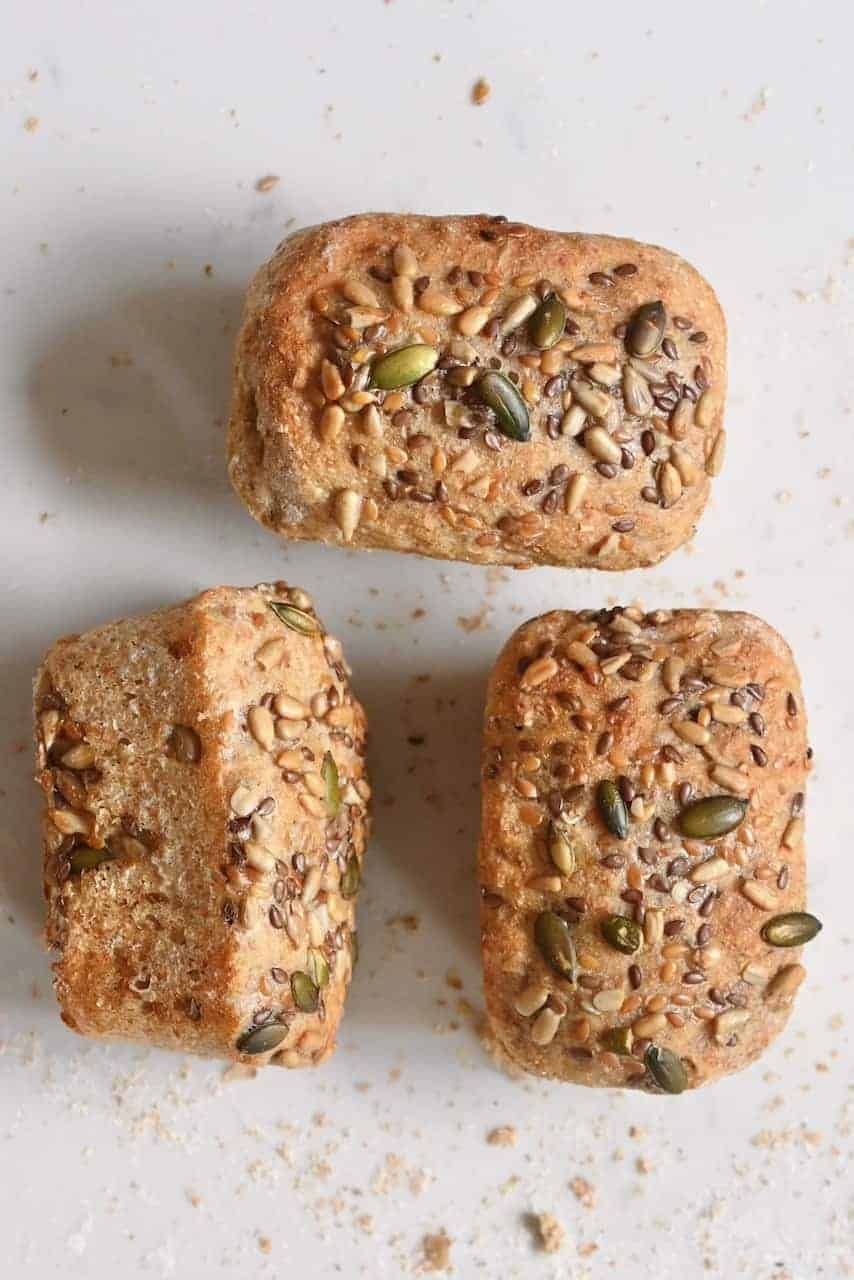
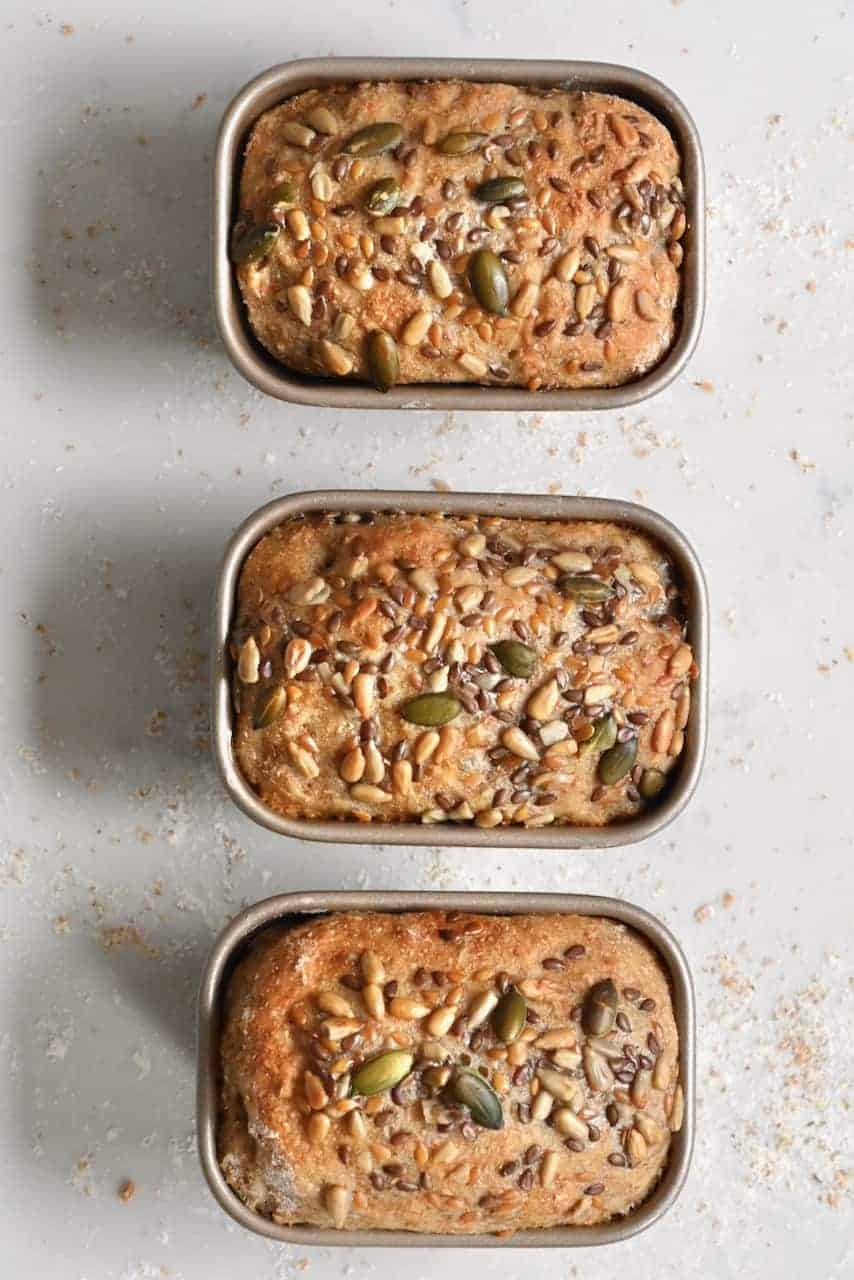
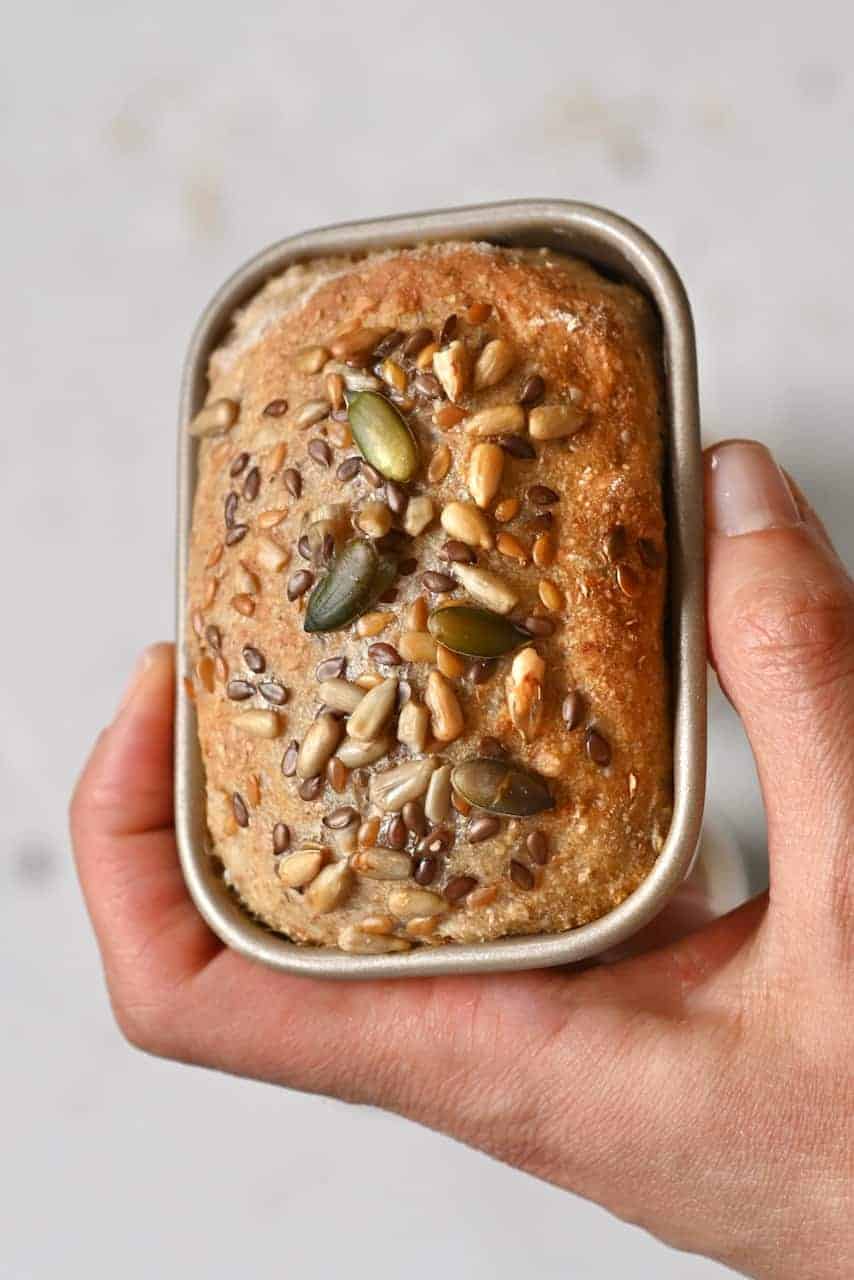
Plus, you can use this recipe to either make one large loaf or even smaller, individual loaves. The smaller ones go perfectly when served warm with some homemade butter and Soup – like this Thai Inspired Vegan Green Pea Soup.
Want to save this recipe?
A few notes on this homemade bread recipe
Homemade bread can be really simple, once you wrap your head around the ingredients and methods. In fact, this recipe is fairly versatile and lends a hand to what you have available to you. For example:
- I topped this whole wheat bread loaf with mixed seeds, however, you can also add seeds/grains into the bread mixture itself (I usually add just a couple of Tbsp). Simply wait until after you’ve proved your dough the first time (which is when you leave it to rise) then mix the seeds in before transferring the dough to a loaf tin. You could use Pumpkin, Flax (flax seeds that have been blended are easier to digest), Sesame, Hemp, Poppy, and Sunflower seeds, or even things like whole Oats.
- Toasting any seeds before adding them to the dough can also add extra flavor – however, be aware that if you’re using them for a topping or a very dry dough then the seeds need to be soaked so that they don’t burn in the oven.
- If you find whole wheat bread a little bitter then you can add in a natural sweetener such as agave, maple (or honey as a non-vegan option). 2-3 tBsp should be more than enough and added when the yeast mixture and dry ingredients are combined in a bowl.

- You can knead this dough by hand, or leave a stand mixer with a dough hook to do the job. Just make sure you knead for the full time until the dough is smooth and elastic, as this will massively impact taste and texture.
- If you don’t have any spelt flour to hand, then you can use all-purpose flour instead.
- The temperature and weather can affect the time it takes for your dough to rise and how wet the dough is. If your apartment/house is particularly cold, you can either leave the bowl dough to prove nearby a heater OR turn the oven on for a few minutes, switch it off and then leave the dough to rise inside the oven (as the heat will be trapped in there for a long time, without being too hot).
Multigrain bread ingredients

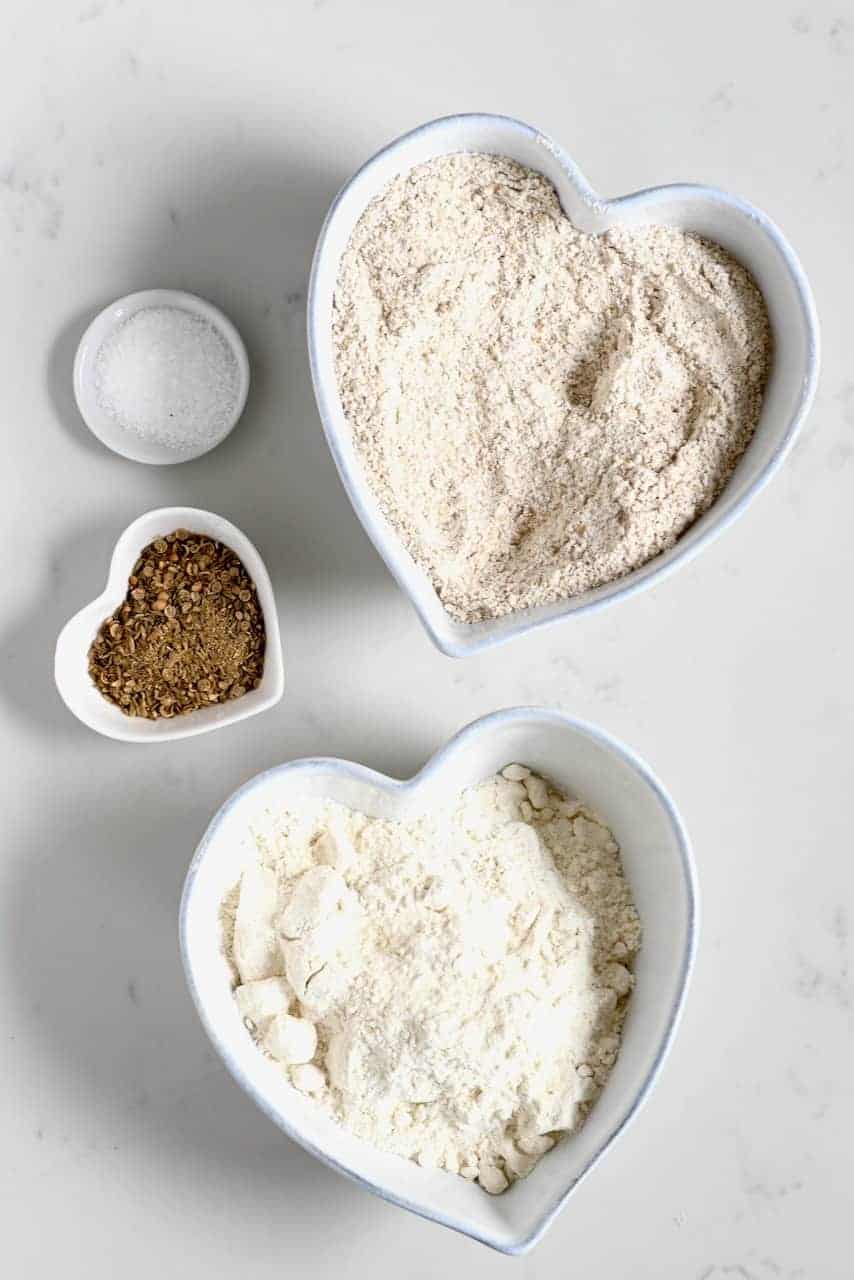
- whole wheat flour and spelt flour (or all-purpose flour)
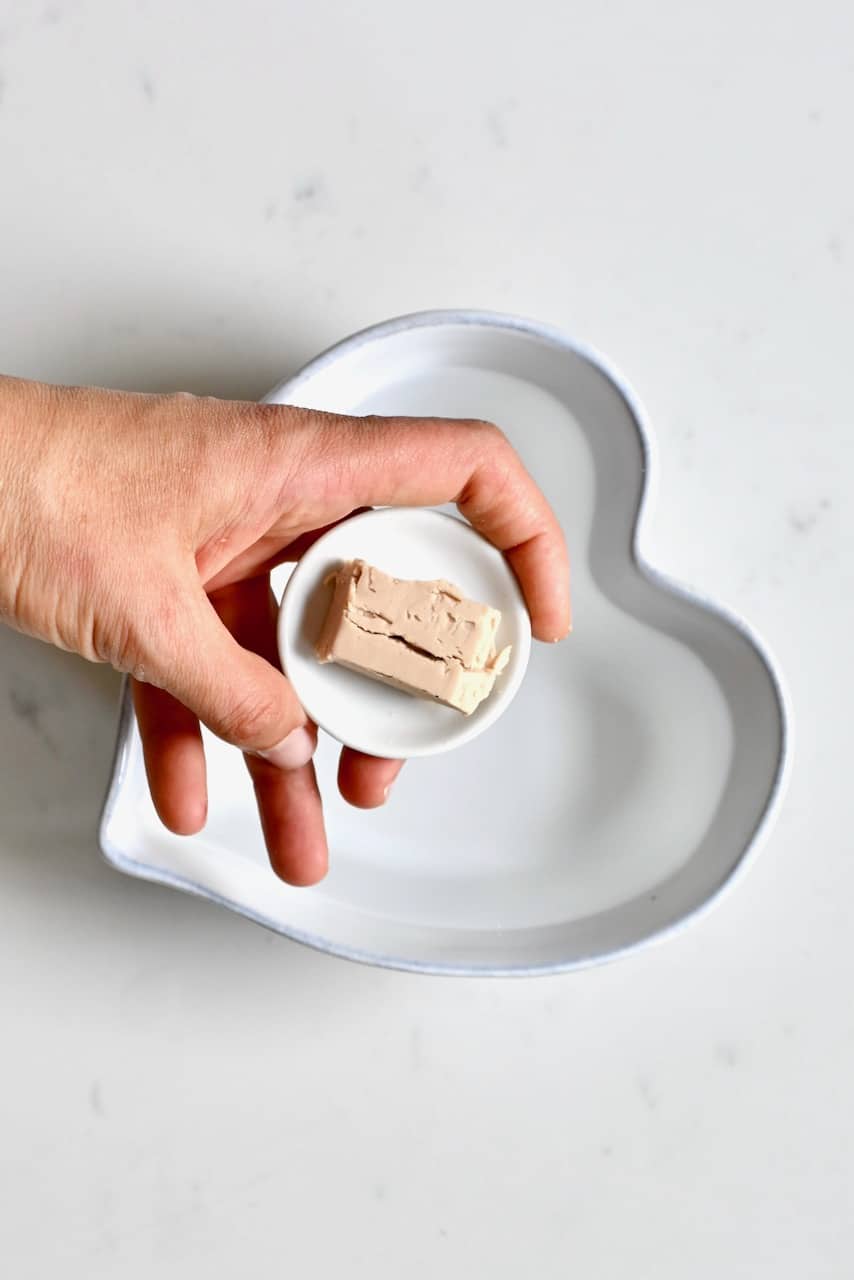
- yeast (I used fresh yeast but you can use dried yeast)
- salt, mixed spices of choice (like coriander seeds, caraway seeds)
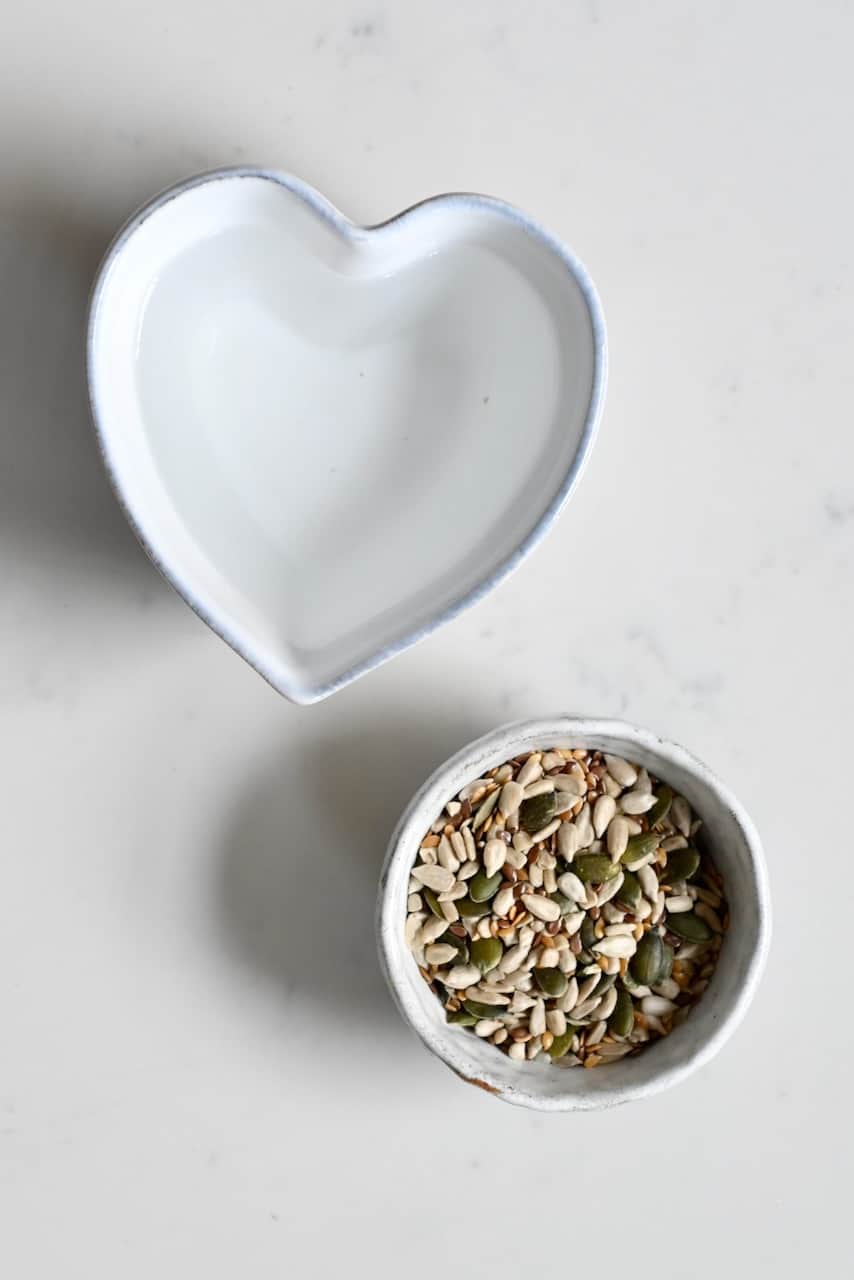
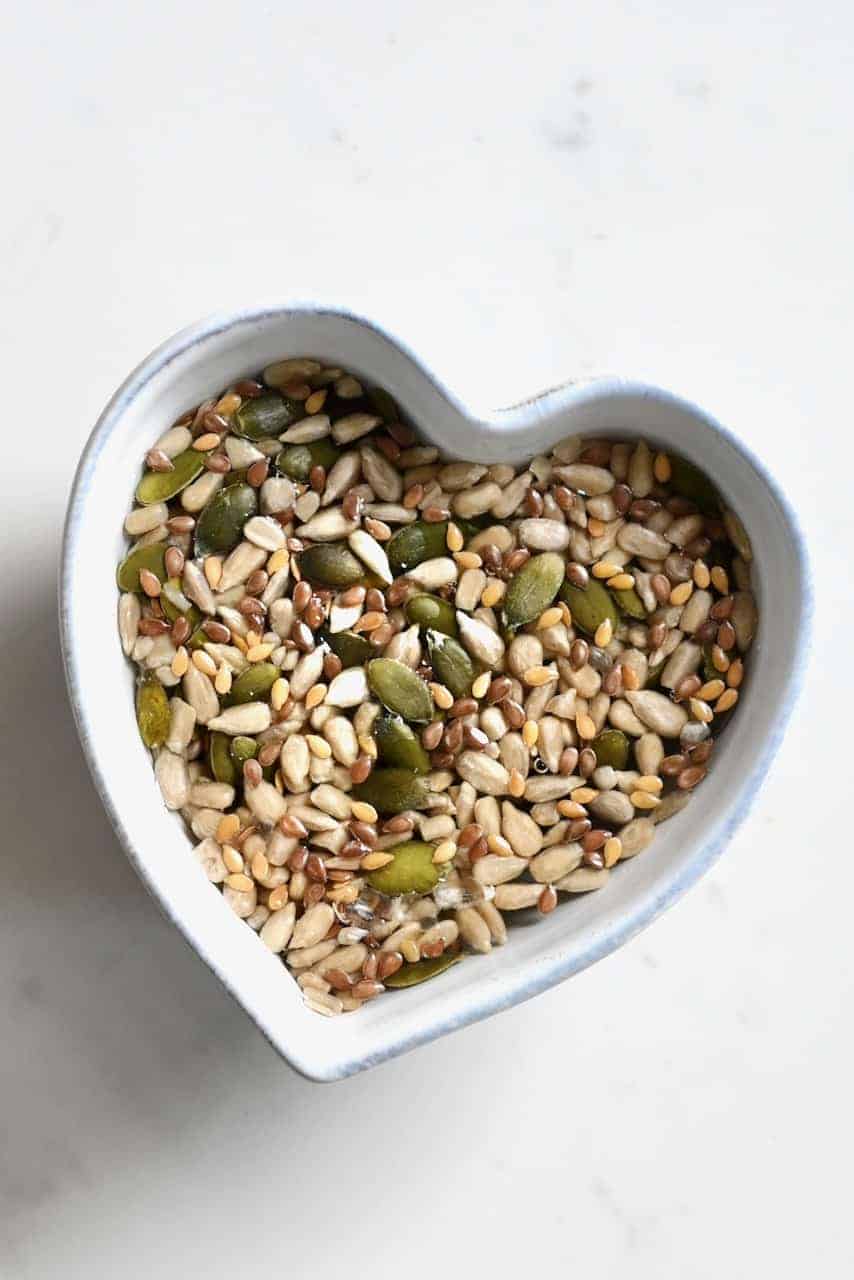
- mixed seeds of choice (I used: sunflower, pumpkin, brown flaxseed, and golden flaxseed)
It’s important to note that, by nature, this wholewheat multigrain bread will be denser than regular white flour bread. If you want to make it more fluffy and airy, you can use white flour instead of the spelt.
How to make multigrain bread
Start by soaking the seeds in 1 cup of water. This step is necessary so that they don’t burn while baking the bread.
Next, mix the whole wheat flour and the spelt flour in a large bowl. Add the spices and salt and incorporate them well.
In a small bowl, dissolve the yeast in lukewarm water. If it’s too hot then it can kill the yeast, so it’s best to stick to lukewarm water (around 110ºF/43ºC). This usually takes around 5 minutes,

Add the yeast mixture into the flour bowl and mix until you obtain a sticky dough. (If you want to add some natural sweetener then add that at this point)
Then, knead the dough for about 10-15 minutes until it becomes uniform, soft, and elastic. This can also be done in a stand mixer for between 8-10 minutes.
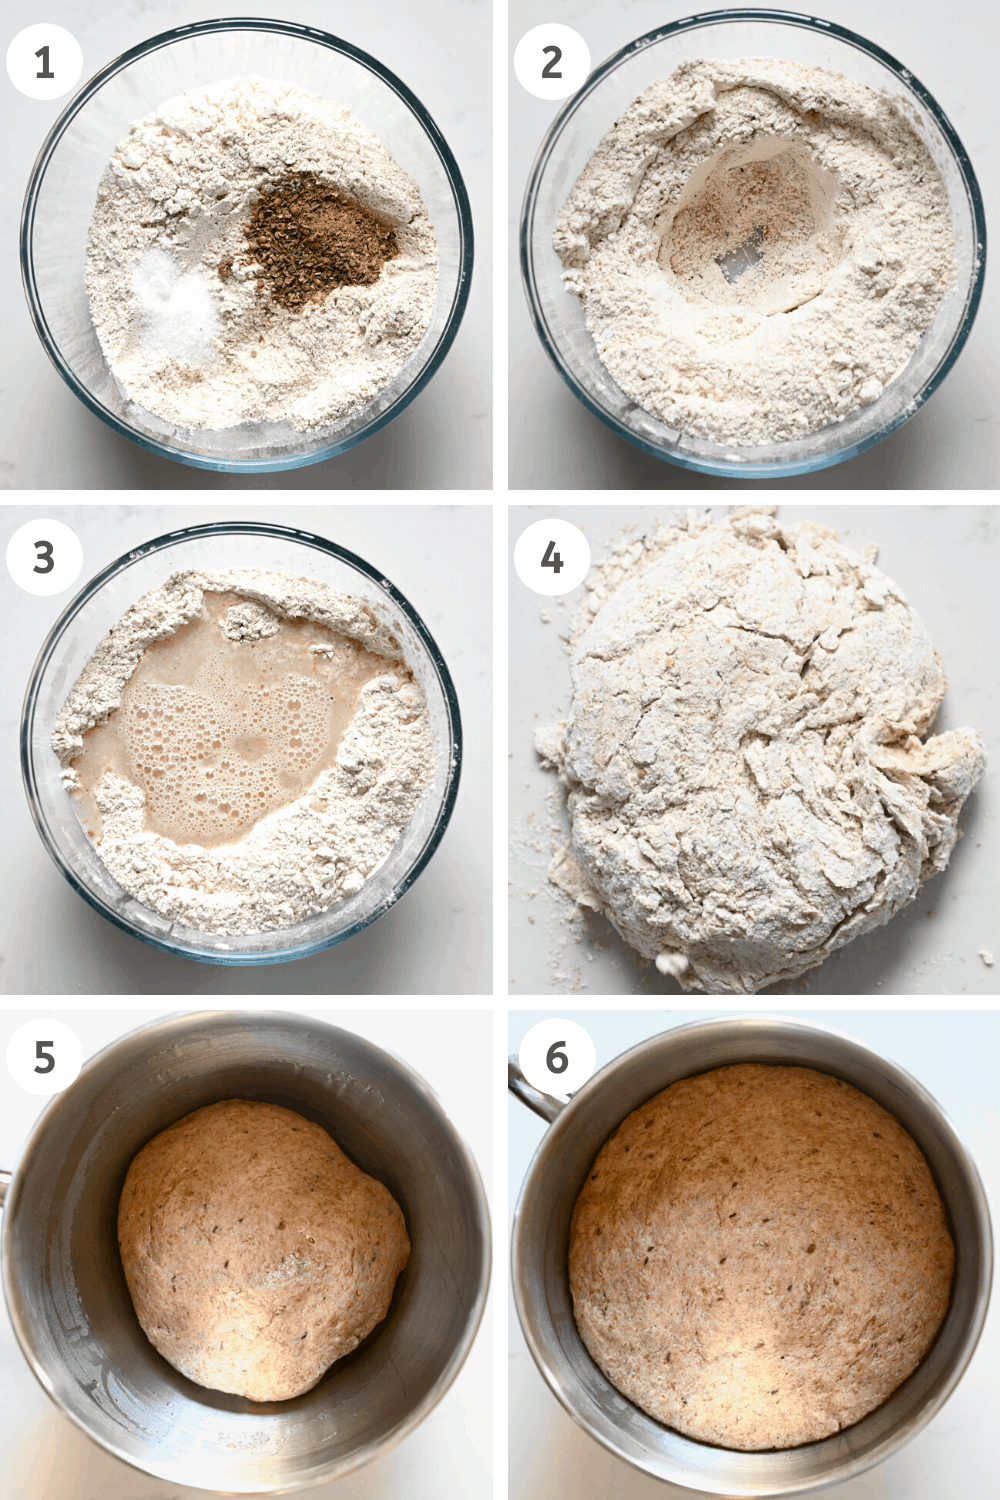
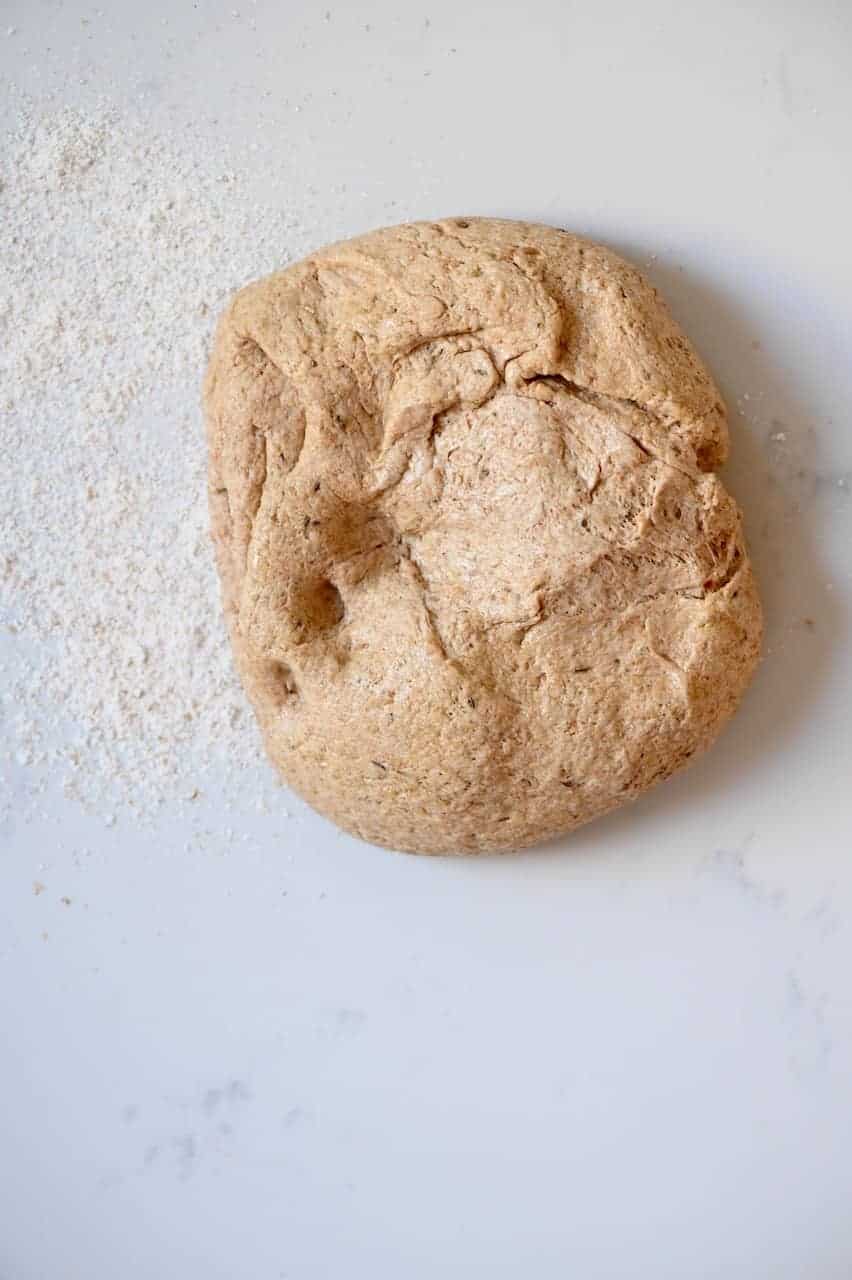
Roll the dough into a ball, wet it with some olive oil, and place it in a lightly oiled bowl. Cover the bowl with a damp tea towel and set aside for 1 hour so the dough can rise to around double its size.
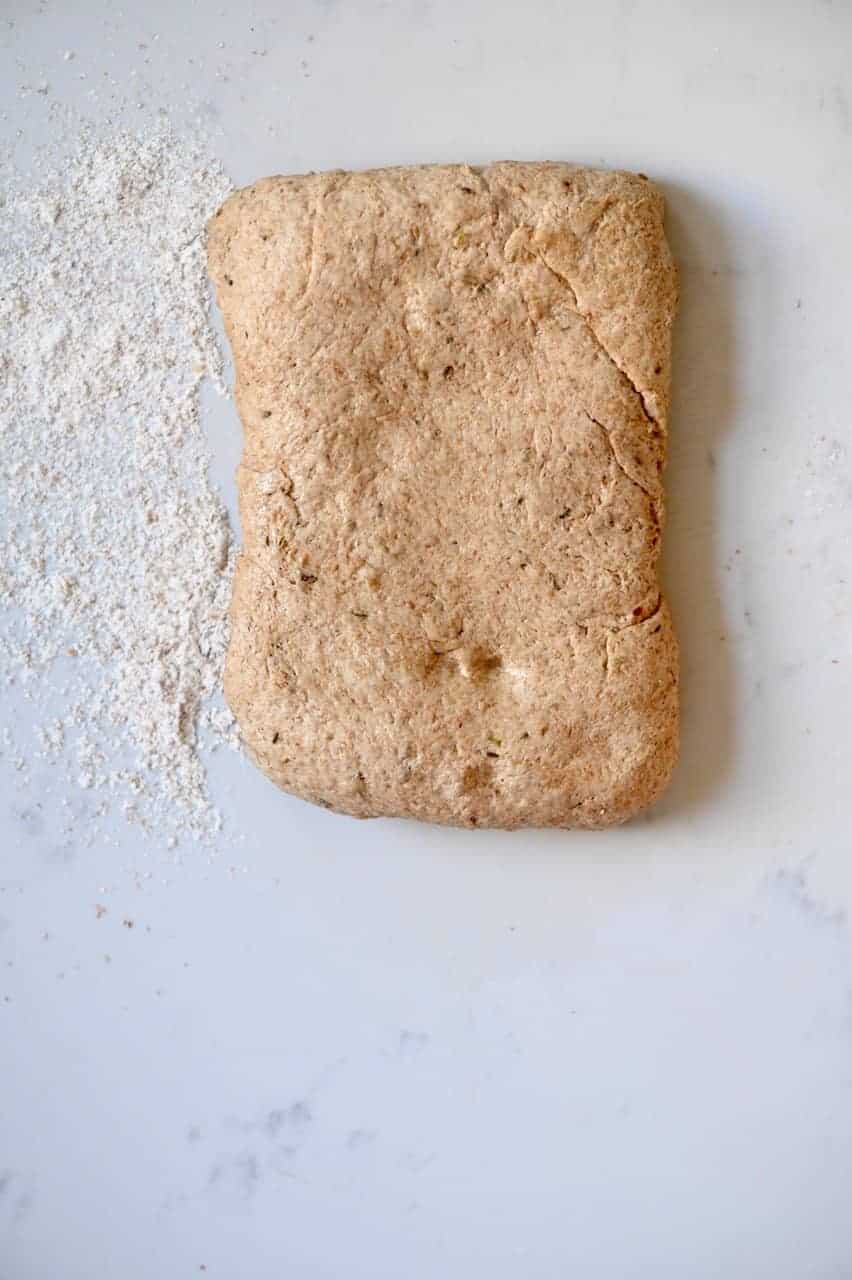
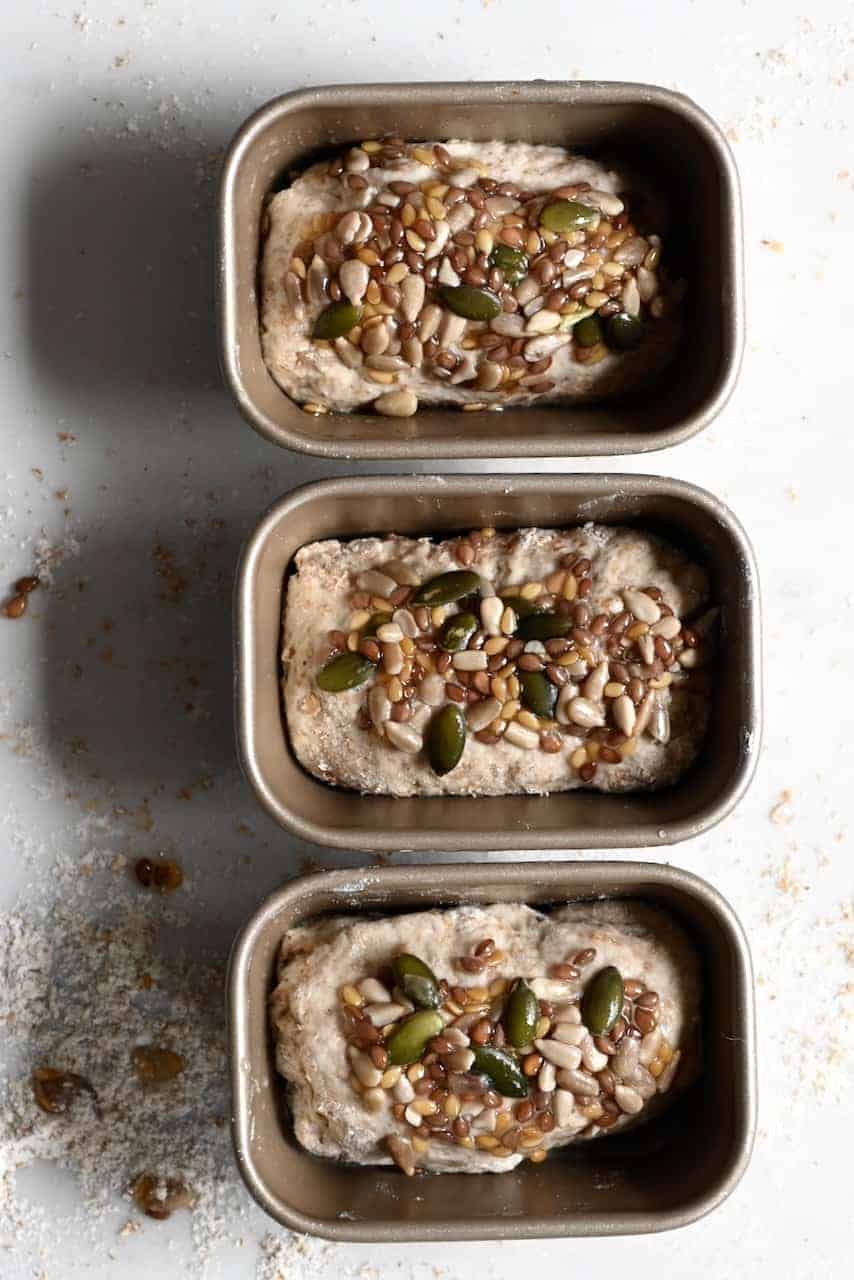
Remove the dough from the bowl, knocking out some air while you shape the dough into a ‘loaf’ shape that is slightly thinner than the width of your loaf tin. The same goes for individual loaves – simply divide your dough evenly and shape accordingly.
Note* If you want to add any seeds/additives into your bread, then you’d add them at this point, just after the first proving.
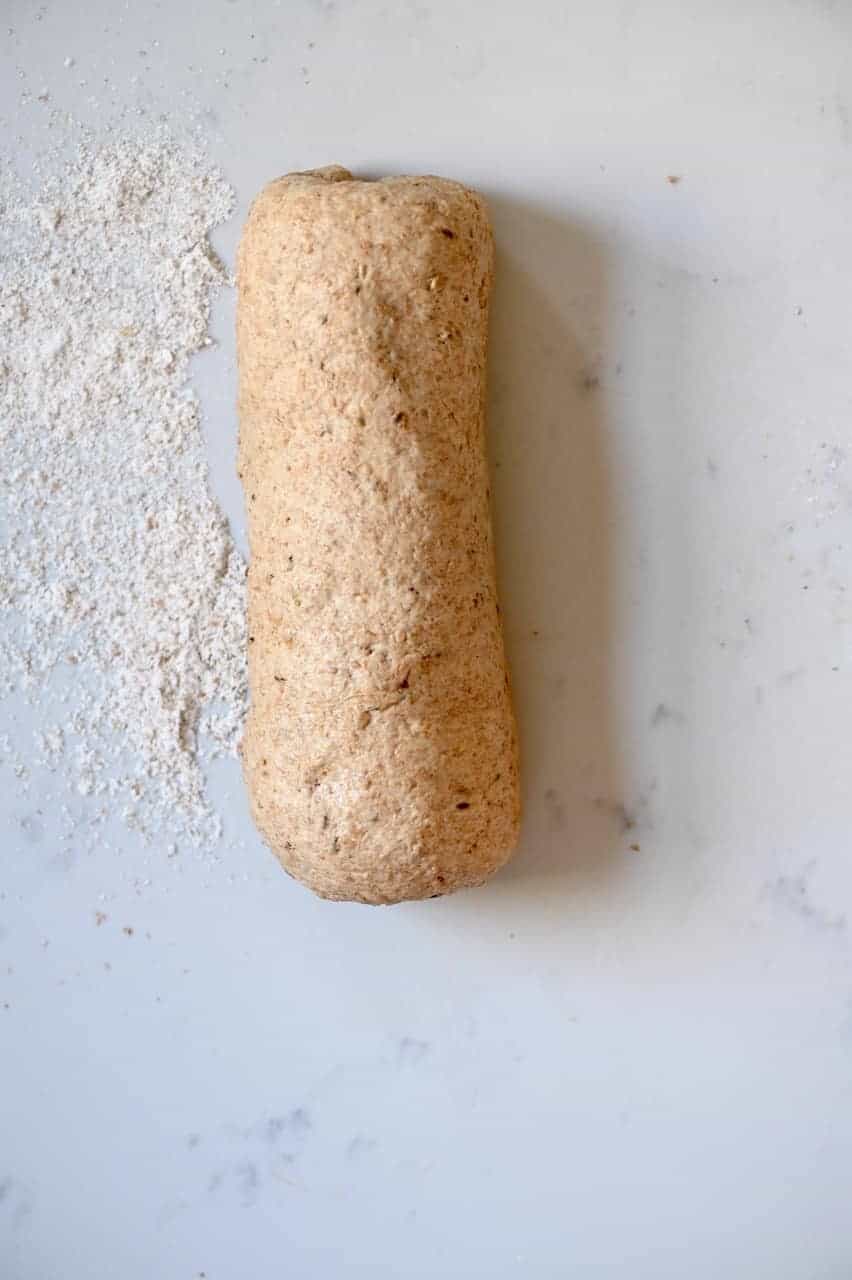
Prepare your bread loaf tin and grease it or line it with baking paper or a bread tin liner. I use a paper liner, which I lightly flour.
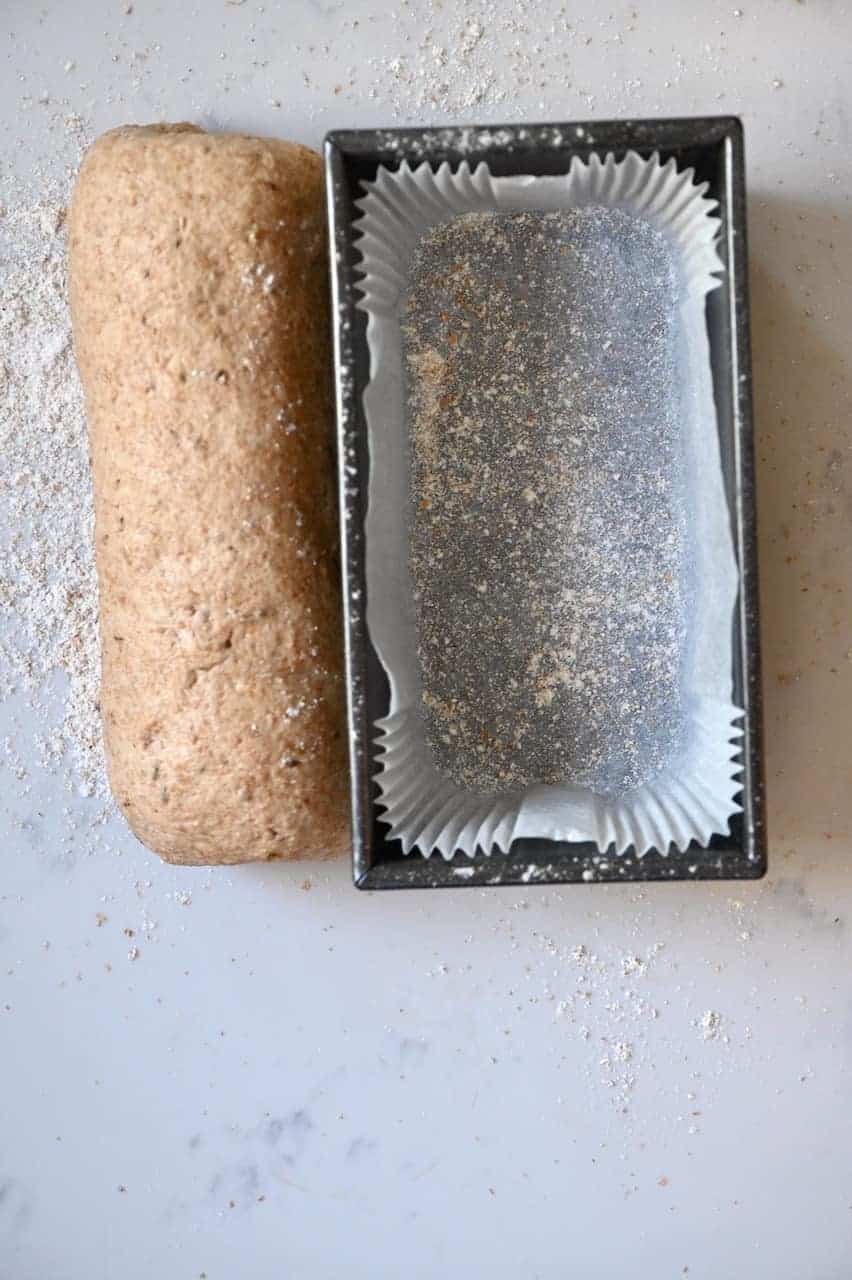
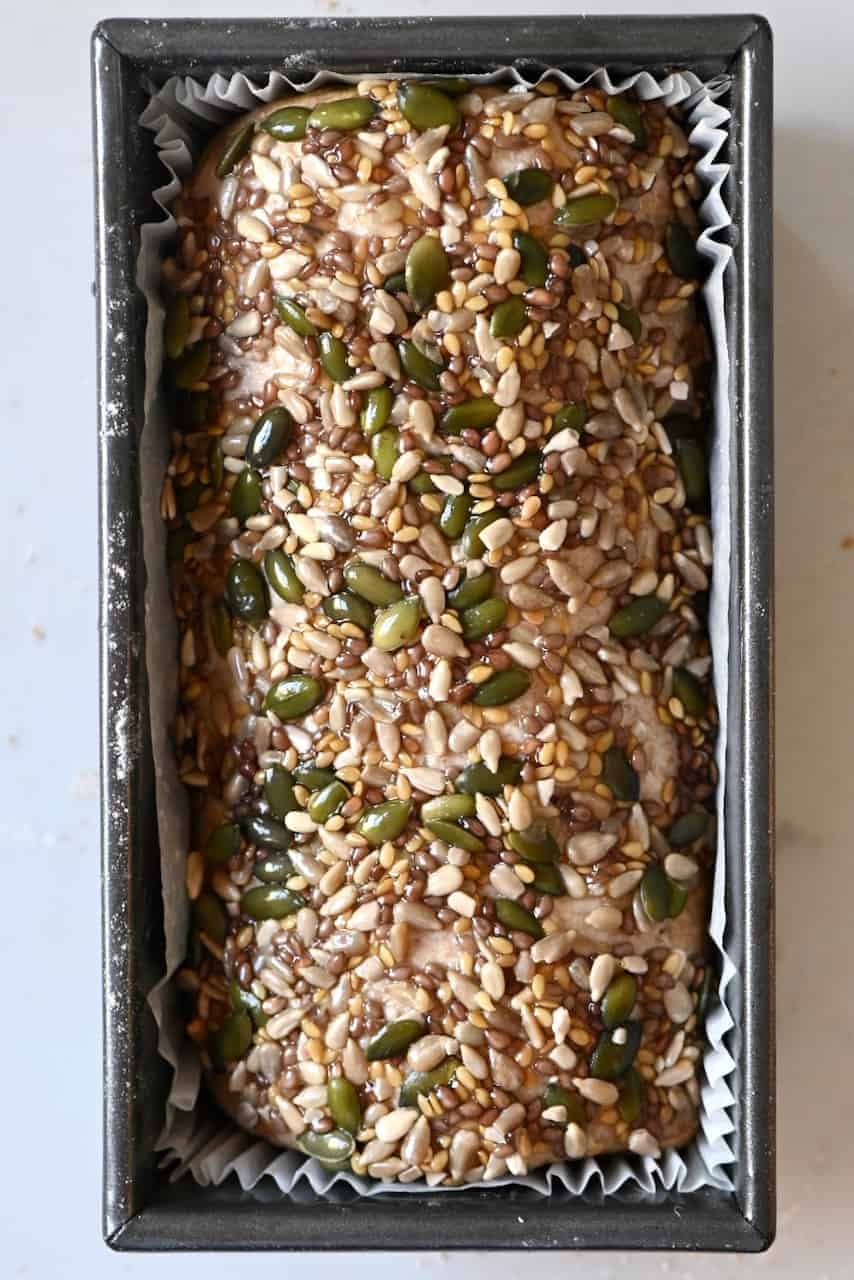
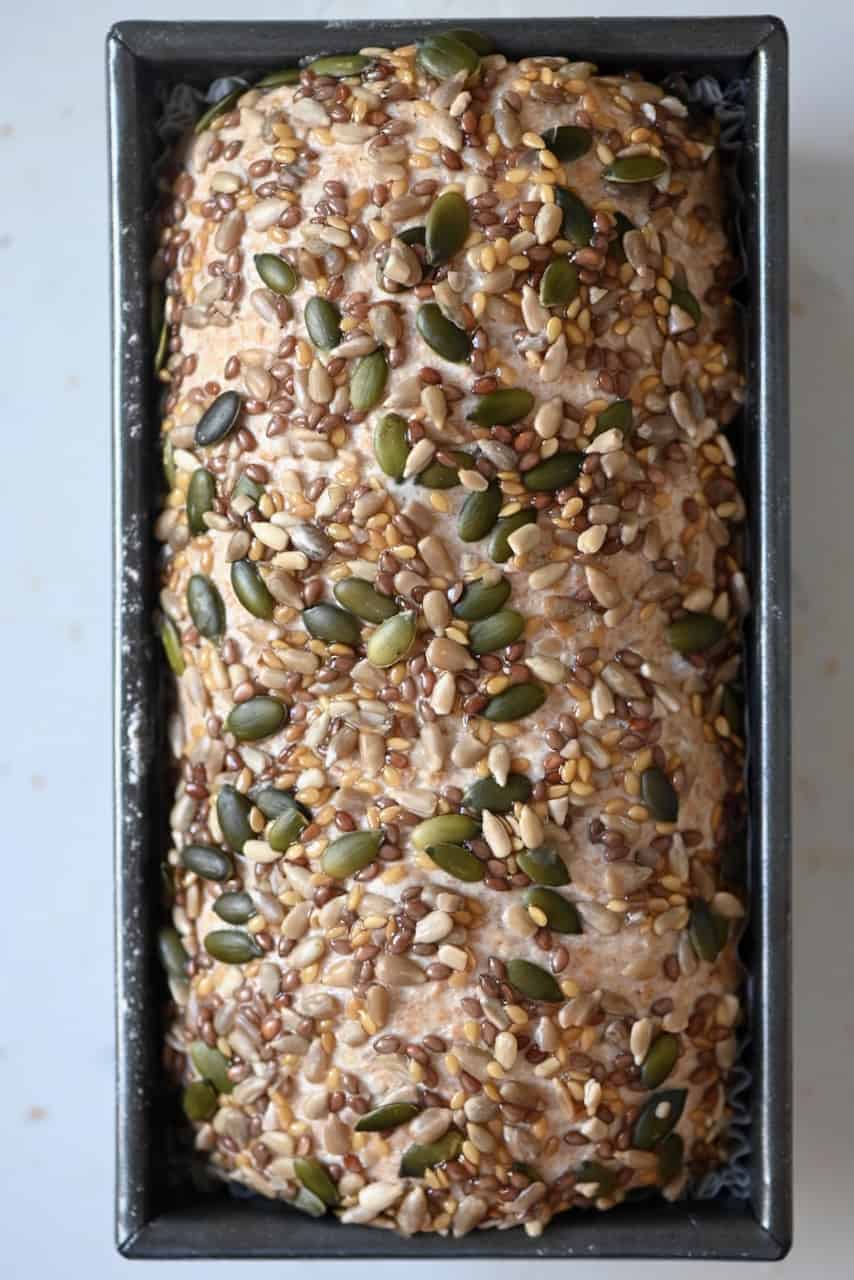
Place the shaped dough inside the tin. Then drain the presoaked seeds from any excess water and place them on top of the dough.
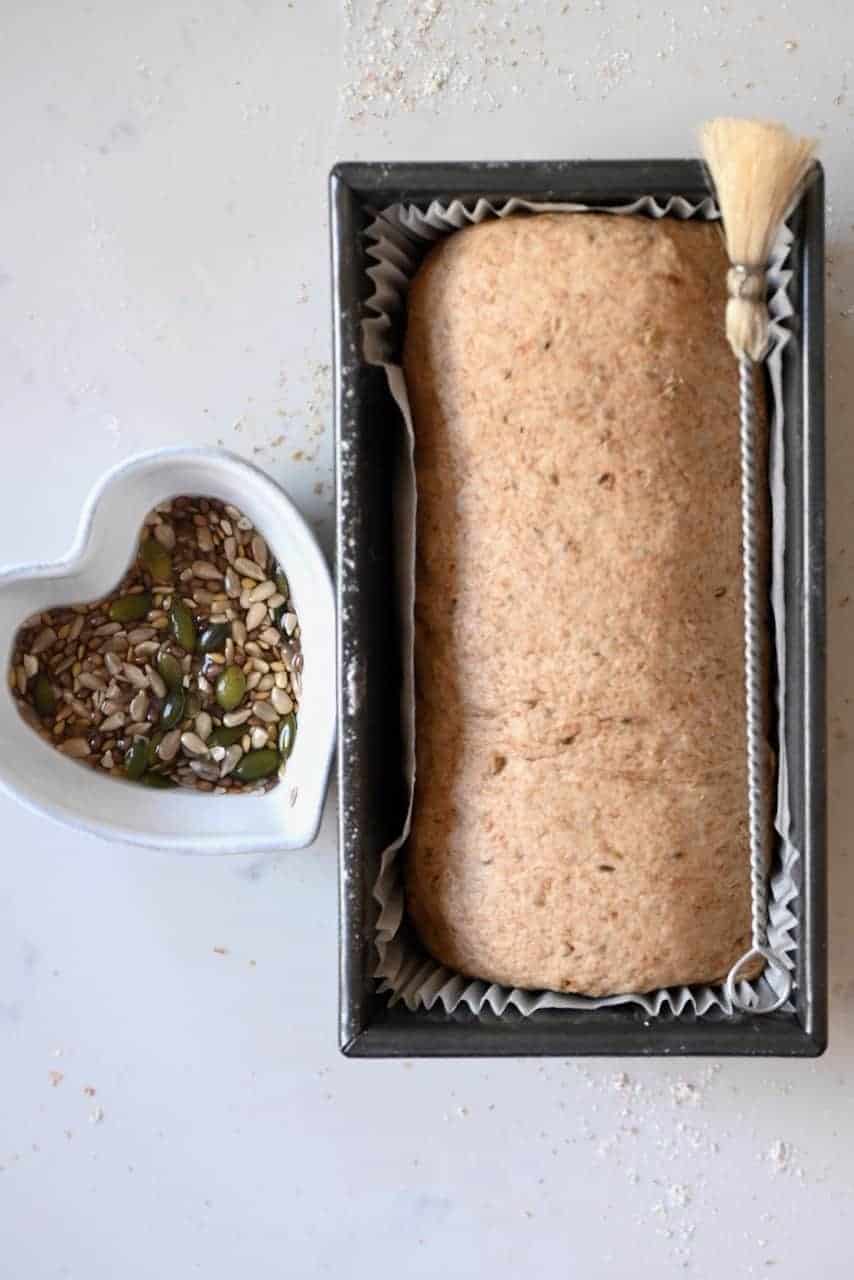
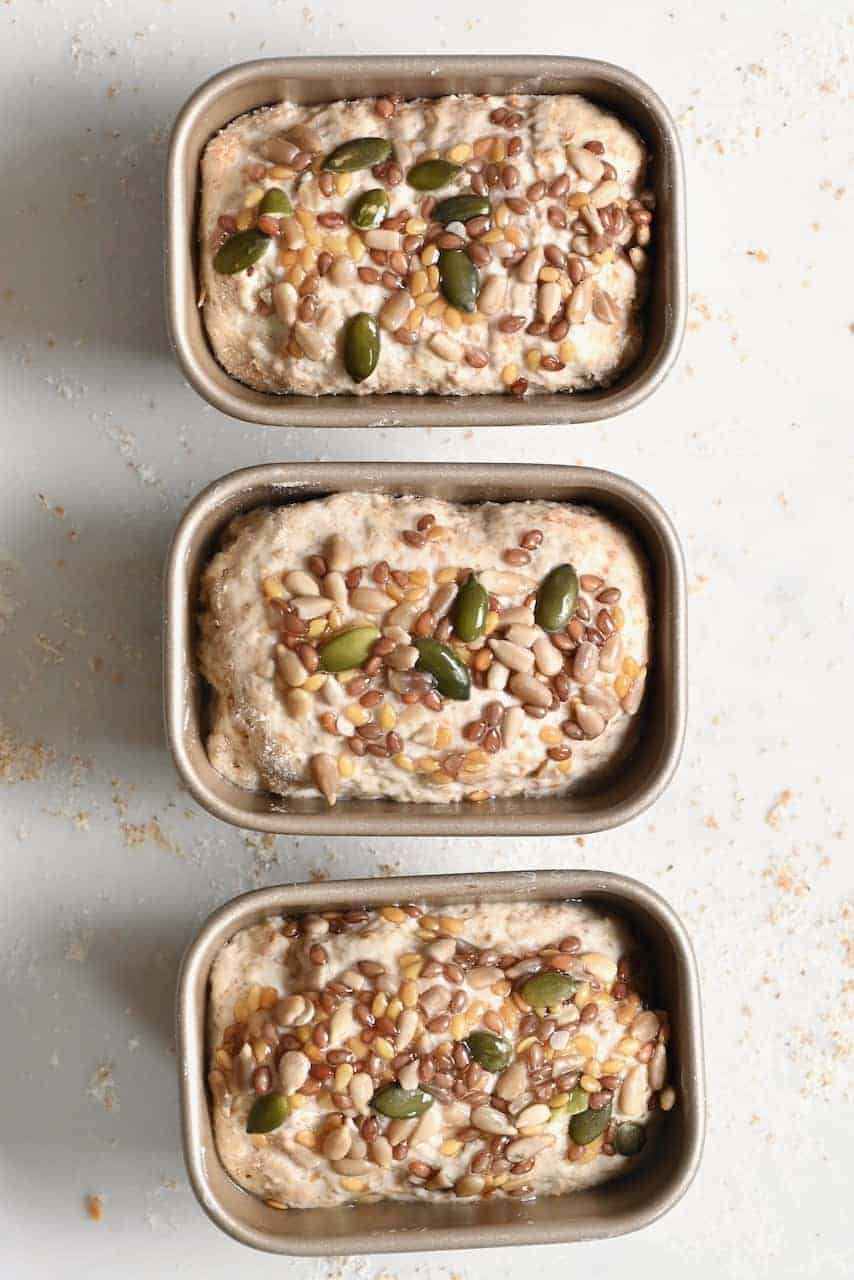
Let the bread proof for another 45 minutes, covered with a damp tea towel. It should double in size, but make sure to not overprove as this can lead to deflated bread with a coarse texture.
In the meantime, preheat the oven to 480ºF/250ºC. First place 2 baking trays as follows:
- One tray in the middle of the oven – this is where the bread loaf tin goes
- One tray in the bottom of the oven – this is where a bit of hot water goes just before baking the bread. The water helps keep the environment moist and will create a nice crispy crust for the loaf.
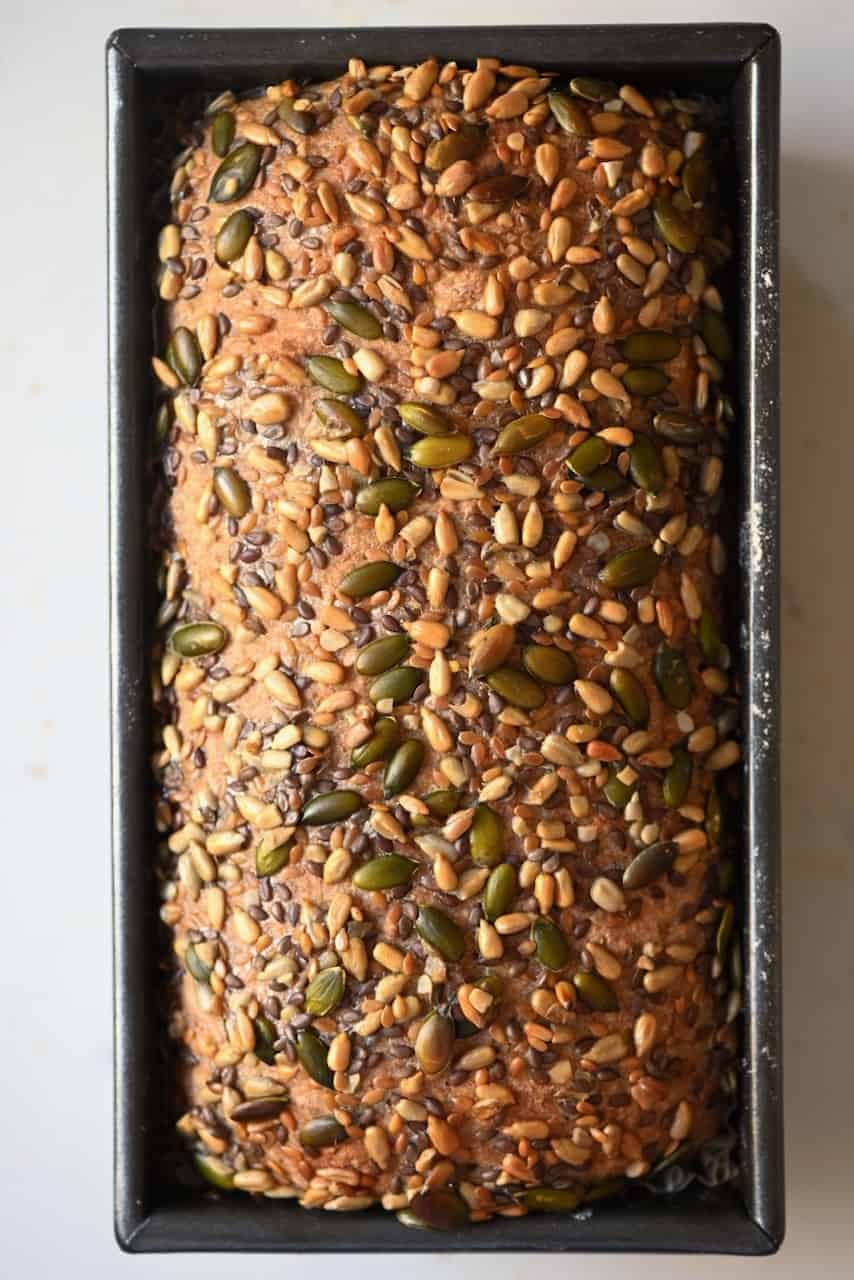
When you are ready to bake, carefully pour a cup of water into the bottom tray (it will be hot so can steam immediately). Then place the bread on the middle shelf.
Bake time will be between 15-20 minutes. If you want to be double sure that it has baked all the way through then you can use a thermometer and check for a temperature between 190-200ºF/~90ºC (although, I’ve never found this necessary).
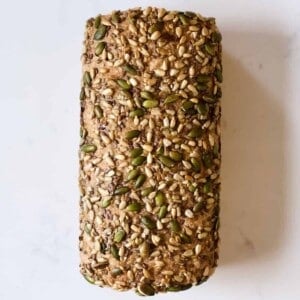
Once baked, set aside to cool down before you cut the bread.
Storage
If the bread is not sliced yet, you can keep it unwrapped at room temperature. This way it will retain its freshness.
Once sliced, keep well wrapped with a tea towel or foil at room temperature for 2-3 days. Alternatively, you can keep it in a bread box as those are meant to trap the moisture inside, so the bread doesn’t dry out.

To keep longer, freeze for up to 3 months. You can freeze the bread cut into slices, that way it’s easy to take out and unfreeze as many as need.
Remember, even if your bread has gone a bit stale then you can still use it for various things including croutons and bread pudding.
If you have any questions, leave a comment below Also, I love seeing your recreations so feel free to tag me on Instagram @AlphaFoodie.
Simple Multigrain Bread (for beginners)
Ingredients
- 250 grams whole wheat flour
- 250 grams wholemeal flour * Spelt
- 10 grams fresh yeast you can also use dry yeast
- 2 tsp salt 10 grams
- 1.5 tBsp mixed spices of choices like coriander seeds, caraway seeds
- 340 ml lukewarm water
- 3 tBsp mixed seeds like sunflower, pumpkin, brown flaxseed, golden flaxseed
Instructions
- Soak the seeds in 1 cup of water. This step is necessary so that they don’t burn while baking the bread.
- Mix the whole wheat flour and the spelt flour in a large bowl. Add the spices and salt and incorporate them well.
- In a small bowl, dissolve the yeast in lukewarm water. If it's too hot then it can kill the yeast, so it's best to stick to lukewarm water (around 110ºF/43ºC). This usually takes a few minutes.
- Add the yeast mixture into the flour bowl and mix until you obtain a sticky dough. (If you want to add some natural sweetener then add that at this point).
- Knead the dough for about 10-15 minutes until it becomes uniform, soft and elastic. This can also be done in a stand mixer for between 8-10 minutes.
- Roll the dough into a ball, wet it with some olive oil, and place it in a lightly oiled bowl. Cover the bowl with a damp tea towel and set aside for 1 hour so the dough can rise to around double its size.
- Remove the dough from the bowl, knocking out some air while you shape the dough into a 'loaf' shape that is slightly thinner than the width of your loaf tin (see video). The same goes for individual loaves – simply divide your dough evenly and shape accordingly.Note* If you want to add any seeds/additives into your bread, then you'd add them at this point, just after the first proving.
- Prepare your bread loaf tin and grease it or line it with baking paper or a bread tin liner. I use a paper liner, which I lightly flour.
- Place the shaped dough inside the tin. Then drain the presoaked seeds from any excess water and place them on top of the dough.
- Let the bread proof for another 45 minutes, covered with a damp tea towel. It should double in size, but make sure to not overprove as this can lead to deflated bread with a coarse texture.
- In the meantime, preheat the oven to 480ºF/250ºC. First place 2 baking trays as follows:-One tray in the middle of the oven – this is where the bread loaf tin goes-One tray in the bottom of the oven – this is where a bit of hot water goes just before baking the bread. The water helps keep the environment moist and will create a nice crispy crust for the loaf.
- When you are ready to bake, carefully pour a cup of water into the bottom tray (it will be hot so can steam immediately). Then place the bread on the middle shelf.
- Bake time will be between 15-20 minutes. If you want to be double sure that it has baked all the way through then you can use a thermometer and check for a temperature between 190-200ºF/~90ºC (although, I've never found this necessary)
- Once baked, set aside to cool down before you cut the bread. Storage:If the bread is not sliced yet, you can keep it unwrapped at room temperature. This way it will retain its freshness. Once sliced, keep well wrapped with a tea towel or foil at room temperature for 2-3 days. Alternatively, you can keep it in a bread box as those are meant to trap the moisture inside, so the bread doesn't dry out. To keep longer, freeze for up to 3 months. You can freeze the bread cut into slices, that way it's easy to take out and unfreeze as many as need. Remember, even if your bread has gone a bit stale then you can still use it for various things including croutons and bread pudding.
Video
Notes
- I topped this whole wheat bread loaf with mixed seeds, however, you can also add seeds/grains into the bread mixture itself (I usually add just a couple of Tbsp). Simply wait until after you’ve proved your dough the first time (which is when you leave it to rise) then mix the seeds in before transferring the dough to a loaf tin. You could use Pumpkin, Flax (flax seeds that have been blended are easier to digest), Sesame, Hemp, Poppy, and sunflower seeds, or even things like whole oats.
- Toasting any seeds before adding them to the dough can also add extra flavor – however, be aware that if you’re using them for a topping or a very dry dough then the seeds need to be soaked so that they don’t burn in the oven.
- If you find whole wheat bread a little bitter then you can add in a natural sweetener such as agave, maple (or honey as a non-vegan option). 2-3 tBsp should be more than enough and added when the yeast mixture and dry ingredients are combined in a bowl.
- You can knead this dough by hand, or leave a stand mixer with a dough hook to do the job. Just make sure you knead for the full time until the dough is smooth and elastic, as this will massively impact taste and texture.
- If you don’t have any spelt flour to hand, then you can use all-purpose flour instead.
- The temperature and weather can affect the time it takes for your dough to rise and how wet the dough is. If your apartment/house is particularly cold, you can either leave the bowl dough to prove nearby a heater OR turn the oven on for a few minutes, switch it off and then leave the dough the rise inside the oven (as the heat will be trapped in there for a long time, without being too hot).
Nutrition
Nutrition information is automatically calculated, so should only be used as an approximation.


If you use instant yeast or active dry yeast how much do you use please?
Hi Penny,
The recipe calls for 10 g fresh yeast. That is 4 g active dry years or 3 g instant yeast.
What an amazing bread recipe! I followed the directions exactly as written for one large loaf. I will be making this again and repeat. Thank you, Samira, for sharing this recipe with the world:)
Thank you so much for your comment, Stacy.
Hello, could i check if i can replace all the flour with bread flour instead?
Yes, that should work fine 🙂
I replaced the spices and seeds (1.5 tBsp mixed spices of choices like coriander seeds, caraway seeds)with 6 tbsp of 5 grain cereal and put them in when the flour went it. I am more a purest when it comes to bread and if you take the time to proof it properly and use good flour the bread will develop a nutty taste all on its own. Great recepie! Thanks. Wont be buying bread any time soon 😉
Thank you so much for your comment, Niall. Glad you adapted the recipe to your liking – these are great options. 🙂
Delicious bread. Surprised about the high temp oven 480 degrees Fahrenheit!!
I baked at this high temp for 20 minutes and it turned out perfect. I soaked the seeds and they did not burn but they did fall off easily. Is there a way to get them to stick to the top of bread?
Hi Frankie,
You can pat lightly the seeds into the bread right before baking, this could help them stick. Also using an egg wash can help the seeds stick better. I hope this helps.
I tried it. Its missing salt. I don’t know how much to put in. Tasty though.
Hi Tom,
I usually add 2 tsp of salt when making this bread. If you feel like it needs more, I’d suggest adding maybe half or 1 tsp more. I hope this helps.
This was the first time I ever tried baking bread–and it came out great. As a beginner, I can confirm that this recipe and the instructions are really good for beginners. I couldn’t find spelt flour or wholewheat flour at the store, so just used bread flour. And I used one packet of dried yeast instead of fresh yeast. For spices, I used caraway seeds and ground coriander, and for seeds I used pumpkin, sunflower and flaxseeds. I also added seeds as well as some flax meal into the dough after the first proofing. I had to bake the loaf for 30 minutes for some reason. After 20 minutes, when inserting a wooden skewer, there was still some sticky dough on it, but after 30 minutes it was all done. Texture turned out perfect, taste is really good as well. Thanks a lot for the recipe.
Thank you so much for your comment, Lucy. So happy you tried the recipe and adjusted it to do with what you had. 🙂
Hi can I proof the bread in the fridge for the first proof and do an overnight proofing?
Hi Marlon,
Normally, yes, you can do the final proof in the fridge overnight.
Your bread sounds so good and I can tell wait to make it but II just wanted to know if this recipe would need any adjustments if I use a bread machine?
Hi Leila,
There might be some adjustments needed but unfortunately, I can’t give you precise details. You need to check the flour capacity of your machine to see if the amount called for in the recipe is not too much. It’s also better to add ingredients in the order directed by your machine’s booklet. Alternatively, you can use the manual cycle of the machine to prepare the dough. Once fully risen, take it out, shape it and bake in the oven. I hope this helps.
I followed recipe exactly except didn’t add any seeds to the dough, but I topped it with sesame, pumpkin, and sunflower seeds. I needed to add a bit more water when mixing dough because it was really dry. Also, I was making one loaf and found it needed longer to bake. Temp was at 190 F when I pulled it out at 30 minutes. Could have even stayed in a little more. The shorter timeframe probably works best when you divide it into smaller loaves. Looks beautiful and can’t wait to try it.
Hi Samira, thank you for your time and recipes. I would like to know if it would work with just whole meal spelt flour as I am avoiding normal wheat.
Hi Cristina,
You could use only the spelt flour. Just add enough to replace the normal wheat. Do keep in mind that the bread would become more dense though. You will also need to cook it for longer – about 30-40 minutes, but I’d check on it at 30.
I hope this helps 🙂
The bread came out so divine, the recipe is really good
Hi Sandhya, thank you so much for the feedback, so glad you liked it 🙂
I made this with half whole wheat and half rye. It turned out great. I had to bake it for double the time (35 minutes) but I think that is only because I used rye which is more dense naturally. But the loaf tastes absolutely delicious. The spices I used were rosemary, cumin, caraway, ground coriander seeds, and oregano. The seeds I used were golden flaxseed, flaxseed, pepitas, sunflower seeds, and sesame seeds. Thank you Samira for this recipe!