
This post may contain affiliate links. Please read our disclosure policy.


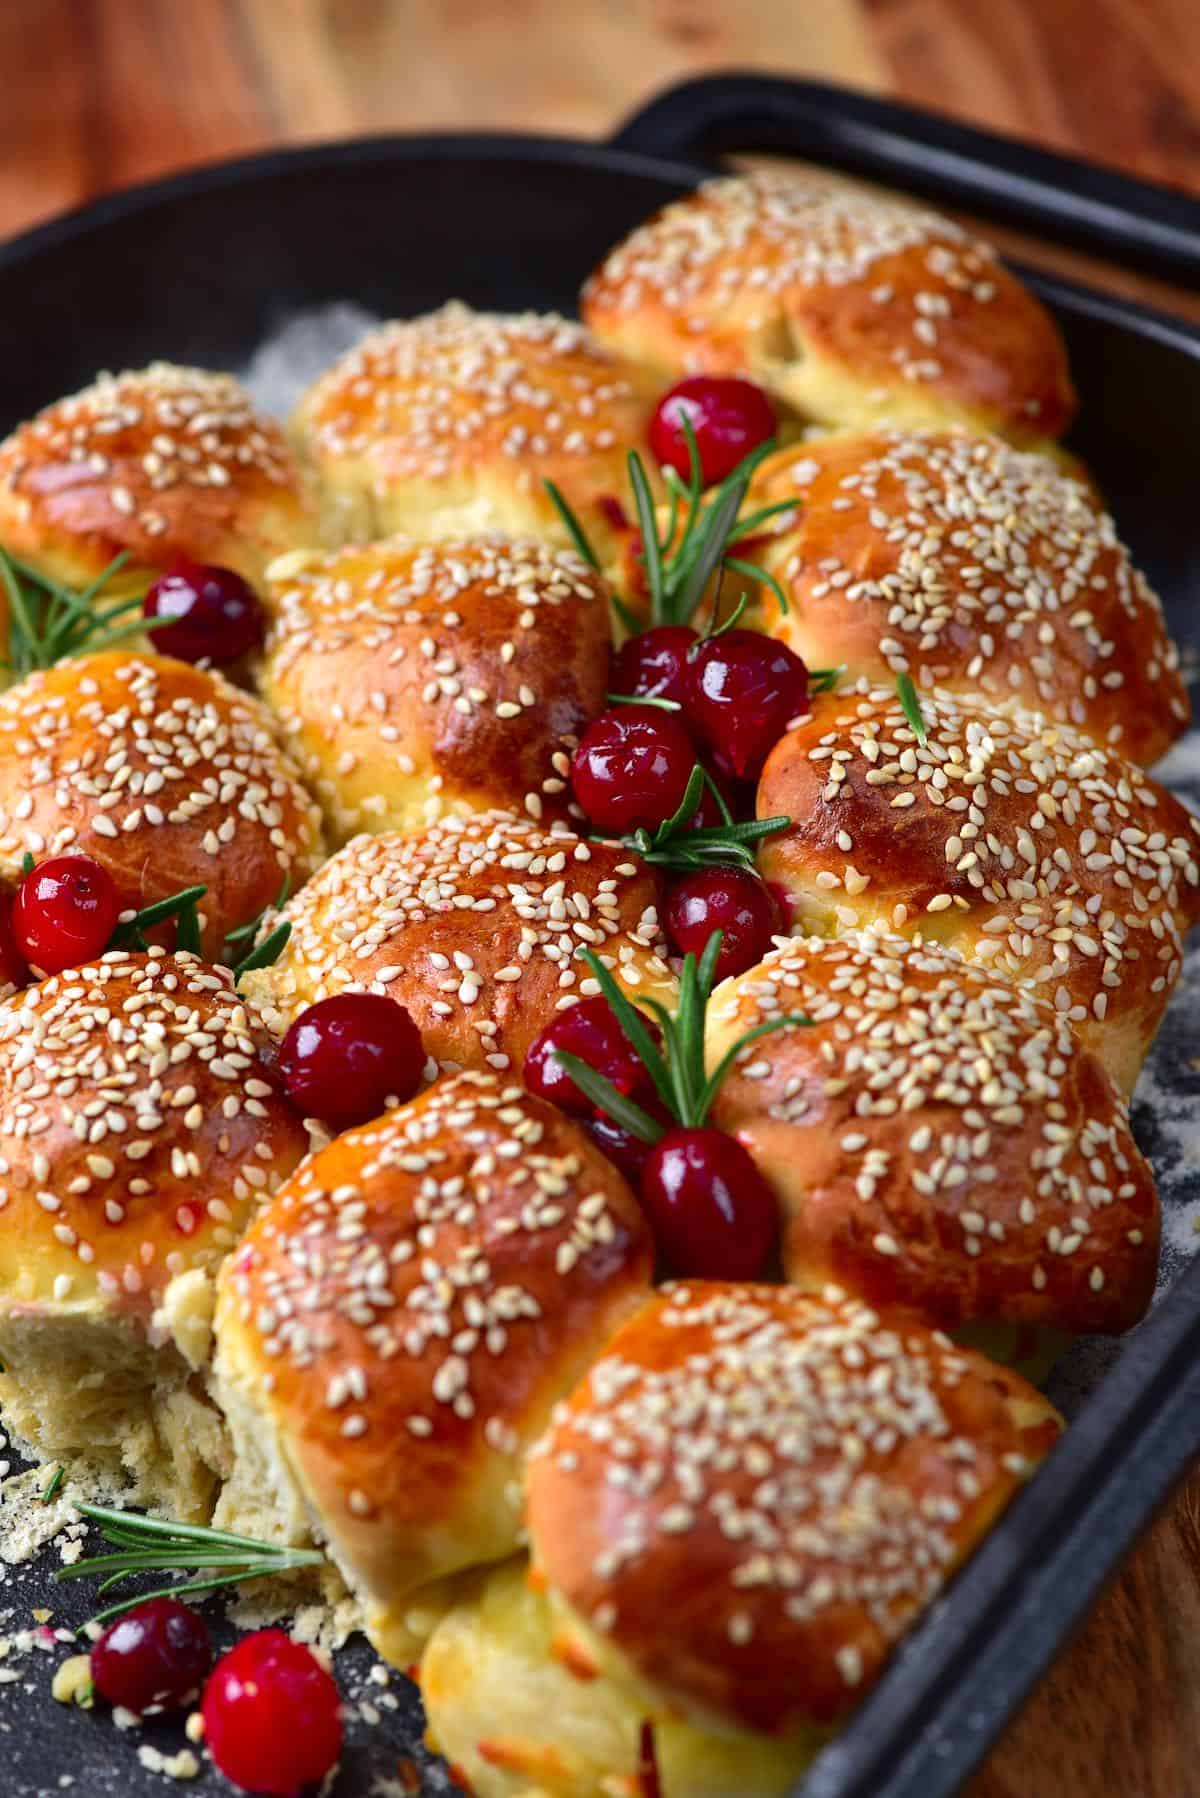
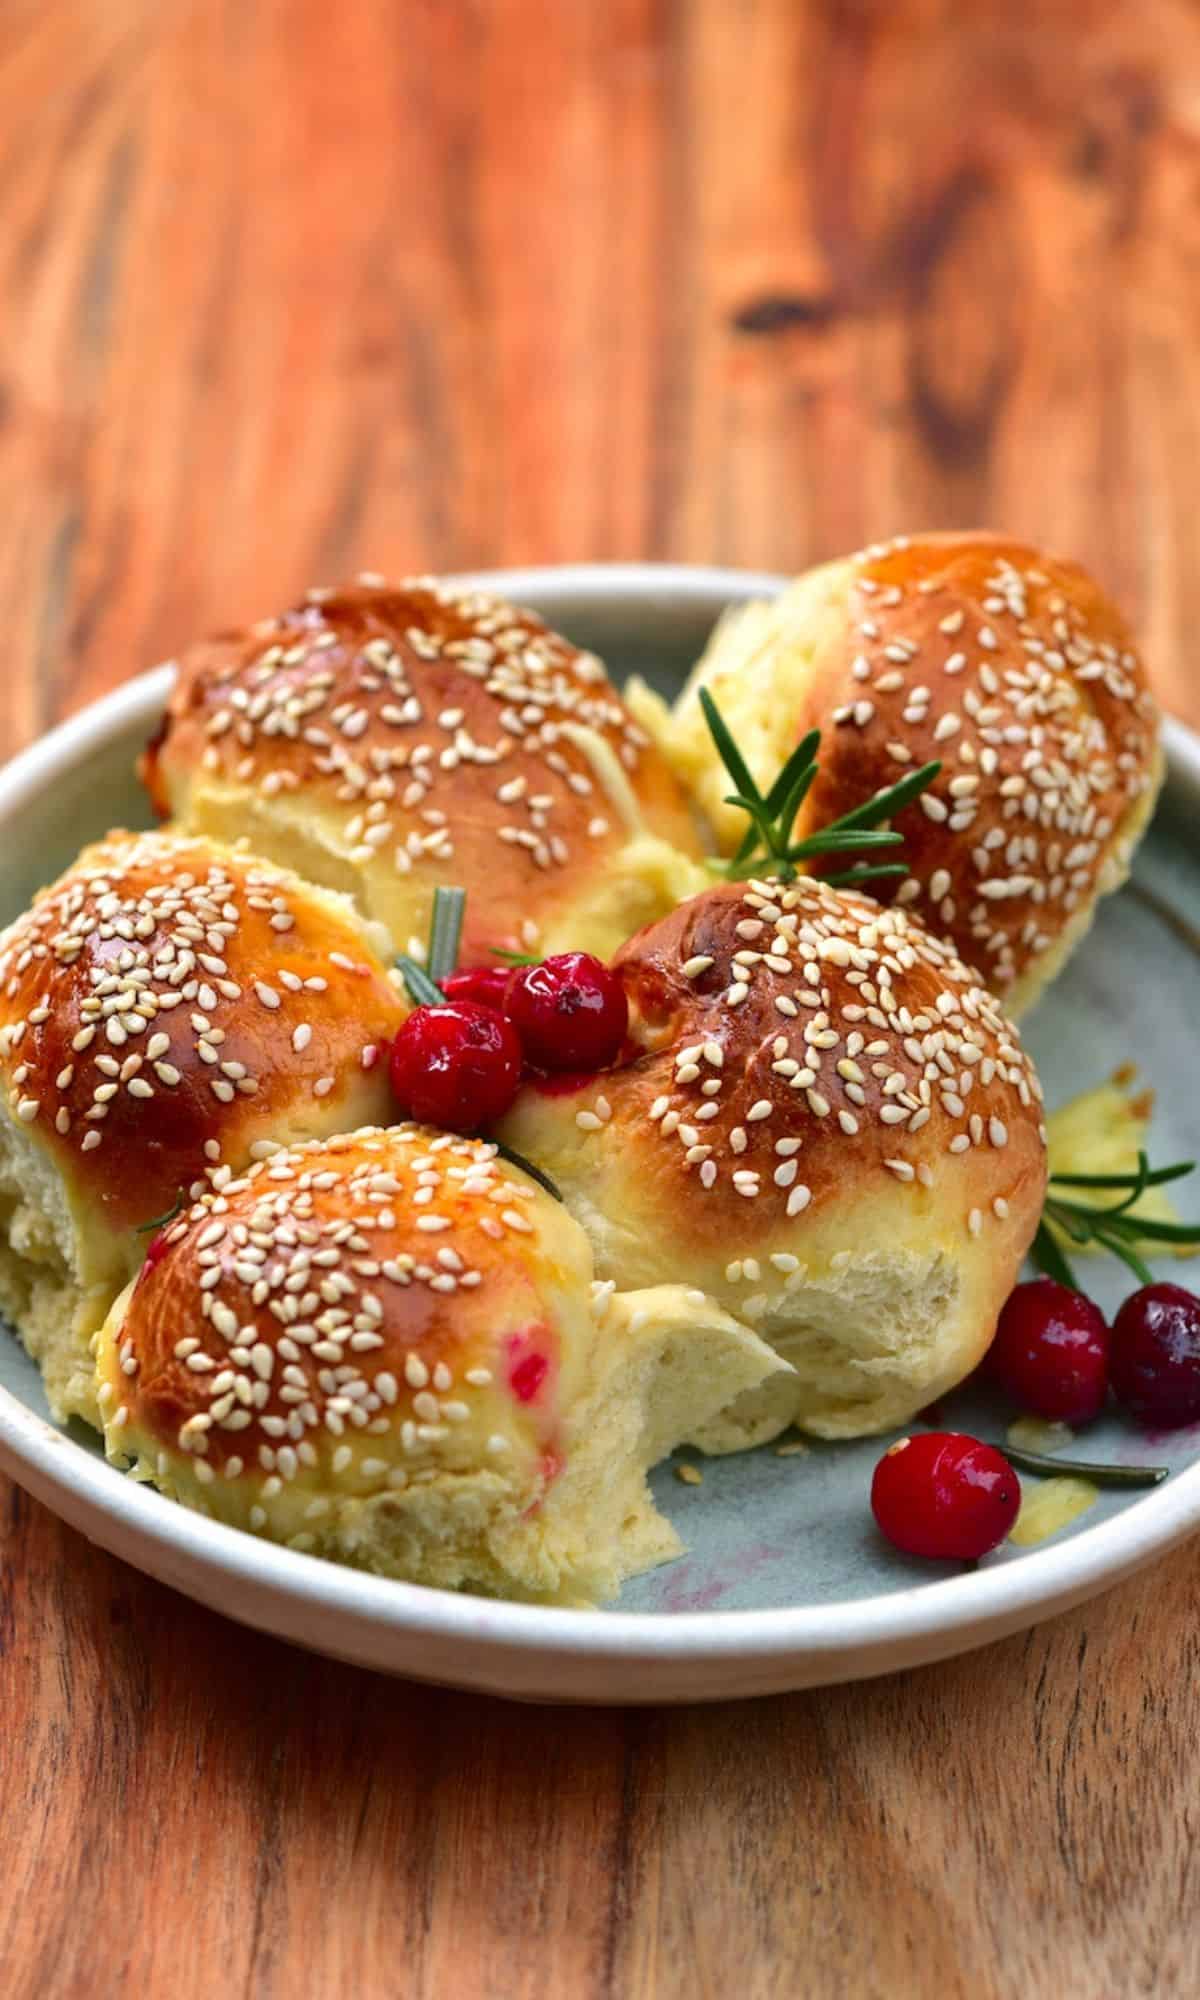
Flavorful cheese buns stuffed with ooey-gooey melting cheese make up this festive Christmas tree pull-apart bread dish (or another shape of your choice). A beautiful and delicious centerpiece to be served as an appetizer, party food, or alongside your festive cheeseboard!
This Christmas, cheese-stuffed, pull-apart bread is a delicious festive appetizer. A guaranteed showstopping centerpiece to your feast table. Dough has become one of my favorite things to deal with – it’s surprisingly simple once you get the knack and cathartic. I’ve already posted recipes for simple dinner rolls, baked camembert with dinner rolls, NY-style bagels, Pizza dough, and Simple Homemade Multigrain Bread – now it’s time for these stuffed cheese buns.
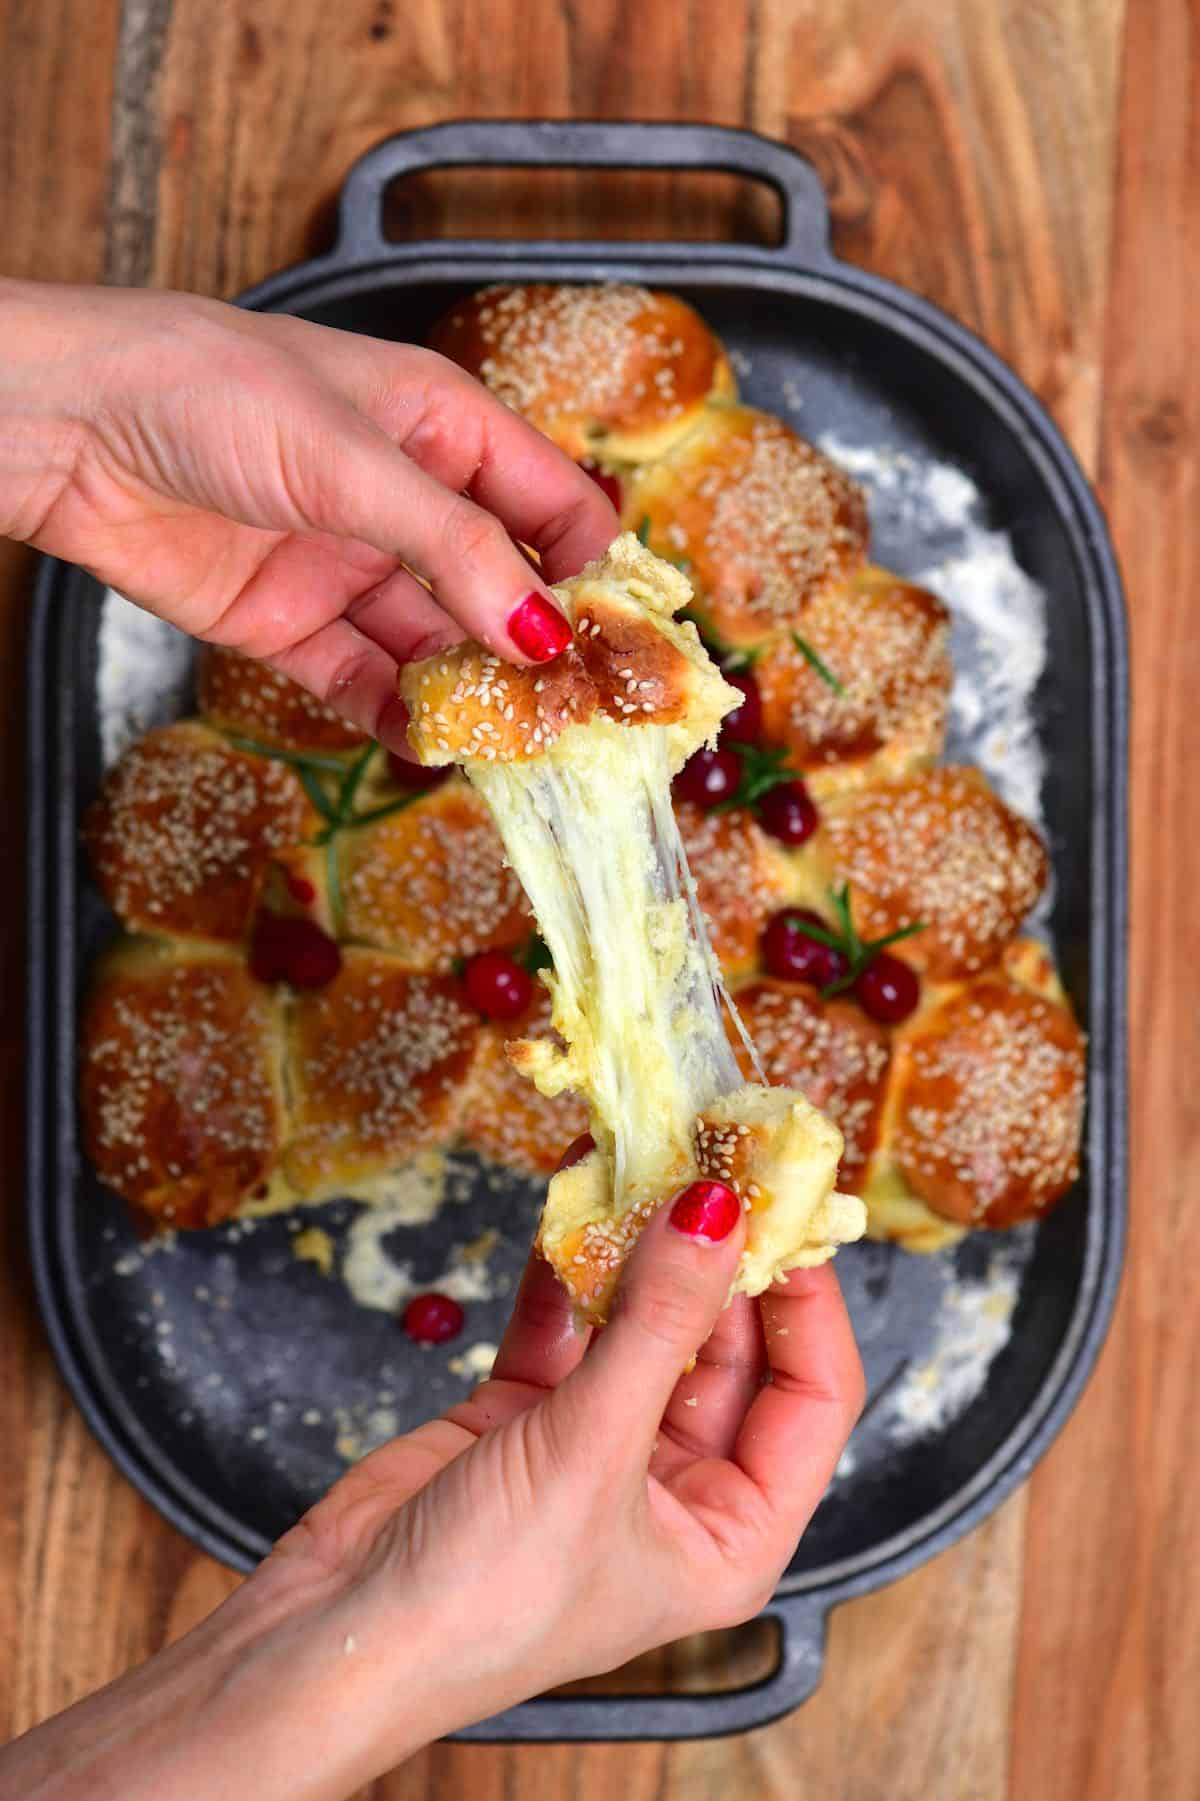
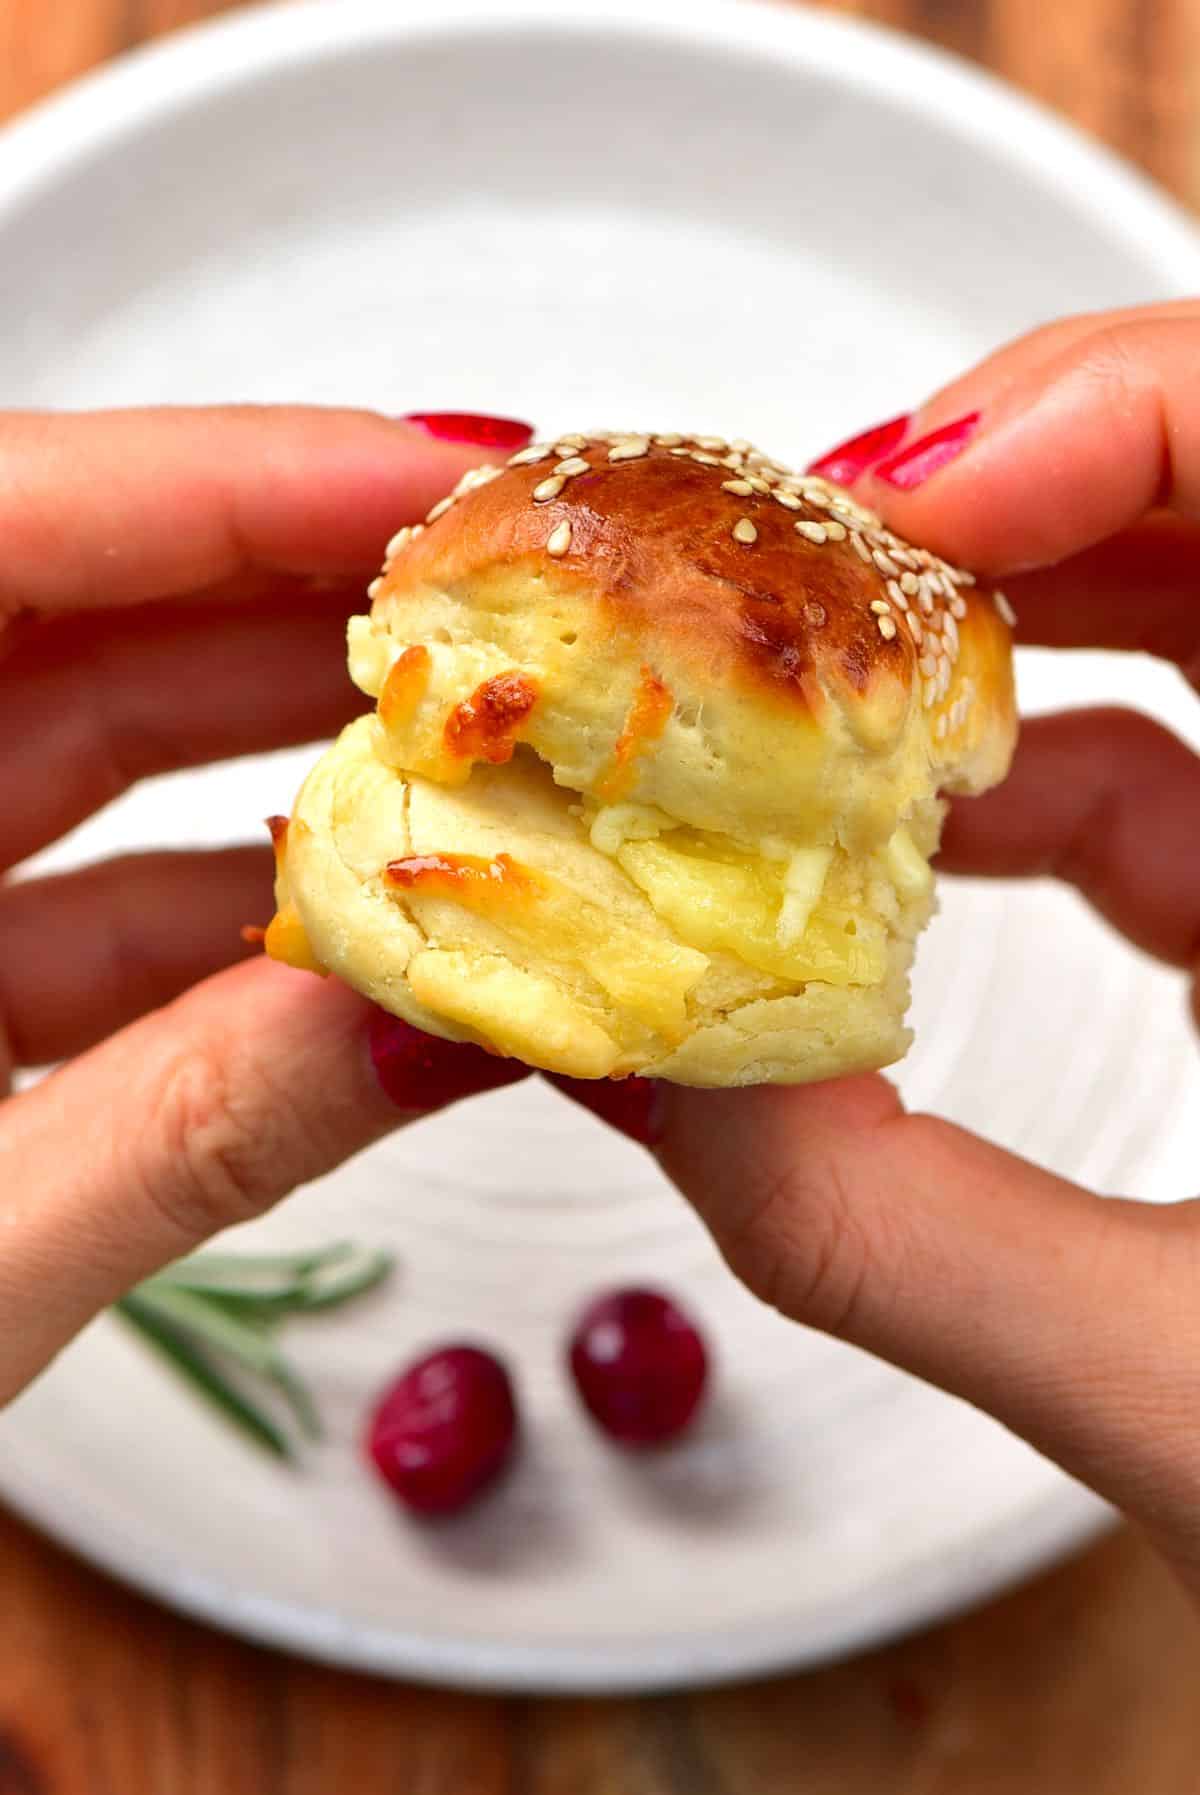
Even mid-festive season, it’s not too late to prepare these delicious stuffed cheese buns. With a lightly crisp top, fluffy bread, and melty cheesy center, this cheesy bread is one of my favorite indulgent bread recipes. By transforming the already decadent buns into a Christmas tree pull-apart bread, you end up with a festive centerpiece that ticks all the boxes.
While bread with yeast has a little bit of a reputation for being complicated, believe me when I say that ANYONE can do this recipe. Proving/rising may sound like scary terms if you’ve never done it before. But you’ll wonder what you were so afraid of when you’re digging into this cheesy pull-apart bread.
What makes these cheese buns so special? The versatile ooey-gooey cheese-stuffed middles, of course. You can’t throw a party without serving something stuffed with melty cheese – that should be a rule (dairy-free cheese included, of course!). I’ve used mozzarella for this Christmas bread recipe, but any cheese that melts will work (cheddar, etc.). When serving as party food, I love to mix and match different cheeses as a delicious surprise for all (think pepper jack, smoky gouda, camembert, chili cheddar, etc.!)

Best of all, this dough can be made ahead and stored in the fridge or freezer, ready to bake when needed! Great for the busy holiday season.
Want to save this recipe?
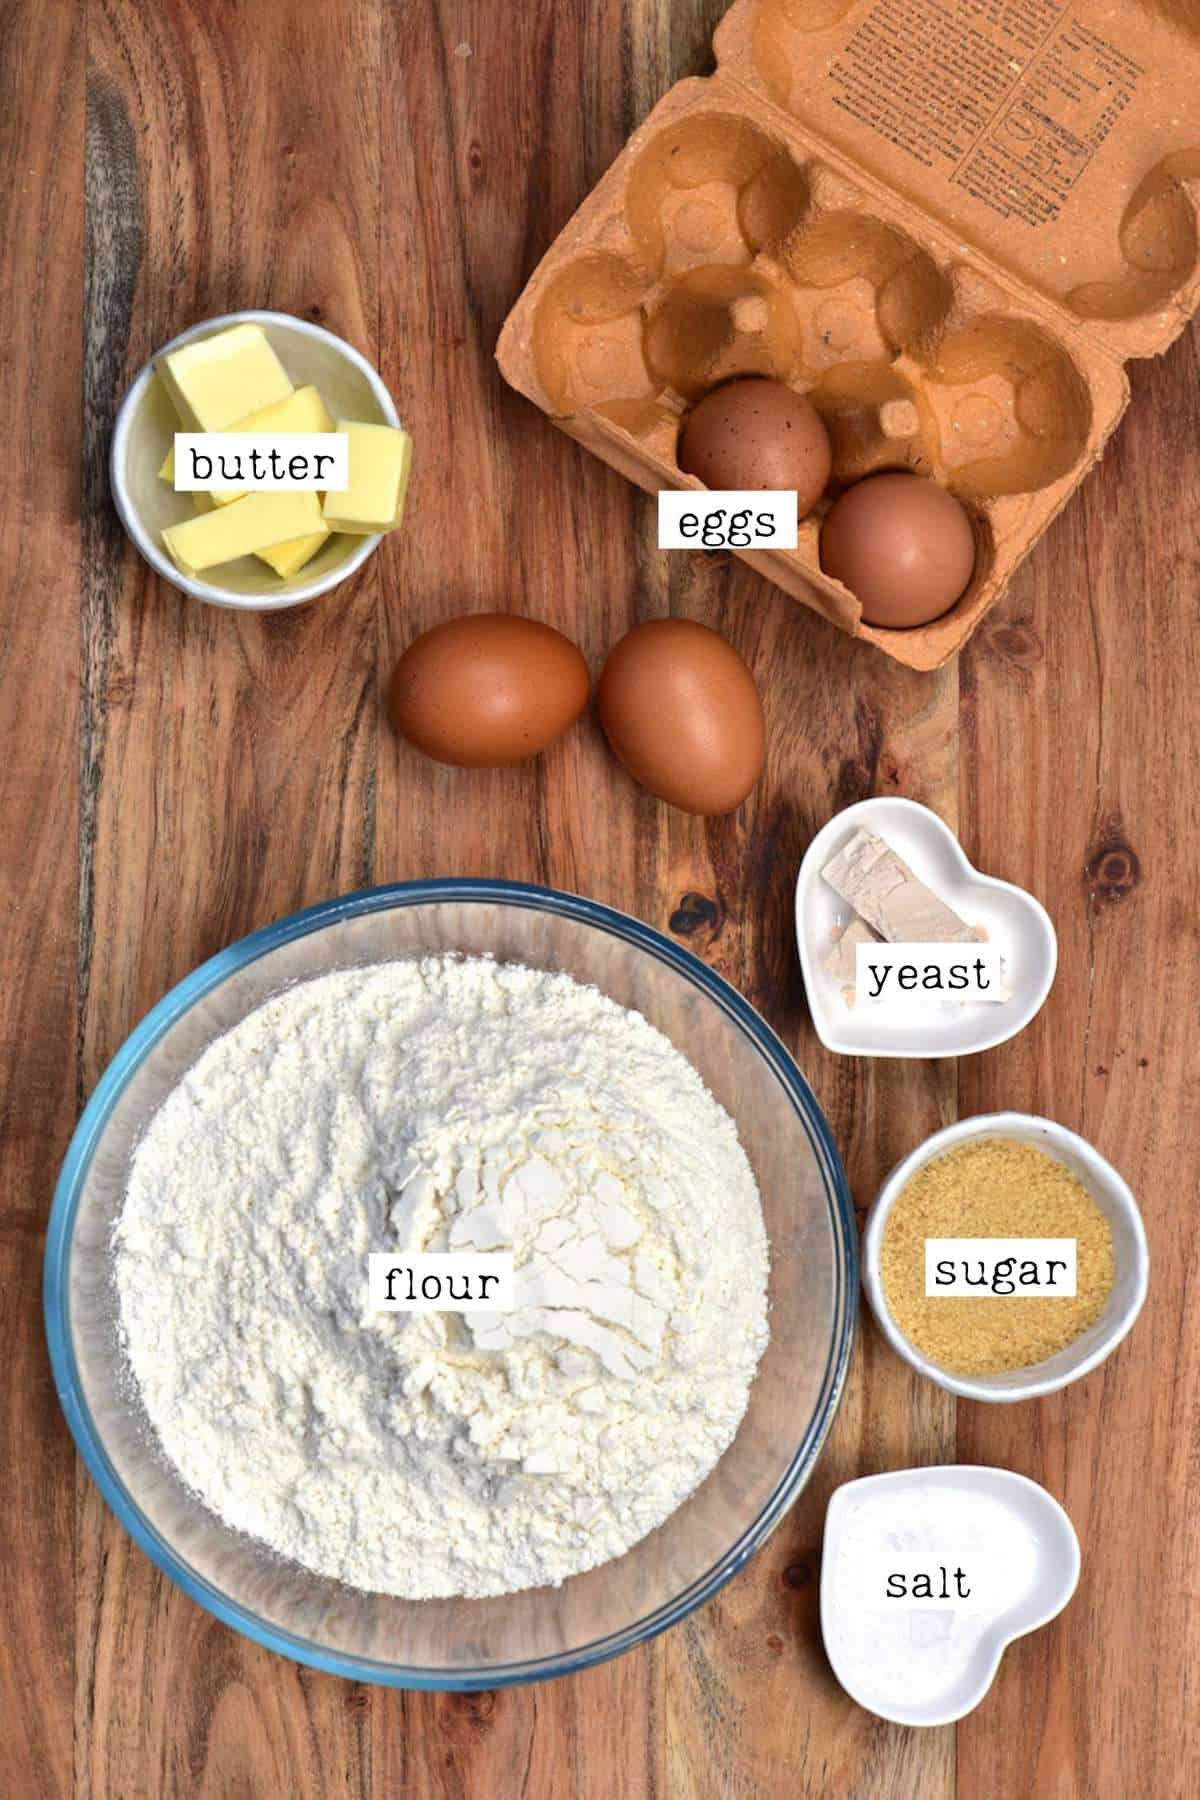
Ingredients For The Cheese Buns
- Flour – white bread flour yields very light and fluffy bread. All-purpose flour can also work but will yield slightly denser, more chewy rolls.
- Eggs – will help to provide structure as well as flavor to the dough.
- Yeast – you can use fresh yeast or dry yeast. Read the correct amounts in the recipe card.
- Milk (not pictured above) – use your milk of choice. I’ve found that whole milk created the best, softest texture (due to the higher fat content). Though you can use a skimmed version. You could also use buttermilk (or a buttermilk alternative) for wonderful results.
- Butter – I used unsalted homemade butter.
- Sugar – this will help to activate and feed the yeast. You could use maple syrup or unrefined granulated sugar instead. If you use a liquid sugar source, you may need a small amount of additional flour.
- Cheese – I used mozzarella. However, feel free to use the cheese of your choice (hard but melty cheese options are best). A combination of melty cheese (cheddar, pepper jack, smoky gouda, camembert, chili cheddar, etc) and semi-hard cheese (gouda, parmesan, swiss, etc.,) also works well. Also, you can use either small cubes of cheese or grated cheese.
- Salt – for flavor
For The Toppings
- Sesame seeds
- Cranberries (or pomegranate)
- Rosemary
Alternatively, you could use:
- Melted butter with or without herbs in
- Grated parmesan
- Fig jam
How To Make The Christmas Tree Pull Apart Bread
Step 1: Prepare & knead the dough
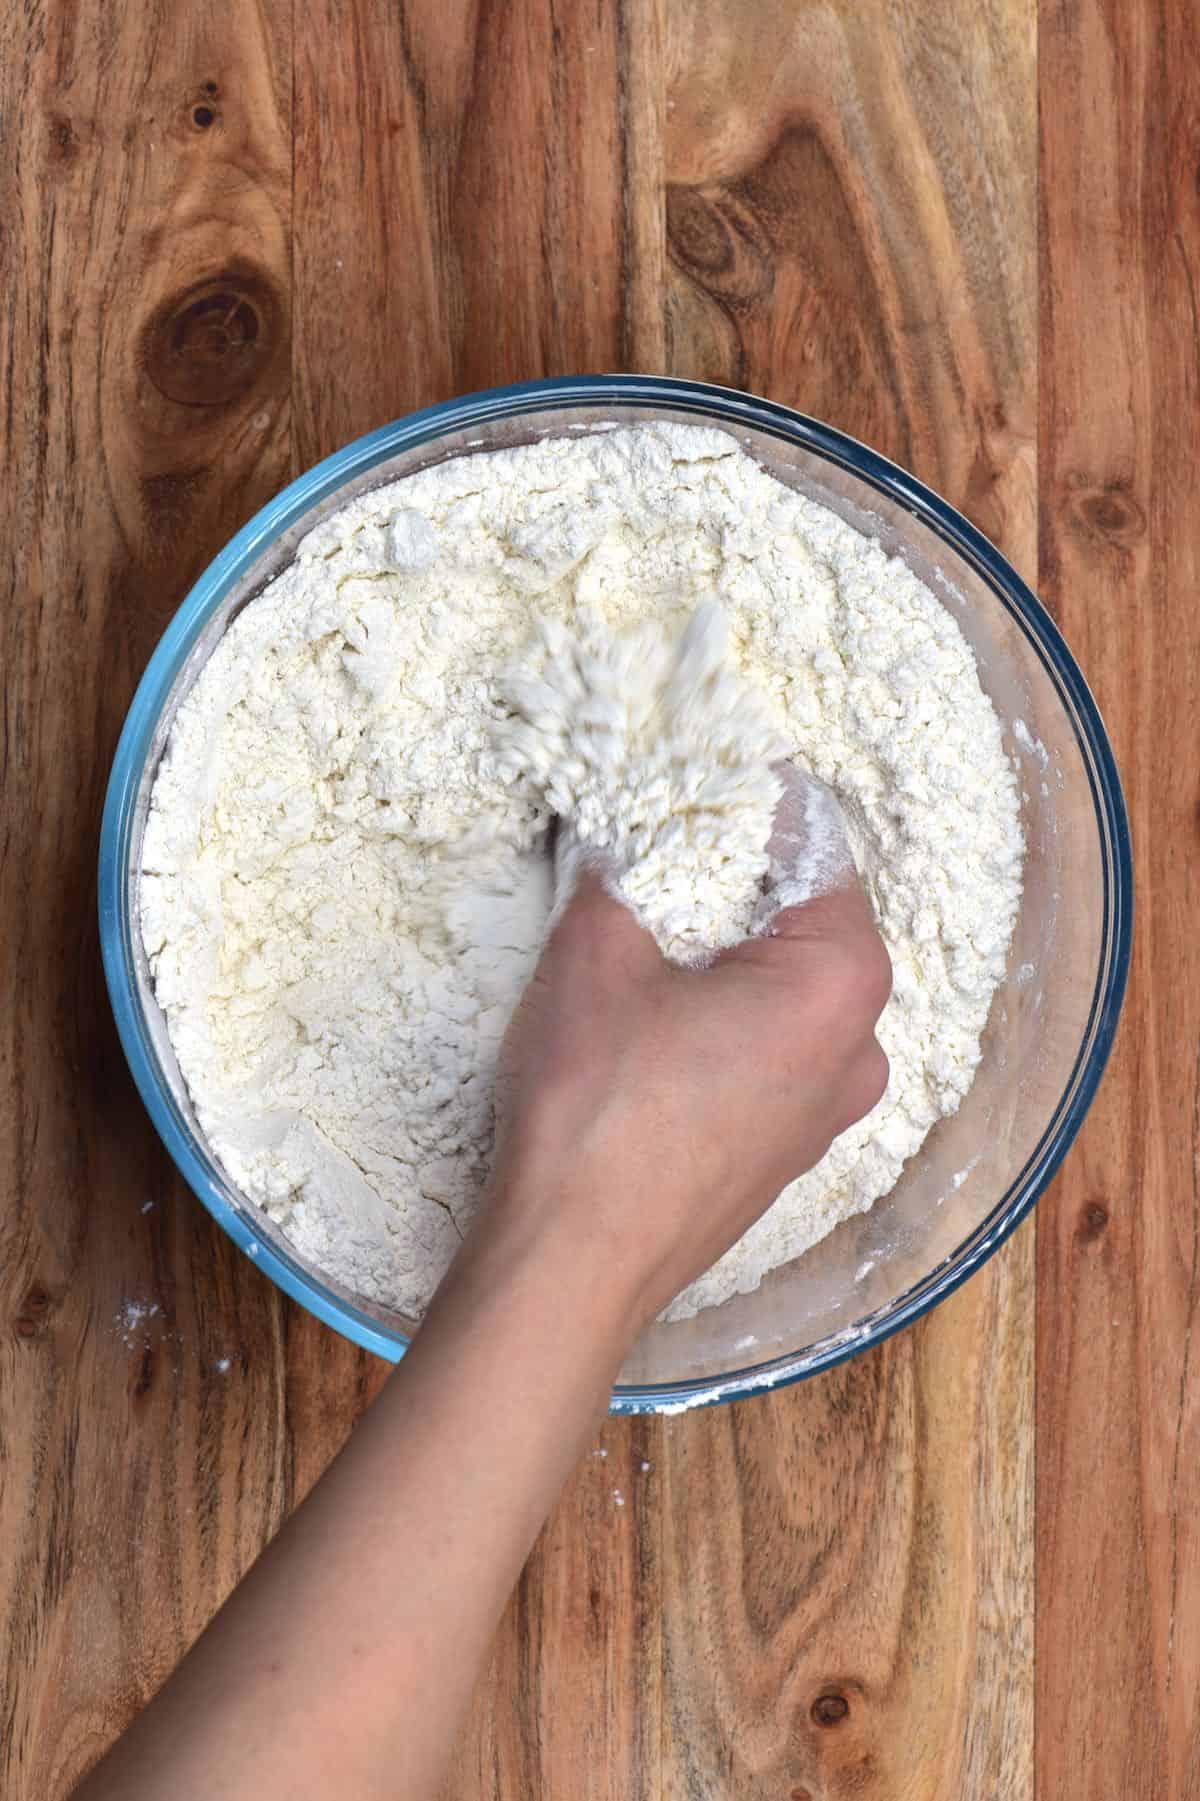
Mix the flour and salt in a large bowl.
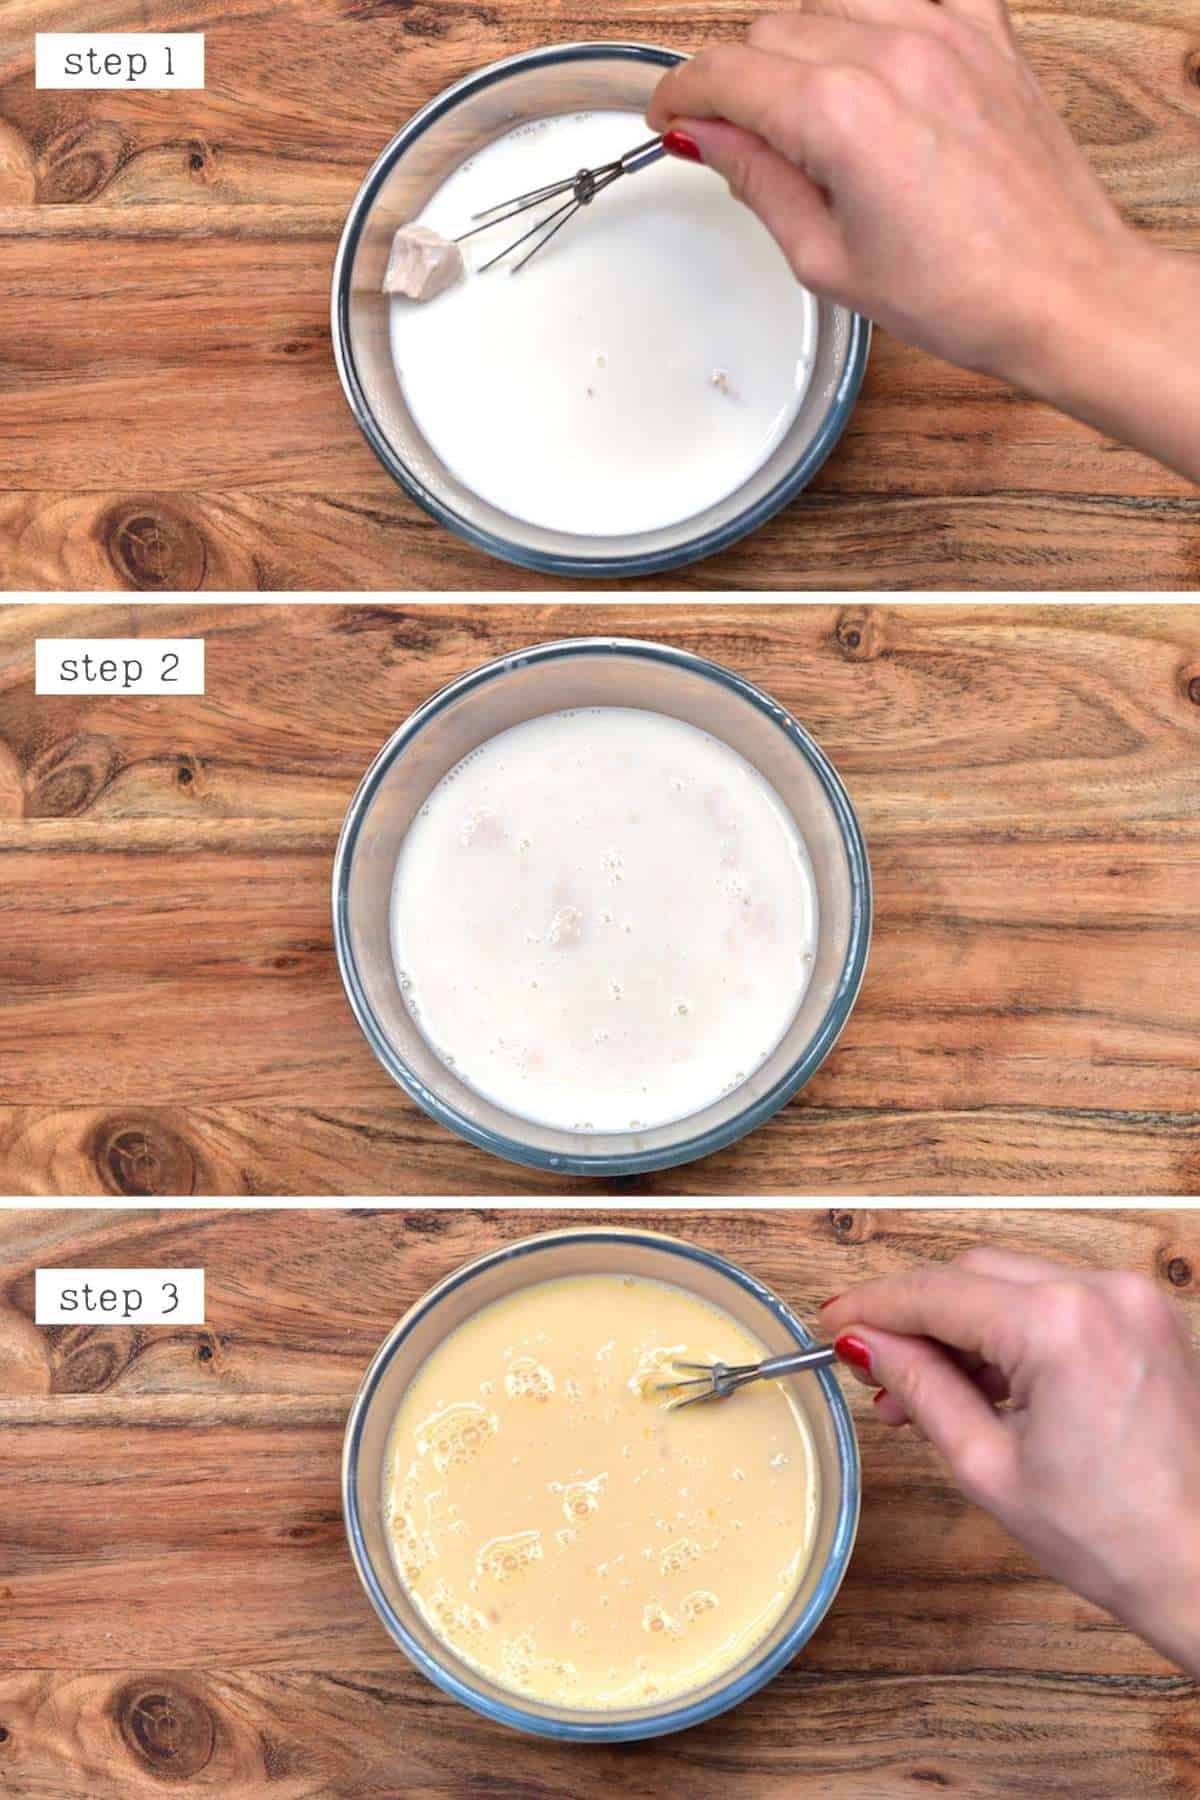
In a separate bowl, combine the milk, sugar, and yeast, stirring to dissolve the yeast and sugar. Then add the eggs and whisk well.
Transfer the dough to a clean surface and make a well in the center. You can also keep it in the bowl if you prefer. Pour the liquid mixture into the well of the dry mix. Start to mix the flour into the wet ingredients gradually, until you obtain a dough-like mixture.
(Move the dough to your working surface if you haven’t yet.) Knead for 7-10 minutes. Stretch and fold the dough to work the gluten until you obtain a smooth, elastic dough.
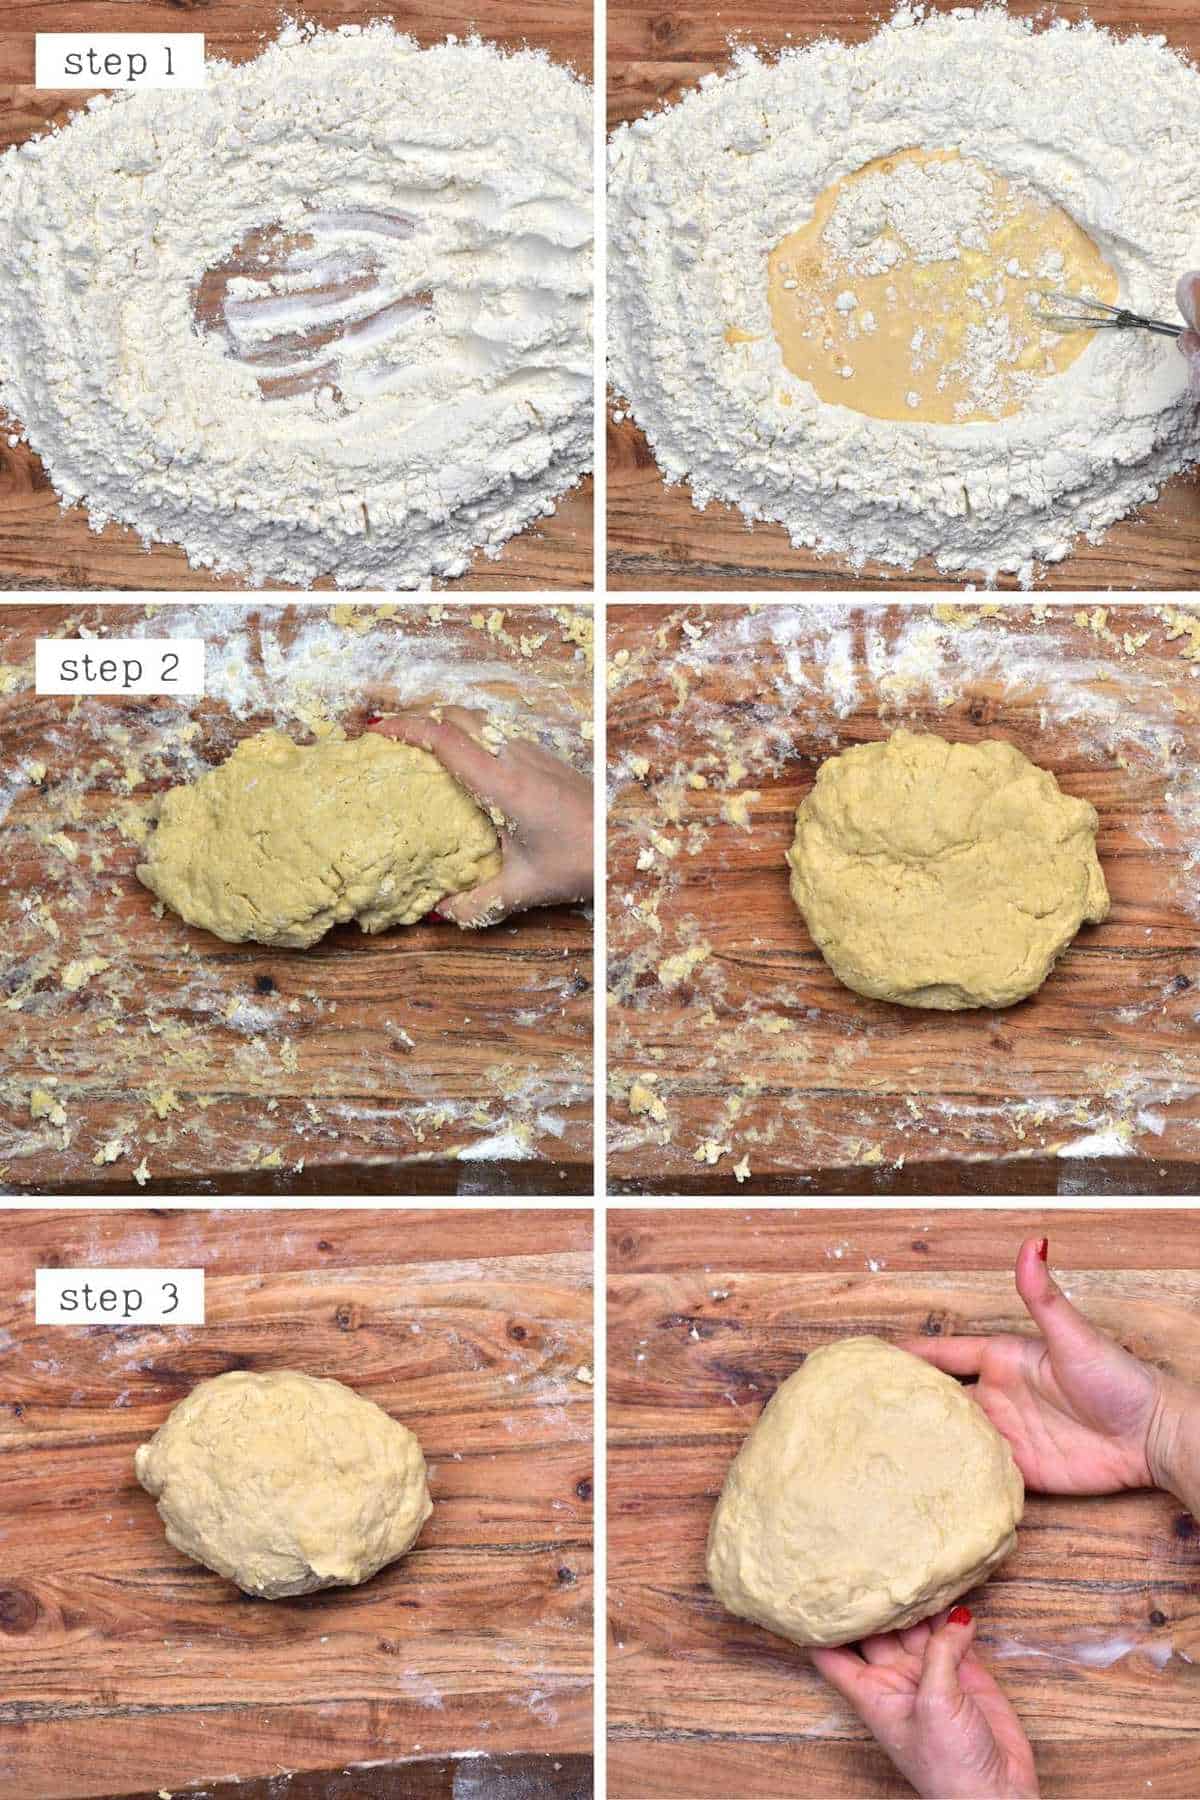
It’s okay for the dough to be slightly tacky. If it seems a little too wet and won’t become smooth, add a little extra flour to the dough, 1 tablespoon at a time until it is only slightly tacky. Don’t be tempted to add too much extra flour, or the cheese rolls will be dense and blegh (technical term – of course 😉 ), rather than fluffy and light.
Step 2: Rest, Butter, and Repeat
Shape the dough into a ball and place it back into the bowl, sprinkling it with a little flour on top. Leave it to rest in a warm area for 10 minutes, covered with a kitchen towel.

Once ready, place the dough back onto the work surface and start incorporating the butter into the dough little by little, kneading it to incorporate fully. It’s easiest to do this as small cubes/spoonfuls.
The warmth of your hands will begin to melt the butter slightly, so don’t worry, this is normal – try not to get the dough too warm, though.
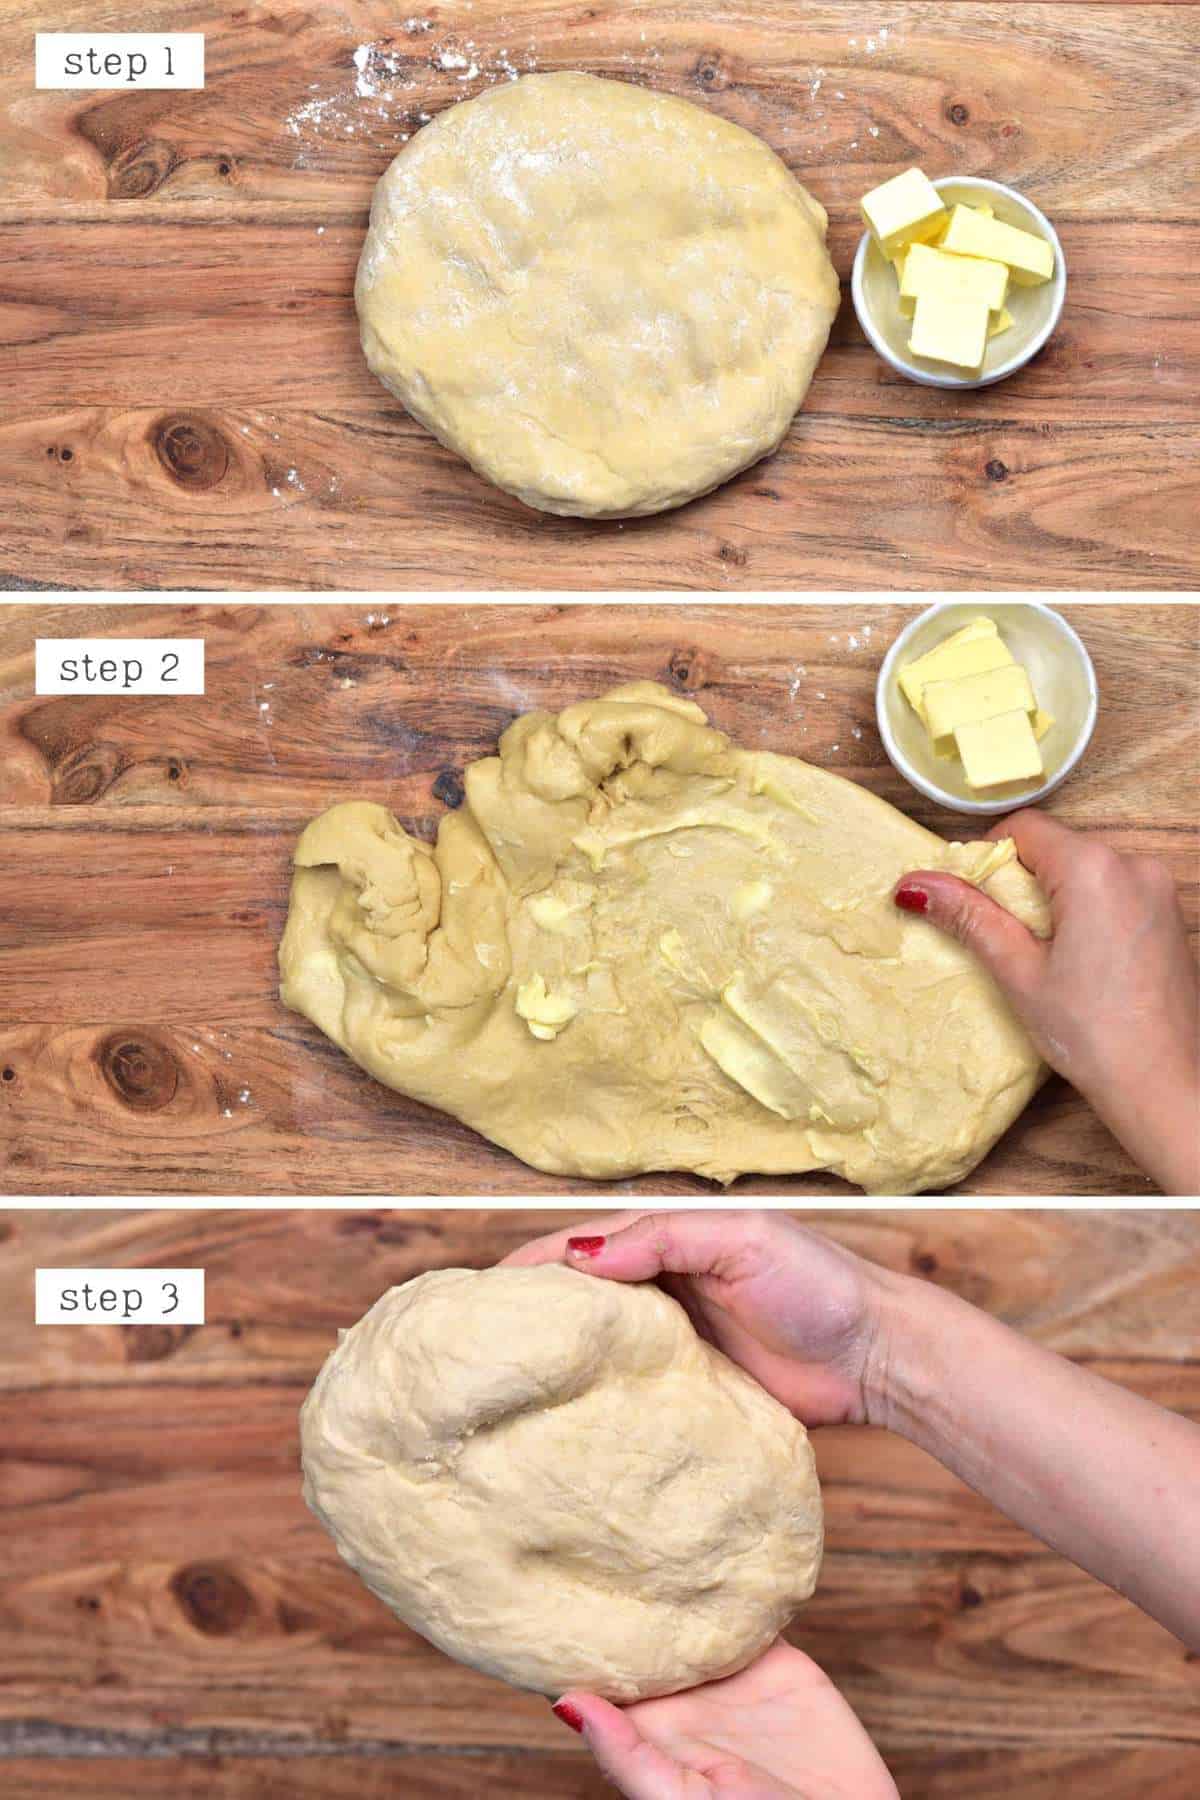
Once the butter is fully incorporated, shape it back into a bowl and leave it to rest for another 10 minutes in the bowl, covered in the kitchen towel.
Step 3: Shape & rest the dough again
Once the dough is rested, gently deflate it. Then use a knife or bench scraper to divide it into even pieces. Make sure they are as similar as possible, you can use a scale to measure. I made 19 balls of around 40-45g/1.4-1.5oz each, you can make them smaller or bigger if you prefer.
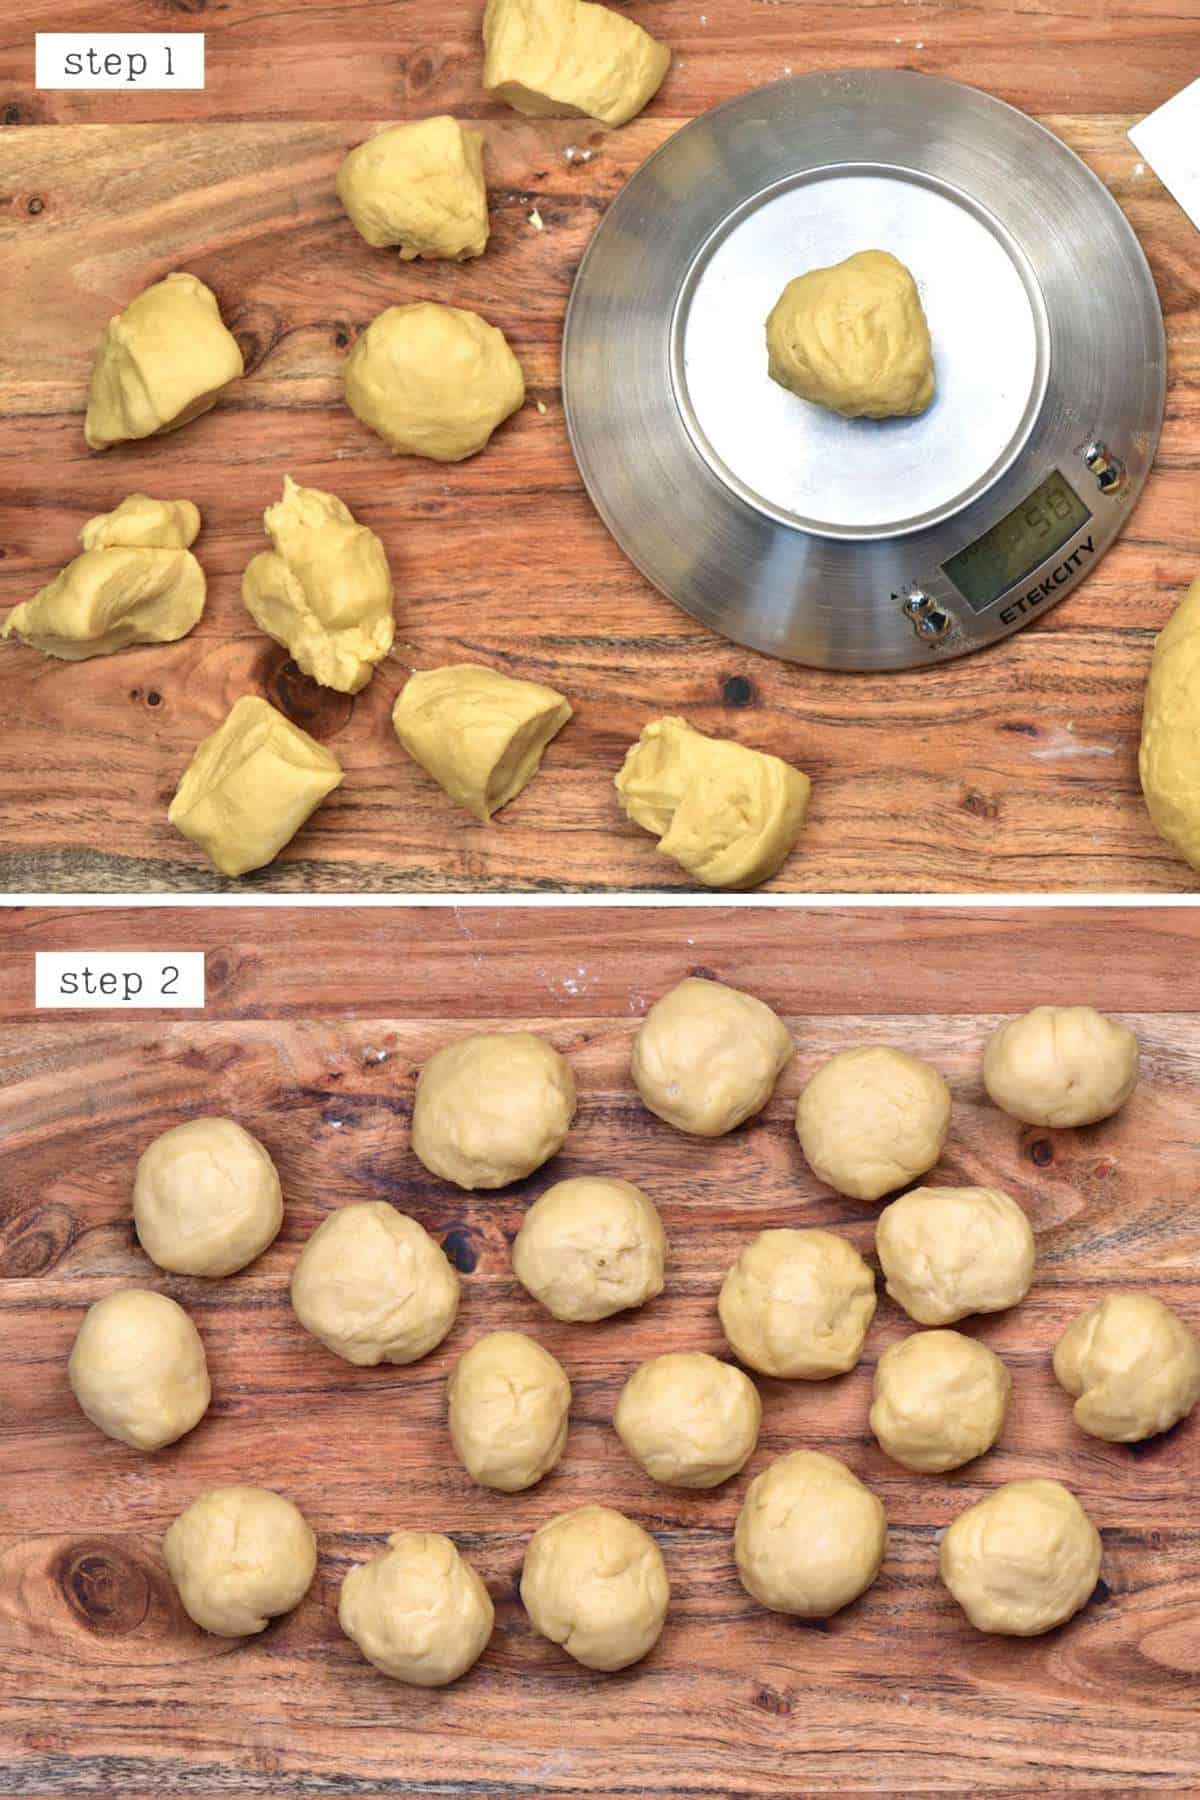
Roll each piece into a ball and place it on a parchment-lined baking tray. Chill in the refrigerator for 20 minutes so that they firm up.
Step 4: Stuff the cheese buns
Once chilled, slice each dough ball halfway through horizontally, so it opens like a book – refer to the image below. Add your small cheese cube/s or shredded cheese to the center. Then close the dough. You can also pinch the ends together to a better seal. I didn’t do this, though, and the cheese buns still turned out great.
Roll the balls gently along the surface for a smoother finish.
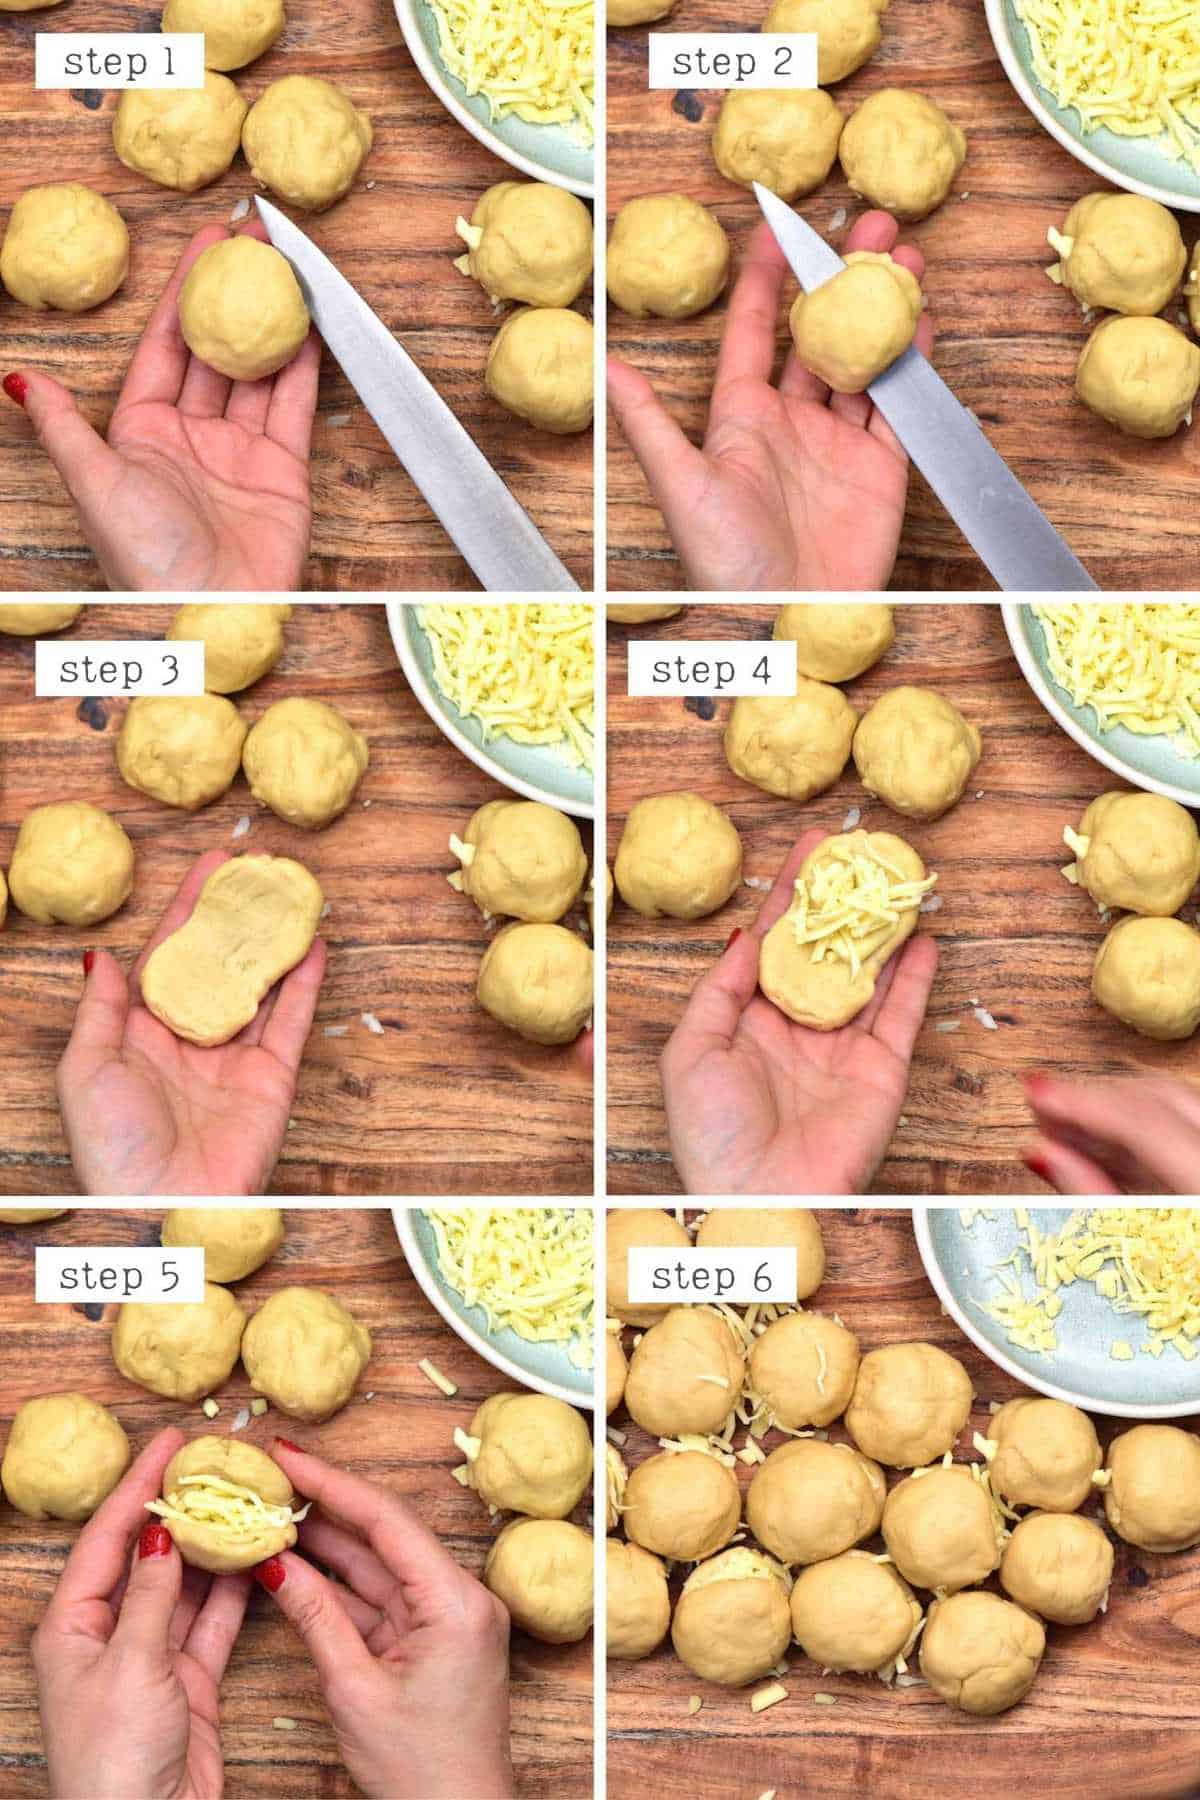
Chef’s Note: You can alternatively flatten each dough ball into a cookie shape, add the cheese and then bring in all the edges, pinching them shut and rolling gently on a surface to smooth it.
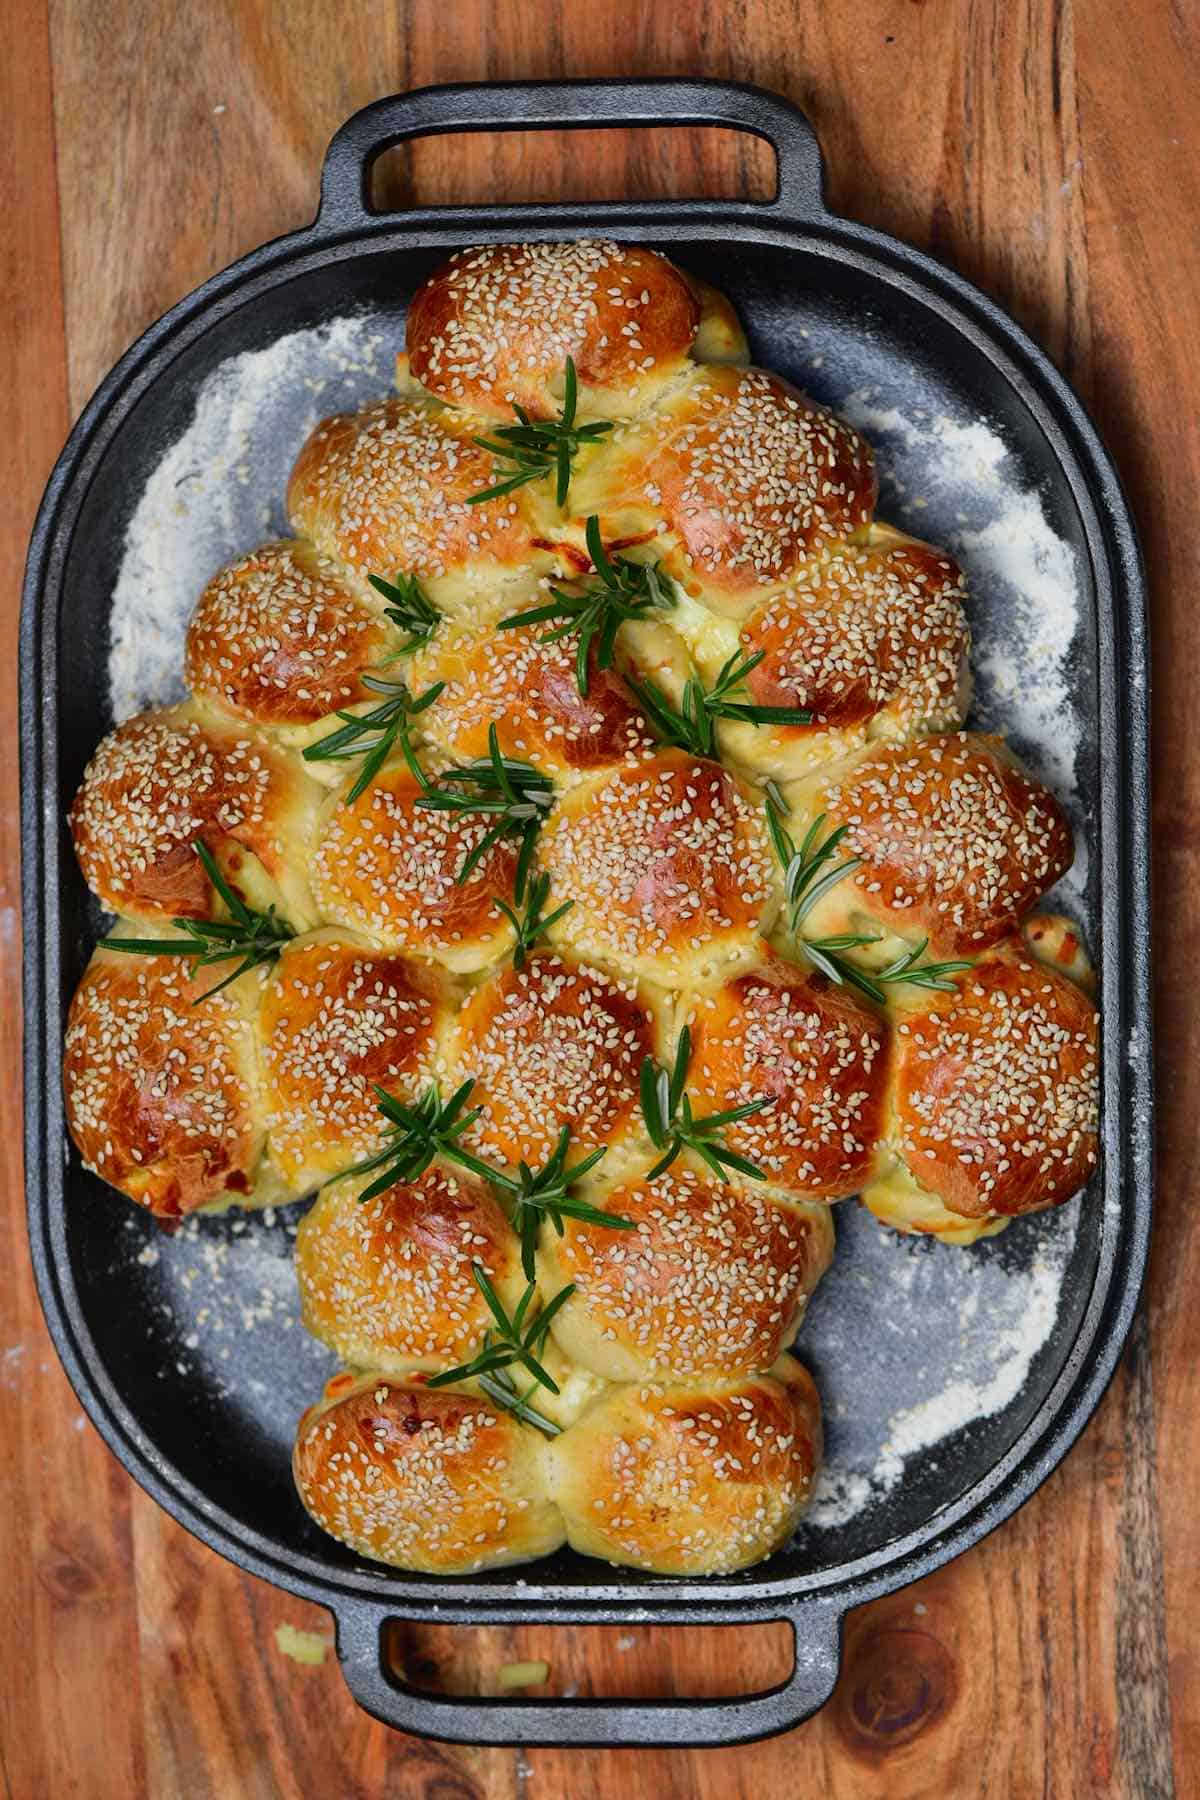
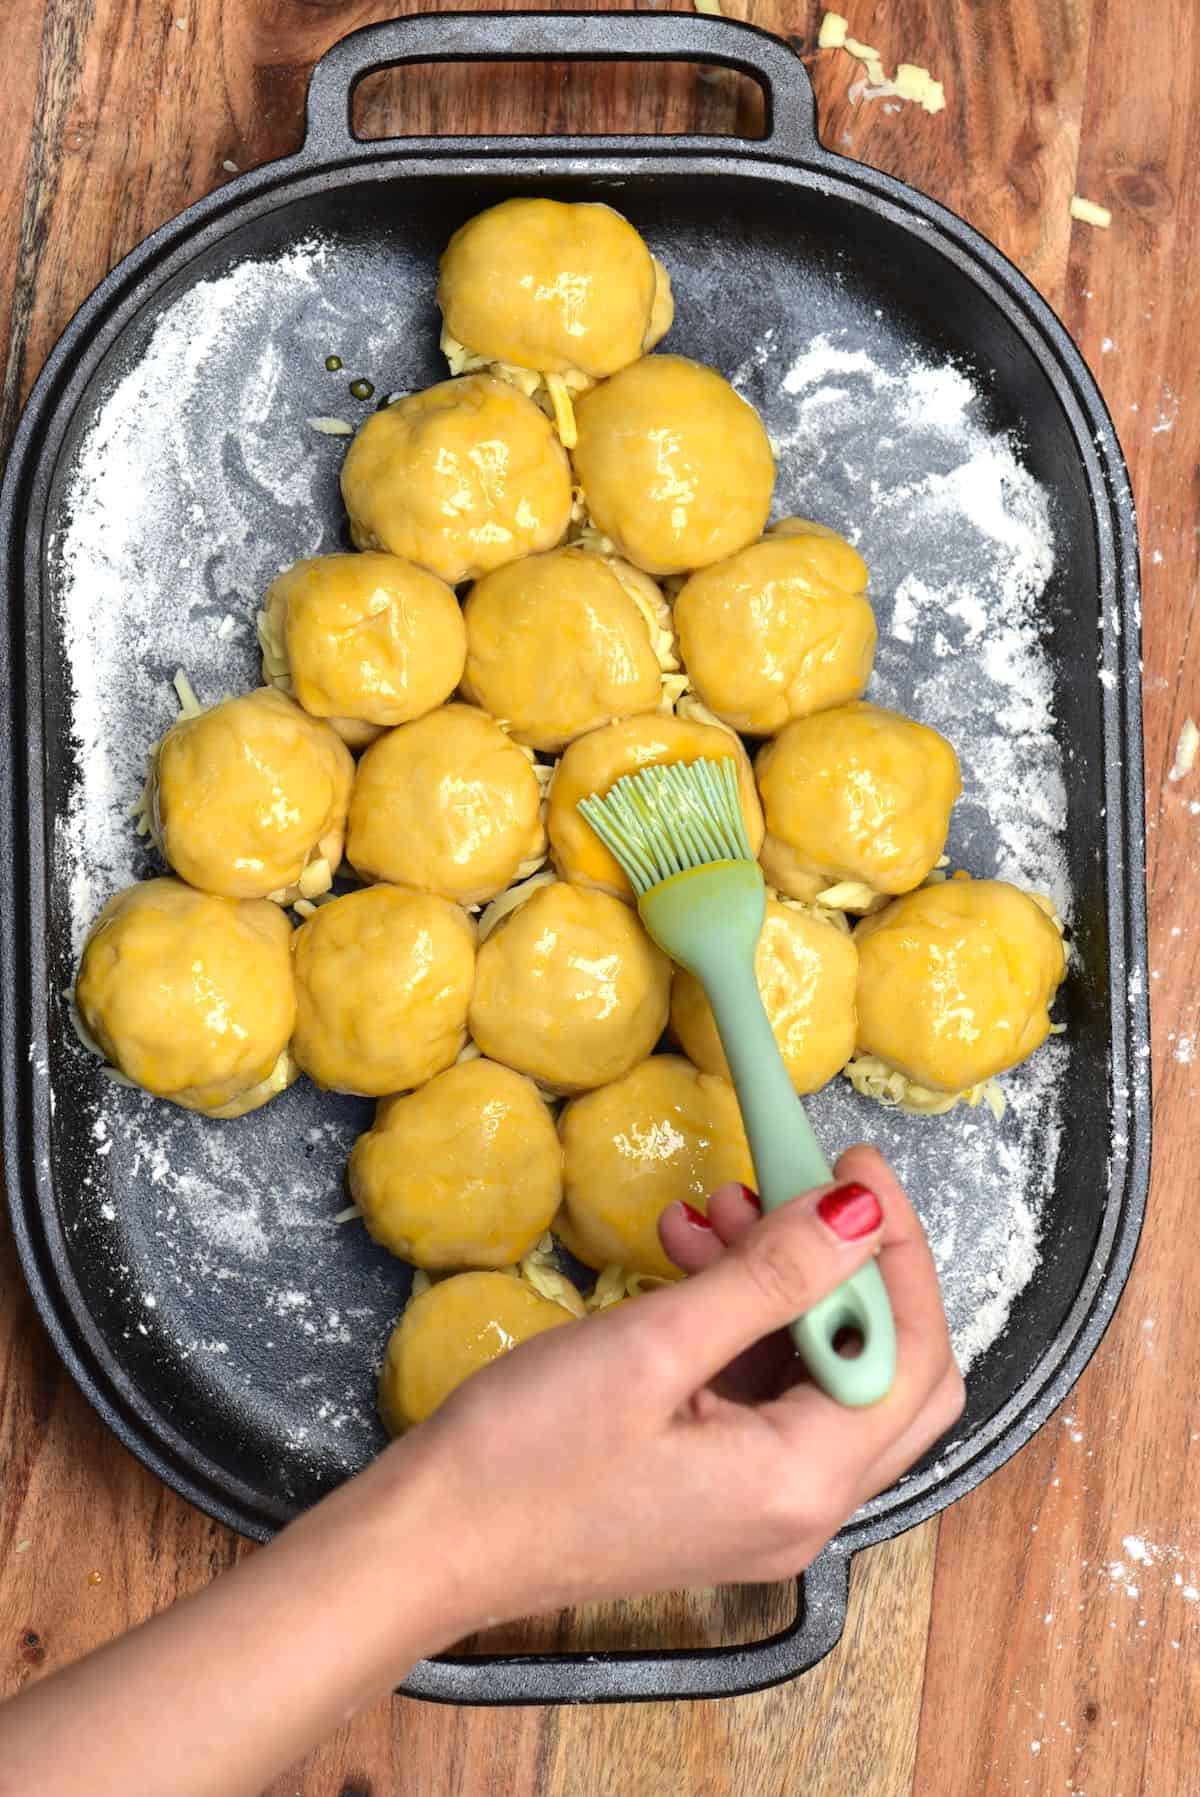
Step 5: Shape the Christmas tree bread
Arrange the dough balls onto a large baking tray into the shape of a Christmas tree. I do this in layers of 1,2,3,4, and 5 dough balls, then one or two rows of 2 balls for the tree ‘base’ (trunk).
Don’t place them too tightly to one another as we’ll be doing one final prove, allowing the dough to expand further.
Brush the dough with egg wash or melted butter and set aside to prove for around an hour in a warm area.
Step 6: Bake it
Once proved, sprinkle over the sesame seeds and then bake the Christmas tree pull-apart bread in the oven at 200ºC/400ºF for 18 minutes until golden brown.
Chef’s Note: For super cheese lovers, feel free to add a cheese crust/topping. To do this, sprinkle the buns with cheese before baking – this will become golden and turn crisp.
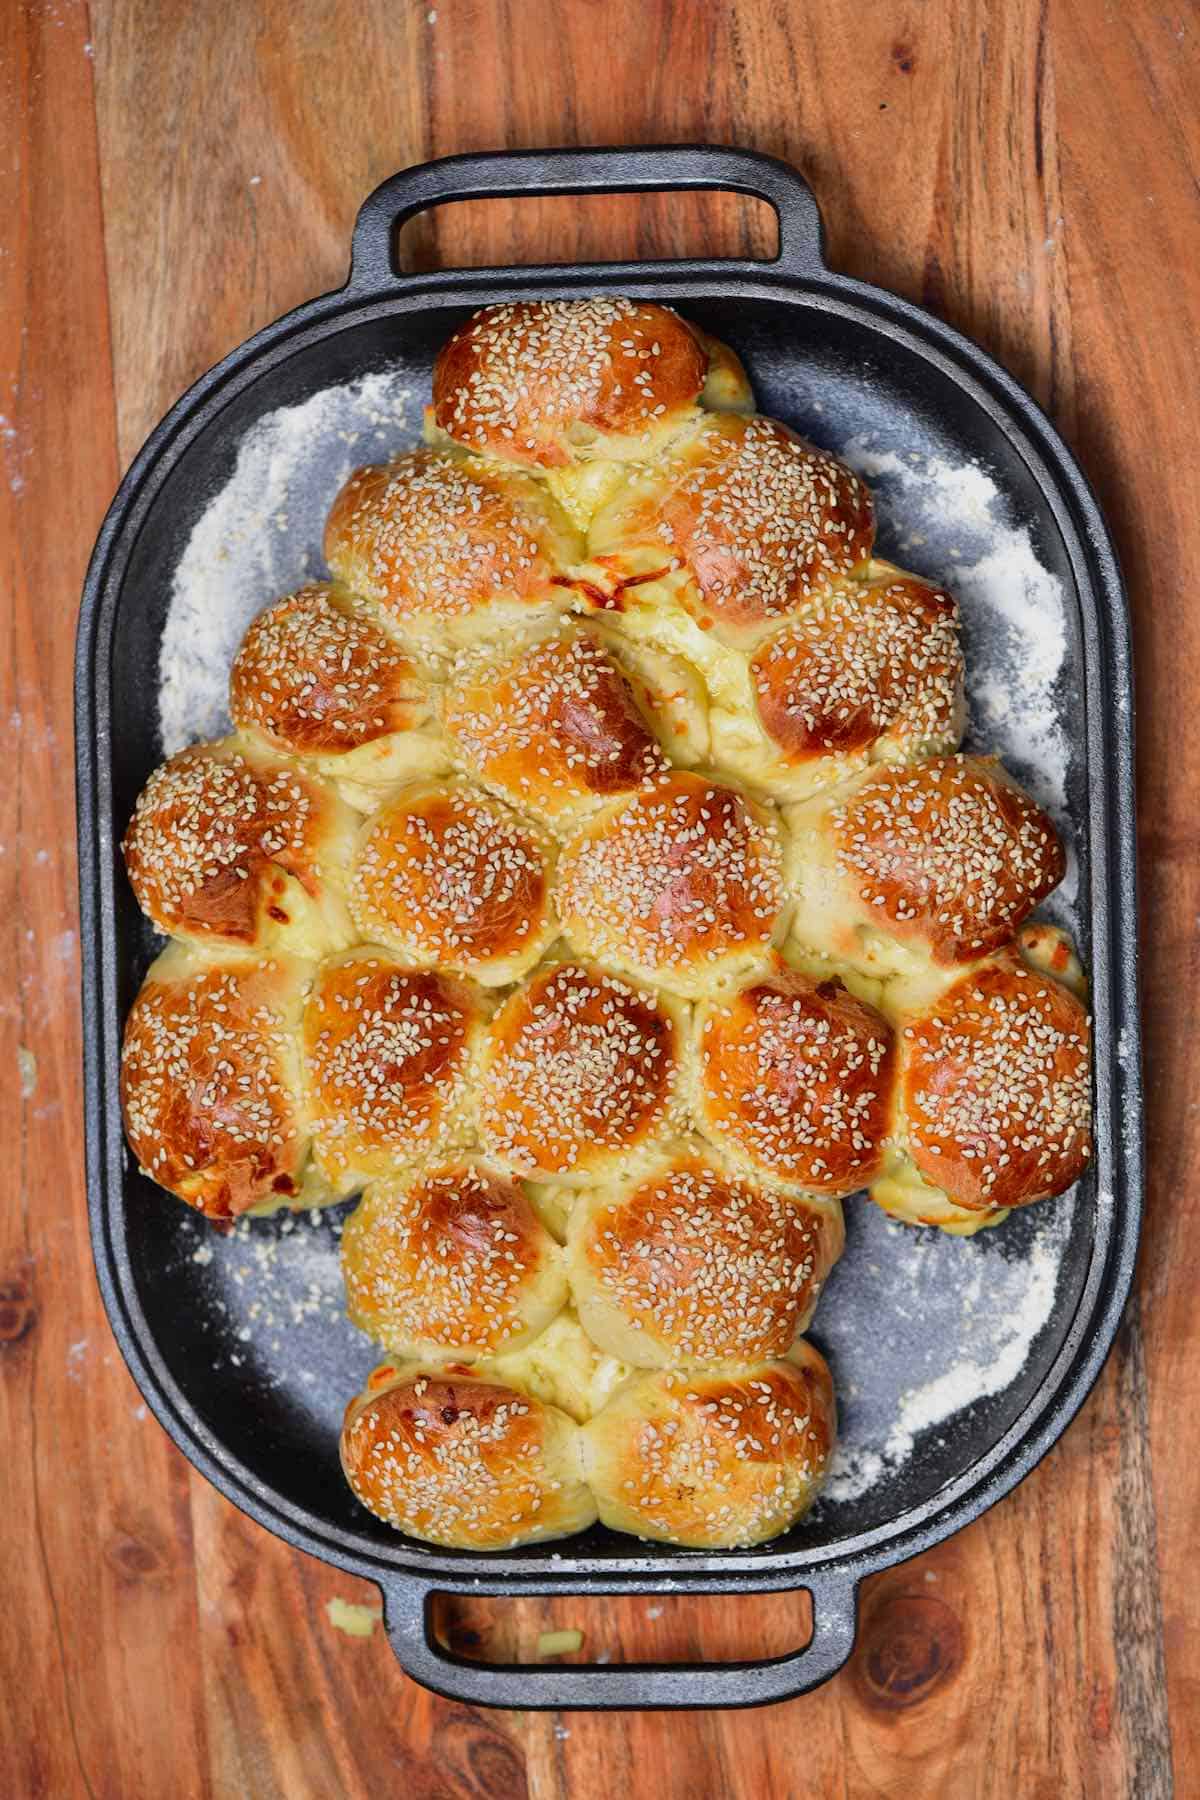
Once baked, enjoy the cheese buns while they’re still warm!
How To Serve
Once baked, you can optionally top the pull-apart bread with extra festive (or tasty) toppings. These include more melted butter with fresh herbs (oregano, rosemary, parsley, etc.), grated parmesan, fig jam, etc.
I used cranberries (pomegranate seeds will also work) with fresh rosemary twigs to emulate the look of holly.
Serve the cheesy bread tree alongside some homemade compound butter and/or dips like a warmed marinara sauce.
How to Make Ahead & Store
To Make ahead: you can prepare this bread dough (after steps 1-3) a day ahead when chilling it in the fridge. Alternatively, the ready dough can be frozen, wrapped up tightly, for up to three months. Allow it to thaw in the refrigerator overnight before lightly kneading and continue the recipe from step 4.
Once baked: this cheesy pull-apart bread is best enjoyed immediately, while the cheese inside is still melted. If you have any leftovers, these can be stored in an airtight container in the fridge for 2-3 days.
To Freeze: freeze the baked cheese buns, wrapped tightly in a layer of plastic wrap and foil for up to three months. Thaw in the fridge overnight before reheating.
To Reheat: Simply warm in the microwave (though the buns will be softer) or in the oven at 200ºC/400ºF until warmed through (10-15 minutes)
FAQs
I follow a similar method to brioche bread for these cheese buns, where butter is often added at the end of the dough-making process. This is because butter can inhibit gluten formation.
By adding it after the kneading process, the gluten is ready and the butter won’t impact the gluten as much and will yield softer bread.
Yes, to use instant yeast, then use 1/4 of the amount stated of the fresh yeast. To use dry yeast, then use 1/2 the amount stated.
I.e., if needing 100g fresh, then use 50g dry, or 25g instant.
Yes, you can use either a stand mixer or food processor with a dough blade to mix and knead the dough.
Recipe Notes
- Optional Dough add-ins: garlic powder, onion powder, Italian herbs, etc., can all be added to the dough for additional flavor.
- Optional Fillings add-ins: The filling for the cheese buns is more versatile than just the choice of cheese. You could add finely chopped garlic, herbs, jalapenos or other chili’s, pesto, etc.
- It’s always best to add slightly less flour than suggested to any dough recipe. This is because various factors (such as humidity and climate) can affect the amount of flour you need. I suggest adding 3/4 of the amount recommended and then increasing by one tablespoon at a time if needed.
- Feel free to adjust the amount of dough used per cheese dough ball if you want to make smaller vs. larger rolls.
More Christmas recipes you might enjoy
- Puff Pastry Christmas Tree Appetizer (Multiple Filling Options)
- Dinner Rolls with Baked Camembert
- How To Roast Chestnuts In The Oven
- Simple Hot Cocoa Recipe
- White Hot Chocolate
- Mushroom Wellington
- Vegan Stuffed Butternut Squash
- Easy Candied Pecans
If you try this Christmas Tree Pull-Apart Bread (Cheese Buns) recipe, then let me know your thoughts and questions in the comments. I’d also really appreciate a recipe rating and would love to see your recreations – just tag @AlphaFoodie.

Christmas Tree Pull-Apart Bread (Cheese Buns)
Ingredients
- 5 cups white flour bread flour
- 3 tsp salt
- 3 eggs I used Clarence Court Burford Browns Eggs
- 0.53 oz fresh yeast 0.25 oz/7g dry yeast
- 7.7 oz milk full fat works best; buttermilk will also work
- 2.6 oz butter unsalted
- 1.8 oz sugar about 3.5 Tbsp
- 7 oz cheese of choice can be shredded or cubed
- 1 egg for egg wash or melted butter
Instructions
Step 1: Prepare & knead the dough
- Mix the flour and salt in a large bowl.
- In a separate bowl, combine the milk, sugar, and yeast, stirring to dissolve the yeast and sugar. Then add the eggs and whisk well.
- Transfer the flour to a clean working surface and make a well in the center. If preferred, you can do this in the bowl.Pour the liquid mixture into the well of the dry mix and start to mix the flour into the wet ingredients gradually until you obtain a dough-like mixture.
- (Move the dough onto a working surface if you haven't yet.)Knead for 7-10 minutes, stretching and folding the dough to work the gluten until you obtain a smooth, elastic dough.It's okay for the dough to be slightly tacky. If it seems a little too wet and won't become smooth, add a little extra flour to the dough, 1 tablespoon at a time until it is only slightly tacky. Don't be tempted to add too much extra flour, or the cheese rolls will be dense and blegh (technical term – of course 😉 ), rather than fluffy and light.
Step 2: Rest, Butter, and Repeat
- Shape the dough into a ball and place it back into the bowl, sprinkling it with a little flour on top. Leave it to rest in a warm area for 10 minutes, covered with a kitchen towel.
- Once ready, place the dough back onto the work surface and start incorporating the butter into the dough little by little, kneading it to incorporate fully. It's easiest to do this as small cubes/spoonfuls.The warmth of your hands will begin to melt the butter slightly, so don't worry, this is normal – try not to get the dough too warm, though.
- Once the butter is fully incorporated, shape it back into a bowl and leave it to rest for another 10 minutes in the bowl, covered in the kitchen towel.
Step 3: Shape & rest the dough again
- Once the dough is rested, gently deflate it and then use a knife or bench scraper to divide it into 19 even pieces (around 50g/~1.8oz each).
- Roll each piece into a ball and place on a parchment-lined baking tray, then chill in the refrigerator for 20 minutes so that they firm up.
Step 4: Stuff the cheese buns
- Once chilled, slice each dough ball halfway through horizontally, so it opens like a book – refer to the photos on the blog post. Add your small cheese cube/s or shredded cheese to the center and then close the dough. You can pinch the ends for a better seal; I didn't do this and the buns still turned out great.Roll the balls gently along the surface for a smoother finish.Chef's Note: You can alternatively flatten each dough ball into a cookie shape, add the cheese and then bring in all the edges, pinching them shut and rolling gently on a surface to smooth it.
Step 5: Shape the Christmas tree bread
- Arrange the dough balls onto a large baking tray into the shape of a Christmas tree. I do this in layers of 1,2,3,4, and 5 dough balls, then one or two rows of 2 balls for the tree 'base' (trunk).Don't place them too tightly to one another as we'll be doing one final prove, allowing the dough to expand further.
- Brush the dough with egg wash or melted butter and set aside to prove for around an hour in a warm area.
Step 6: Bake it
- Once proved, sprinkle over the sesame seeds and then bake the Christmas tree pull apart bread in the oven at 200ºC/400ºF for 18 minutes until golden brown.Chef's Note: For super cheese lovers, feel free to add a cheese crust/topping. To do this, sprinkle the buns with cheese before baking – this will become golden and turn crisp.Once baked, top with your additional topping of choice (like cranberries and rosemary), and enjoy the cheese buns while they're still warm!
How to make ahead & Store
- To Make Ahead: You can prepare this bread dough after steps 1-3) a day ahead when chilling it in the fridge. Alternatively, the ready dough can be frozen, wrapped up tightly, for up to three months. Allow it to thaw in the refrigerator overnight before lightly kneading and continue the recipe from step 4.Once Baked: This cheesy pull apart bread is best enjoyed immediately, while the cheese inside is still melted. If you have any leftovers, these can be stored in an airtight container in the fridge for 2-3 days.To Freeze: Freeze the baked cheese buns, wrapped tightly in a layer of plastic wrap and foil for up to three months. Thaw in the fridge overnight before reheating.To Reheat: Simply warm in the microwave (though the buns will be softer) or in the oven at 200ºC/400ºF until warmed through (10-15 minutes)
Notes
- Optional Dough add-ins: garlic powder, onion powder, Italian herbs, etc., can all be added to the dough for additional flavor.
- Optional Fillings add-ins: The filling for the cheese buns is more versatile than just the choice of cheese. You can also jazz up the fillings with the addition of finely chopped garlic, herbs, jalapenos or other chili’s, pesto, etc.
- It’s always best to add slightly less flour than suggested to any dough recipe. This is because various factors (such as humidity and climate) can affect the amount of flour vs. liquid you need in the dough. I suggest adding 3/4 of the amount recommended and then increasing by one tablespoon at a time if needed.
- Feel free to adjust the amount of dough used per cheese dough ball if you want to make smaller vs. larger rolls.
Read the FAQ sections for more top tips on creating this Christmas tree pull-apart bread!!
Nutrition
Nutrition information is automatically calculated, so should only be used as an approximation.


