
This post may contain affiliate links. Please read our disclosure policy.


This New York-style bagel recipe is easy to prepare and fun to make. You only need a few simple ingredients to enjoy delicious, fresh, chewy homemade bagels with tons of fillings and toppings every day.
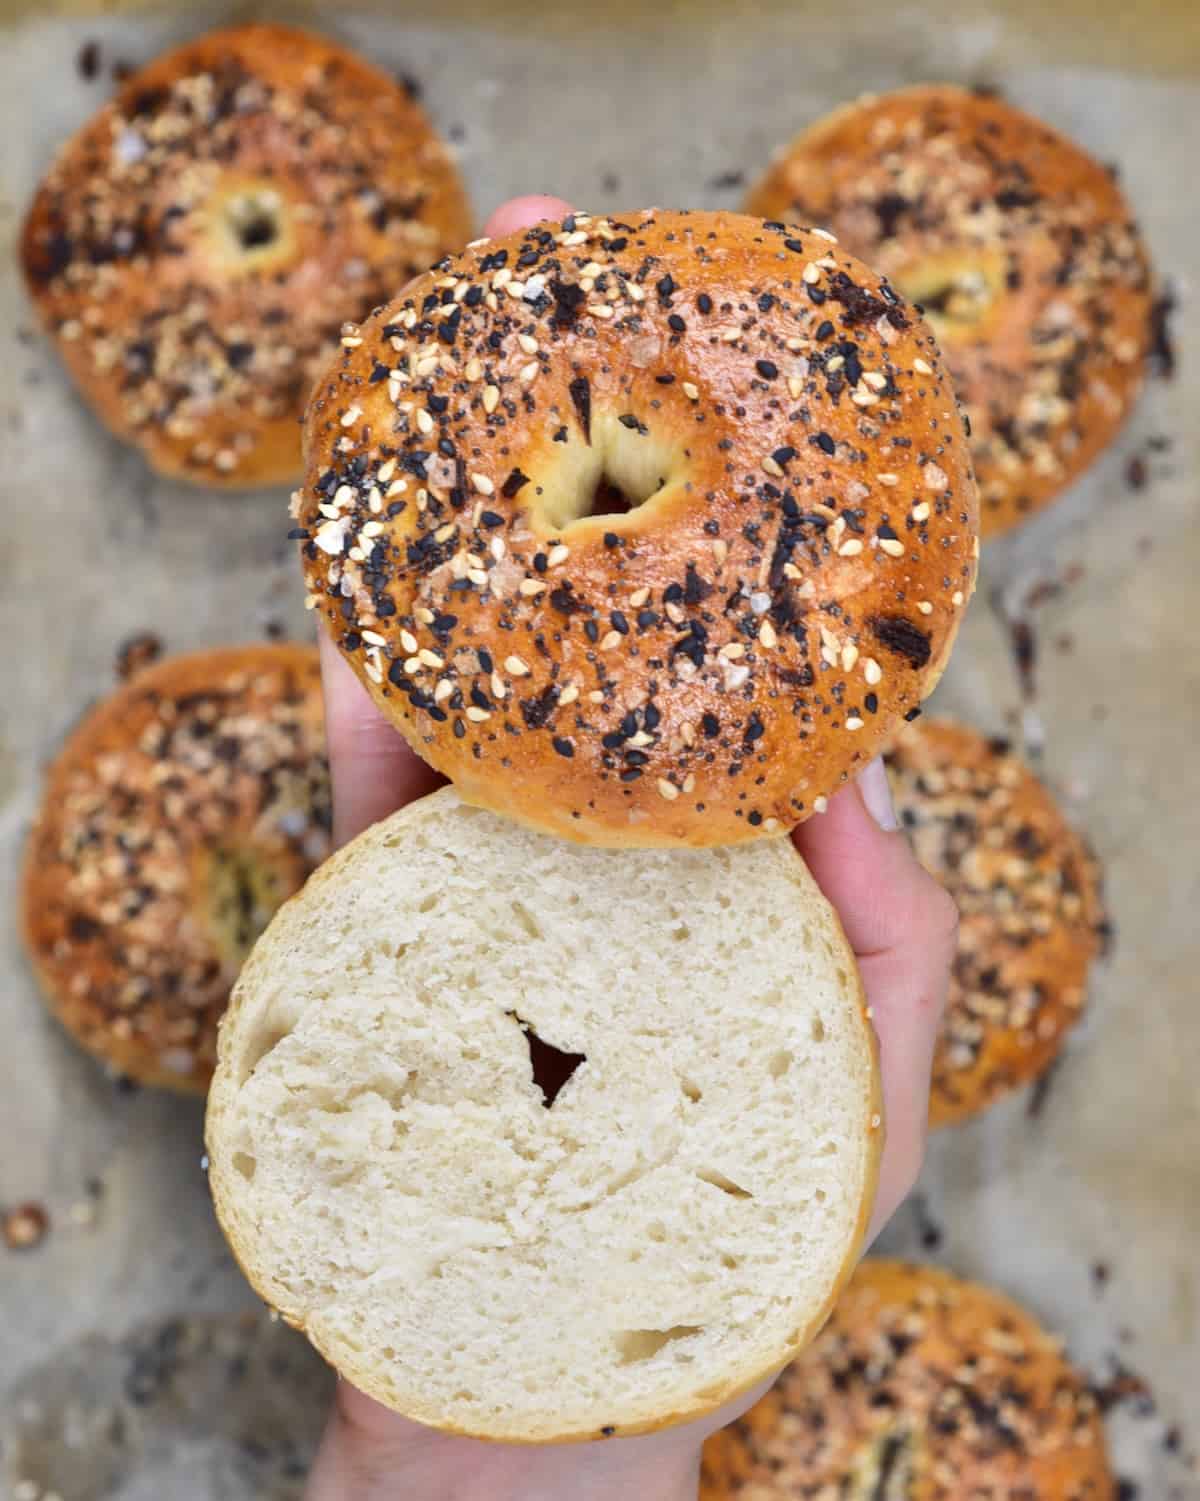
These homemade bagels are glazed, crisp, chewy, and delicious—just like the classic New York bagels. While this recipe is not super quick, the method is simple, and there is a ton of hands-off time. The most magical factor of this New York-style bagel recipe is the boiling step—it allows the outside of the bagel to “set” before it’s baked, creating a thick, chewy crust and keeping the interior softer.
The resulting bagels taste fresher and are cheaper to make with a few pantry staples you might already have in your kitchen. Best of all, they are freezer-friendly and can be toasted from frozen – perfect for a quick morning treat!
Ingredients

- White bread flour: High-protein flour, like bread flour, will produce chewy bagels.
- Yeast: I used fresh yeast; however, you can also use active dry yeast.
- Sweetener: Sugar is needed to activate the yeast and for the poaching liquid. I used maple syrup in the yeast and cane sugar for poaching. However, you can use a liquid sweetener (barley malt syrup, maple) or granulated sugar of your choice.
- Water: Use lukewarm water (105-115ºF/40-46ºC) to activate the yeast.
- Oil: Use any neutral-flavored oil.
- Salt
- Egg: I use an eggwash for glazed, shiny bagels. You can also use neutral oil or milk or omit it entirely.
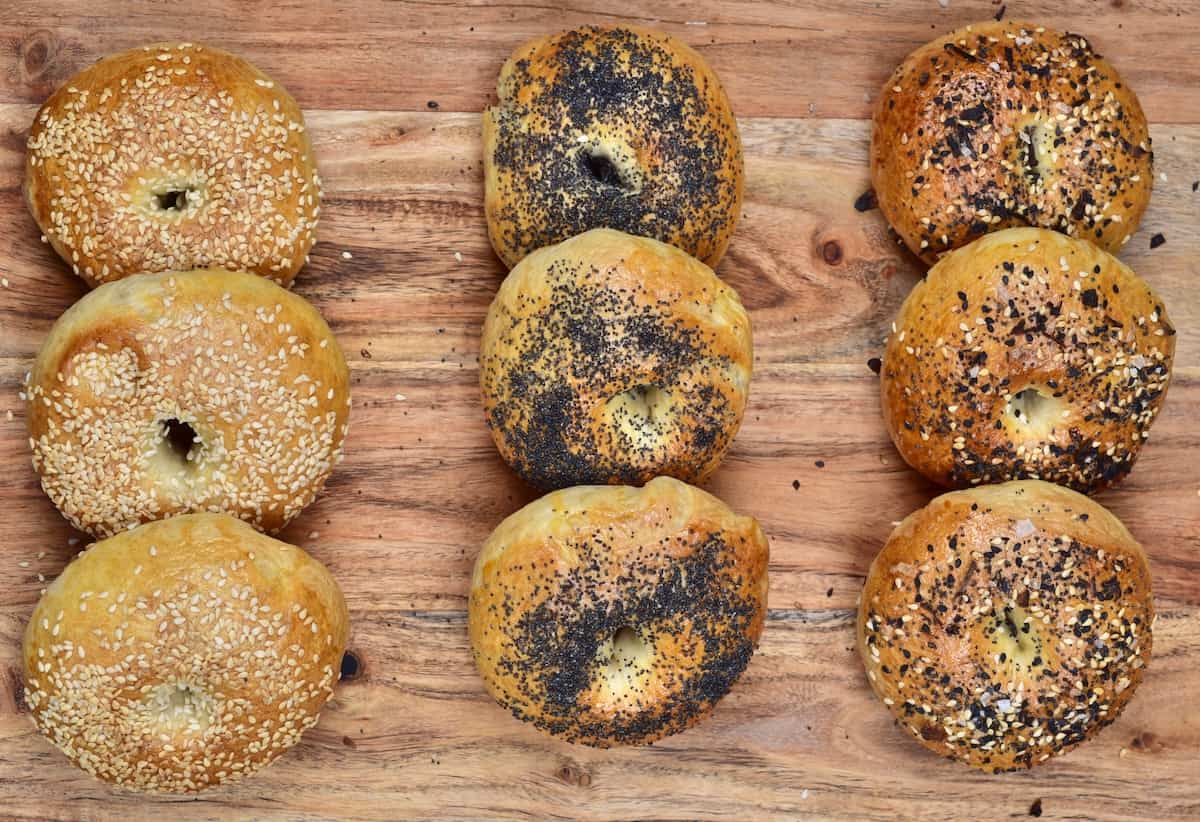
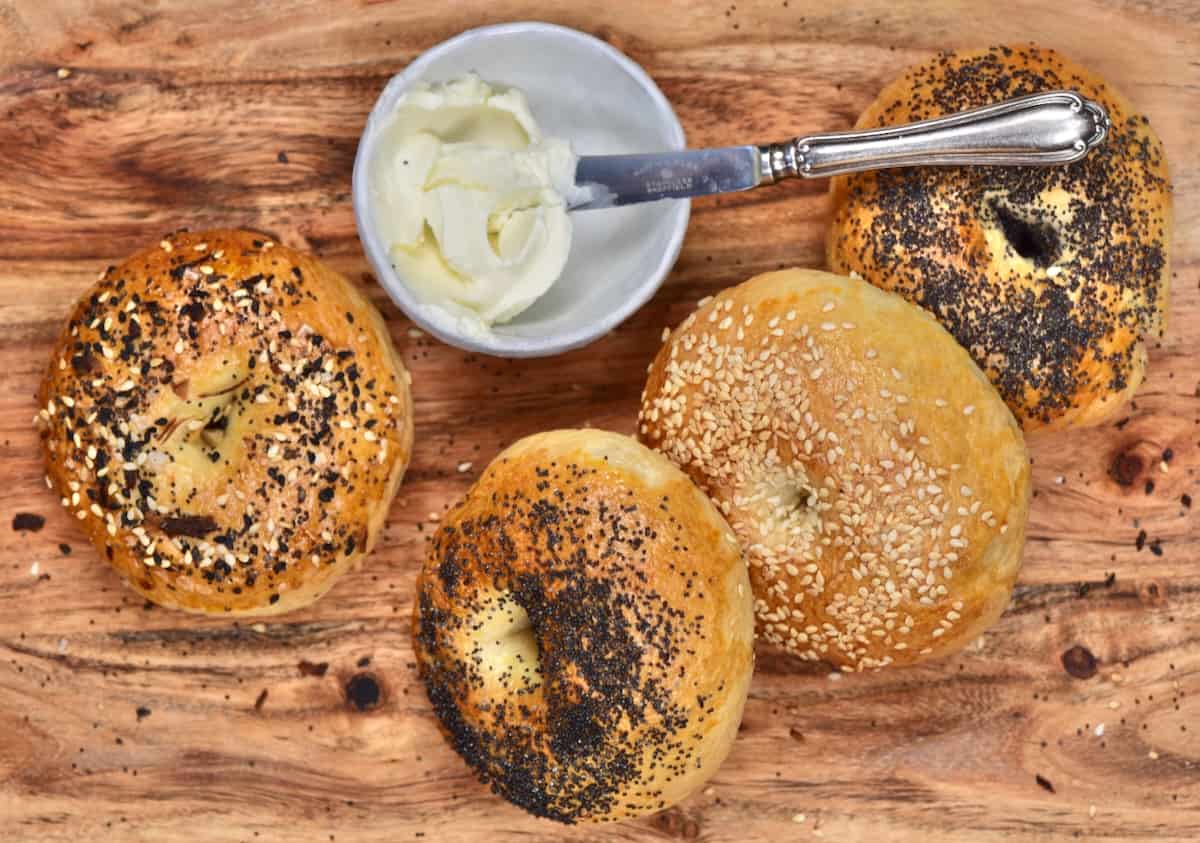
- Bagel toppings: There are tons of ways to customize and “top” the bagels: everything bagel seasoning, poppy seeds, sesame seeds, flaky salt, garlic or onion flakes, a little parmesan, or even cinnamon sugar.
How to make New York-style bagels
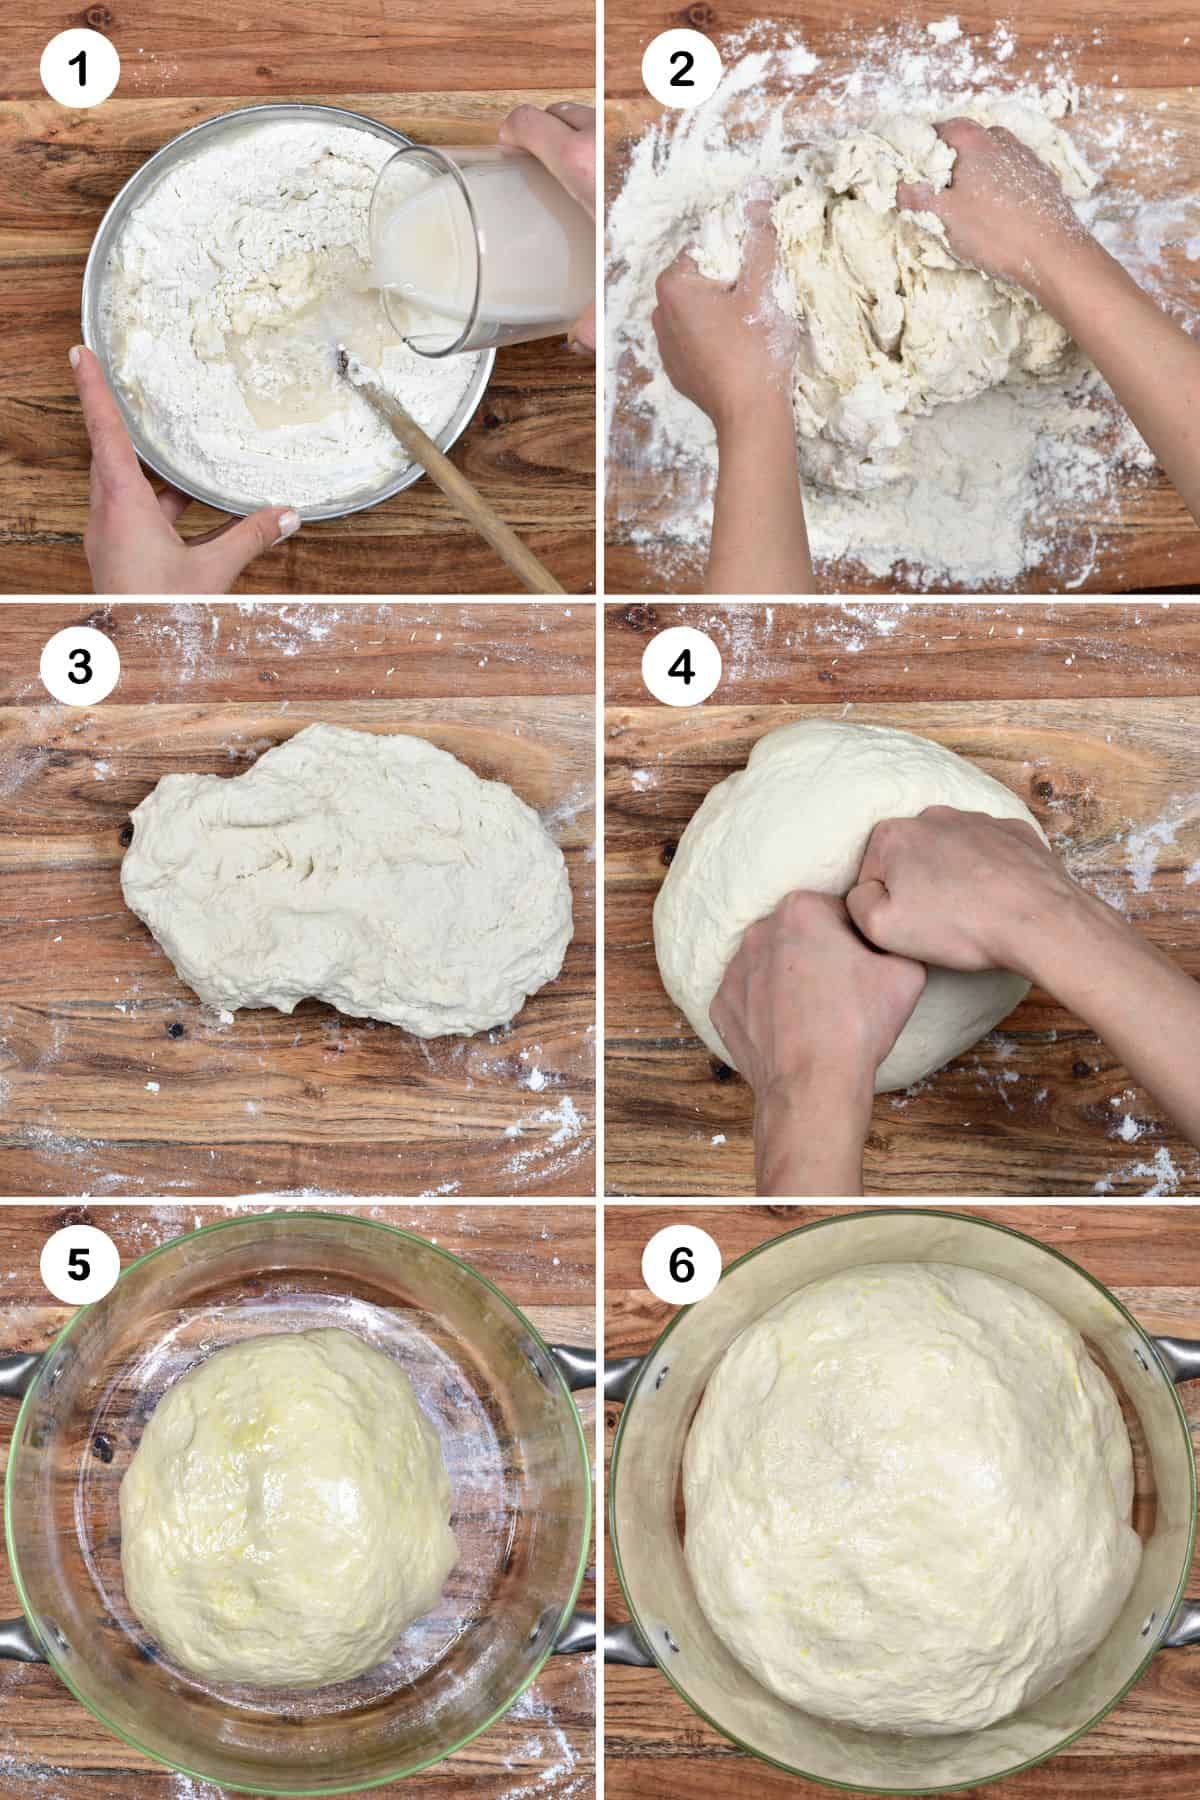
Prepare the dough: First, prepare the yeast mixture by adding the yeast, warm water (between 40-46ºC/105-115ºF), and maple syrup to a bowl. Mix until the yeast has dissolved completely. Then set aside to activate for five minutes – during this time, it should bubble up and become slightly frothy.

Knead the dough: Sift the flour and salt in a large bowl and add the yeast mixture. Then knead the dough until it becomes smooth and elastic. Once kneaded, shape the dough into a large ball by folding over the edges to the underside, creating a smooth round top.
If the dough is a bit dry, add a tiny bit more water. Keep in mind that the humidity/climate, altitude, and even the type and brand of flour can affect how much liquid you need in the dough.
Rest the dough: Lightly oil the outside of the dough with your hands and place it in an oiled bowl. Cover the bowl with a kitchen towel (or clingfilm), and then set it aside to rest for 1 hour in a warm area (such as inside your switched-off oven).
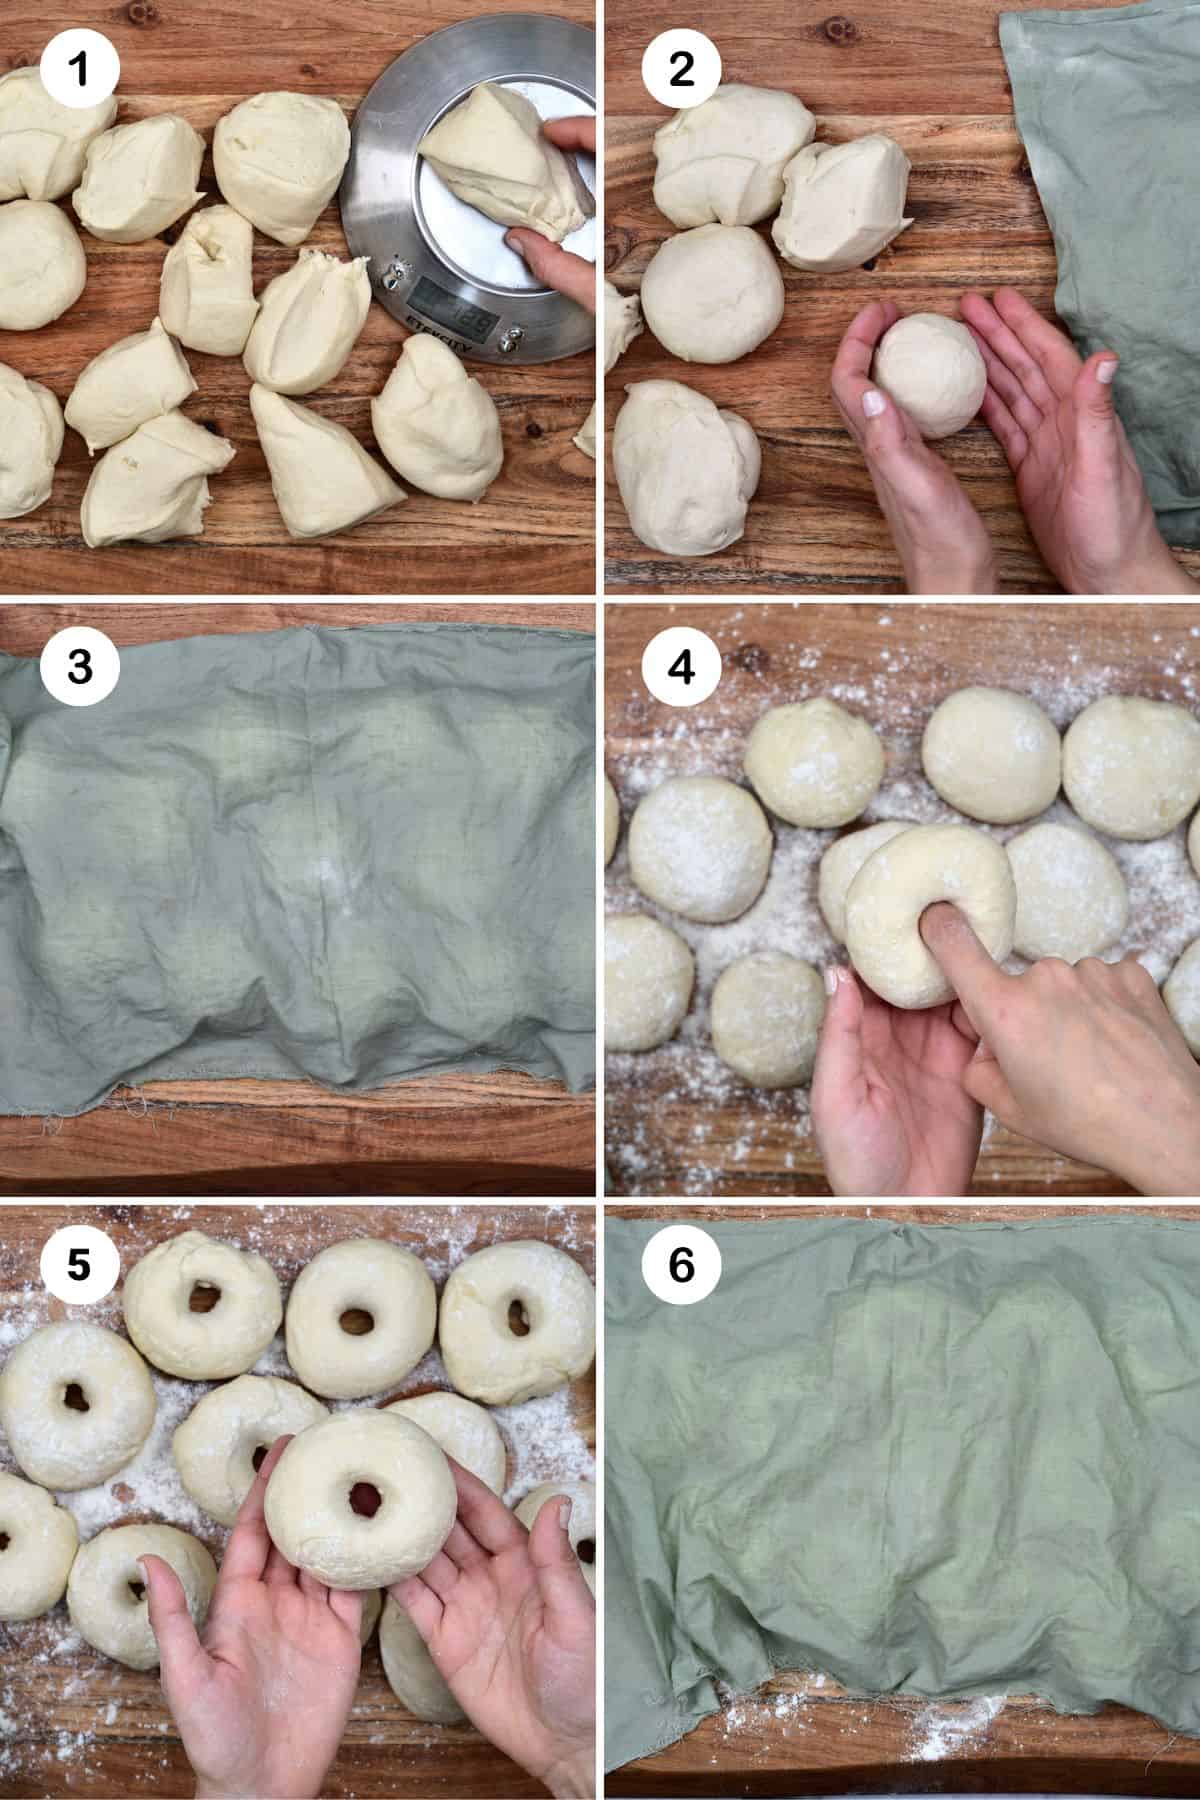
Divide the dough: Once rested, the dough should have doubled in size. At this point, you need to deflate it with light kneading for 30 seconds or so. Then, divide the dough into 13 pieces. For perfectly uniform bagels, weigh each piece with a scale. They should be around 3.5 oz each (100 g) or whatever the weight of your dough ball is divided by 13.
Roll each piece into a ball and place them on a tray covered with a damp kitchen towel. Set the tray aside for 10-15 minutes to rest the dough once more.
Shape the bagels: Press a finger or thumb into the center to create a hole in the ball and spin it lightly. If you want a more pronounced hole, spin the bagel lightly around your finger/s to get a 1.5- to 2-inch hole (it will get smaller during the rest of the making process and can close up if you’re not careful).
Once shaped, set the bagels back under the kitchen towel and leave for a further 10 minutes.
Boil the bagels: While the bagels rest, bring a large pot of water and the cane sugar to a boil, mixing well so the sugar is fully dissolved. Once it begins to boil, reduce the heat to a simmer.
Once the bagels have rested, gently lower them into the simmering water with a skimmer or slotted spoon. Make sure to do just a few at a time, not overcrowding the pan (as they increase in size while boiling). Then poach for 20 seconds on each side.
You can increase the poaching time to 1 minute for chewier results or even 2 minutes for a denser, chewier bagel. Never do less than 20 seconds per side, though, and I wouldn’t recommend more than 2 minutes per side.
Place the poached bagels onto a prepared baking tray (lightly oiled or covered with parchment paper), leaving at least an inch between them. Repeat with all the bagels.
At this point, you can preheat the oven to 4750ºF/240ºC.
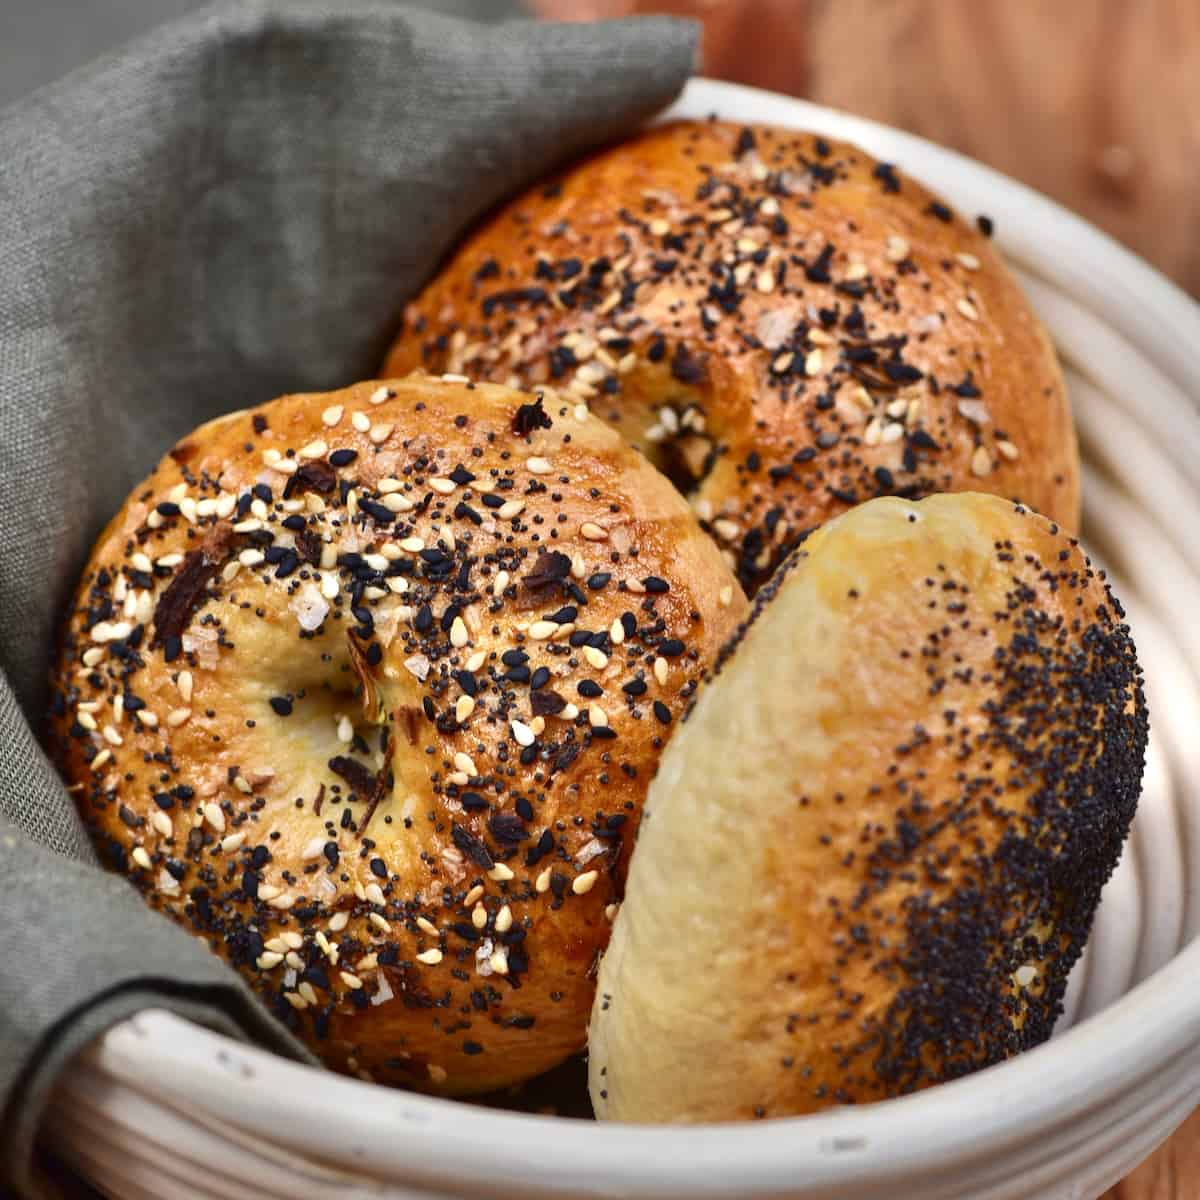
Add the toppings: Brush the bagels with the egg wash and sprinkle with your topping of choice. I used a combination of seeds on their own and everything bagel seasoning for my batch.
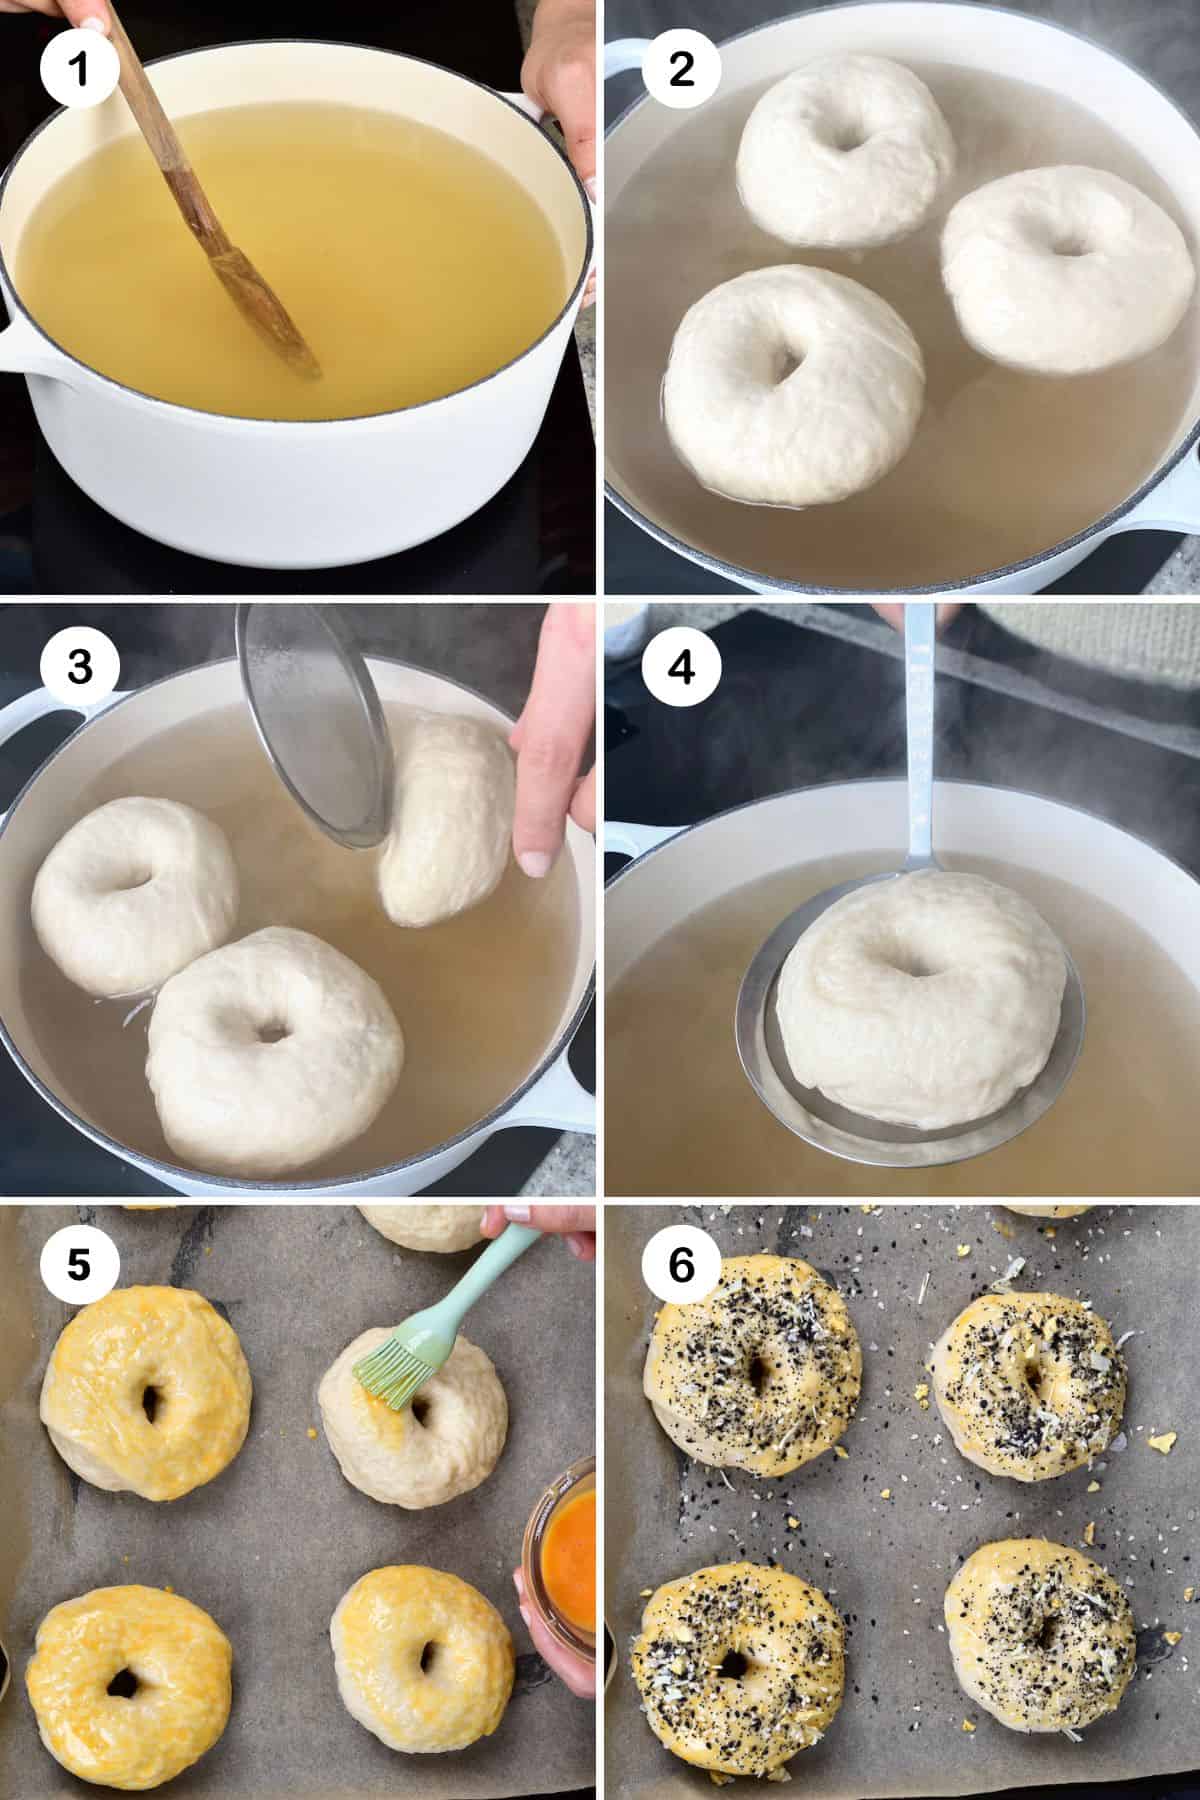
Bake the bagels: Bake in the oven at 4750ºF/240ºC bake for 10 minutes. Then spin the tray so the front bagels are now at the back of the oven, and bake for a further 6-10 minutes until they are uniformly golden brown. Keep an eye on the bagels to ensure that they don’t burn.
Once ready, allow them to cool slightly, and then they are ready to enjoy!
Serve and enjoy: I use these New York bagels interchangeably with standard bread slices for sandwiches, burgers, and whatever toppings I’m in the mood for. You can add butter or cream cheese to them, add smoked salmon for lox bagels, make avocado-egg toast, and more.
Storage
To store: The homemade bagels will stay fresh when stored in an airtight container/bag at room temperature for up to three days.
To freeze: You can also freeze any leftover bagels. Slice them in half, then freeze them in reusable freezer-safe bags for up to three months. Allow the bagels to thaw before using or place them in the toaster from frozen for a delicious quick treat!
More baking recipes


If you try this New York-style bagel recipe, let me know how it goes in the comments below. I’d appreciate a recipe card rating and would love to see your recipe recreations – tag me on Instagram @Alphafoodie!

New York-Style Bagel Recipe
Ingredients
- 2 lb white bread flour or a 50/50 mix with wholewheat flour
- 2 tsp salt
Yeast mixture
- 2 cups water lukewarm
- 1 Tbsp maple syrup or your sugar of choice
- 2 tsp active dry yeast (14g) or 28 g fresh yeast
For boiling the bagels
- 15 cu[s water
- 1/4 cup sugar or malt barley syrup
For brushing
- 1 egg (for eggwash) or milk or neutral oil (optional)
Toppings (optional)
- everything bagel seasoning
- sesame seeds or your favorite
Instructions
Prepare the dough
- Add the yeast, lukewarm water (105-115ºF/40-46ºC), and maple syrup to a bowl and mix until the yeast has dissolved completely. Set aside to activate for five minutes.
- In a large bowl, sift the flour and salt. Add the yeast mixture. Knead the dough until it becomes smooth and elastic. This can take at least 10 minutes. If you find that the dough is a little dry, add a tiny bit more water.
- Shape the dough into a large ball by folding over the edges to the underside, creating a smooth, round top.
- Lightly oil the outside of the dough and place it in an oiled bowl. Cover the bowl with some clingfilm (or a kitchen towel) and then set aside for it to rest for 1 hour in a warm area (such as inside your switched-off oven).
Shape the bagels
- Once rested, the dough should have doubled in size. Deflate it with a light kneading for about 30 seconds
- Divide the dough into 13 pieces – use a scale to weigh them. Each piece should be around 3.5 oz/100g (or whatever the weight of your dough is divided by 13).
- Roll each piece into a ball and place them on a tray covered with a damp kitchen towel. Set the tray aside for 10-15 minutes to rest the dough once more.
- Press a finger or thumb into the center of the ball to create a hole and spin it lightly. If you want a more pronounced hole, spin the bagel lightly around your finger/s to get a 1.5- to 2-inch hole.
- Place the bagels back under the kitchen towel and leave for a further 10 minutes to rest.
Boil the bagels
- While the bagels rest, add the water and cane sugar in a large saucepan. Bring to a boil, mixing well so the sugar is fully dissolved. Once it begins to boil, reduce the heat to a simmer.
- Using a skimmer or slotted spoon, gently lower 2-3 bagels at a time into the simmering water. Poach for 20 seconds on each side. Repeat with the rest.
- Place the poached bagels onto a prepared baking tray (lightly oil or cover with parchment paper), leaving at least an inch between them.
Bake the bagels
- Preheat the oven to 475º/240ºC.
- Brush the bagels with the egg wash and sprinkle with your topping of choice (everything bagel seasoning, seeds, parmesan, etc).
- Bake in the oven at 475ºF/240ºC bake for 10 minutes. Then spin the tray so the front bagels are now at the back of the oven, and bake for a further 6-10 minutes until they are uniformly golden brown.Once ready, allow them to cool slightly, and then they are ready to enjoy!
Notes
Nutrition
Nutrition information is automatically calculated, so should only be used as an approximation.


Is the dough supposed to be super firm? It just about killed my KitchenAid.
Hi Diane! Yes, bagel dough is meant to be quite stiff and low-hydration, which is what gives bagels their signature dense, chewy texture, so what you experienced is normal 😊 That said, it can be tough on a stand mixer, so I’d recommend mixing on low speed, working in shorter bursts to avoid straining the motor, and finishing the kneading by hand if it starts to struggle. Happy baking!
hi im in australia. just wondering how much a pint is equivalent to please???
Hi Vanessa,
You’ll need ~470 ml water. I hope this helps.
Hi! Can you use instant yeast? I’m afraid I have access to neither fresh nor active dry. Thanks!
Hi there,
Yes you can 🙂 I hope you enjoy this recipe!
Can I use All purpose flour alone?
Hi Maria,
Do you mean without using yeast?
I can’t thank you enough for this wonderful recipe Samira. Absolute heaven. I used 50:50 Wheat and White flour and the texture and taste were on-point. Keep up the good work and thank you for sharing all your recipes with us.
Thank you so much for your comment, Janani. This mix of wheat and white flour sounds delicious 🙂
This recipe was really easy to follow and the bagels turned out great! Thank you very much for sharing 🙂
I just won’t add any toppings the next time, this time I used sesame, sunflower seeds and pumpkin seeds but they completely fall off while cutting but the bagels actually don’t need toppings as they are awesome without it too 😀
I haven’t had too much of an issue with toppings when using an eggwash or eggwash sub, though it can be an issue. So glad you enjoyed the bagels, though <3
First time making bagels they were perfect and I live at altitude!
Thank you for your comment, Romina. Glad you made the recipe 🙂
Thank you for sharing a GREAT bagel recipe. My bagels turned out so good thanks to you! Now I don’t miss visiting
my local bagel store!!
Thank you so much for your comment, Ellen. Glad you tried and enjoyed this bagel recipe.
Can you freeze the dough portions and then use then bake them when unfrozen?
Hi Camila,
Although this isn’t something I’ve tried (I usually freeze the ready-made bagels and then toast them from frozen), you could try freezing the dough after its first rise. When it’s doubled in size, deflate it with a light kneading just for 30 seconds or so. Then you can freeze it for up to 3 months (make sure it’s very tightly wrapped). When needed, you can thaw overnight in the fridge, deflate again if needed, and continue with the recipe (divide into pieces, form the bagels, etc). If you try this, it would be great to hear how it goes 🙂