
This post may contain affiliate links. Please read our disclosure policy.


Authentic homemade brioche bread is a lot easier to make than you think. Turn your kitchen into a proper cuisine with this easy French bread classic.
The French know how to do bread. Who isn’t tempted by baguettes, pain de champagne, or buttery, flaky croissants at the supermarket or, if you’re lucky, at a proper boulangerie?
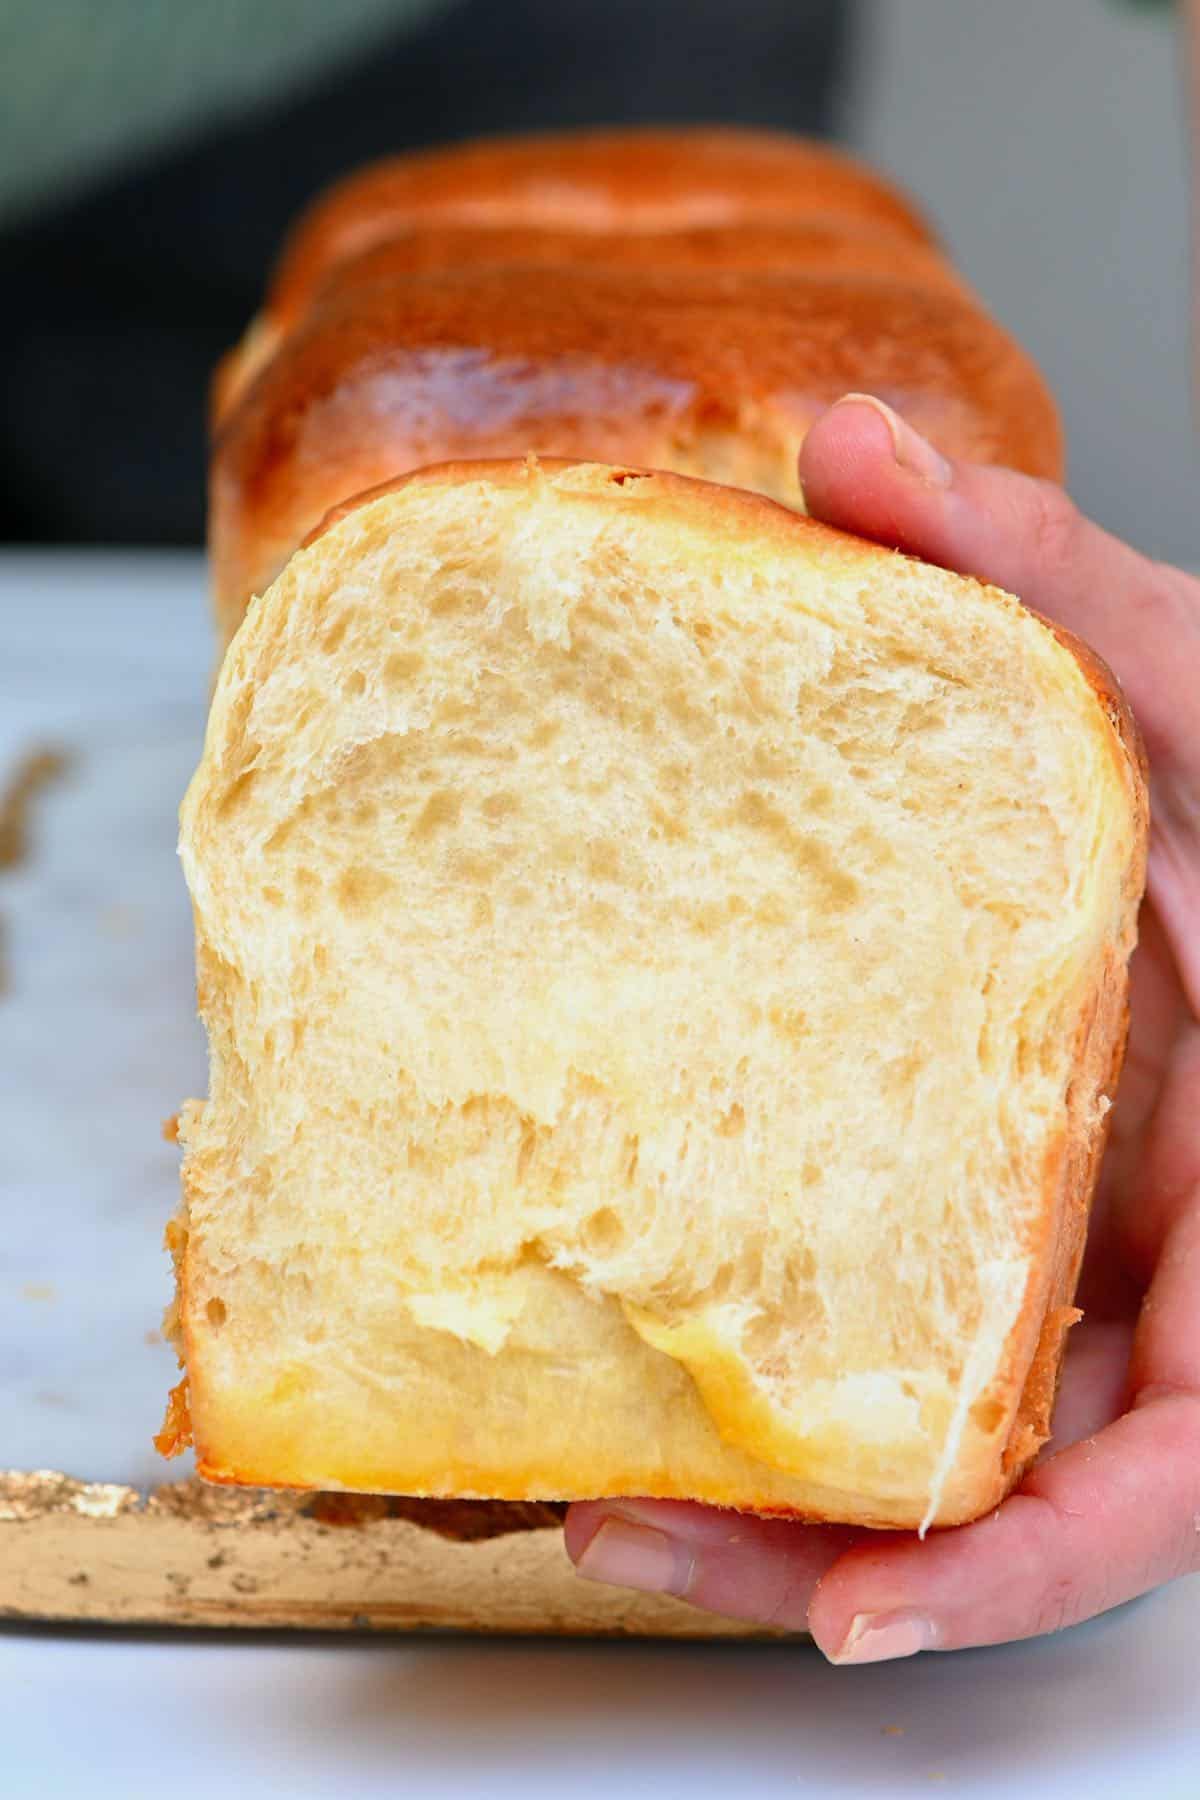
For a long time, I looked at these classics and assumed they were too tricky to make at home. Not anymore. With a little effort and some know-how, you can create fluffy, pillowy soft homemade brioche bread in your own kitchen.
Want to save this recipe?
What Is Brioche Bread
Brioche is a sweet French bread made out of enriched dough. They’re typically known as a viennoiserie – a bread or pastry, like croissants.
Made in France since the 15th century, brioche has a dark golden crust and a fluffy, soft interior and can be enjoyed with either sweet or savory recipes. Try making a pain perdu – aka French Toast, bread pudding, or summer pudding with it.
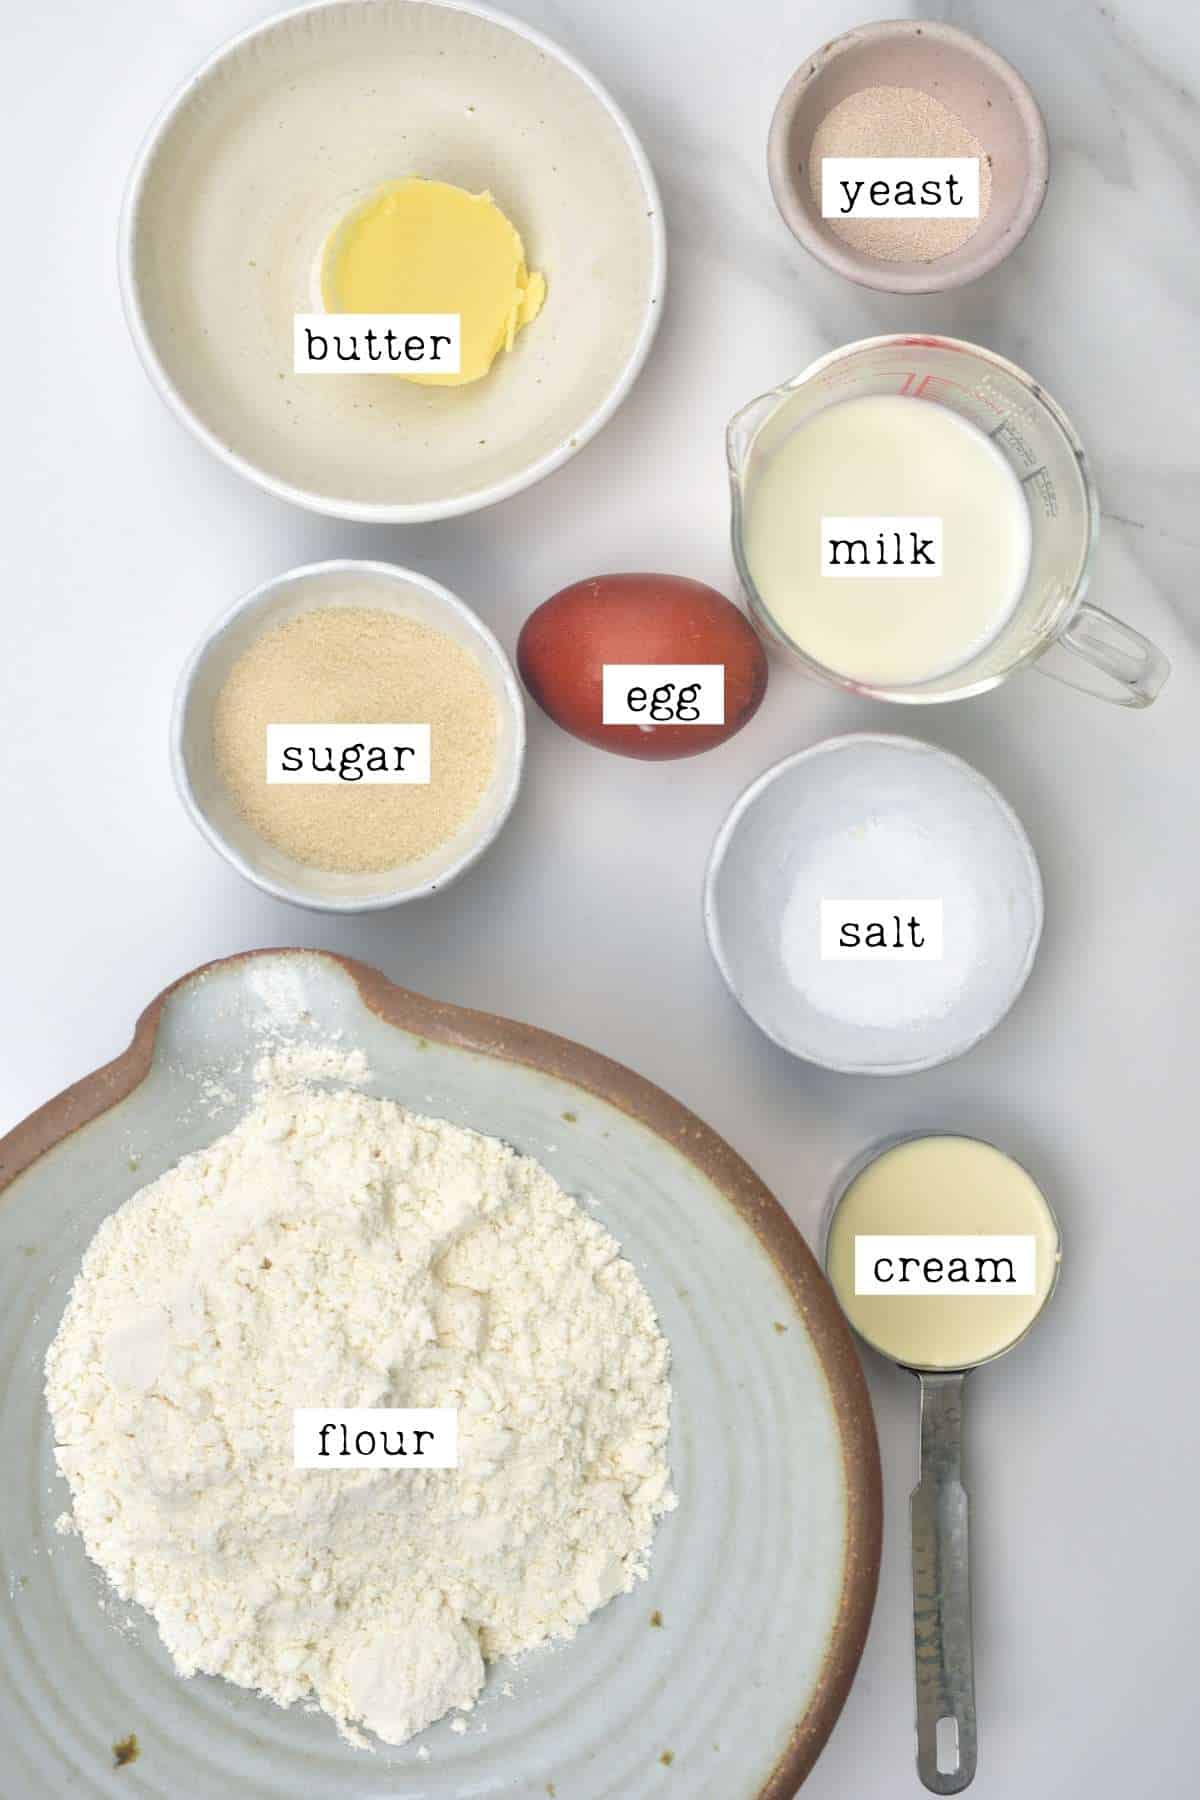
Brioche Bread Ingredients
- Flour: You can use all-purpose flour, bread flour, or a combination of the two. Bread flour will make your brioche loaf slightly chewier because of the higher protein content.
- Dairy: I used a combination of milk and double/heavy cream.
- Butter: Use unsalted butter as we’ll be adding some for flavor later to your brioche bread.
- Egg: After LOTS of experimenting, I’ve found just one large egg will get you fluffy results for your brioche.
- Salt: Just a little to enhance the flavors of the easy brioche recipe.
- Sugar: Plain white will do – this is needed to activate the yeast.
- Yeast: I used active dry yeast. You could also use instant yeast (but use 25% less) – this doesn’t need to be activated.
- Egg Wash: Mix an egg and milk together – this will give the brioche bread its shiny crust.
How to Make Brioche Bread
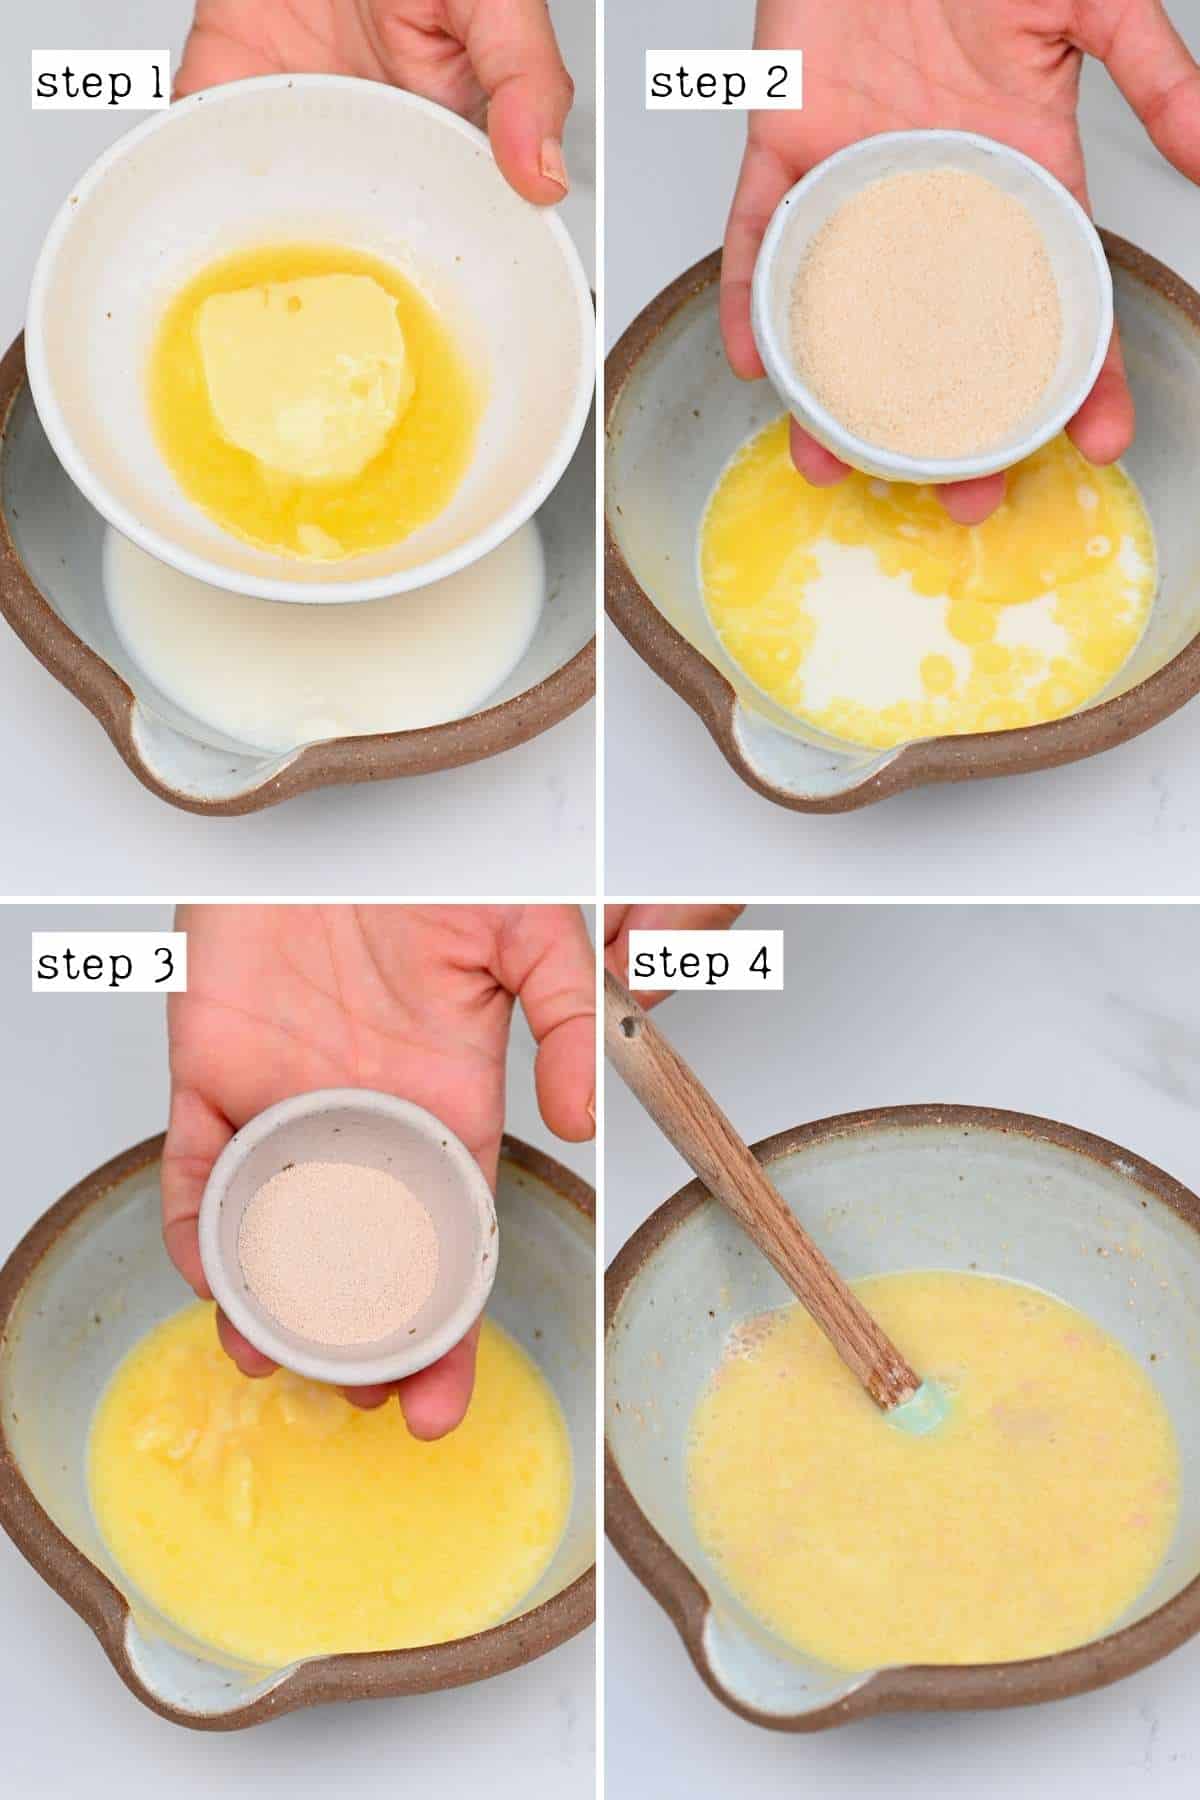
First, melt the butter either in the microwave in 10-15 second bursts or over a double boiler.
Combine the melted butter, milk, sugar, and yeast and set aside for 5 minutes so the yeast activates.
Skip this step if you’re using instant yeast, it won’t need activating. You can add all these ingredients to the bowl in the next step.
Making Brioche Bread Dough
You can mix the dough manually or in a stand mixer.
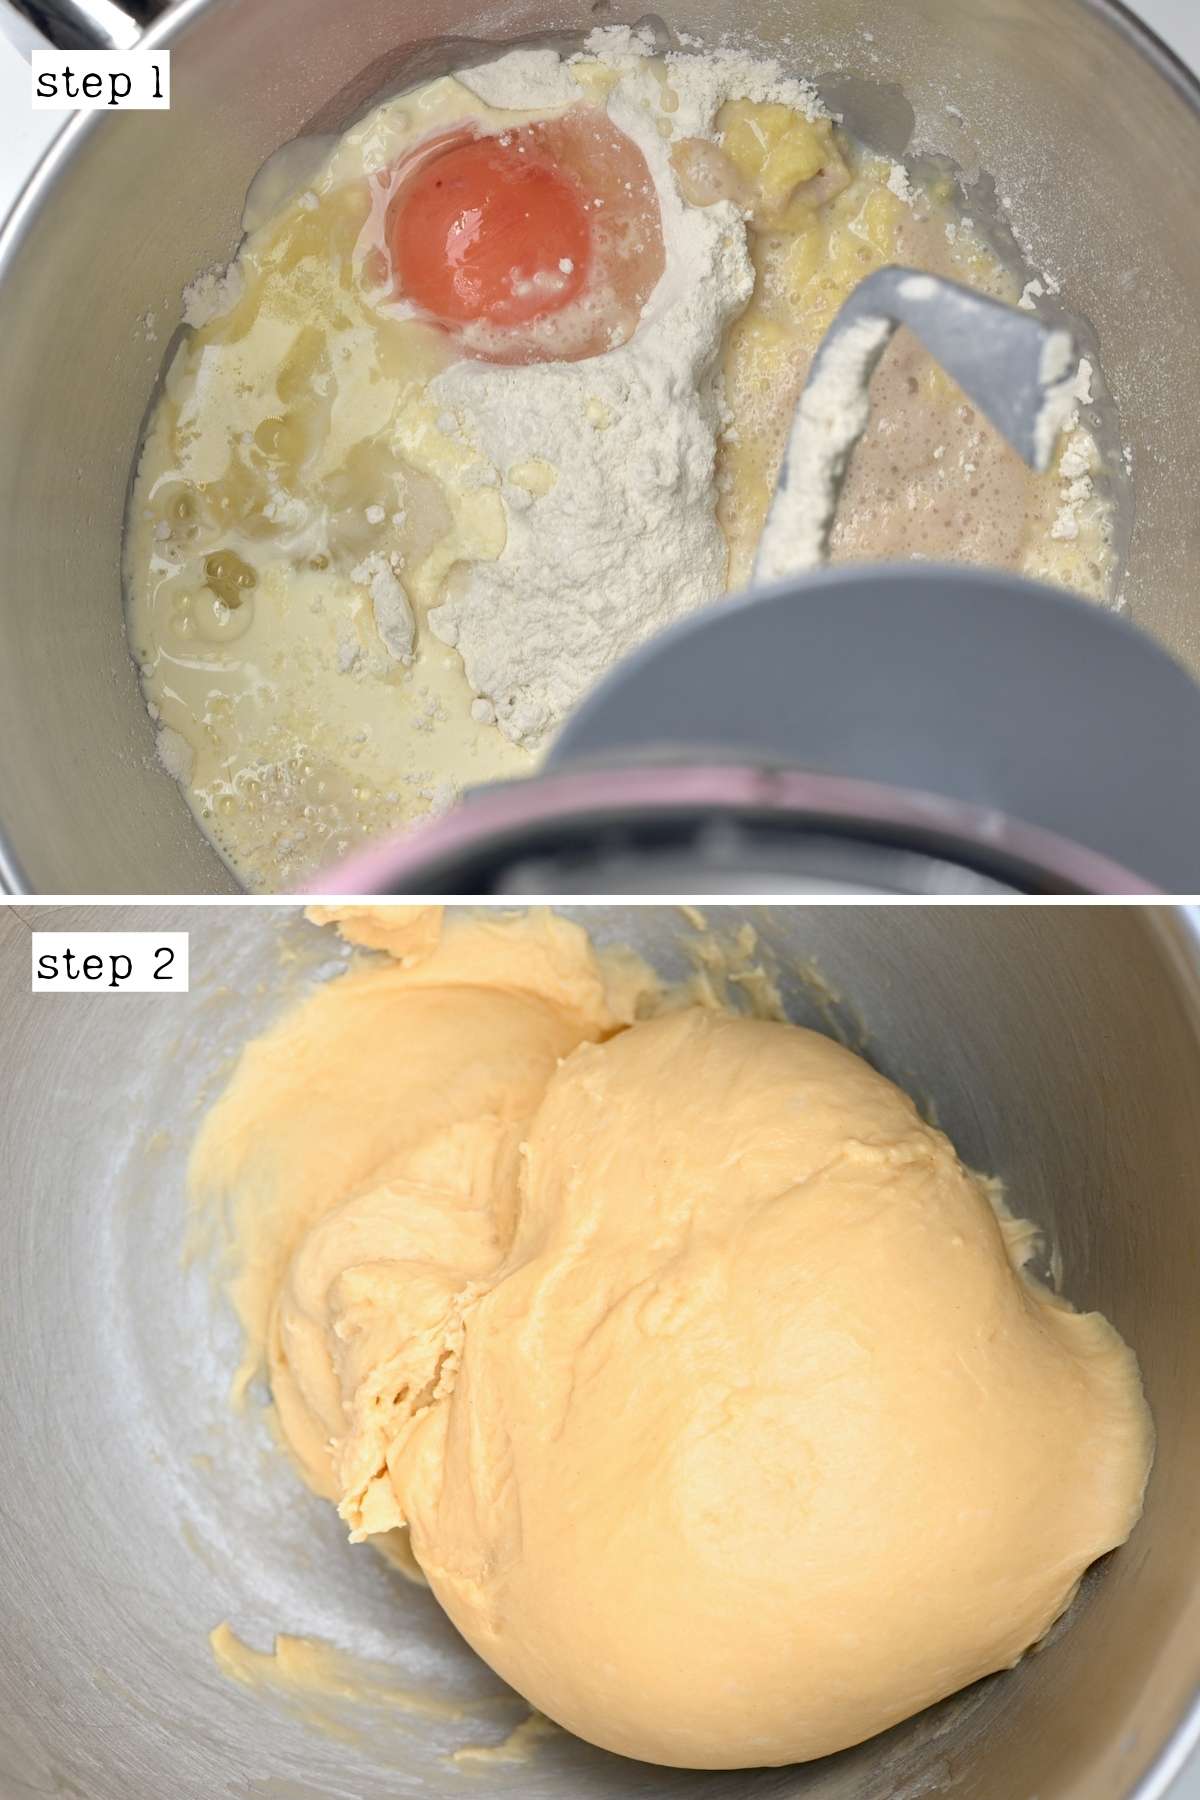
Combine the yeast mixture, flour, salt, egg, and cream in a bowl or the bowl of a stand mixer. Mix into a sticky dough, then knead until smooth. This is a moist dough, so it will be sticky.
By hand, it may need up to 30 minutes of kneading, though I find it takes closer to 15-20 minutes. When it’s ready, the dough should be smooth and velvety.
If you’re using a stand mixer, knead at medium speed for 10-12 minutes with a dough hook attachment. It’ll be ready when you can lift the dough hook and the dough lifts cleanly from the bowl.
Two Methods for Dough Rising
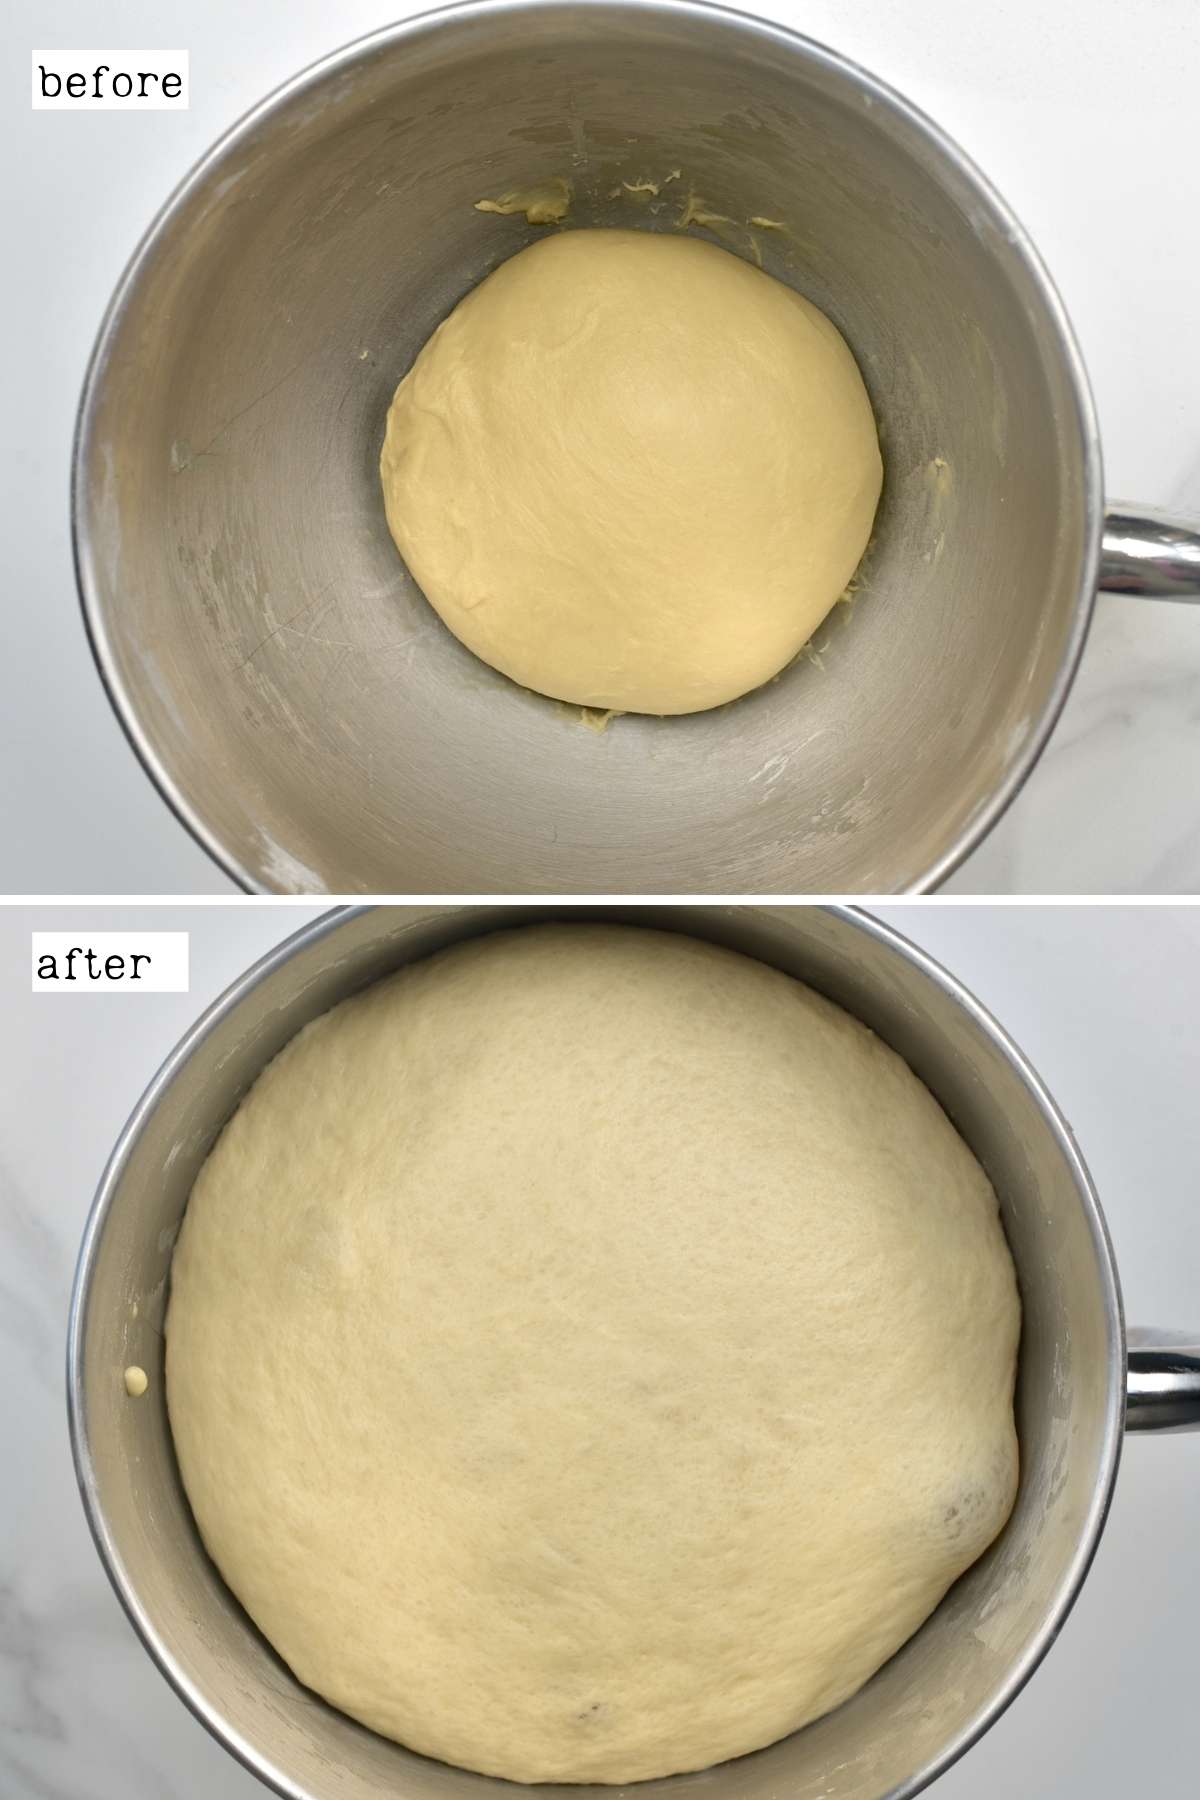
Next, the brioche needs to proof for about 1 hour.
Method One: Leave the dough to rise in the bowl for an hour in a warm location. Keep it well covered with plastic wrap or a kitchen towel.
Method Two: If it’s winter or you live somewhere cold, preheat your oven to its lowest temperature. Switch off the oven, then leave the dough to rise for 30-60 minutes. During this time, it will double (or even triple) in size.
In the meantime, prepare your loaf tin, greasing it with a little oil, butter, or cooking spray.
How to Shape Brioche Dough
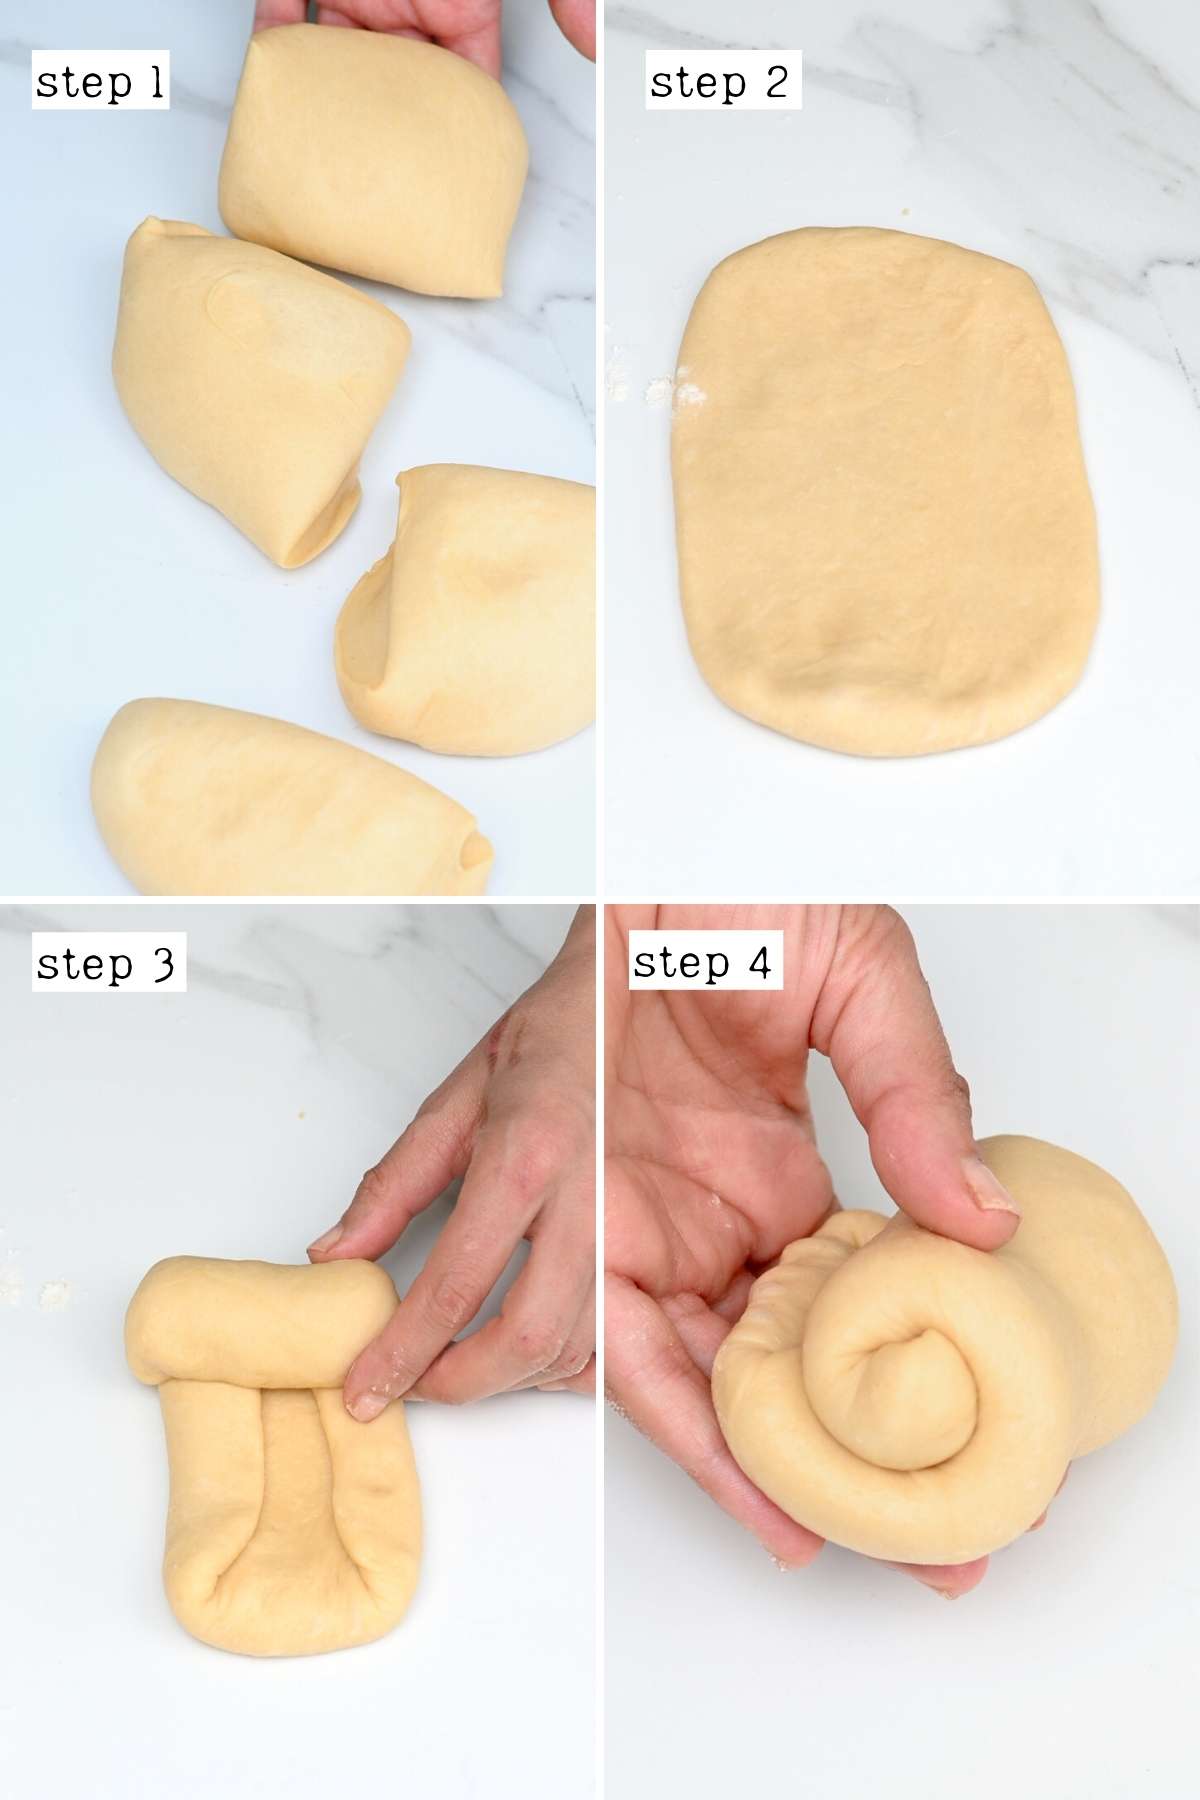
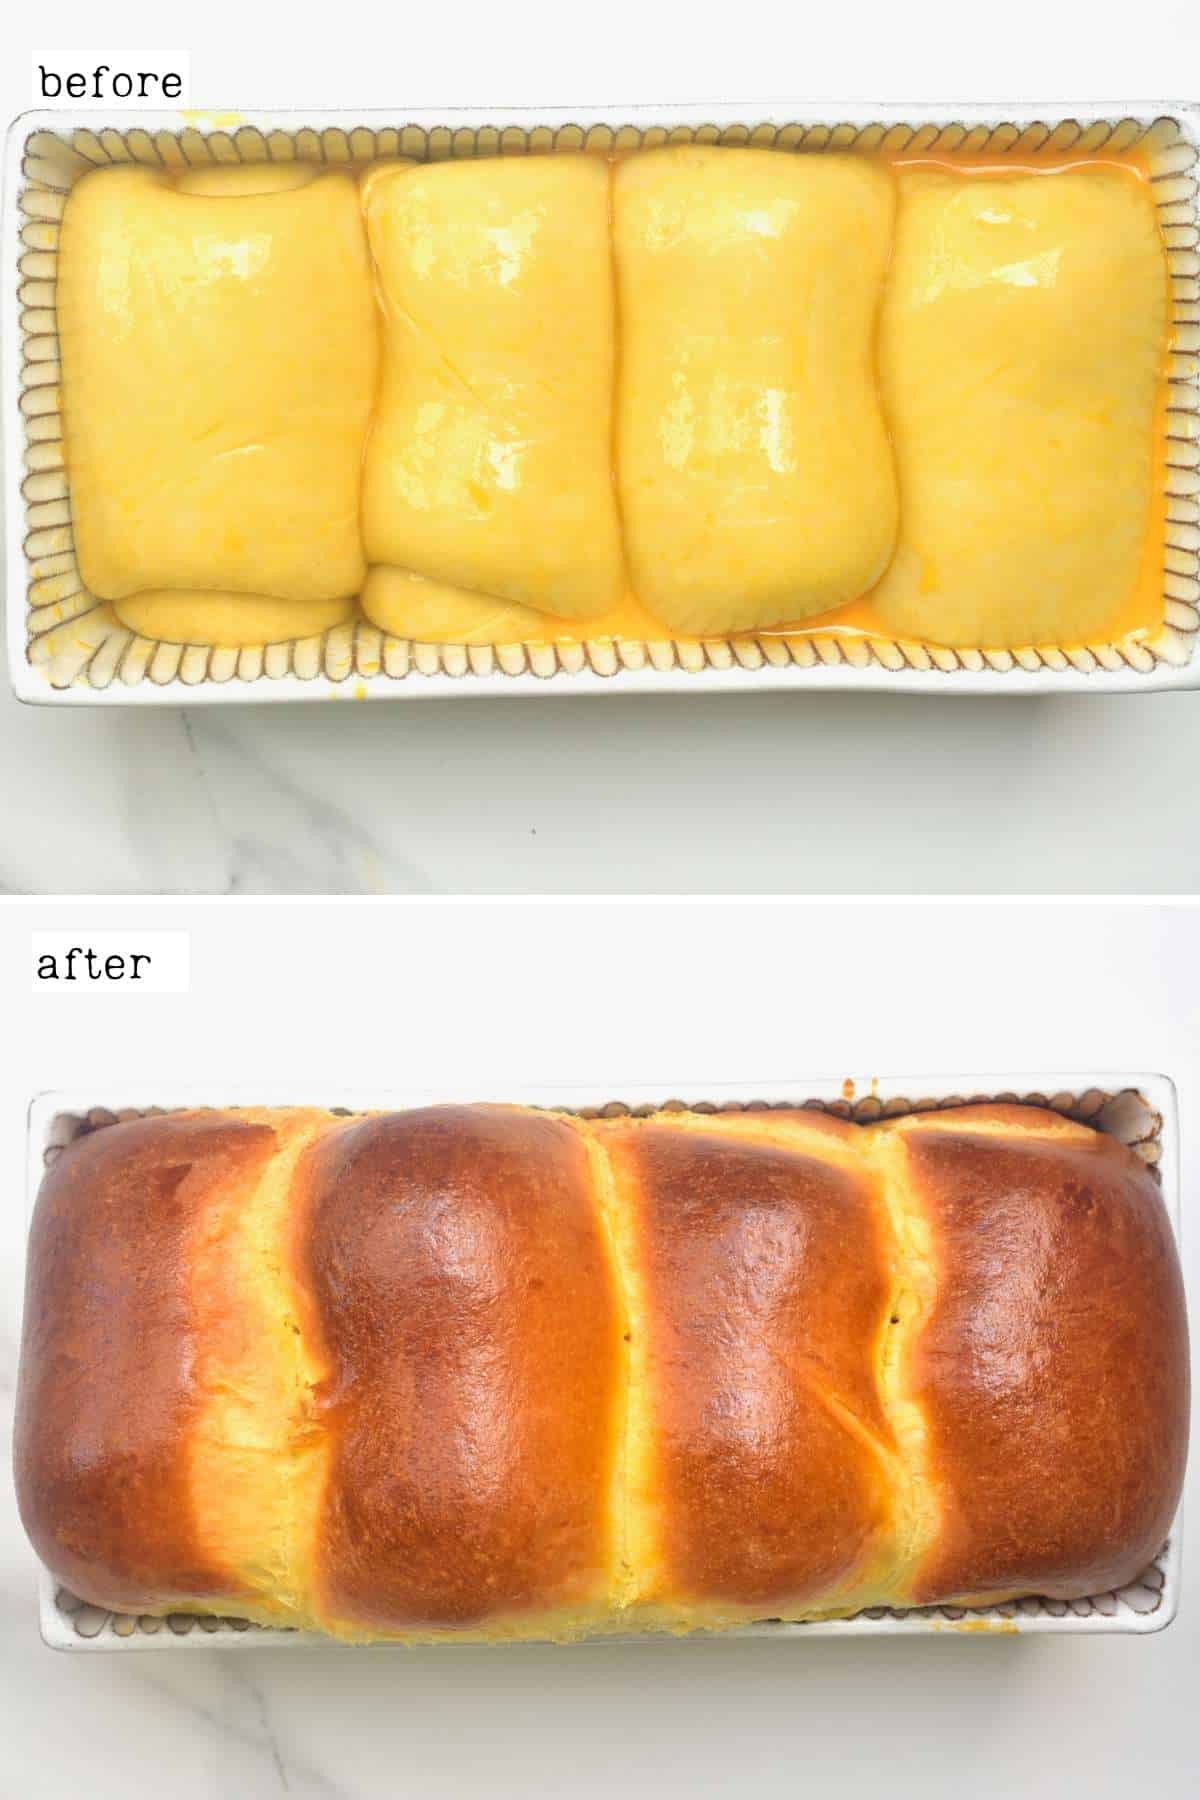
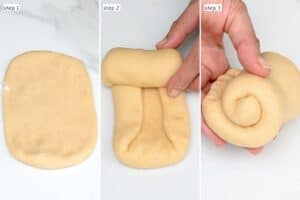
Transfer your dough to a lightly floured surface and cut into four equal pieces. I prefer doing it by eye, but you can measure it precisely with a kitchen scale.
Flatten each piece until it’s a couple of inches wider than your loaf tin and an even thickness. You should have a rectangular piece like the one in the photo below.
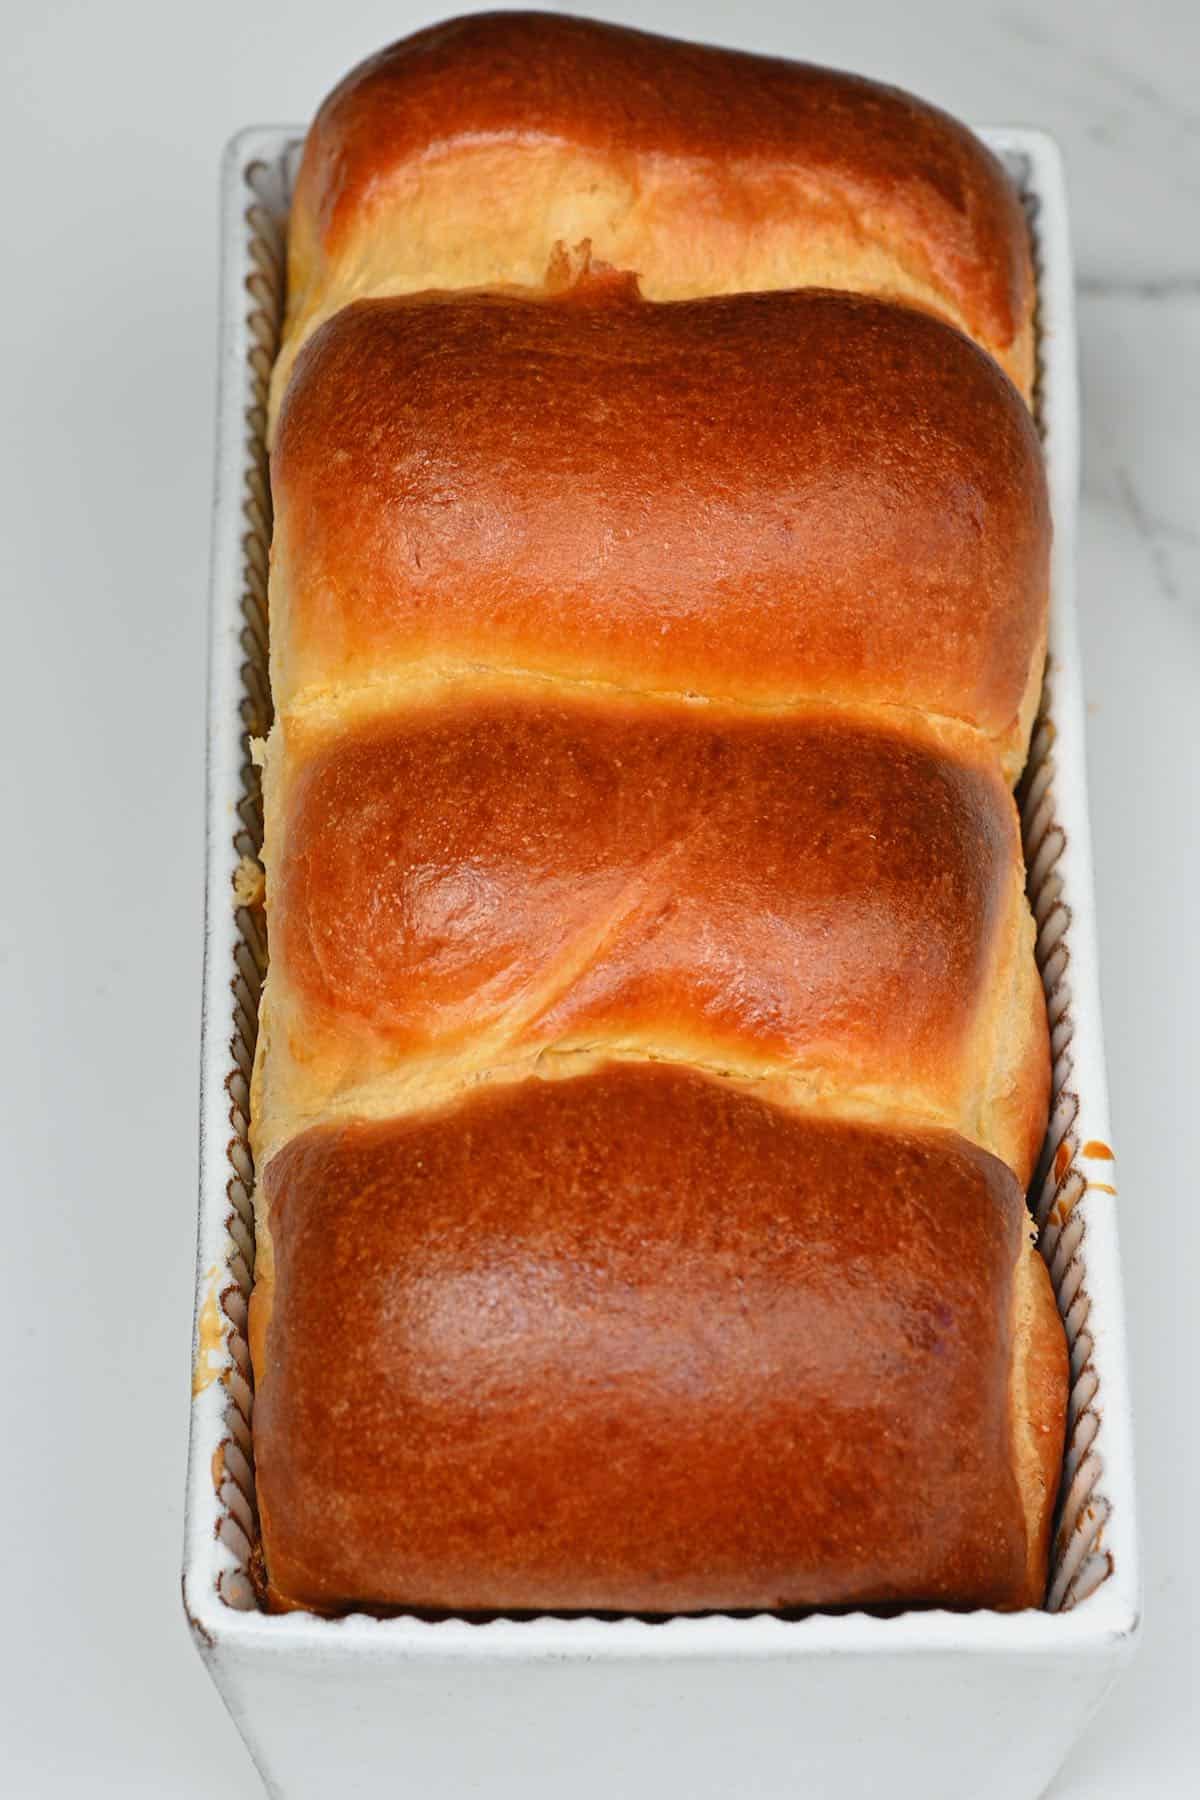
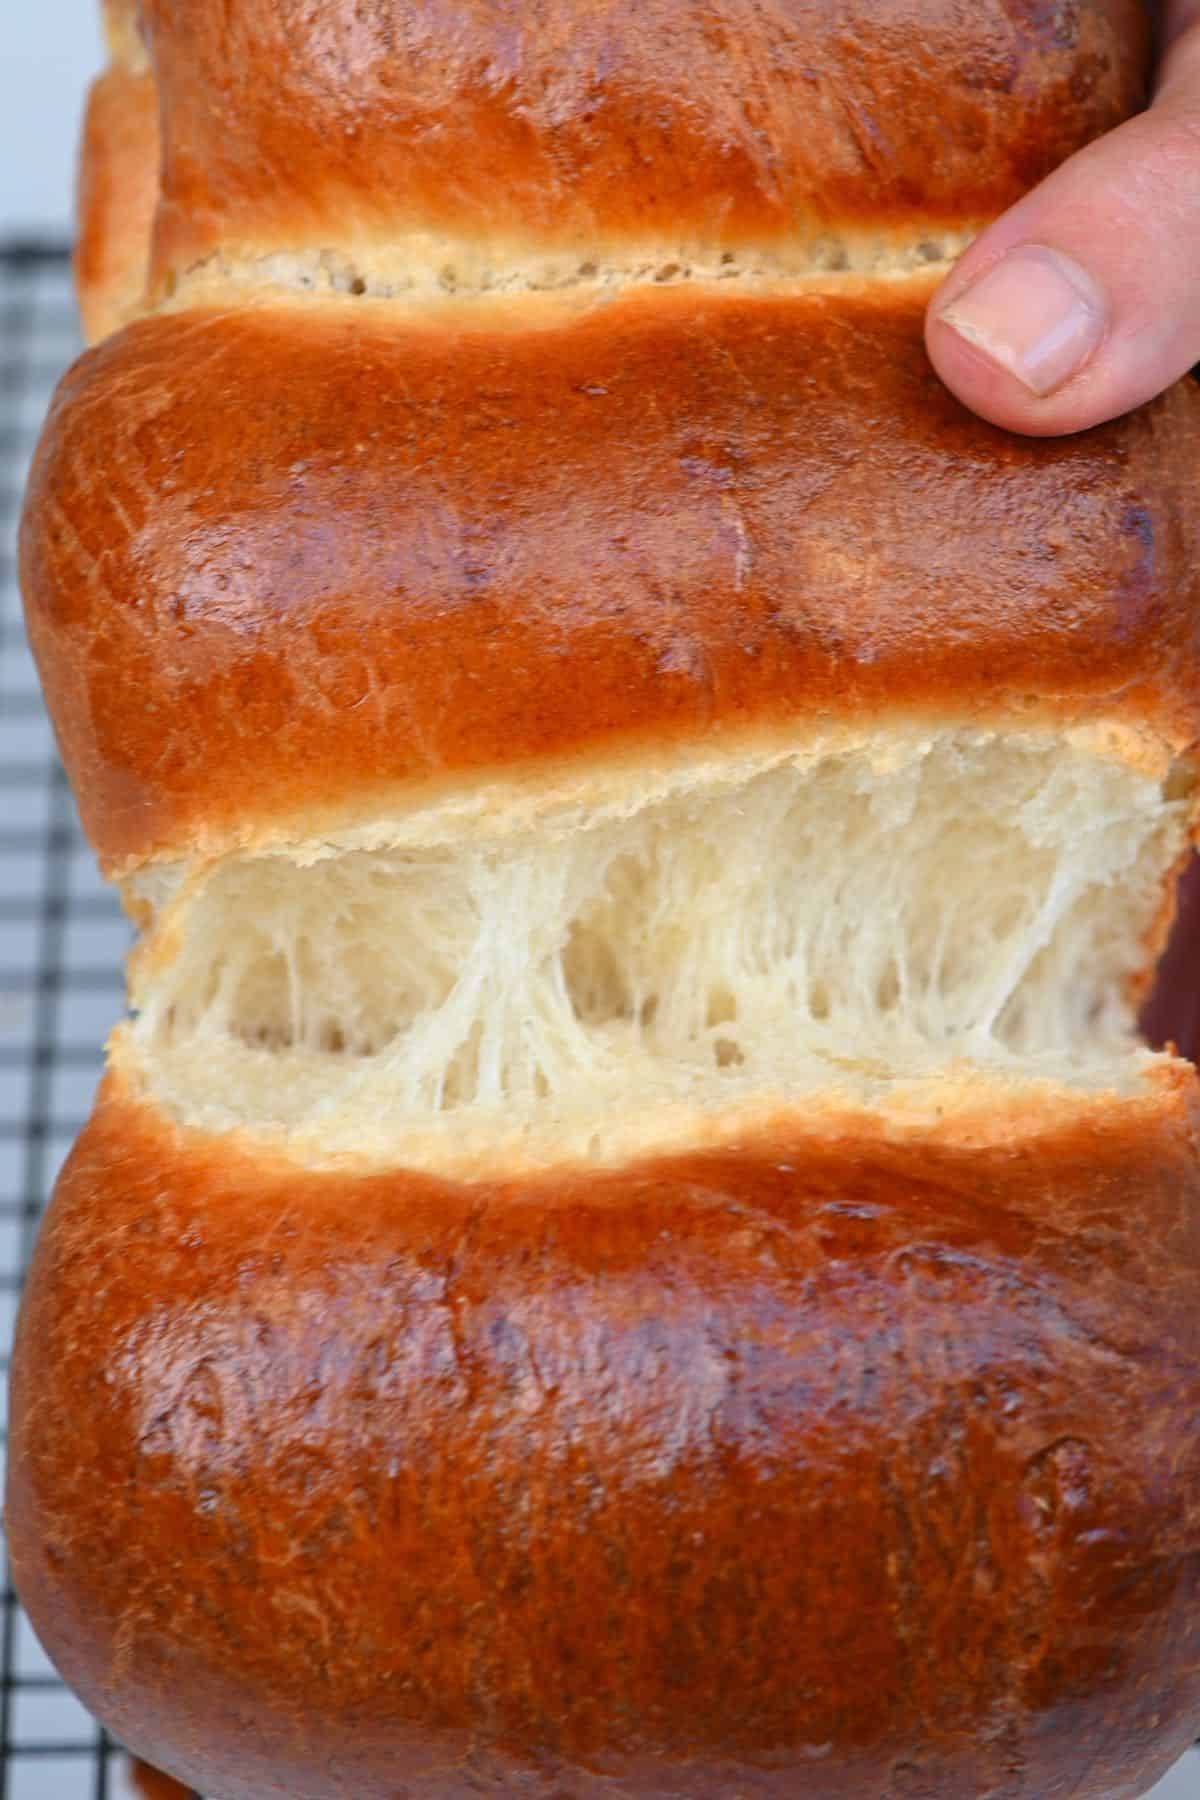
To shape, fold each piece in about an inch on both sides (so it fits in your tin), then roll it up.
Chef’s Tip: Alternatively, you can create a Nantaise loaf. Divide the dough into eight pieces, roll them into small balls, then place those in the tin in two rows.
Or, if you want to make a braided loaf, split the dough into three pieces and roll it into logs the length of the tin. Press the three strands together on one end, braid, and press again on the other end. Tuck in the pressed end and place in the tin.
Getting a Light and Fluffy Brioche with Second Proofing
A second proof will give you the fluffiest brioche bread.
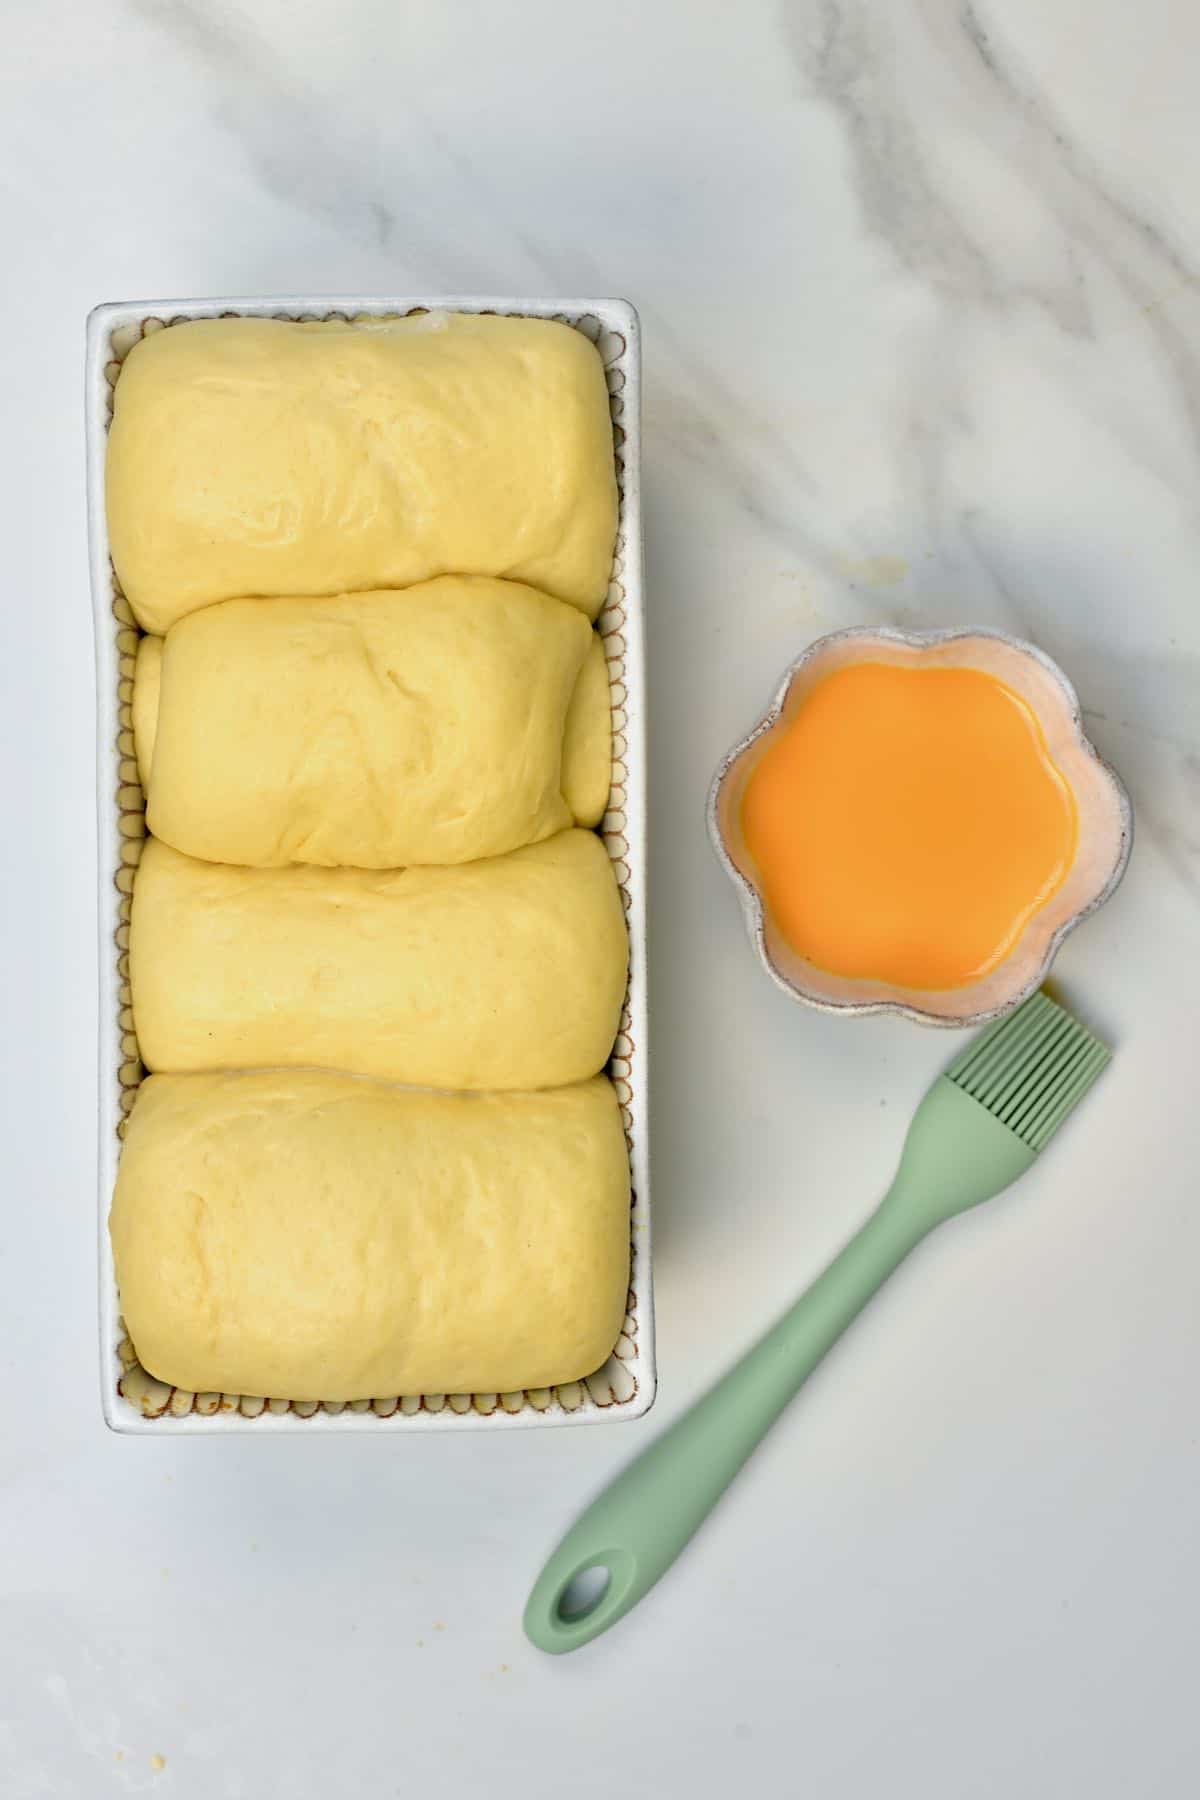
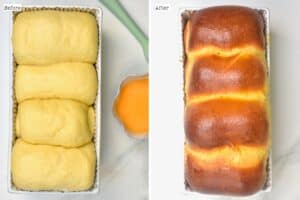
Arrange the four pieces into the tin and brush with a bit of milk or water to stop the dough from drying. Leave to rise again for 30 minutes or until it doubles in size.

Depending on the temperature and climate of your kitchen, this can take up to 2 hours – so keep an eye on your dough. To test, poke one side of the dough. When fully proofed, it should bounce back just a little. If it bounces back completely, it needs more time.
Bake in Oven
Brush the top of the brioche dough liberally with the egg wash (egg and milk) to get a shiny crust.
Bake at 350ºF/175ºC for 25-30 minutes until puffed up and golden brown.
Chef’s Tip: You could also use honey mixed with milk, melted butter, or butter and milk instead of an egg wash – each will change how shiny the bread is.
If it looks like it’s browning too quickly, cover the brioche bread with foil or place a baking sheet on the rack above your tin to stop it from burning.
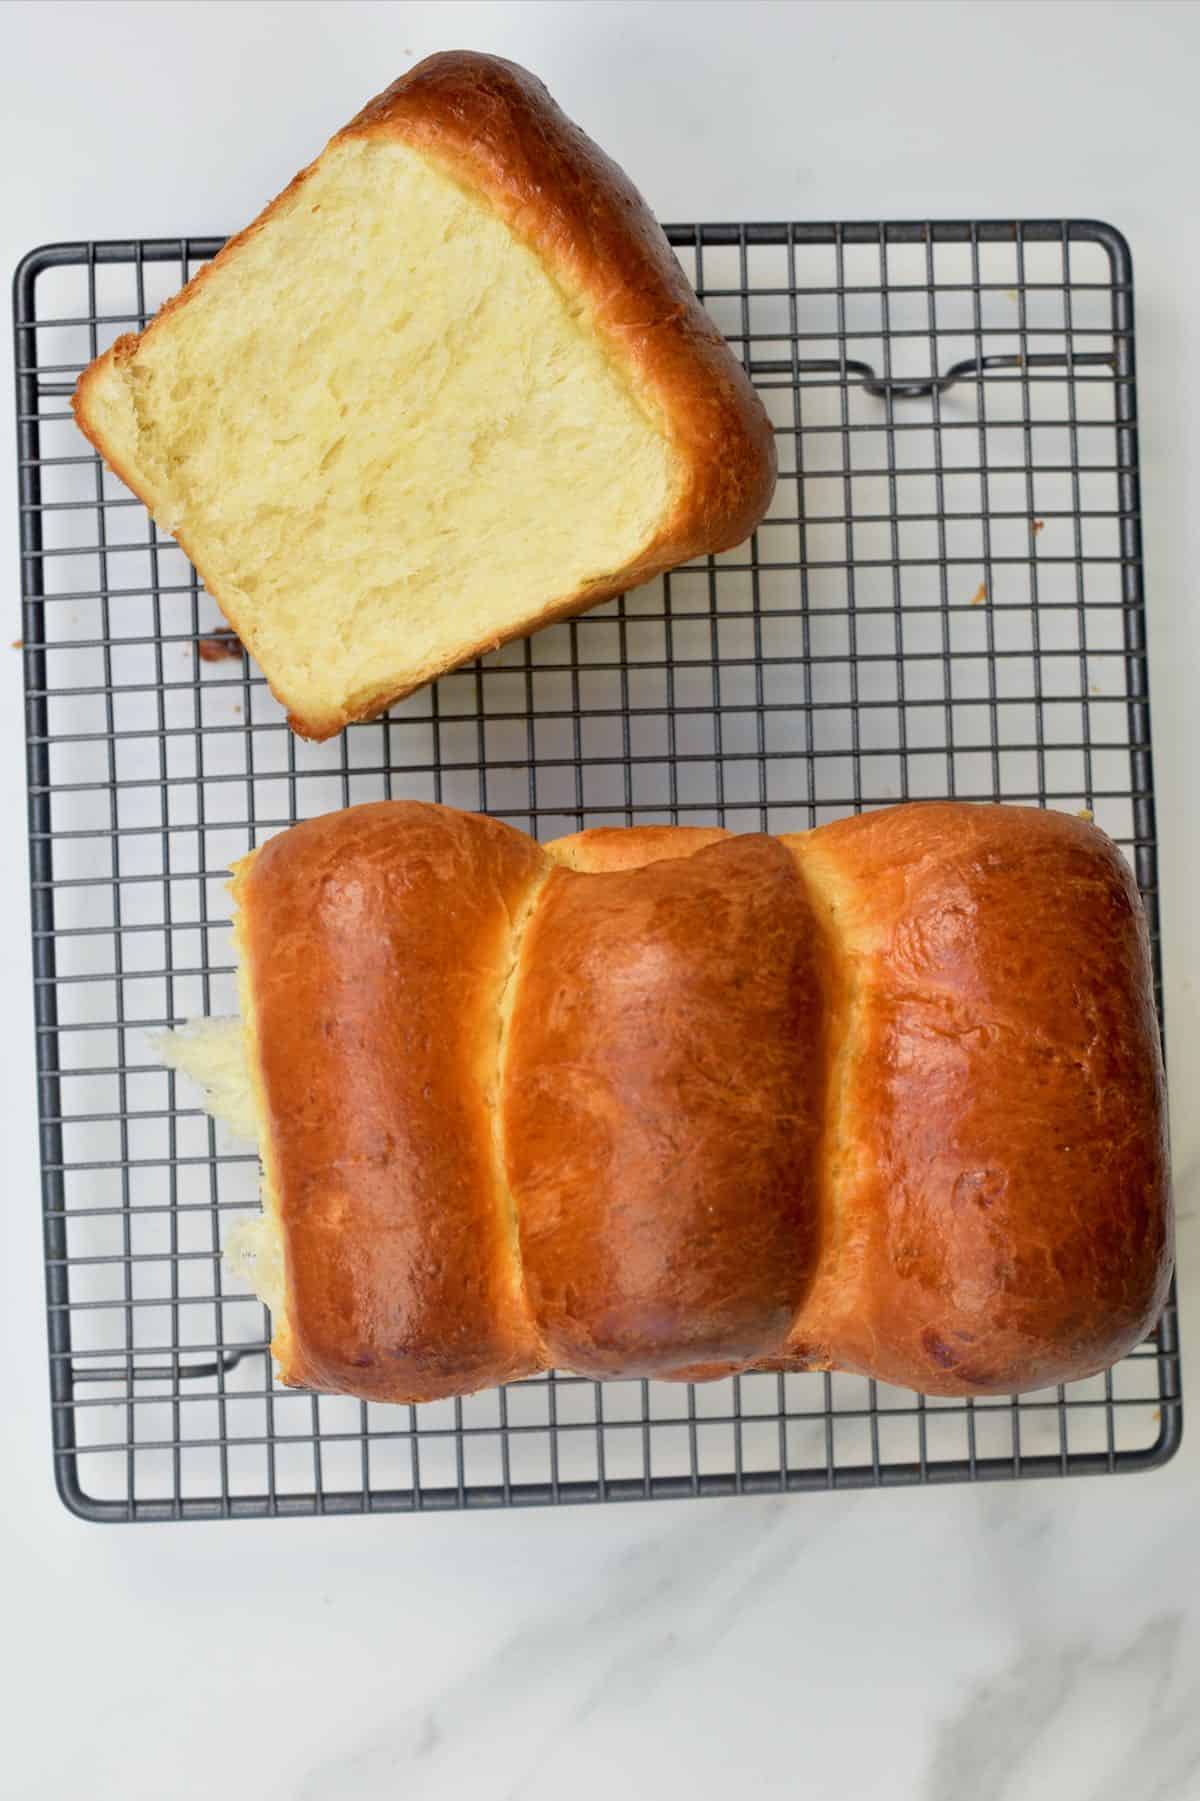
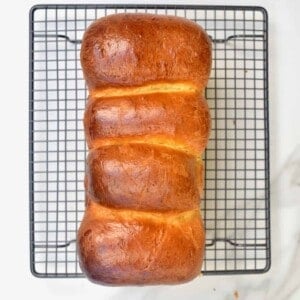
Remove the brioche from the oven and allow to cool fully on a wire rack before slicing or tearing.
Favorite Ways to Enjoy Brioche Bread
I’ve mentioned a few already, but these are some of my top ways to enjoy brioche bread:
- Make pain perdu aka French Toast.
- Toast a slice and slather it with butter, jam/marmalade (I love strawberry jam, blackberry jam, raspberry jam, ginger jam, or rose jam), or homemade Nutella.
- Use it for savory breakfast toast with creamy sauteed mushrooms.
- Use for grilled cheese, Croque Madame, or Croque Monsieur.
- Use for summer pudding or bread pudding.
- Make breadcrumbs or homemade croutons from leftovers.
- Use the dough to make hot dog buns, burger buns, filled pastries, etc.
Storing Tips
Storing: The best way how to store brioche bread is in an airtight container or bag – it’ll last for several days and stays soft for 3-4 days. Alternatively, store it in the refrigerator for up to a week.
Freeze: To freeze baked brioche, wrap tightly in foil while still slightly warm and place in a freezer-safe bag, removing any air. Seal and freeze for up to 2 months.
To defrost, leave it in the fridge overnight to thaw or place the bread in the microwave for a few seconds so it doesn’t get dense.
Can you freeze unbaked brioche dough? Yes, you can. I recommend doing the two proofs and then wrapping the dough tightly in plastic wrap. Then place it in an airtight freezer-safe container/bag for up to two weeks.
Thaw the dough overnight in the fridge and then proof and bake.
Can I Mix and Knead Brioche by Hand
Yes – but, a mixer makes it so much easier. It’s labor-intensive to get the gluten to develop properly and adding the butter slowly makes things very messy! The mixer is my go-to.
Can I Use This Recipe to Make Brioche Buns
Yes! Divide the dough into 6, 8, or 12 pieces (depending on how big you want the buns to be). Roll each piece into a ball and leave to do their second proof on a baking sheet with a couple of inches of space between them, then bake.
More Bread Recipes
If you try this French bread brioche recipe, let me know how it goes in the comments below. I’d appreciate a recipe card rating and would love to see your recipe recreations – tag me on Instagram @Alphafoodie!
Easy Homemade Brioche Bread Recipe
Equipment
- Stand mixer or you can mix and knead by hand
Ingredients
- 12.4 oz flour all-purpose flour, bread flour, or a 50:50 combination
- 1/4 cup heavy cream (double cream)
- 1 egg large
- 1 tsp salt
- 2/3 cup milk
- 2 Tbsp butter unsalted
- 3 Tbsp sugar
- 1/4 oz active dry yeast usually 1 individual packet
Egg wash
- 1 Tbsp milk
- 1 egg or use honey mixed with milk or butter, or simple milk and melted butter mixture
Instructions
Step 1: Activate the yeast
- Melt the butter either in the microwave in 10-15 second increments or over a double boiler.
- Combine the butter, milk, sugar, and yeast and set aside for 5 minutes for the yeast to activate. (See notes below if using instant yeast as it doesn't need activating.)
Step 2: Make the dough
- You can mix the dough manually or with a stand mixer. Combine the yeast mixture, flour, salt, egg, and cream into a bowl (or mixer bowl) and mix into a sticky dough. Then knead until smooth and tacky. This is a moist dough, so stickiness is normal.By hand, it may need up to 30 minutes of kneading, though I find it takes closer to 15-20 minutes. When it's ready, the dough should be smooth and velvety. If you're using a stand mixer, knead at medium speed for 10-12 minutes with a dough hook attachment. It'll be ready when you can lift the dough hook and the dough lifts cleanly from the bowl.
Step 3: Leave the dough to rise
- The dough needs to proof for about 1 hour.Method One: Leave the dough to rise in the bowl for an hour in a warm location. Keep it well covered with plastic wrap or a kitchen towel.Method Two: If it's winter or you live somewhere cold, preheat your oven to its lowest temperature. Switch off the oven, then leave the dough to rise for 30-60 minutes. During this time, it will double (or even triple) in size.
- Towards the end of the proofing time, prepare your loaf tin by greasing it with a little oil, butter, or cooking spray.
Step 4: Shape the loaf
- Transfer the risen dough to a lightly floured surface and cut into 4 equal pieces. You can do it by eye or measure it precisely with a kitchen scale.
- Flatten each piece until it’s about a couple of inches wider than your loaf tin and an even thickness throughout. You’ll end up with a rectangular piece (see image).To shape each piece, fold in about an inch on both sides (so it will fit your loaf tin) and then roll it up.Check the blog post for alternative shapes like Nantaise loaf, braided loaf, or dinner rolls.

Step 5: Second proofing
- A second proof will give you the fluffiest brioche. Arrange the four pieces into the tin and brush with a bit of milk or water to stop the dough from drying. Leave to rise again for 30 minutes or until it doubles in size.This second proof can take up to two hours, depending on the temperature and climate, so just keep an eye on it and try to keep it in a warm location. To test that it’s ready, lightly poke one side of the dough. When it’s ready, it should only bounce back slightly (if at all). If it bounces back completely, it needs more proofing.
- When the brioche looks just about ready, preheat the oven to 350ºF/175ºC.
Step 6: Bake the brioche
- Brush the top of the dough liberally with egg wash (milk and egg) – this will give it a lovely shiny crust.
- Bake in the oven at 350ºF/175ºC for between 25-30 minutes until golden brown and puffed up.If the bread looks like it’s browning too quickly on top, then you can place a baking sheet on the rack above your tin or even cover the loaf with some foil.
- Remove the brioche from the oven and allow to cool fully on a wire rack before slicing or tearing.
How to store
- Store: store it in an airtight container/bag for 3-4 days. Alternatively, store it in the refrigerator for up to a week.Freeze: To freeze baked brioche, wrap tightly in foil while still slightly warm and place in a freezer-safe bag, removing any air. Seal and freeze for up to 2 months. To defrost, leave it in the fridge overnight to thaw or place the bread in the microwave for a few seconds so it doesn't get dense.
Notes
- Test the yeast: if you haven’t baked in a while, it’s always a good idea to check your yeast to make sure it’s still active. Do this by combining a little yeast with water and sugar, then let it rest for a few minutes. If it’s active, it should start to foam and become bubbly.
- If using Instant Yeast: you will need 25% less than active dry yeast (that would be 3/16 oz or 5 g). Also, it doesn’t need activating so you can skip the first step and add those ingredients to the bowl with the rest.
- It’s best to use a stand mixer: while it’s technically possible to make it by hand, it takes much longer – sometimes up to 30 minutes!
- Don’t open the oven door: when baking brioche, it’s important to leave the oven door closed until the loaf has a developed crust and is fully risen. Otherwise, you may end up with a flat loaf.
- Vanilla: scrape the seeds of a vanilla pod into the dough when mixing.
- Extra sugar: if you want a sweeter loaf, feel free to add in a little extra sugar – just be careful, as extra sugar will also make the dough slacker.
- Orange zest: you can then make fresh orange juice with the oranges.
- Poppy seeds: sprinkle over the egg-washed bread before baking.
- Dried fruit: like raisins, sultanas, apricots, etc. Soaked in hot water or even rum.
- Chocolate: chocolate chips are an easy (and delicious) addition. I recommend adding chocolate chips AND orange zest.
- Cinnamon: add some directly into the dough or sprinkle a pearl sugar and cinnamon mix over the loaf before baking.
- Glaze: if you’re making a sweet brioche, feel free to create a simple glaze to drizzle over the baked loaf. Combine powdered sugar with a bit of milk and lemon juice until it reaches the desired consistency.
Nutrition
Nutrition information is automatically calculated, so should only be used as an approximation.


I made this bread yesterday and it came out absolutely perfect! So excited. Thanks!
Hi Sharon! Perfect brioche on the first go, that’s wonderful! 😊 So happy it came out beautifully. Thanks for sharing, and happy baking!
The flour measure by cups please
Hi Mary,
It’s much more precise to weigh the flour instead of using a cup. 12.4 oz of flour is a little more than 2 3/4 cups. I hope this helps.
What size pan??? It’s not listed anywhere. I don’t want to just assume 9×5! Please update your recipe with the info as well.
Hi Georgianne,
I recommend using a pan sized 8.5 x 4.5 in. I hope this helps.
This is my second time making it! I did a double batch and made one loaf and some buns. They all came out great. Thank you for sharing.
Hi Melanie! Thank you so much for commenting. Glad to hear you enjoyed the brioche! Happy baking! 🙂
I used this recipe in my gcse cooking exam, it was the bread base of my croque madame. my exam assessors loved it! and trust me, they have high expectations. i loved it too, so much i took the leftovers home.
This is amazing, Charlotte! Thank you for using this recipe, and congratulations! <3
This recipe was so clear and on point! Bread came out beautiful and yummy. You really broke it down. Thank you. I added honey to the egg and milk wash, just because. Excellent!!
Thank you for your comment, Okechukwu. Glad you liked the recipe!
Can you tell me why you form the loaf in the four different pieces. It looks like it comes together in the bake to make only one loaf.
Hi Mary,
Shaping the dough into smaller pieces and allowing them to rise together creates a pull-apart style loaf, where each segment remains incredibly soft and airy. I hope this helps.
Hello. I’m planning to make this real soon but had a question. Should the milk be heated before mixing with the yeast, sugar, etc.? Thanks.
Hi Robert,
It’s best if the milk is at room temperature. As the melted butter might be too warm, the rest of the ingredients will bring its temperature down. The optimum temperature for the yeast would be 100ºF/38ºC. I hope this helps.