
This post may contain affiliate links. Please read our disclosure policy.
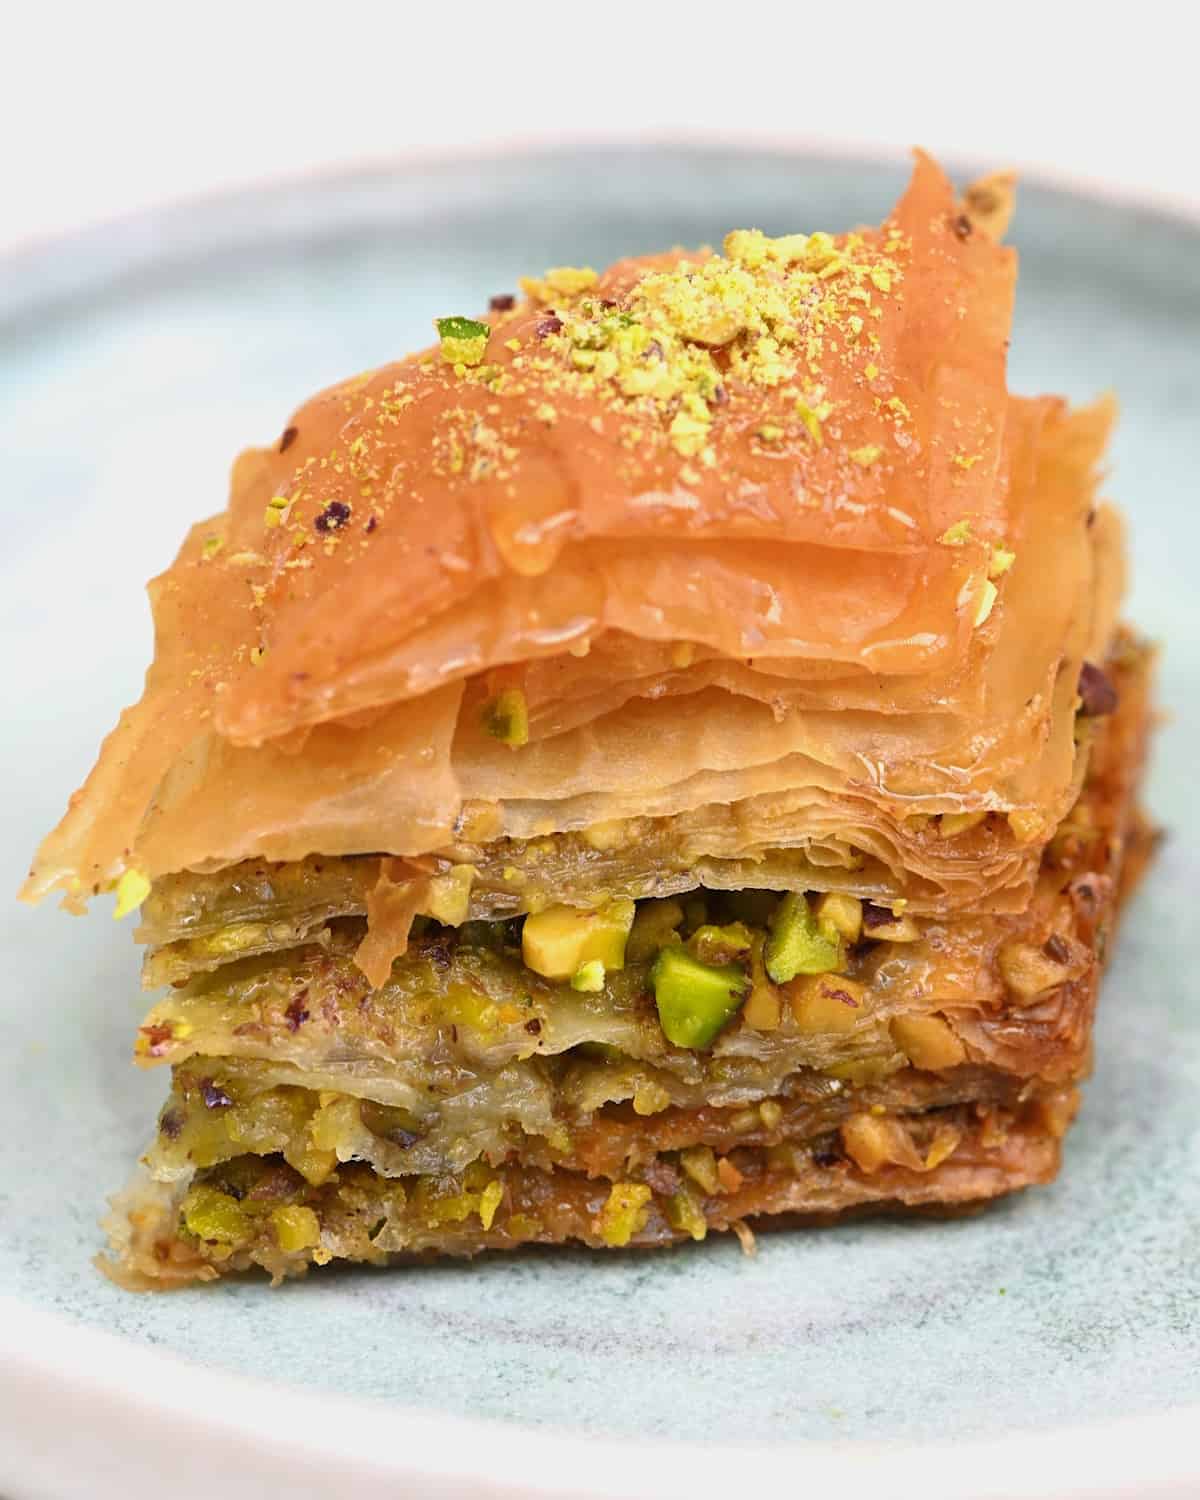
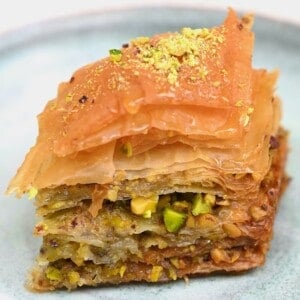
My easy homemade baklava recipe combines buttery, honey-soaked layers of flaky phyllo pastry with an appetizing nut filling – a crispy dessert everyone will love! Including top tips and step-by-step photos and video.
Baklava (sometimes spelled baklawa or baklava) is a type of pastry made of layers of chopped nuts and flaky phyllo pastry soaked in sweet syrup. It dates back to the Ottoman Empire and is linked to Turkey, Greece, and Persian countries. Nowadays, it is a popular dessert enjoyed in Arab, Bulgarian, Greek, Iranian, and Turkish cuisines, as well as across the Balkans and Central Asia.
I love the baklava recipe I grew up with in Lebanon—it’s filled with crunchy pistachios and is flavored with delicate orange blossom water. It was always so fun to prepare it together with Mom and my sisters. It’s the best snack for a sunny day, along with date-filled cookies and refreshing mint lemonade.
While it might sound complicated to make, my detailed step-by-step instructions will show you exactly how to prepare this delicious recipe. It is the ultimate filo pastry for a sweet tooth and is also perfect for holidays and special occasions.
Want to save this recipe?
Watch how to make baklava
Ingredients
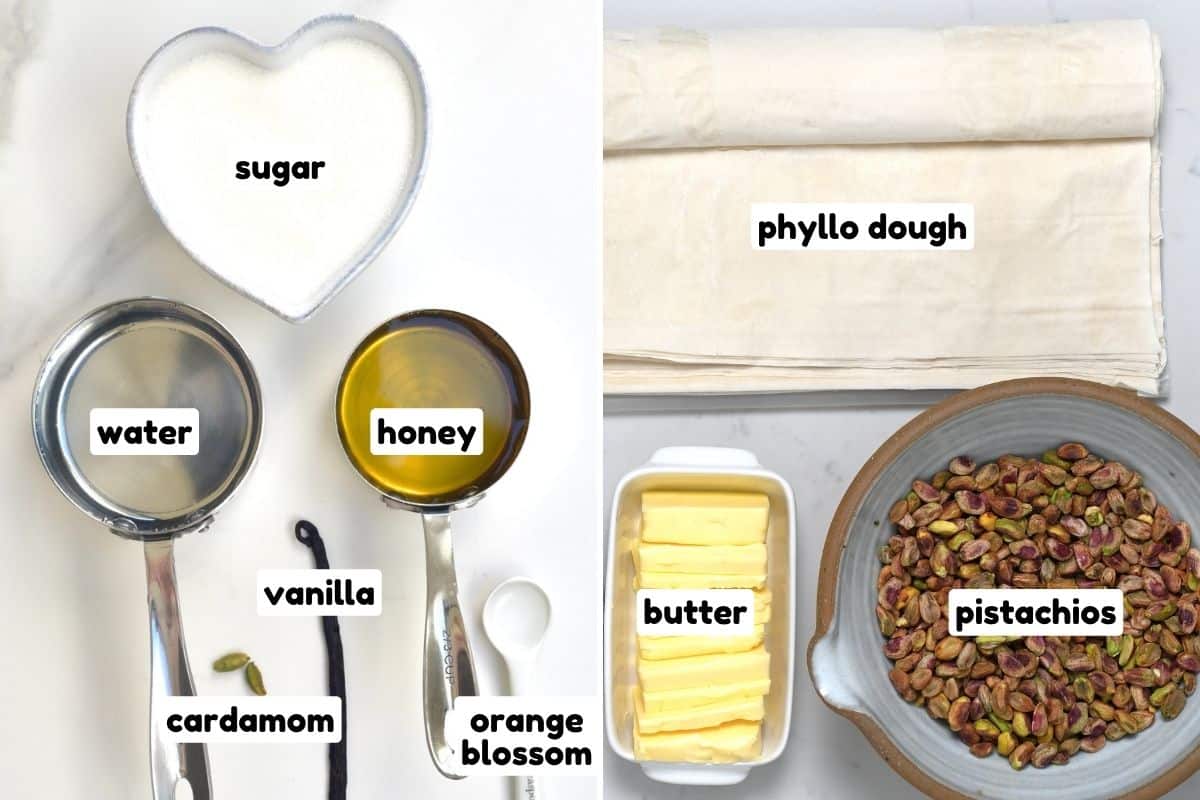
- Phyllo dough: Use pre-made phyllo to save time and effort. You can use frozen phyllo dough as well (found next to pie crust packs in the freezer section).
- Nuts: I use fresh green pistachios that have already been de-shelled. You can also use walnuts, cashews, or a mix of nuts. Buying nuts in bulk can help to keep the cost down.
- Butter: I love the richness of butter, but if you like the nuttier flavor, homemade ghee is perfect. It browns evenly, and there’s less of a risk of burning it.
For the syrup:
- Sugar: Regular white sugar is best.
- Honey: I love combining sugar and honey for added rich depth. If you’d prefer to omit the honey, make extra simple syrup following my recipe (1:1 ratio).
- Water.
- Cardamom: For a subtle but delicious flavor.
- Vanilla: Use a high-quality vanilla pod, though natural vanilla paste/extract will work too.
- Orange blossom: (or rose water) For a wonderfully fragrant yet subtle floral note.
- Lemon juice: To cut through the sweetness.
How to make baklava
Make the Syrup: First, combine the sugar and water in a medium-large saucepan. Heat it over medium, stirring often until the sugar is almost melted. Then, add the lightly crushed cardamom, vanilla pod (cut in half lengthwise; you can also scrape the seeds into the pot), and a squeeze of lemon juice. Bring to a boil.
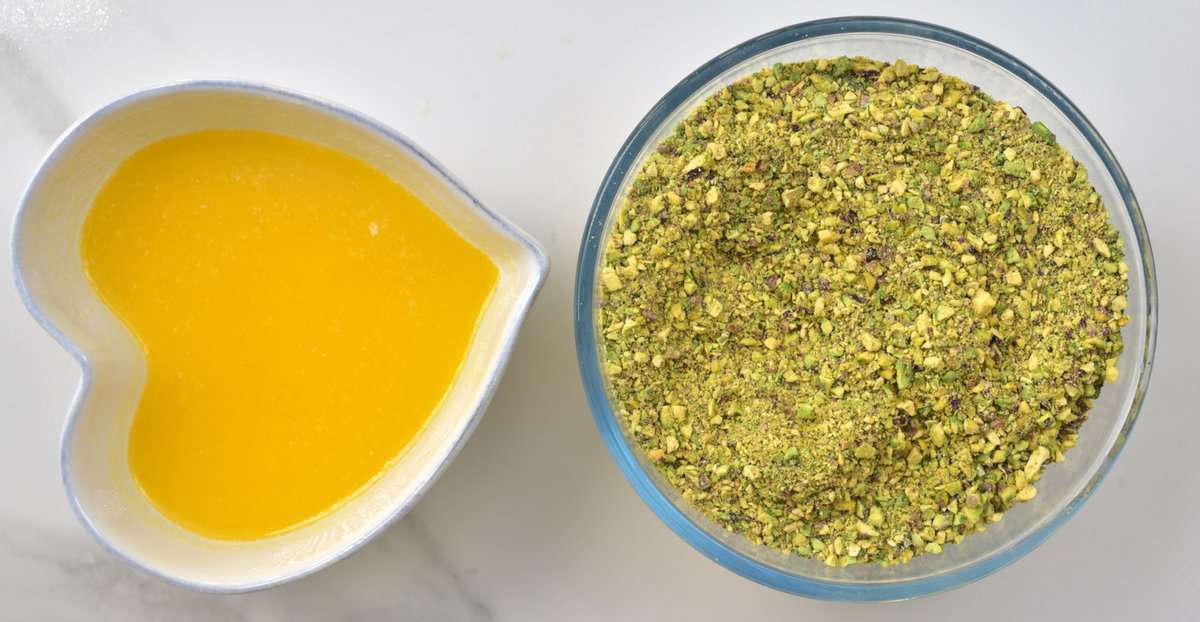
Next, remove the pot from the heat and stir in the honey and orange blossom (or rose water). The consistency should be like maple syrup. Allow the liquid to cool for 10 minutes before straining out the solids. Then, set it aside to cool completely.

Prepare the Other Elements: Transfer the pistachios (or your nut of choice) to a food processor and process them to a medium-crumb consistency – you need 4 cups of them. Melt the butter in a microwave-safe bowl or a saucepan on the stovetop over medium-low heat.
Prepare the Phyllo Dough: If working with frozen dough, make sure to thaw it following the package instructions. Usually, it’s best to thaw in the fridge for 12-14 hours.
Then, cut the phyllo pastry to fit your pan – I used a 9×13-inch baking pan (23x33cm), though round pans will also work. You need 33 layers in total. Store-bought phyllo here tends to come in sheets of 14×18 inches. So, I cut them in half and trim the extra inch. Keep the phyllo sheets under a damp towel so they don’t dry out.
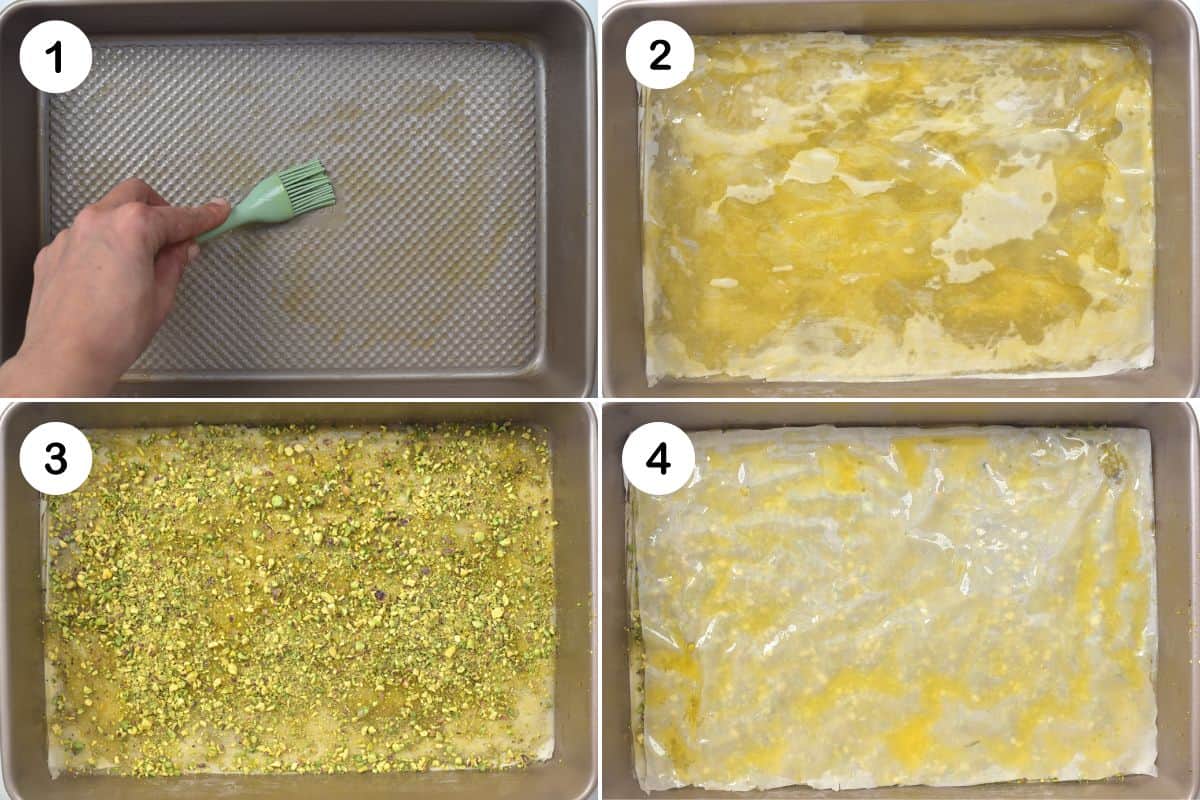
Assemble the Baklava: Start by brushing the bottom of the baking pan with a bit of the melted butter. Then add 8 sheets of phyllo pastry one at a time, brushing each with a thin, even layer of butter. Add ½ cup of the ground pistachios, spreading them evenly across the pastry. Then, alternate between 3 butter phyllo sheets and nut mixture until you use all the ingredients. The final layer on top will have 4 buttered phyllo sheets.
The arrangement of the baklava layers should look like this:
- Bottom: 8 buttered phyllo sheets, 1/2 cup pistachios
- 3 buttered phyllo sheets, 1/2 cup pistachios,
- 3 buttered phyllo sheets, 1/2 cup pistachios,
- 3 buttered phyllo sheets, 1/2 cup pistachios,
- 3 buttered phyllo sheets, 1/2 cup pistachios,
- 3 buttered phyllo sheets, 1/2 cup pistachios,
- 3 buttered phyllo sheets, 1/2 cup pistachios,
- 3 buttered phyllo sheets, 1/2 cup pistachios
- Top: 4 buttered phyllo sheets (remember to butter the top, too).
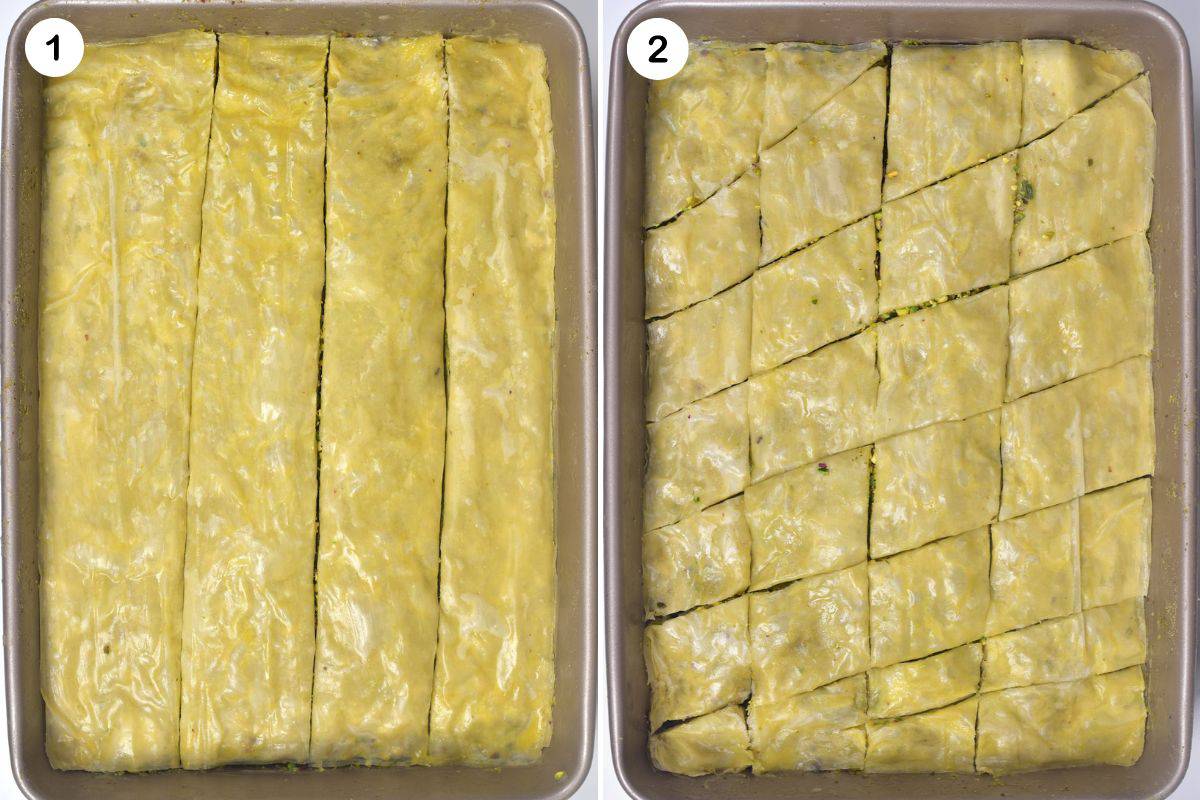
Cut the Baklava: Preheat the oven to 325ºF/165ºC fan-assisted. To make diamond shapes, first, make straight, parallel cuts lengthwise (across the 9-inch part of the pan). For large, even-sized pieces, I recommend spacing them every 2.25 inches. Make three cuts in total, and you will have four long sections of baklava. For smaller pieces, I recommend making four cuts instead, every 1.8 inches apart.
Then, slice diagonally across the baklava at equal intervals (2.25 inches for larger pieces or 1.8 inches for smaller ones). Not all the edge pieces will be similar in size. That’s normal – if you want more even pieces, cut squares or triangles instead.
For square/rectangular pieces: Cut the lines vertically and then horizontally, rather than diagonally, at equal intervals.
For triangular pieces: Cut the pieces into larger rectangles/squares. Then, slice diagonally through the squares to cut them each into two separate triangles.
Bake the Baklava: Transfer the tray to the middle shelf of a preheated oven and bake for about one hour at 325ºF/165ºC fan-assisted. Check it at the 30-minute mark, and if it browns on top too quickly, tent the pan with foil. When ready, this baklava dessert should be golden-brown and crispy throughout every layer of pastry.
Pour Over The Syrup: Immediately after removing the pastry from the oven, pour the fully cooled liquid evenly over it. It will sizzle – that is normal!
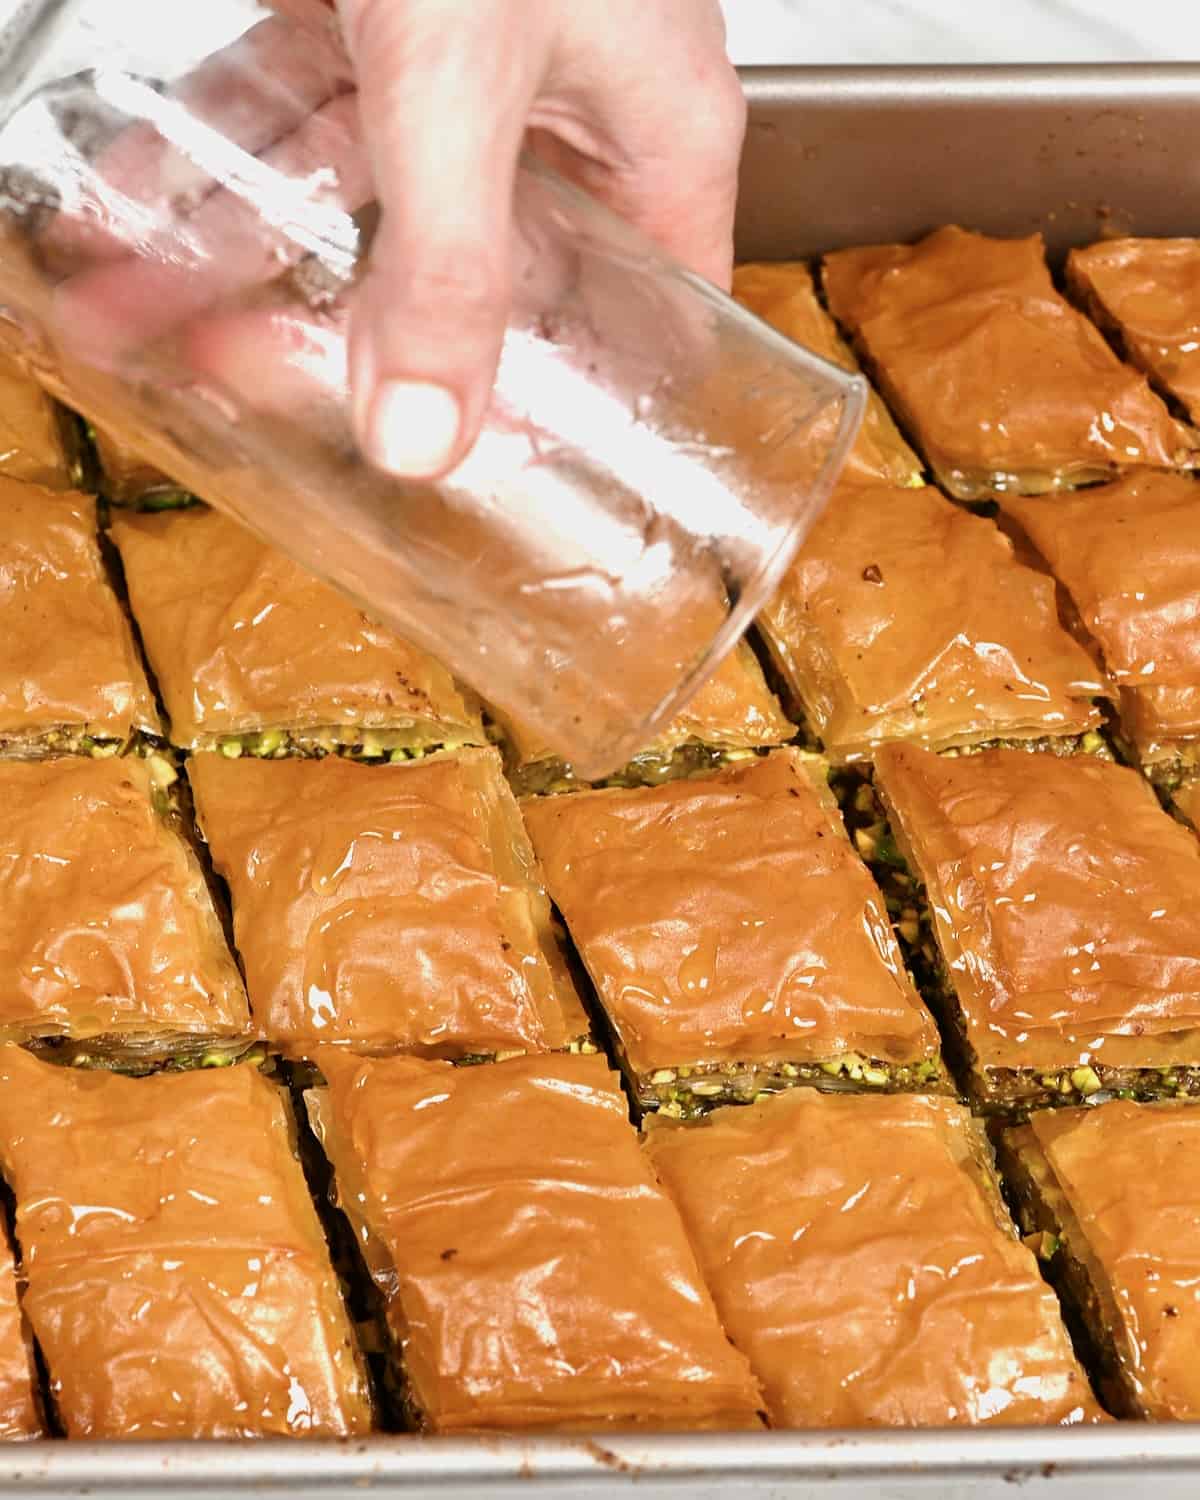
Then, set the pistachio baklava aside to cool down and absorb the liquid for 6 hours (overnight is even better). Optionally, garnish it with extra chopped nuts or a drizzle of melted chocolate.
Top baklava tips
- Use a sharp knife to cut through all the layers easily. For even pieces, use a ruler. Otherwise, free-hand it. The space between the cuts will determine how big or small the pieces are.
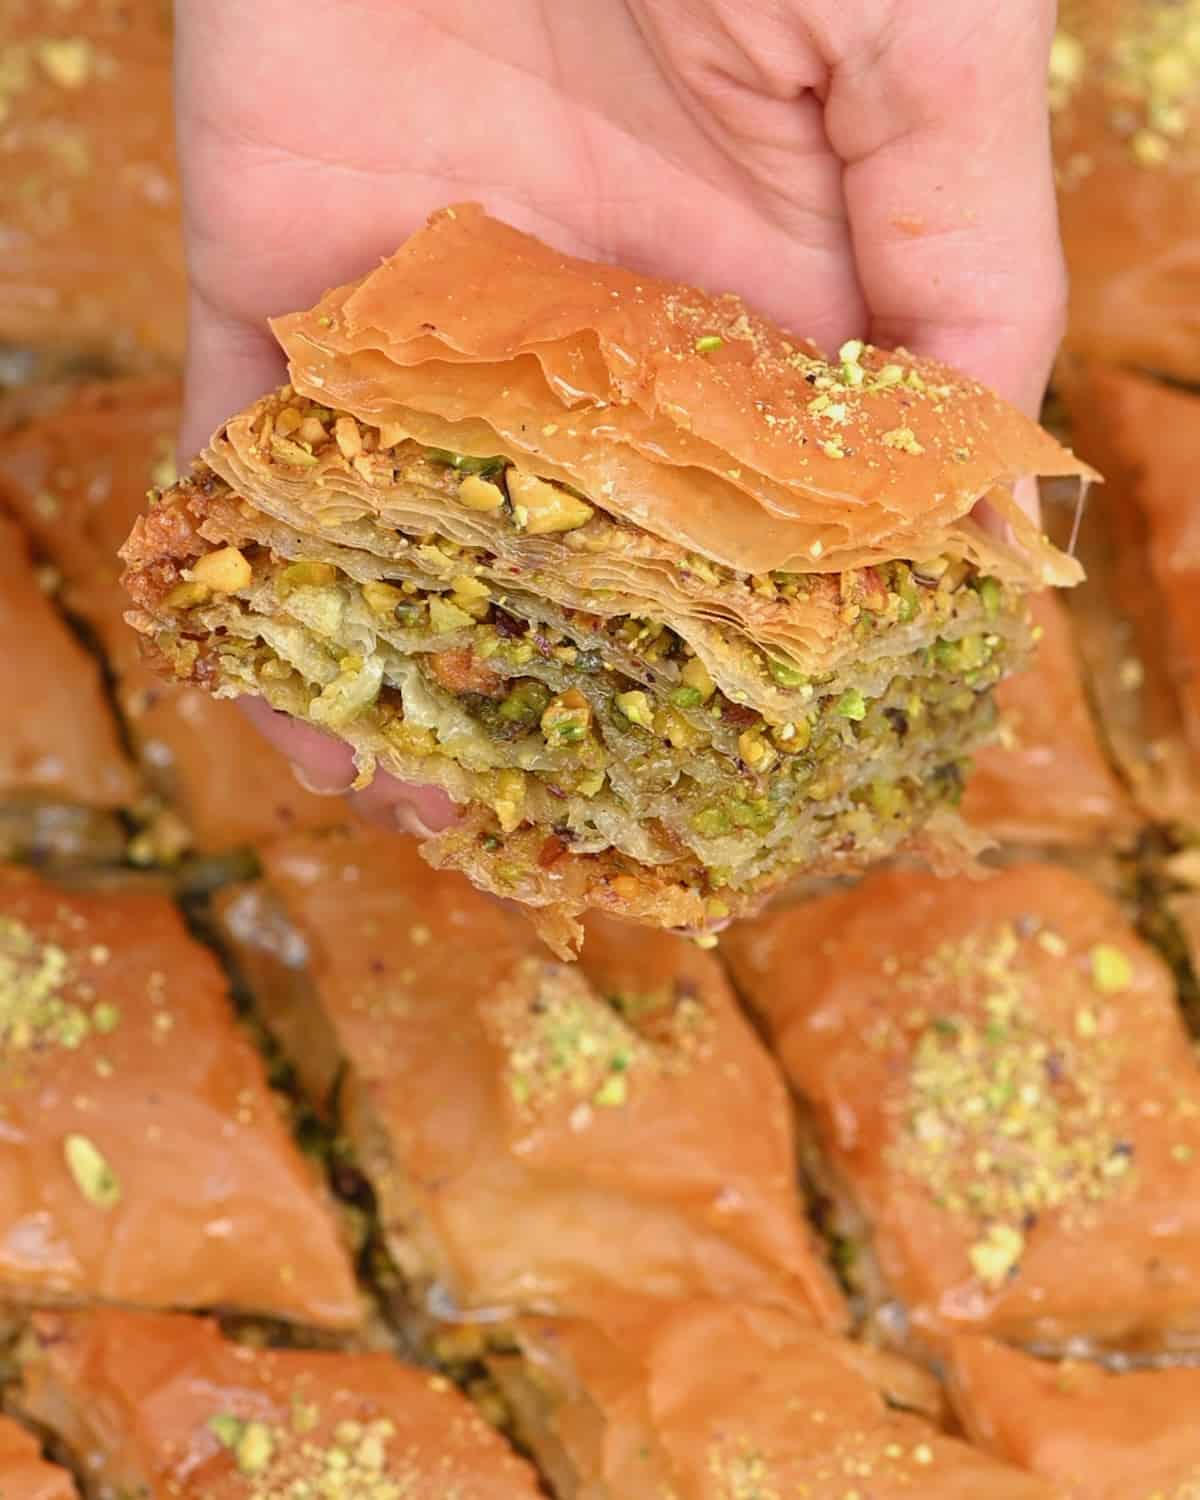
- Crispy but well-soaked: This is the key to perfect baklava. The pastry should remain crispy on top (and when you bite into it). It should also be thoroughly soaked in the sugar-honey mix, but not pooling out the bottom or dripping.
- Buttery: The best baklava should have a subtle buttery smell/taste. However, be careful not to use too much, or you’ll end up with soggy baklava.
- Use cold syrup: To avoid soggy baklava, use completely cooled liquid on hot pastry.
More sweet treats to try
If you try this pistachio baklava recipe, let me know how it goes in the comments below. I’d appreciate a recipe card rating and would love to see your recipe recreations – tag me on Instagram @Alphafoodie!
The Best Baklava Recipe
Ingredients
- 14 oz phyllo pastry sheets (filo) needed 33 sheets or more
- 10 oz butter or ghee/clarified butter
- 4 cups pistachios crushed, or other nuts like walnuts, cashews, hazelnuts, etc.
For the sugar syrup
- 1 cup sugar
- 1 cup water
- 2/3 cup honey OR make 2/3 cup more simple syrup
- 1/2 tsp orange blossom or rose water
- 2 cardamom pods optional
- 1/2 vanilla bean optional
- 1 tsp lemon juice
Instructions
Make the syrup
- Combine the sugar and water in a medium-large saucepan and heat it over medium, stirring often, until the sugar is almost melted.
- Add the lightly crushed cardamom, vanilla pod (cut in half lengthwise; you can also scrape the seeds into the pan), and a squeeze of lemon juice. Bring the mixture to a soft boil until the sugar has completely melted.
- Remove from the heat and stir in the honey and orange blossom (or rose water). The consistency should be like maple syrup.
- Allow to cool for 10 minutes before straining out the solids. Then, set it aside to cool completely.
Prepare the other elements
- Transfer the pistachios (or your nut of choice) to a food processor and process them in a medium-crumb consistency. You need 4 cups of ground nuts.
- Melt the butter in a microwave-safe bowl or a saucepan on the stovetop over medium-low heat.
- If working with frozen dough, thaw it following the package instructions.
- Cut the phyllo pastry to fit your pan. I used a 9×13-inch baking pan (23x33cm), though round pans will also work. You need 33 layers in total. Keep the phyllo sheets under a damp towel so they don't dry out.
Assemble
- Brush a bit of butter across the bottom of the baking dish.
- Add 8 sheets of phyllo pastry one at a time, brushing each with a thin, even layer of butter.
- Add ½ cup of the ground pistachios, spreading them evenly across the pastry.
- Alternate between 3 butter phyllo sheets and pistachios until you use all the ingredients. The final layer on top will have 4 buttered phyllo sheets. See the Notes below for the detailed arrangement.
Cut the pastry and bake
- Preheat the oven to 325ºF/165ºC fan-assisted.
- For diamond shapes: Make straight, parallel cuts lengthwise (across the 9-inch part of the pan) either every 2.25 inches (for larger pieces) or every 1.8 inches (for smaller pieces). Then, slice diagonally across the baklava at equal intervals (2.25 inches for larger or 1.8 inches for smaller pieces). Note that not all corner pieces will be the same size.For squares/rectangles: Cut the lines vertically and then horizontally, rather than diagonally, at equal intervals.For triangles: Cut the pieces into larger rectangles/squares. Then, slice diagonally through the squares to cut them each into two separate triangles.
- Transfer the baking dish to the middle shelf of the preheated oven and bake for about one hour at 325ºF/165ºC fan-assisted, until it's golden brown and crispy.Check it at the 30-minute mark, and if it browns on top too quickly, tent the pan with foil.
Pour the syrup and set aside
- Immediately after removing the pastry from the oven, pour the fully-cooled syrup evenly over it.
- Set the pistachio baklava aside to cool down and absorb the liquid for 6 hours (overnight is even better). Optionally, garnish it with extra chopped nuts or a drizzle of melted chocolate.
Video
Notes
- Bottom: 8 buttered phyllo sheets, 1/2 cup pistachios
- 3 buttered phyllo sheets, 1/2 cup pistachios,
- 3 buttered phyllo sheets, 1/2 cup pistachios,
- 3 buttered phyllo sheets, 1/2 cup pistachios,
- 3 buttered phyllo sheets, 1/2 cup pistachios,
- 3 buttered phyllo sheets, 1/2 cup pistachios,
- 3 buttered phyllo sheets, 1/2 cup pistachios,
- 3 buttered phyllo sheets, 1/2 cup pistachios
- Top: 4 buttered phyllo sheets (remember to butter the top, too).
Nutrition
Nutrition information is automatically calculated, so should only be used as an approximation.


There should be cardamom/sugar mix between the layers too. Syrup is way too thick.
Hi Naz! Thanks for the feedback. 😊 You’re right that many baklava recipes add a cardamom-sugar mix between the layers, and that’s a lovely traditional touch, so feel free to sprinkle some in if you prefer that flavor. As for the syrup, it should thin a bit while warm and thicken as it cools; if it set too thick, reducing it for slightly less time or adding a touch more water next time will give a more pourable result. I appreciate you sharing your thoughts!
The only pistachio’s I can find are roasted and salted, will these work? If not, could you please clarify what is needed and where to you located them?
Hi Joy,
If the pistachios are roasted and salted already, I wouldn’t use them for this recipe. Usually, big supermarkets should have raw pistachios (either with or without the shells). Alternatively, you can find those online. I hope this helps.