
This post may contain affiliate links. Please read our disclosure policy.


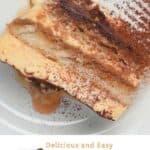
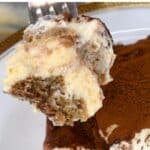

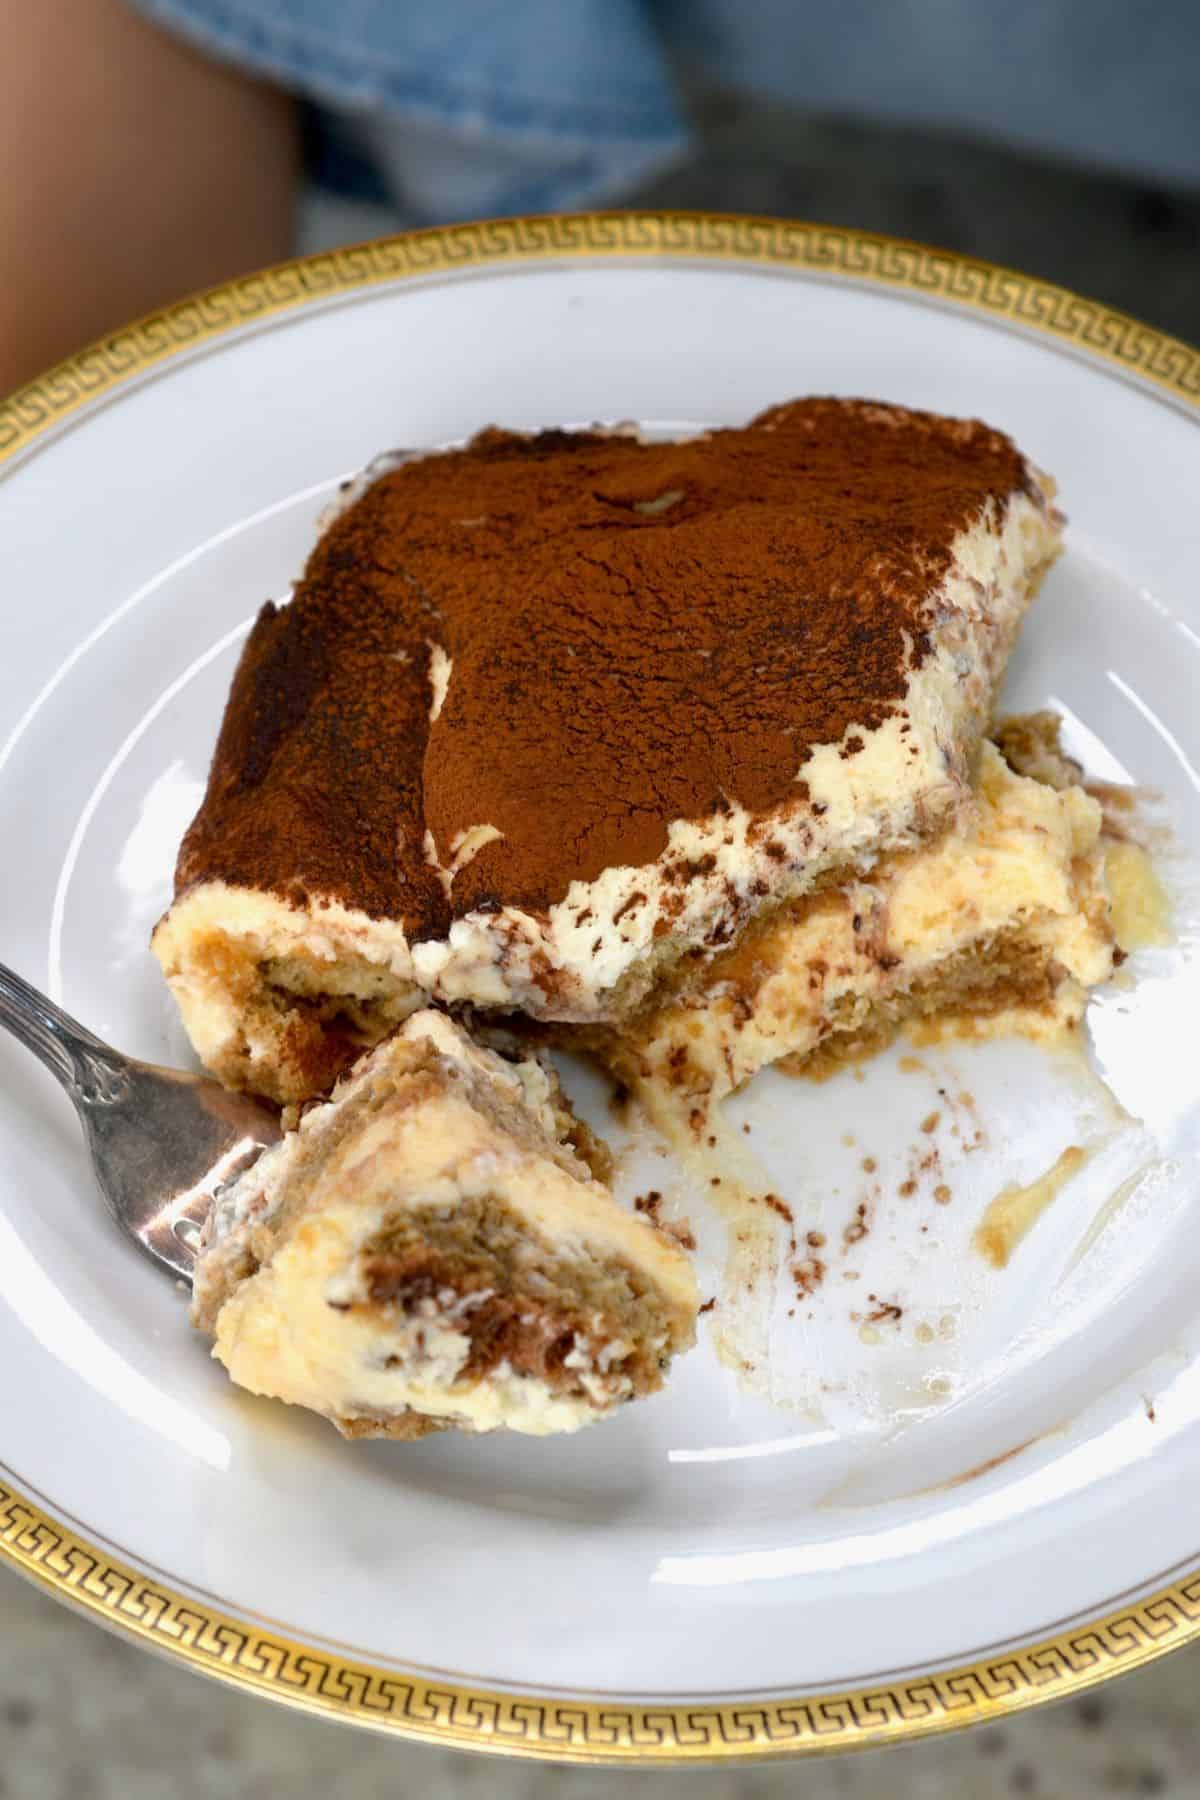
This authentic tiramisu recipe combines light ladyfingers soaked in an espresso-alcohol (alcohol optional) mixture then layered with a fluffy, rich, creamy mascarpone mixture before being topped off with a dusting of cacao powder. This Italian tiramisu recipe is sure to impress friends and family alike – rich, creamy, decadent, and yet light enough to enjoy year-round!
Until I actually made this authentic tiramisu recipe for the first time, I always thought of it as a restaurant dessert. Living in London, I’d been to countless Italian restaurants, and tiramisu has always been a guilty pleasure. It’s creamy and decadent with a robust coffee flavor and a hint (or more) of alcohol (optional) – perfect for ending a delicious Italian meal.
Want to save this recipe?
Creamy decadent authentic tiramisu recipe
Well, since it seems this summer is a season of Italian appreciation for myself, it was just a matter of time before I set my sights on a homemade authentic Italian tiramisu recipe! So after enjoying summery dishes like Italian heirloom salad, peach Caprese salad, tomato bruschetta, pasta alla Norma (or homemade pasta with homemade basil pesto), Neapolitan pizza, and others, why not end the night with this creamy homemade tiramisu.
Learning how to make tiramisu is surprisingly simple too. While the tiramisu recipe may be slightly time-consuming, it’s not particularly hard, especially with this easy-to-follow step-by-step recipe. In no time at all, you’ll be whipping up the sweet, silky mascarpone filling with custardy egg yolks, dunking ladyfingers in espresso, and then layering up the no-bake tiramisu dessert.
In fact, the most challenging part of this recipe is having to wait the several hours it needs to set. Therefore, I recommend preparing it the night before, so you’re not tempted to try to slice it early!
Since this version is based on an authentic tiramisu recipe an Italian friend passed on to me, the cream layer does contain egg yolks. But don’t worry, if you’re worried about using raw eggs, you can pasteurize eggs at home or buy them, or use the method listed below to lightly cook the egg.
Then again, this wouldn’t be the only recipe I love that uses egg yolks – like this caramel ice cream, vanilla custard, and chocolate crème pâtissiere, perfect for these homemade choux eclairs! And also, this isn’t the only dessert recipe that uses “cheese” – check out my Easy Knafeh/Kunafa for a sweet cheesy dessert!
For now, though, let’s just dive right into this authentic tiramisu recipe!
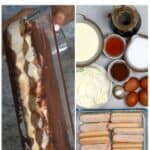
The tiramisu ingredients

- Lady Fingers: you can use pre-made ladyfingers (sponge fingers), aka savoiardi or boudoirs. It’s best to use hard/crunchy Italian ladyfingers (savoiardi) if you can get a hold of them, as softer ones will soften more.
- Eggs: this recipe uses raw eggs, you can buy them pasteurized or pasteurize eggs yourself at home.
- Heavy cream: double cream in the UK.
- Mascarpone: make sure to use full-fat, natural mascarpone.
- Espresso: it’s best to use espresso, though strong-brewed black coffee will work in a pinch (and will be less bitter). Use decaf if preferred, and make sure to use a coffee you like!
- Alcohol: while Marsala is the traditional choice, you can also make tiramisu with Amaretto, rum, Kahlua, Baileys, whiskey, or brandy. Simply omit it for a booze-free version.
- Sugar: I recommend using caster sugar, which is finer than regular granulated. Alternatively, powdered sugar would work. If you don’t have either, then you can grind the granulated sugar in a coffee/spice grinder or food processor until it’s finer.
- Salt: just a little salt helps to enhance and balance the various flavors..
- Cacao powder: you can use cacao or cocoa powder; just make sure it’s unsweetened. Dutch-processed cocoa would also work.
- Chocolate (optional): to shave over the top of the tiramisu before serving. Use healthy dark chocolate or milk chocolate.
Optional add-ins and variations
There are several simple variations you can make to this homemade tiramisu. While there are versions out there that omit coffee entirely for the likes of fruits, etc., for this authentic tiramisu recipe, I’ve just added a few suggestions that don’t make the dessert too different. Let me know in the comments if you’d like me to share alternative tiramisu recipes!
- Gluten-free tiramisu: make sure to use gluten-free ladyfingers. Otherwise, the recipe is already gluten-free.
- Coffee-free tiramisu: though it’s not authentic, you can swap out the espresso in this Italian tiramisu recipe for hot cocoa instead (with or without alcohol).
- Vanilla extract: instead of (or alongside) the alcohol, you could add a little vanilla extract – around ½ tsp.
- Banana: the combination of coffee and banana is surprisingly delicious. Thinly slice banana to lay in a single layer over the cream layer and optionally a few on the top of the tiramisu to garnish.
- Chocolate cream: definitely not an authentic tiramisu recipe addition. However, if you want more of a chocolate tiramisu, you can add some melted chocolate into the mascarpone mixture. The amount you add depends on if you want the entire cream mixture to be chocolate or only one layer (1/2 the mixture). I recommend between 1-2 oz/30-60 g of melted dark chocolate (around 70%).
- Tiramisu cups: also written in the recipe notes. Feel free to serve this homemade tiramisu in a cup (well, multiple cups!) rather than a single large dish.
How to make tiramisu
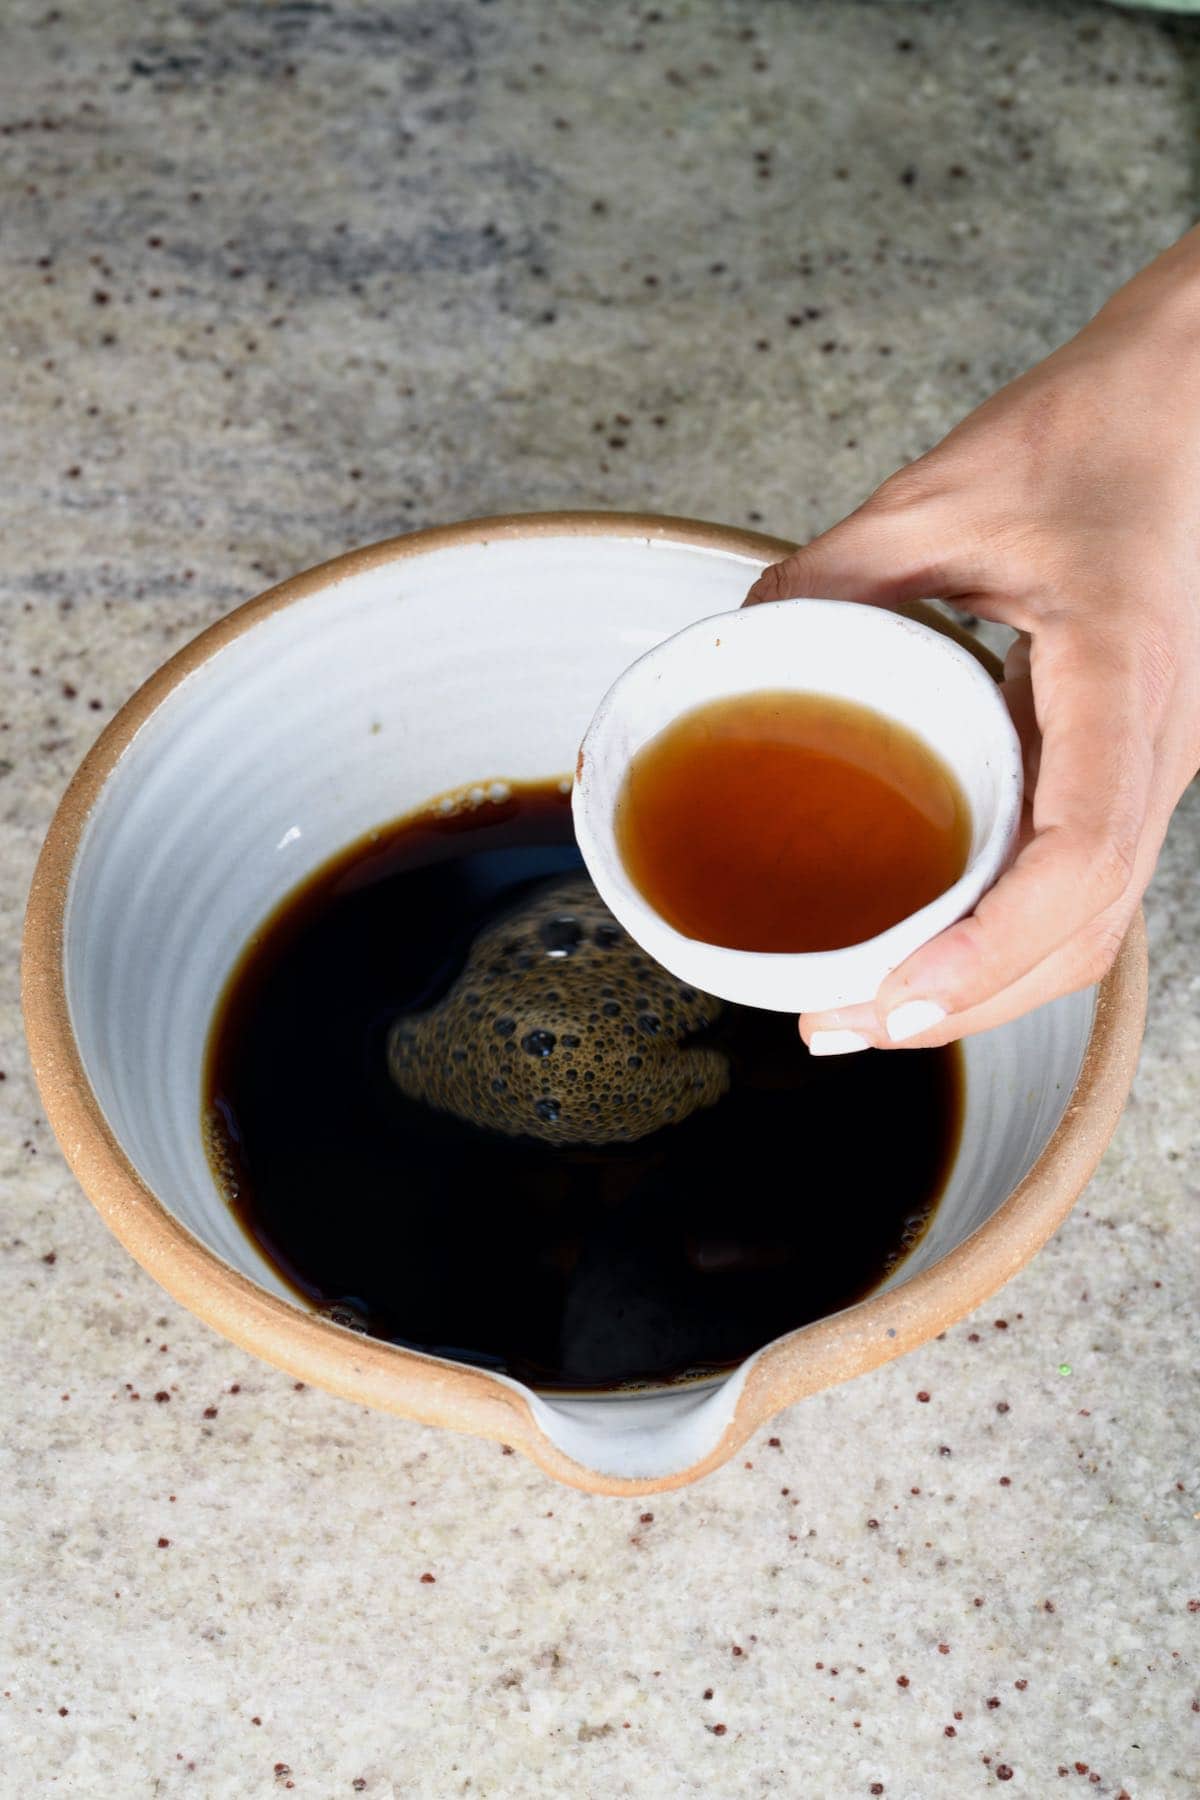
Step 1: Prepare the espresso
First, prepare the espresso, add the alcohol (if using), and allow it to cool down while you prepare the remainder of the ingredients.
Step 2: Prepare the cream mixture
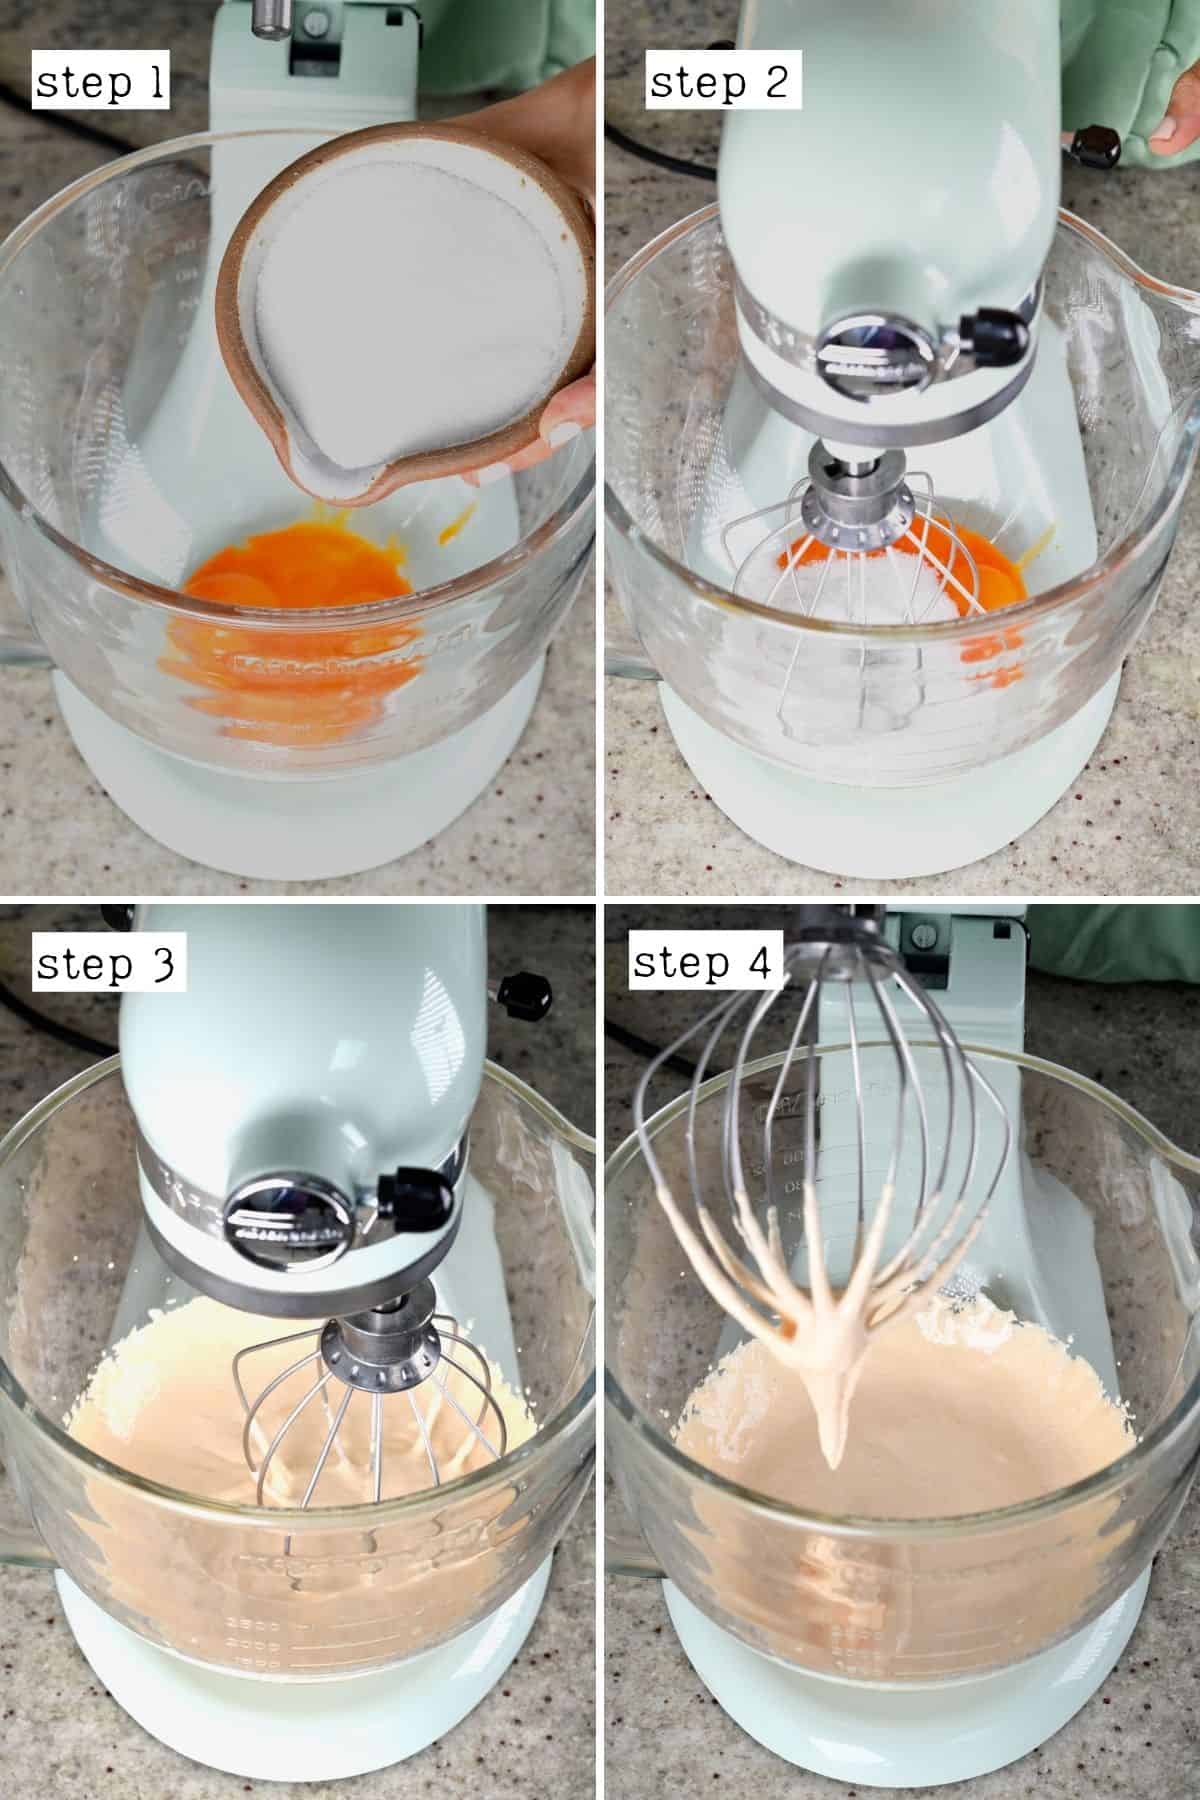
First, separate the eggs into yolks and whites.
The egg whites aren’t needed in this recipe, so you can save them for something else. Store, covered, in the fridge for up to 2 days or in the freezer for between 2-3 months. Thaw in the refrigerator before using.
Add the egg yolks, sugar, and salt in a large bowl or stand mixer (with whisk attachment). Whisk until well creamed and a light pale-yellow color. This will take between 3-5 minutes using a stand mixer.
Alternatively, you can add the egg yolks, sugar, and salt to a double boiler (bowl over a pan with about 1 inch of boiling water), whisking/mixing until the color becomes pale yellow. The extra heat will slightly cook the eggs (without scrambling them) if you’re particularly worried about bacteria/don’t have pasteurized eggs.
Make sure that the bottom of the bowl doesn’t touch the water in the double boiler. Otherwise, you may end up accidentally scrambling the eggs.
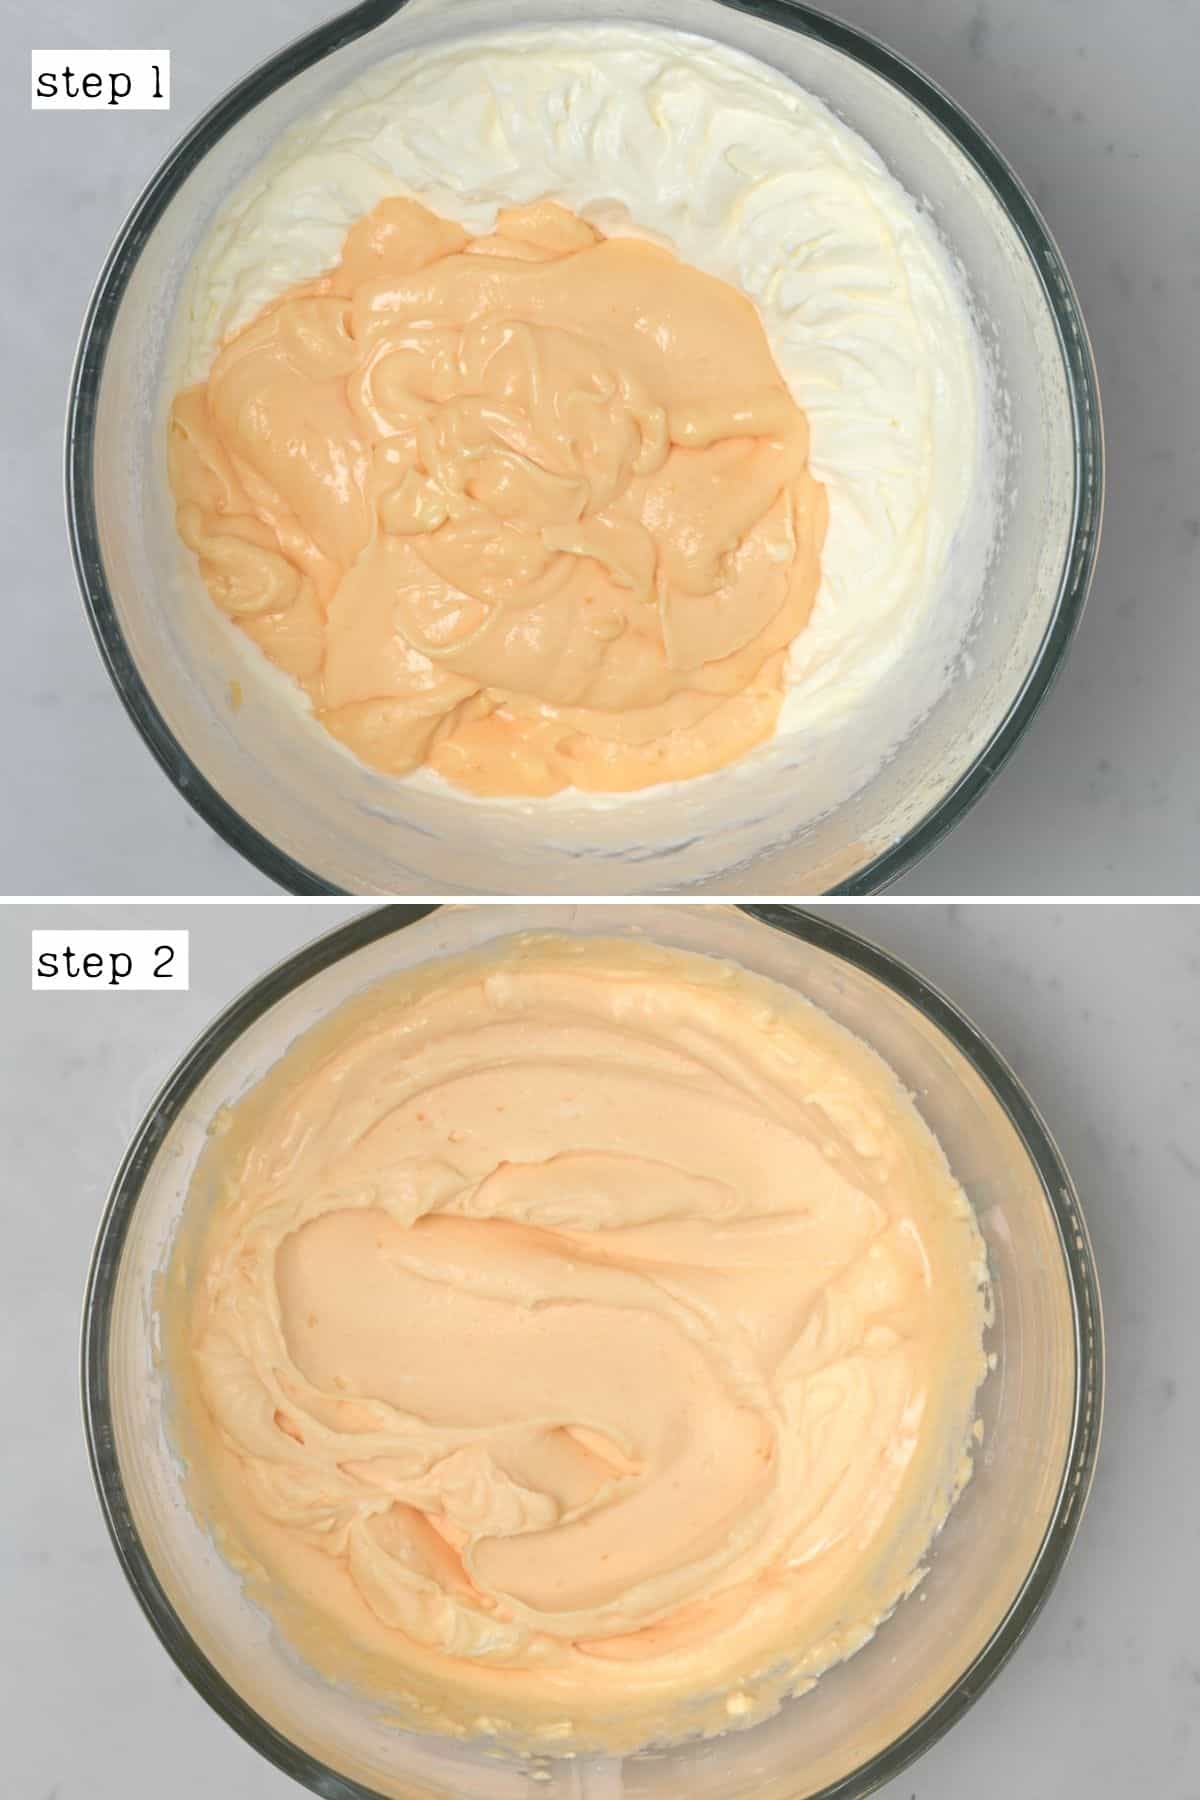
Then, add the mascarpone to the egg mixture and slowly whisk/fold in at low speed.

In a separate bowl, whisk the heavy cream until soft peak phase. Make sure you don’t overwhip it, or you’ll end up with homemade butter!
For a lighter cream, you could whisk the egg whites into soft peaks, then fold them into the whisked cream. However, I find that there’s more of a chance of ending up with a runny cream mixture when doing this. I also prefer the dessert richer.
Then, fold the whipped cream into the egg mixture, careful not to knock out too much air.
Step 3: Assemble the tiramisu
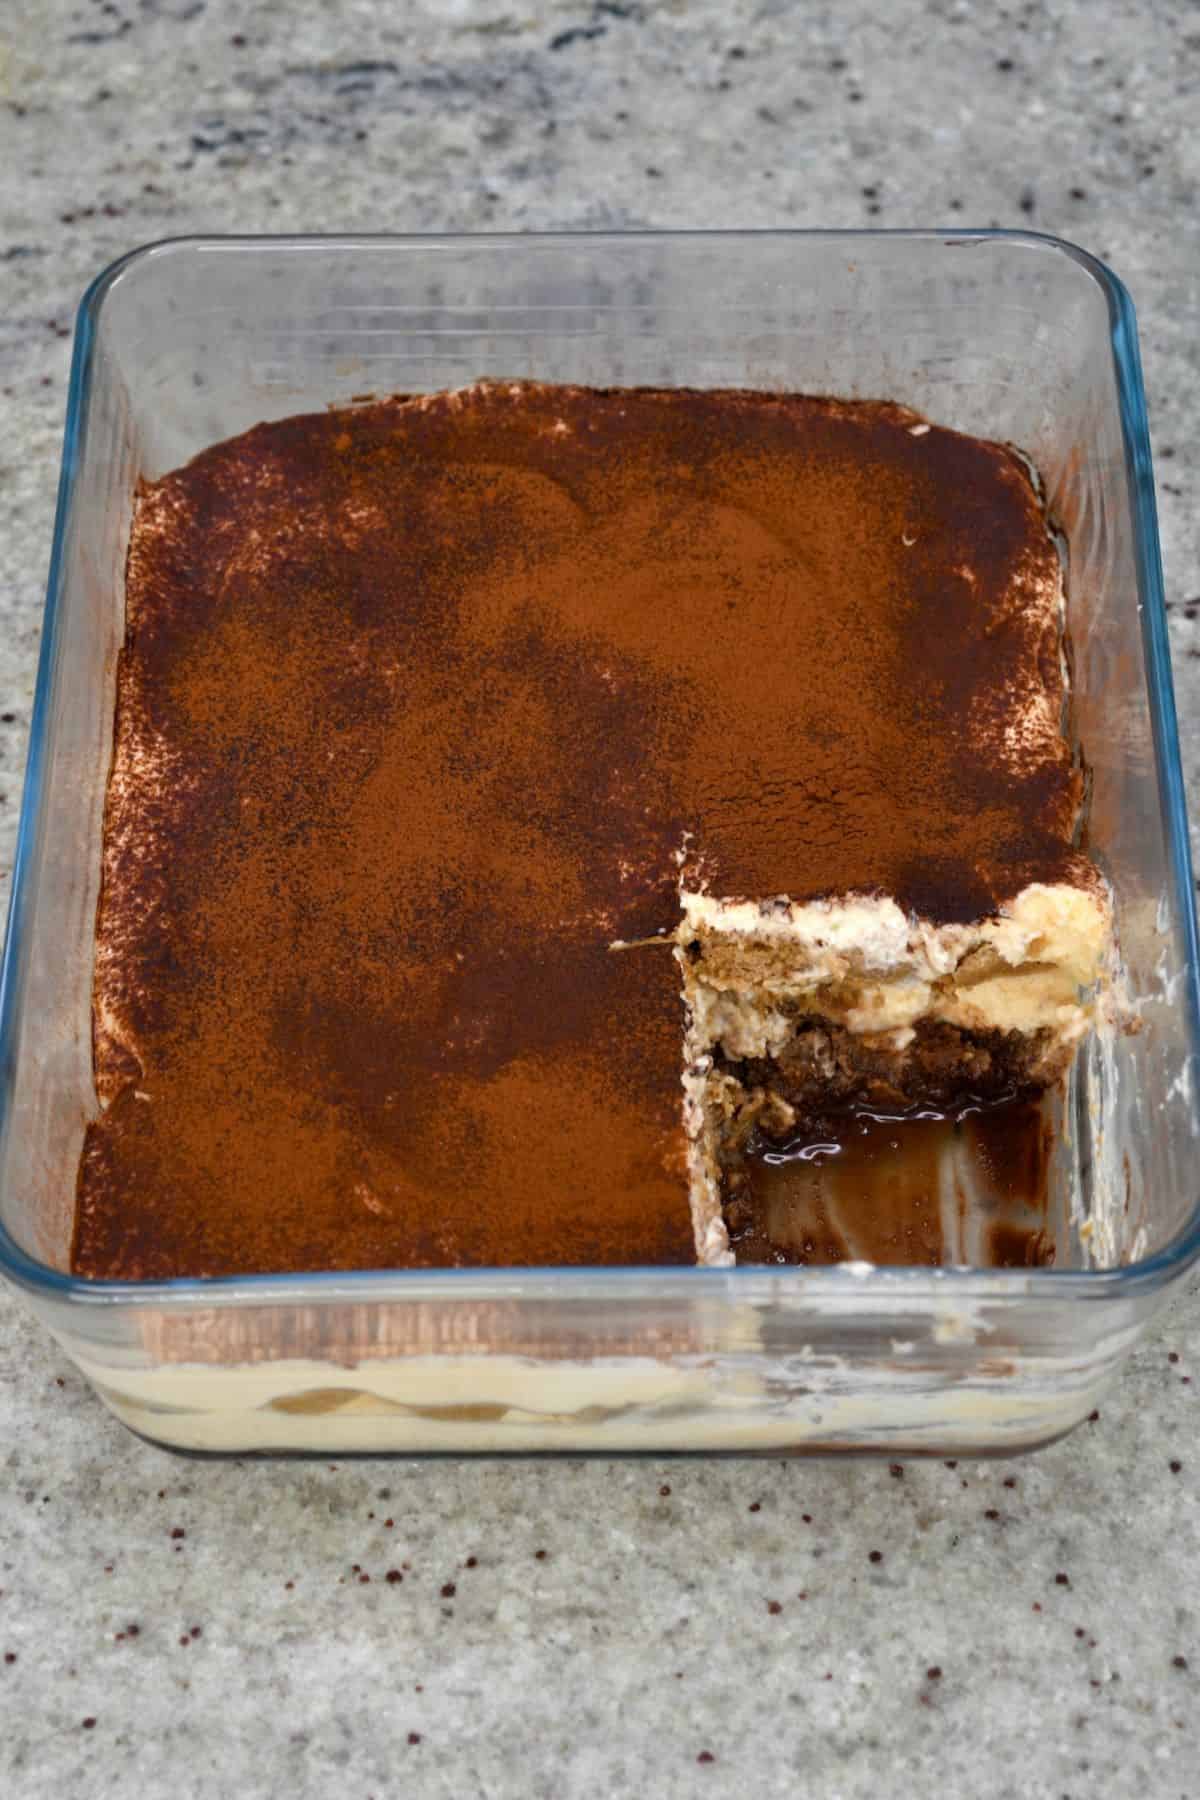
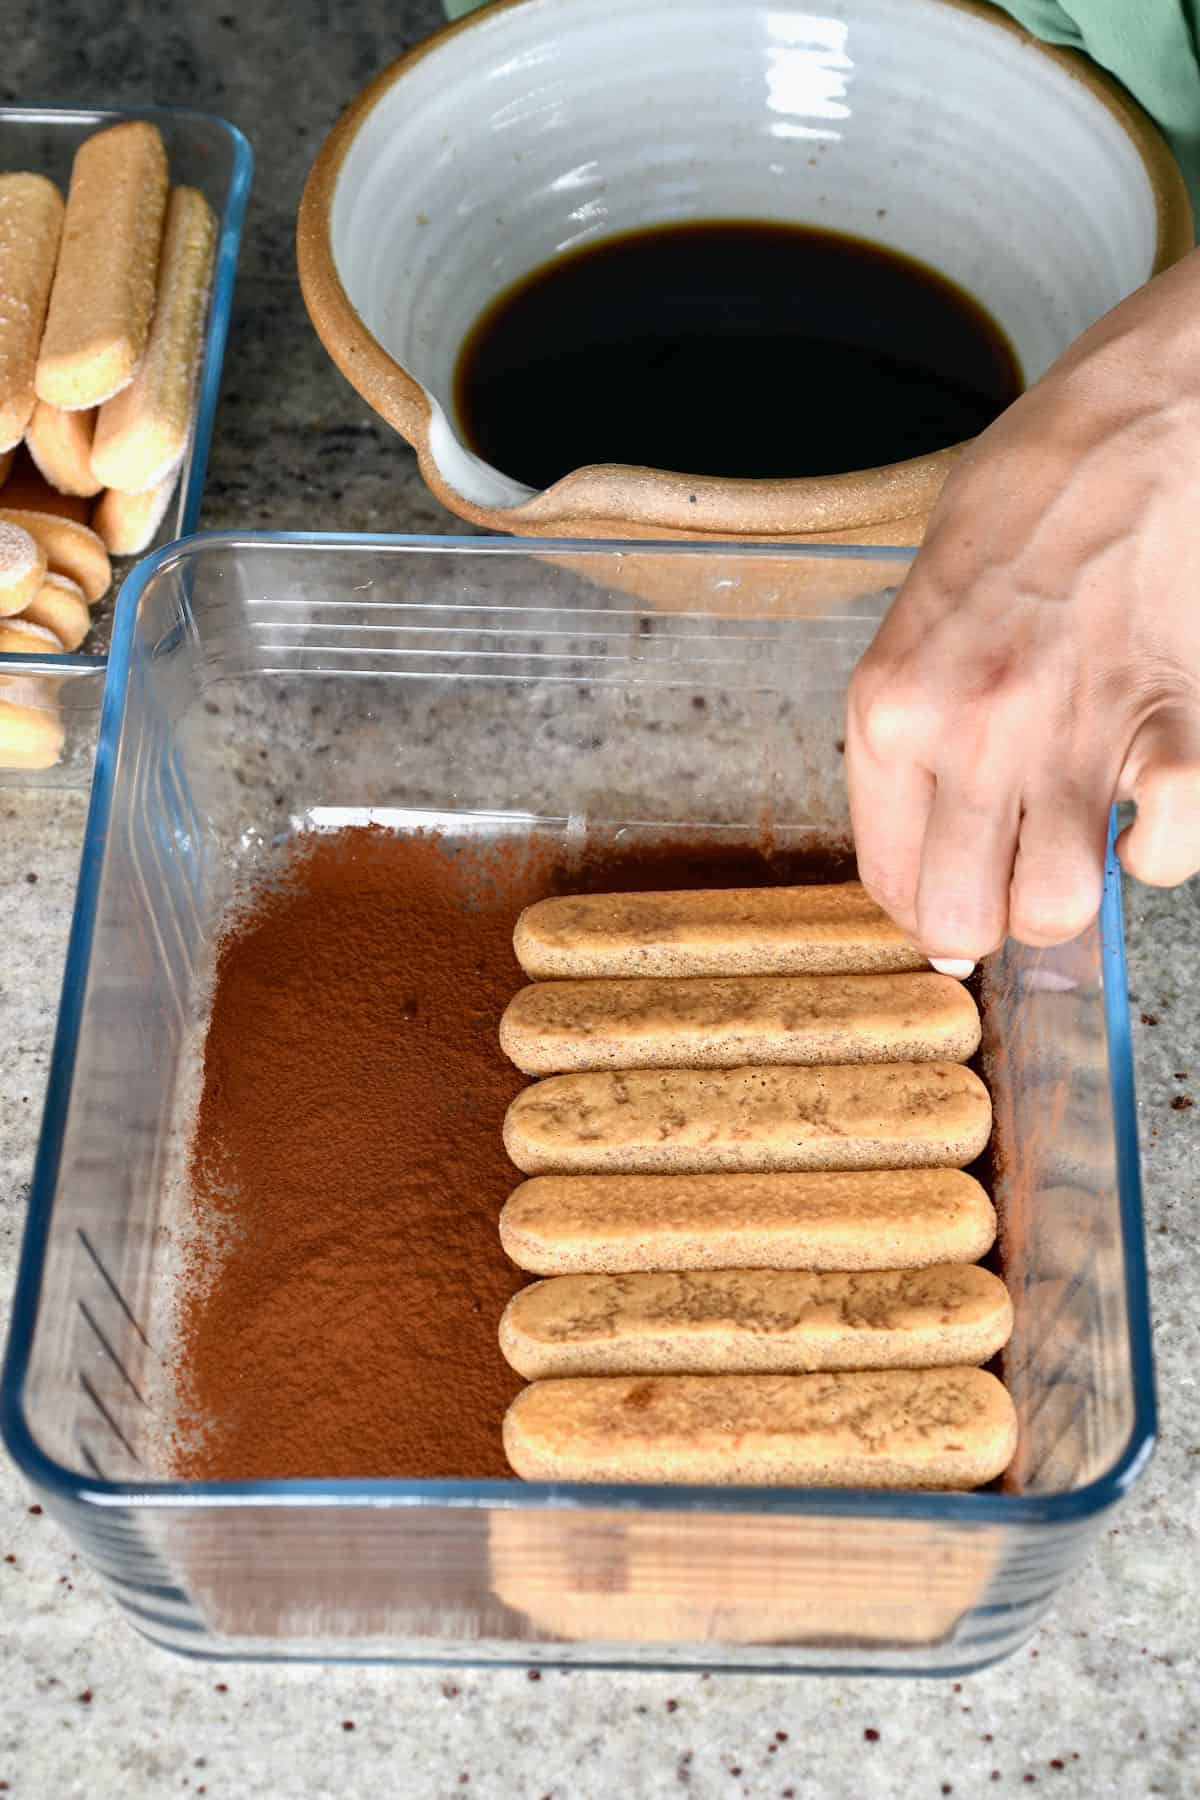
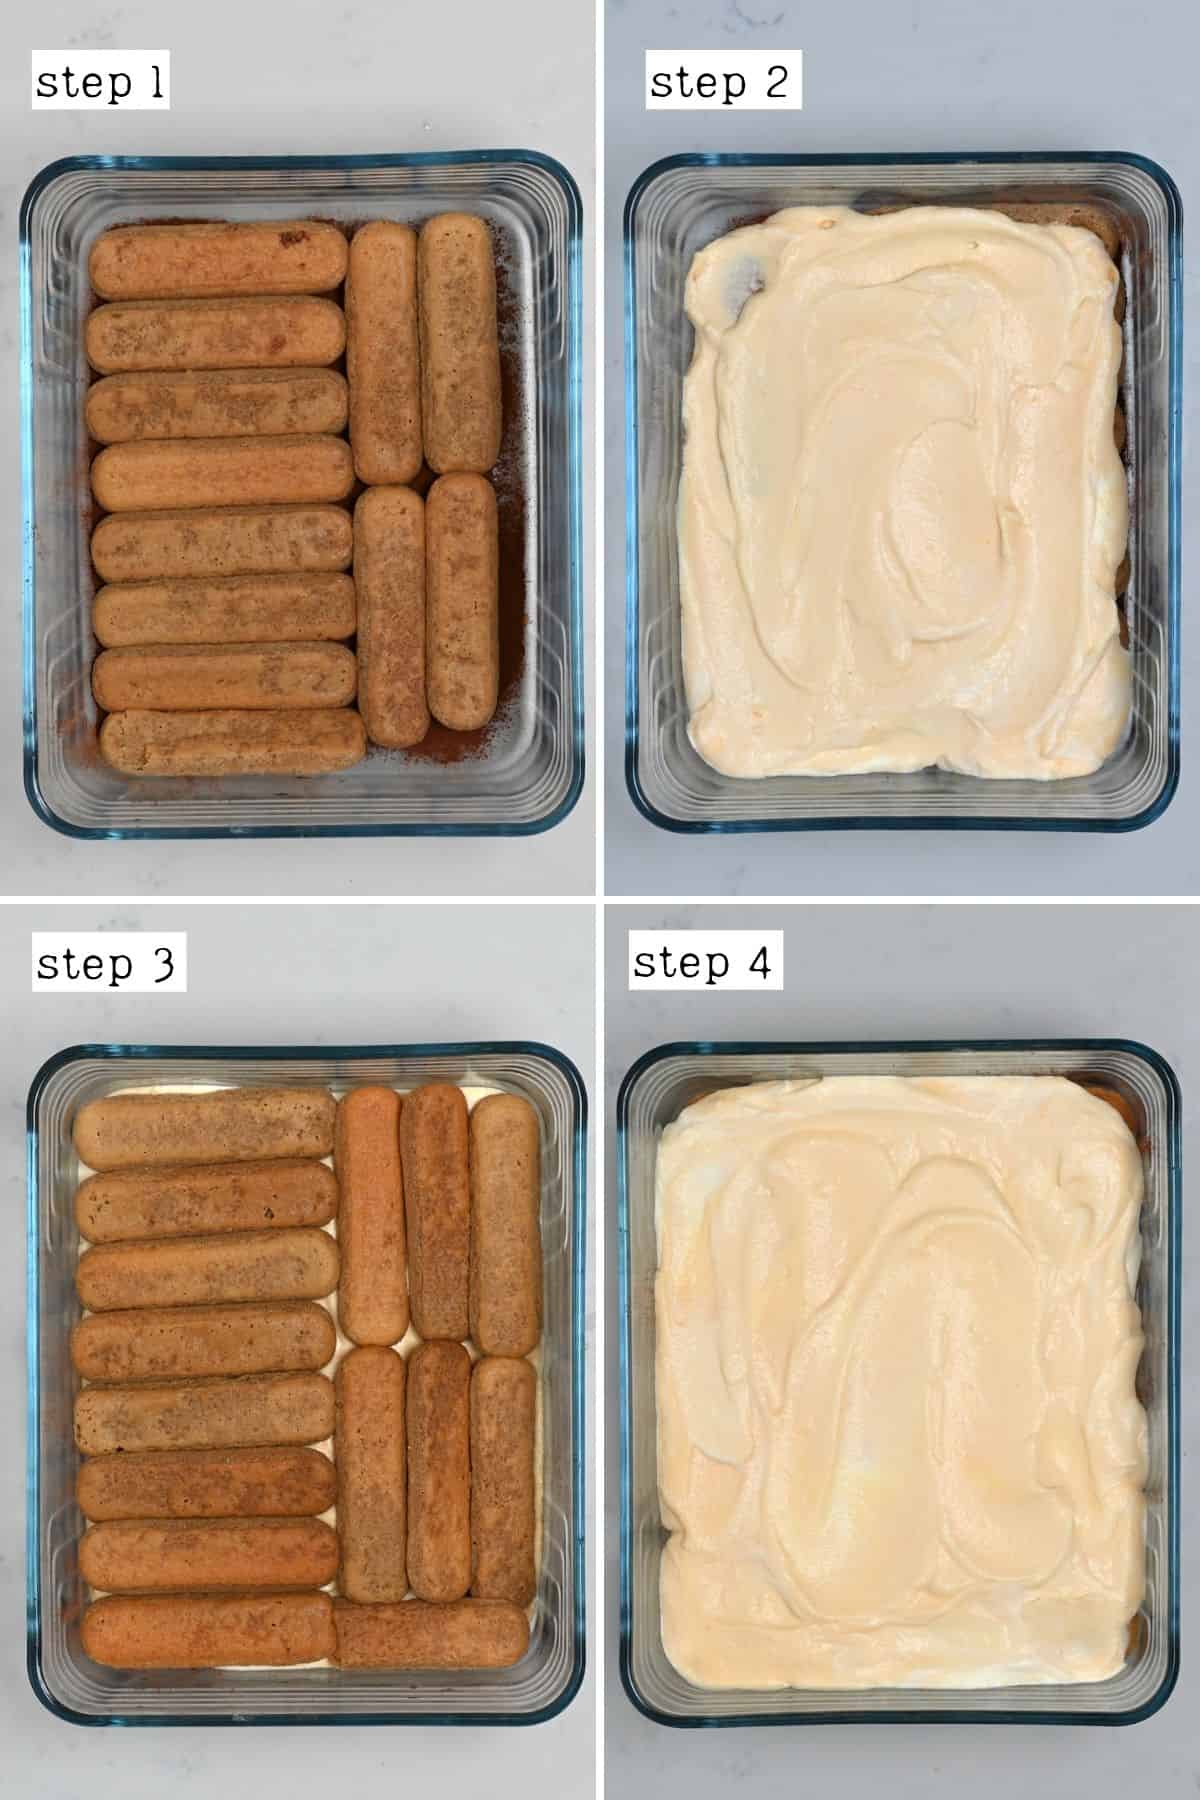
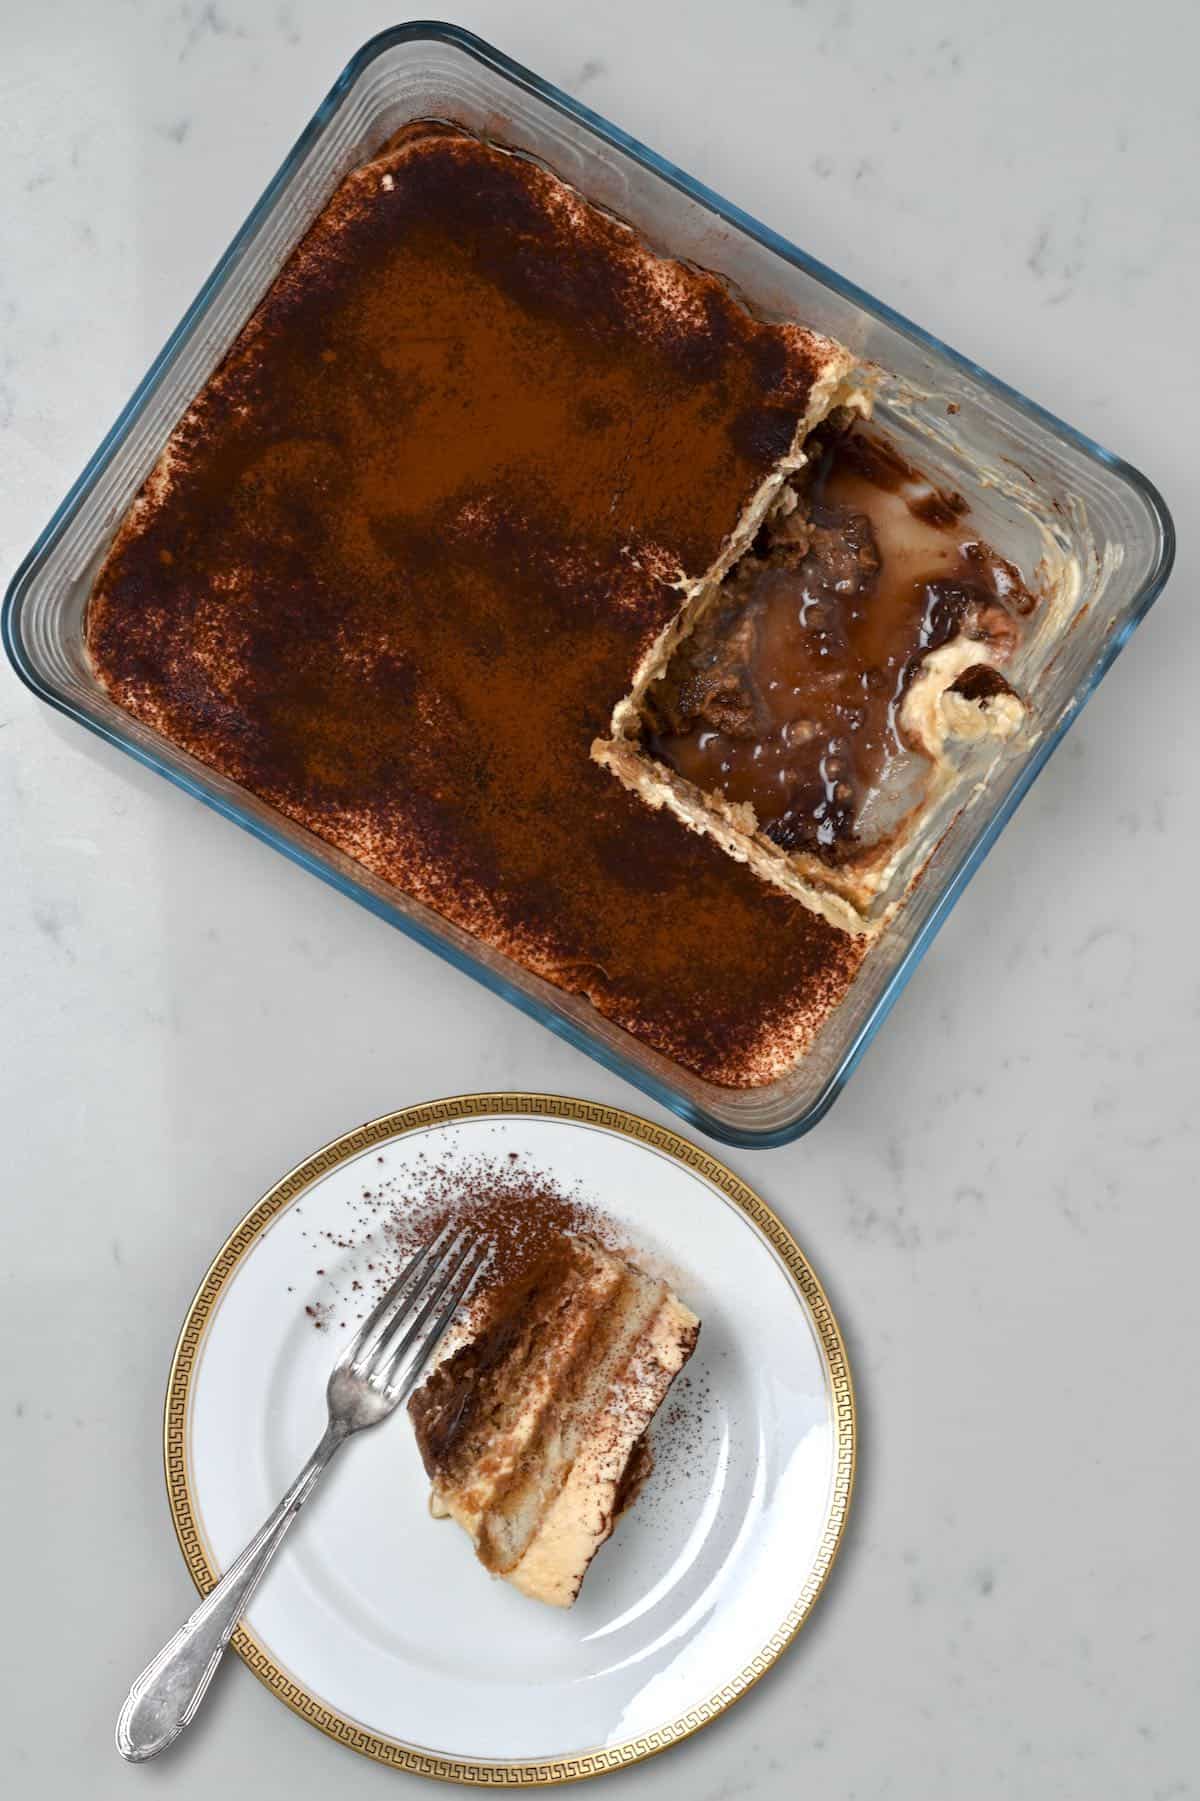
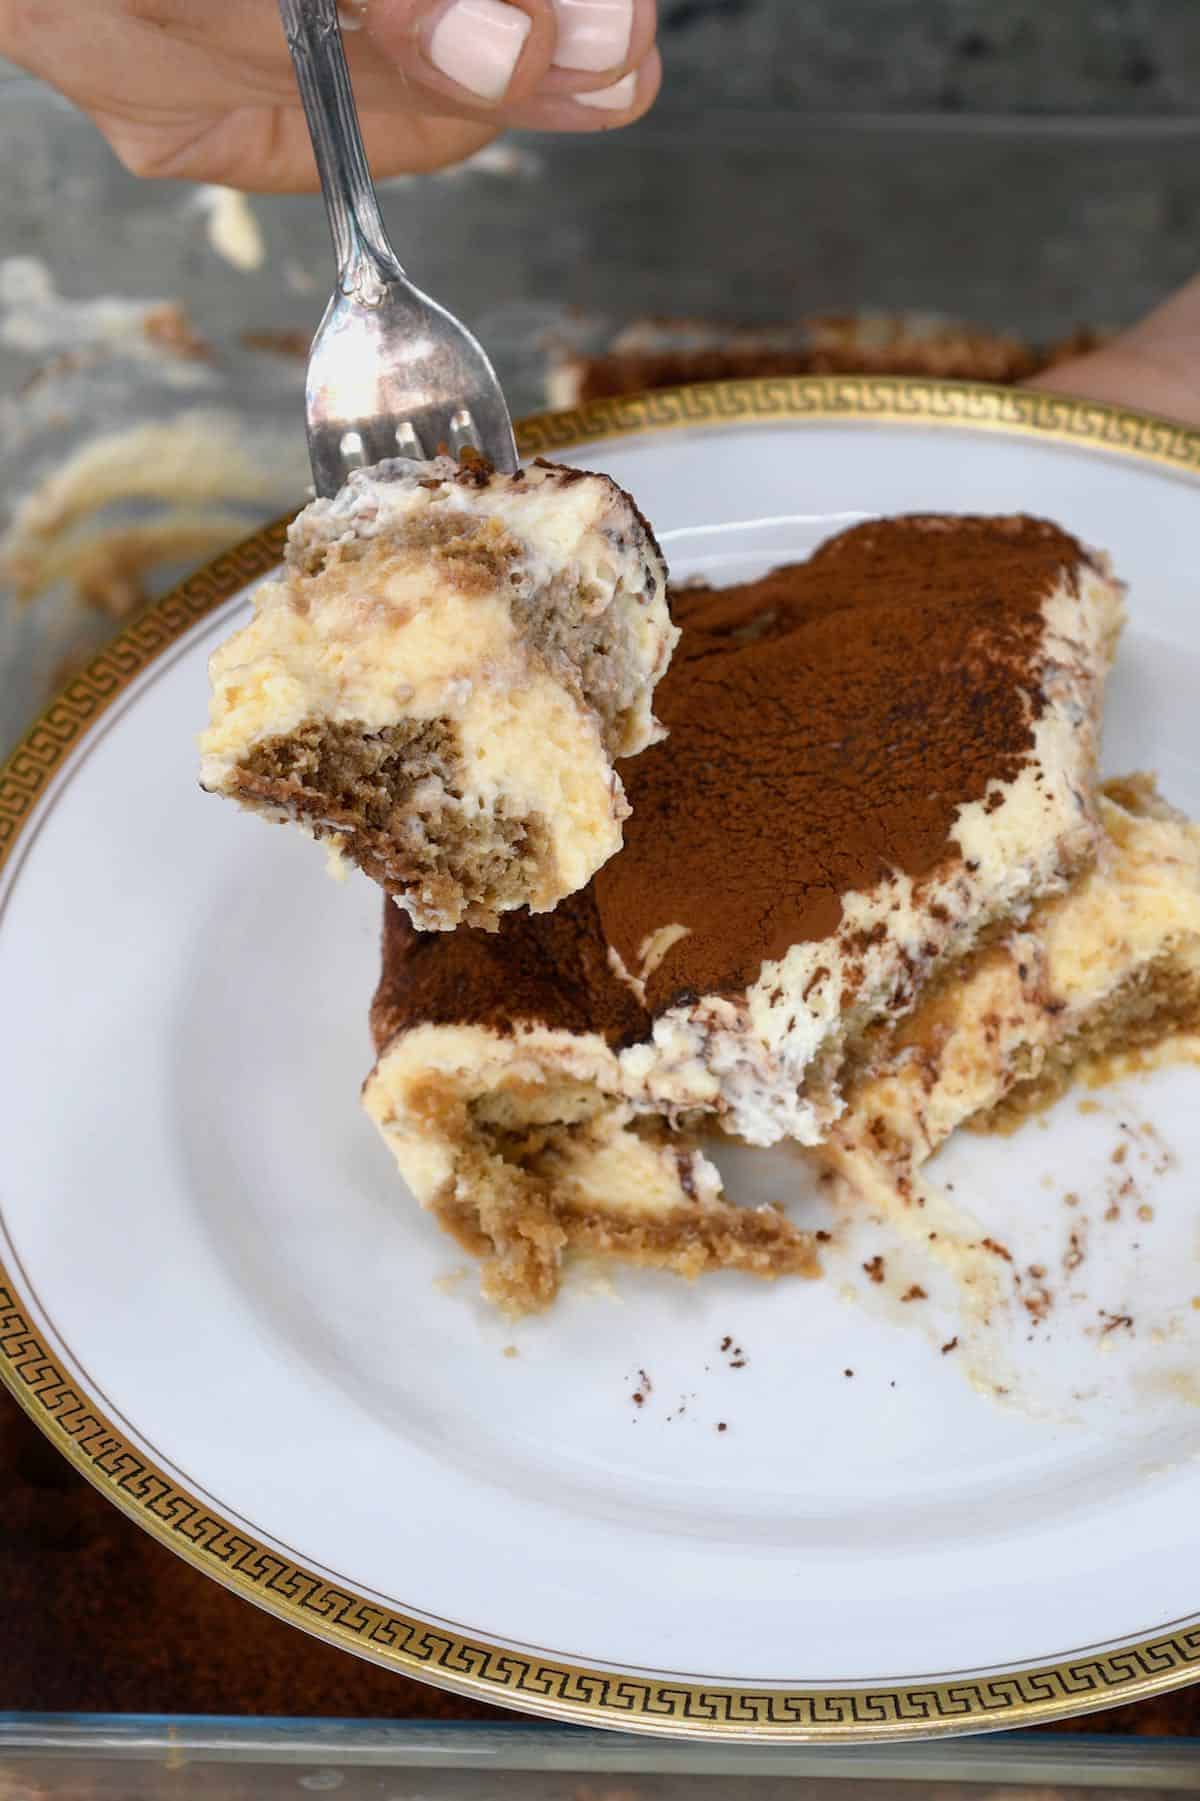
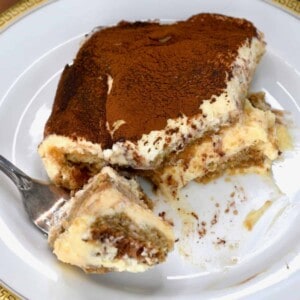
First, add a layer of cacao powder to the bottom of your dish. I used a Pyrex dish that’s 6×8 inches/15×20 cm.
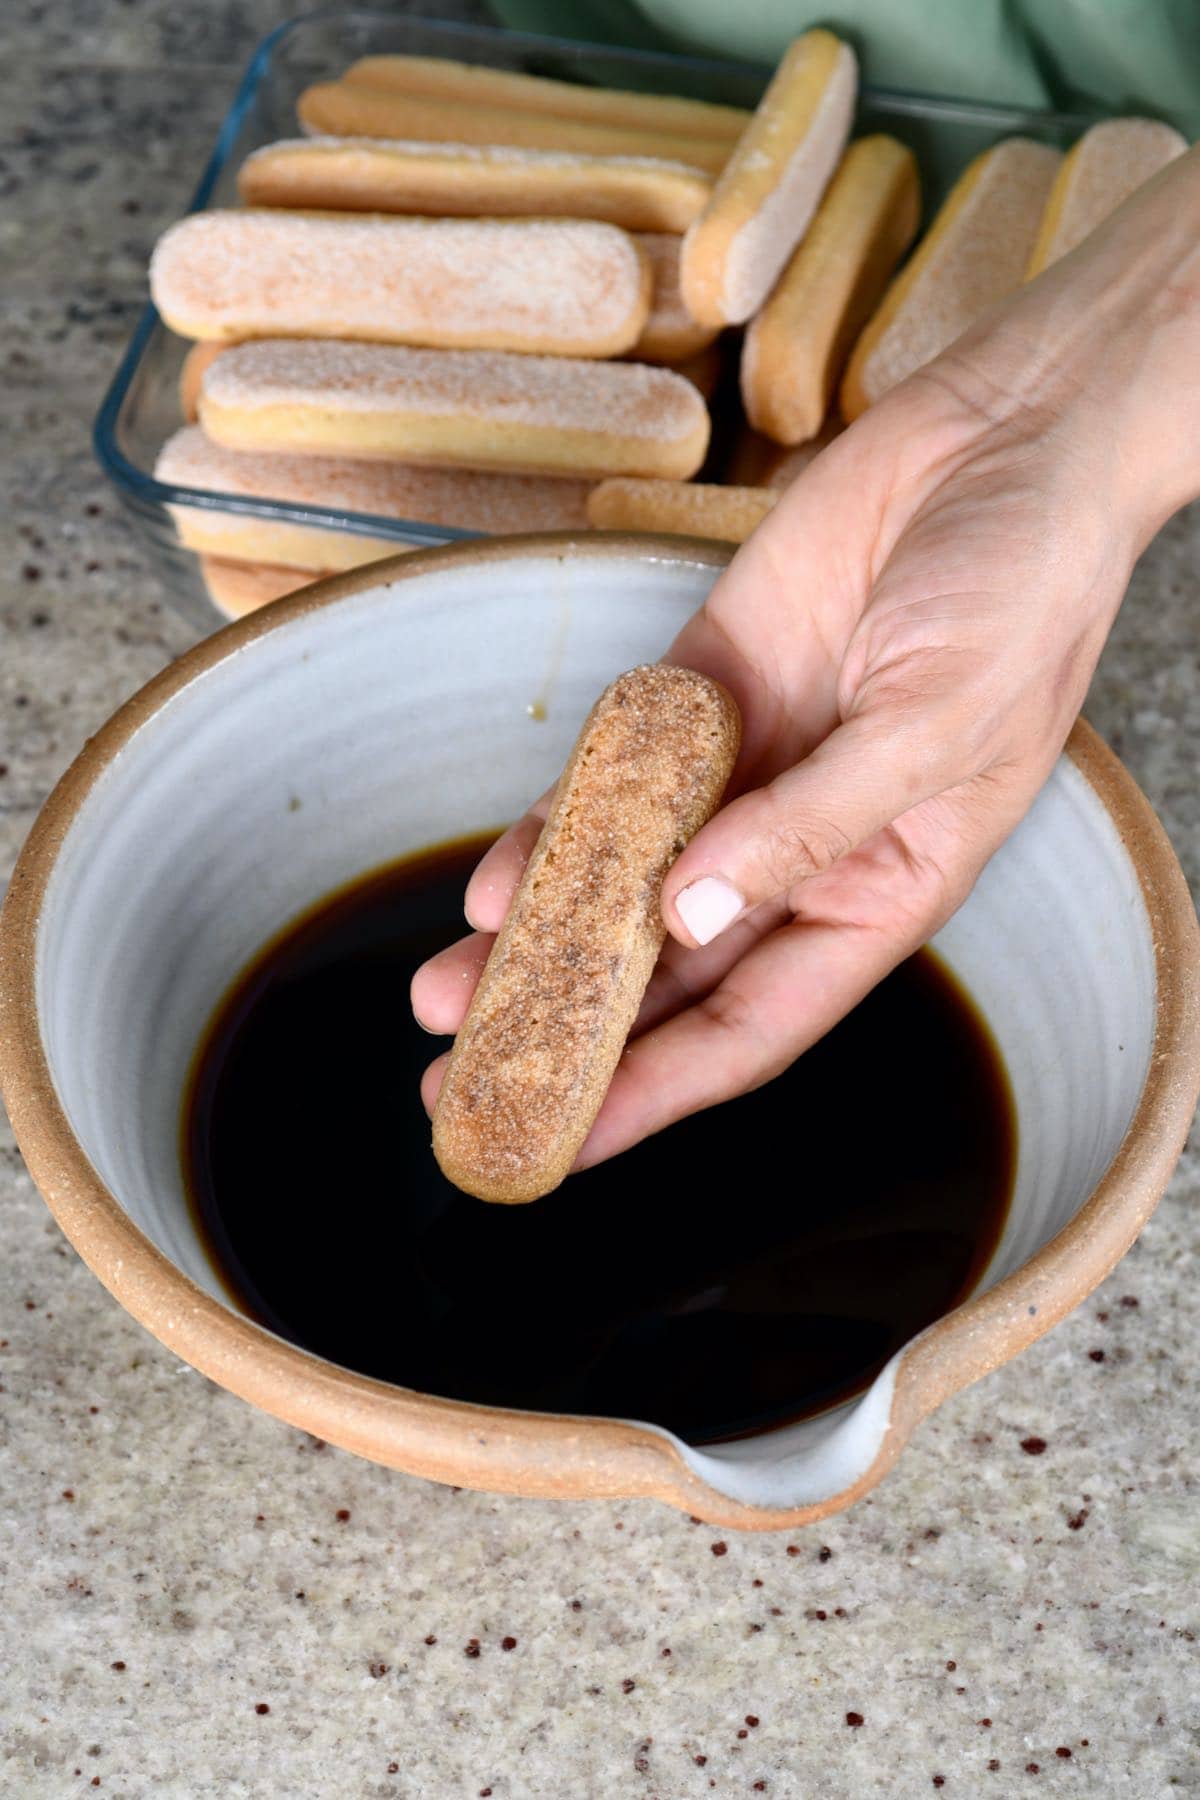
Then, dip each ladyfinger into the espresso mixture for just 1-2 seconds and lay them into your dish until you have a single layer of soaked ladyfingers. Be careful not to over-soak the ladyfingers, or they’ll become too soggy and make it harder to slice pieces of your tiramisu. It’ll also make the dessert watery (mine were actually slightly over-soaked this time – eep!).
Chef’s Tip: If you’re worried about this, I recommend you dip just one side of the ladyfingers in the coffee mixture for 2 seconds, then flip it over when laying it in the dish – that way, the espresso mixture will slowly filter down to the other side of the biscuit, for the perfect amount of soaking.
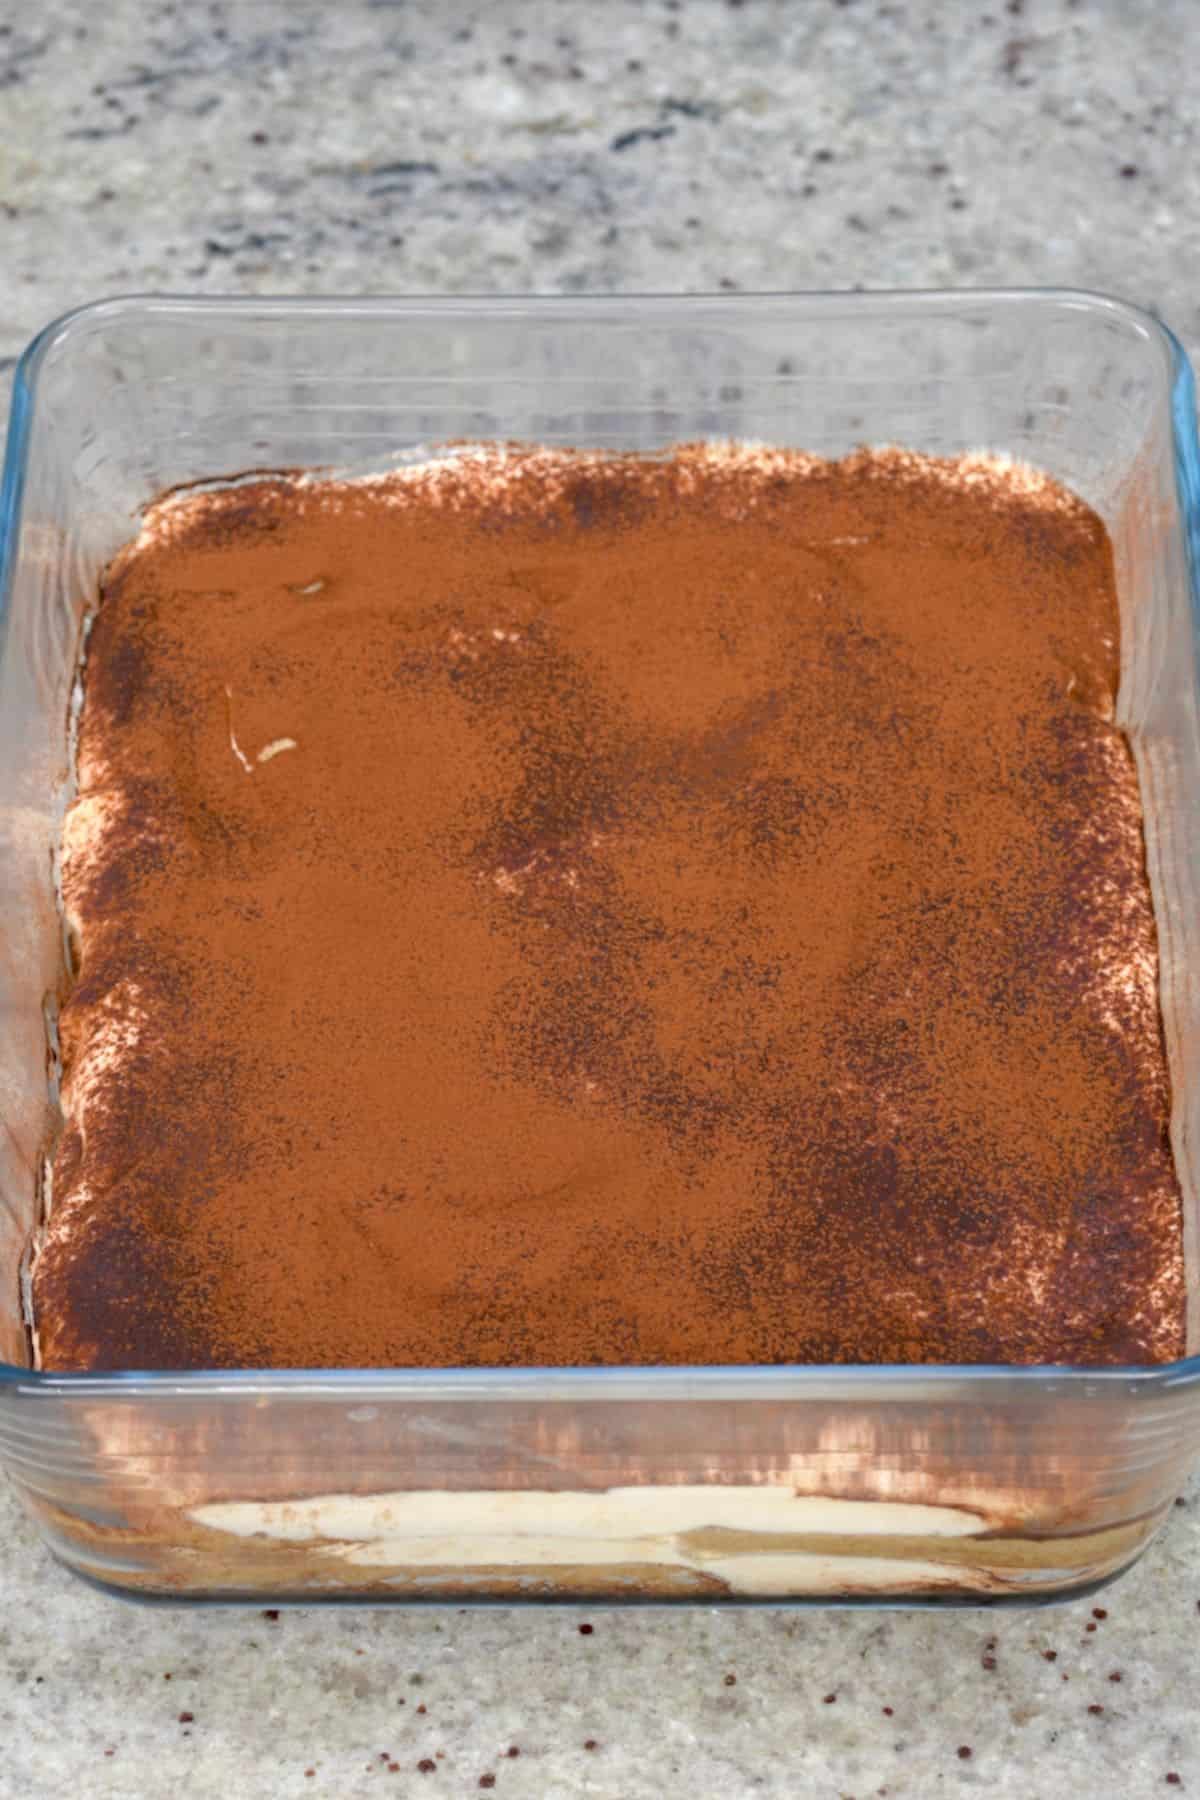
Then add half of the mascarpone cream mixture over the ladyfingers and use a spatula to spread it into an even layer. Arrange another coffee-soaked ladyfinger layer and top with the remaining half of the cream mixture. Then dust the top with a light coating of cacao powder.
Alternatively, you can omit the cacao powder for now, as it will become “wet” while the tiramisu chills/sets. Just add the cacao powder right before serving.
Step 4: Allow the tiramisu to chill
Transfer the tiramisu to the fridge to set for at least 4-5 hours or overnight. Then, enjoy!
How to store
Make ahead: since the Italian tiramisu requires hours of chill time, I actually recommend you prepare it the day before you plan on serving. In fact, the flavor always tastes best after a day of setting.
Storing: store any leftovers covered tightly in the refrigerator for up to 3 days, though it’s best enjoyed after a day of setting and then within 24hrs.
Freeze: alternatively, freeze the homemade tiramisu for up to 2 months. To save yourself from having to keep the dish in the freezer, line it with plastic wrap or tin foil (plus overhang) before assembling the tiramisu. Once solid, remove the tiramisu from the container and wrap tightly to protect it from freezer burn. When you want to thaw it, place it back in the dish and leave it in the fridge overnight.
If you plan to freeze some immediately, then omit the cocoa powder before freezing.
How to serve
You can enjoy a piece of this Italian tiramisu alone, with a scoop of coffee ice cream, or topped with some fresh berries. In general, you shouldn’t need much to enjoy it with, as it’s so decadent and yummy!
Authentic Italian tiramisu FAQs
You sure can. Though each substitution will impact the flavor/texture differently, you can substitute the mascarpone for fresh ricotta cheese or subtle, creamy cream cheese.
Yes, but it does require further recipe tweaking. To omit the eggs, use extra heavy cream and replace the granulated sugar with icing sugar, which will mix into the mascarpone/cream layer easier.
It’s not recommended for the best flavor. However, yes, you can.
I’ve never had this issue. Though I’ve read that you can add it to a double-boiler and whisk the mixture until it’s smooth again. Allow it to cool slightly, then continue with the authentic tiramisu recipe.
You may not be able to “fix” it as such but it doesn’t need to be wasted. Instead, transfer the dessert to the freezer and enjoy it as a semi-frozen dessert. It works!
Recipe notes and top tips
- Make tiramisu cups: If you want to make individual-serve tiramisu in a cup, I recommend crumbling the ladyfingers into your cups and brushing/pouring a little alcohol over them. Alternatively, you can carefully cut them the size of your cup right after you’ve dipped them in the coffee. Then layer up the fillings and allow them to set. I still recommend 4 hrs minimum for the flavors to meld and develop.
- For patterned cream: you can transfer the cream mixture into a pastry bag and use different nozzles to create different shapes in the cream for more decorative finishing.
- Using mascarpone well: make sure to mix the mascarpone cold, just 5 or so minutes from the fridge, and use full-fat natural mascarpone.
- Mixing the mascarpone: Be careful not to over-mix the mascarpone, or else it can curdle. You want it “just” mixed until the ingredients are combined.
- Use fresh ingredients: avoid using eggs, cream, or mascarpone close to the expiration date. Otherwise, they can impact the texture of the tiramisu.
- To control the amount of coffee: rather than dipping the biscuits, you can use a pastry brush to brush the coffee over the biscuits. Then, as it soaks up, the coffee will filter down the biscuits.
More creamy dessert recipes
- Vegan coffee ice cream (no-churn)
- Homemade caramel fudge
- No-bake chocolate caramel cake (Mars bar cake)
- Silky ginger milk pudding
- Mango sago dessert
If you try this authentic tiramisu recipe, I’d love to hear your thoughts/questions below. Also, I’d appreciate a recipe card rating below, and feel free to tag me in your recipe recreations on Instagram @Alphafoodie!
How to Make Italian Authentic Tiramisu Recipe
Equipment
Ingredients
- 9 oz Ladyfingers aka sponge fingers or Savoiardi (best!) or boudoirs (around 30 or so)
- 4 eggs raw eggs, pasteurized is recommended
- 7 oz sugar caster sugar is best (1 cup)
- 1/8 tsp salt
- 14 oz mascarpone
- 10.15 floz heavy cream double cream
- 1.5 cup espresso or strong-brewed black coffee; if using granules, use 2.5 Tbsp in 1.5 cup boiling water
- 1/4 cup alcohol marsala, amaretto, rum, Kahlua, baileys, whiskey, brandy, etc. or omit completely
- 1 Tbsp cacao powder or Dutch-processed cocoa powder, used just for dusting
Instructions
Step 1: Prepare the espresso
- Prepare the espresso, add the alcohol (if using), and allow it to cool down while you prepare the remainder of the ingredients.
Step 2: Prepare the cream mixture
- Separate the eggs into yolks and whites.The egg whites aren't needed in this recipe, so you can save them for something else. Store, covered, in the fridge for up to 2 days or in the freezer for between 2-3 months. Thaw in the refrigerator before using.
- Add the egg yolks, sugar, and salt in a large bowl or stand mixer (with whisk attachment). Whisk until well creamed and a light pale-yellow color. This will take between 3-5 minutes using a stand mixer.Alternatively, you can add the egg yolks, sugar, and salt to a double boiler (bowl over a pan with about 1 inch of boiling water), whisking/mixing until the color becomes pale yellow. The extra heat will slightly cook the eggs (without scrambling them) if you're particularly worried about bacteria/don't have pasteurized eggs.Make sure that the bottom of the bowl doesn't touch the water in the double boiler. Otherwise, you may end up accidentally scrambling the eggs.
- Add the mascarpone to the egg mixture and slowly whisk/fold in at low speed.
- In a separate bowl, whisk the heavy cream until soft peak phase. Make sure you don't overwhip it, or you'll end up with homemade butter!For a lighter cream, you could whisk the egg whites into soft peaks, then fold them into the whisked cream. However, I find that there's more of a chance of ending up with a runny cream mixture when doing this. I also prefer the dessert richer.
- Fold the whipped cream into the egg mixture, careful not to knock out too much air.
Step 3: Assemble the tiramisu
- Add a layer of cacao powder to the bottom of your dish. I used a Pyrex dish that’s 6×8 inches/15×20 cm.
- Dip each ladyfinger into the espresso mixture for just 1-2 seconds and lay them into your dish until you have a single layer of soaked ladyfingers. Be careful not to oversoak the ladyfingers, or they'll become too soggy and make it harder to slice pieces of your tiramisu. It’ll also make the dessert watery (mine were actually slightly oversoaked this time- eep).If you're worried about this, I recommend you dip just one side of the ladyfingers in the coffee mixture for 2 seconds, then flip it over when laying it in the dish – that way, the espresso mixture will slowly filter down to the other side of the biscuit, for the perfect amount of soaking.
- Add half of the mascarpone cream mixture over the ladyfingers and use a spatula to spread it into an even layer.
- Arrange another coffee-soaked ladyfinger layer and top with the remaining half of the cream mixture. Then dust the top with a light coating of cacao powder.Alternatively, you can omit the cacao powder for now, as it will become "wet" while the tiramisu chills/sets. Just add the cacao powder right before serving.
Step 4: Allow the tiramisu to chill
- Transfer the tiramisu to the fridge to set for at-least 4-5 hours or overnight. Then, enjoy!
How to Store?
- Make ahead: since the tiramisu requires hours of chill time, I actually recommend you prepare it the day before you plan on serving. In fact, the flavor always tastes best after a day of setting.Storing: store any leftovers covered tightly in the refrigerator for up to 3 days, though it's best enjoyed after a day of setting and then within 24hrs.Freeze: alternatively, freeze the homemade tiramisu for up to 2 months. To save yourself from having to keep the dish in the freezer, line it with plastic wrap or tin foil (plus overhang) before assembling the tiramisu. Once solid, remove the tiramisu from the container and wrap tightly to protect it from freezer burn. When you want to thaw it, place it back in the dish and leave it in the fridge overnight.If you plan to freeze some immediately, then omit the cocoa powder before freezing.
Notes
- Make tiramisu cups: if you want to make individual-serve tiramisu in a cup, I recommend crumbling the ladyfingers into your cups and brushing/pouring a little alcohol over them. Alternatively, you can carefully cut them the size of your cup right after you’ve dipped them in the coffee. Then layer up the fillings and allow them to set. I still recommend 4 hrs minimum for the flavors to meld and develop.
- For patterned cream: you can transfer the cream mixture into a pastry bag and use different nozzles to create different shapes in the cream for more decorative finishing.
- Using mascarpone well: make sure to mix the mascarpone cold, just 5 or so minutes from the fridge, and use full-fat natural mascarpone.
- Mixing the mascarpone: be careful not to overmix the mascarpone, or else it can curdle. You want it “just” mixed until the ingredients are combined
- Use fresh ingredients: avoid using eggs, cream, or mascarpone close to the expiration date. Otherwise, they can impact the texture of the tiramisu.
- To control the amount of coffee: rather than dipping the biscuits, you can use a pastry brush to brush the coffee over the biscuits. Then, as it soaks up, the coffee will filter down the biscuits.
Nutrition
Nutrition information is automatically calculated, so should only be used as an approximation.


