
This post may contain affiliate links. Please read our disclosure policy.


How to make a gingerbread house from scratch using a custom template – including how to design, bake, construct, and decorate it, along with top tips and FAQs for the best homemade gingerbread house to eat or display!
Building a gingerbread house from scratch is a fantastic family activity kids will love, but it may seem daunting for beginners. Luckily, this post contains everything you need to know about how to make a gingerbread house and decorate it.
That includes making a gingerbread template, my solid gingerbread cookie dough recipe, step-by-step instructions to assemble it, decoration ideas, and lots of top tips and FAQs for an amazing gingerbread house every time!

Ingredients and Tools Needed to Make a Gingerbread House
Here is what you need for the best gingerbread house to enjoy during the holiday season.
Gingerbread House Ingredients
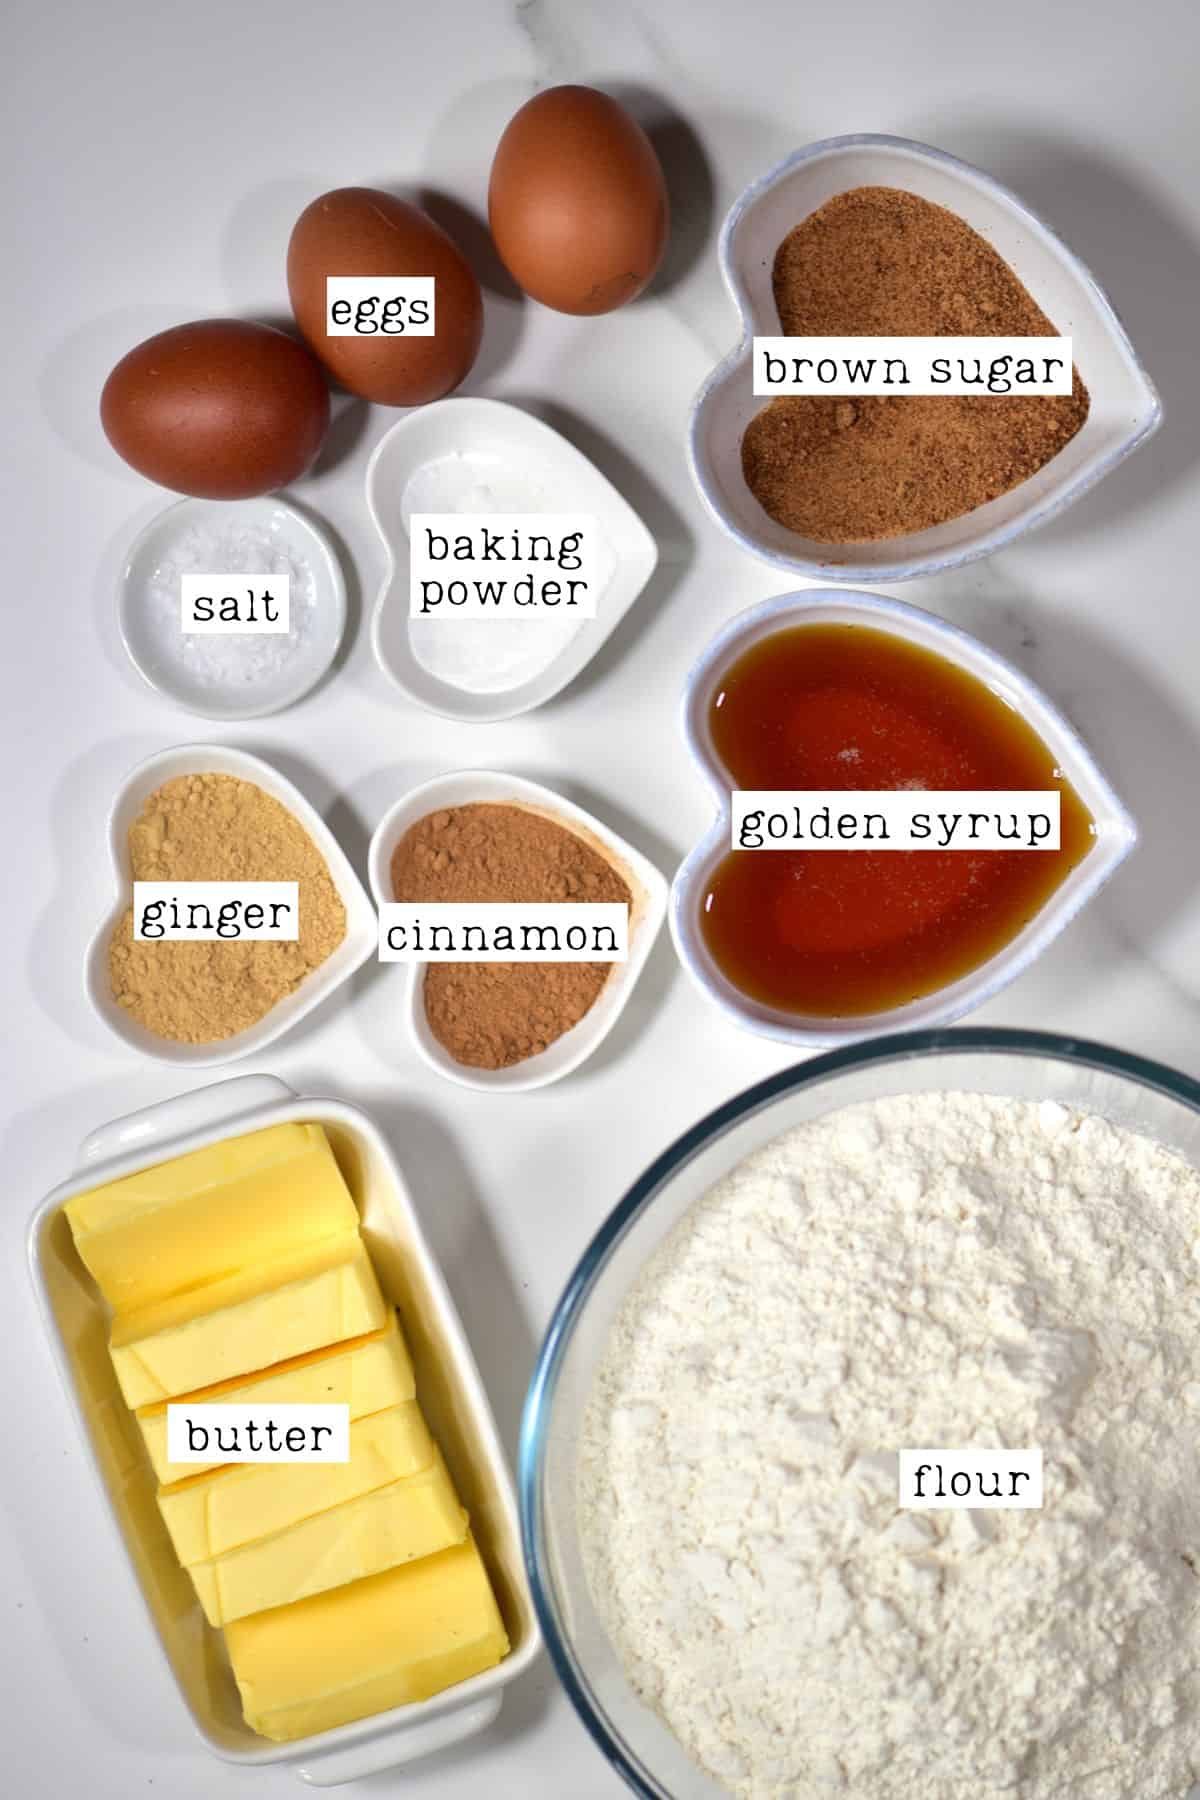
This Christmas cookie house recipe requires these pantry-friendly ingredients.
- Flour: Regular white all-purpose flour.
- Butter: Unsalted is best.
- Brown sugar: Important for the molasses flavor and darker color.
- Golden syrup: For more molasses flavor, replace a small amount of the golden syrup with molasses. Alternatively, use corn syrup mixed with molasses.
- Eggs: Use room temperature medium eggs.
- Baking powder: Just a small amount, so the pieces don’t puff up too much.
- Spices: This homemade gingerbread dough uses a simple combination of cinnamon, ground ginger, and salt.
Alternatively, use a pre-mixed “gingerbread spice” blend (including more spices – like cinnamon, ginger, cloves, allspice) for this homemade gingerbread recipe.
Royal Icing for Gingerbread House
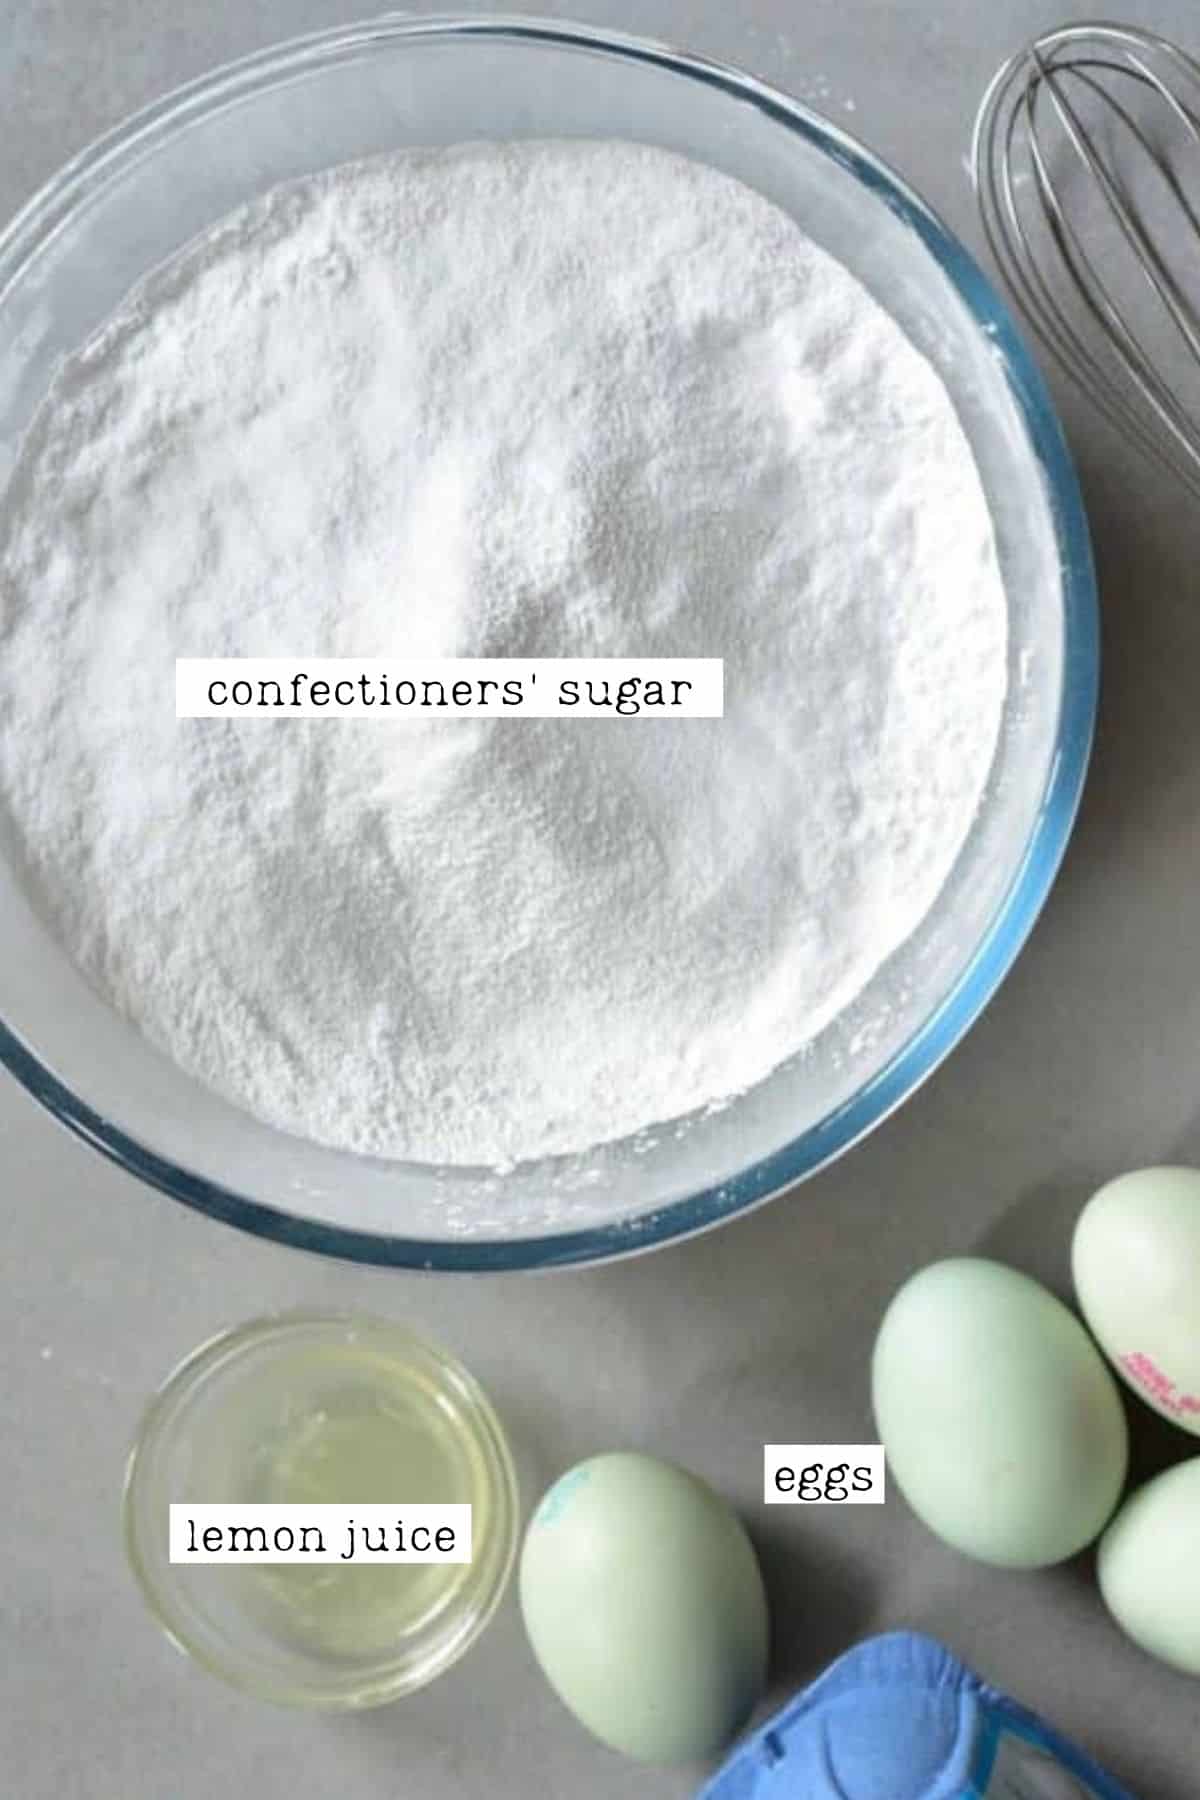
Royal icing is the best gingerbread icing recipe. Unlike buttercream or regular icing, it’s thick, stable, and hardens as it dries. This makes it a great “glue” to assemble the house and decorate it.
- Egg whites: If you plan to consume the gingerbread house icing, use pasteurized eggs to ensure it’s safe to eat.
- Icing sugar: Aka confectioners’ sugar (powdered sugar).
- Lemon juice: Use fresh lemon juice or lime juice, or use half the amount of cream of tartar (to help stabilize the egg white and prevent sugar crystallization).
- Cream or tartar: (Optional) Add a teaspoon to help stabilize the whipped egg whites and prevent sugar crystallization.
If you plan to use a lot of icing for decorating or as “glue” for decorations, make 1.5 or 2x batches of the royal icing recipe for gingerbread houses. You can also use natural food colorings to color portions of the icing for decorative detailing and/or add some orange or peppermint extract.
The Tools and Extras
You’ll need several gingerbread house supplies to create this Christmas or Thanksgiving gingerbread house.
- A ruler,
- Paper, pen/pencils, scissors – to make the template,
- Silicone molds (for the house texture – optional),
- Gelatin sheets (for the windows – optional),
- Piping bags (or a squeeze bottle or Ziplock with the tip cut off – for piping the royal icing),
- Plastic wrap,
- Baking sheets,
- Sharp knife/pizza cutter/Exacto knife,
- Rolling pin,
- Hand mixer or stand mixer,
- Measuring cups/spoons.
How to Build a Gingerbread House From Scratch
While there are several parts to making gingerbread houses, here is my simple step-by-step guide.
Make Your Own Gingerbread House Template
If you want to use my gingerbread house template (refer to the template for gingerbread house photos below), skip this first section. Otherwise, here is everything you need to consider when designing your own gingerbread house patterns:
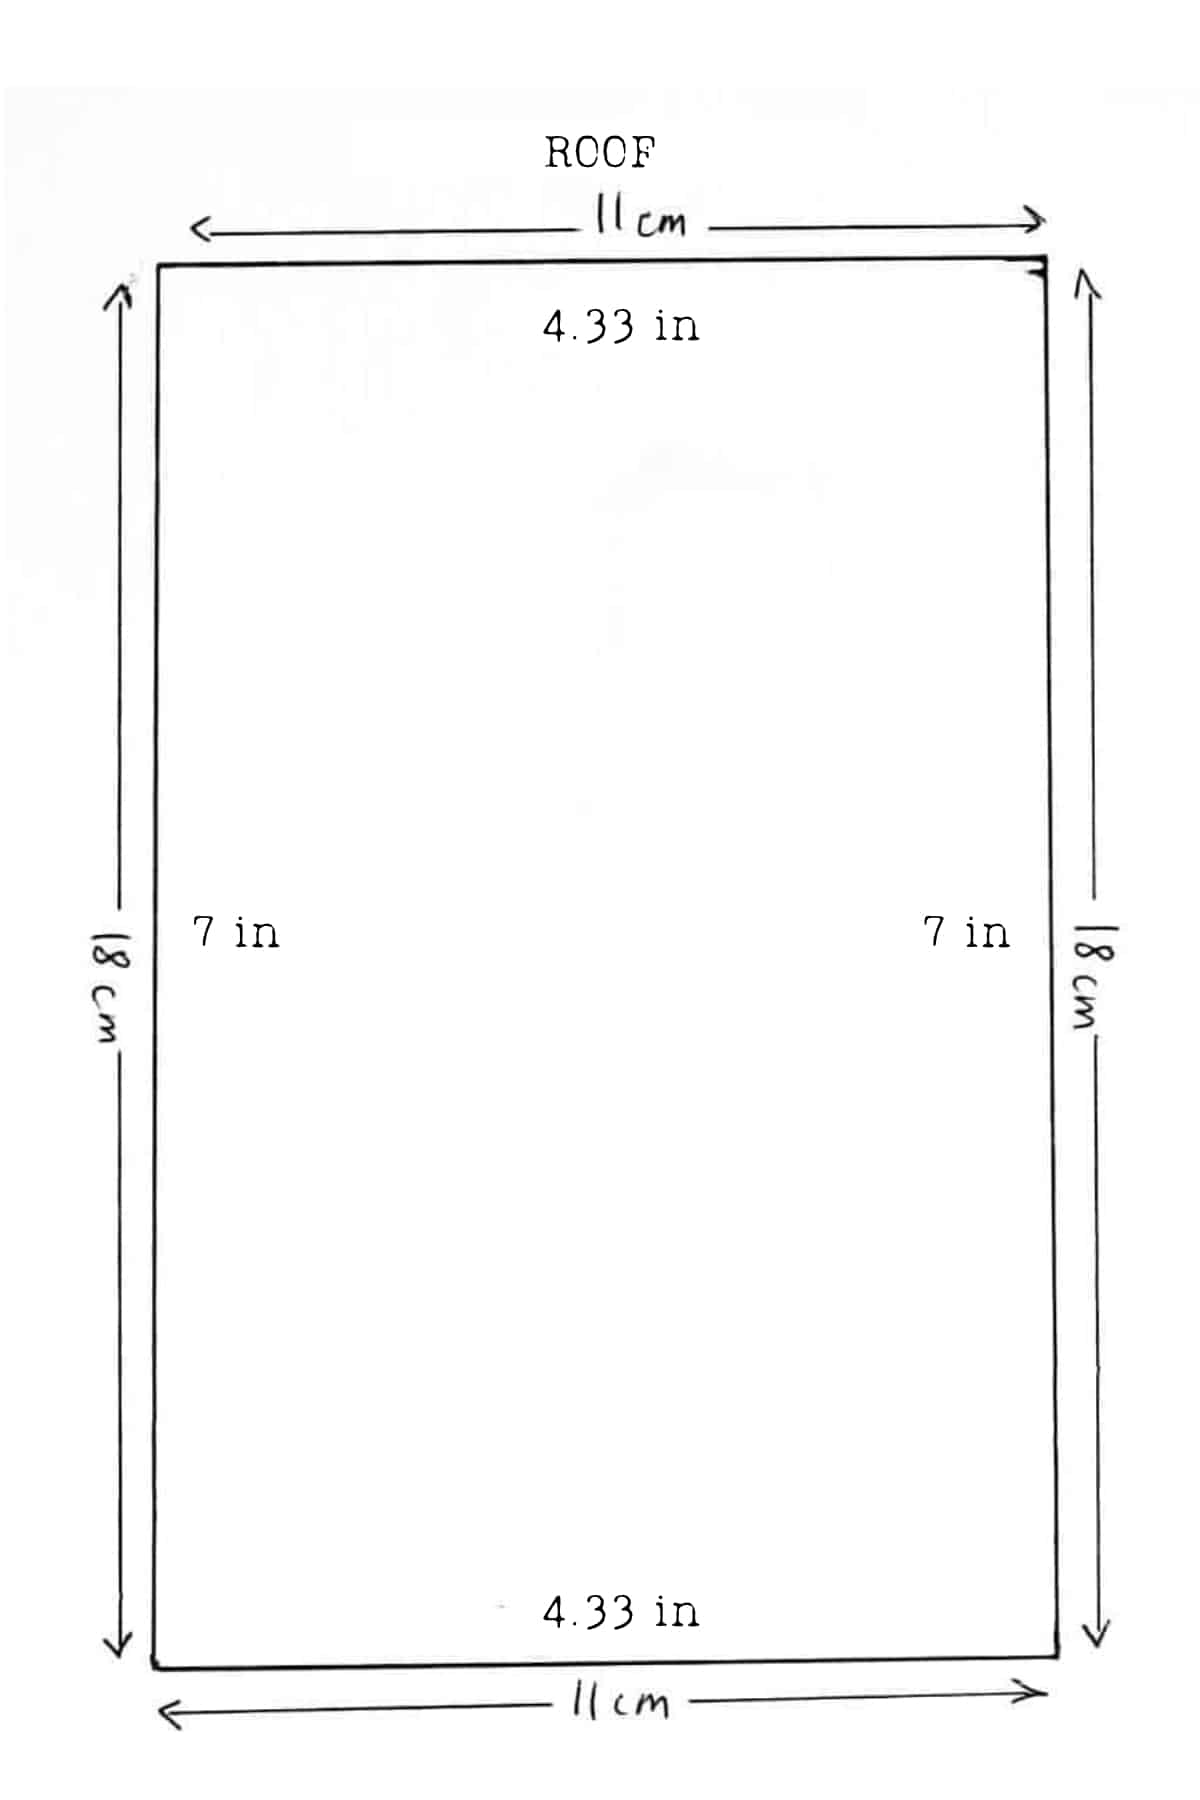
- The gingerbread house dimensions: The pieces must fit in your oven and on your oven trays. Remember, there will be a minimum of 6 pieces (4 walls and the 2 roof slabs) to bake.
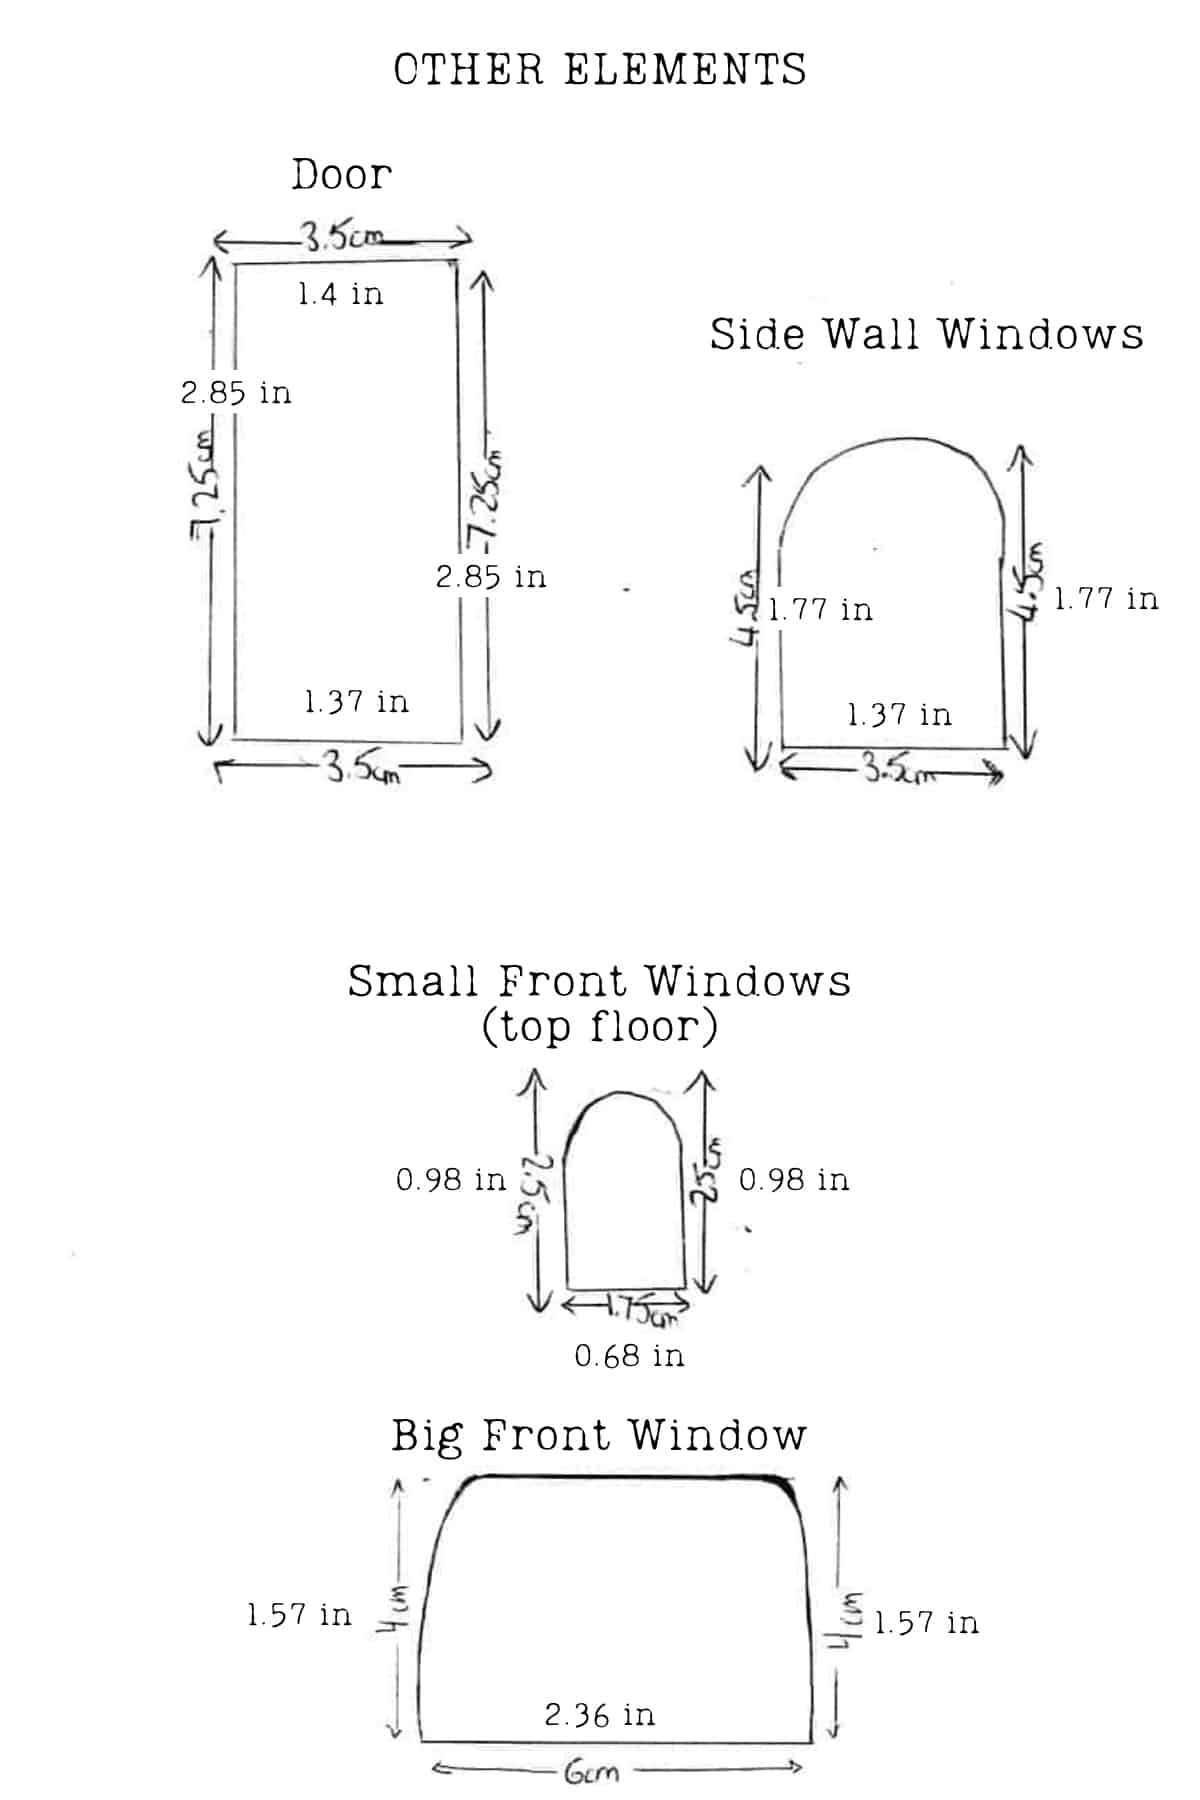
- Additional decoration: With the key pieces out of the way, are there any other pieces you want in your design? I.e., window frames, a chimney, a door, decorations, etc. You can even get fancy and make a deck with columns or a porch.
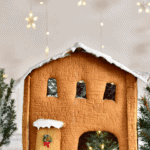
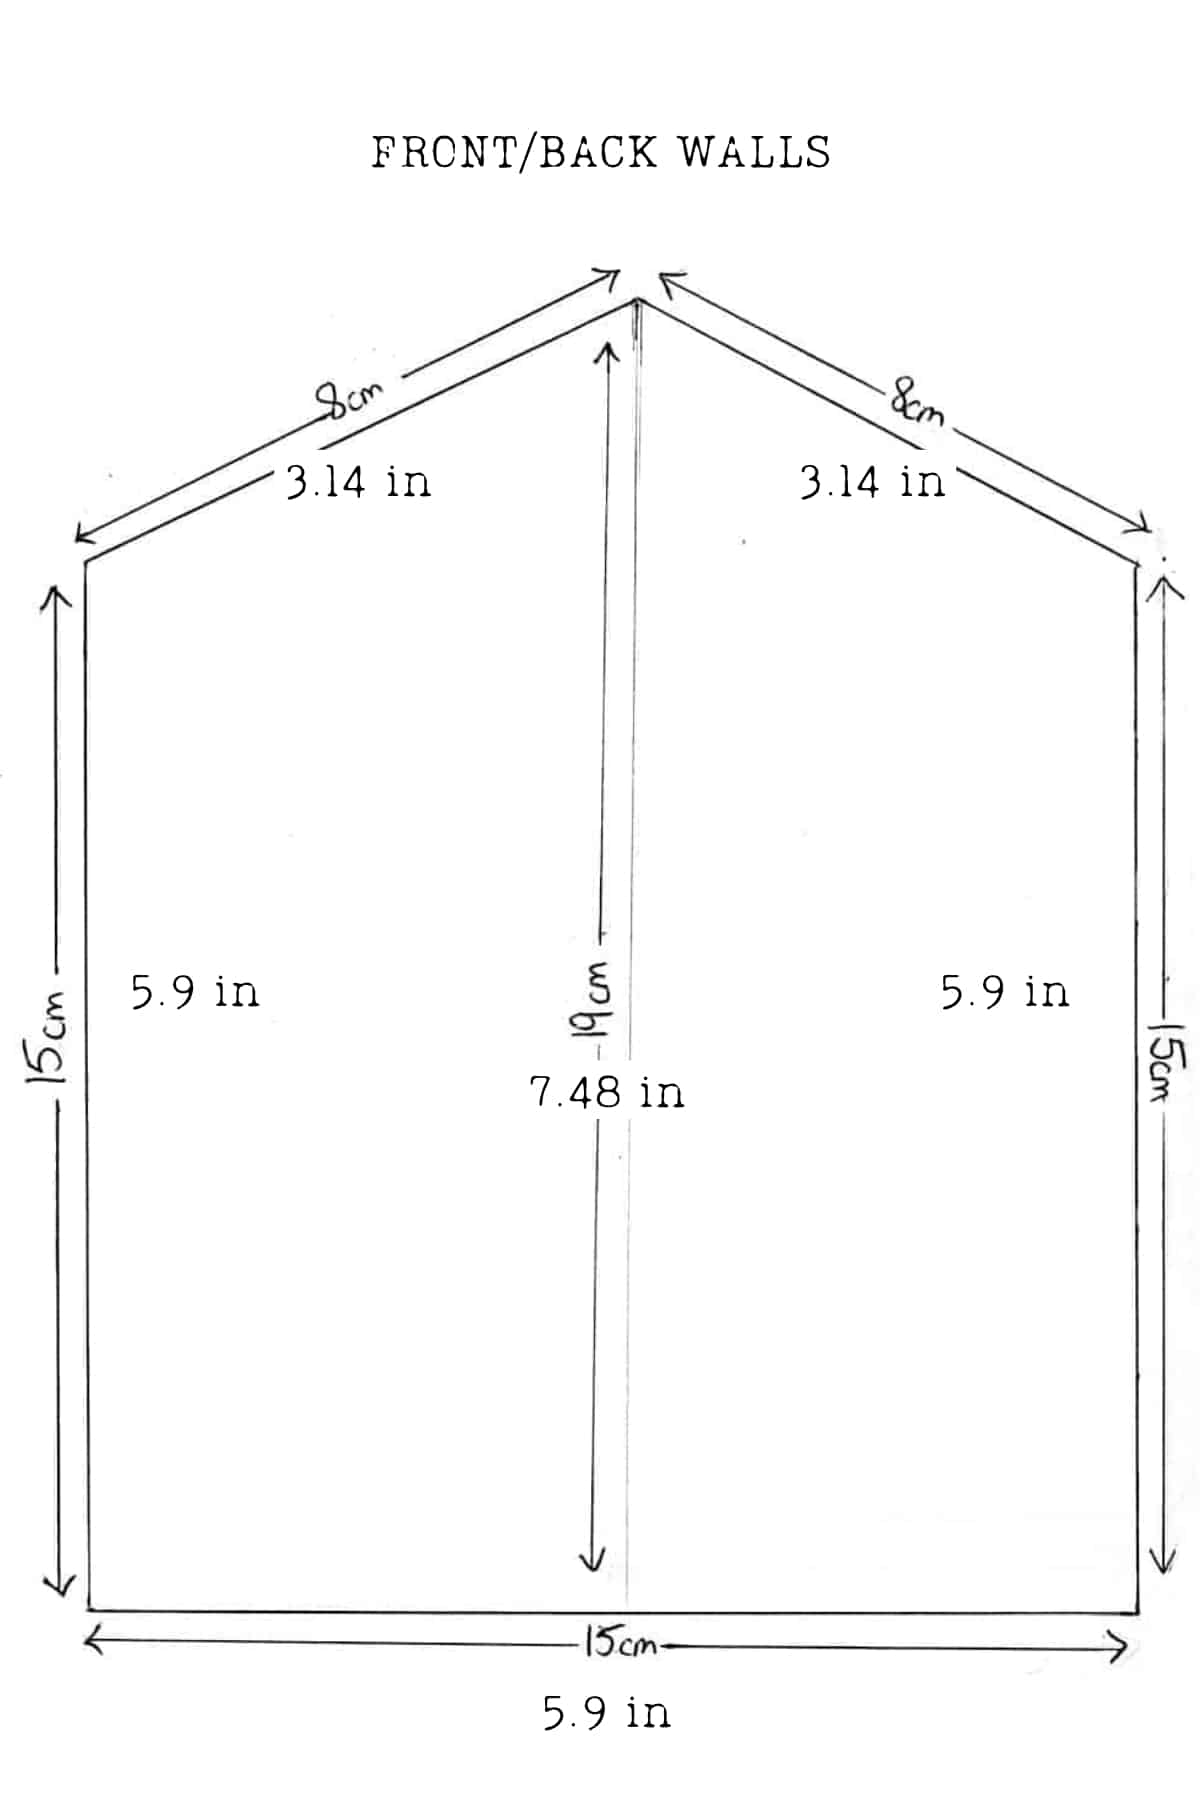
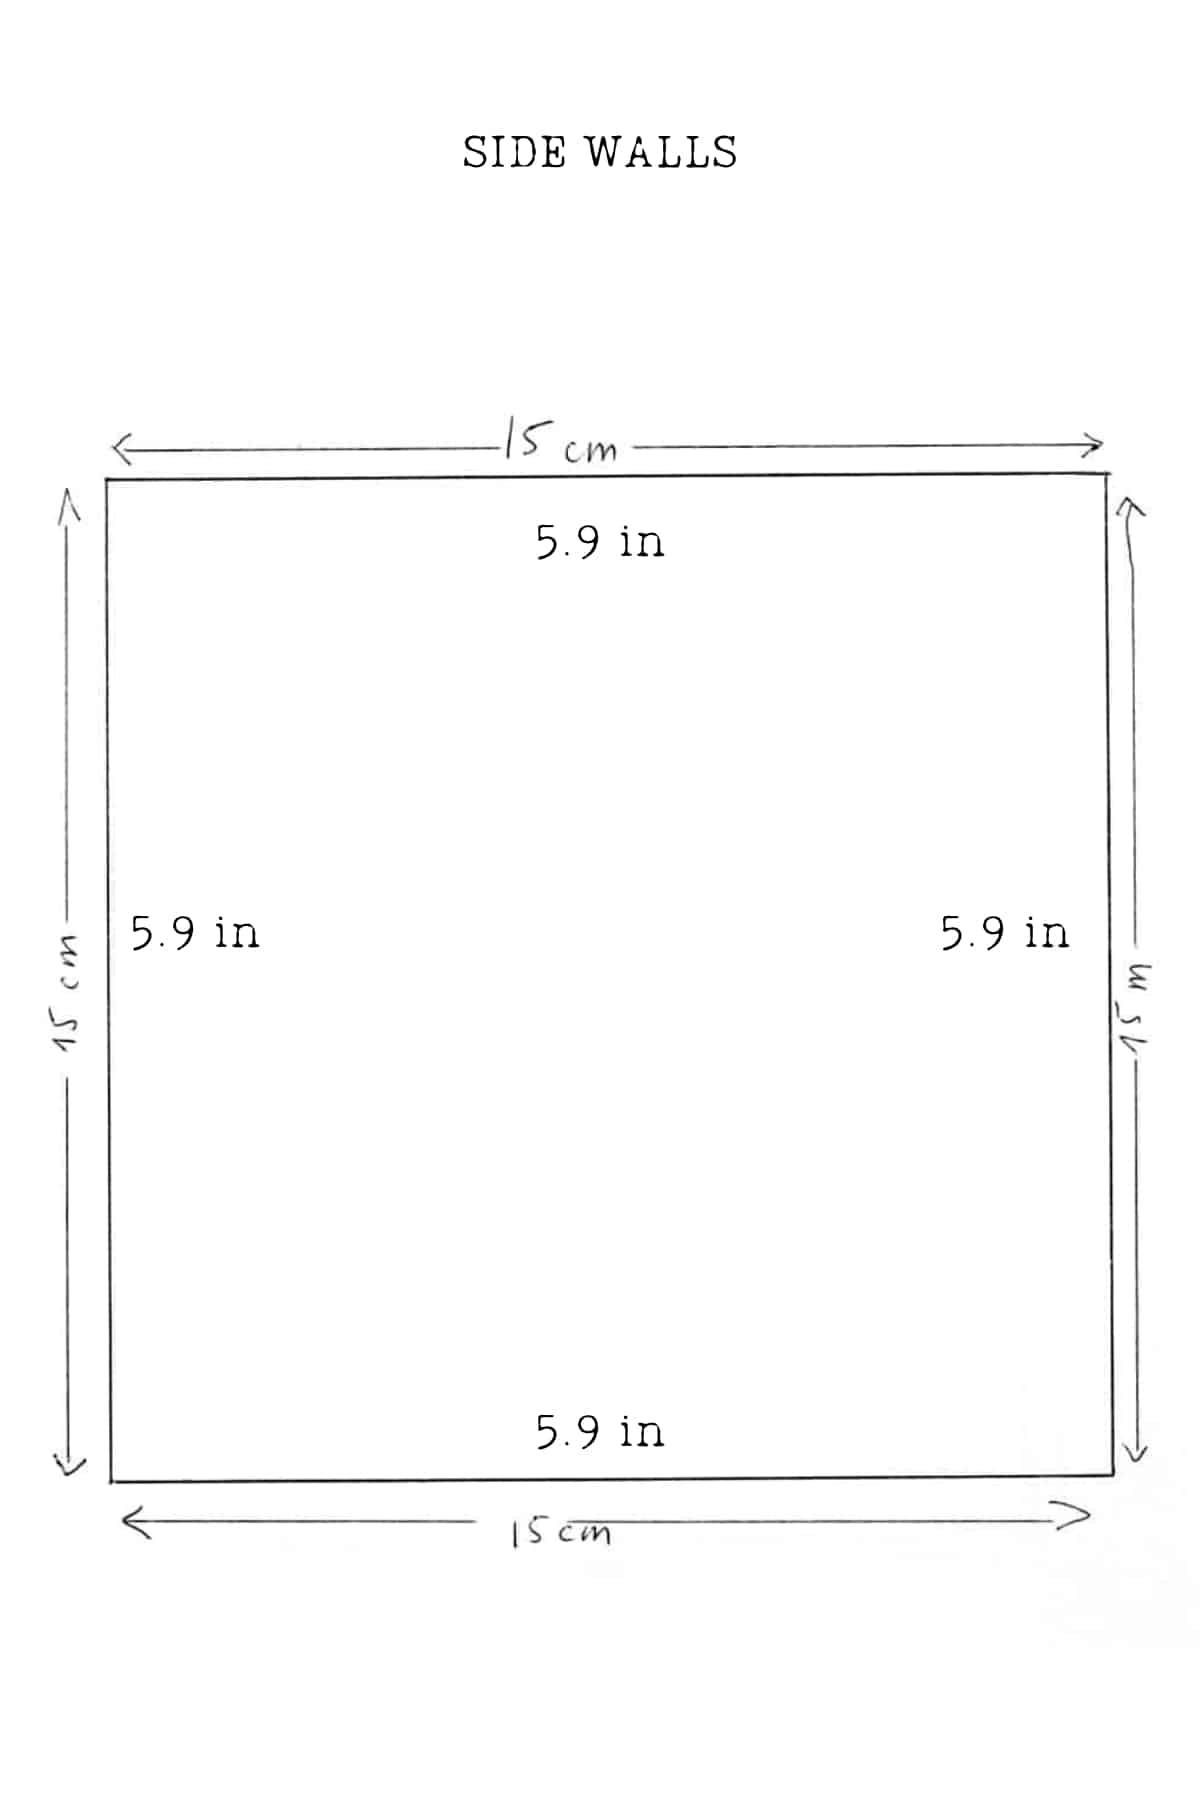
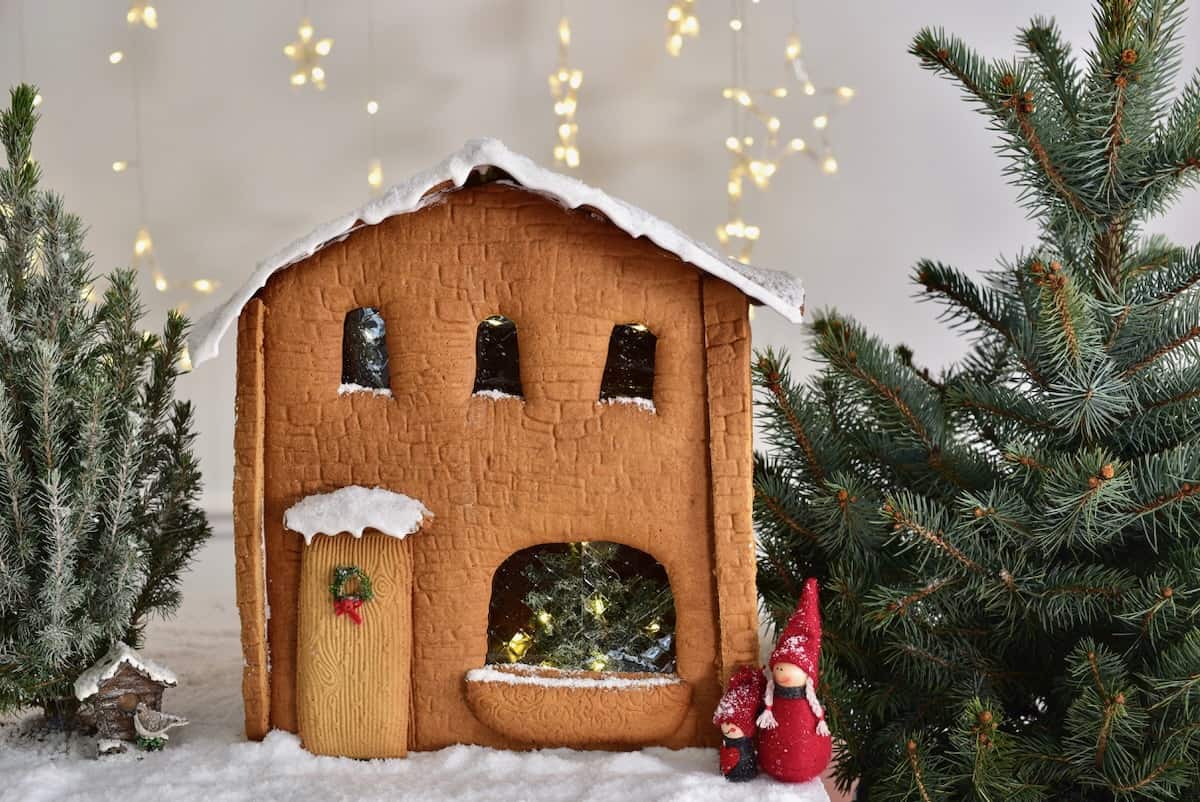
- The shape: As you can see from my template below, I made a basic gingerbread house shape with a taller front and back, square sides, and rectangular roof panels.
- Windows & Doors: Whether you plan to display something inside the house, consider how many windows you want and their size, etc., and they’ll all need to be added to the gingerbread house pattern if you want them to be an even size.
You can also search for gingerbread house ideas/patterns/templates online and/or purchase them.
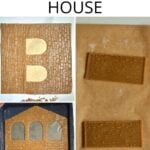
Cut Out the Pattern Pieces
Once your design is complete, it’s time to prepare the pattern and draw a gingerbread house. You’ll only need one cut-out template for each of the matching pieces. I.e., one front piece, one side wall, etc.
Use card (the most rigid, easiest option), paper, or baking paper. Measure the pieces following mine or your custom template. Then use scissors to cut them out.
I recommend using old cardboard boxes to make a “draft” template and build it to ensure everything fits together and works.
Make the Gingerbread House Dough
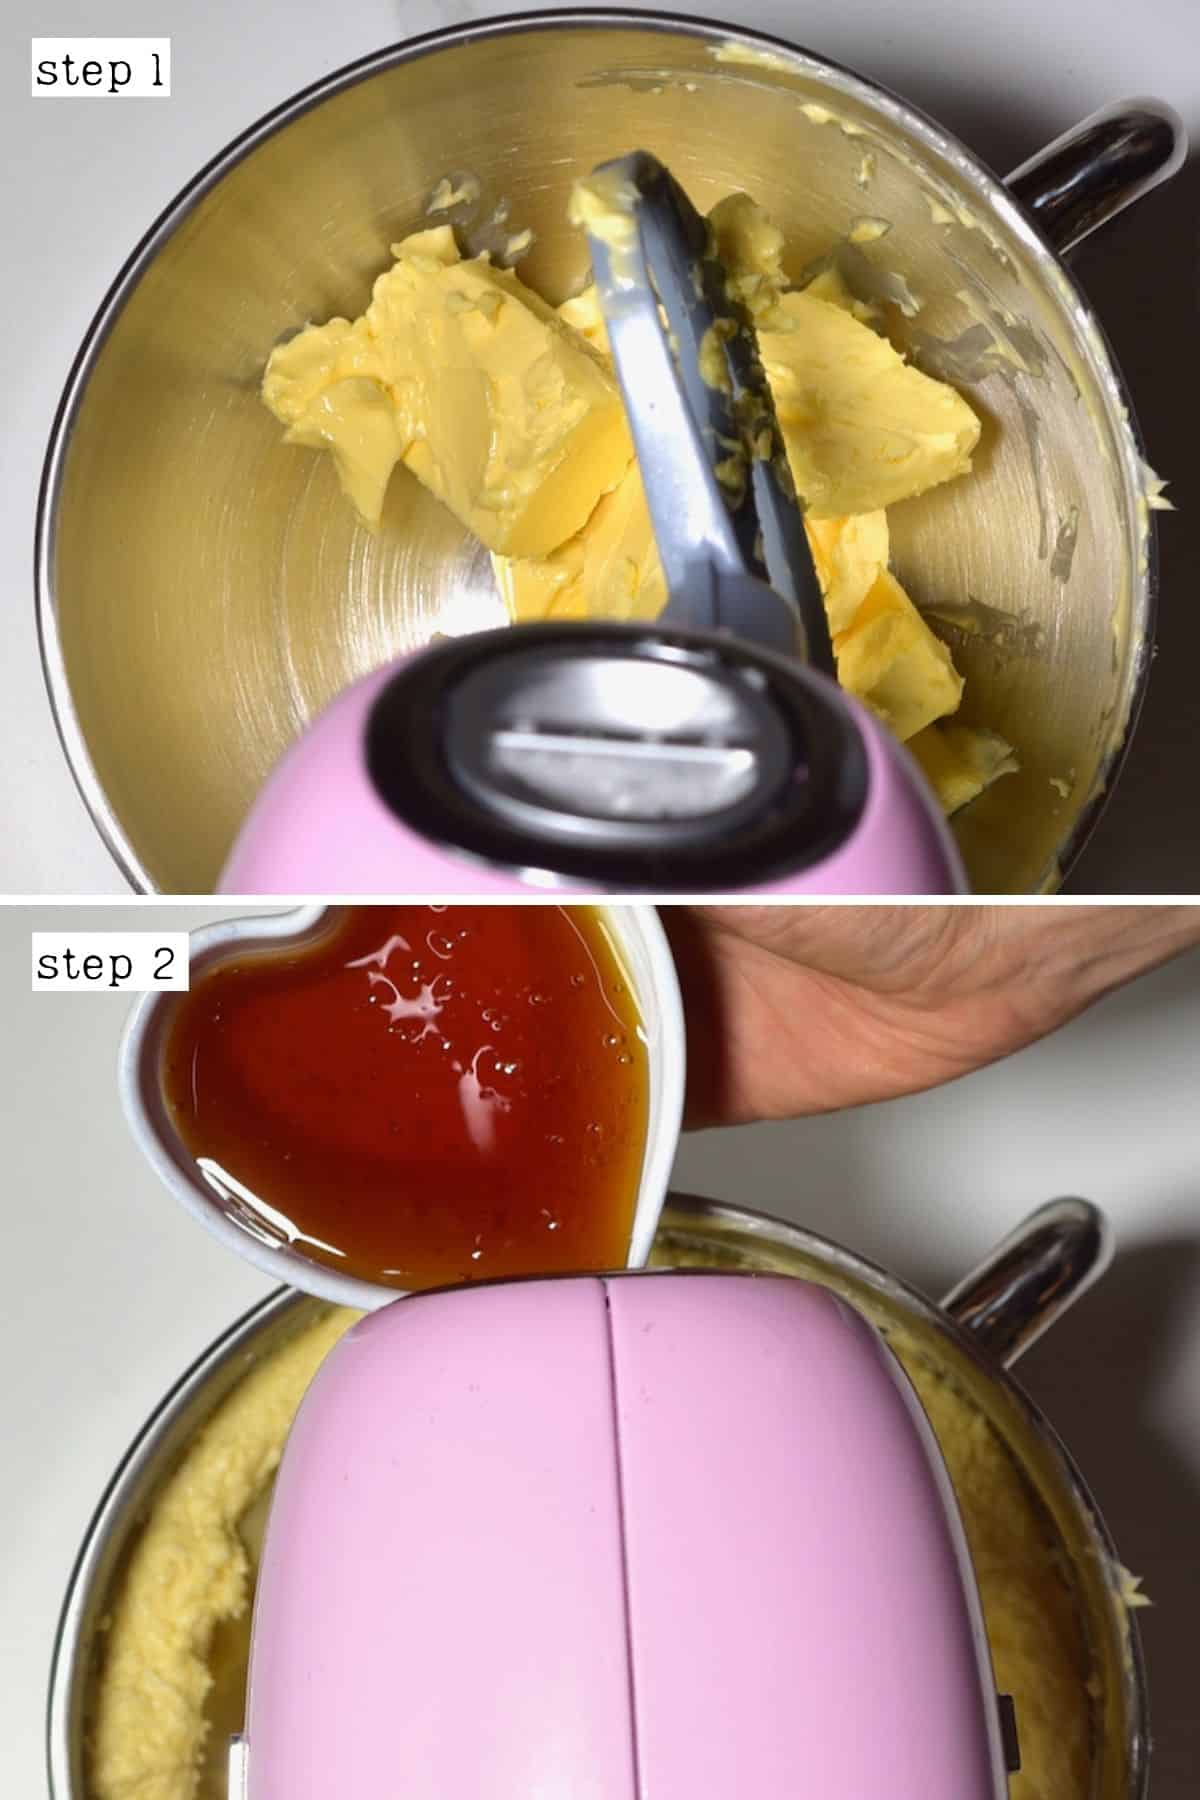
Using a hand mixer or a stand mixer (using the paddle attachment), start by creaming the brown sugar and softened butter until it’s light and fluffy.
Then, gradually add the eggs, one at a time, while continuing to mix, and finally, the golden syrup.
Doing this step with a manual whisk is possible, but it takes a lot more effort and time.
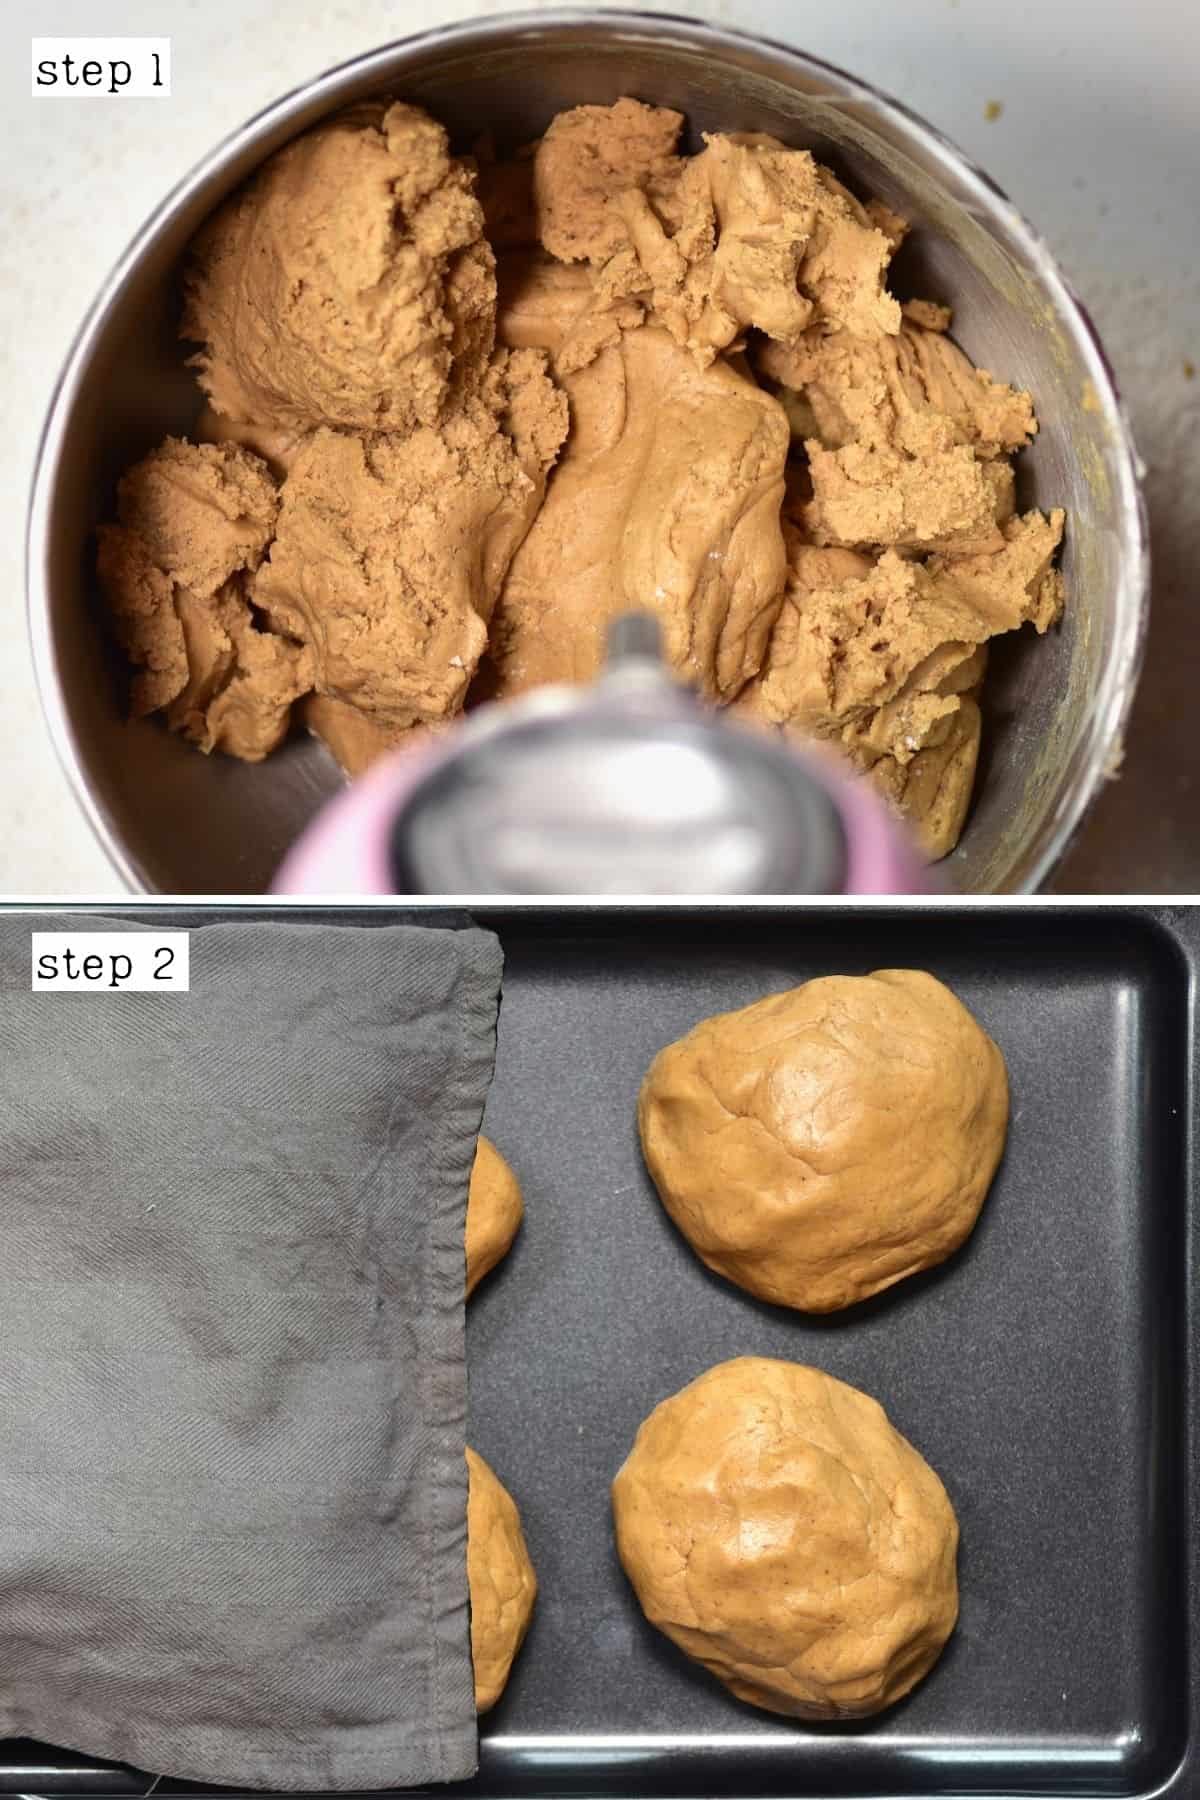
Next, sift in the dry ingredients (flour, baking powder, and spices), and mix until you achieve a smooth dough.
Separate the gingerbread into several smaller, more manageable pieces. Then wrap them tightly in clingfilm and refrigerate for at least 2 hours, though overnight is even better.
Do You Have to Chill Gingerbread Dough
Yes, chilling the dough flour mixture helps stop it from spreading as much while it bakes and slightly dries out the dough for the correct consistency. The un-chilled dough puffs up and cracks a lot.
How Thick to Roll Gingerbread House Dough
At this point, you can preheat the oven to 350ºF/180ºC.
Then, lay a piece of lightly flour-dusted parchment paper on your kitchen counter and roll out one piece of the gingerbread dough using a floured rolling pin to about 1/4-inch thick (½ cm).
How to Make Gingerbread House Pieces
Place a template over the dough, using a pizza cutter or sharp knife to trace the template/pattern. Use a ruler to ensure the cuts are straight.

Repeat this with the remaining gingerbread dough and all the house pieces and decorative pieces you’d like.
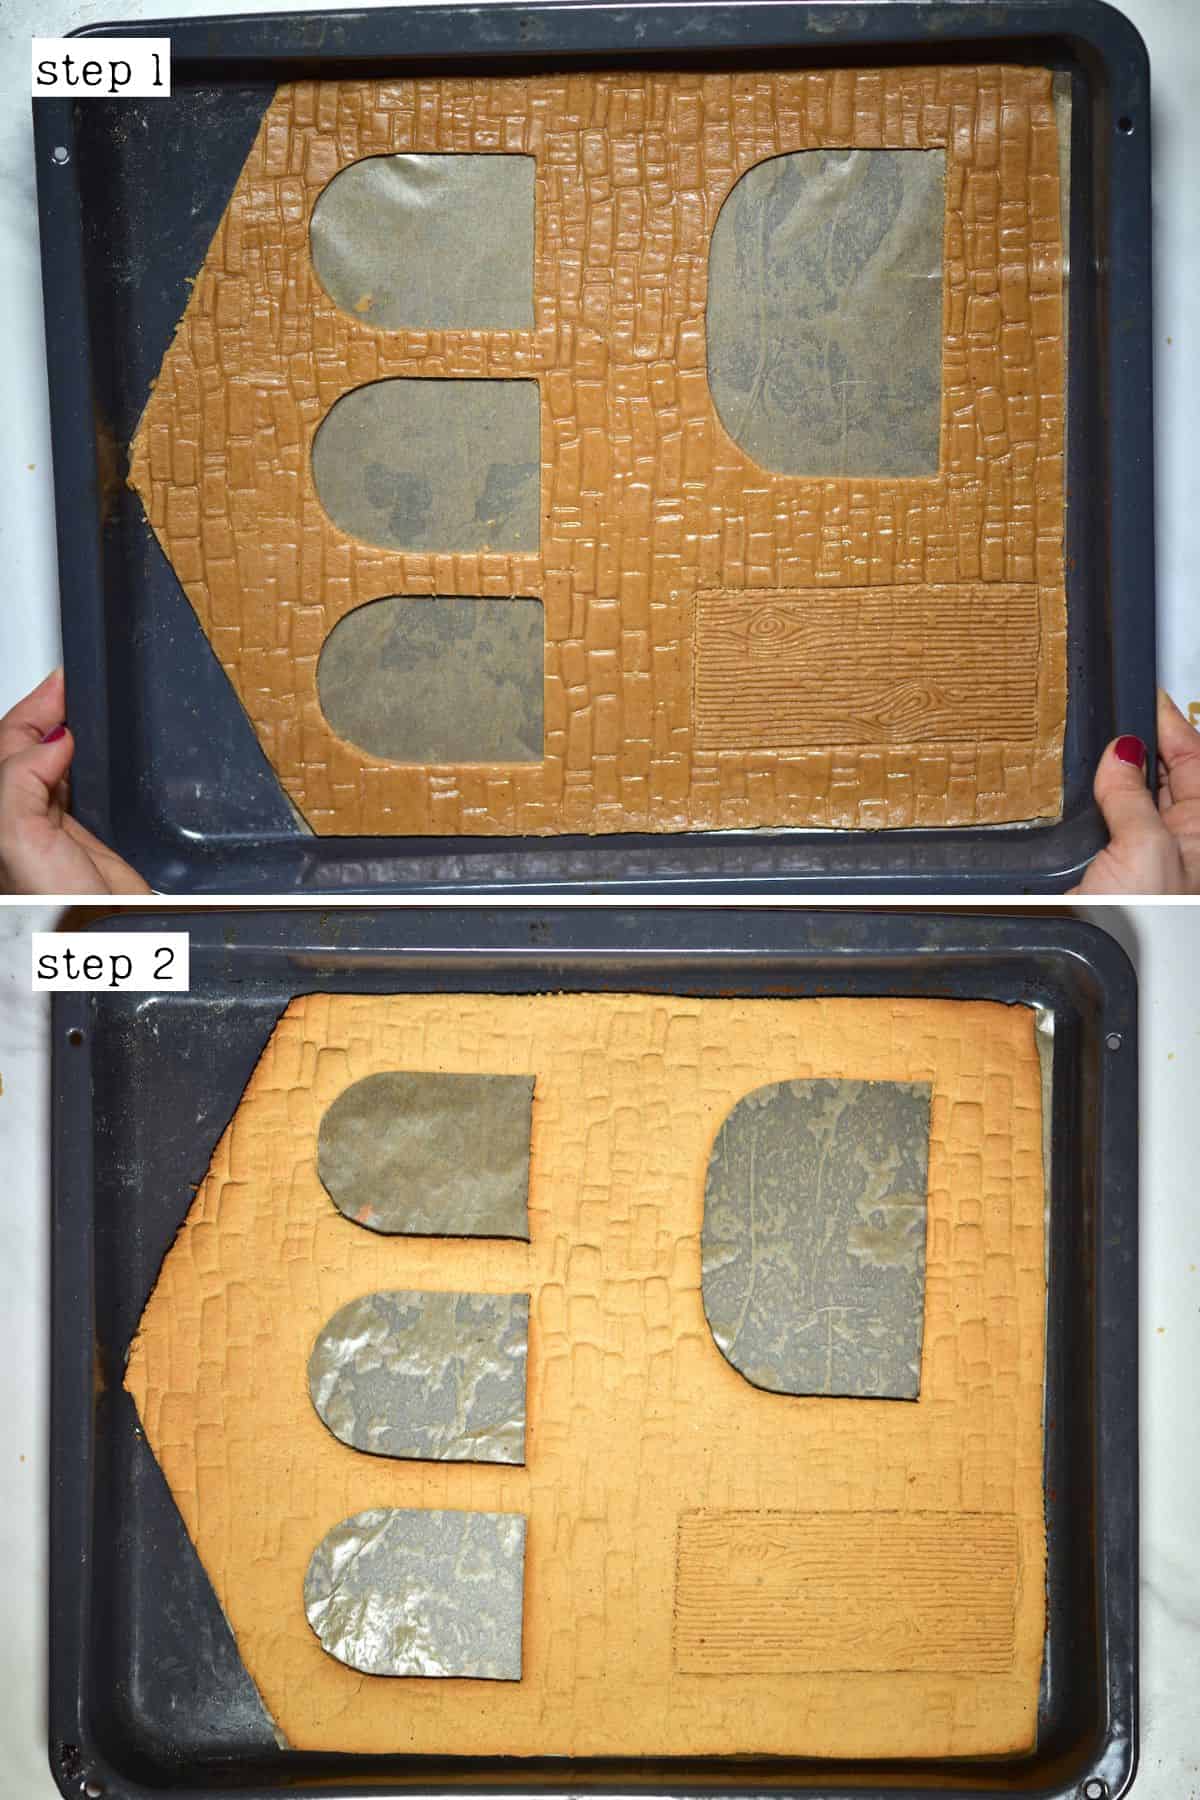
To add realistic texture to the gingerbread dough walls, I use textured silicone sheets to press into the cookie dough. However, you can also use a knife or fork to make your own pattern.

How Long Does It Take to Bake Pieces for Gingerbread House
Transfer the gingerbread pieces to parchment-lined baking ban/sheets or silicone mats (cook them in batches if necessary), and bake for between 11-15 minutes (5-8 minutes for small decorative pieces) until the edges are just browning.
It’s better if they’re on the slightly over-baked side rather than under-baked, as they’ll be sturdier.
Then, leave the cookies to cool completely.

Prepare the Royal Icing
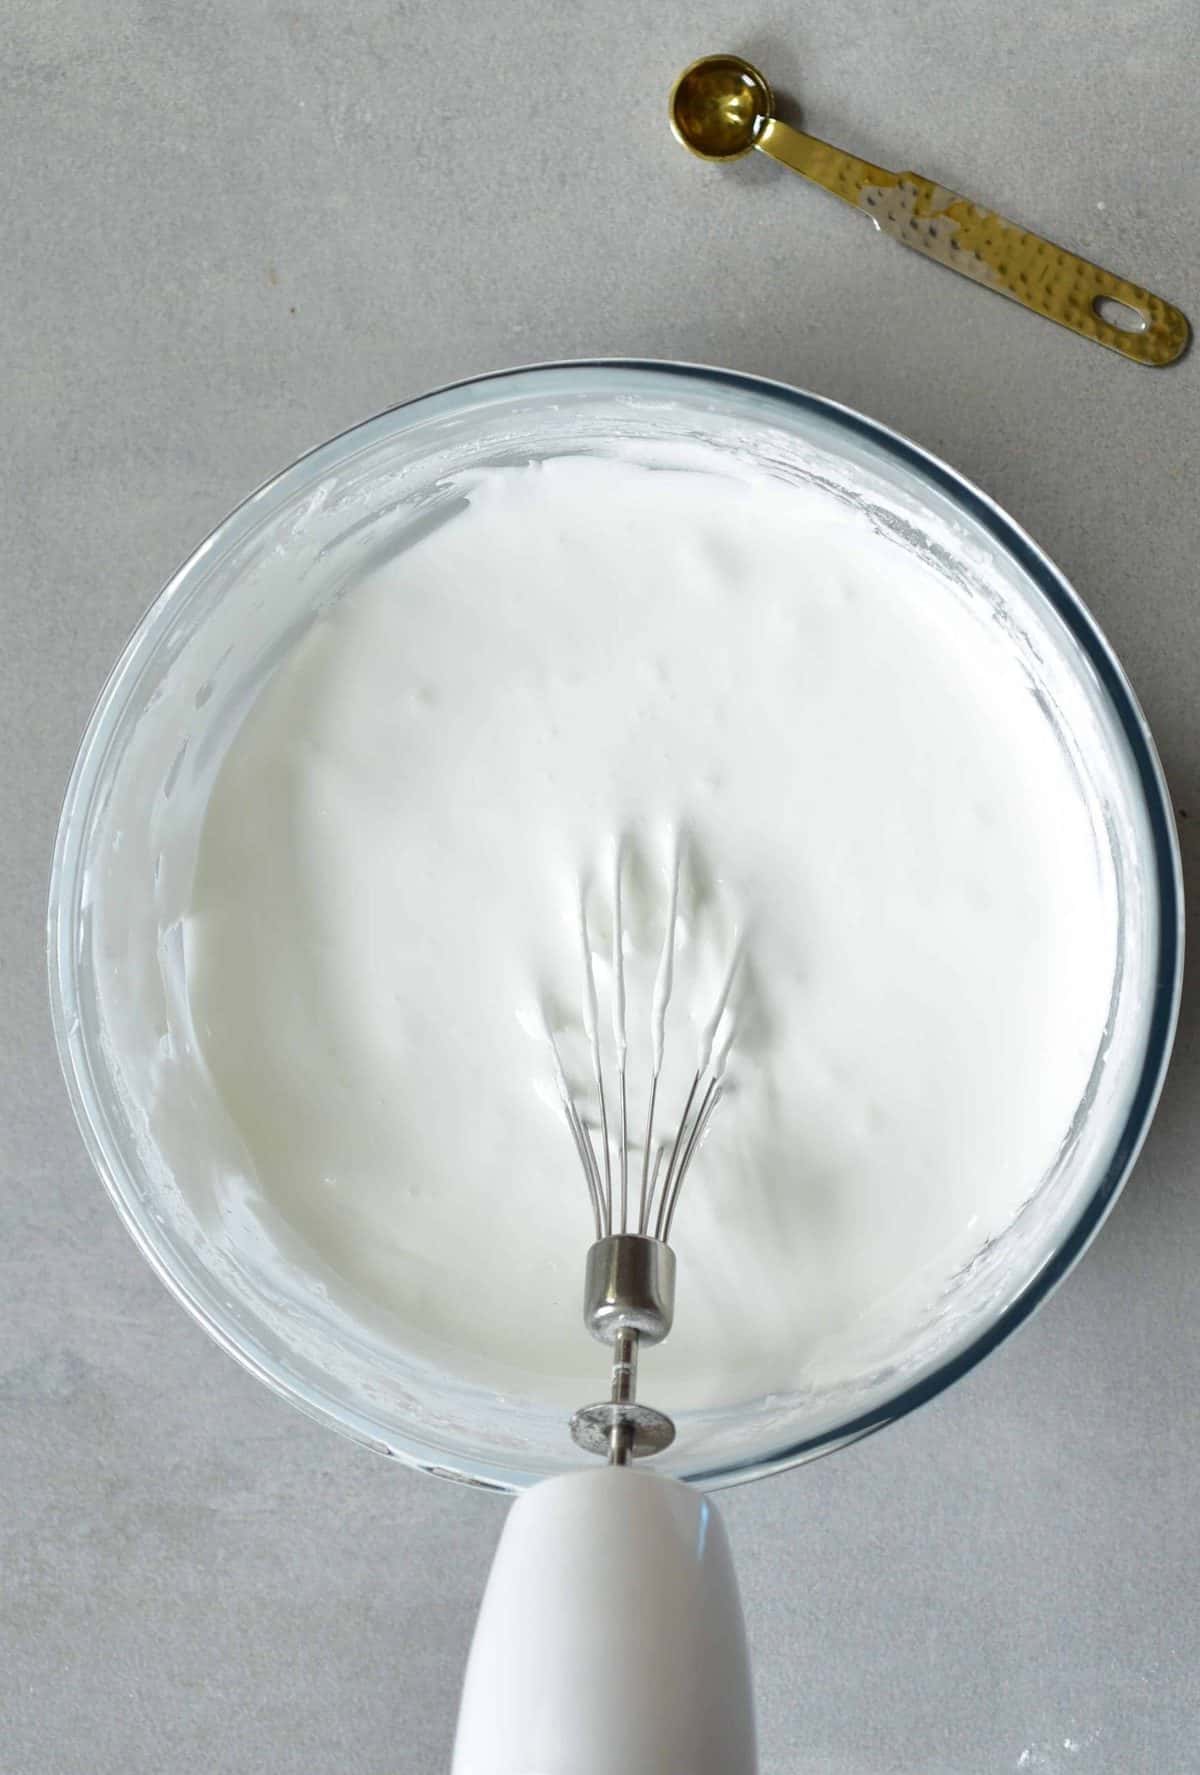
While the cookies cool, prepare the royal icing. To do so, beat the egg whites until light and foamy. Then, gradually add in the lemon juice and icing sugar until soft, creamy, and thick like toothpaste.
If it’s too thin, add more icing sugar. Too thick? Add some water, a few drops at a time.
Keep it in the bowl covered with a damp tea towel and/ or transfer some or all of it to a squeeze bottle/piping bag (or a Ziplock with the tip cut off) for more precision decorating.
How to Glue Gingerbread House Together
If you plan on piping a lot of decorations and adding candies, it is best to do these decorations BEFORE assembling, so you aren’t wrestling with gravity. Also, add the gelatin sheet windows now, if using, sticking them with a royal icing border.
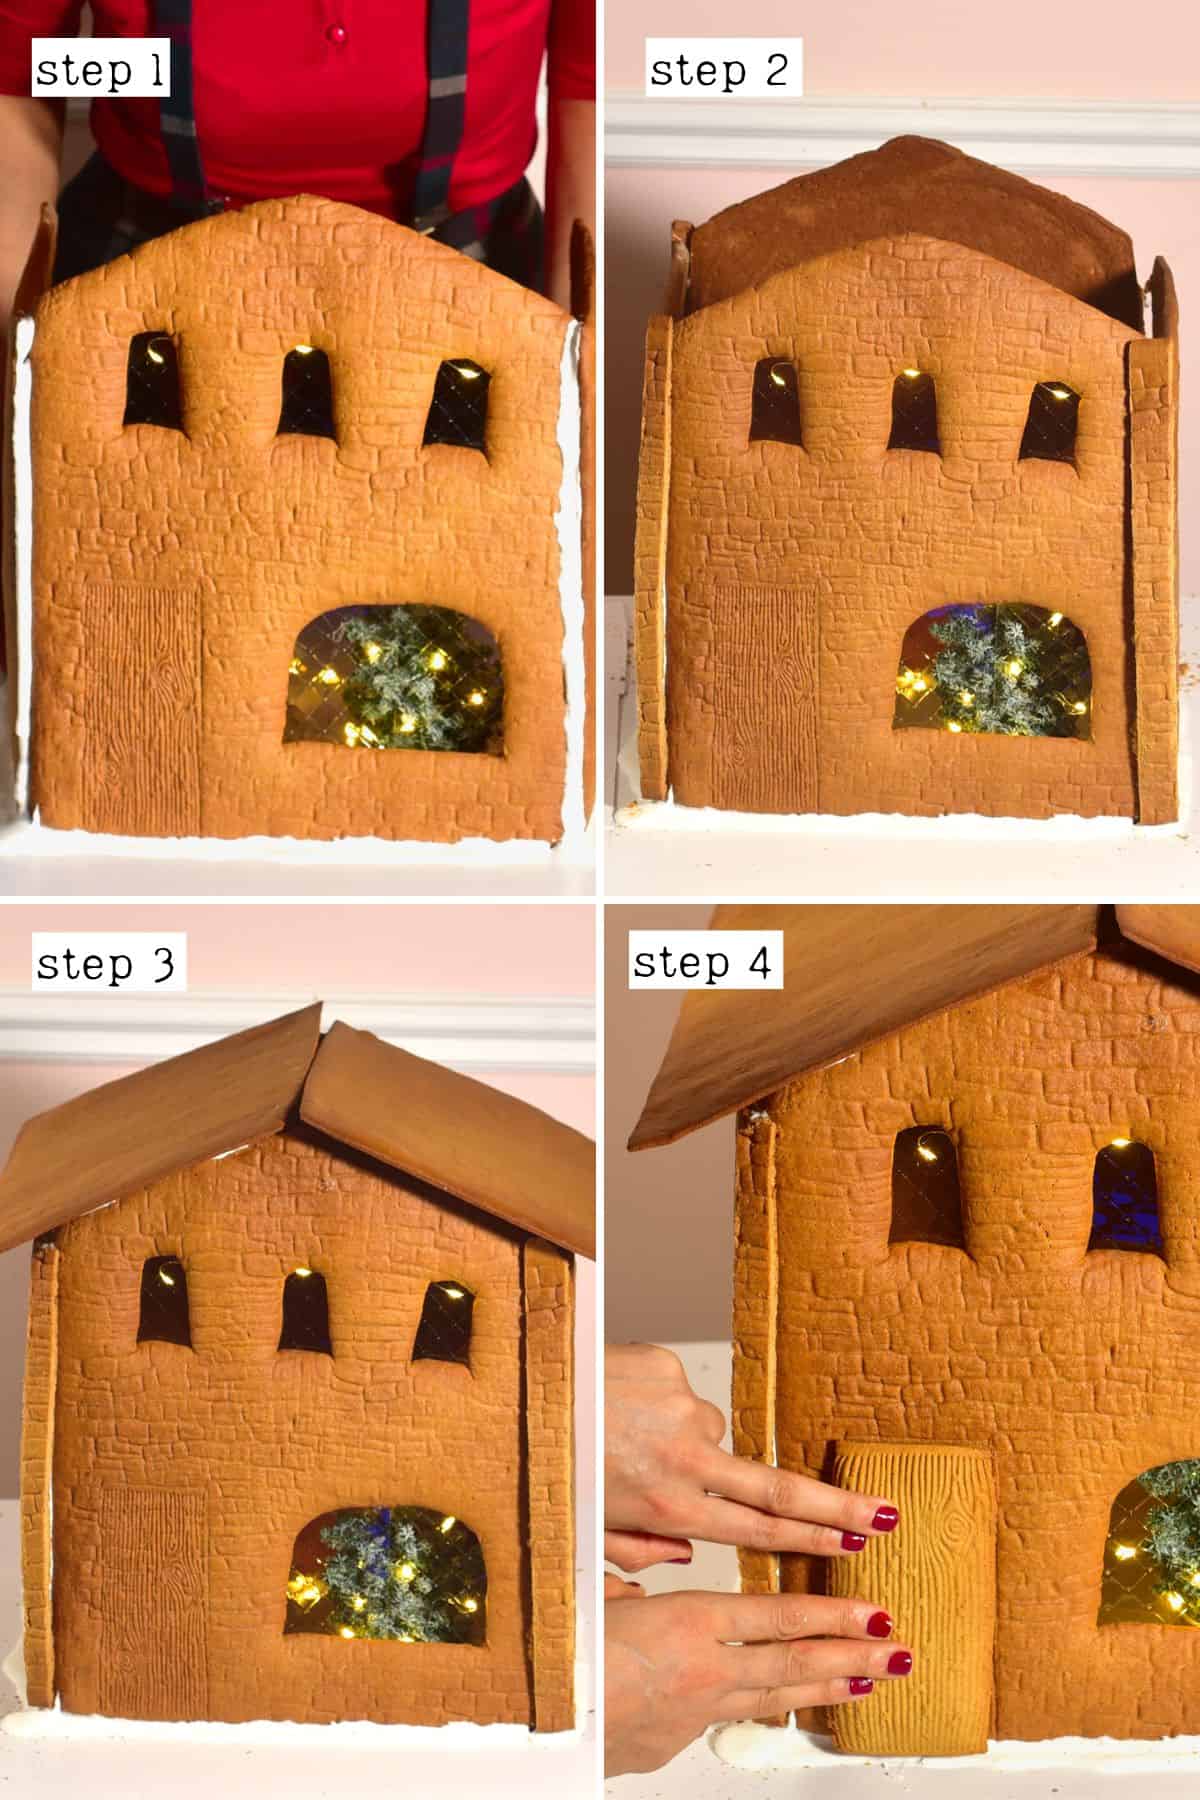
Now, it’s time to assemble the house. If you plan to stick it to a base, start by piping a thick line onto your base and pressing the wall piece into it, holding it for a while to harden. Otherwise, start by sticking two walls together, with a thick line of piped icing between them.
If you don’t want the icing “glue” to be seen too much, pipe the thick lines inside the house. To keep the gingerbread pieces in place, you could use heavy glasses or other items on either side of the walls.

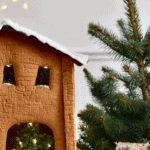
You can also add any interior decorations to the house now (like a fake Christmas tree, fairy lights, etc.).
Leave it to dry for at least an hour before adding the roof pieces, piping icing along the entire top of the house’s walls and between the two roof pieces in the middle.
Don’t worry if there are any imperfections. You can use the royal icing as “snow” to cover them. Untidy seams of your Christmas gingerbread house can also be fixed later with more icing or candy.
How to Decorate a Gingerbread House
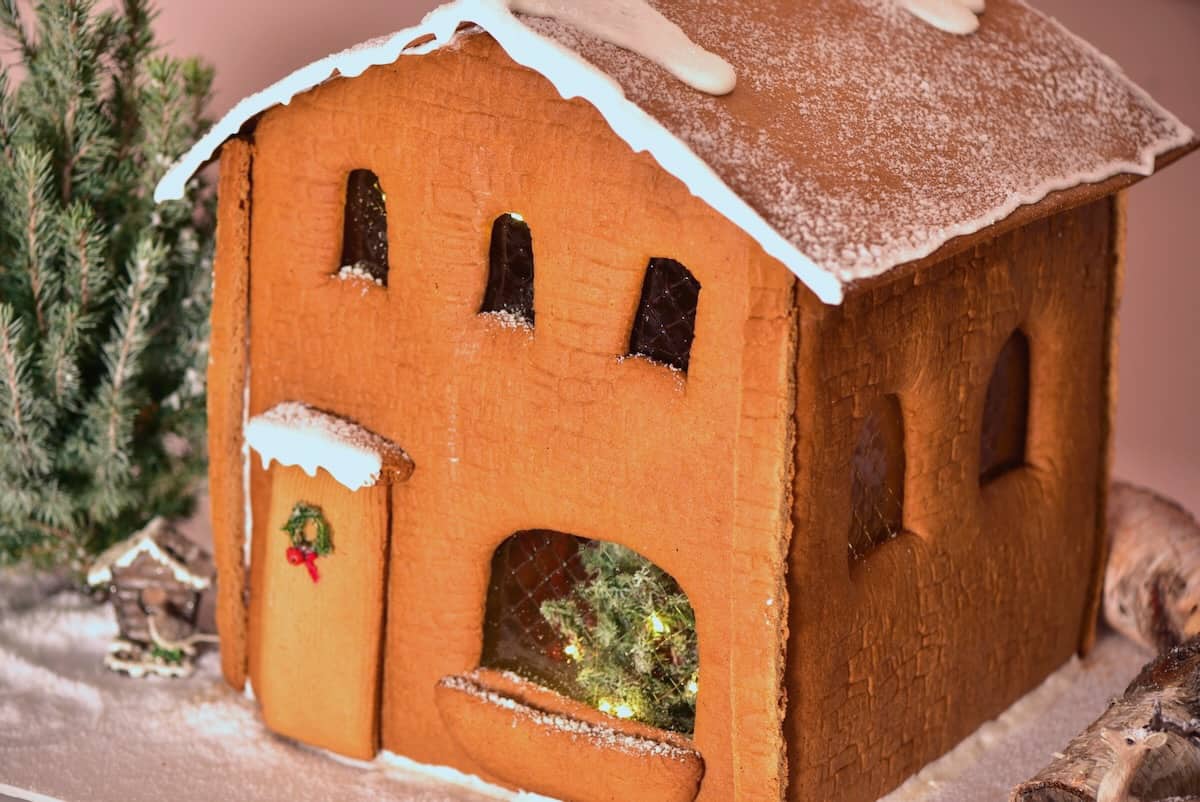
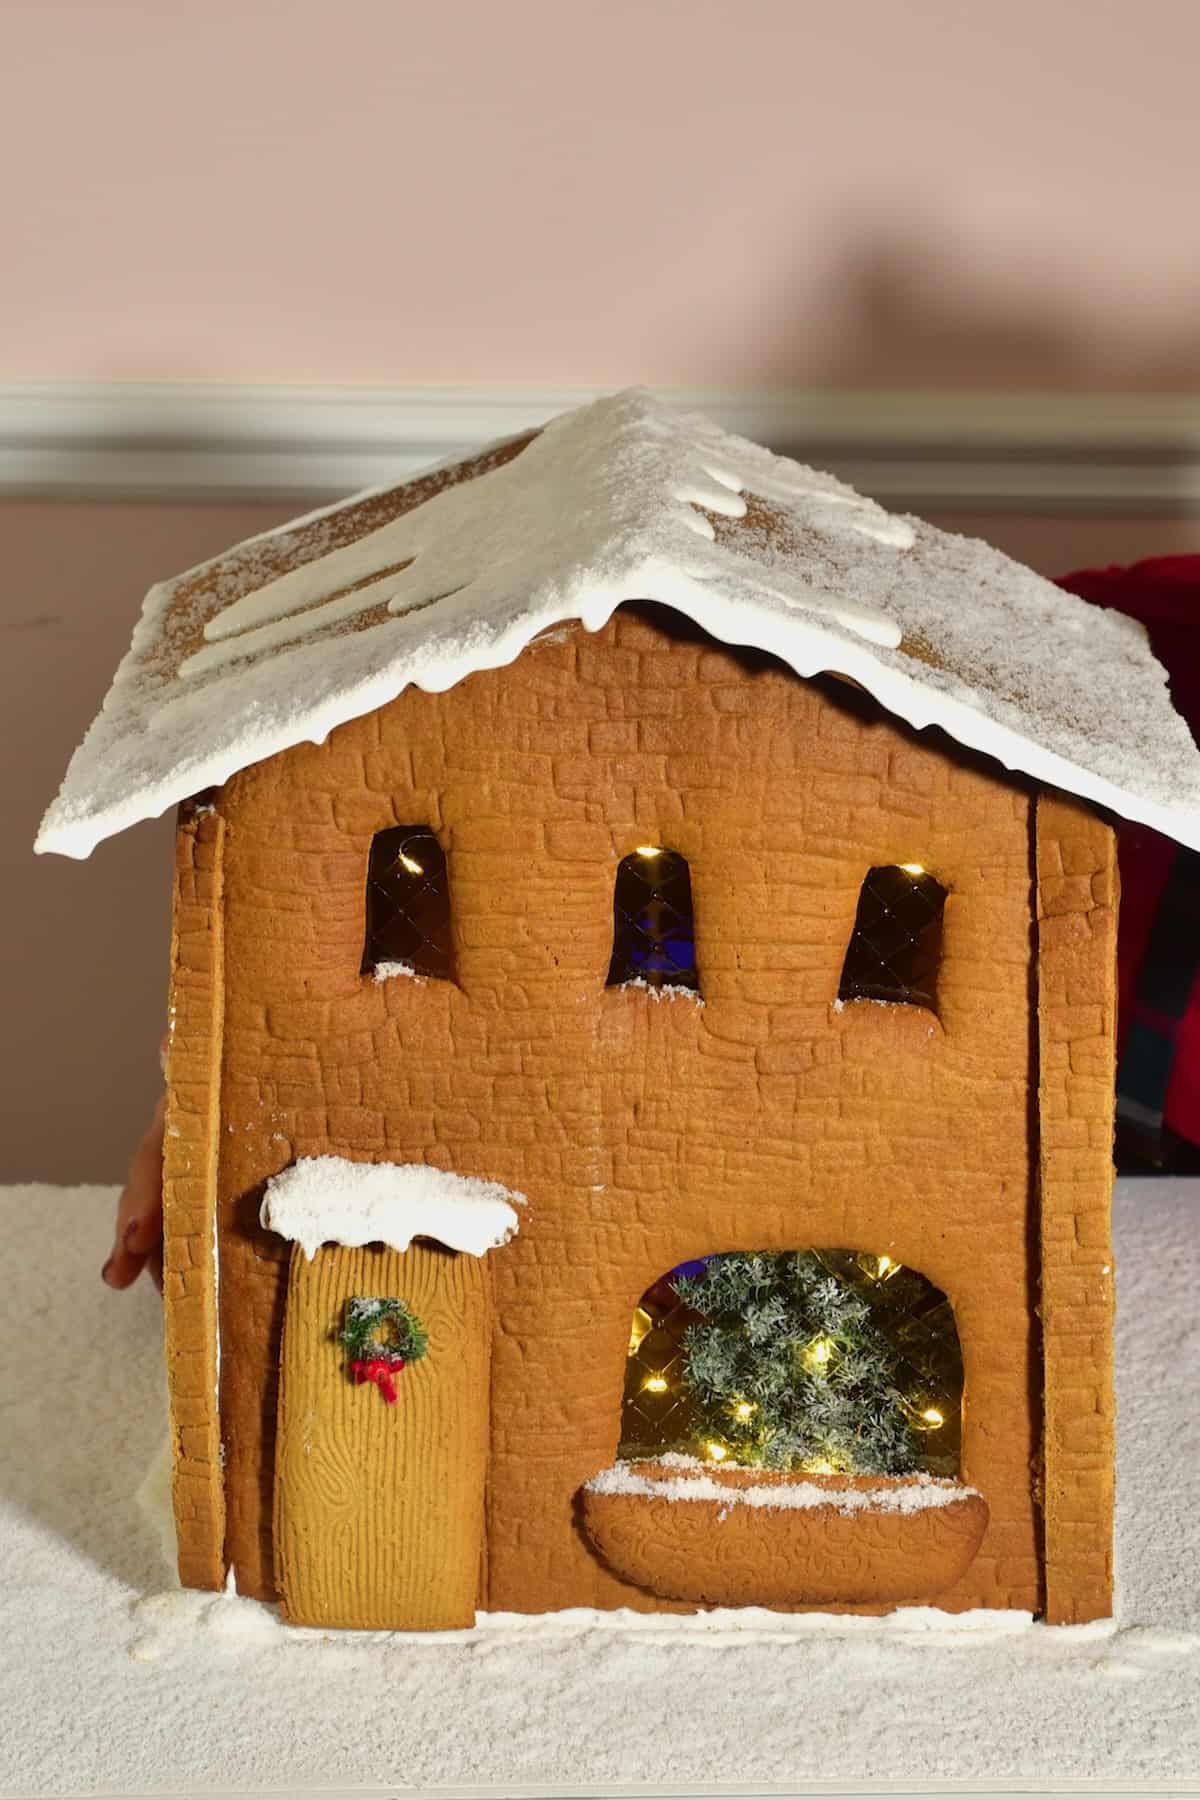
Finally, it’s time to add any final decorations. I kept things simple, using the royal icing to look like snow on the roof (if needed, thin it with a bit of water to look like drippy snow), windowsills, and the top of the door.
You can also add gingerbread decor around the base, like little trees, snow (confectioners’ sugar works well or “fake snow” products that you hydrate with water – if you don’t plan to eat the house). Voila!
What to Use for Gingerbread House Decorations
I made a minimally decorated Christmas gingerbread house. But if you’re looking for something a little more colorful, here is my favorite candy to decorate gingerbread houses:
- Gumdrops and other jelly sweets,
- Sprinkles,
- Mini candy canes,
- Peppermint candies,
- Chocolate buttons,
- Smarties/M&M’s,
- Marshmallows,
- Coconut flakes,
- Twizzlers,
- Jelly beans,
- Pretzel sticks (to make the house look wooden),
- Fondant icing in various colors.
How Long Does Gingerbread House Last
The best way to store a ginger bread house depends on how long you hope to keep it. For up to one holiday period, store it in a cool, dry place and cover it entirely with plastic wrap overnight to keep away moisture, dust, and bugs (especially if you plan to eat it).
FAQs
I don’t recommend it as most icings (including store-bought icing) won’t properly “harden” or dry out enough to be a stable “glue” to hold a gingerbread house together.
Yes, you can eat the Christmas gingerbread house. It’s best to do so within 5-7 days of assembling it. The longer it sits out, the more dry and flavorless it becomes, so I wouldn’t recommend eating it after the 2-3 week point at all, but within a week is best.
Plus, you can use the leftover gingerbread house to make several recipes (gingerbread truffles, ice cream, milkshakes, pie crust, etc). You can also crumble it into a yogurt bowl, over ice cream, with cereal, etc.
Yes. Wrap the gingerbread house pieces tightly in plastic wrap and freeze them for up to 3 months. Then, allow them to thaw to room temperature before assembling gingerbread houses.
You could try melted sugar (caramelized sugar), which acts like hot glue. Just melt about 1 cup of sugar in a skillet over low to medium-low on the stove. Wait for it to melt, constantly stirring, until it just starts turning a pale golden color.
Dip the edges of your gingerbread into the sugar, press them together, and hold for a few seconds. The sugar will harden as it cools, making for a great “glue.” Keep it over low heat while assembling the house so the sugar doesn’t harden.
If you don’t plan on eating it, you could even use hot glue to assemble the house.
Cover it entirely in plastic wrap each night to keep out moisture, dust, and bugs. That will help extend its freshness for longer.
More Holiday Bakes
- Slice-and-Bake Swirl Cookies
- Puff Pastry Christmas Tree
- Baked Camembert Wreath
- Turmeric Rosemary Focaccia
- Quick Dinner Rolls Recipe
- 45 Best Christmas Breakfast and Brunch Ideas
- 55+ Best Christmas Dinner Ideas To Impress
If you try this easy gingerbread houses recipe, let me know how it goes in the comments below. I’d appreciate a recipe card rating and would love to see your recipe recreations – tag me on Instagram @Alphafoodie!
How to Make a Gingerbread House (From Scratch)
Equipment
- Silicone Impression Mat optional for texture
- Paper for the template
Ingredients
- 14 cups all-purpose flour
- 2 cups butter softened, unsalted
- 2 cups golden syrup feel free to swap a small amount (1/4 cup) for molasses or replace with corn syrup & molasses
- 1 cup brown sugar
- 6 eggs medium
- 3 Tbsp ground ginger powder
- 2 Tbsp ground cinnamon powder
- 3 tsp baking powder
- 1.5 tsp salt
For the Icing
- 6 egg whites
- 3 tsp lemon juice or 1.5 tsp cream of tartar
- 8 cups icing sugar (confectioners sugar)
Instructions
Make a Gingerbread House Template
- If you want to use my gingerbread house template, skip this first section. Otherwise, here is everything you need to consider when designing your own gingerbread house patterns:1. The gingerbread house dimensions: The pieces must fit in your oven and on your oven trays. Remember, there will be a minimum of 6 pieces (4 walls and the 2 roof slabs) to bake.2. Additional decoration: With the key pieces out of the way, are there any other pieces you want in your design? I.e., a door, window frames, chimney, etc. You can even get fancy and make a deck with columns or a porch.3. The shape: As you can see from my template (photos on the blog post), I made a basic gingerbread house shape with a taller front and back, square sides, and rectangular roof panels.4. Windows & Doors: Whether you plan to display something inside the house, consider how many windows you want and their size, etc., and they'll all need to be added to the gingerbread house pattern if you want them to be an even size.You can also search for gingerbread house ideas/patterns/templates online and/or purchase them.
Cut Out the Pattern
- Once your design is complete, it's time to prepare the pattern. You'll only need one template for each of the matching pieces. I.e., one front piece, one side wall, etc.Use card (the most rigid, easiest option), paper, or baking paper and measure the pieces. Then use scissors to cut them out.I recommend using old cardboard boxes to make a "draft" template and build it to ensure everything fits together and works.
Make the Gingerbread House Dough
- Using a hand mixer or a stand mixer (using the paddle attachment), start by creaming the brown sugar and softened butter until it's light and fluffy.
- Gradually add the eggs, one at a time, while continuing to mix, and finally, add the golden syrup.Doing this step with a manual whisk is possible, but it takes a lot more effort and time.
- Sift in the dry ingredients (flour, baking powder, and spices), and mix until you achieve a smooth dough.
- Separate the gingerbread into several smaller, more manageable pieces. Then wrap them tightly in clingfilm and refrigerate for at least 2 hours, though overnight is even better.
Roll and Cut the Gingerbread
- Preheat the oven to 350ºF/180ºC.
- Lay a piece of lightly flour-dusted parchment paper on your kitchen counter and roll out one piece of the gingerbread dough using a floured rolling pin to about ½cm in thickness.
- Place a template over the dough, using a pizza cutter or sharp knife to trace the template/pattern. Use a ruler to ensure the cuts are straight.
- Repeat this with the remaining gingerbread dough and all the house pieces and decorative pieces you'd like.To add realistic texture to the gingerbread dough walls, I use textures silicone sheets (impression mats) to press into the cookie dough. However, you can also use a knife to make your own pattern.
Bake the Gingerbread
- Transfer the gingerbread pieces to parchment-lined baking sheets or silicone mats (cook them in batches if necessary), and bake for between 11-15 minutes (5-8 minutes for small decorative pieces) until the edges are just browning.
- Leave the cookies to cool completely.
Prepare the Royal Icing
- While the cookies cool, prepare the royal icing. To do so, beat the egg whites until light and foamy. Then, gradually add in the lemon juice and icing sugar until soft, creamy, and thick like toothpaste.If it's too thin, add more icing sugar. Too thick? Add some water, a few drops at a time.
- Keep it in the bowl covered with a damp tea towel and/ or transfer some or all of it to a squeeze bottle/ piping bags (or a Ziplock with the tip cut off) for more precision decorating.
Assembling and Decorating the Gingerbread House
- If you plan on piping a lot of decorations and adding candies, it is best to do these decorations BEFORE assembling, so you aren't wrestling with gravity. Also, add the gelatin sheet windows now, if using, sticking them with a royal icing border.Refer to my blog post for my top list of gingerbread house decorations/candies.
- Time to assemble the house. If you plan to stick it to a base, start by piping a thick line onto your base and pressing the wall piece into it, holding it for a while to harden. Otherwise, start by sticking two walls together, with a thick line of piped icing between them.If you don't want the icing "glue" to be seen too much, pipe the thick lines inside the house. To keep the gingerbread pieces in place, you could use heavy glasses or other items on either side of the walls.You can also add any interior decorations to the house now (like a fake Christmas tree, fairy lights, etc.).
- Leave it to dry for at least an hour before adding the roof pieces, piping icing along the entire top of the house's walls and between the two roof pieces in the middle.Don't be worried if there are any imperfections, as you can use the royal icing as 'snow' to cover them. Untidy seams can also be fixed later with more icing or candy.
- Finally, add any final decorations. I kept things simple, using the royal icing to look like snow on the roof (if needed, thin it with a bit of water to look like drippy snow), windowsills, and the top of the door.You can also add gingerbread decor around the base, like little trees, snow (confectioners' sugar works well or "fake snow" products that you hydrate with water – if you don't plan to eat the house). Voila!
Storage Instructions
- Unbaked dough: You can store the unbaked gingerbread dough in your fridge for up to 3 days or in the freezer for a month, tightly wrapped in clingfilm.Baked gingerbread: You can make the gingerbread house pieces up to a week in advance and store them tightly covered, at room temperature, or in the fridge. Freeze: Wrap the gingerbread house pieces tightly in plastic wrap and freeze them for up to 3 months. Then, allow them to thaw to room temperature before assembling gingerbread houses.The assembled house: The best way to store a gingerbread house depends on how long you hope to keep it. For up to one holiday period, store it in a cool, dry place and cover it entirely with plastic wrap overnight to keep away moisture, dust, and bugs (especially if you plan to eat it). To preserve the edible gingerbread house for longer, use a spray bottle to apply varnish or clear lacquer over the entire house (interior and exterior), then allow it to completely dry over a day or two, then keep it stored in a dry place. This version will NOT be safe to eat anymore. Store it in a plastic bag within a bug-proof box in between seasons.
Video
Notes
- Measure the flour correctly: Fluff it up in the bag, spoon it into your measuring cup, then level the top with the back of a knife.
- Make extra icing: After assembling, you’ll be using the gingerbread house icing for gluing decoration and other decorations, so you’ll need plenty.
- Do it in stages: This is a long process. I recommend baking the gingerbread one day, assembling the frame the following day, and leaving at least a few hours (or overnight) to dry before doing the final decorations.
- Make double any decorative pieces: I recommend making double any small or fragile pieces you plan to make (like a window frame, chimney, door, etc.), just in case one breaks. Either way, you can eat any leftovers.
- If pieces expand/warp: You can trim the pieces (using your template) while they’re still warm from the oven. Alternatively, wait until they cool and use a fine grater (microplane) to “sand” the edges flat.
- To avoid warped windows/doors: Cut the window/door pieces in the raw dough, but don’t remove it. After baking, cut and remove the indented windows and doors while it’s still warm (note, I didn’t do this in these photos, this is a trick I learned after).
- Decorate the walls before assembling: So you don’t have to compete with gravity when doing any intricate piping/sticking on pieces.
- Don’t waste any leftovers: Depending on your gingerbread house idea/template, you may have excess dough/icing. Save it for later or bake as smaller cookies, decorate, and enjoy!
- For a “stained glass window” effect when decorating gingerbread houses, use various colored crushed hard candies. Pour the crushed candy into the window hole and bake for 3-5 minutes until the candy melts. Before moving the gingerbread from the baking paper/foil, leave it to cool and harden.
Nutrition
Nutrition information is automatically calculated, so should only be used as an approximation.


I definitely love this recipe!!!!! I had help making this recipe with staff’s help and I plan on eating it in portions later on down the line and as it gets closer to Christmas!!!!!!!!!!
Glad you enjoyed it, Camille!