
This post may contain affiliate links. Please read our disclosure policy.
An easy guide to pressure canning for beginners: a simple at-home canning technique, perfect for preserving high & low-acid fruit and vegetables, meat, fish, soups, and more to lock in its freshness and flavor. With step-by-step instructions and top tips!
Want to save this recipe?
Table of Contents
- What is pressure canning?
- Altitude adjustments for pressure canning
- Pressure canning methods: hot pack vs. raw pack
- Tools needed for pressure canning
- How to use a pressure canner
- Pre-use safety check for home-canned foods
- Pro tips for safely pressure canning foods
- More canning guides
- The Complete Guide to Pressure Canning Recipe
What is pressure canning?
There are two main types of home food preservation: water bath canning and pressure canning. In both methods, ingredients are packed into sterilized jars and processed with heat to kill bacteria and ensure an airtight seal resulting in an extended shelf life. Plus, unlike buying canned items from a store, learning how to pressure can at home is economical and you’re in 100% control of ingredients (like sugar and sodium).
In the case of pressure canning, high-pressure heat and water (similar but not the same as pressure cooking) are used to destroy the harmful bacteria/mold/yeast in the food to ready them for long-term storage. This works well for high and low-acid foods and is great for anyone with abundant fruit, vegetables, or meat they want to preserve.
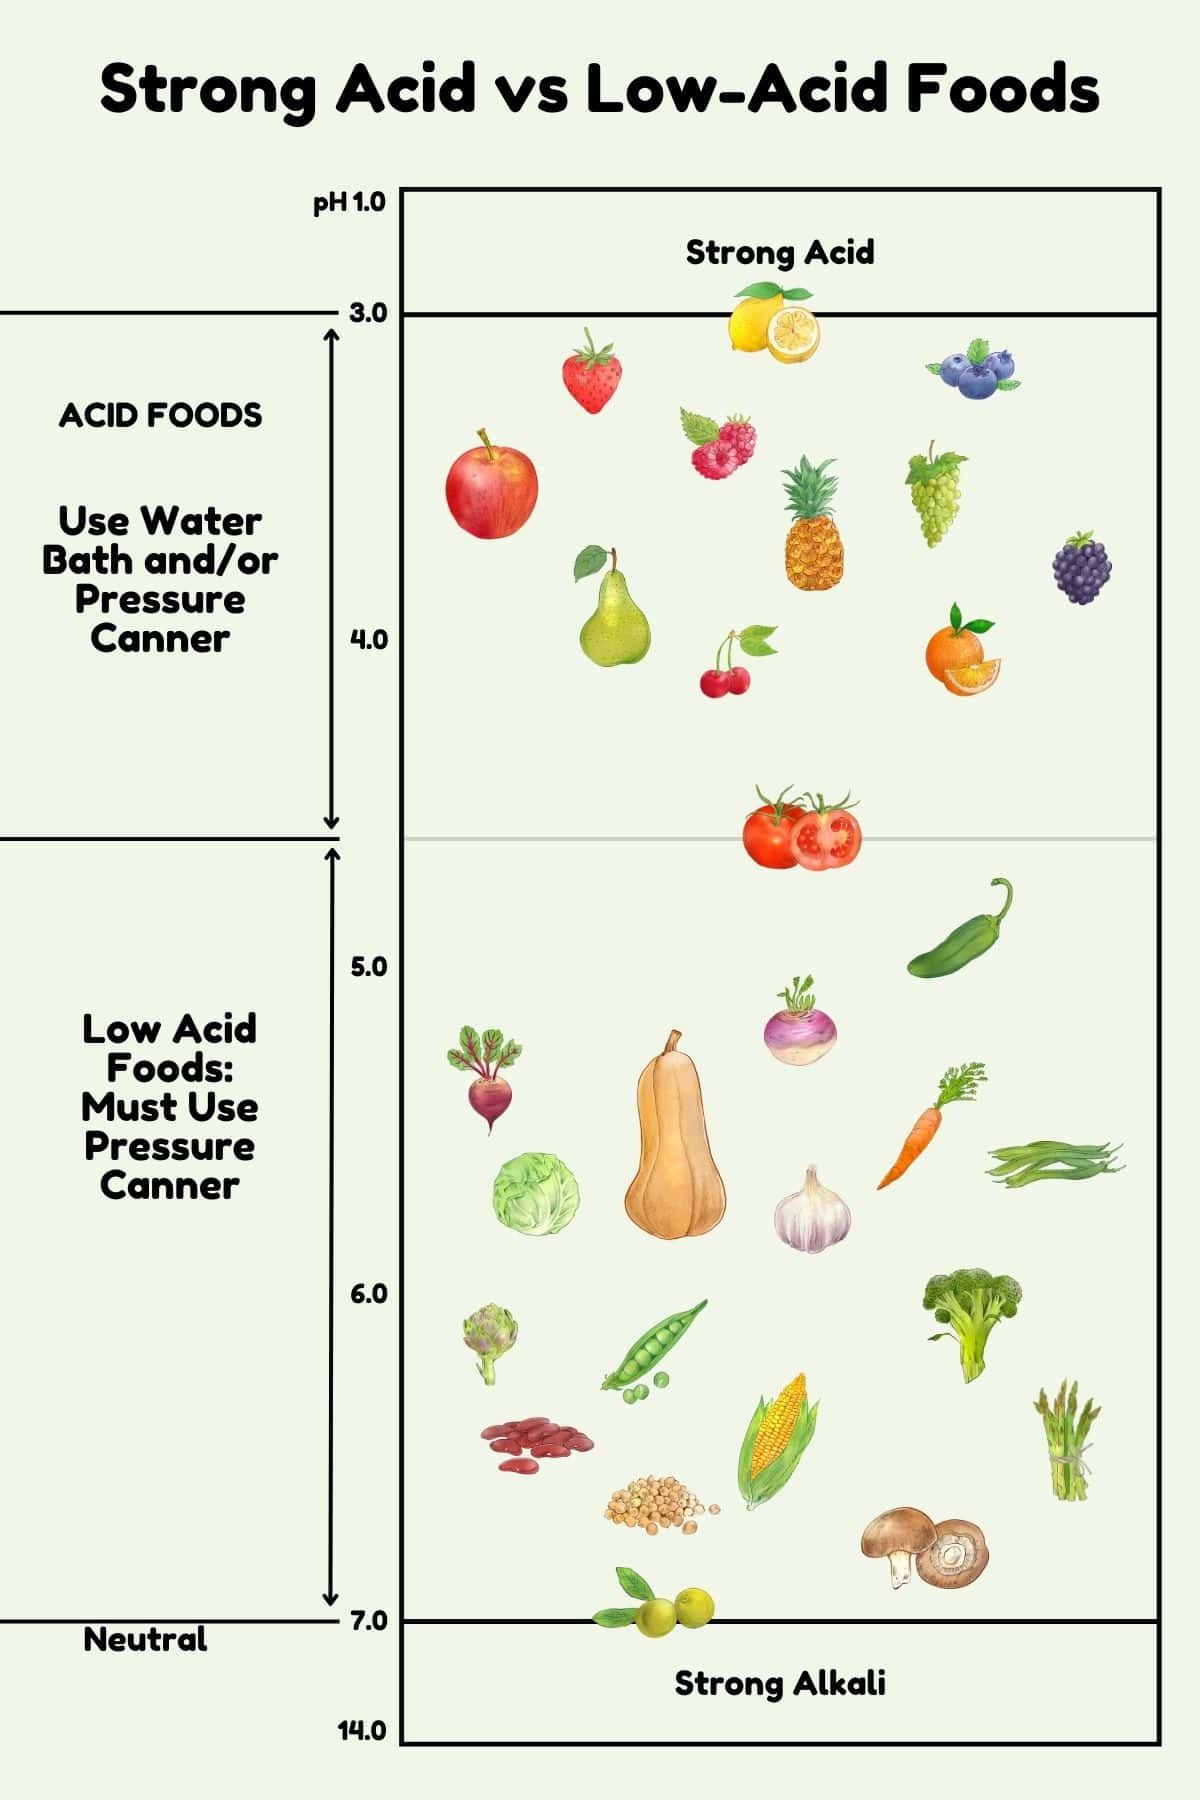
Please note that pressure canning is suitable for high and low-acidic foods, whereas water bath canning must ONLY be used for high-acid foods.
Some low-acid foods are:
- Low-acid vegetables: Asparagus, beets, carrots, corn, green beans, mushrooms, okra, onion, potatoes, peas, pumpkin, butternut squash, etc.
- Low acid fruit: Watermelon and cantaloupe.
- Low acid pulses: Like black beans, kidney beans, baked beans, chili, etc. Check out my post on how to can chickpeas.
- Other foods: Meat and poultry – like chicken, beef, other red meats, seafood, etc., soups and stews, stocks and broths, etc.
If you’re confused about an ingredient’s best method, refer to the USDA’s Guide to Home Canning to practice safe home canning & reduce the risk of foodborne illnesses.
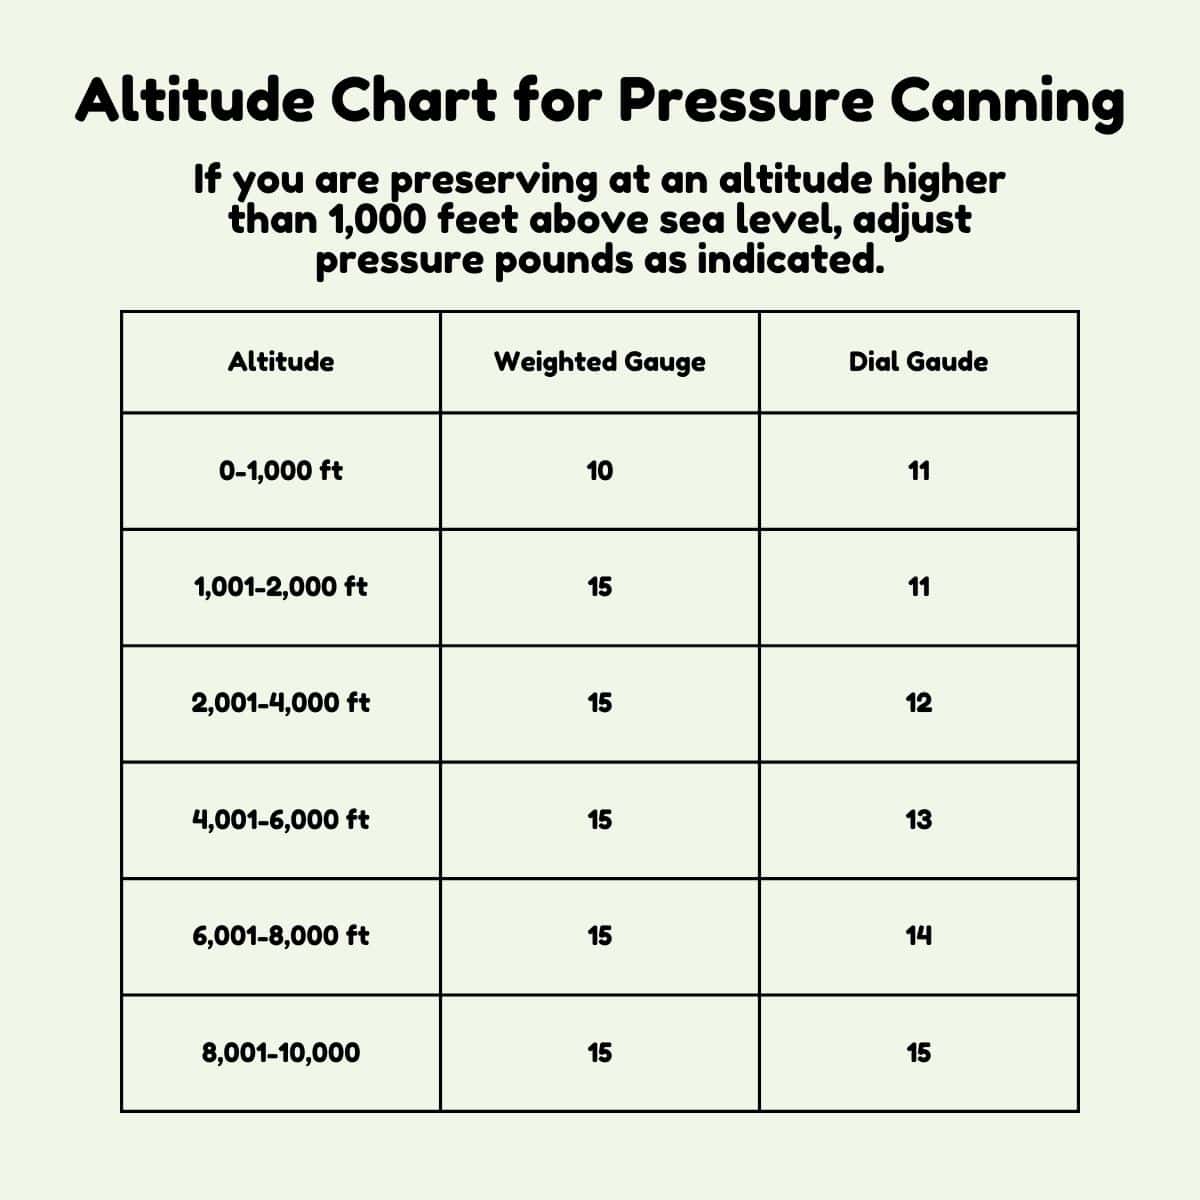
Altitude adjustments for pressure canning
It’s important to adjust the processing method based on the altitude where you live. This is important as higher altitudes/elevations lower water’s boiling point because the air is thinner.
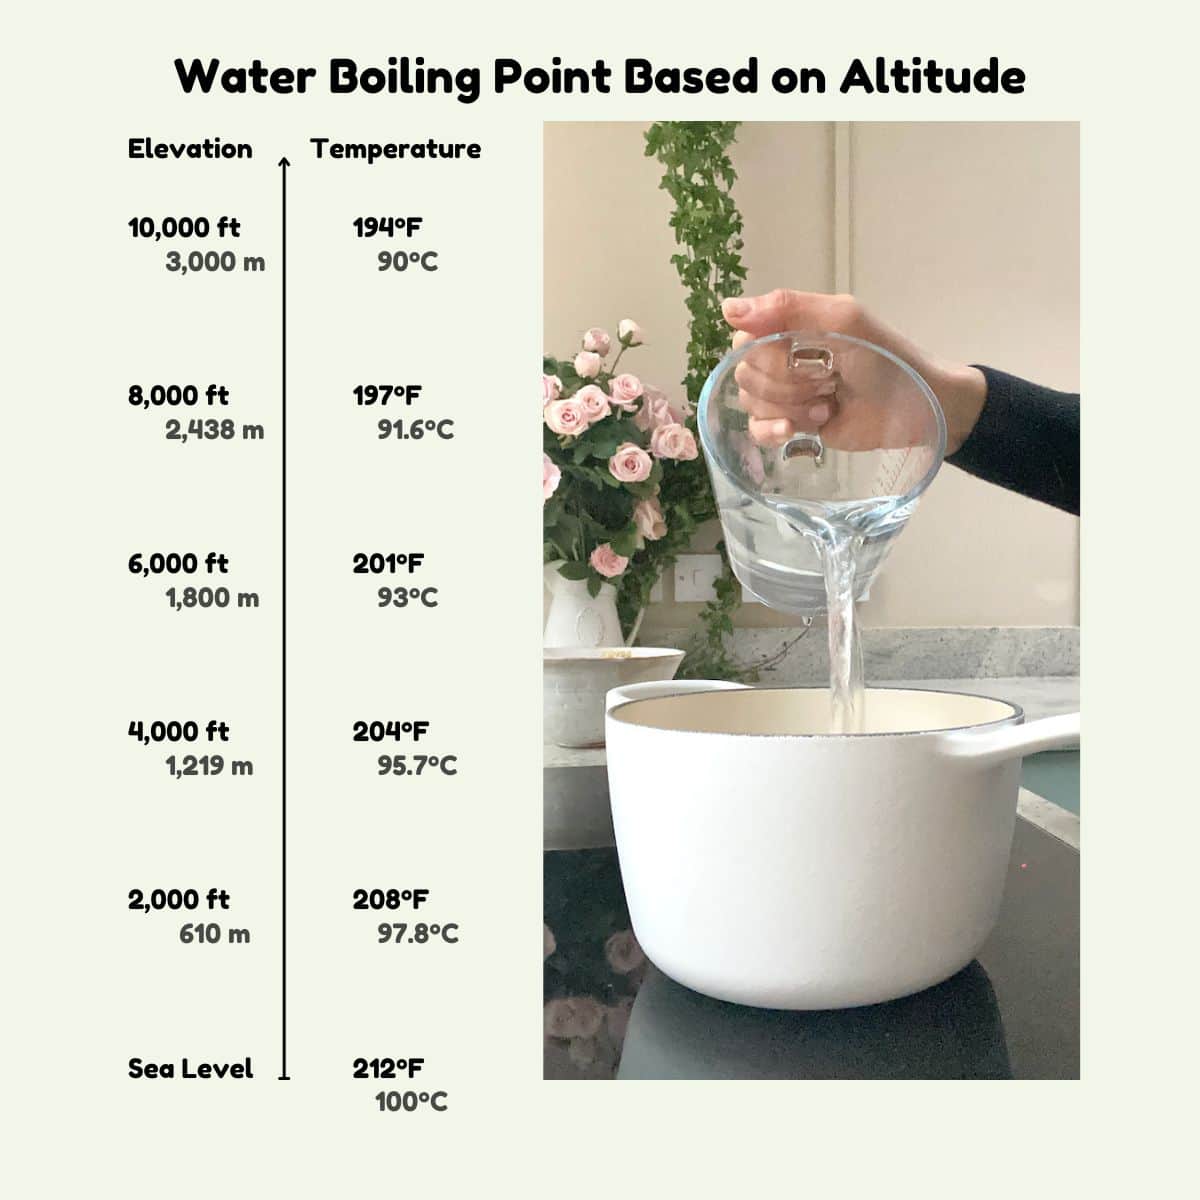
Because the processing stage in the canner requires you to reach and maintain a specific temperature to destroy harmful bacteria, this will need to be adjusted based on the atmospheric pressure (aka altitude).
Most foods are processed at 10 pounds pressure at 240ºF/116ºC. Refer to the image below for how to adjust the pressure canner based on altitude.
Pressure canning methods: hot pack vs. raw pack
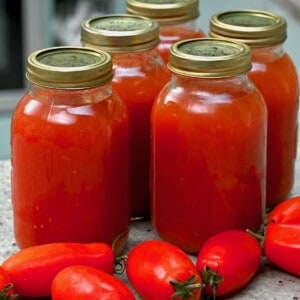
Hot-packing: This describes foods that have been blanched or simmered for several minutes before adding them to the jars. This will remove excess air (reducing the risk of air pockets, for improved quality and shelf life), soften the ingredients, and reduce their volume (so it’s easier to pack into the jars).
This method works best for any ingredient that benefits from blanching/pre-cooking– such as fruits, vegetables, and some meat/poultry. That said, hot packing generally helps preserve the food’s color, texture, and flavor better in the long run, which is why it’s my preferred method.
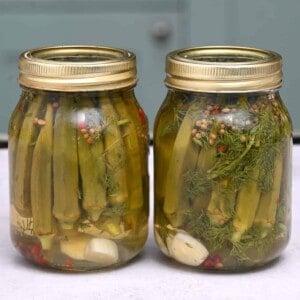
Raw packing/cold packing: This means filling the jars with prepared raw, unheated food covered in a hot liquid in hot jars. This method saves time as it skips the pre-cooking step (great for canning large quantities). Plus, it maintains a crispier texture, as the ingredients are raw.
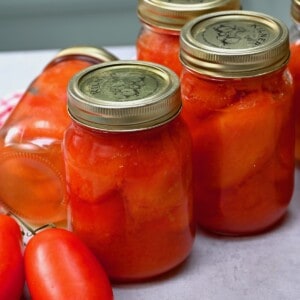
However, it’s only good for certain ingredients like berries, pickles, peaches, pears, tomatoes (peeled but uncooked), some veggies, and meat. It can only be done with a pressure cooker, not a water bath canner.
Whatever method you use, the canning liquid must be hot before being added to the jar!
Tools needed for pressure canning
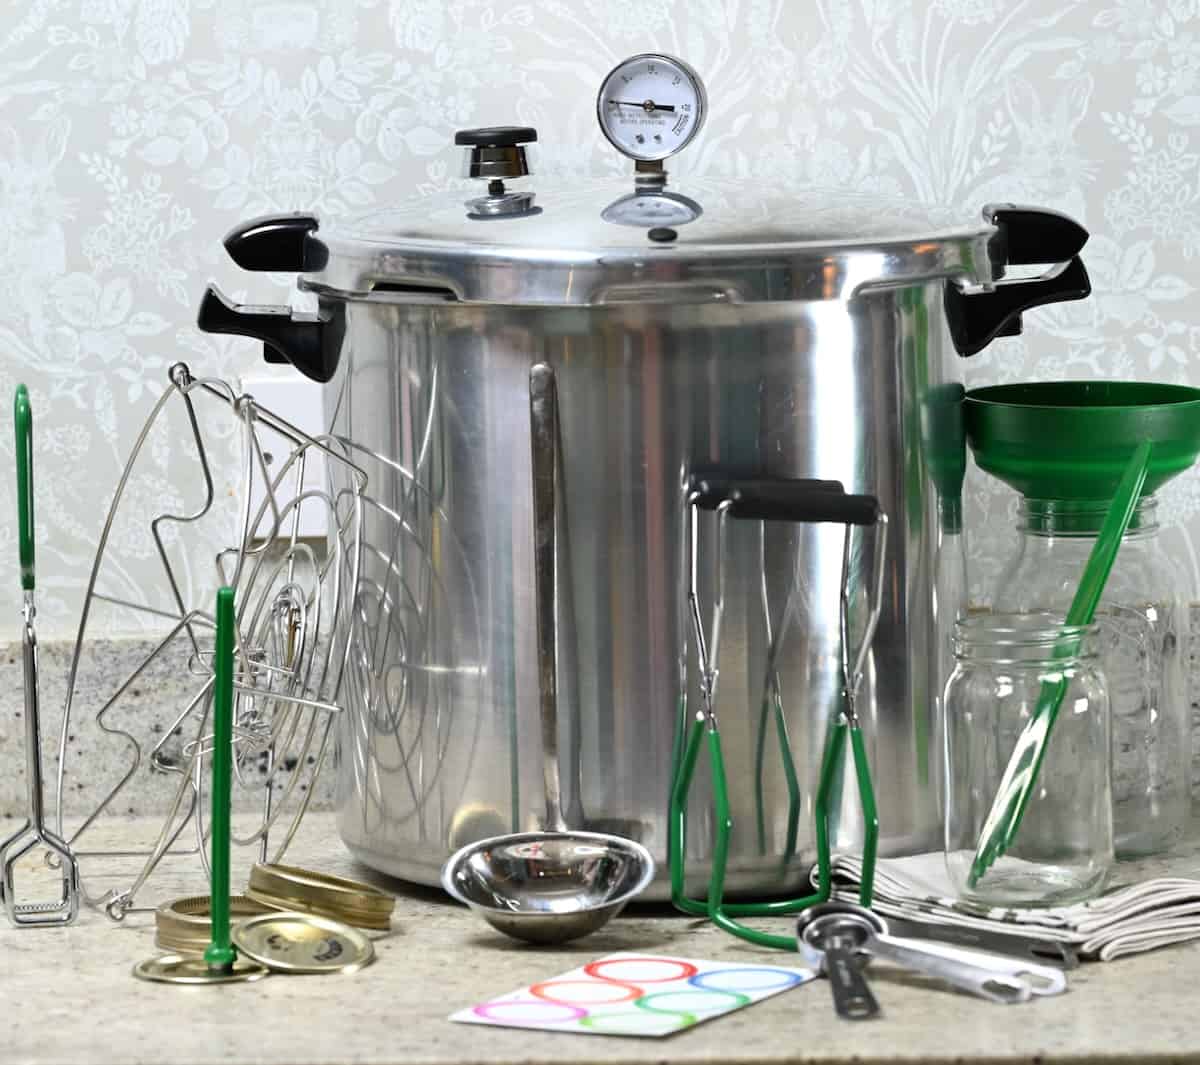
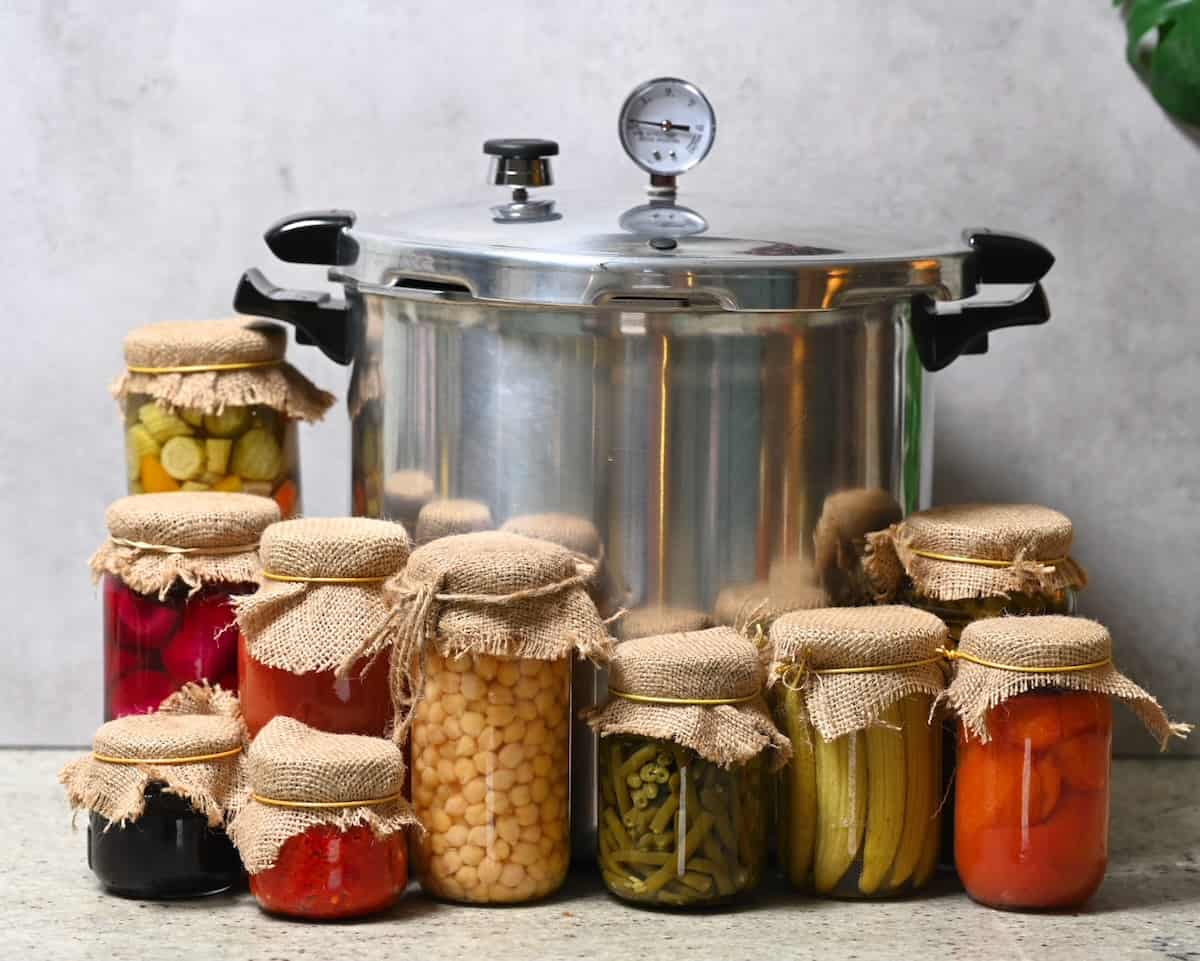
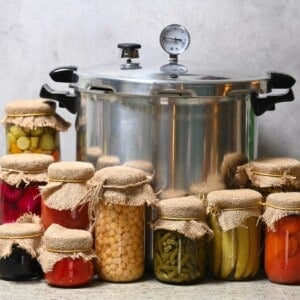
- Pressure canner: Please note a pressure canner is NOT the same as a pressure cooker, which should not be used for this purpose. There are two main types of pressure canners:
- Dial gauge pressure canners are cheaper and can adjust the pressure to a precise pound but require monitoring and adjusting the heat to keep them at the right pressure.
- Weighted gauge pressure canners allow you to choose either 5, 10, or 15 pounds of pressure and use a weighted valve to ensure it stays at that pressure.
- Metal rack: You need to place a heat-proof wire rack (or silicone trivet) at the bottom of the canner. In this way, jars aren’t in direct contact with the bottom of the pan.
- Canning jars: It’s best to use canning jars (wide-mouthed are best) with metal lids and screw band tops. If they’re fairly old, ensure the jars are chip-free, and the lids aren’t rusty, otherwise they’ll require replacements. Note that jars and lid rings are reusable as long as they’re chip-free/rust-free, but the flat disk canning lids are single-use only.
- Funnels/ladles: To help transfer the ingredients to the jars with minimal mess.
- Clean kitchen towels/cloths: To wipe away any mess on the jars and set the jars on after processing.
- Air bubble remover: There are specific tools to remove air bubbles (called a bubble remover or headspace tool). But you could also use a sterile chopstick, skewer, plastic or wooden knife, or thin silicone/plastic spatula.
- Canning tongs/jar lifter: It’s best to use canning-specific secure-grip jar lifting tongs that are coated in a layer of rubber to grip the jar lids safely when inserting/removing them from the pressure canner.
How to use a pressure canner
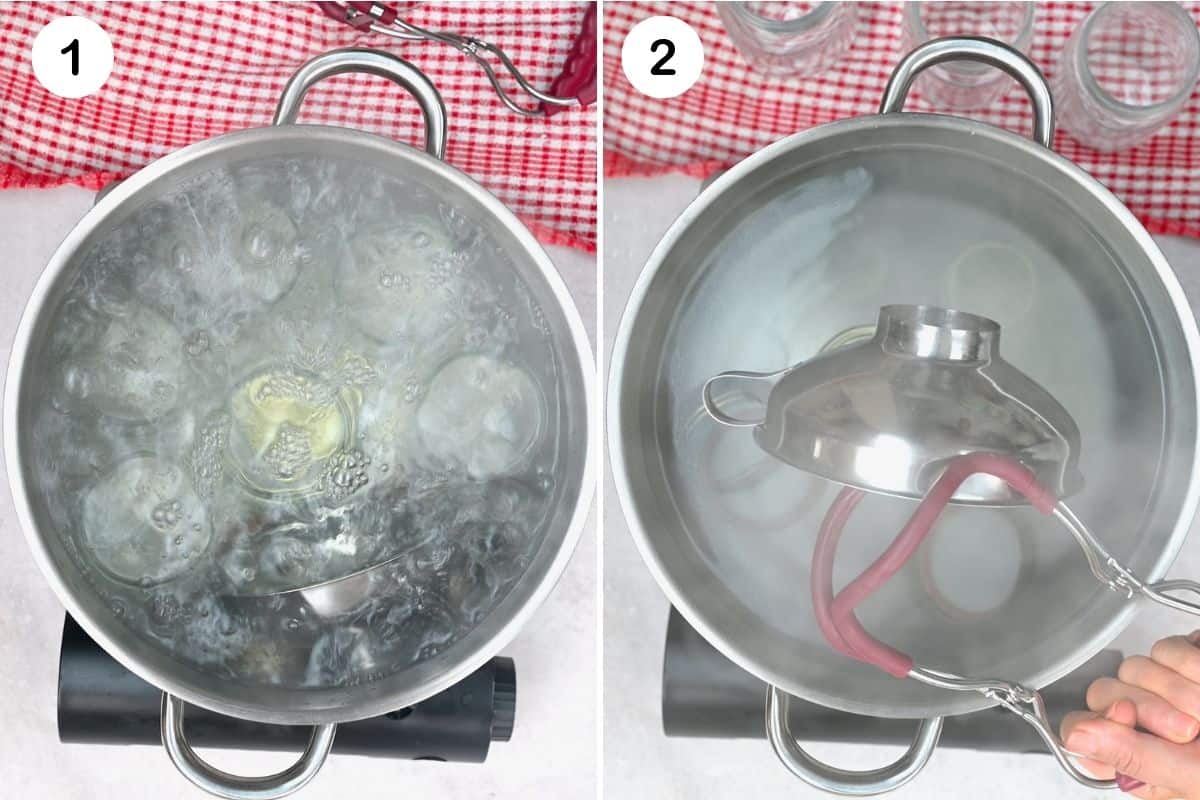
Step 1: Sterilize the Canning Tools and Prepare the Canner: It’s important to sterilize everything you’ll use for pressure canning, including the jars, lids, tongs, pressure canner, funnel, and kitchen counters. First, wash the items in hot, soapy water and rinse them well.
Then leave everything to dry except the jars, which must stay hot until ready to fill. To do so, place the wire rack/trivet (or a jar separator) at the bottom of the pressure canner (which should be on your stovetop at this point). Add hot water to the canner – the exact amount will depend on the recipe, but it’s usually 2-3 inches of water.
If you live in an area with hard water, optionally add some vinegar to the water to prevent calcification to the outside of the jars.
Then, add the jars (filled with a little water to stop them from floating) to the canner. Leave them to sit in the simmering water to keep them warm (around 180ºF/82ºC for hot-packed OR 140ºF/60ºC for raw-packed).
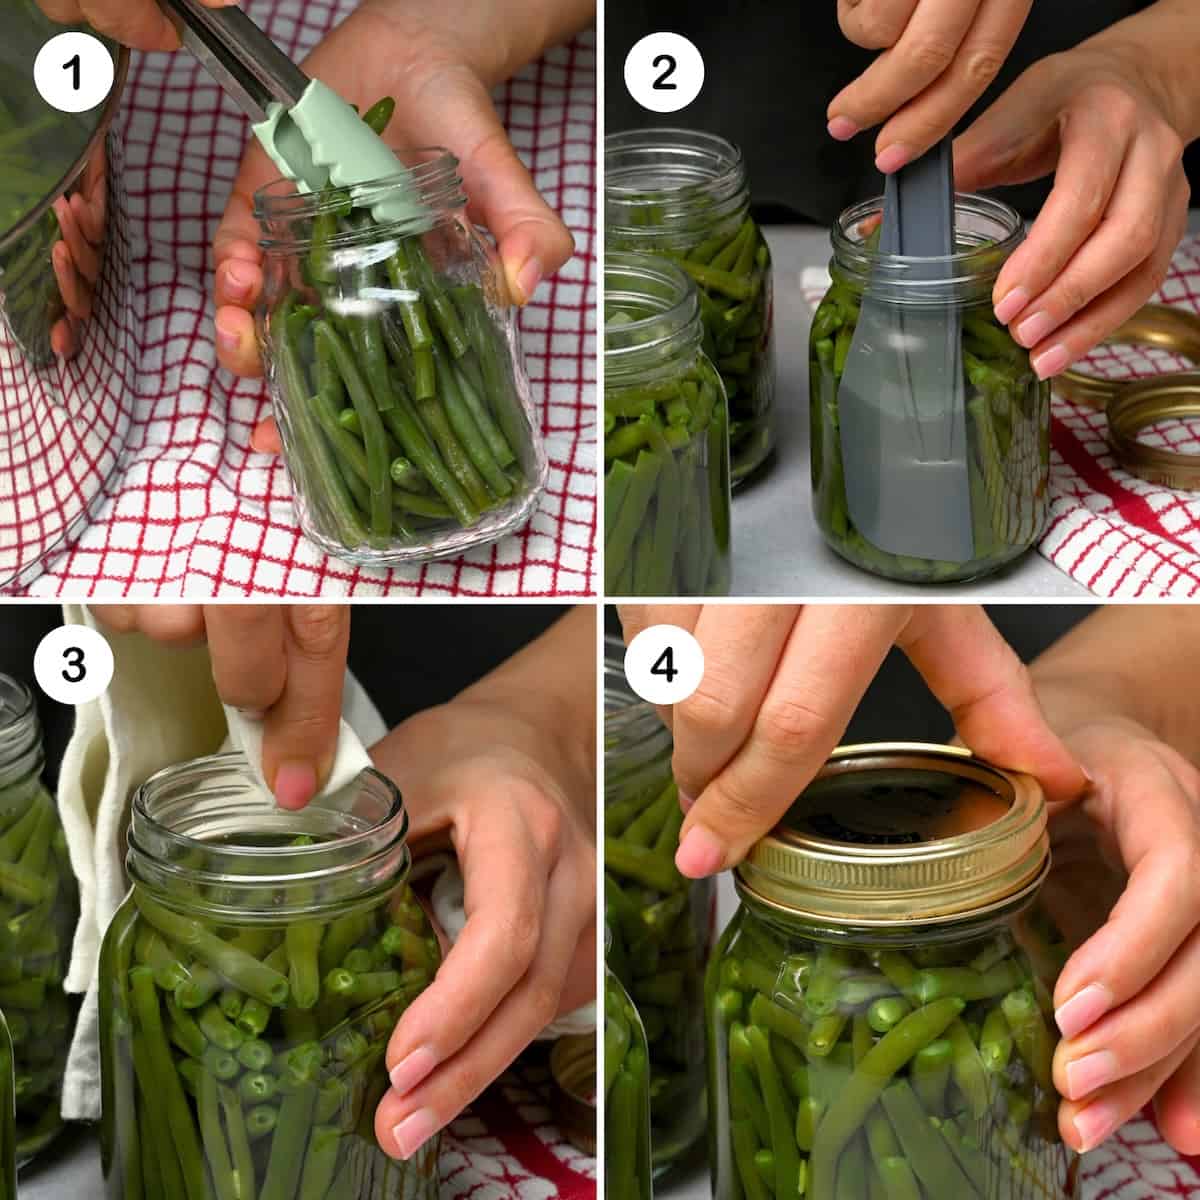
Step 2: Prepare the Food and Fill the Jars: First, prepare the food according to its recipe/the USDA guidelines. For vegetables, this usually means blanching or par-cooking them, and for meat/poultry, it’s usually trimmed/chopped down to size.
Then, take a jar from the hot water and use a funnel or ladle to transfer the food to the hot jar. Be careful to avoid messes and include the right amount of headspace. It is important to check the accurate amount of headspace needed. Too much can form a “false seal” and the jar will become unsealed over time; too little may cause leaks (aka “siphoning”).
Fill the remaining jars, working one at a time.
Once filled, use your tool of choice (like a chopstick or a small non-metallic spatula) to run along the insides of the jar to release trapped air bubbles that can affect the shelf life.
Before sealing the jars, wipe away any messes from the rim with a clean tea towel. Then add the lid and screw it until finger-tight (securely screwed until the point of resistance, but not too tight that air can’t escape during the processing). Note that tightening too much can lead to lids buckling. If they’re too loose, the contents may leak.
Step 3: Pressurize the Canner: Carefully place the sealed jars in the canner. Do this as you fill them, so they don’t cool down too much. Ensure they remain upright the entire time and aren’t touching the sides of the canner or each other.
Next, close and lock the canner lid, ensuring the pressure vent/petcock is open. Heat the stove at its highest heat setting until you notice steam escaping the vent/petcock consistently. Then, start a timer to allow it to vent for 10 minutes. This step is necessary as it removes excess air from the canner allowing it to create a “vacuum” environment. This is crucial to obtaining the correct temperatures.
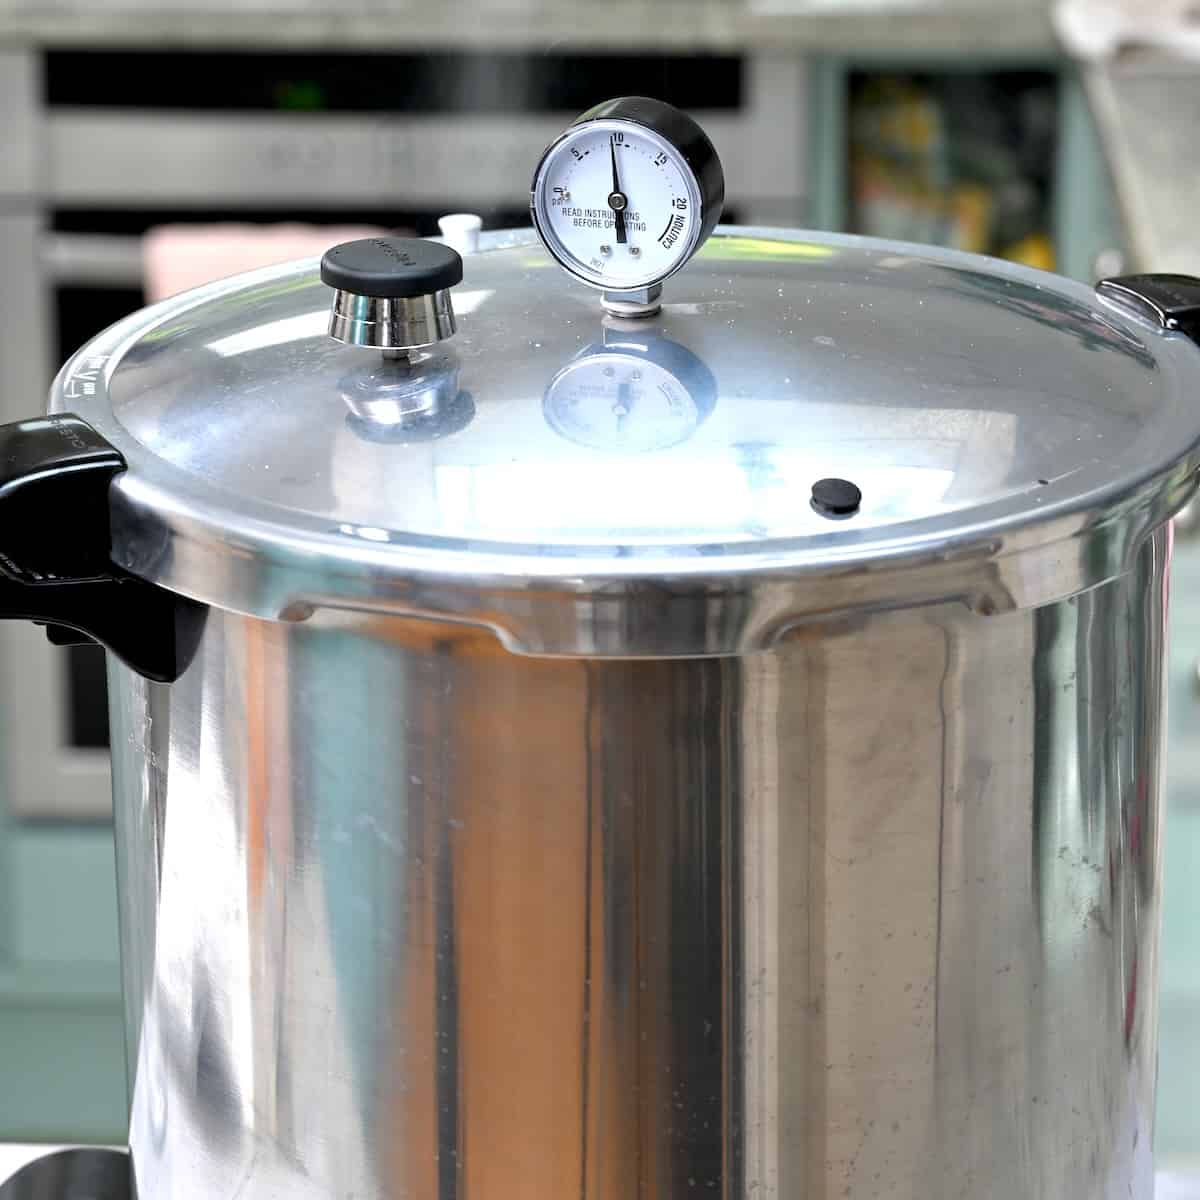
Step 4: Process the jars: At that point, close the vent/petcock and allow the pressure to build in the canner. This usually takes between 3-8 minutes. If using a weighted gauge canner, the gauge will begin to jiggle/rock.
Then, set a time to process the jars according to their recipe.
If you’re using a dial gauge canner, adjust the heat, if needed, to maintain steady pressure (slightly above is fine, too). If it drops below the recommended pressure, you must return it to the correct gauge pressure and start the processing time all over again.

Step 5: Depressurize the Canner: Following the required processing time, remove the canner from the heat. Leave it to depressurize and the safety lock to release/the air vent to drop to its normal position. Note that older models of canners that don’t have a dial gauge should be timed. Around 30 minutes for pint jars or 45 minutes for quart jars. Don’t force-cool the canner, or it can lead to food spoilage.
After the canner is depressurized, remove the weight from the vent port/open the petcock, and leave it for another 10 minutes. Then finally, carefully remove the lid facing away from you so hot steam flows in the other direction.
Step 6: Remove the jars from the pot and leave them to cool. At that point, use the canning tongs/jar lifter to carefully remove the jars from the canner, ensuring they remain upright the entire time. Then, transfer to a heat-proof flat surface (like a wooden chopping board or kitchen towel-covered worktop). Make sure to leave a 1-inch space between the jars.
Leave them undisturbed to cool at room temperature for at least 12 hours (up to 24 hours) before handling them. During this time, the jars will properly seal. So it’s important not to touch or handle them and risk creating a “false seal.”
Then, it’s time to inspect the jars for proper sealing. Remove the ring and inspect the lid. It should look concave and not flex, wobble, or make a popping sound when pressed in the center. It should feel 100% secure. Any jars that haven’t properly sealed can be re-processed within 24 hours with a new jar/lid. Alternatively, transfer them to the fridge to use within a few days.
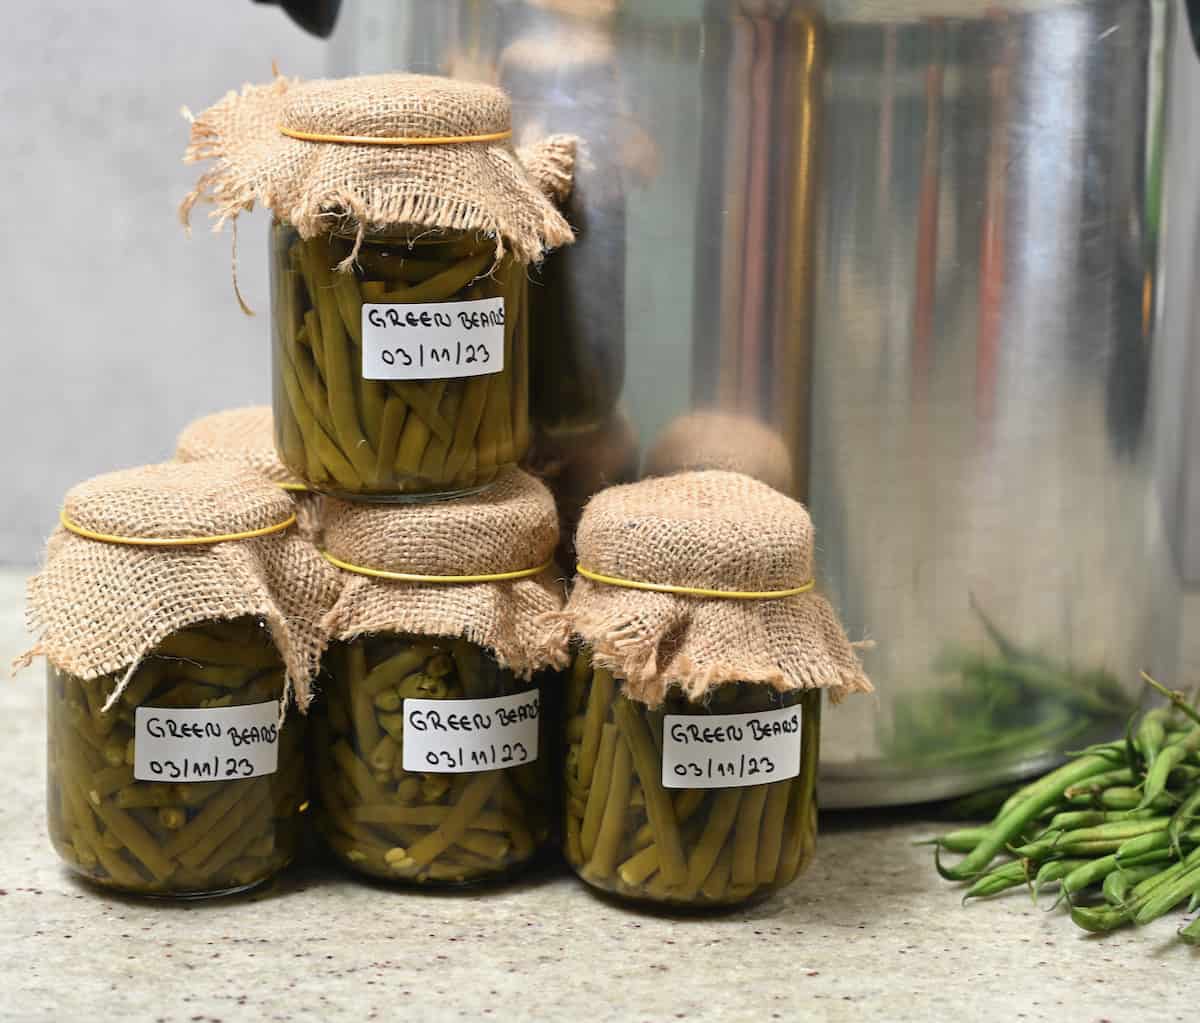
Step 7: Label and Store the Jars: I recommend marking the date on the cooled jars to avoid food waste. Aim to consume most canned products within 12-18 months for the best quality. It will last longer but usually begin degrading from that point.
Store the jars in a cool, dry, dark place like a kitchen cupboard or pantry. The ideal temperature is somewhere between 50-70ºF/10-21ºC, though below 95ºF/35ºC is fine. When stored properly, they will last for a year (or sometimes, more).
Pre-use safety check for home-canned foods
Even having properly followed all the previous steps, I still think it’s important to check the quality of the food when opening the jar. To do so:
- Check the seal – it should be properly sealed and make a “pop” noise when opened.
- Check the appearance – is there any visible mold or discoloration?
- Check the smell – does it smell off/ rancid?
- Check the taste – if unsure, taste just a bit to see if it seems fine.
If you’re having difficulties removing the disk-type lids from the jar, use a spoon or blunt knife. Insert it between the lid and jar and twist it to release the lid.
Once opened, transfer canned goods to the refrigerator and consume them within a few days. They may also freeze well but should be transferred to a separate freezer-safe airtight container first.
Pro tips for safely pressure canning foods
- Use high-quality foods: Preservation is all about locking in freshness. So it’s very important to use the best ingredients with no sign of spoilage, over-ripeness, etc.
- Can the ingredients asap: Once the food is prepared for canning, it’s important to do so as soon as possible to maintain maximum quality and nutrient levels.
- Hot jar: It’s important to keep the jars hot right until you’re ready to fill them with the hot food. This helps avoid temperature “shock”/shattering jars.
- Use sterilized tools: Bacteria is the enemy of shelf-stable food preservation, so sterilize everything (counters, tools, the canner, etc.).
- Follow the process carefully: It’s essential to follow each step to ensure safe food preservation. This includes accurately timing the venting and processing stages, measuring the headspace, removing air bubbles, etc.
- Adjust the method to your altitude: This is incredibly important, as the water boiling point changes based on the altitude. Exact temperatures and timings are required for safe pressure canning.
- Follow recipes carefully: Pressure canning is an exact science and it’s important to follow the procedure/recipes carefully for safe food preservation.
More canning guides

If you try this pressure canning at home, let me know how it goes in the comments below. I’d appreciate a recipe card rating and would love to see your recipe recreations – tag me on Instagram @Alphafoodie!
The Complete Guide to Pressure Canning
Equipment
- Big glass jars (32 oz) as many as needed
- Bubble remover or chopstick, skewer, plastic/wooden knife, thin silicone/plastic spatula
Instructions
Sterilize the canning tools and prepare the canner
- Sterilize everything you'll use for pressure canning, including the jars, lids, tongs, pressure canner, funnel, and kitchen counters. Wash the items in hot soapy water and rinse them well. Leave everything to dry except the jars.
- Place the pressure canner on the stovetop. Add the wire rack/trivet (or a jar separator) to the bottom of the canner. Add about 2-3 inches of hot water (the exact amount will depend on the recipe). Add the jars (filled with a little water to stop them from floating). Keep the water simmering to keep the jars warm.
Prepare the food and fill the jars
- Prepare the food according to its recipe or the USDA guidelines.
- Take a jar from the hot water and use a funnel or ladle to transfer the food to the hot jar. Make sure to leave the right amount of headspace.
- Once filled, use a bubble remover (or a chopstick, etc) to run along the insides of the jar to release trapped air bubbles.
- Wipe away the rim with a clean tea towel. Add the lid and screw it until finger-tight (securely screwed until the point of resistance, but not too tight that air can't escape during the processing).
- Place the closed jar in the canner and fill the remaining jars, working one at a time.
Pressurize the canner and process the jars
- Ensure the jars remain upright the entire time and aren't touching the sides of the canner or each other.
- Close and lock the canner lid, ensuring the pressure vent/petcock is open. Heat the stove at its highest heat setting until you notice steam escaping the vent/petcock consistently. Then, start a timer to allow it to vent for 10 minutes.
- After 10 minutes, close the vent/petcock and allow the pressure to build in the canner. This usually takes between 3-8 minutes. If using a weighted gauge canner, the gauge will begin to jiggle/rock,
- Set a time to process the jars according to their recipe.
Depressurize the canner
- Following the required processing time, remove the canner from the heat. Leave it to depressurize and the safety lock to release/the air vent to drop to its normal position. Older models of canners that don't have a dial gauge should be timed. Around 30 minutes for pint jars or 45 minutes for quart jars.Don't force-cool the canner!
- After the canner is depressurized, remove the weight from the vent port/open the petcock, and leave it for another 10 minutes.
- Carefully remove the lid facing away from you so hot steam flows in the other direction.
Cool, inspect, and label the jars
- Use the canning tongs/jar lifter to carefully remove the jars from the canner, ensuring they remain upright the entire time. Transfer to a heat-proof flat surface (like a wooden chopping board or kitchen towel-covered worktop), leaving a 1-inch space between the jars.
- Leave them undisturbed to cool at room temperature for at least 12 hours (up to 24 hours) before handling them.
- Once fully cooled and undisturbed for at least 12 hours, inspect the jars for proper sealing. Remove the ring and inspect the lid. It should look concave and not flex, wobble, or make a popping sound when pressed in the center. It should feel 100% secure.Any jars that haven't properly sealed can either be re-processed within 24 hours with a new jar/lid OR transferred to the fridge to use within a few days.
- Label the cooled jars with the contents and a date to avoid food waste.
- Store the jars in a cool (below 95ºF/35ºC; somewhere between 50-70ºF/10-21ºC is ideal), dry, dark location like a kitchen cupboard or pantry for a year (or sometimes, more).


