
This post may contain affiliate links. Please read our disclosure policy.


I absolutely love the flavor of black garlic, but buying it adds up fast. So I finally asked the question that sent me down a rabbit hole: is it worth making black garlic at home?
After a lot of trial and error (and one particularly garlicky house), I landed on a method that actually works every time: a rice cooker. It gives you steady low heat, trapped humidity, and those chewy, date-like cloves with that deep sweet-savory flavor you’re looking for.
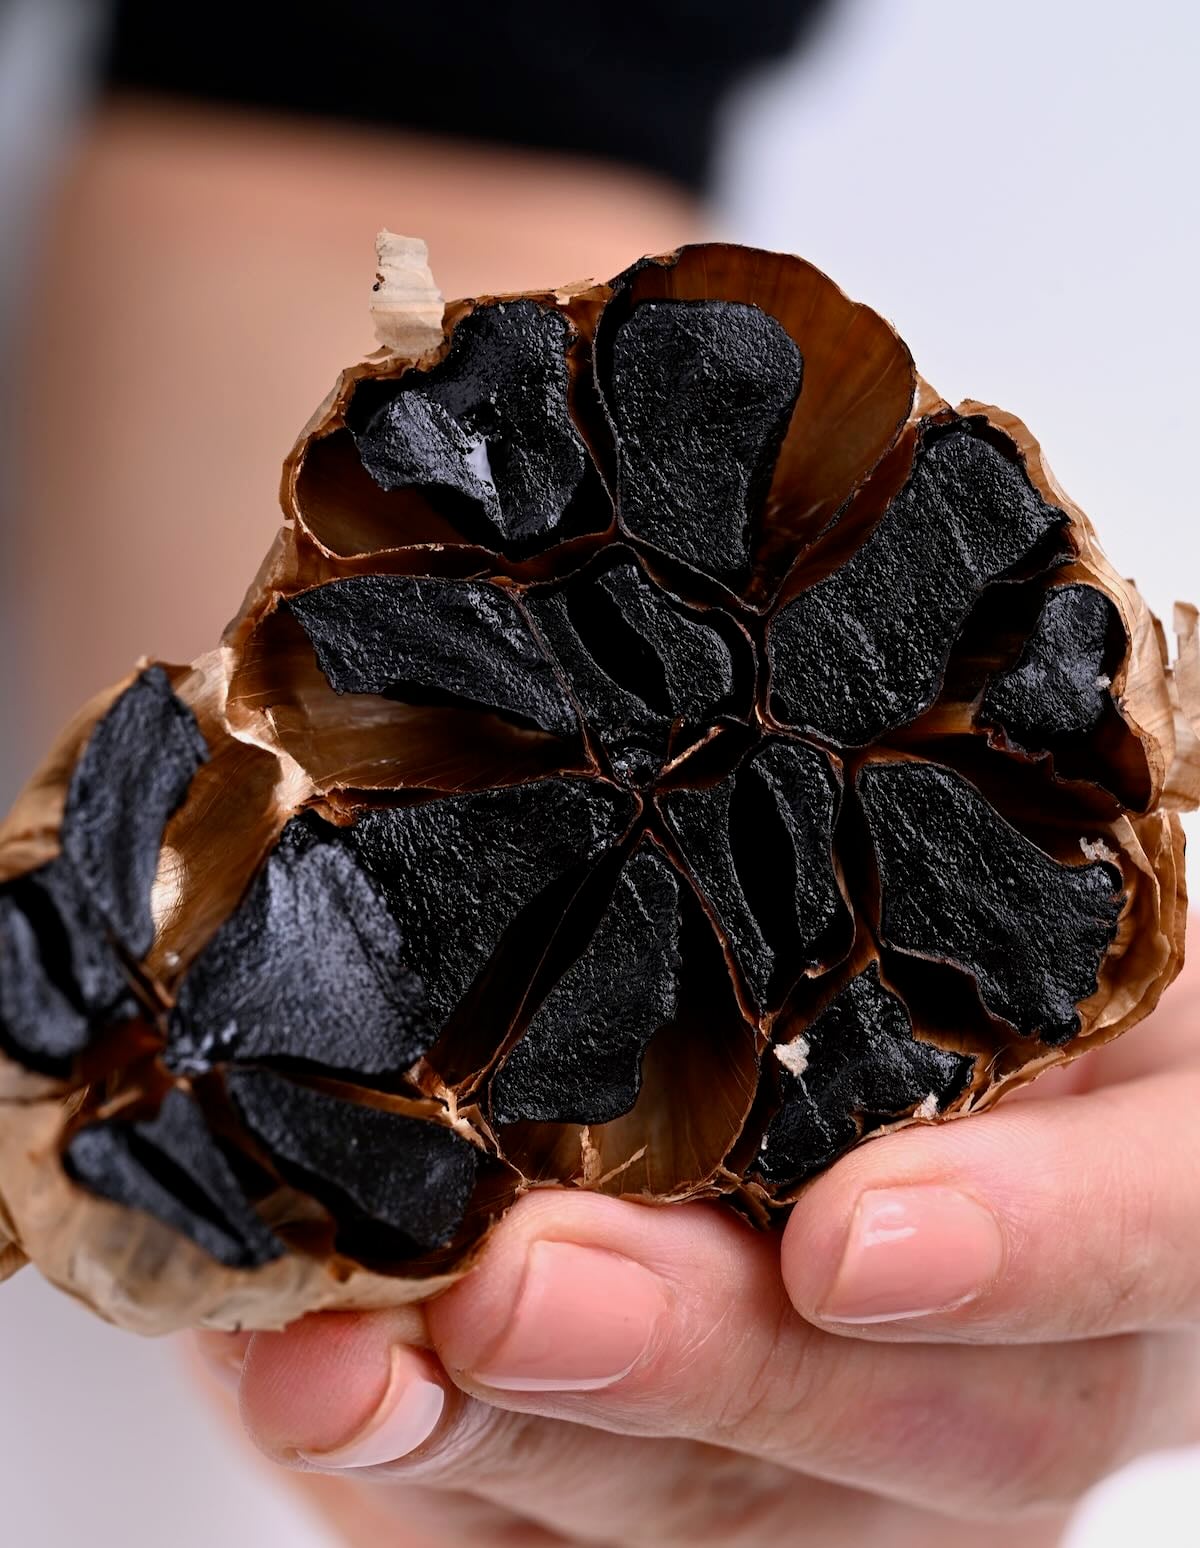
Black garlic is simply aged garlic. Over several days, the cloves slowly undergo the Maillard reaction (the same browning process that builds flavor in toasted and roasted foods), turning dark, mellow, and almost jammy. If you want the best at-home method using equipment many people already have, use a rice cooker that can hold a steady low temperature and keep the humidity in.
If you love garlic projects, you might also enjoy my guides for garlic confit, roasting garlic in the oven, and garlic paste.
What you’ll need
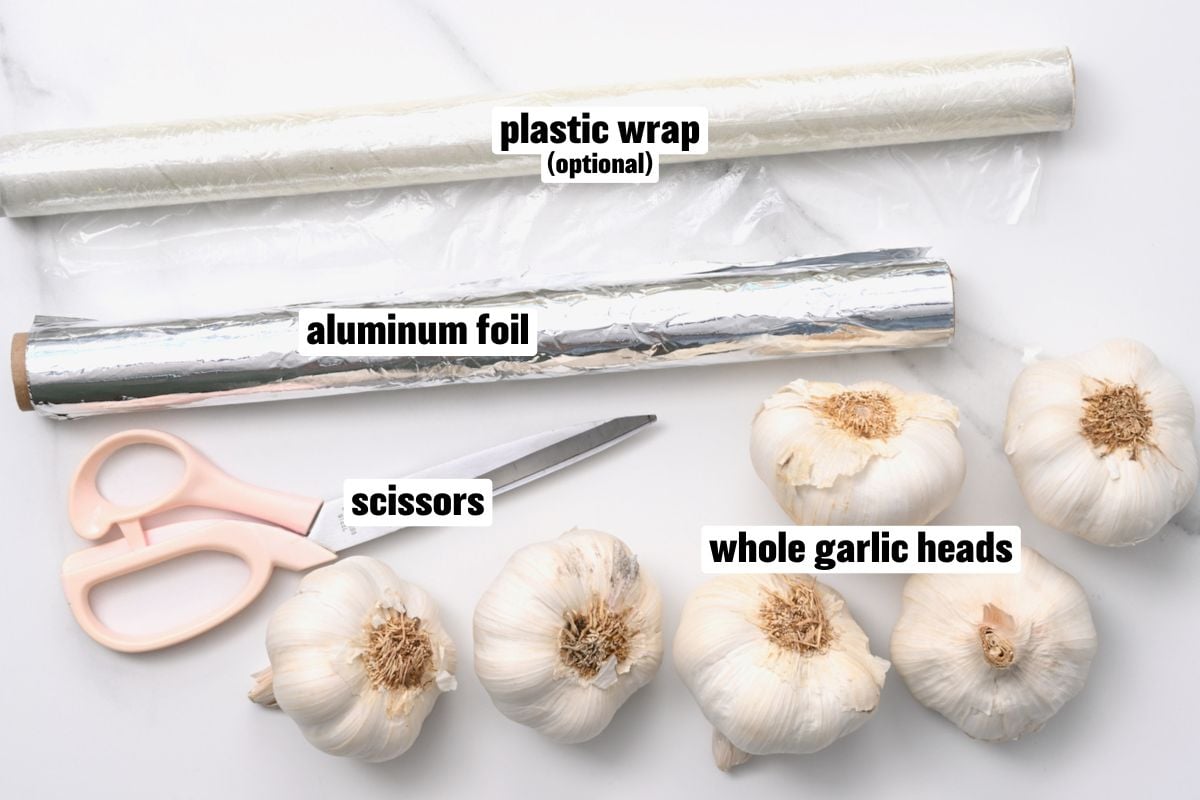
- Whole garlic heads: Choose firm, heavy bulbs with tight, dry papery skins. Avoid any heads with soft spots, mold, or moisture, and skip sprouted garlic if possible.
- Aluminum foil (heavy-duty if you have it): This traps moisture so the cloves soften and turn jammy instead of drying out.
- Rice cooker with a low “Keep Warm” setting: You want a steady low temperature (roughly 140–170°F, but consistency matters more than the exact number).
- Instant-read thermometer (optional but helpful): Use it once to confirm your rice cooker’s “warm” temperature before you commit to a week-long run.
Optional
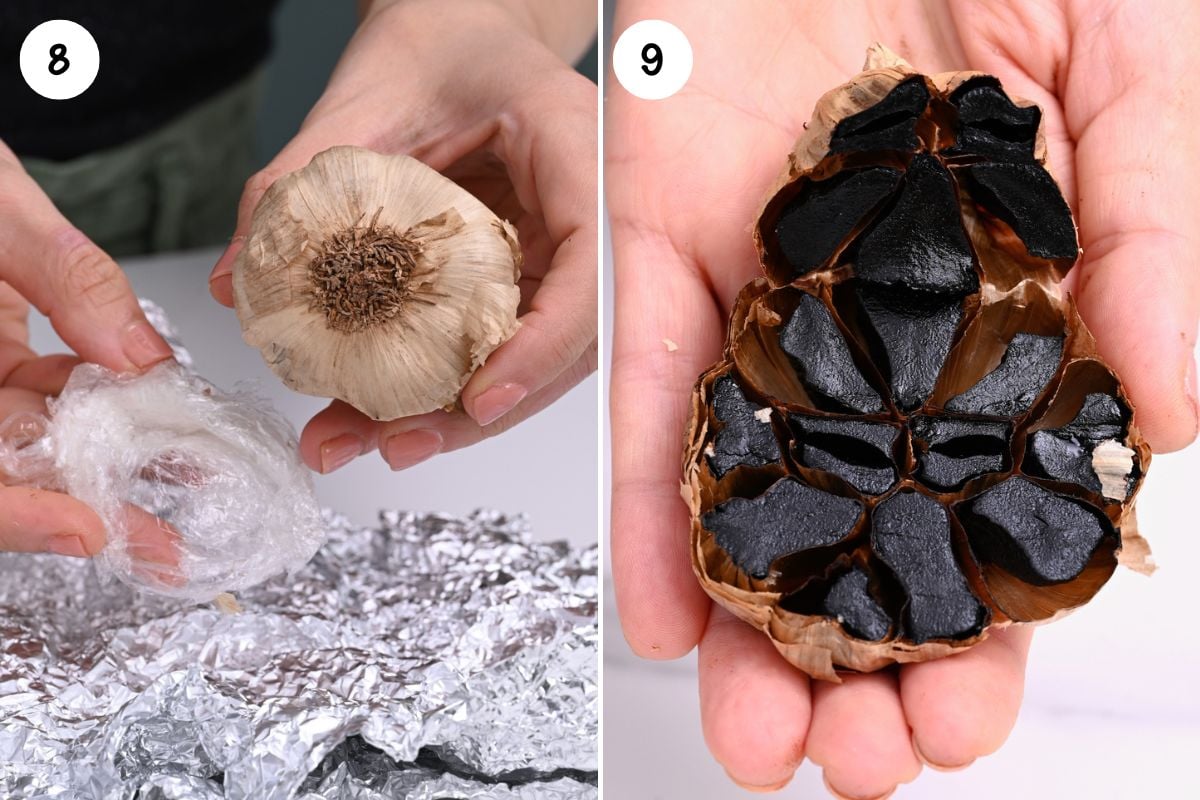
- Plastic wrap/cling film (optional): Some people wrap the bulbs in plastic wrap first, then foil, to retain even more moisture (do this only if you’re comfortable with it).
- Extra foil to cover the lid (optional): Helps trap humidity and reduce garlic aroma in the room.
See printable recipe card below for the full ingredients list and quantities.
How to make black garlic
Target conditions: Black garlic needs low, steady heat and high humidity. Too hot or too dry is what causes hard, bitter, dried-out cloves.
Before you start: I went down the black garlic rabbit hole and tried more than one method, but the rice cooker is the only one I’d use again: steady warmth, better humidity, and consistently jammy cloves.
Also, this will make your kitchen smell strongly like garlic for days, so run the rice cooker in a garage, balcony, or a well-ventilated room if you can.
Finally, don’t add water, and try not to open the lid unless you’re checking for doneness.
Test your rice cooker: Set it to “Keep Warm” for 30–60 minutes with the lid closed, then check the temperature inside the empty pot (an instant-read thermometer helps). You want a steady low range, roughly 140–170°F. If it runs much hotter, use a different appliance or method.
Prep the garlic: Don’t wash the bulbs. If needed, wipe off dirt with a dry towel. Leave the papery skins intact (trim extra-long roots or stem tips if you want).
Wrap tightly to trap moisture: Wrap each whole garlic head snugly in foil with no gaps or tears (heavy-duty foil helps). I like to double-wrap them. This is the easiest way to prevent drying and get that soft, date-like center.
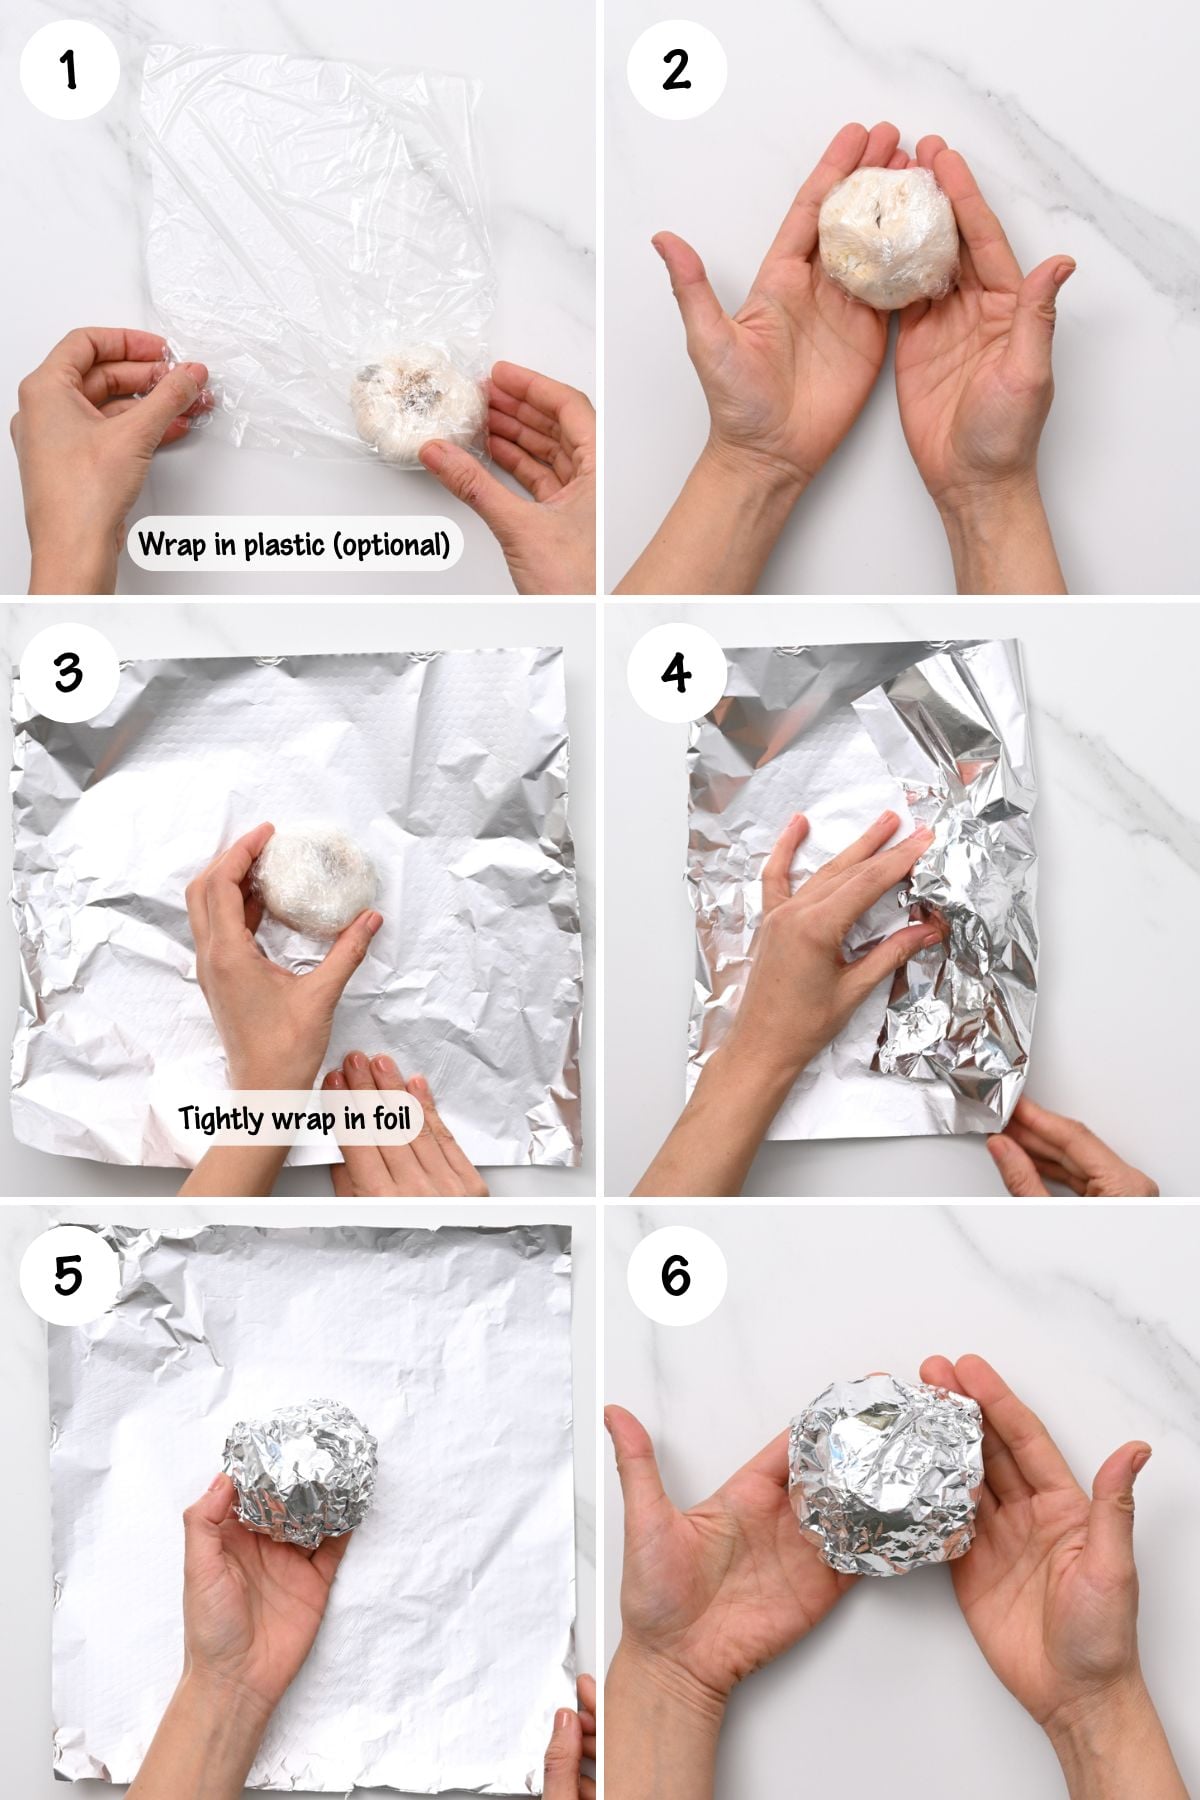
Load and seal: Place the wrapped heads in the rice cooker in a single layer and close the lid. For extra humidity retention (and less aroma), you can wrap the lid area with an additional layer of foil.
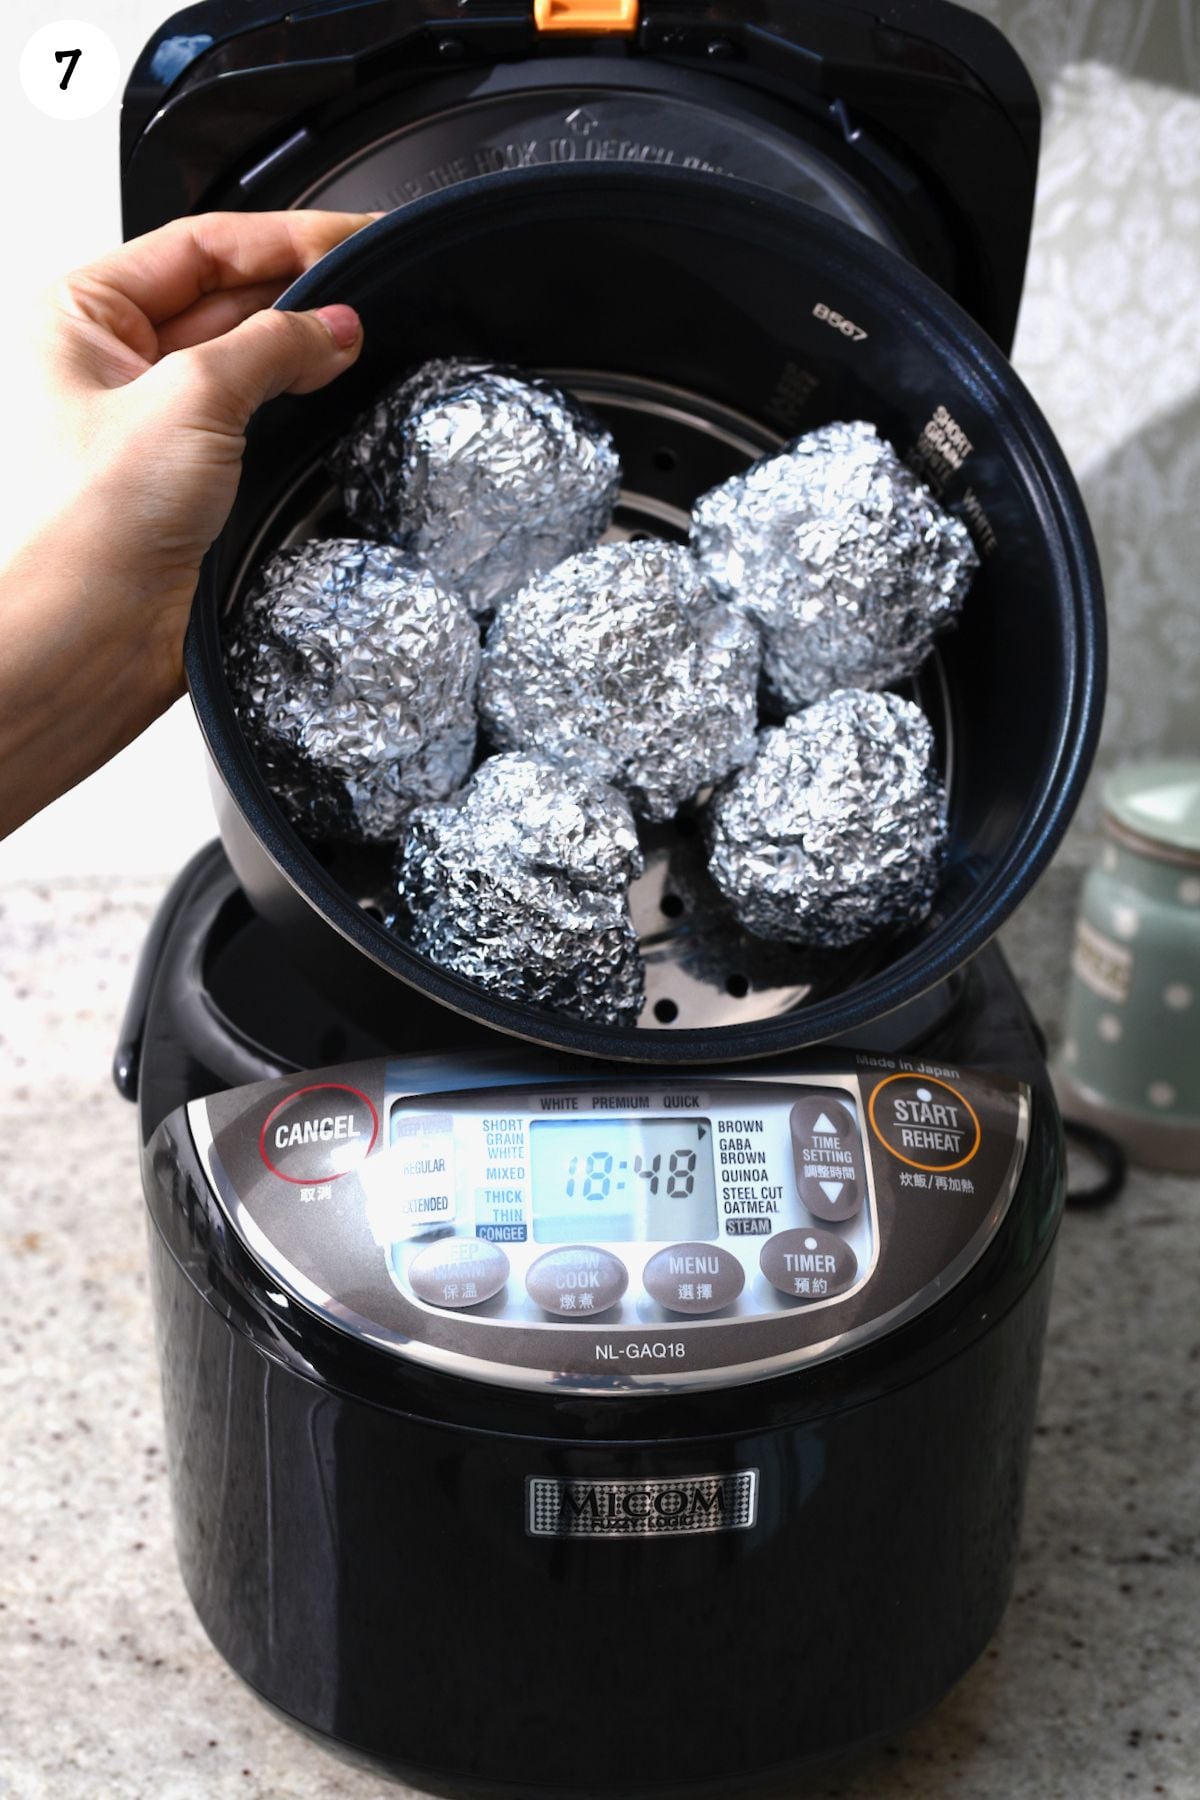
Hold low and slow: Keep the rice cooker on “Keep Warm” continuously. Avoid opening the lid because every peek releases humidity. Start checking around day 8. In many rice cookers, black garlic takes about 8–12 days, but cooler “warm” settings can take longer (at 140°F, it may take closer to 3–4 weeks). The exact timeline depends on your model, so don’t rely on the day count alone.
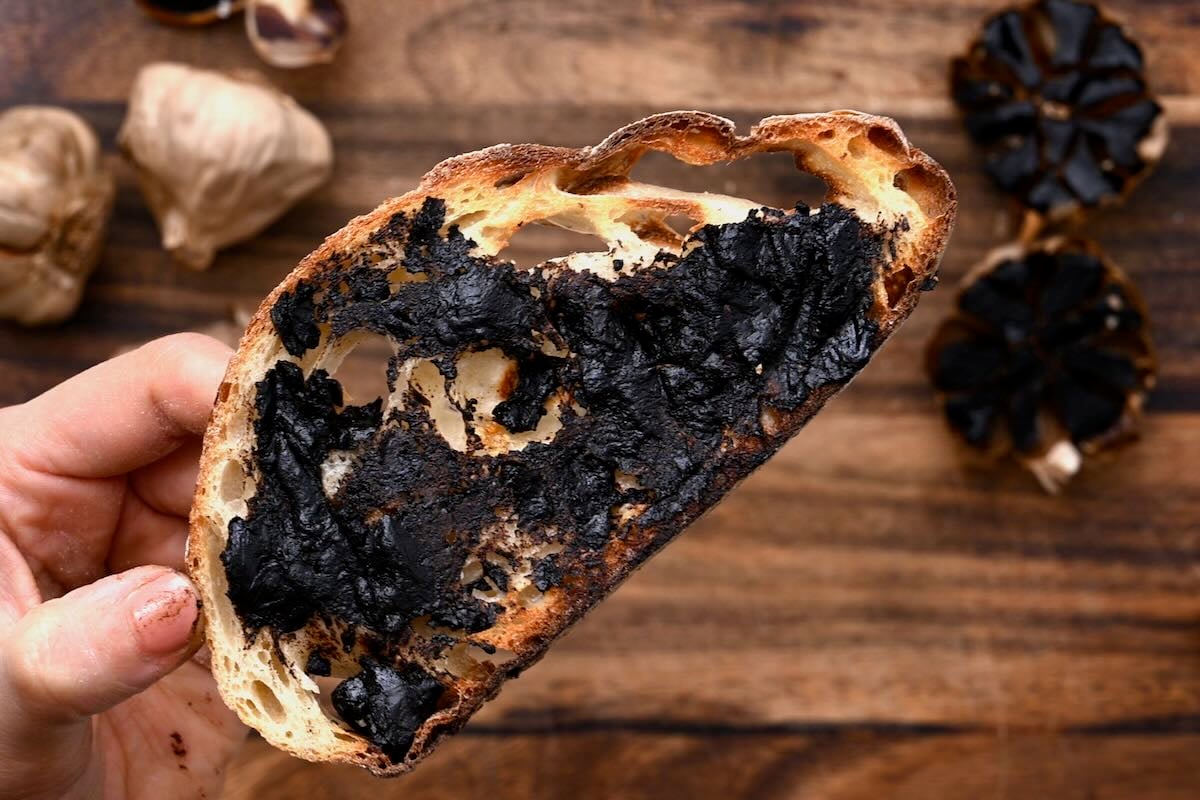
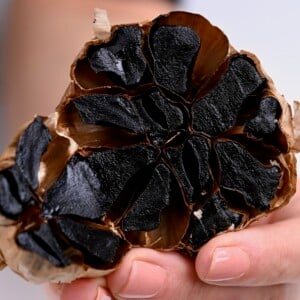
Check for doneness: Work quickly so you don’t lose humidity. Unwrap one head, peel a clove, and test. You’re looking for cloves that are uniformly deep brown to black, soft, and slightly sticky (they may cling to the knife). When you slice a clove, the center should look jammy and date-like, not dry or chalky. The aroma should be sweet-savory and mellow, not raw or sharp. If it’s still firm or light brown, rewrap and continue for 1–3 more days, checking again.
Cool, then store: Remove the bulbs and let them cool completely. Store the heads or individual cloves in an airtight container (see storage guidance below).
If your cloves taste a little bitter or feel dry: pull them a day sooner next time and reduce how often you open the cooker.
Success checklist
- Color: very dark brown to black
- Texture: soft, chewy, slightly sticky (not dry or powdery)
- Flavor: mellow, sweet-savory, with balsamic/molasses-like notes (no raw garlic bite).
My tips

• Verify the heat: Every rice cooker is different. A quick thermometer check before you start saves time and garlic later.
• Seal in moisture: Wrap each bulb tightly in foil (no gaps), and don’t open the lid often. Humidity is the difference between jammy cloves and dry ones.
• Start with fresh bulbs: Choose firm, heavy heads with tight skins. Older, drier garlic can over-dry before it fully darkens.
• Check briefly: Start testing around day 8, but keep it fast: test one clove, then rewrap immediately to preserve humidity.
• Control the aroma: Run the cooker in a garage, laundry room, or near an open window if you don’t want your whole house to smell like garlic. Also, rice cookers can hold onto the aroma, so this is a good project for an older cooker if you have one.
• Keep it simple: You only need garlic and time. No oil, no water.
Troubleshooting
- Dry, flaky cloves: You lost humidity (the wrap wasn’t tight or you opened it too often). Wrap tighter next time and peek less.
- Burnt/charred or bitter notes: Your “Keep Warm” runs too hot. Check the temperature before starting, or use a different appliance.
- Not dark enough yet: It simply needs more time at the correct low temperature. Cooler warm settings can take closer to 3–4 weeks.
How to use black garlic
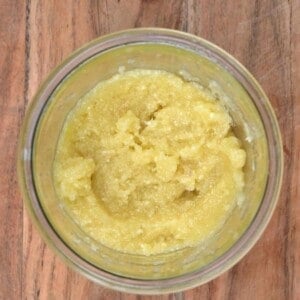
Black garlic is sweet, mellow, and packed with umami, so it works anywhere you’d normally use garlic, but want a deeper, almost balsamic-like richness. I usually mash it first (it blends better than chopping).
- Spread on toast (butter, olive oil, ricotta, or avocado).
- Mix into dressings and sauces (vinaigrettes, creamy dressings, mayo/aioli).
- Stir into dips (hummus or white bean dip).
- Add to pasta (mixed into butter or your favorite sauce).
- Use as a finishing boost for soups, curries, and even pizza (thinly sliced or mashed into a drizzle).
Quick black garlic sauce: Mash 2–3 cloves with soy sauce + chili (or chili oil), then loosen with a splash of water or rice vinegar. Great on noodles, stir-fries, dumplings, and roasted vegetables.
Storage
- Room temperature: Store in an airtight container in a cool, dark place for up to 1 week.
- Fridge: For best freshness, refrigerate for up to 1 month.
- Freezer: Freeze (whole bulbs or peeled cloves) for up to 6 months. If you freeze cloves, thaw them in the fridge and use them within a few days for the best texture.


If you give this a try, I would be so grateful for a rating and quick comment below.
How to Make Black Garlic (Rice Cooker Method)
Equipment
- Instant-read thermometer optional
Ingredients
- 6 garlic heads unpeeled (firm, heavy bulbs with dry skins)
Instructions
- Test your rice cooker: Set it to “Keep Warm” for 30–60 minutes, then check the temperature inside the empty pot (a thermometer helps). Aim for a steady low range around 140–170°F. If it runs much hotter, use a different appliance/method.
- Prep the garlic: Don’t wash the bulbs. Wipe off dirt with a dry towel, leaving the skins intact (trim long roots/stem tips if you want).
- Wrap tightly: Wrap each garlic head snugly in foil with no gaps or tears (tight wrapping helps trap moisture and prevents drying).
- Load and seal: Place the wrapped bulbs in the rice cooker (stacking is fine if needed) and close the lid. Optional: wrap the lid area with a layer of foil to help retain humidity and reduce aroma.
- Age on warm: Keep on “Keep Warm” continuously for 8–12 days without opening. Begin checking around day 8.
- Check for doneness: Unwrap one bulb and test a clove. It should be deep brown to black, soft, and slightly sticky/chewy with a jammy, date-like interior. If it’s still firm or light brown, rewrap and continue for 1–3 more days.
- Cool: Remove the bulbs and let them cool completely. Peel as needed or store cloves in their skins.
Notes
Nutrition
Nutrition information is automatically calculated, so should only be used as an approximation.


A brilliant and informative piece. I had no idea about black garlic i do now thank you
Hi Sandra, thanks so much for the feedback, glad to hear you found this post useful 🙂
Do you just pull the garlic from your garden and make it into black garlic or do you let it hang to dry for a couple weeks then make it
Hey Marlene! Freshly harvested garlic should be cured (dried) for a few weeks before making black garlic.
Curing allows excess moisture to evaporate, which helps improve flavor and prevents mold during the fermentation process. Ideally, let the garlic hang or spread out in a dry, well-ventilated area for 2-3 weeks until the outer skin is dry and papery. Once cured, it’s ready to be transformed into black garlic!
Hi Stephanie! Thanks for your comment. Black garlic is indeed a versatile ingredient with many health benefits. It’s always important to do your own research when it comes to health supplements. Hope you have a great day
I’ve had my garlic wrapped in cling and tinfoil, in my crock pot for over 5 weeks. It’s dry and flakey. Was the humidity wrong, or do I still wait longer? It’s been dry for 3 weeks already.
Hey Clarissa! If your garlic is dry and flaky after 5 weeks, it’s likely that there wasn’t enough humidity rather than needing more time. Black garlic should turn soft, sticky, and slightly caramelized, not dry.
Wrapping it in cling film and foil can help retain moisture, but if the overall environment inside the crockpot is too dry, it can still dehydrate. Some things that might help next time:
• Try adding a small dish of water inside the crockpot to maintain humidity.
• Make sure the lid is fully closed to trap moisture.
• Check the temperature—it should stay around 60°C (140°F) for the entire process.
Unfortunately, if the garlic has been dry for 3 weeks, it likely won’t recover. If you try again, adjusting the humidity should help!
I’m making black garlic in my dehydrator. We used the canning jar method. We are 4 days in and it looks as if my garlic is sprouting. Is this normal?
Hey Heather! Garlic sprouting during the black garlic process isn’t typical, but it can happen if the humidity or temperature isn’t quite right. Since you’re using the canning jar method in a dehydrator, make sure the temperature is set to around 60°C (140°F) and that there’s some airflow—but not too much.
If the jars are fully sealed, they may trap excess moisture, and if they’re too open, the garlic might dry out too quickly. Try loosely covering the jars with a breathable lid (like cheesecloth or resting a canning lid on top without sealing) to balance airflow and humidity. As long as the garlic is darkening and softening, it should still turn into black garlic over time.
Thank you for a very detailed recipe. I prepared the garlic as instructed and put them in a slow cooker. The warm function is about 68C and cannot be adjusted. The garlic smell was unpleasant during the first 12 hours and after that the occasional smell was not bad at all. Sometimes there was a slightly burn smell. I took one out after 10 days and unwrapped the clove. The garlic had turned black and there were some black ashes. Tasted acidic and dry. Are they done? Thank you.
Hey Wen! It sounds like your garlic may have overcooked due to the temperature being a little high (68°C / 154°F) since black garlic typically develops best around 60°C (140°F) or lower over several weeks.
The black ashes suggest that some cloves dried out too much, which can happen if there wasn’t enough humidity inside the slow cooker. Ideally, black garlic should be soft, sticky, and slightly sweet, not dry or overly acidic.
If the texture isn’t right, it might help to wrap the bulbs in parchment and foil or place a small dish of water in the slow cooker to retain more moisture. If you try again, checking the garlic around 7-8 days instead of 10 might also prevent it from drying out too much. Hope this helps!
I have not heard of using a dehydrator before. It seems that the continuous fan would prevent any moisture which I understood to be part of the process. Can you explain a little more why this works? Thank you.
Hi Karen,
A dehydrator circulates air at very low temperatures and instead of cooking with heat, it draws moisture out of food. This dries out food so they can be stored and enjoyed over a long period of time. I hope this answers your question.
Great recipe- well written with very clear instructions.
Thank you so much for your comment, Chris!
What do you mean wrap the garlic in
Hi Morgen,
The garlic needs to be tightly wrapped in cling film and foil so the humidity and temperature are regulated during the process. Alternatively, you may be able to place several garlic bulbs in a single mason jar with the lid on. I hope this helps.
Can I use the dehydrator outdoors a covered deck? I live in WA state and it’s going to be cold and rainy when I do this.
Hi Judy,
Normally, dehydrators can be used outdoors as long as you have a place to protect the appliance. That said, please make sure to check the manual of your particular brand and follow their recommendations.