
This post may contain affiliate links. Please read our disclosure policy.


Make your own buttery soft pretzels at home with just five simple ingredients. They’re delicious, soft and fluffy inside, with a chewy, golden crust.
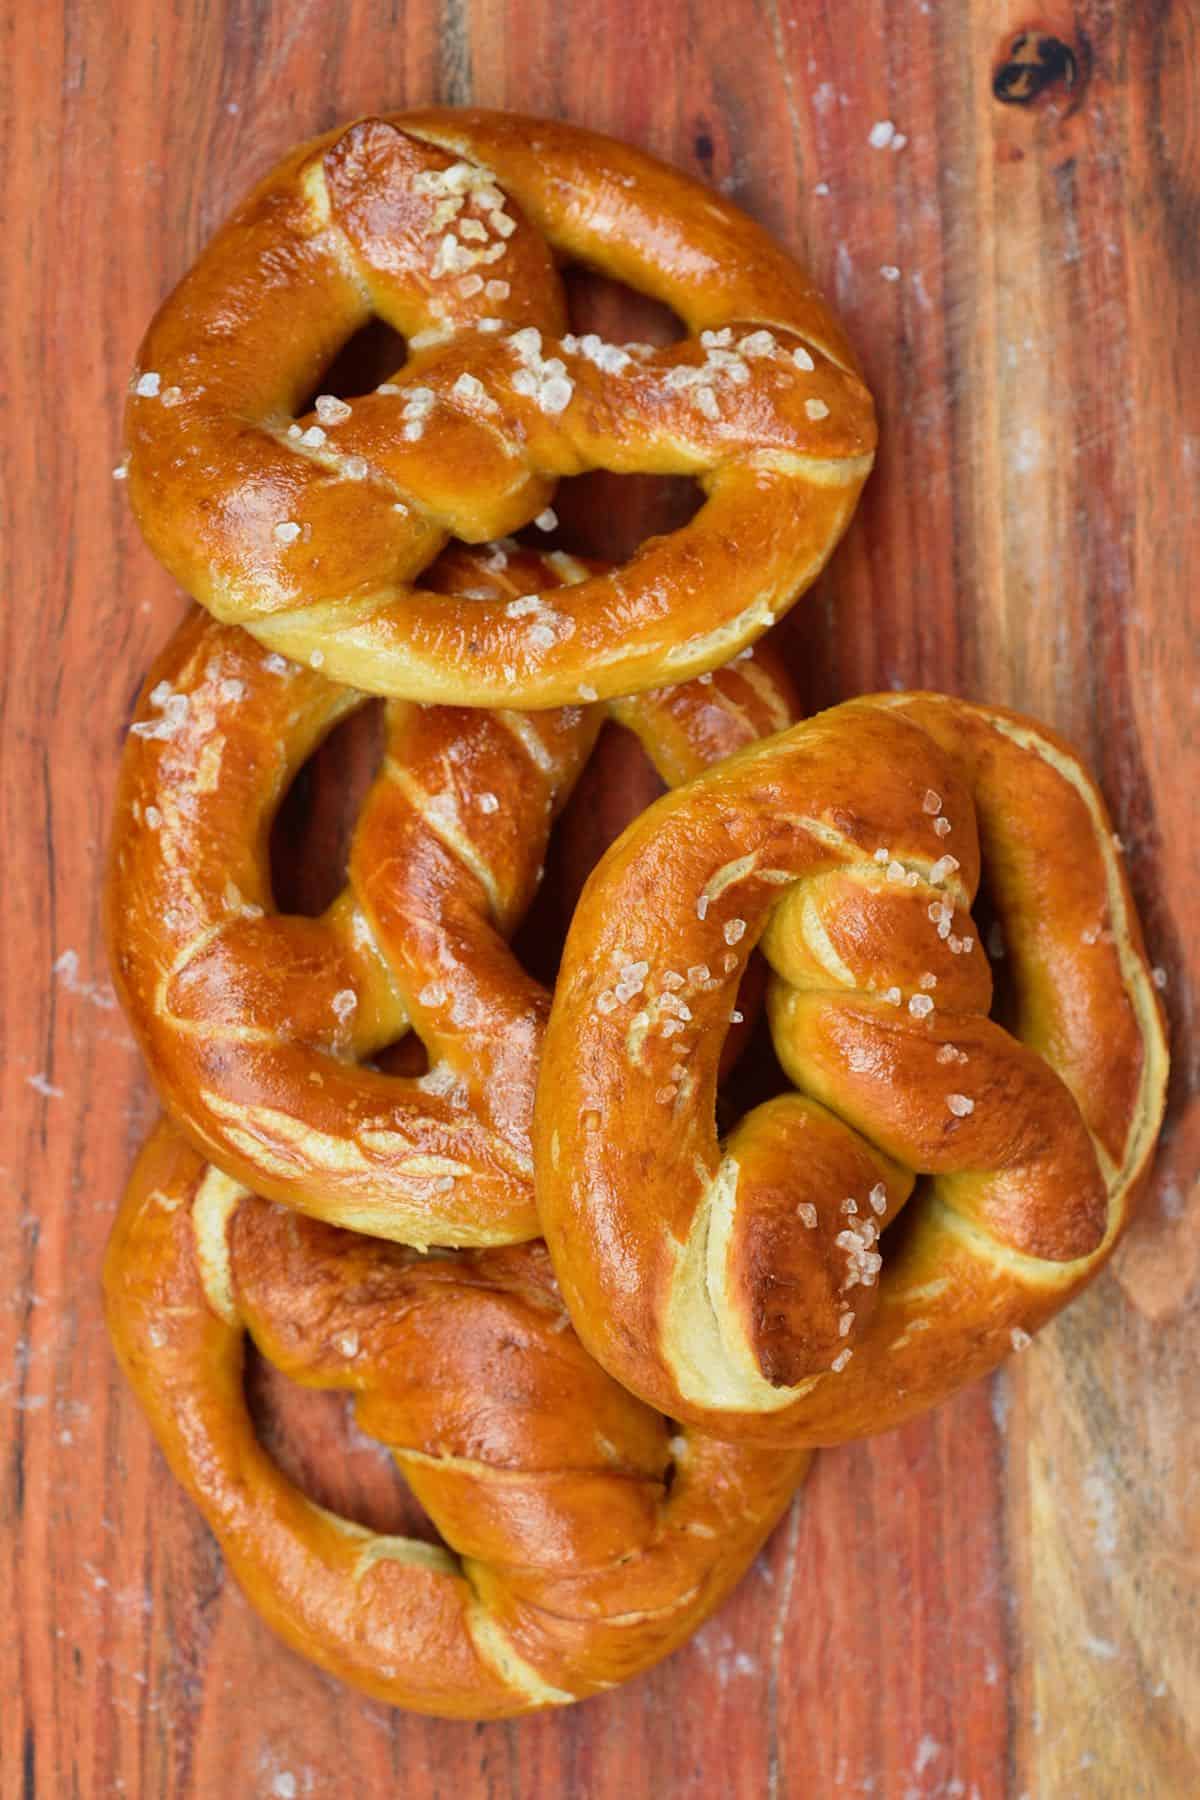
Making soft pretzels at home is as simple as five ingredients and a little time – and they taste much better than store-bought. With just 40 minutes of hands-on prep, you get chewy and crispy pretzels, made even better by a quick baking soda bath to create that famous golden-brown crust. You’d never believe how easy these pretzels are to make!
Table of contents
Ingredients
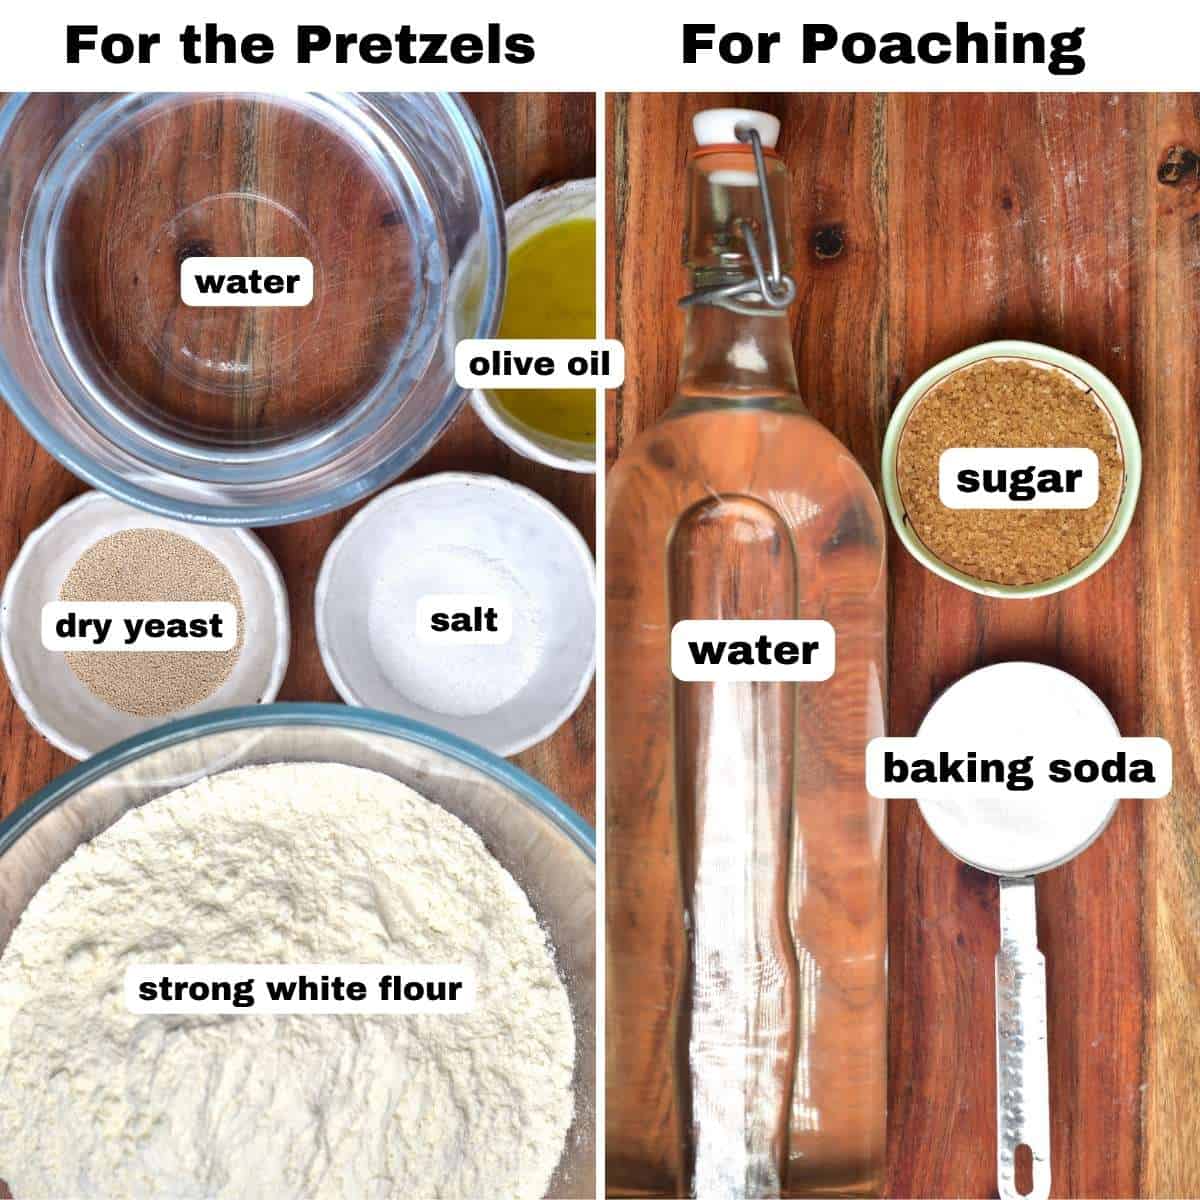
- Strong White Flour: Strong white flour is best for chewier pretzels instead of using all-purpose flour.
- Dry Yeast: You can use instant yeast for soft pretzels; just skip the activation steps. You will also need to convert it if it’s not the correct amount.
- Water: To help activate the yeast, you need lukewarm water – not too hot or too cool. Test with a thermometer – it should be about 105°F/40°C.
- Olive Oil
- Salt
For the Poaching Liquid:
- Water
- Brown Sugar
- Baking Soda
How to make soft pretzels
Mix and Knead The Dough: Combine the flour and salt in a large bowl. In a separate bowl, combine the yeast, warm water, and oil, allowing it to rest for a few minutes. This is known as “activating” the yeast and will tell you whether or not your yeast is usable. When the yeast is properly activated, the bowl should develop a foamy top (like a beer).
Then, add the yeast to the flour mix and combine to form a dough. Using either the dough hook on a stand mixer or your hands, knead the dough until smooth and elastic. The dough is ready when you poke it and it bounces back. This can take 5-15 minutes.
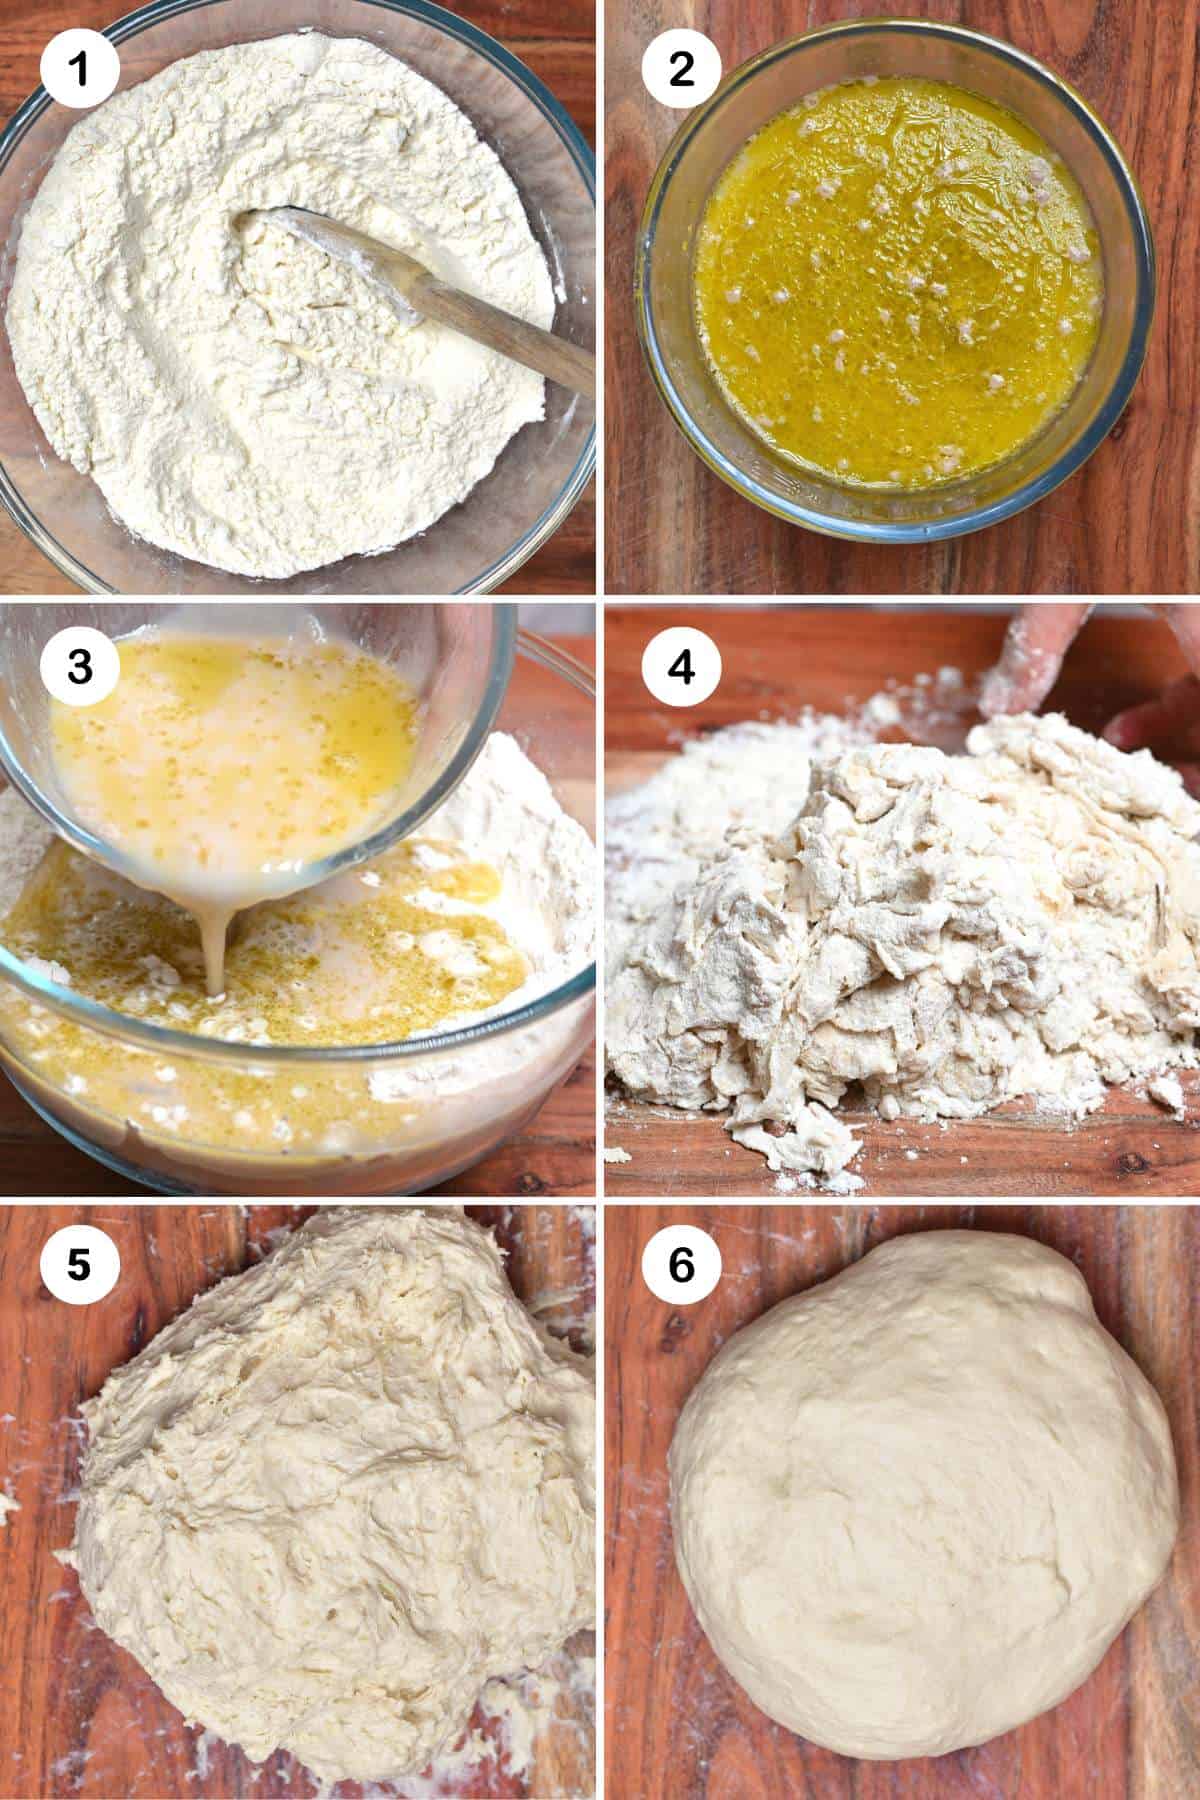
Rest The Dough: Place the kneaded pretzel dough in a greased bowl and leave it covered in a warm place for an hour or until it doubles in size. You can also leave it to rest in the oven with the light on (but no heat) if your area isn’t warm.
Preheat The Oven: Preheat your oven to 425ºF/220°C fan assisted (475ºF/240°C without fan).
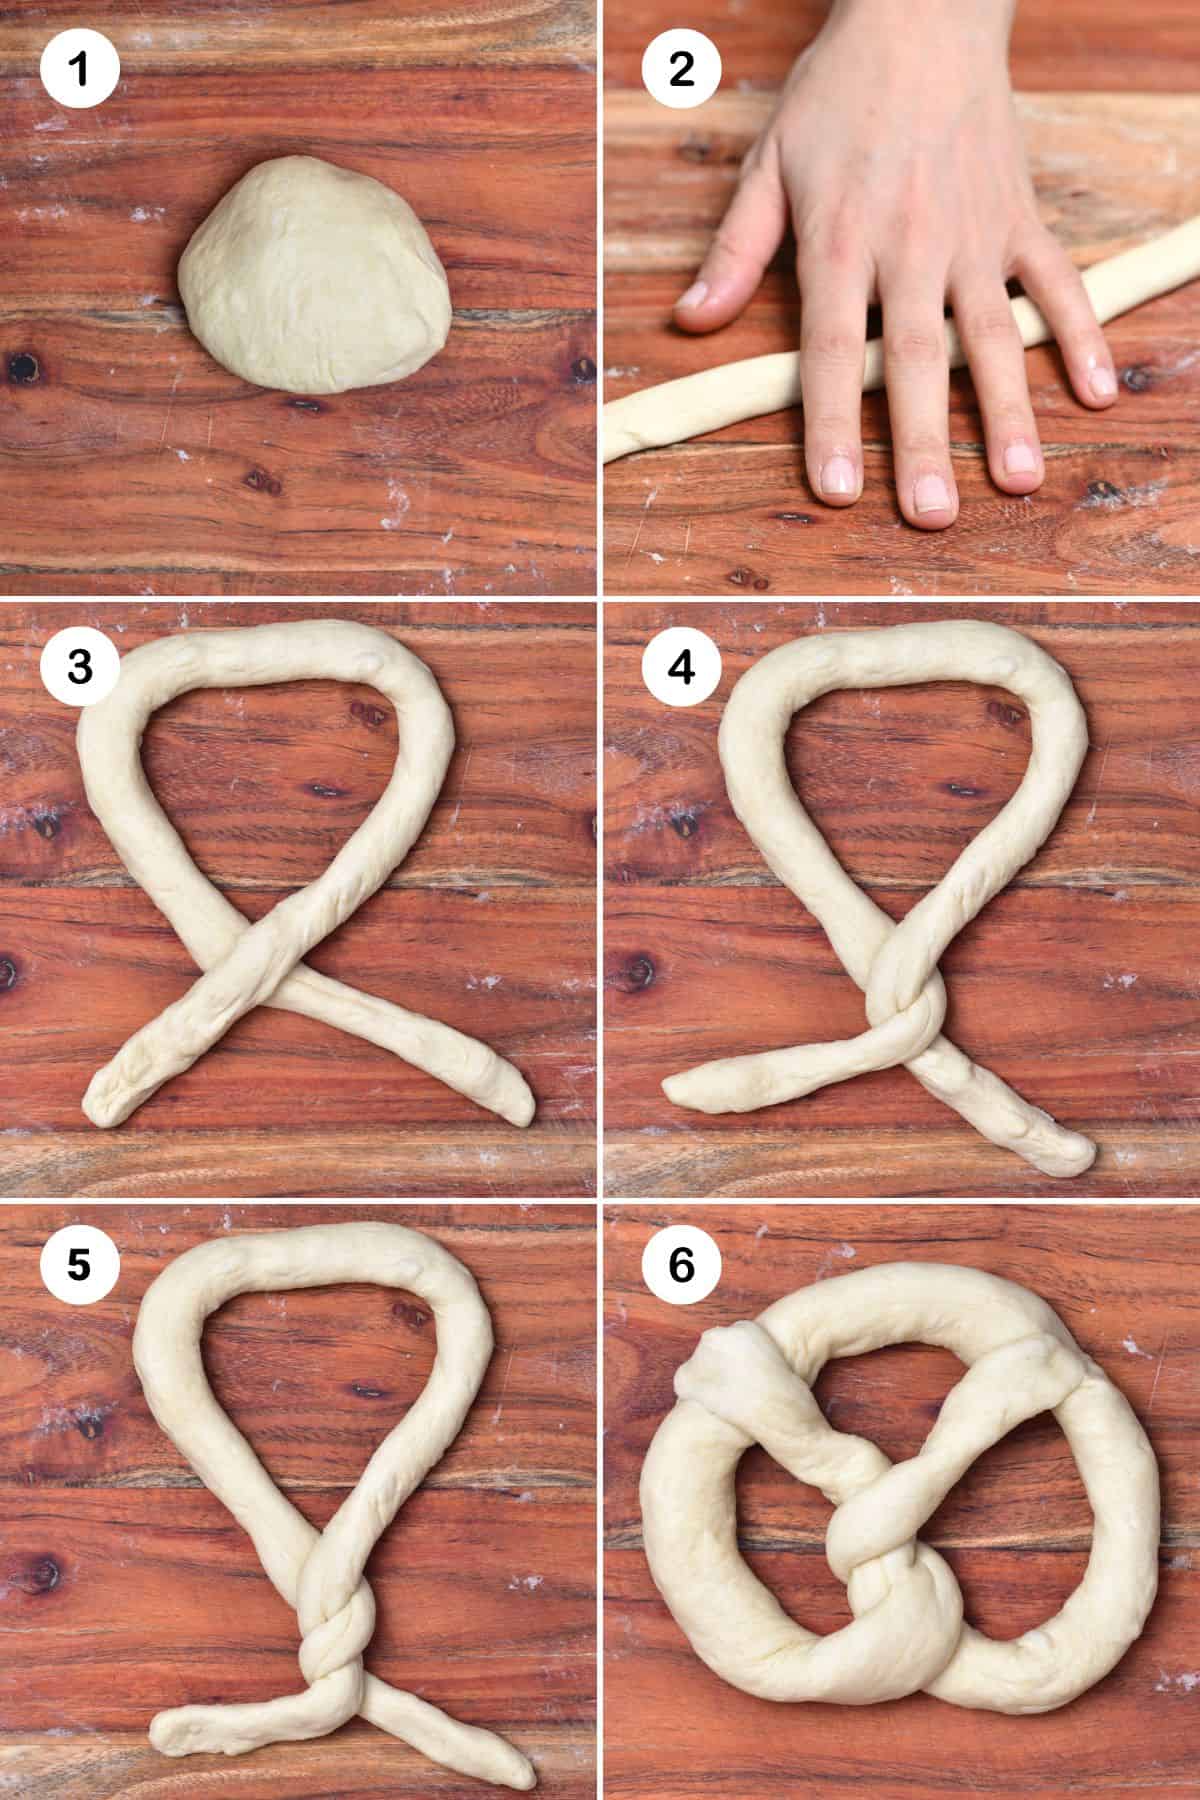
Shape The Pretzels: Gently deflate the dough, then remove it from the bowl and divide it into equal portions. Roll each portion into a rope about 23-25 inches long (60-65cm). Form each rope into a U shape and twist the two ends together a few inches from the top. Twist a second time, then bring the ends to the bottom of the U and press down to form a pretzel shape—follow my pictures below.
Prepare The Baking Soda Bath: Add the water and sugar to a large, high-sided saucepan and bring to a boil. Once it’s at boiling point, add the baking soda.
Poach The Pretzels: Using a spatula or slotted spoon, carefully lower a pretzel into the baking soda water, poaching for 10 seconds on either side – this helps give them a proper crust. Shake away the excess liquid, then place it on a baking tray lined with parchment paper. Repeat with all your soft pretzels.
Don’t poach for any longer than 20 seconds, as this can affect the flavor of the soft pretzels.
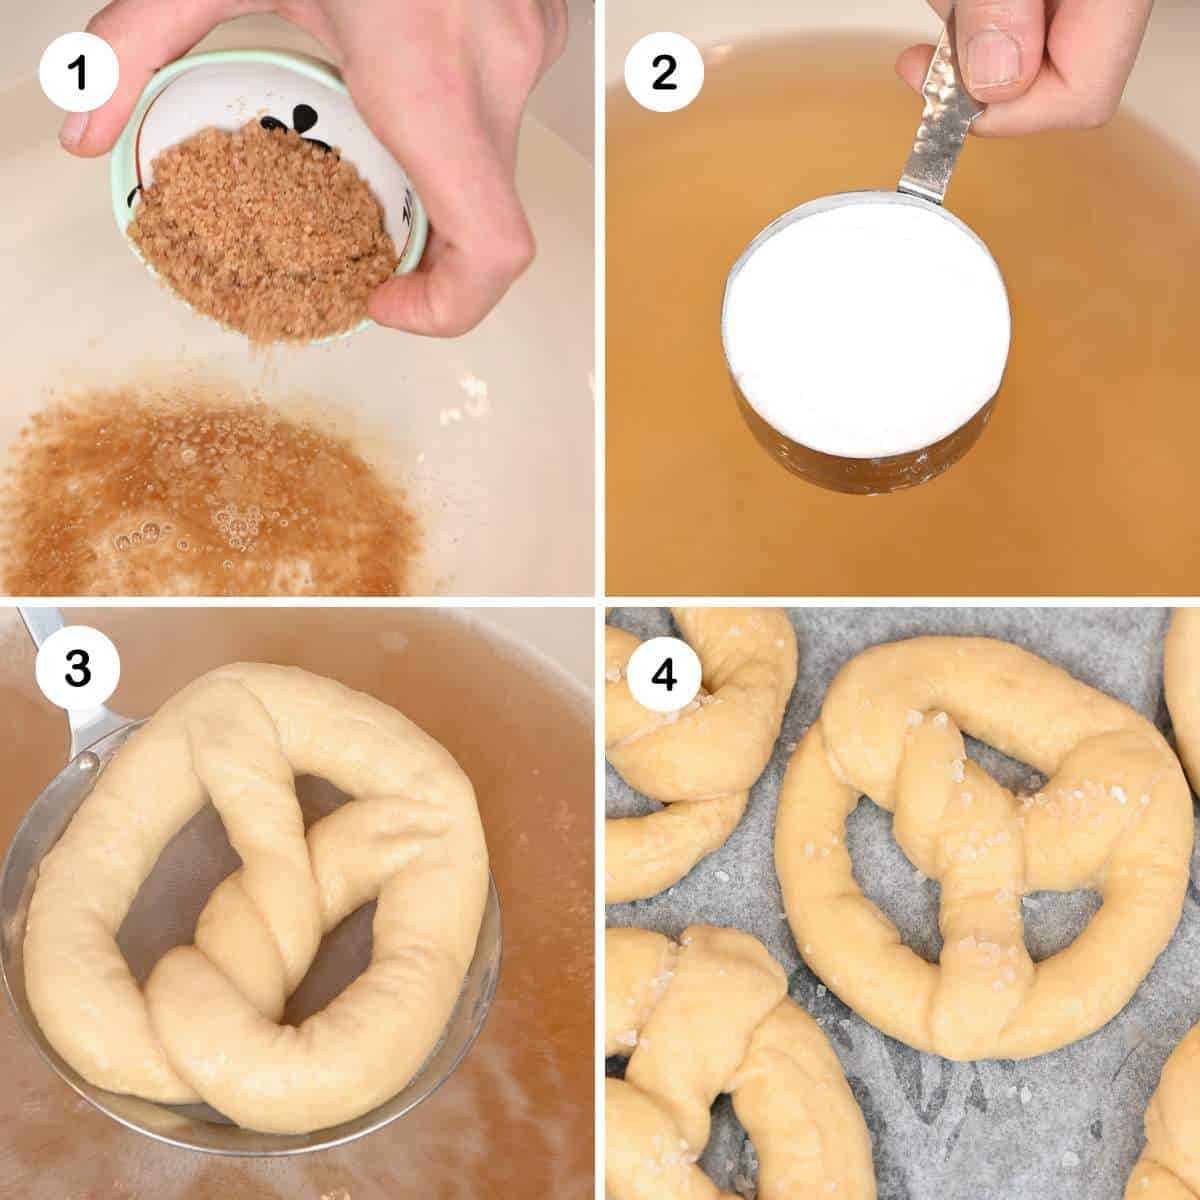
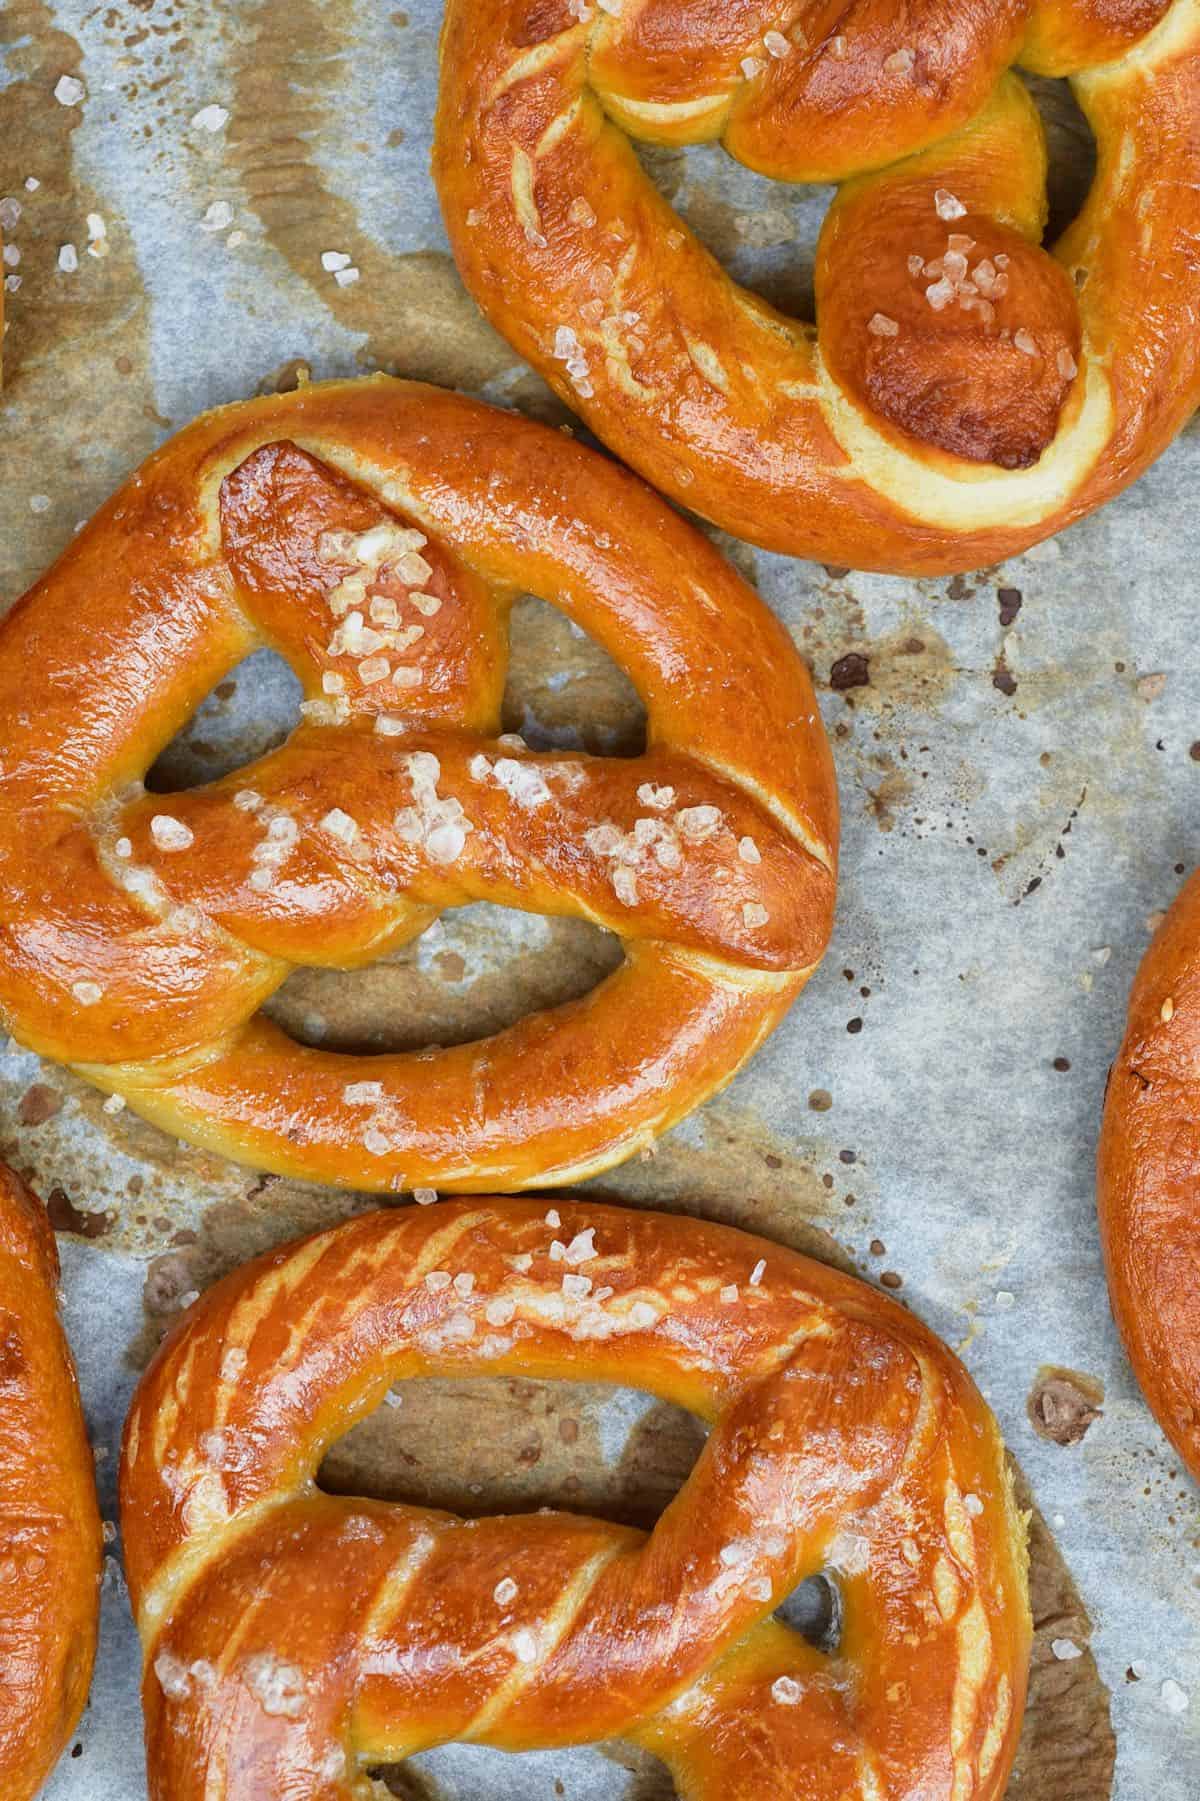
Bake the pretzels: Brush the tops of the soft pretzels with some egg wash or milk for an extra shiny crust. Then bake in the oven at 425ºF/220°C for 12-15 minutes. Keep an eye on them so they don’t overbrown. Remove from the oven, brush with melted butter, and sprinkle with coarse salt to serve.
Serve and Enjoy: Enjoy your homemade soft pretzels with popular options like butter or herby compound butter, dip them into mustard or ketchup, serve them with melted cream cheese, or enjoy them with sweet dips like Nutella.
More favorite baking recipes


If you try this soft pretzels recipe, let me know how it goes in the comments below. I’d appreciate a recipe card rating and would love to see your recipe recreations – tag me on Instagram @Alphafoodie!

Easy Homemade Soft Pretzels
Ingredients
- 4 cups white bread flour or all-purpose flour
- 1 Tbsp salt
- 1.5 cups water
- 3 Tbsp olive oil
- 2 1/4 tsp yeast
For poaching
- 8 cups water
- 1/4 cup brown sugar optional
- 1/3 cup baking soda
Topping
- milk or egg white to brush the pretzels
- coarse sea salt
Instructions
Make The Dough
- In a large bowl add the flour and salt. In a smaller bowl, combine the yeast, olive oil and water. Allow to sit for a few minutes to activate.
- Combine the yeast and flour mix, stirring until it starts to come together. Turn out onto a floured surface and knead, or use the dough hook on a stand mixer to knead until it becomes soft and stretchy.
- Put the dough in a greased bowl and leave to prove, covered, for an hour.
Form The Pretzels
- Knock the air out of the dough and tip onto a floured surface. Divide into equal portions.
- Roll each piece of dough into a rope about 23-25 inches/60-65cm long. Form into a U shape and twist the ends together, then again. Bring the ends together to form a pretzel shape. Use the pictures on the blog for step-by-step instructions.
Poach
- In a large saucepan, add water and brown sugar and bring to a boil, then add baking soda.
- Using a spatula or slotted spoon, dip each of the shaped pretzels into the baking soda water, poaching for 10 seconds on either side. Shake off any excess and transfer to a lined baking sheet. Repeat for all.
Bake
- Preheat the oven to 425ºF/220°C fan assisted (475ºF/240°C without fan). Brush the pretzels with egg white or milk, then bake for 12-15 minutes or until golden brown.
Notes
Nutrition
Nutrition information is automatically calculated, so should only be used as an approximation.


Just made these and wow.. So Good!!!
I made half the dough and made sticks out of it as I wanted many flavors. I made mix cheese, pumpkin seed, flaky salt and cinnamon sugar. My boyfriend and I finished them all for lunch. And he said it’s better than the sourdough ones I usually make :-). And this is soooo fast. Probably will just make these from now on. So so so good, wished I didn’t half the recipe
Thank you so much for your comment, Laura! So happy you both enjoyed the pretzels 🙂
I love following you on insta and love even more how detailed your recipes are in here, it really helps not to mess up when trying them at home. I made the Bagels yesterday and these Pretzels today to my family, it was my first attempt so we are all amazed with how good it turned out <3
Thank you for your comment and all your support, Isadora! Glad you and your family are enjoying these recipes.