
This post may contain affiliate links. Please read our disclosure policy.


How to make classic napa cabbage kimchi (aka baechu-kimchi/pogi-kimchi) – a tangy, savory, spicy Korean fermented cabbage and ultimate side dish! This Korean kimchi recipe is simple to follow and naturally gluten-free, and the spice levels can be adapted!
In the last year or so, I’ve become interested in preserving methods like pickling and fermenting. But, alongside fermented garlic honey, homemade kombucha, and various pickled ingredients like pickled garlic, pickled red onions, pickled jalapenos, and pickled cucumbers, somehow homemade kimchi had utterly passed me by. Until now, with this napa cabbage kimchi (Korean baechu-kimchi).
This pungent fermented cabbage dish is a popular (if not the most popular) Korean side dish and has hundreds of varieties. However, I’ve really been enjoying this classic whole-leaf napa cabbage kimchi version (aka baechu-kimchi or “pogi kimchi” – which refers to using the in-tact cabbage head).
While kimchi has become more readily available in stores, you know what a sucker I am for making things at home, and homemade kimchi is more cost-effective and can easily be made “your own”! In addition, you can tweak the spiciness to your liking, which is very important (especially for palates not used to very spicy food).
Want to save this recipe?
What is Kimchi?
While, in recent years, we (non-Koreans) have come to think of kimchi/kimchee as a specific fermented cabbage dish, the term “kimchi” is actually an umbrella term for vegetable dishes that have been salted, seasoned, and then fermented. That means there are dozens of different varieties just for vegetables alone, hundreds (if not thousands) based on the regional differences and ingredient tweaks made from household to household.
For this Korean kimchi recipe, I’m making napa cabbage kimchi (aka baechu-kimchi), using the whole leaves of the cabbage. This makes it a little more labor-intensive, as you have to spend time spreading the kimchi paste over each leaf. However, this traditional kimchi style is worth trying!
Due to the fermentation process, Korean kimchi is packed with healthy bacteria and has become well-known as a gut-friendly probiotic food.
The Korean Kimchi Ingredients
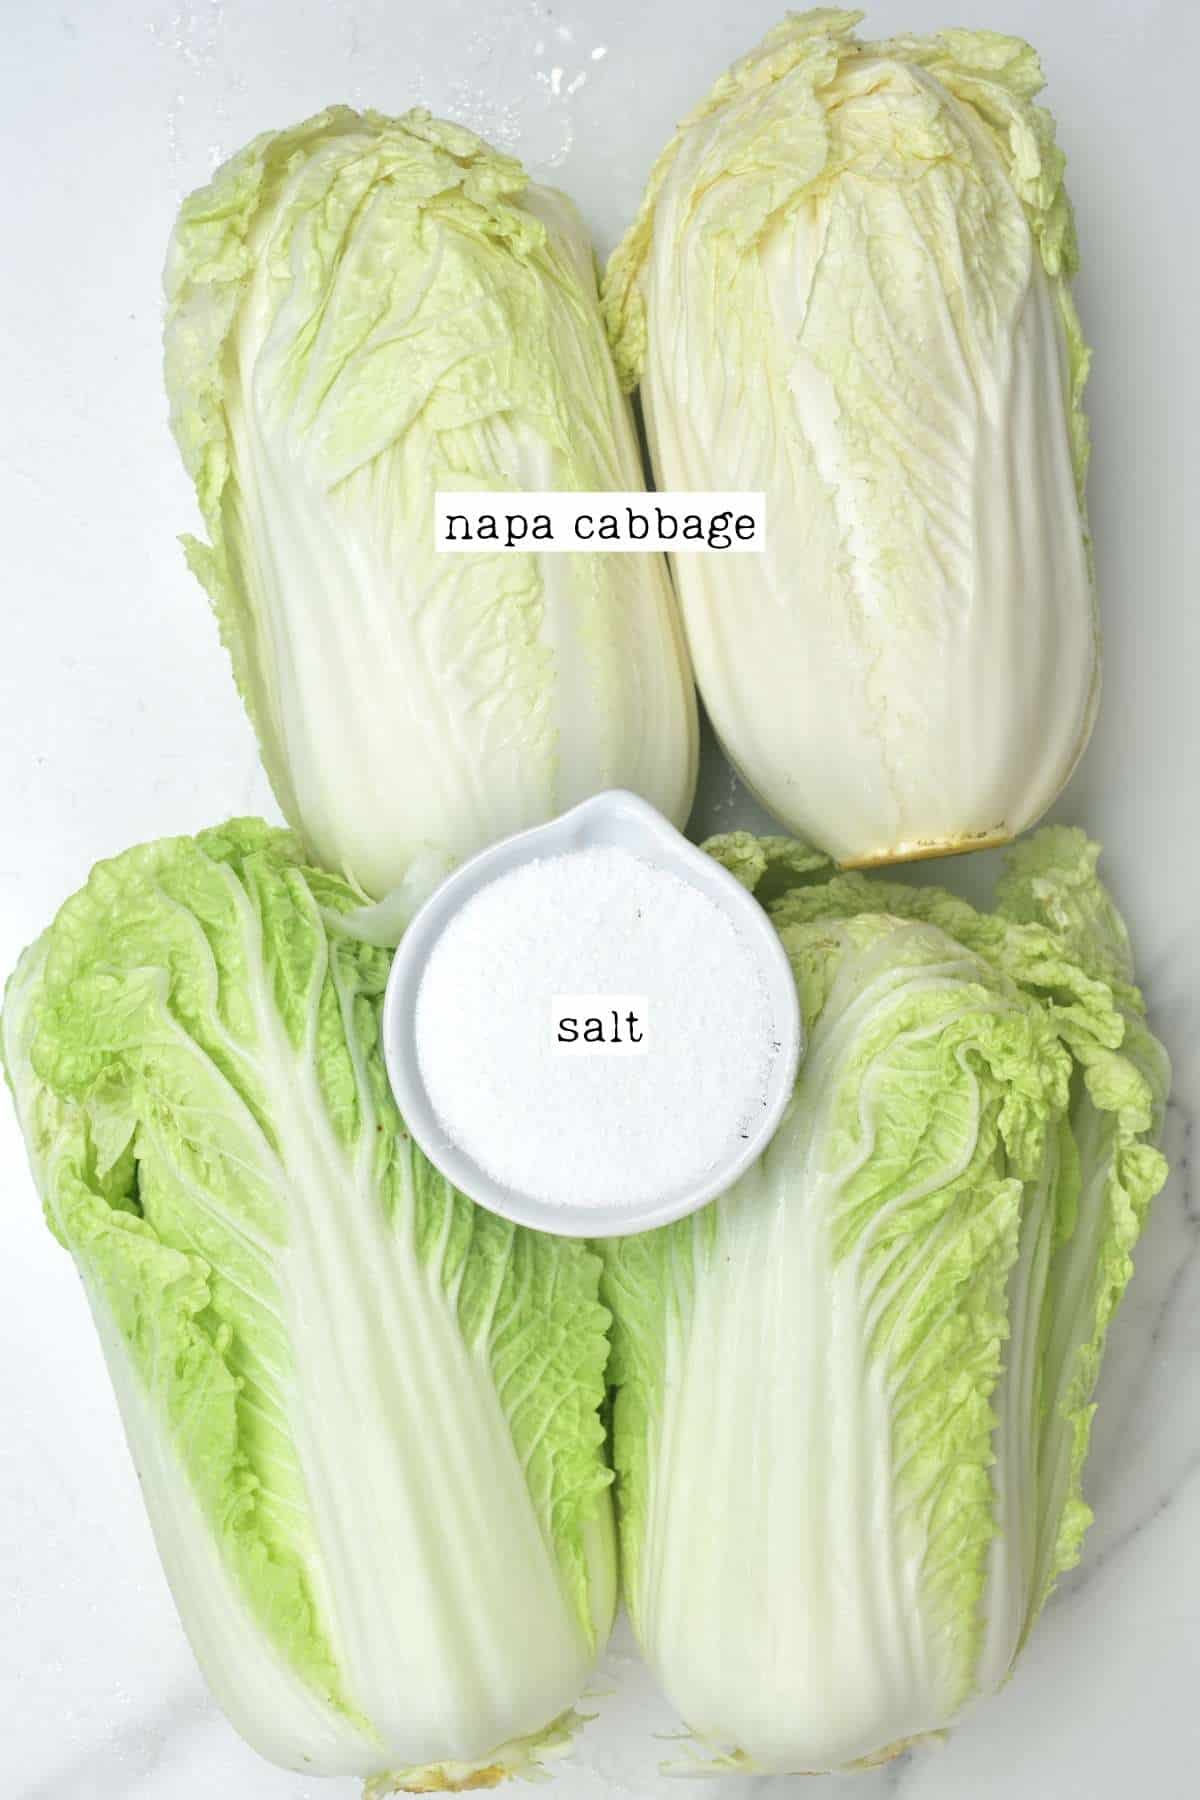
- Cabbage: Napa cabbage is the traditional choice. Read the FAQs for variations.
- Salt: Traditionally, a coarse natural sea salt ( ‘Korean brining salt’ is used for salting the cabbage. However, you can use any coarse salt. If you need to use a finer salt, then reduce the amount used by about 1/4.
The “porridge”
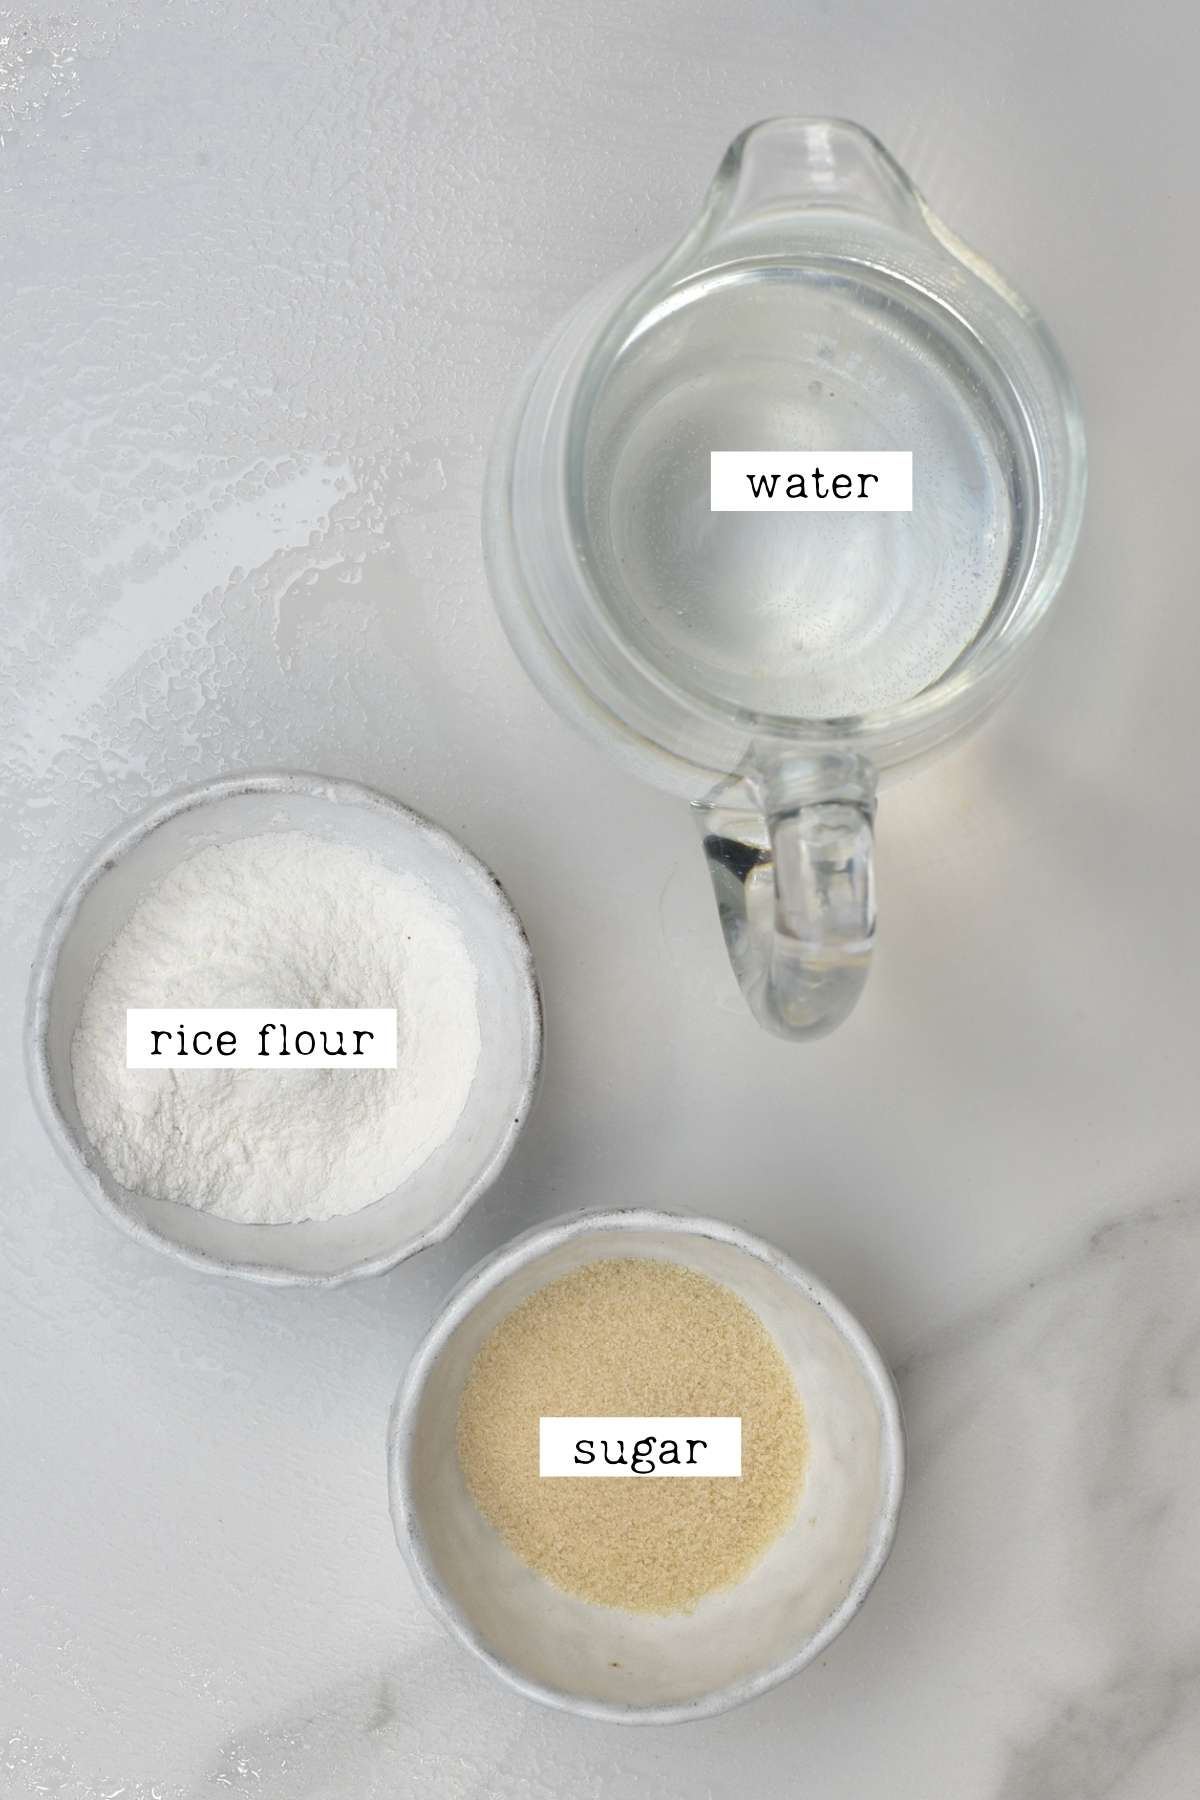
This is needed to allow all the spices to stick to the cabbage.
- I use a combination of glutinous rice flour, sugar, and water. Feel free to omit the sugar, if preferred.
For the Kimchi Paste
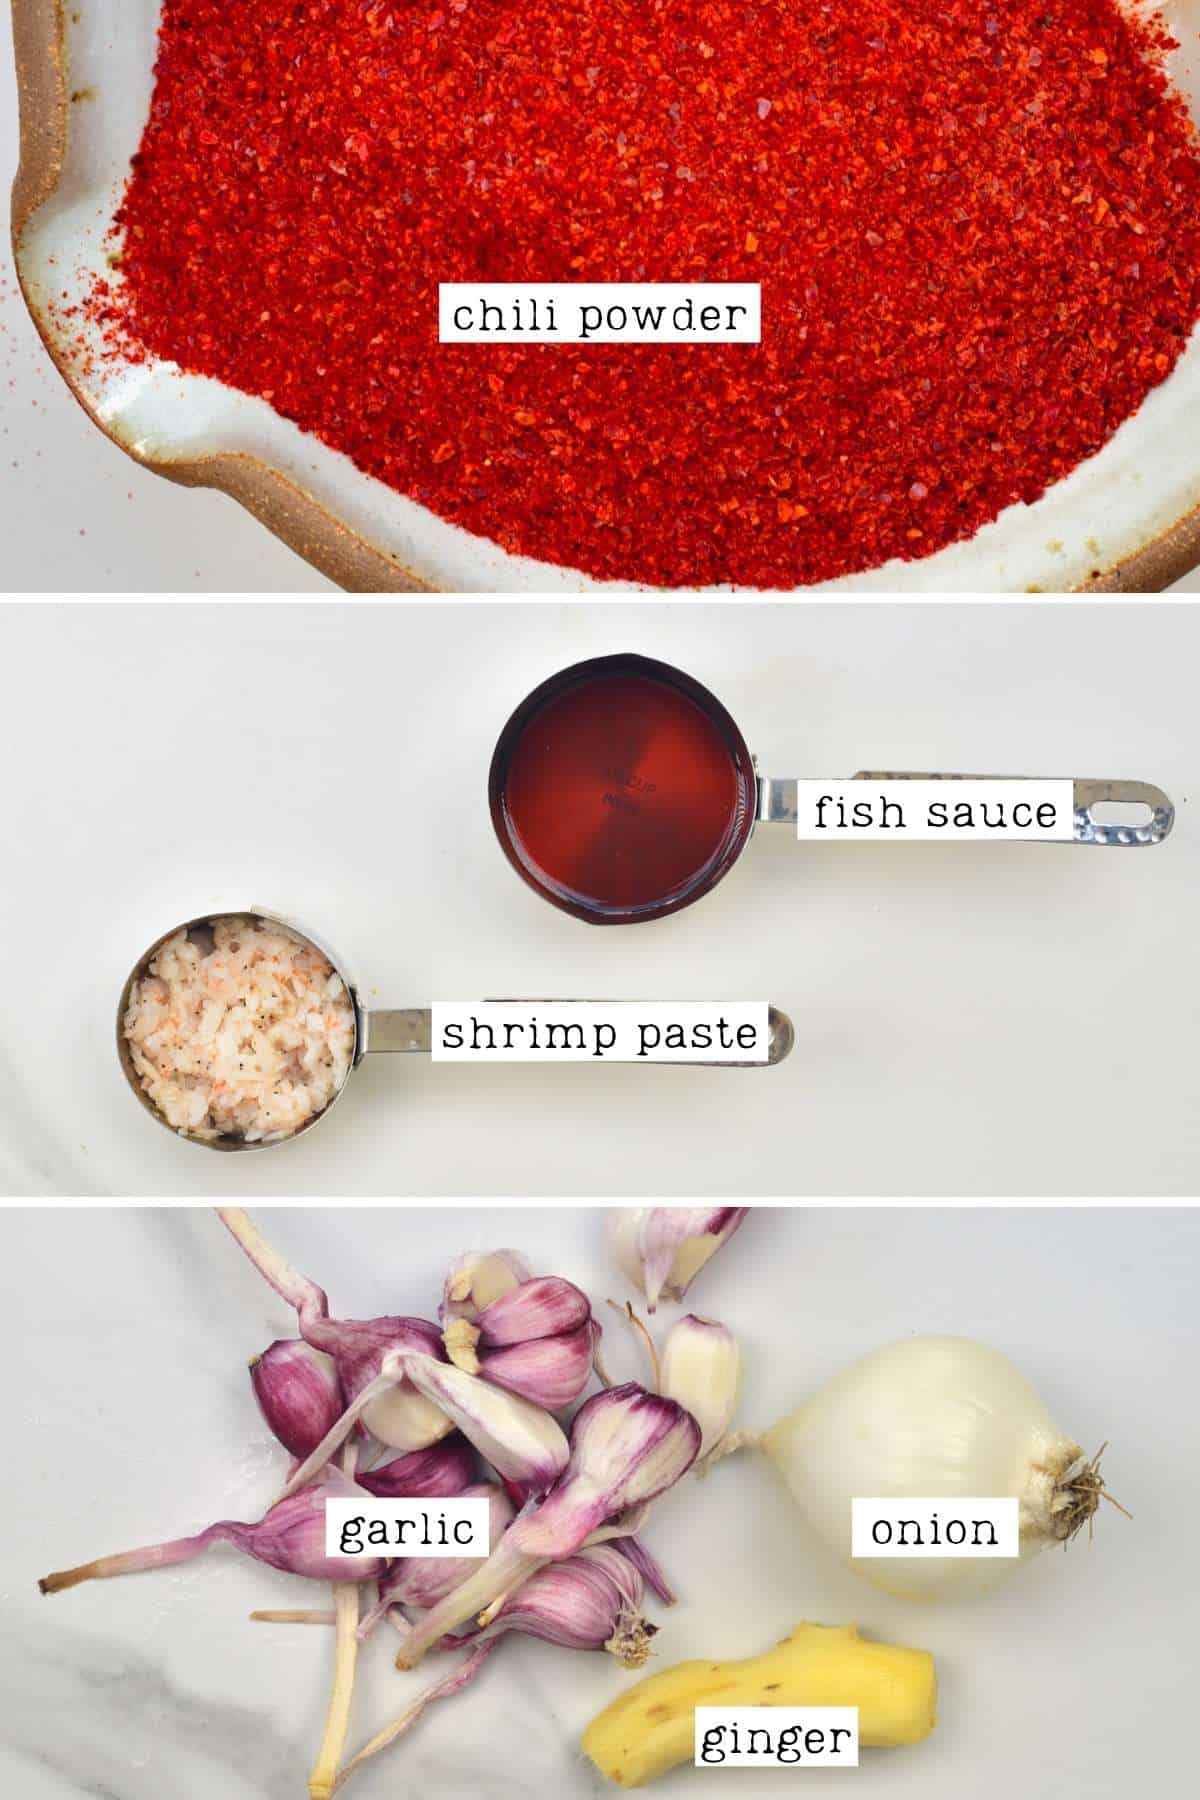
- Chili: Korean chili powder or flakes (gochugaru) is critical to the authentic kimchi flavor. While it’s technically possible to make this cabbage kimchi with another type of chili, the taste will definitely change – adjust the amount based on how spicy you want your cabbage kimchi to be.
- Fish: I used a combination of fish sauce and shrimp paste. You can use store-bought shrimp paste or make your own by combining tiny shrimp with vinegar and salt). You could also decide to use one or the other (increase the amounts to make up for the other).
- Aromatics: I used a traditional combination of onion, garlic, and ginger.
The Vegetables
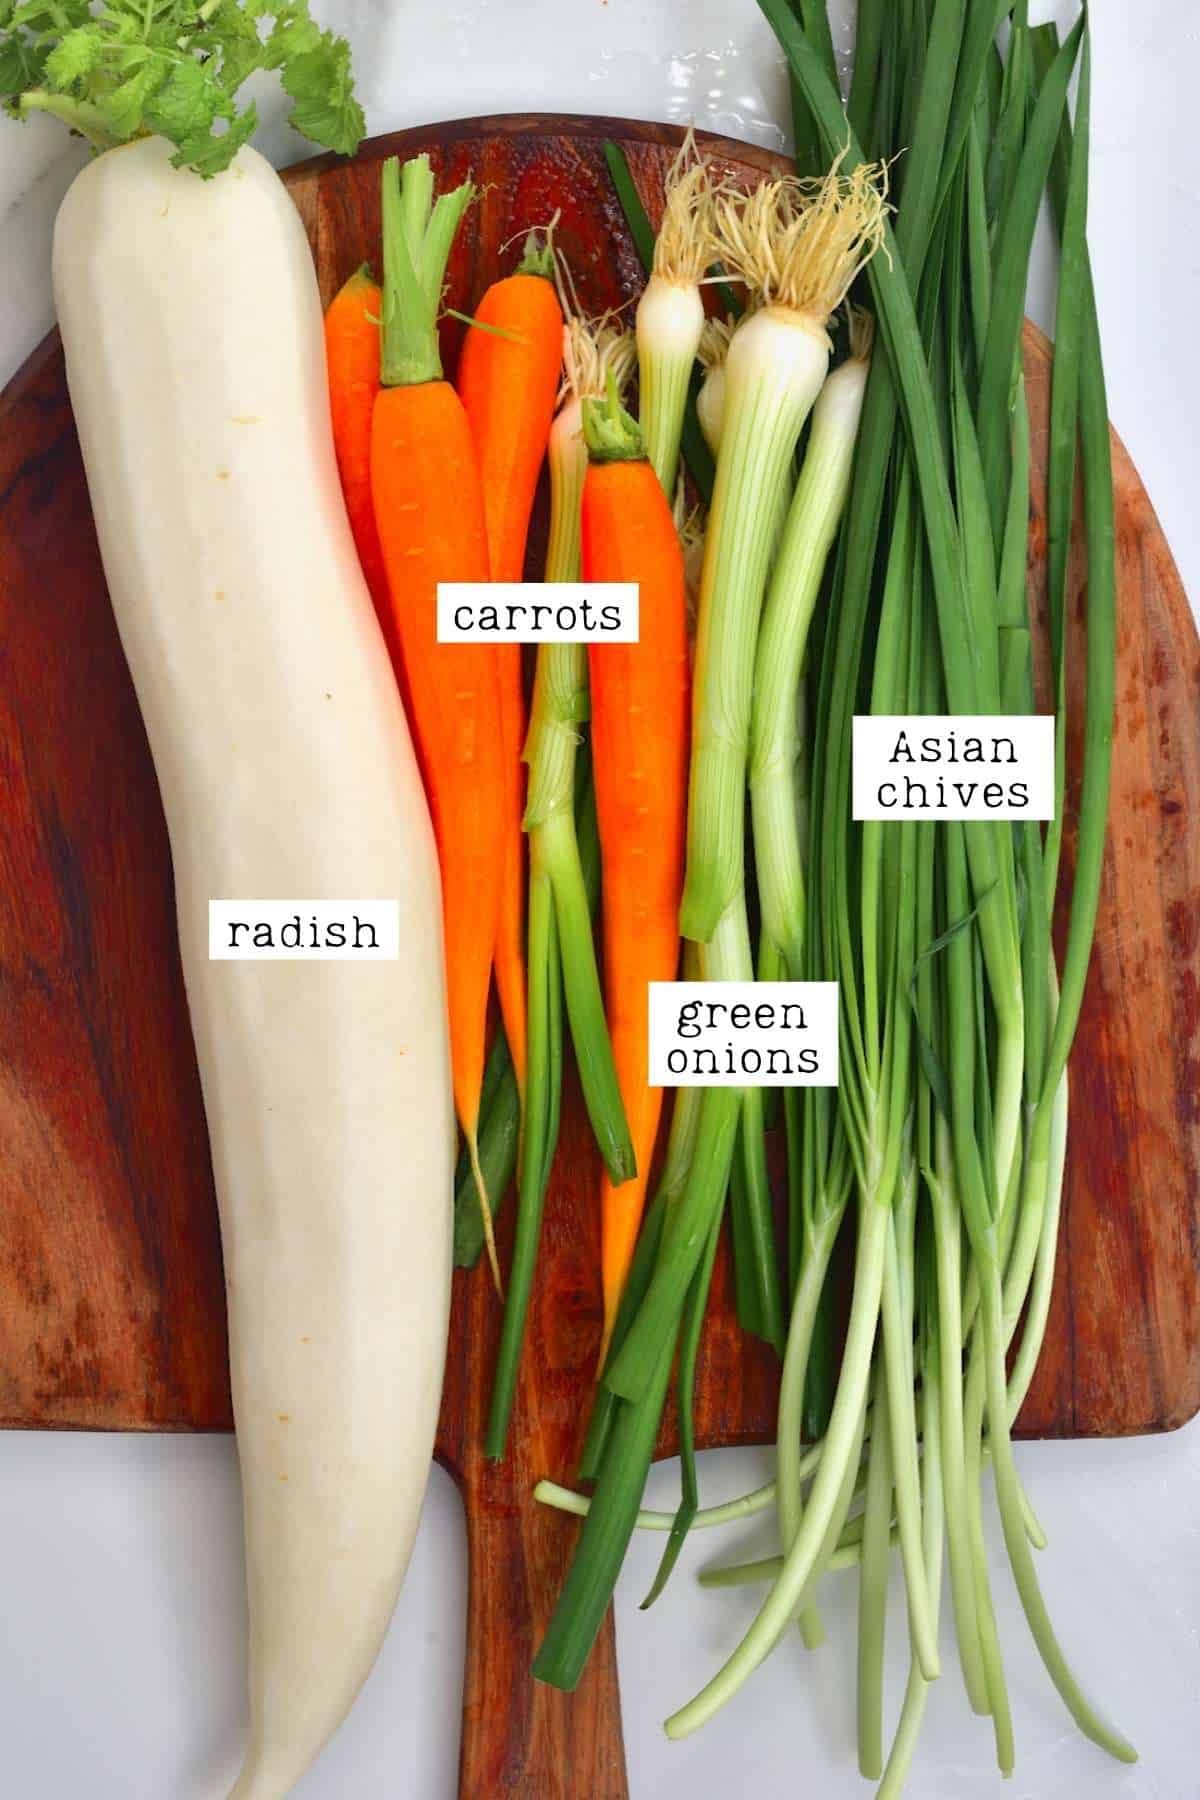
- Radish: Korean radish or Daikon.
- Carrots.
- Green Onion: “Scallion”.
- Asian Chives: “buchu”.
How to Make Traditional Napa Cabbage Kimchi
Step 1: Wash the vegetables
First, wash all the vegetables (cabbage, radish, carrot, onion, green onion, chives, garlic, and ginger). I soak them in a large pot or directly in the kitchen sink.
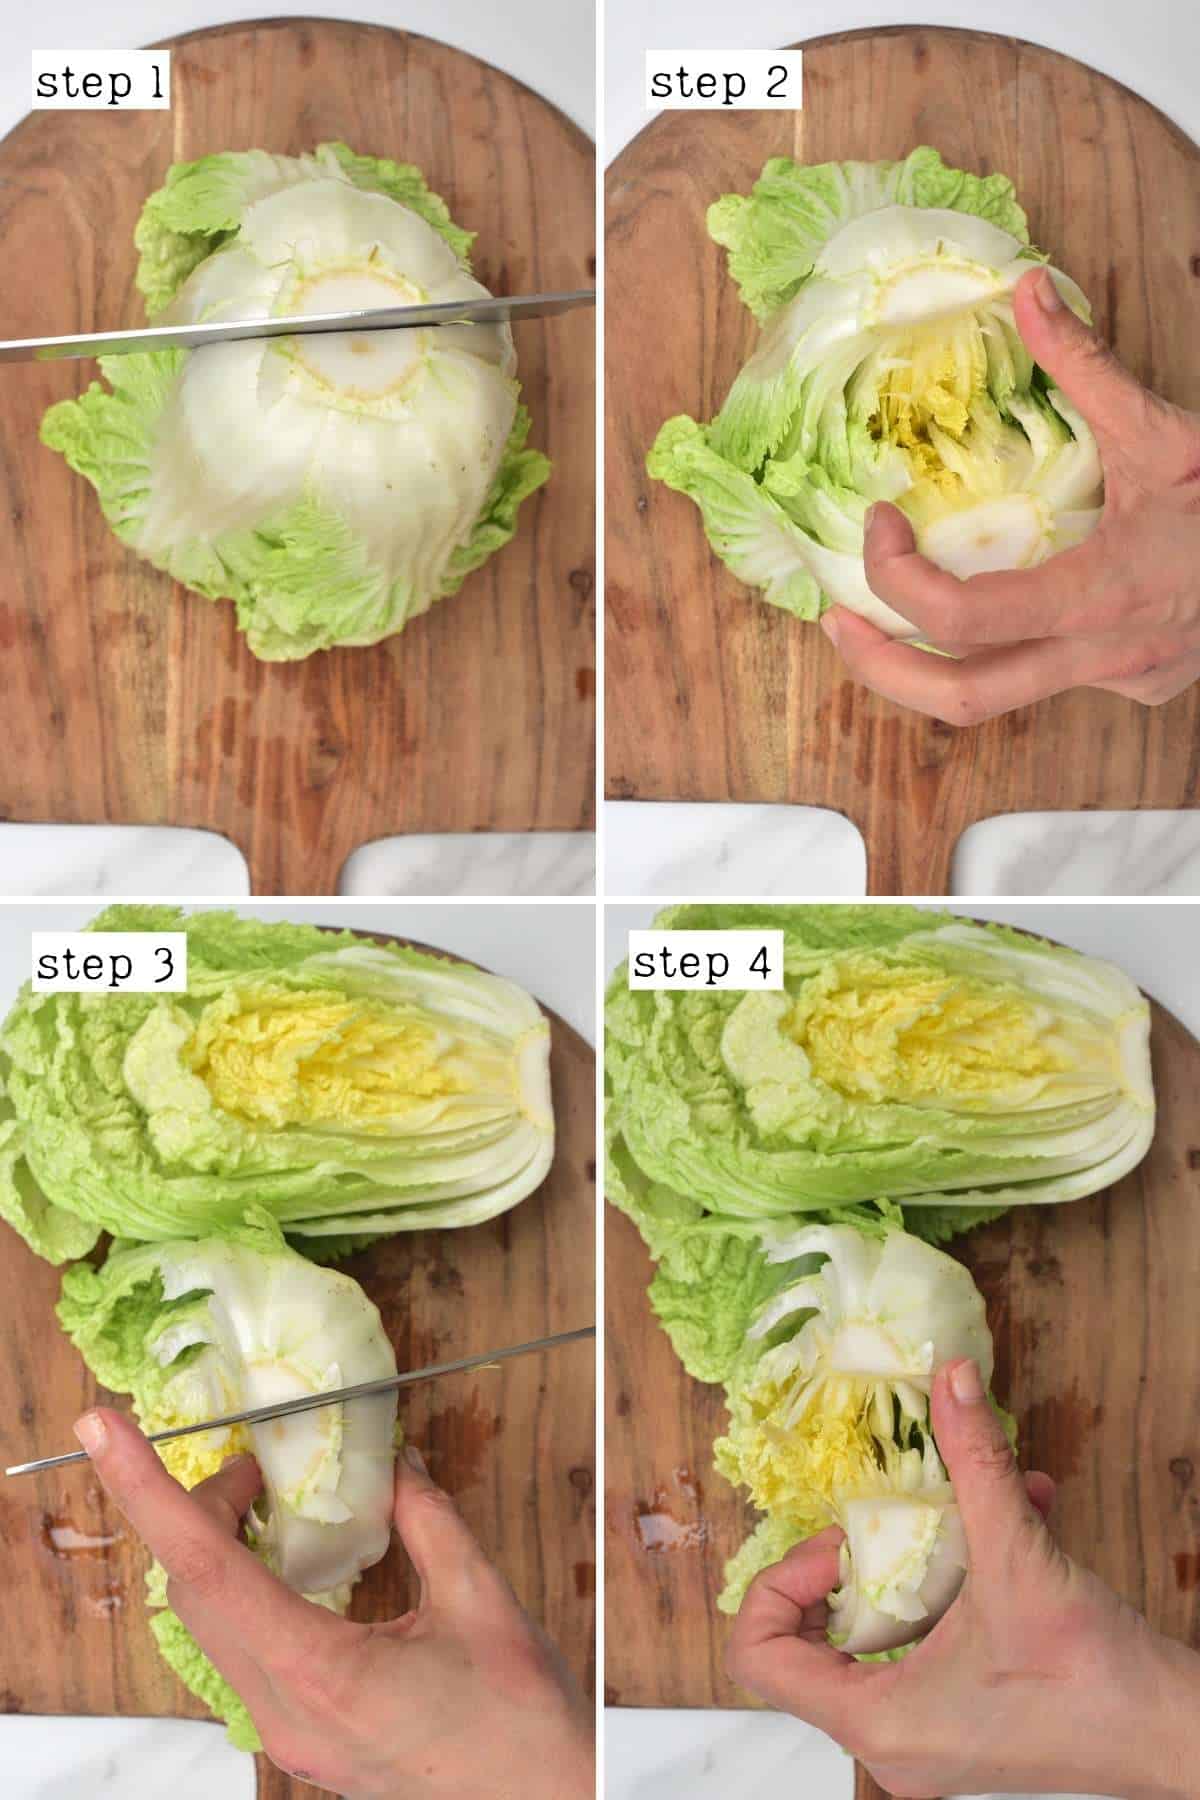
Step 2: Prepare the napa cabbage
Cut off the brown end of the “core” from the cabbage with a sharp knife.
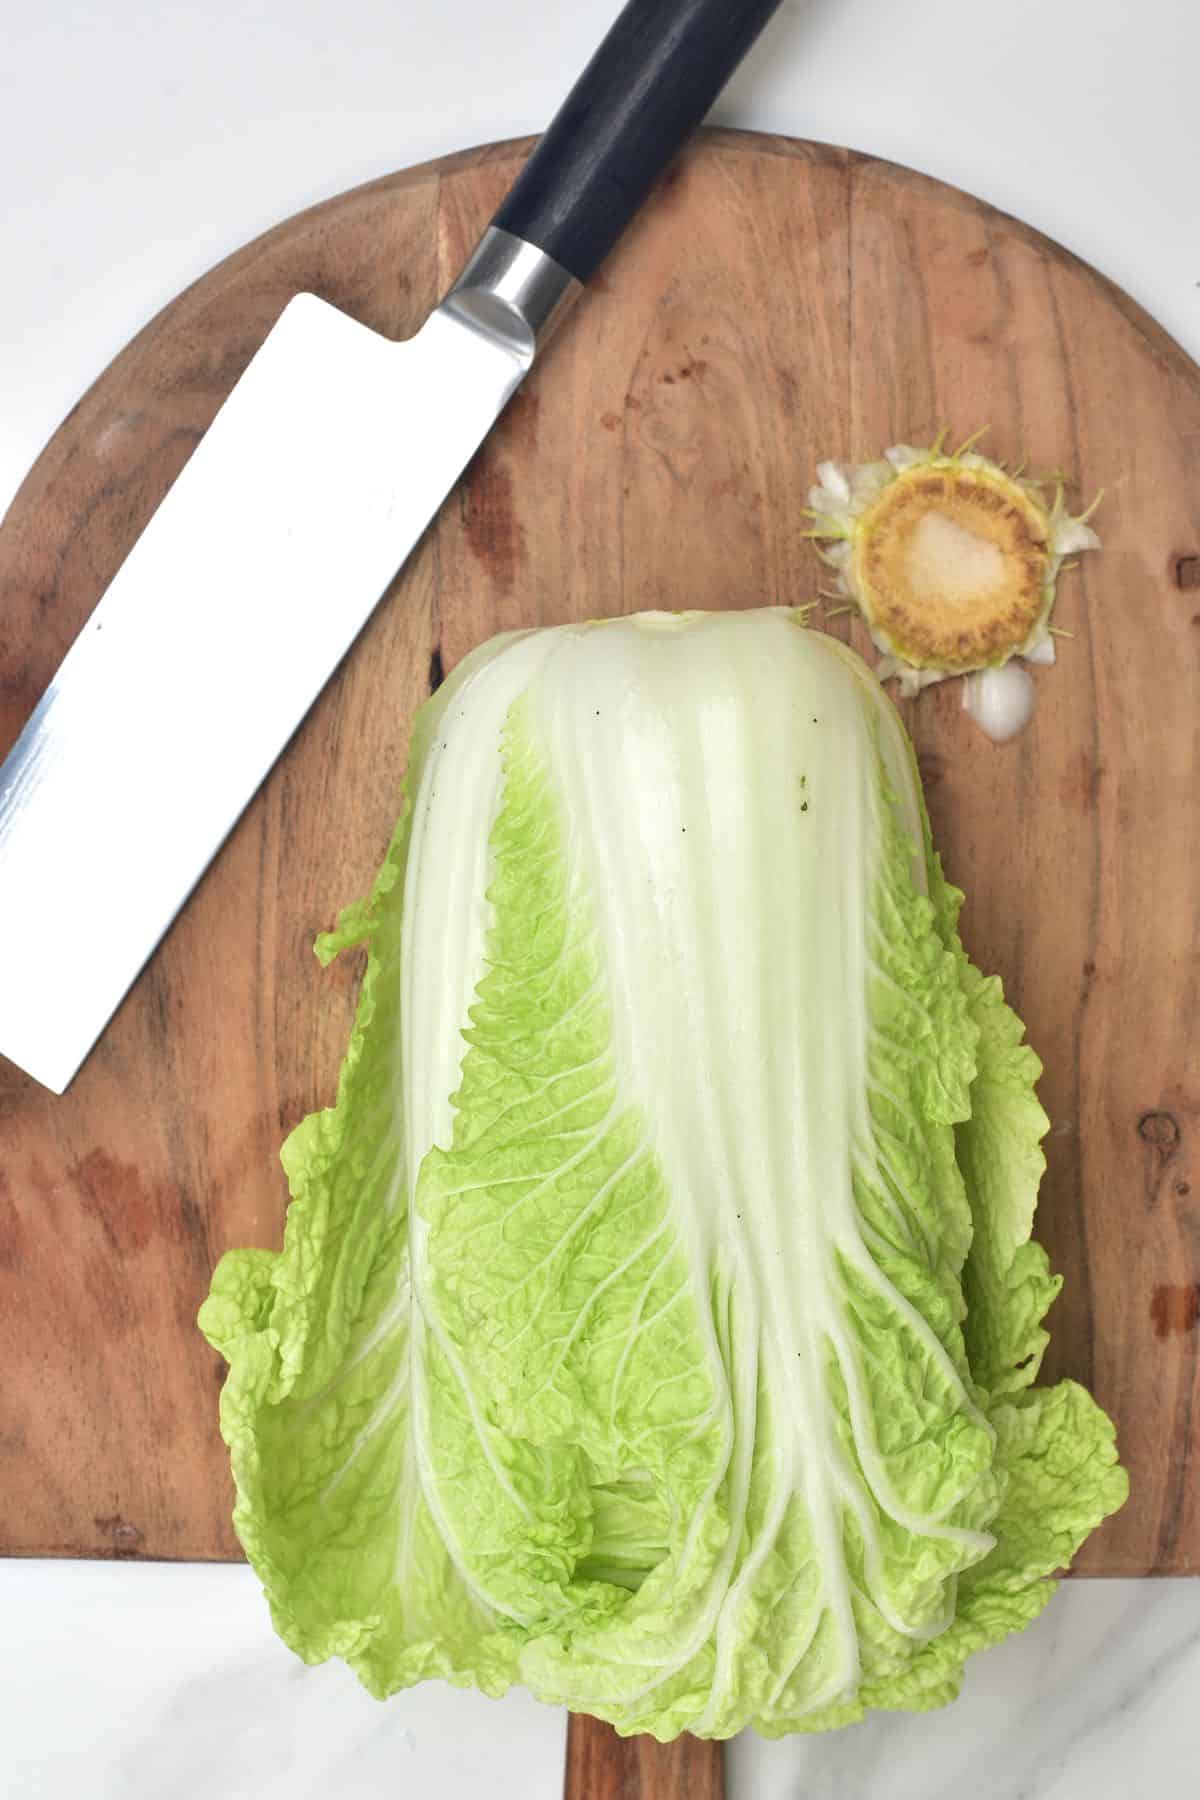
Next, turn the cabbage so the core is upwards and the leaves are against your surface and use a sharp knife to make an incision a few inches down into the cabbage (just enough to grip both halves). Then, with your hands, gently pull the two halves apart.
Repeat this with the cabbage halves to create quarters. By separating the cabbage this way, the leaves remain attached.
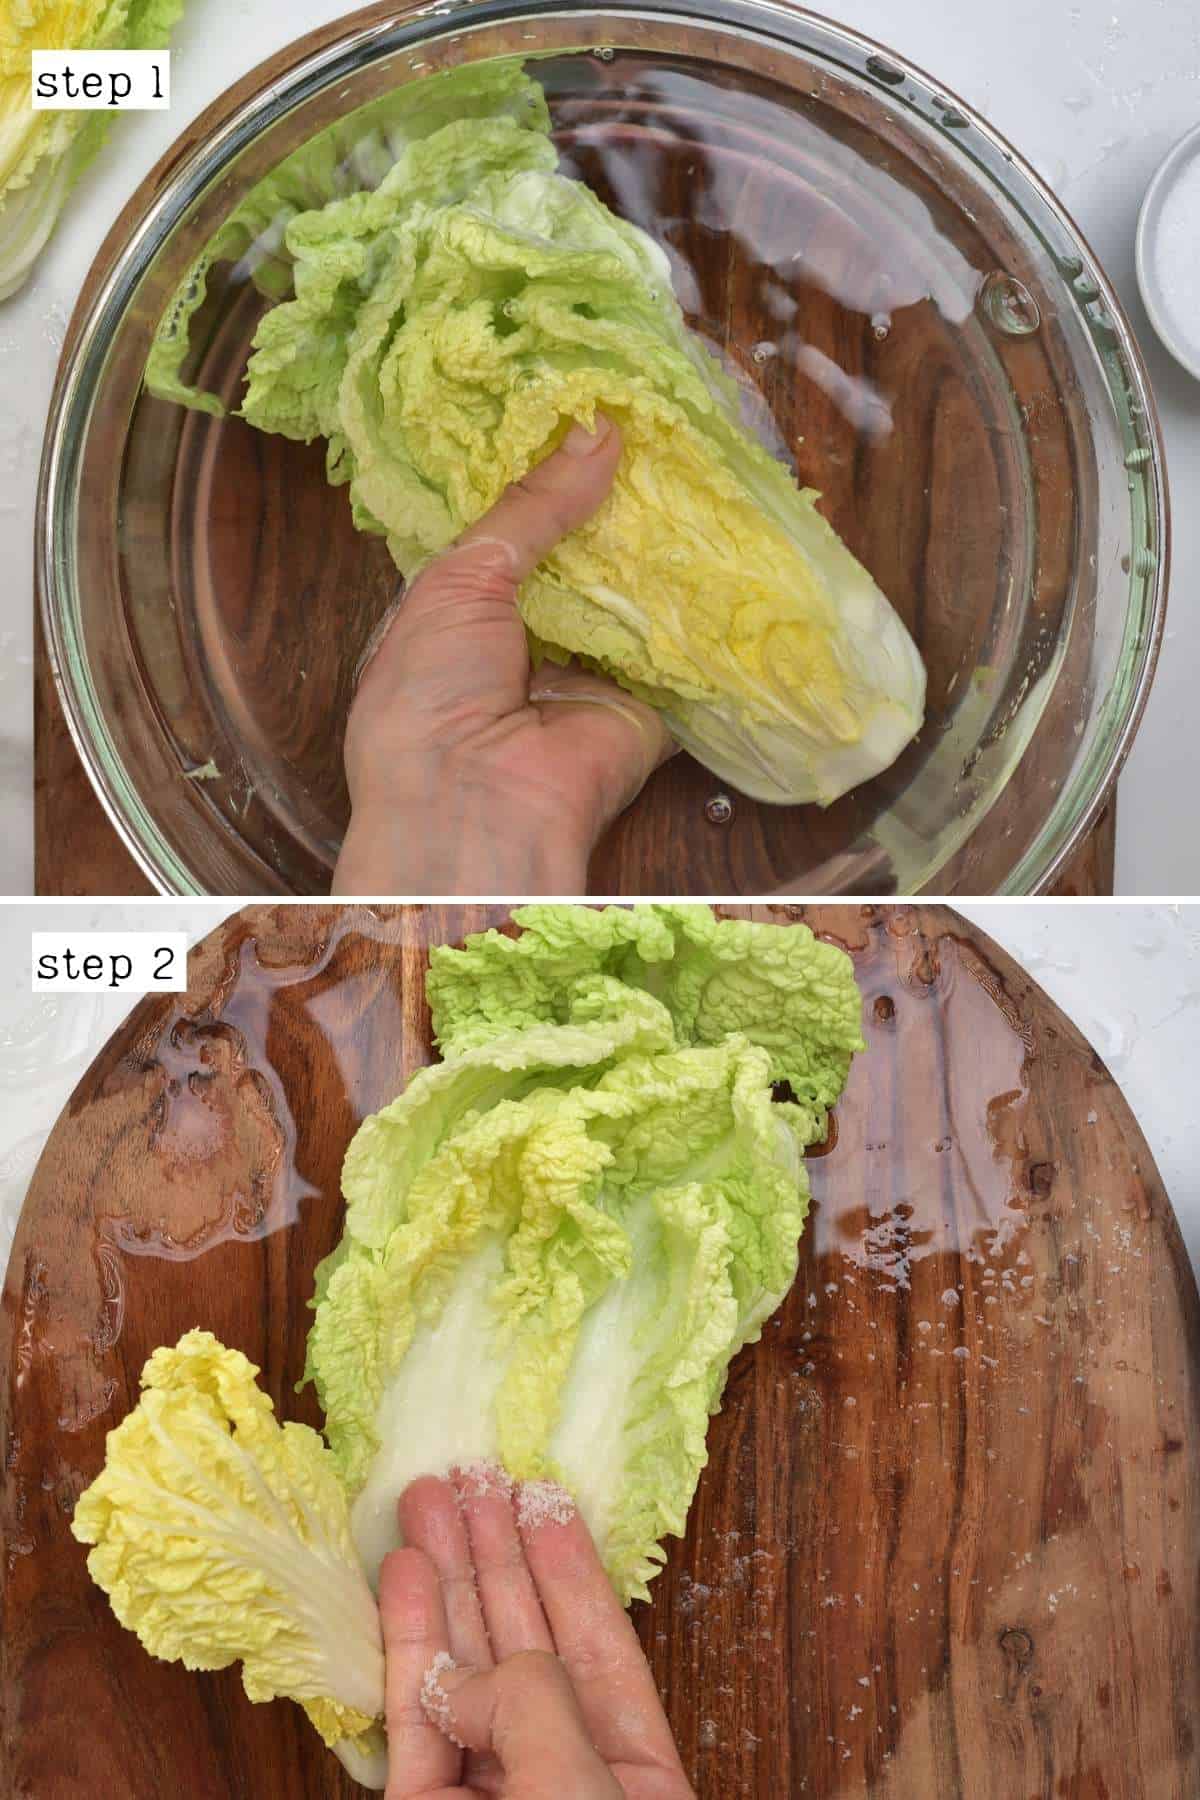
Step 3: Salt the cabbage
First, dunk your cabbage sections into the water to wet them. Then, liberally salt between each leaf, place the pieces in a large container and set aside.
Wetting it first allows the salt to adhere better to the cabbage.
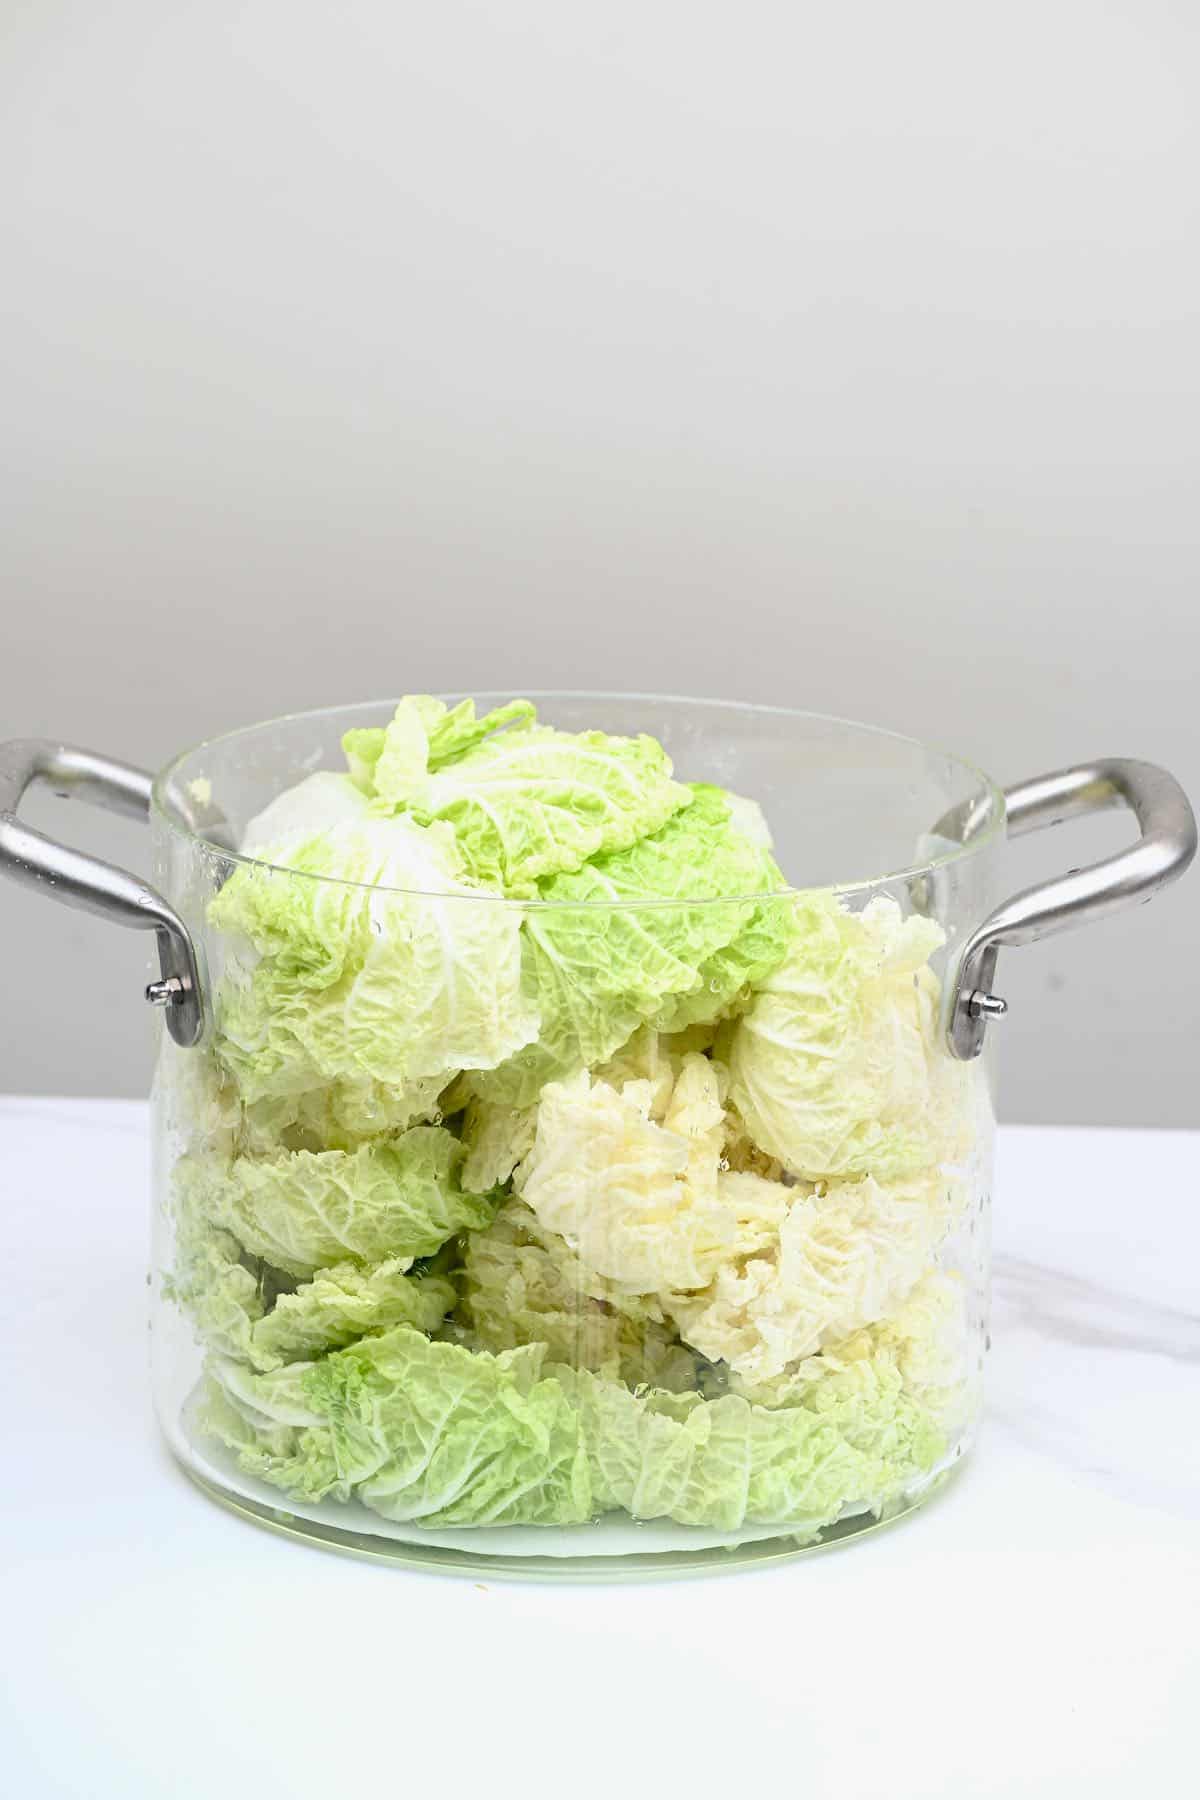
Every 30 minutes for 2 hours (so, repeated four times), turn it over – move the cabbage section on top of the container to the bottom. This will allow all the leaves to soften and release water.
Optionally, you can scoop up some of the released water and spoon it over the cabbage to further encourage softening.
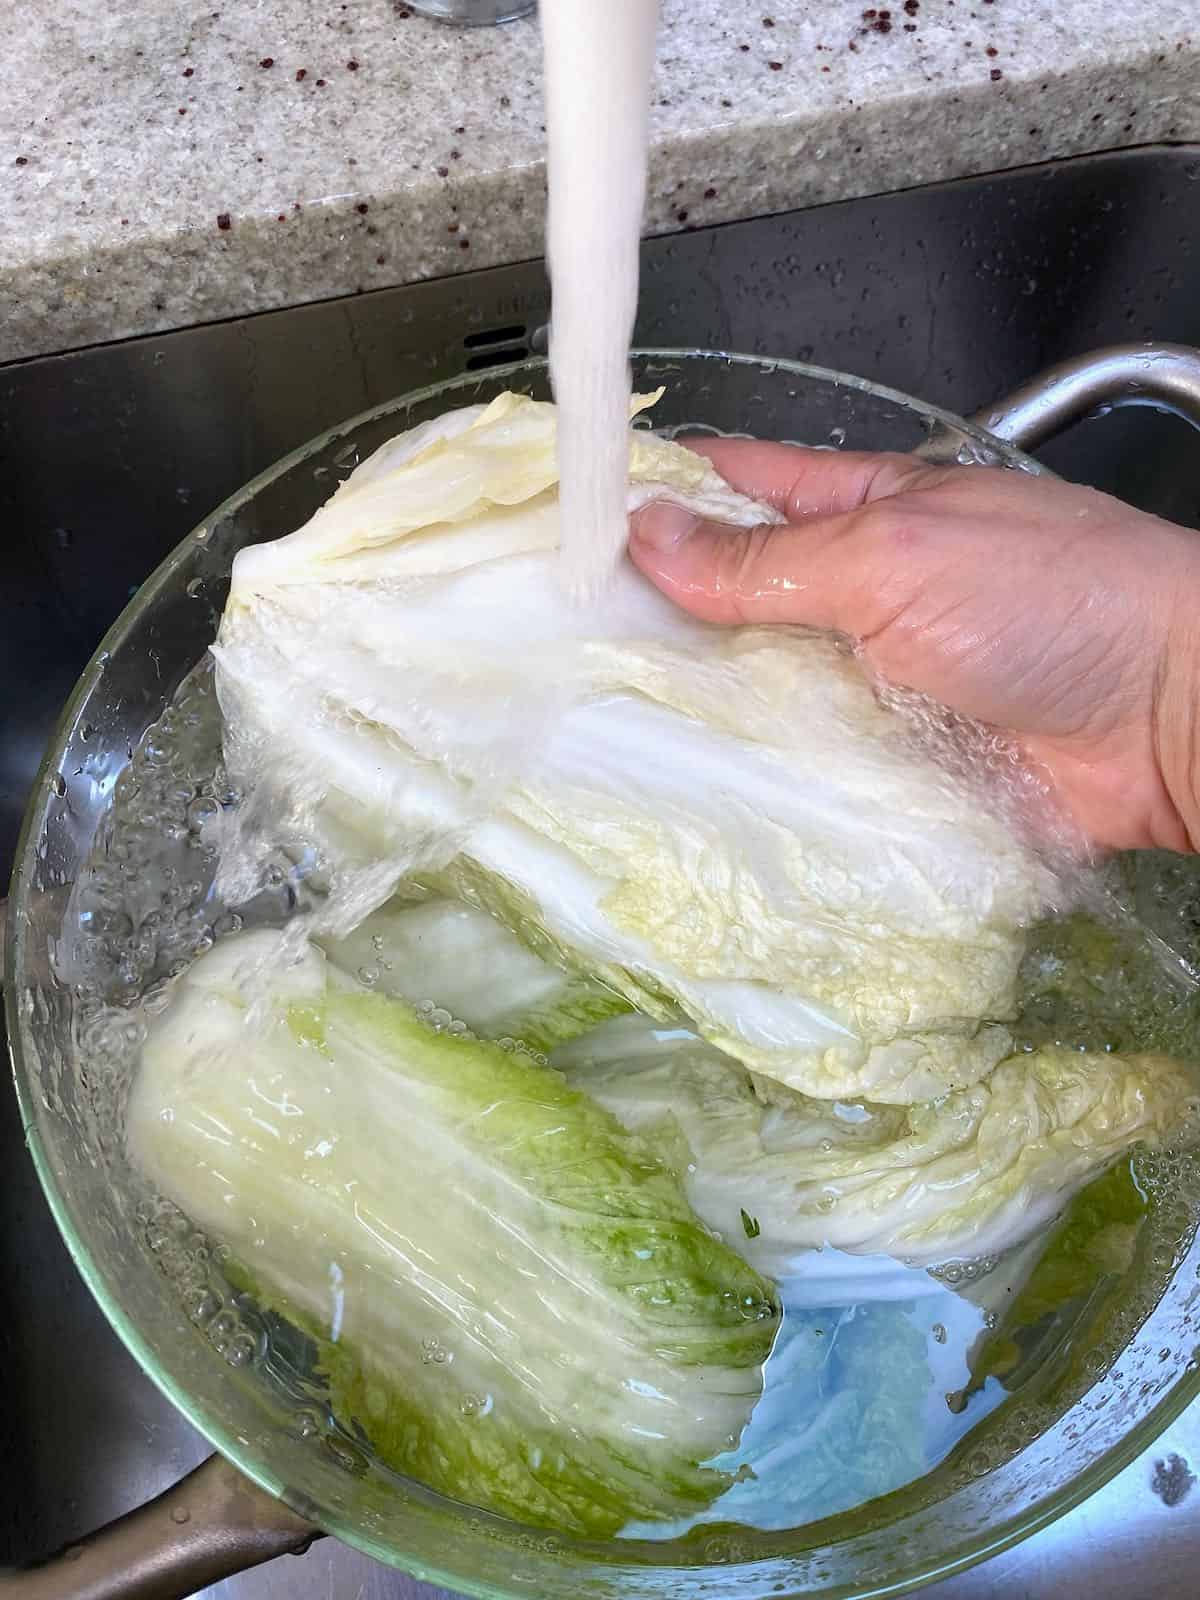
After two hours, wash the cabbage to remove excess salt and gently squeeze to remove the excess water. Let it drain well.
Step 4: Prepare the kimchi “porridge”
Meanwhile, as the cabbage is being salted, you can prepare the porridge mixture. Add the water and flour to a small pot and heat over medium heat for around ten minutes, stirring occasionally.
Once the mixture begins to bubble, add the sugar, stir, and cook for a further minute or so until the sugar has dissolved.
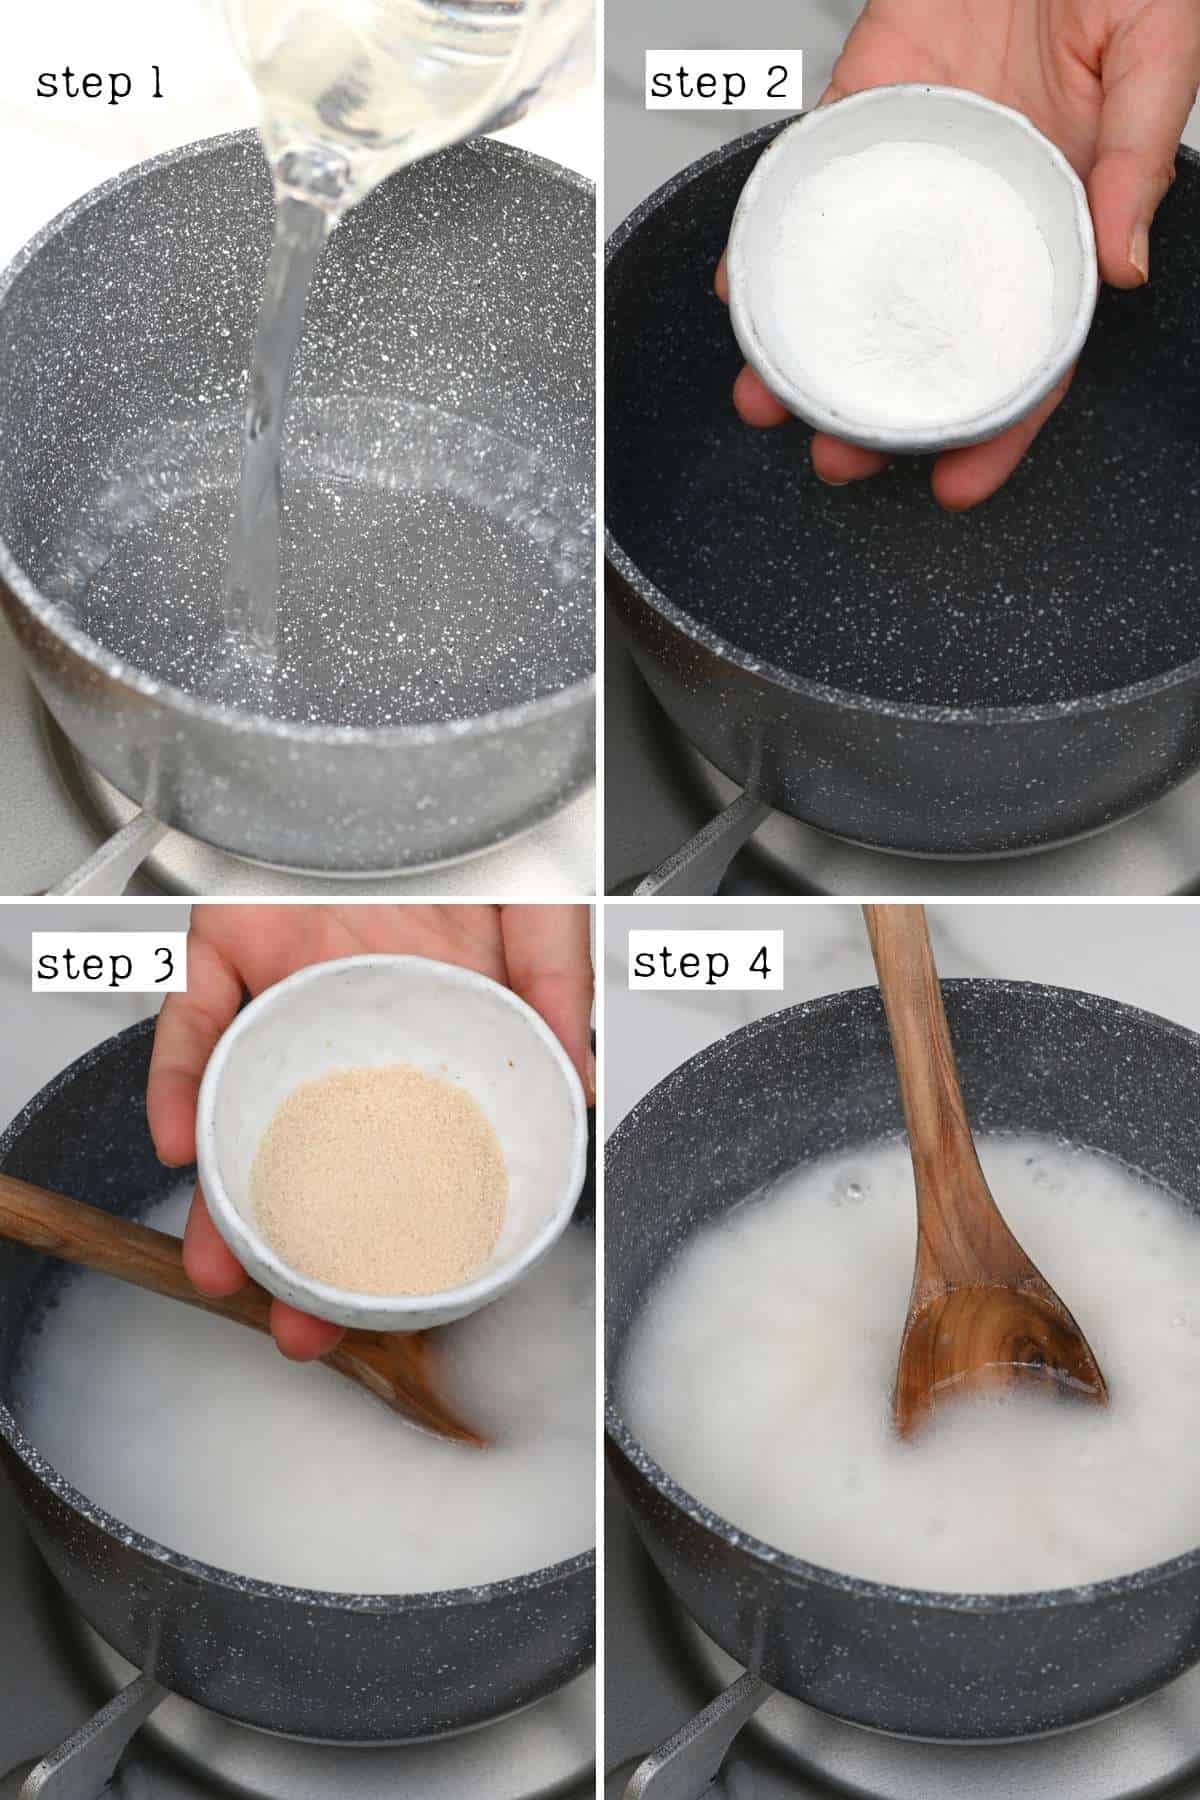
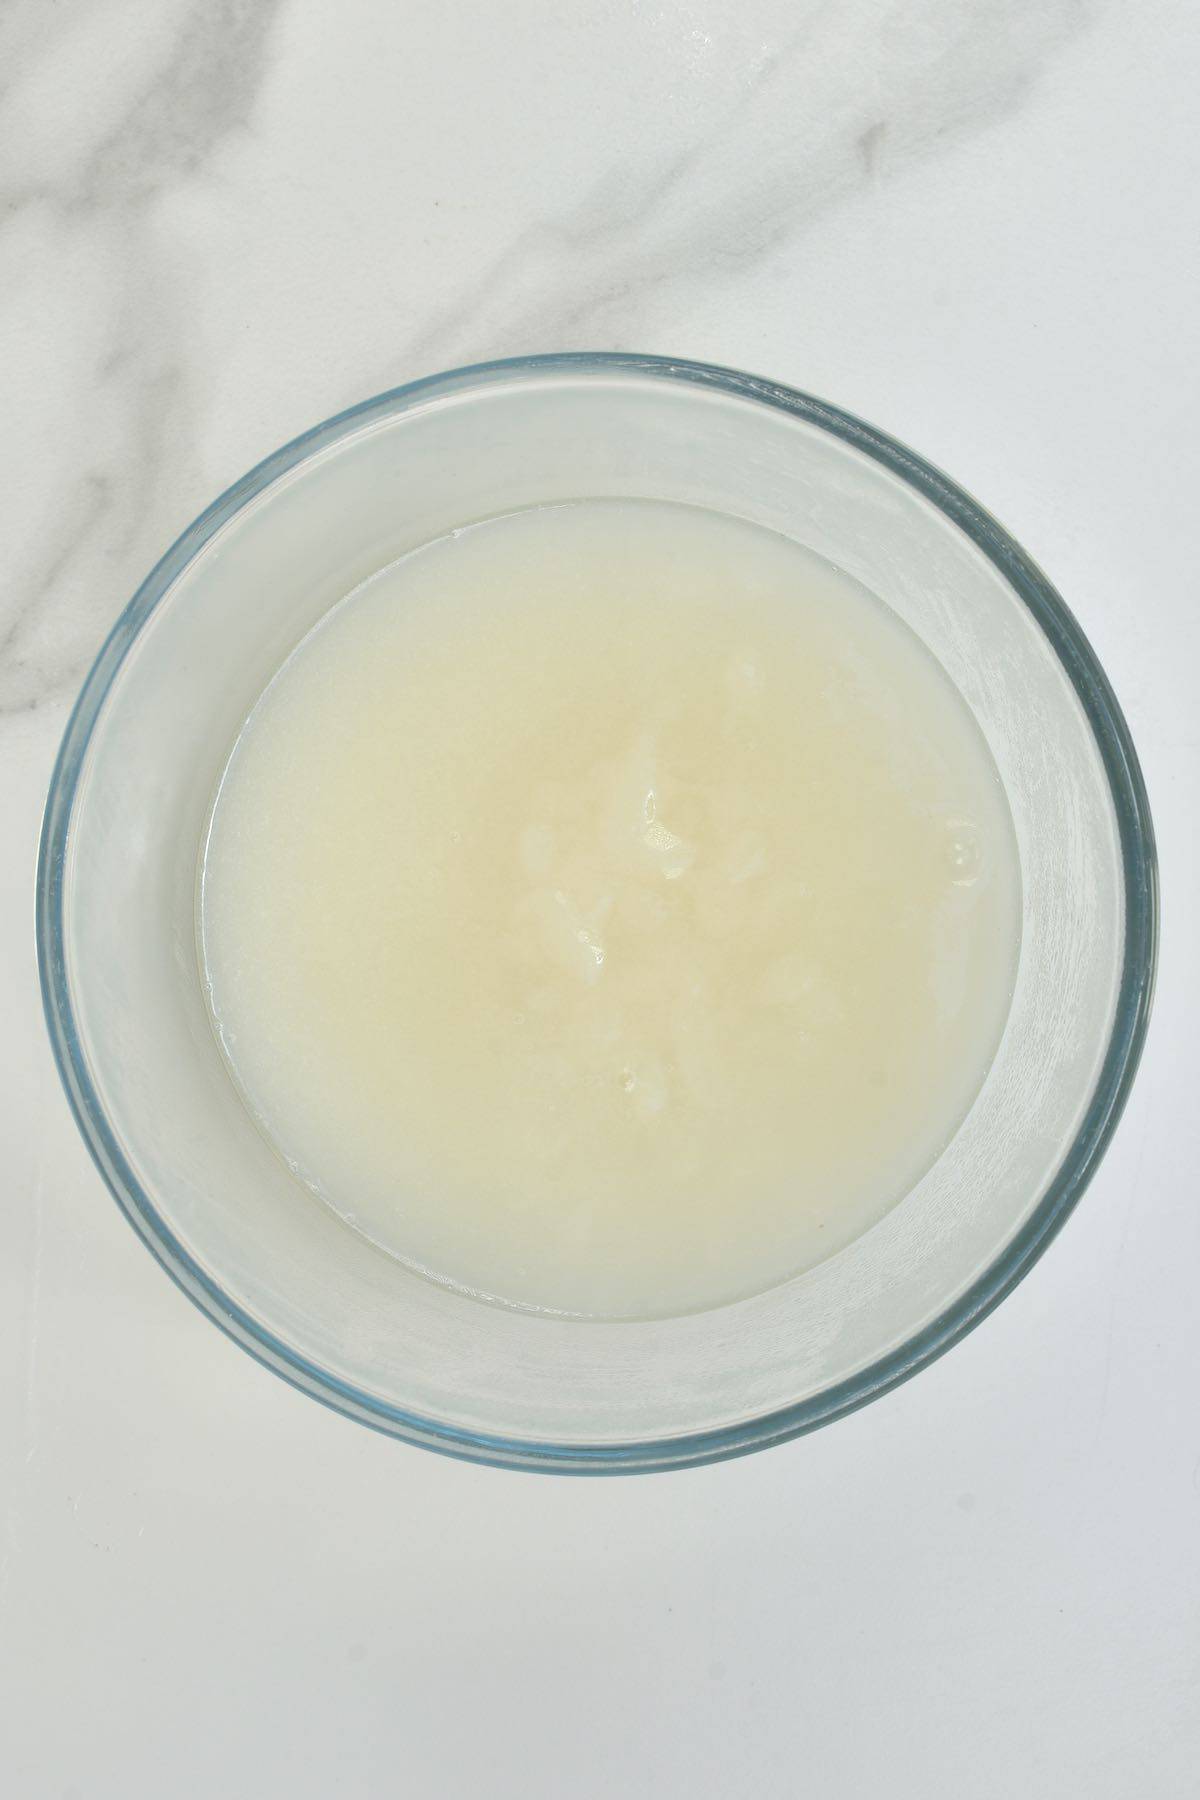
You can optionally sieve the mixture to remove any lumps. Otherwise, simply allow it to cool down completely before using it (this is why it’s great to cook this as soon as you’ve started the cabbage salting – to give it a chance to cool before the cabbage is ready).
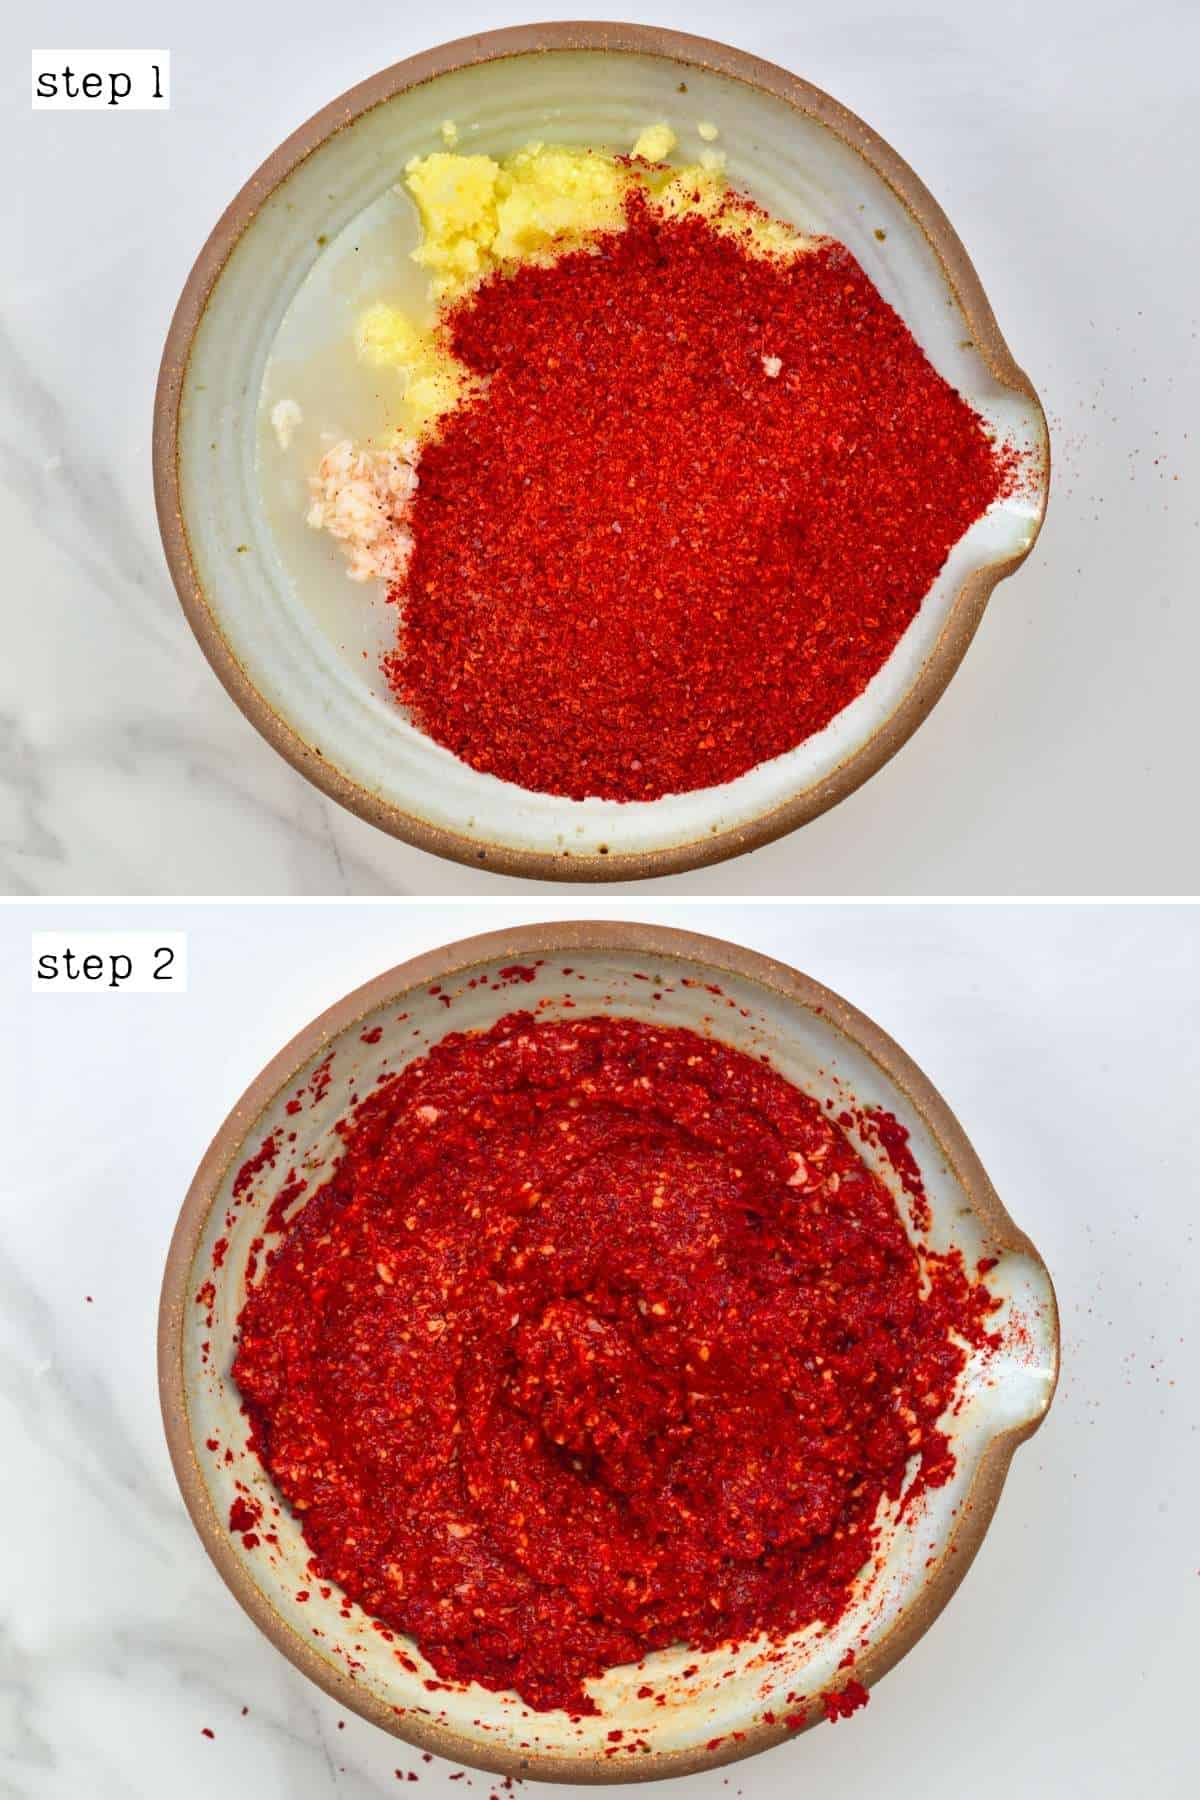
Step 5: Prepare the kimchi shrimp paste
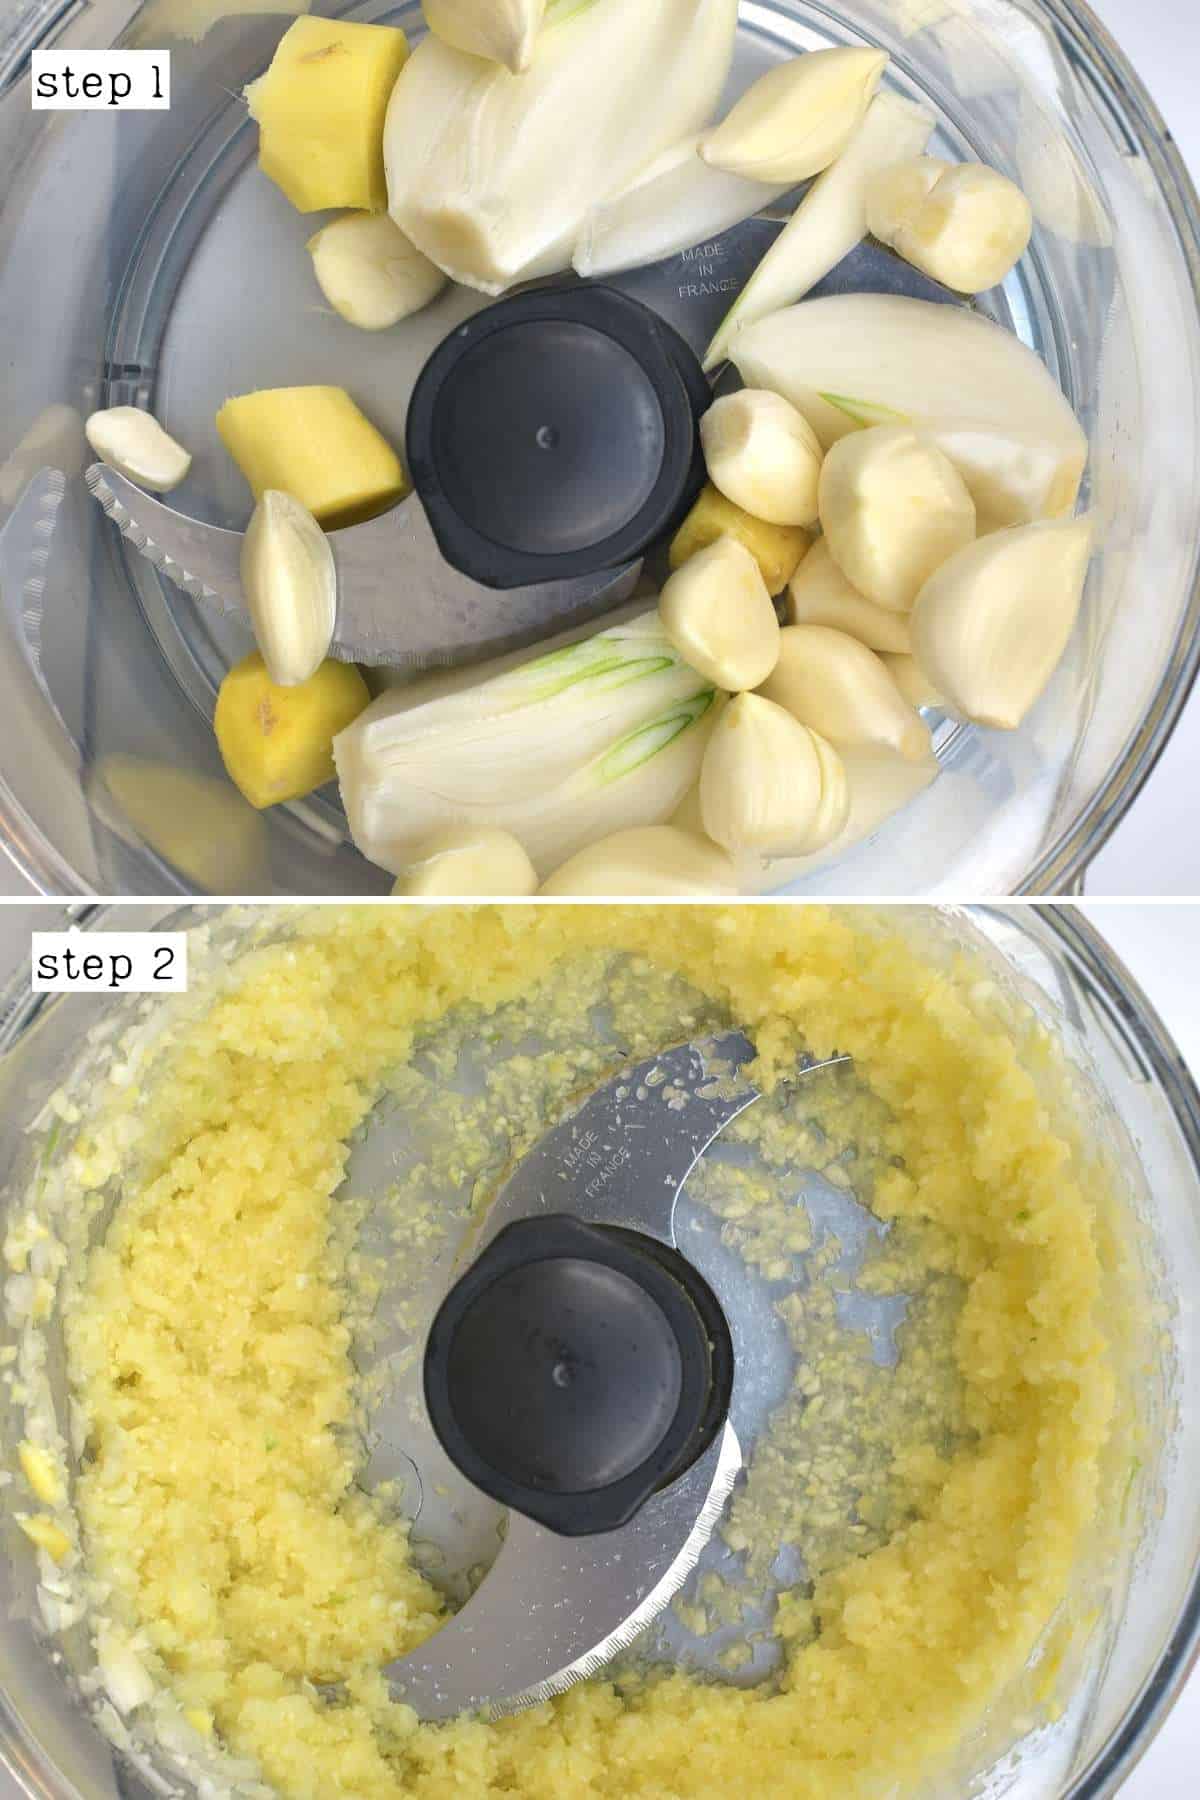
First, peel and roughly chop the onion, ginger, and garlic. Then transfer them to a food processor to process into a paste. Alternatively, mince the ingredients by hand – but you’ll save so much time using a machine.
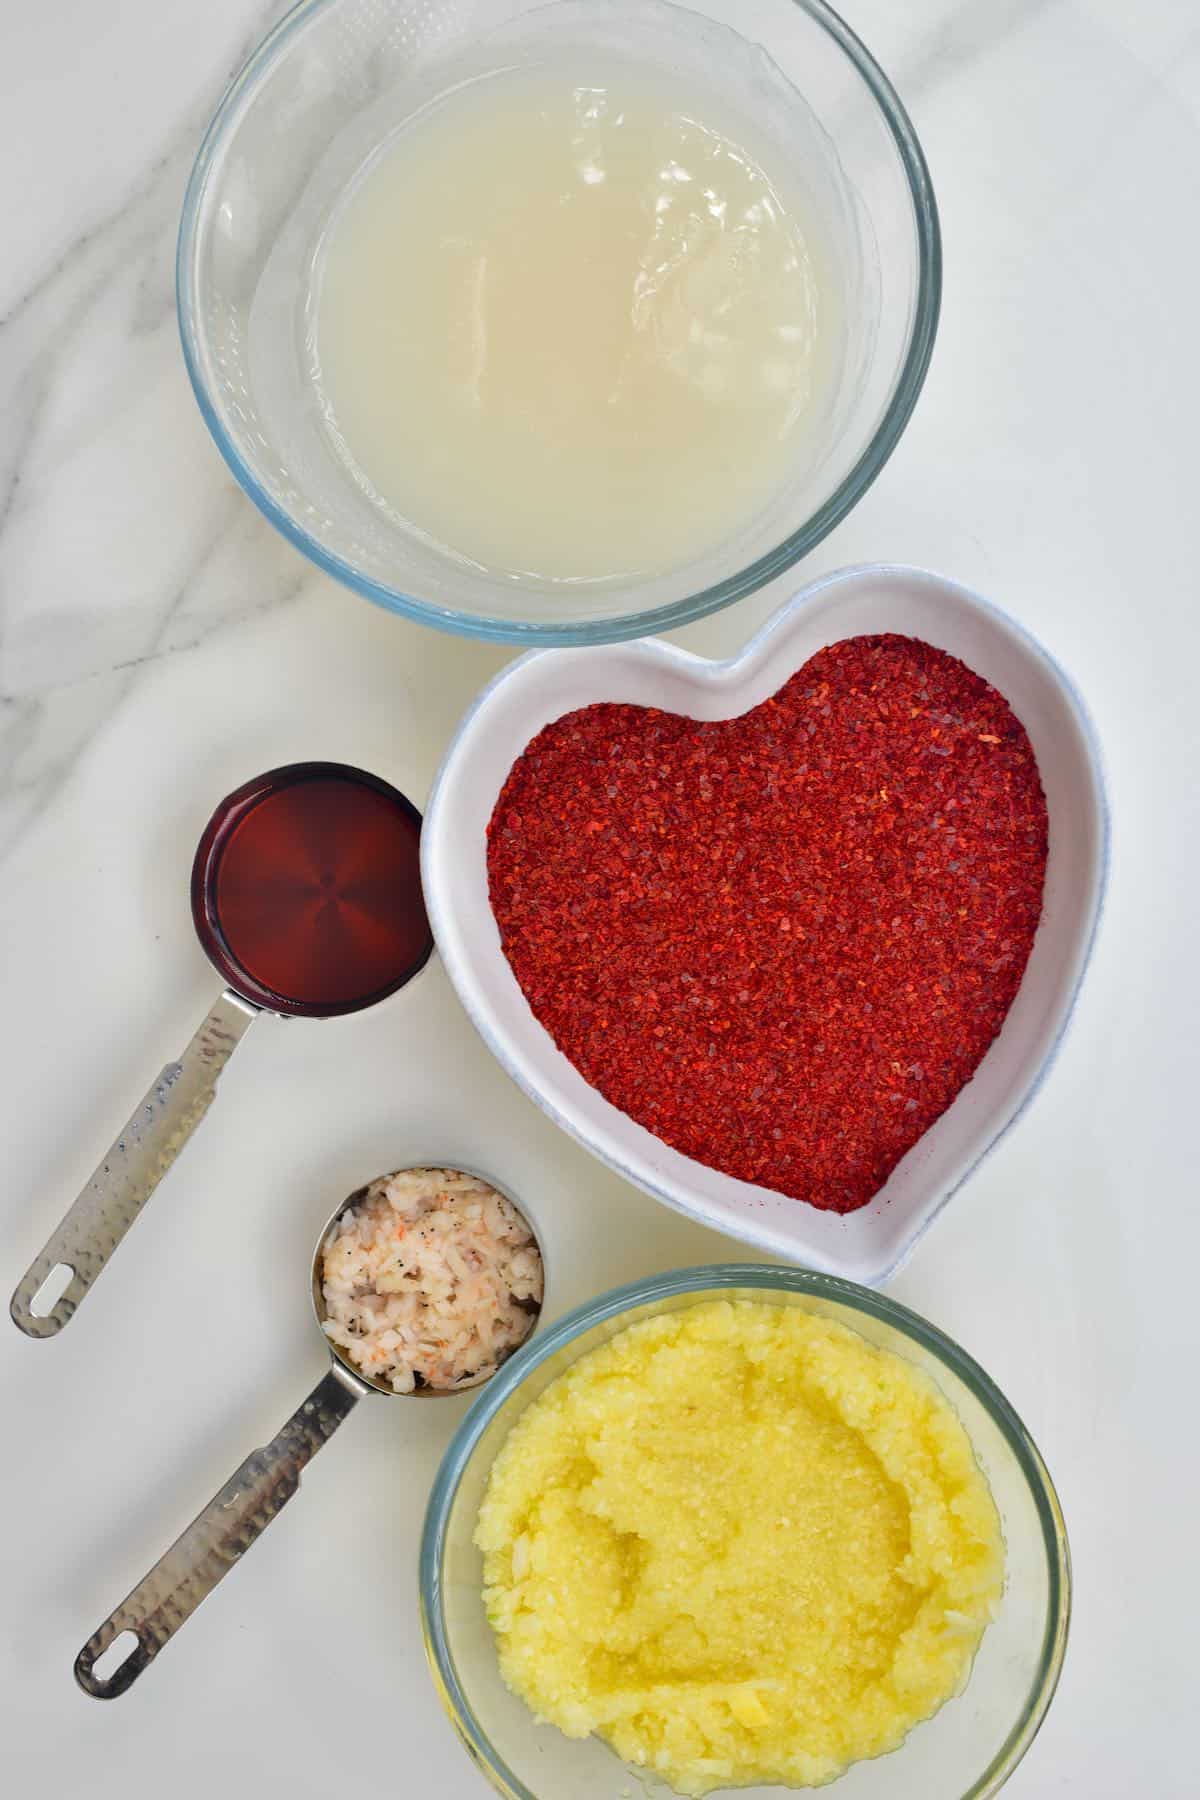
Then, mix the processed ingredients with the porridge, fish sauce, shrimp paste, and Korean chili powder and whisk well until thoroughly combined.
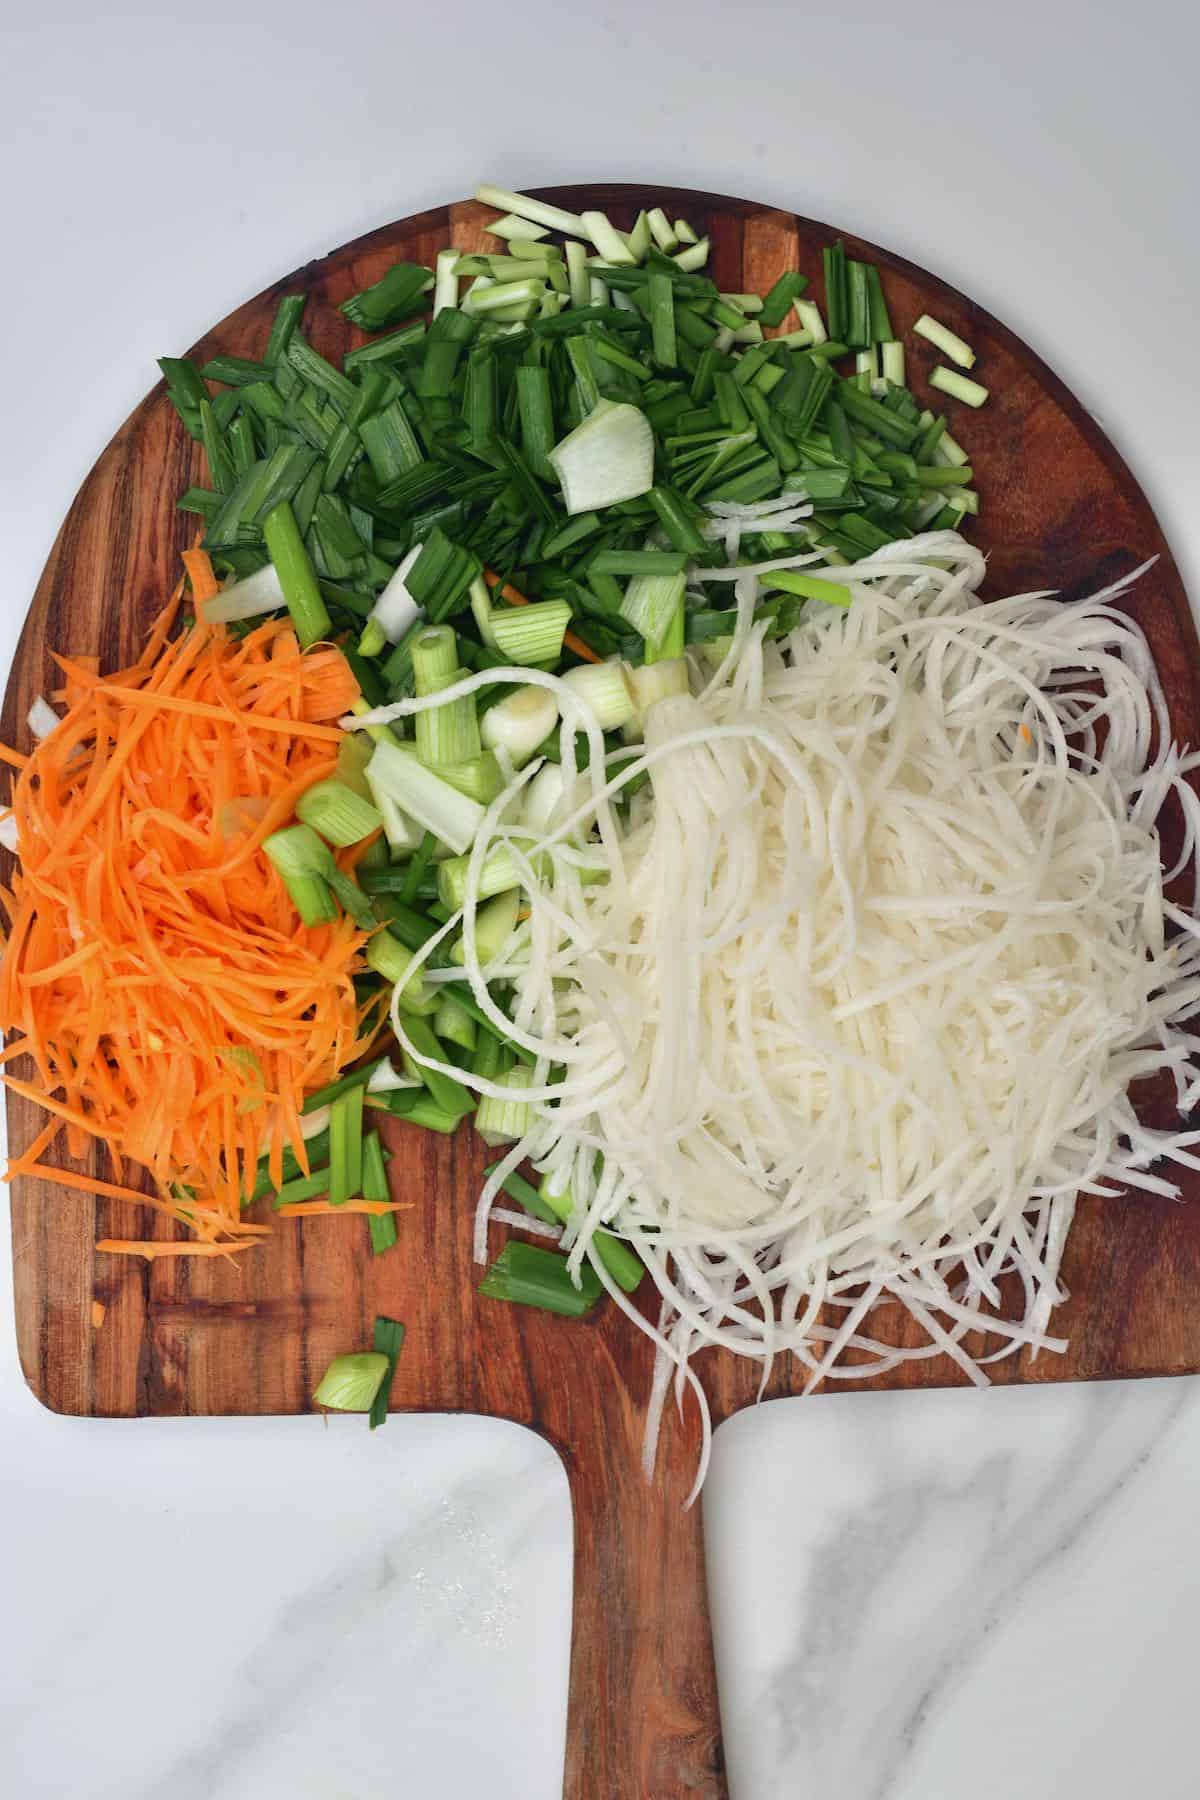
Step 6: Prepare the vegetables
First, peel the radish and carrots. Then, use a vegetable peeler, mandoline, or knife, if your knife skills are good enough, to shred the radish and carrot into tin noodle-like julienned pieces(around ¼ inch/0.6 cm thin maximum). Alternatively, you can cut them into matchsticks.
Then cut the green onions (scallions) and chives into small pieces. Mine were around ½-1 inch/1.3-2.5 cm each, but you could cut them even smaller.
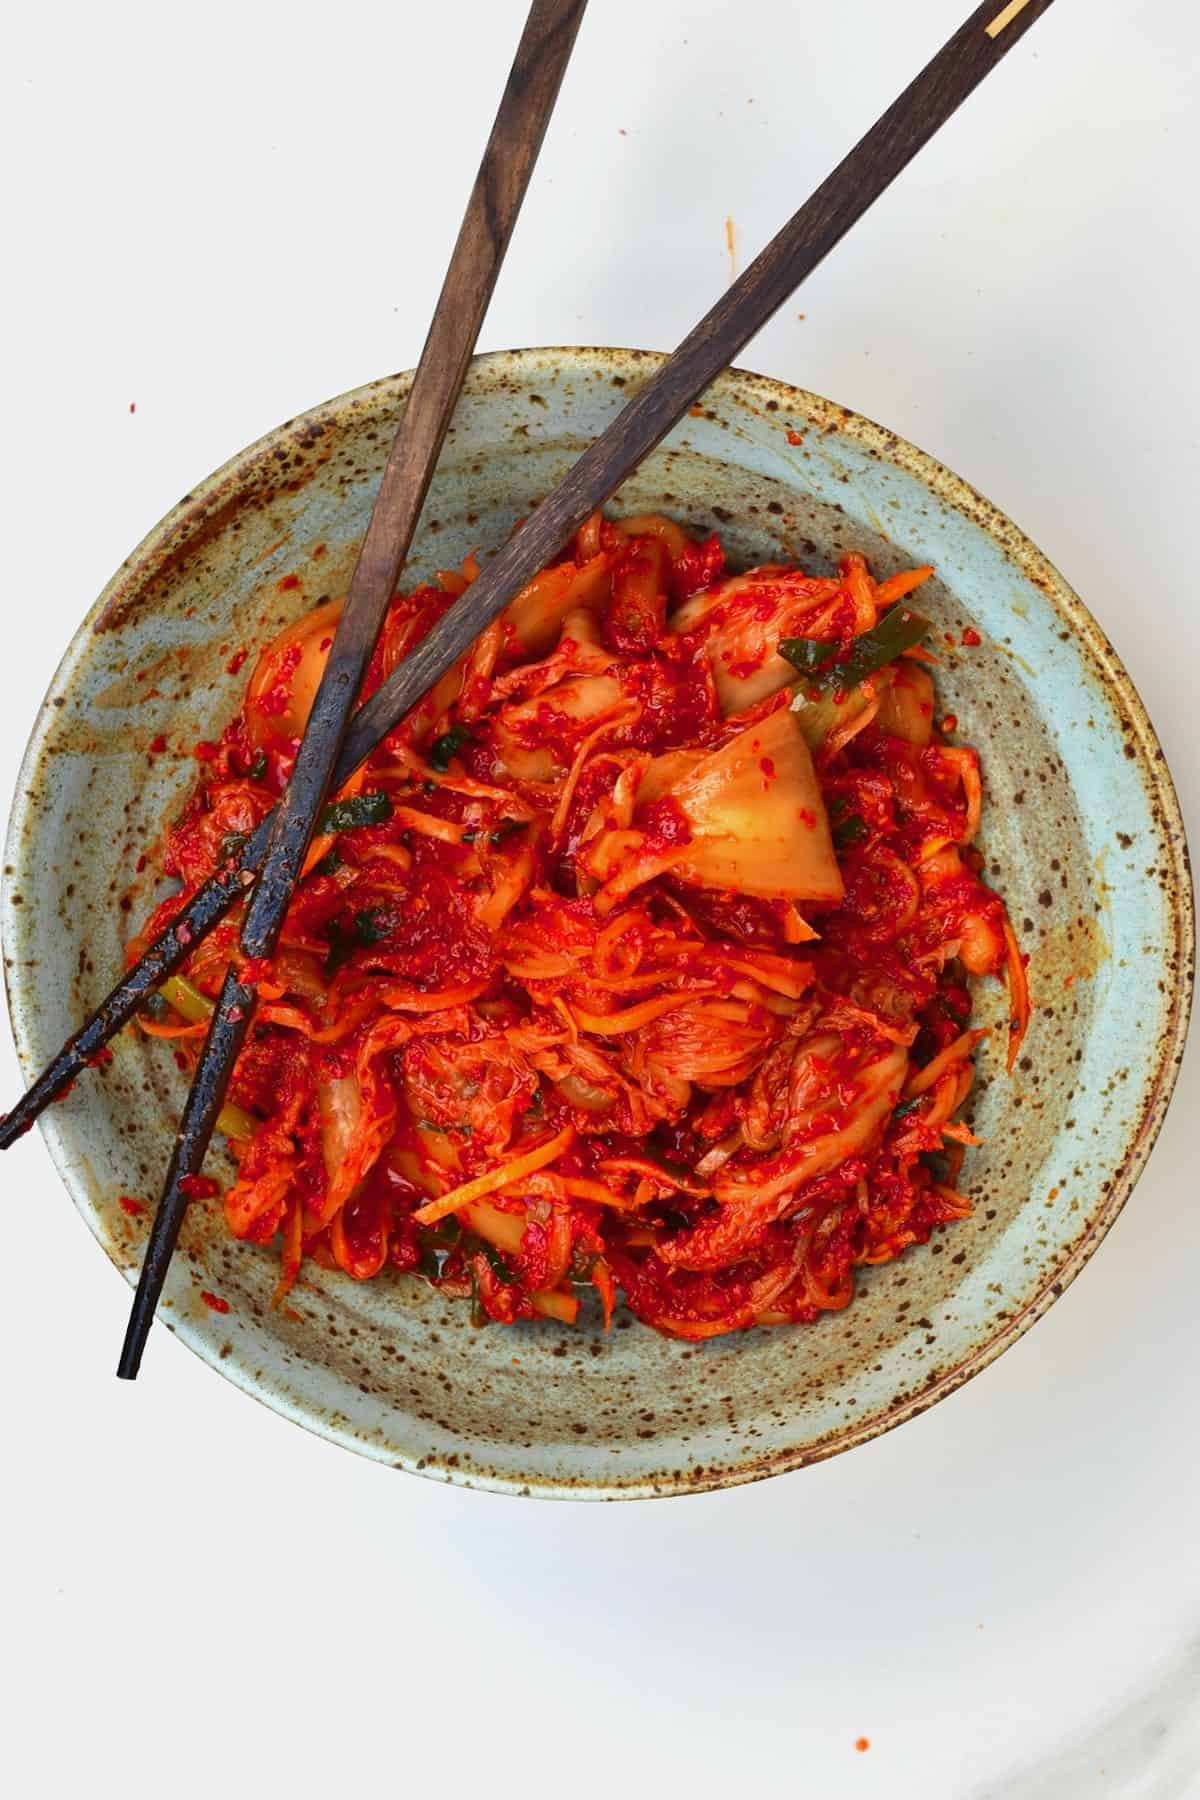
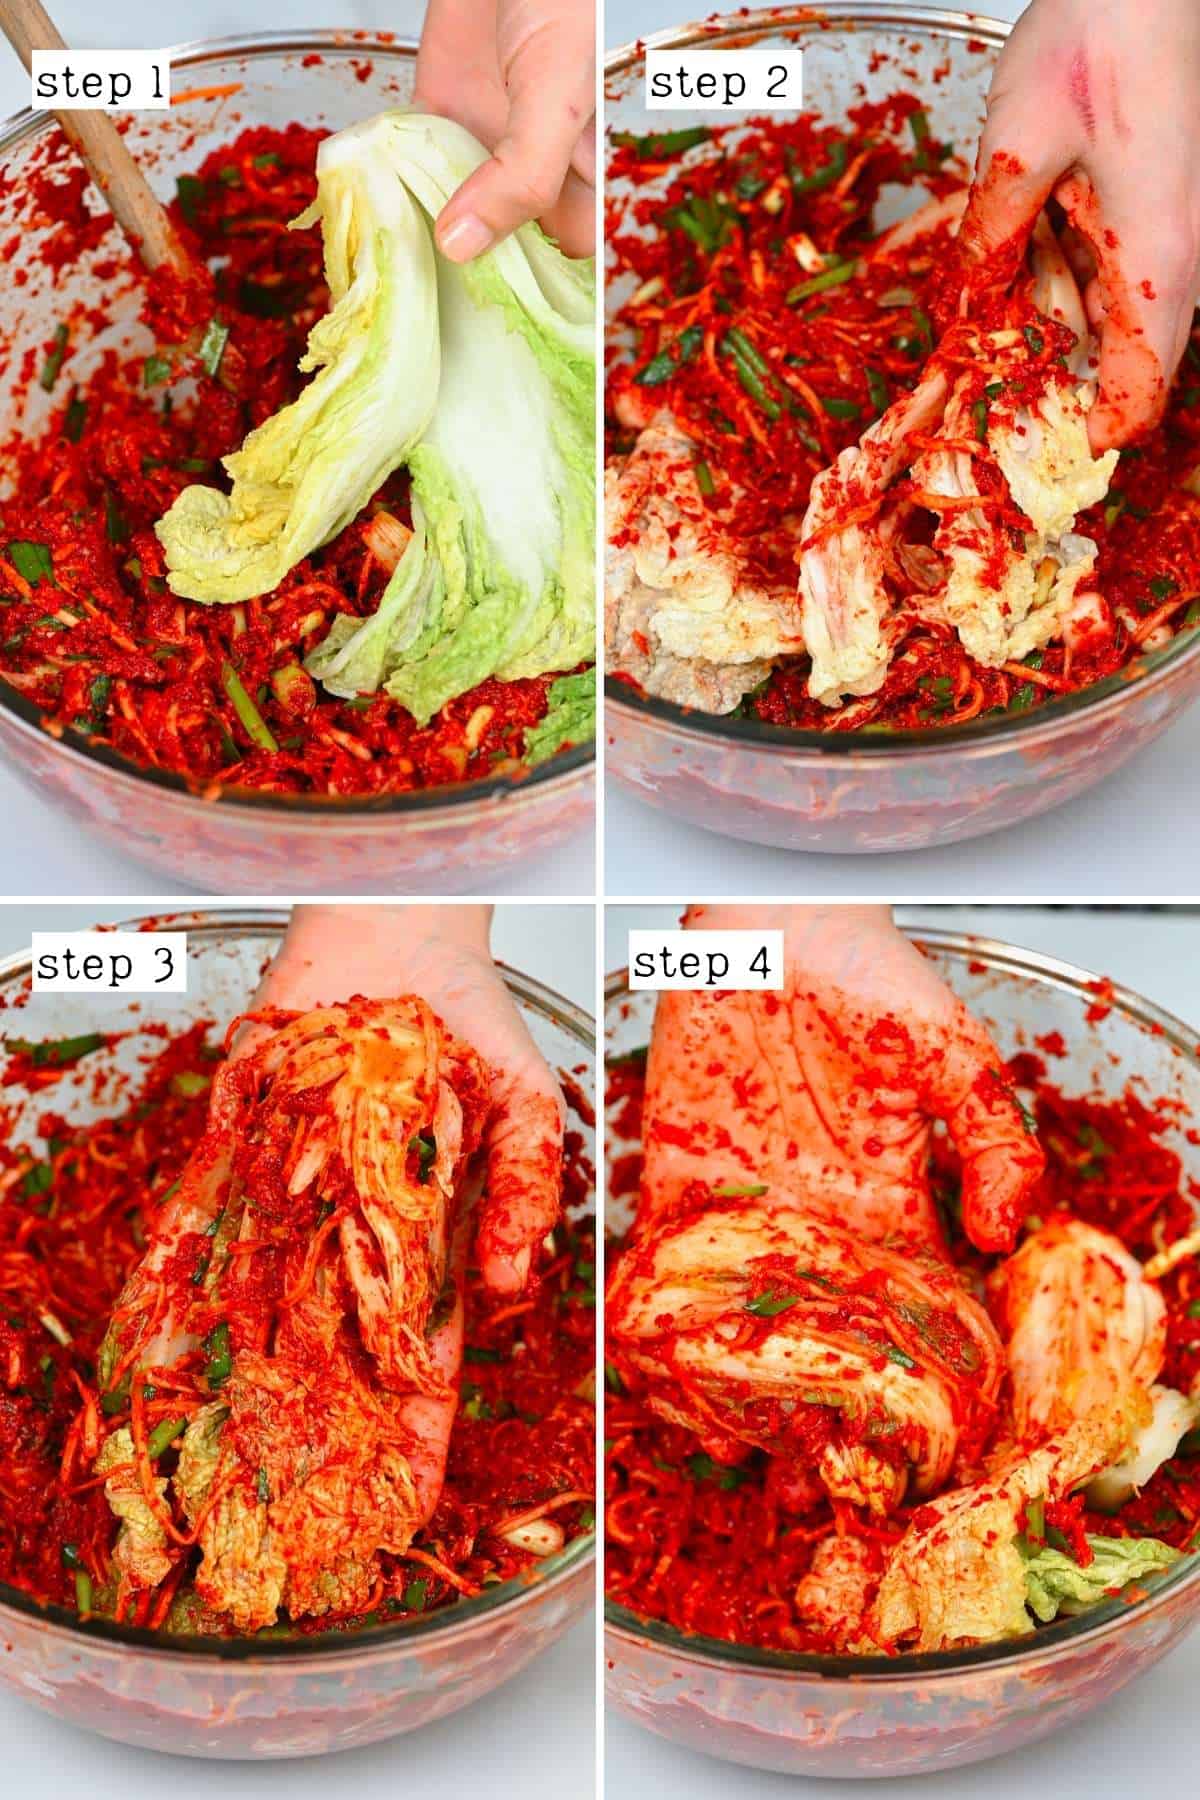
Step 7: Combine the Korean kimchi ingredients
In a large bowl, combine the chopped vegetables and kimchi paste and stir well. Because the radish contains a lot of water, this will naturally “thin” the paste over time.

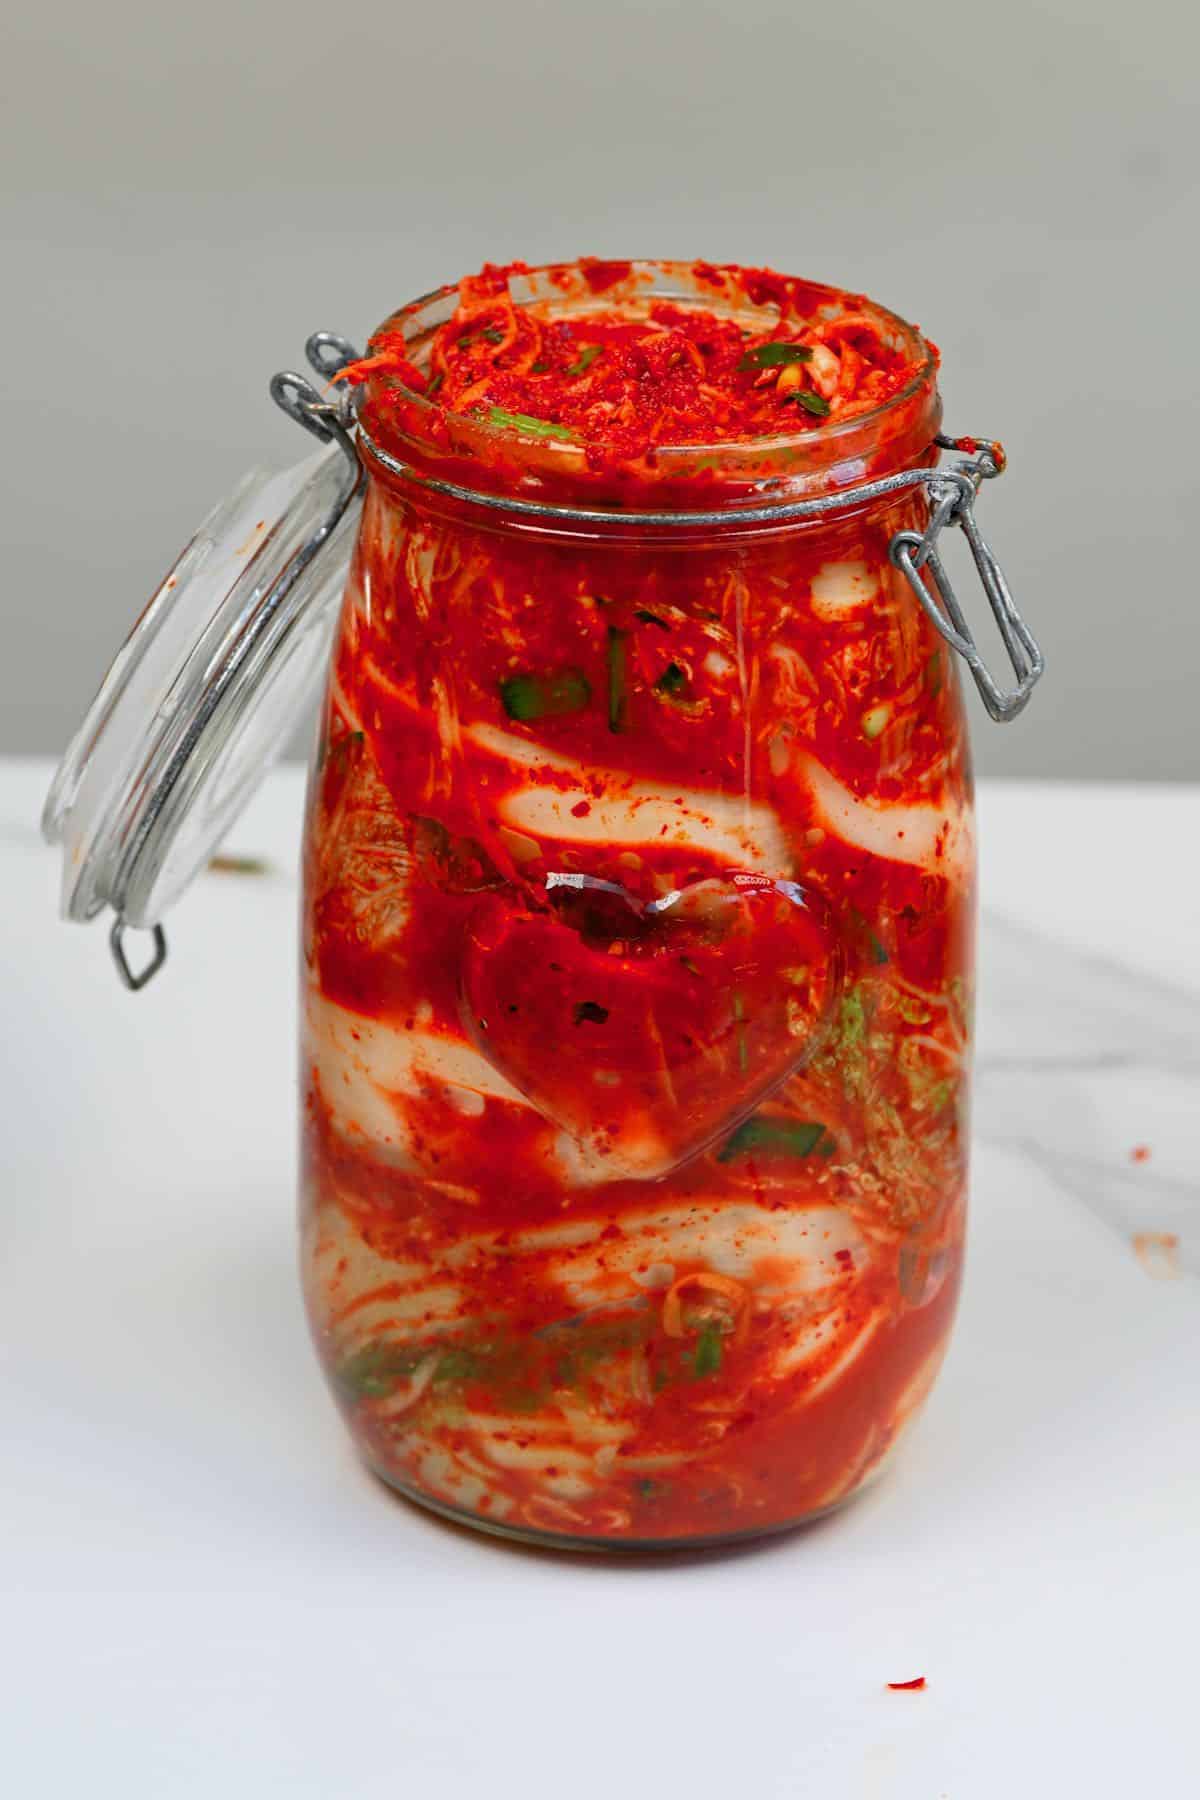
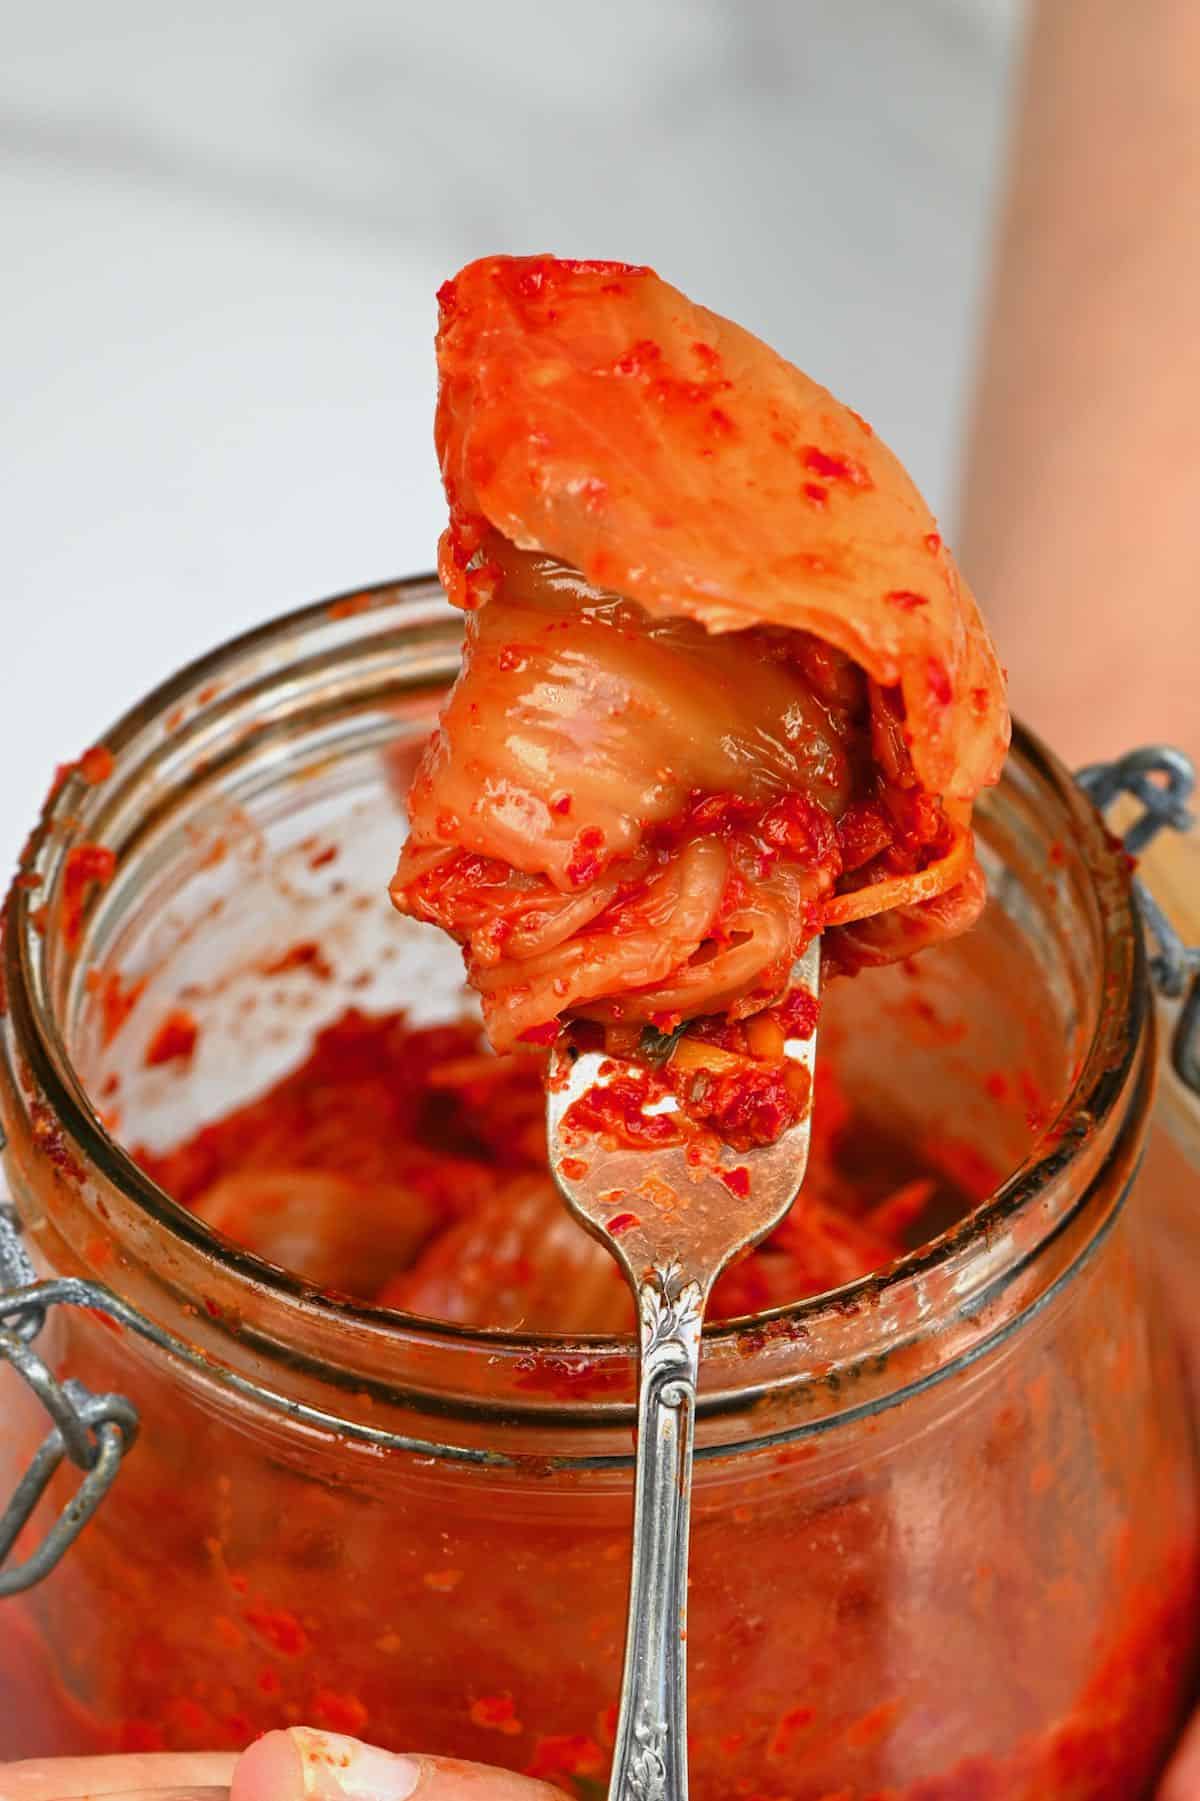
Finally, it’s time to add the salted (and rinsed!) cabbage sections. Using one section at a time, fold some of the kimchi mixture into the cabbage, making sure to spread some of the paste over every leaf, so it’s thoroughly coated.
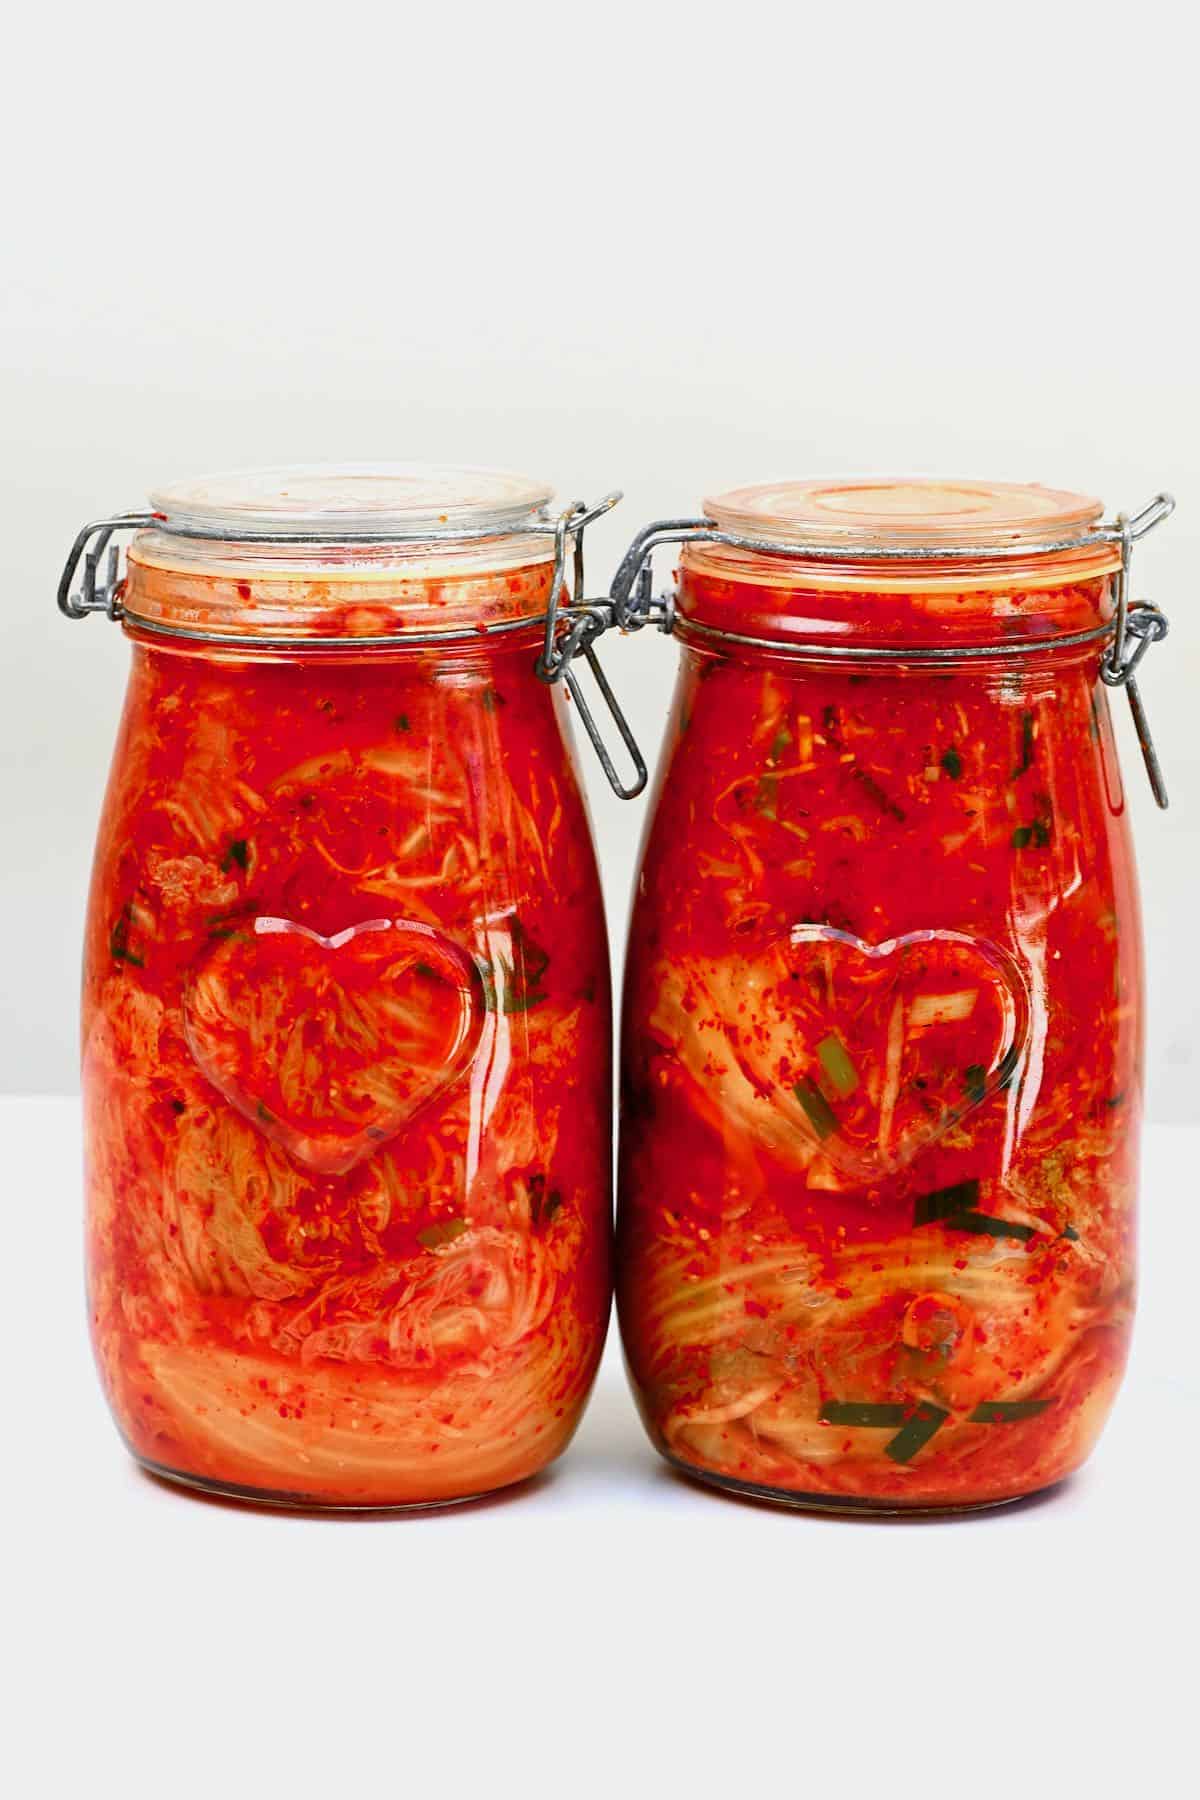
Then, roll the cabbage into a circle to fit your jar, lay it at the bottom of the jar, and top with a few spoonfuls more of the kimchi paste.
You could also use a traditional onggi for the fermentation (a type of Korean earthenware crockpot dish).
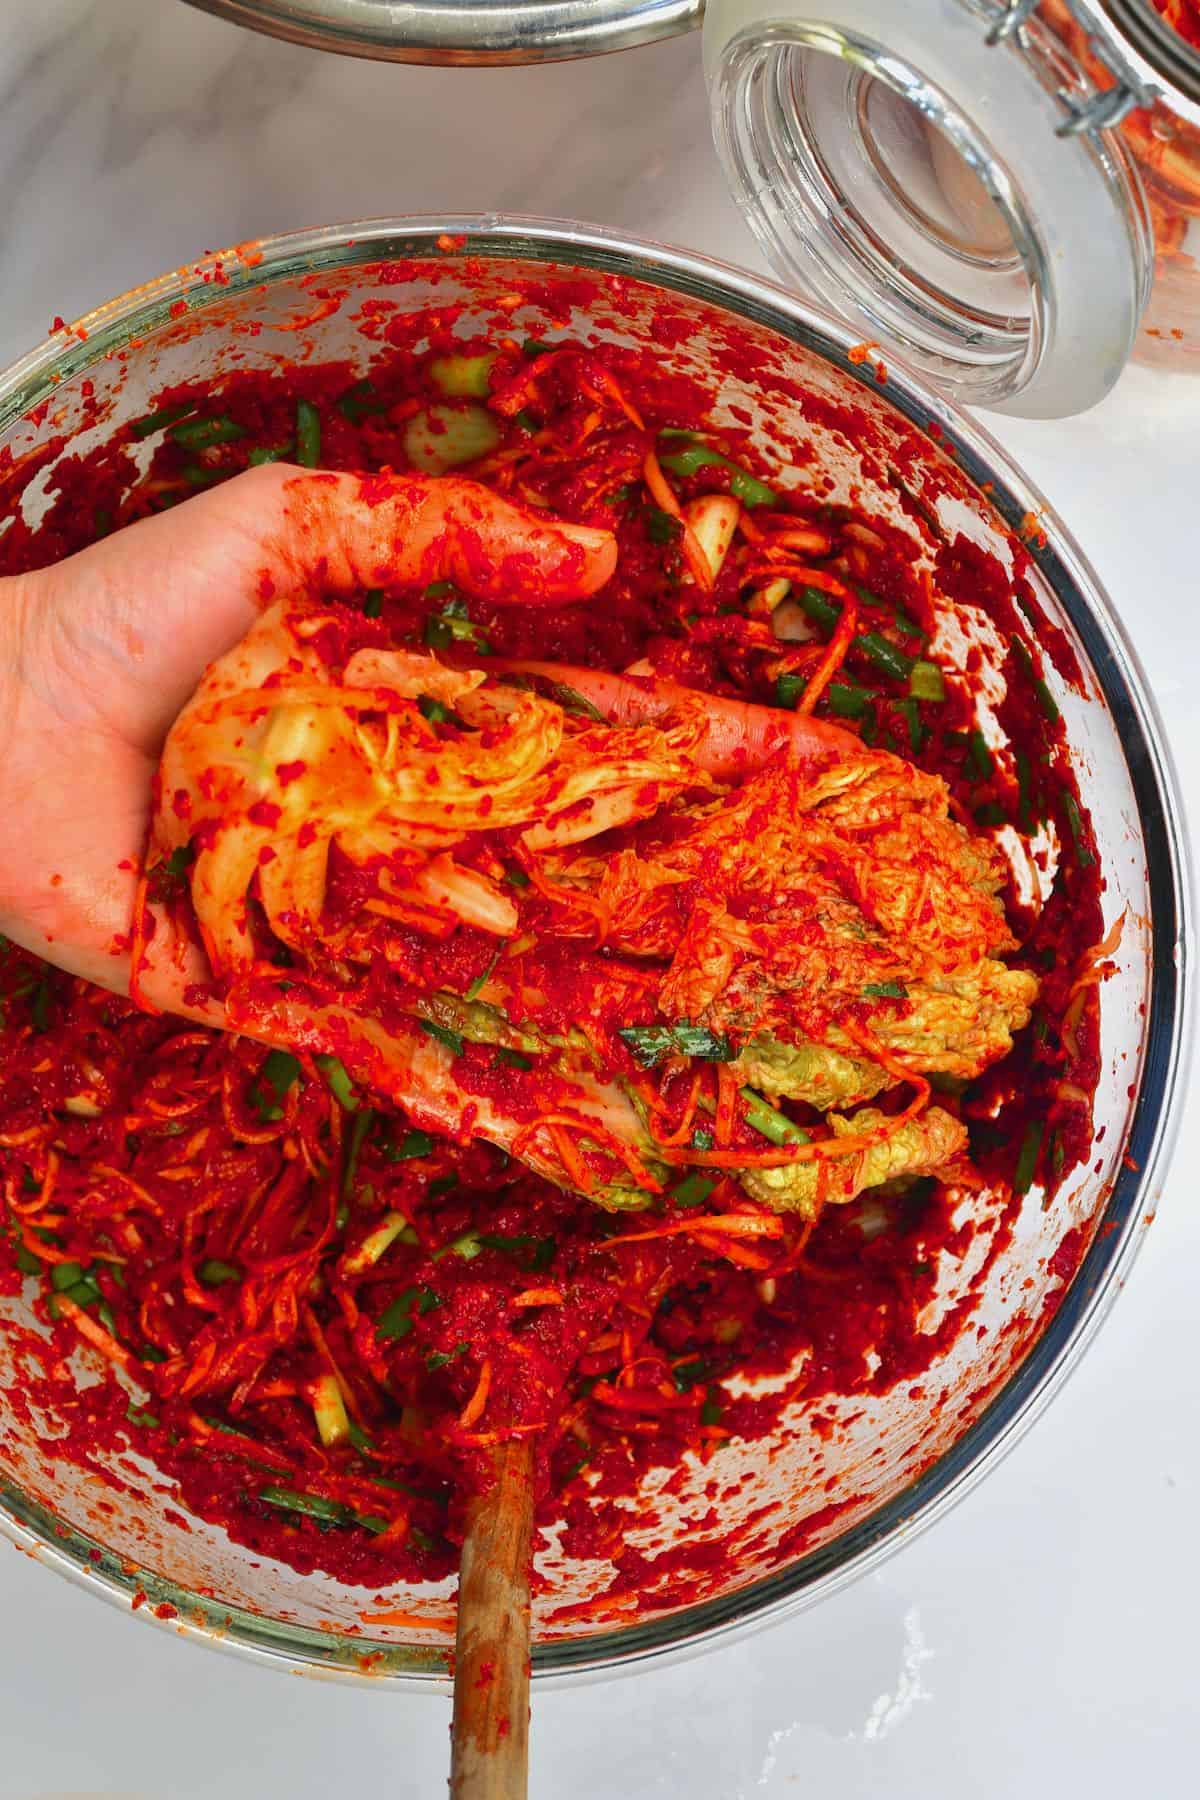
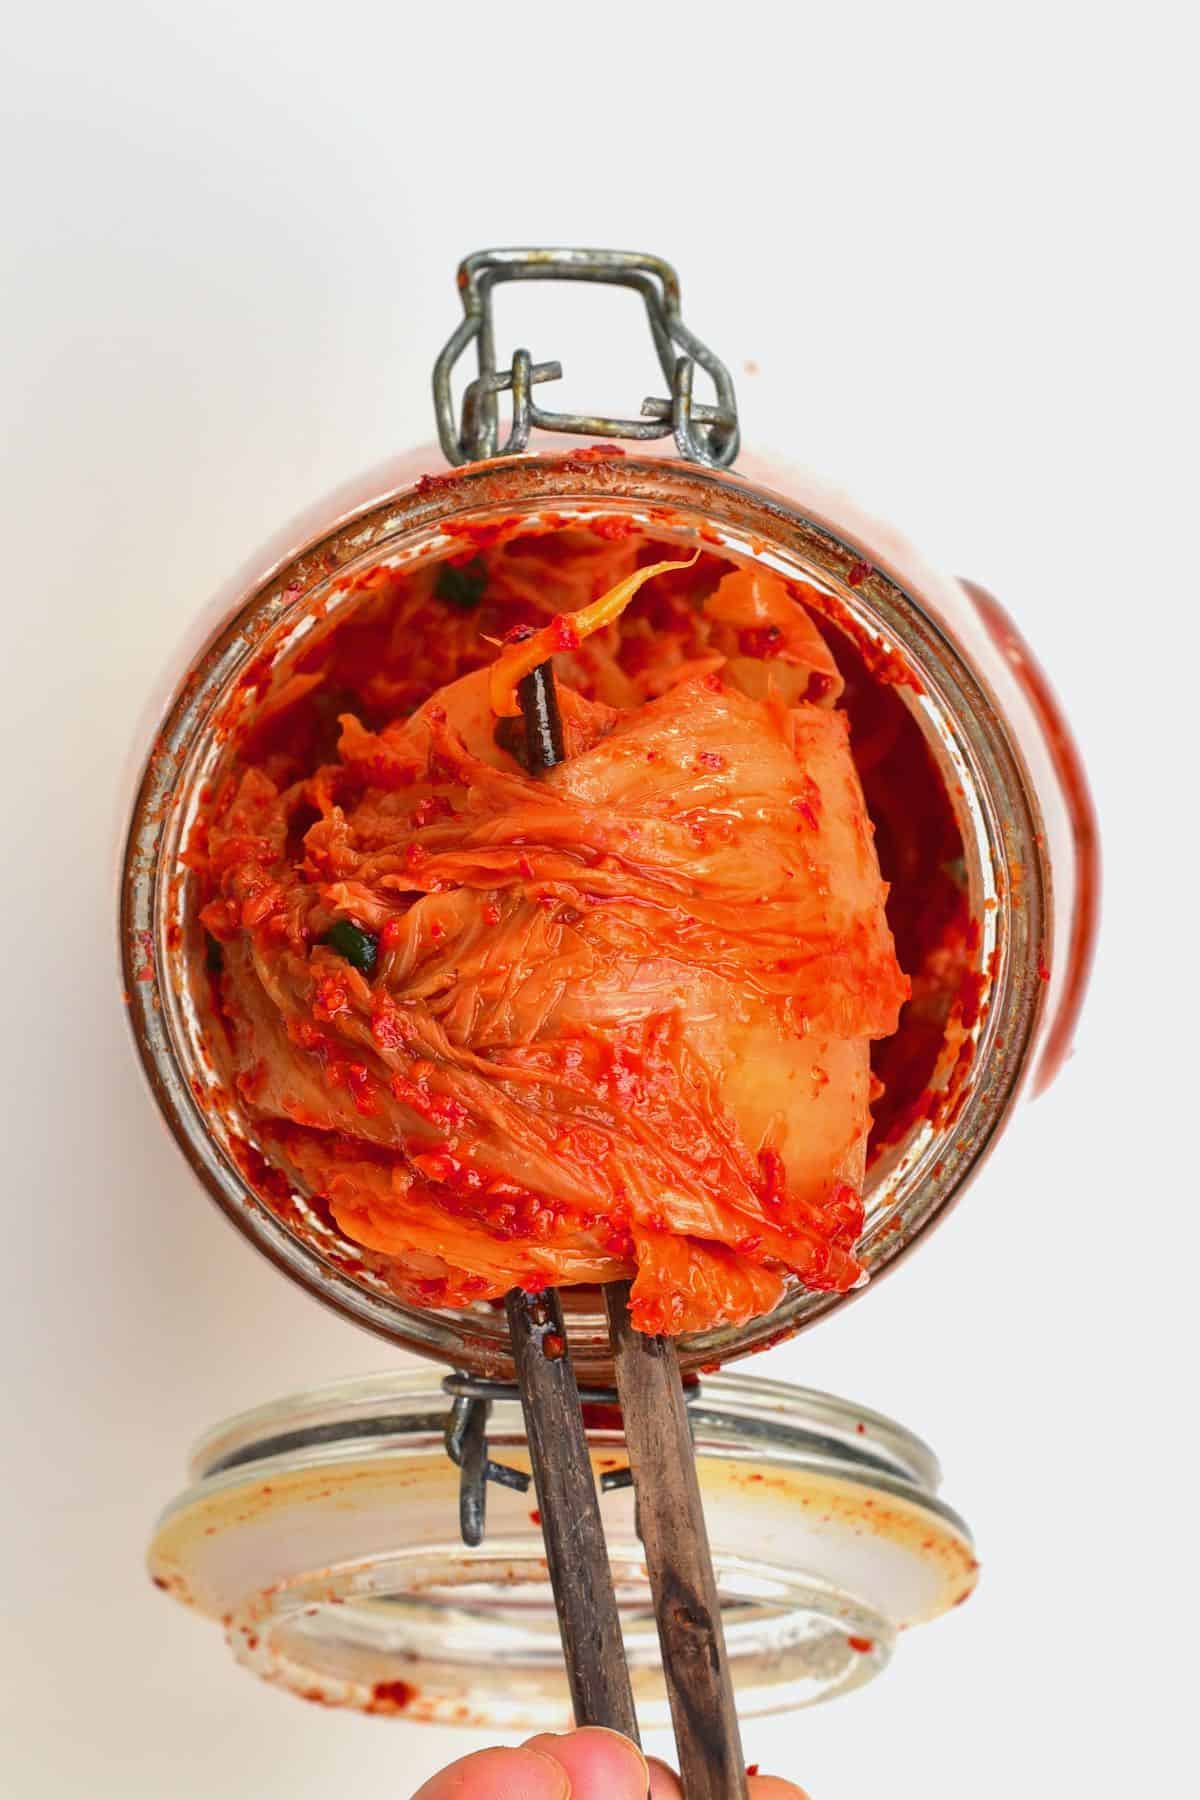
Repeat this with the remaining cabbage and kimchi paste until the jar is ¾ full – making sure to leave a couple of inches at the top. This is because the cabbage will expand slightly from the fermentation.
Instead of a jar, you can use any other air-tight container.
Your napa cabbage kimchi is ready to enjoy immediately. However, it’s best to allow it to ferment first.
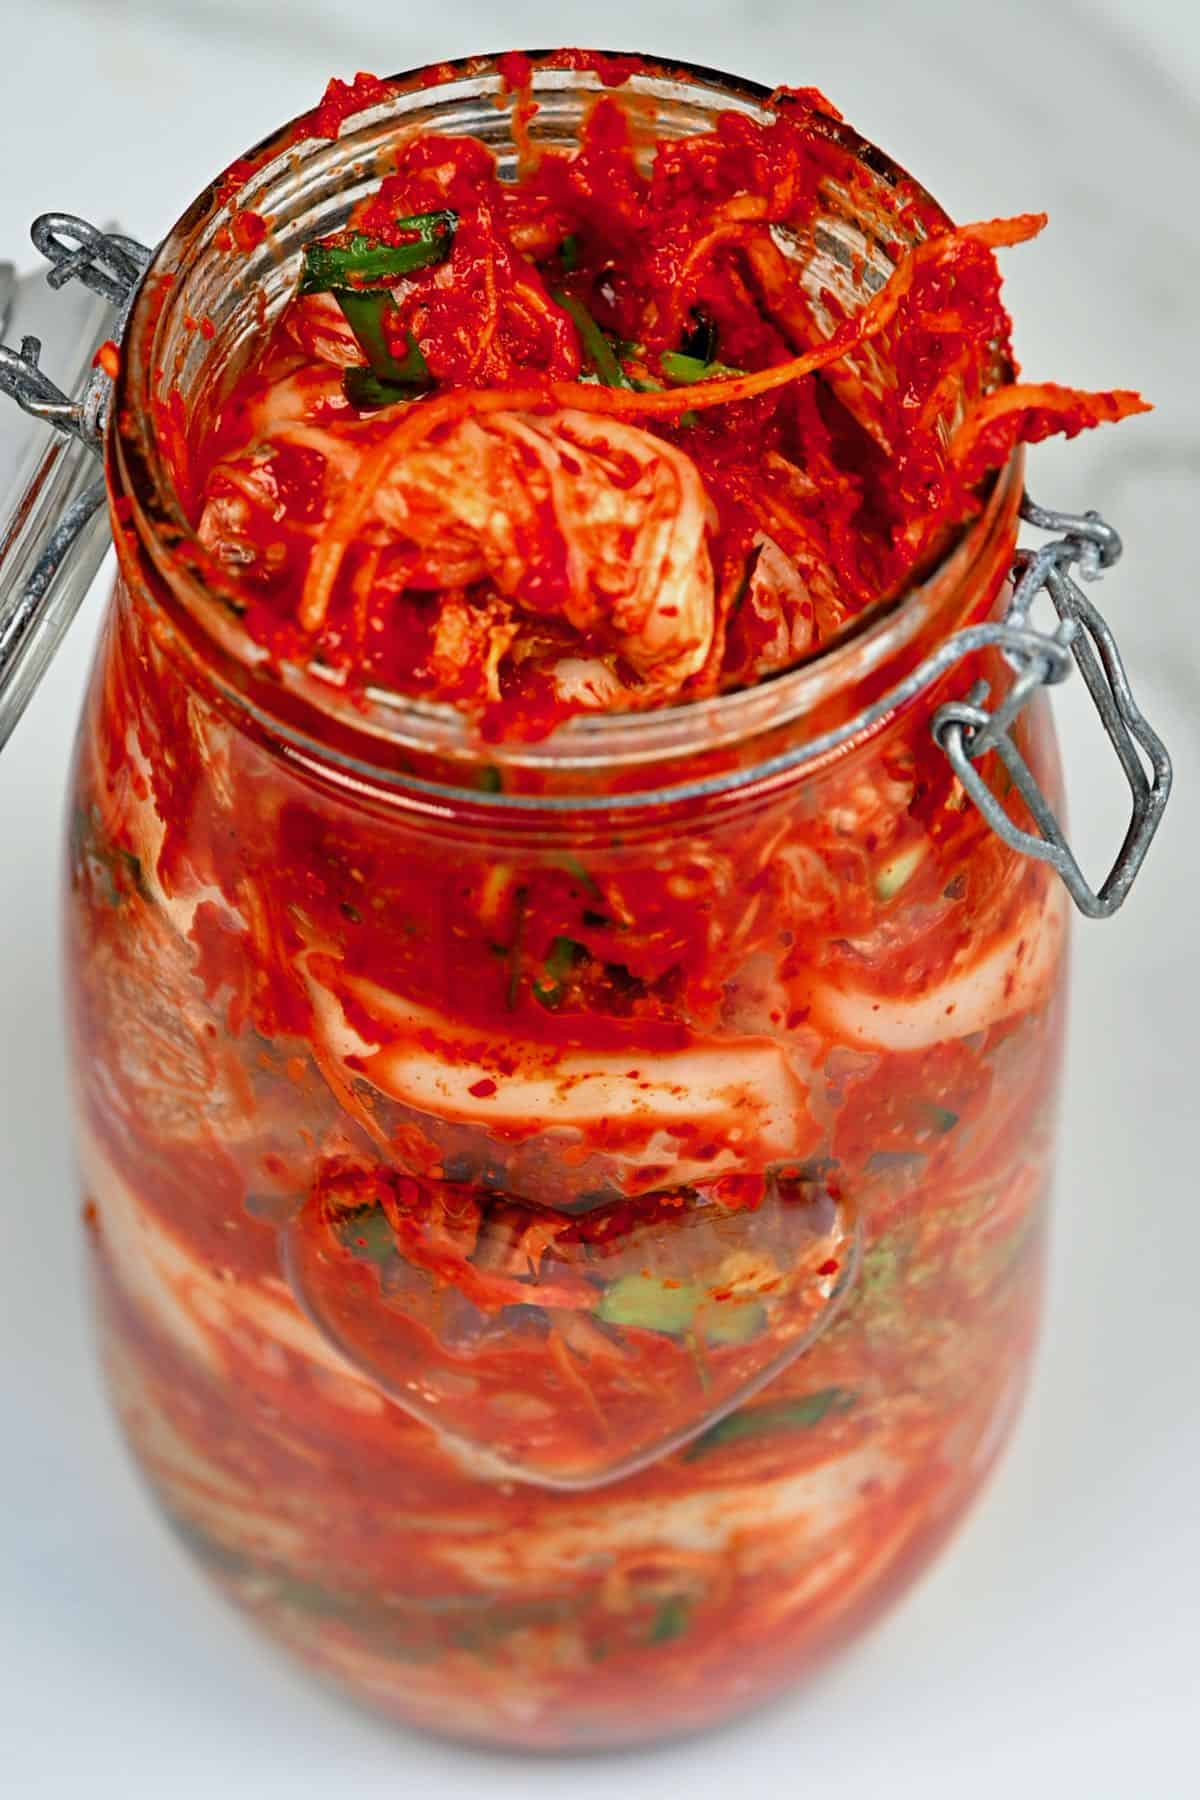
Step 8: Ferment the cabbage kimchi
Leave the jar to ferment for several days at room temperature (2-3 at least, up to 5 days) away from direct sunlight. Burp the jar from time to time (open the lid just for a moment) to allow any built-up gases to release so the jar doesn’t shatter. I do this 1-2 times per day, pressing lightly on the fermenting cabbage to ensure it stays beneath the kimchi “brine.”
You may start to notice bubbling inside the jar during this time – that is the gases from the fermentation building up and is completely normal.
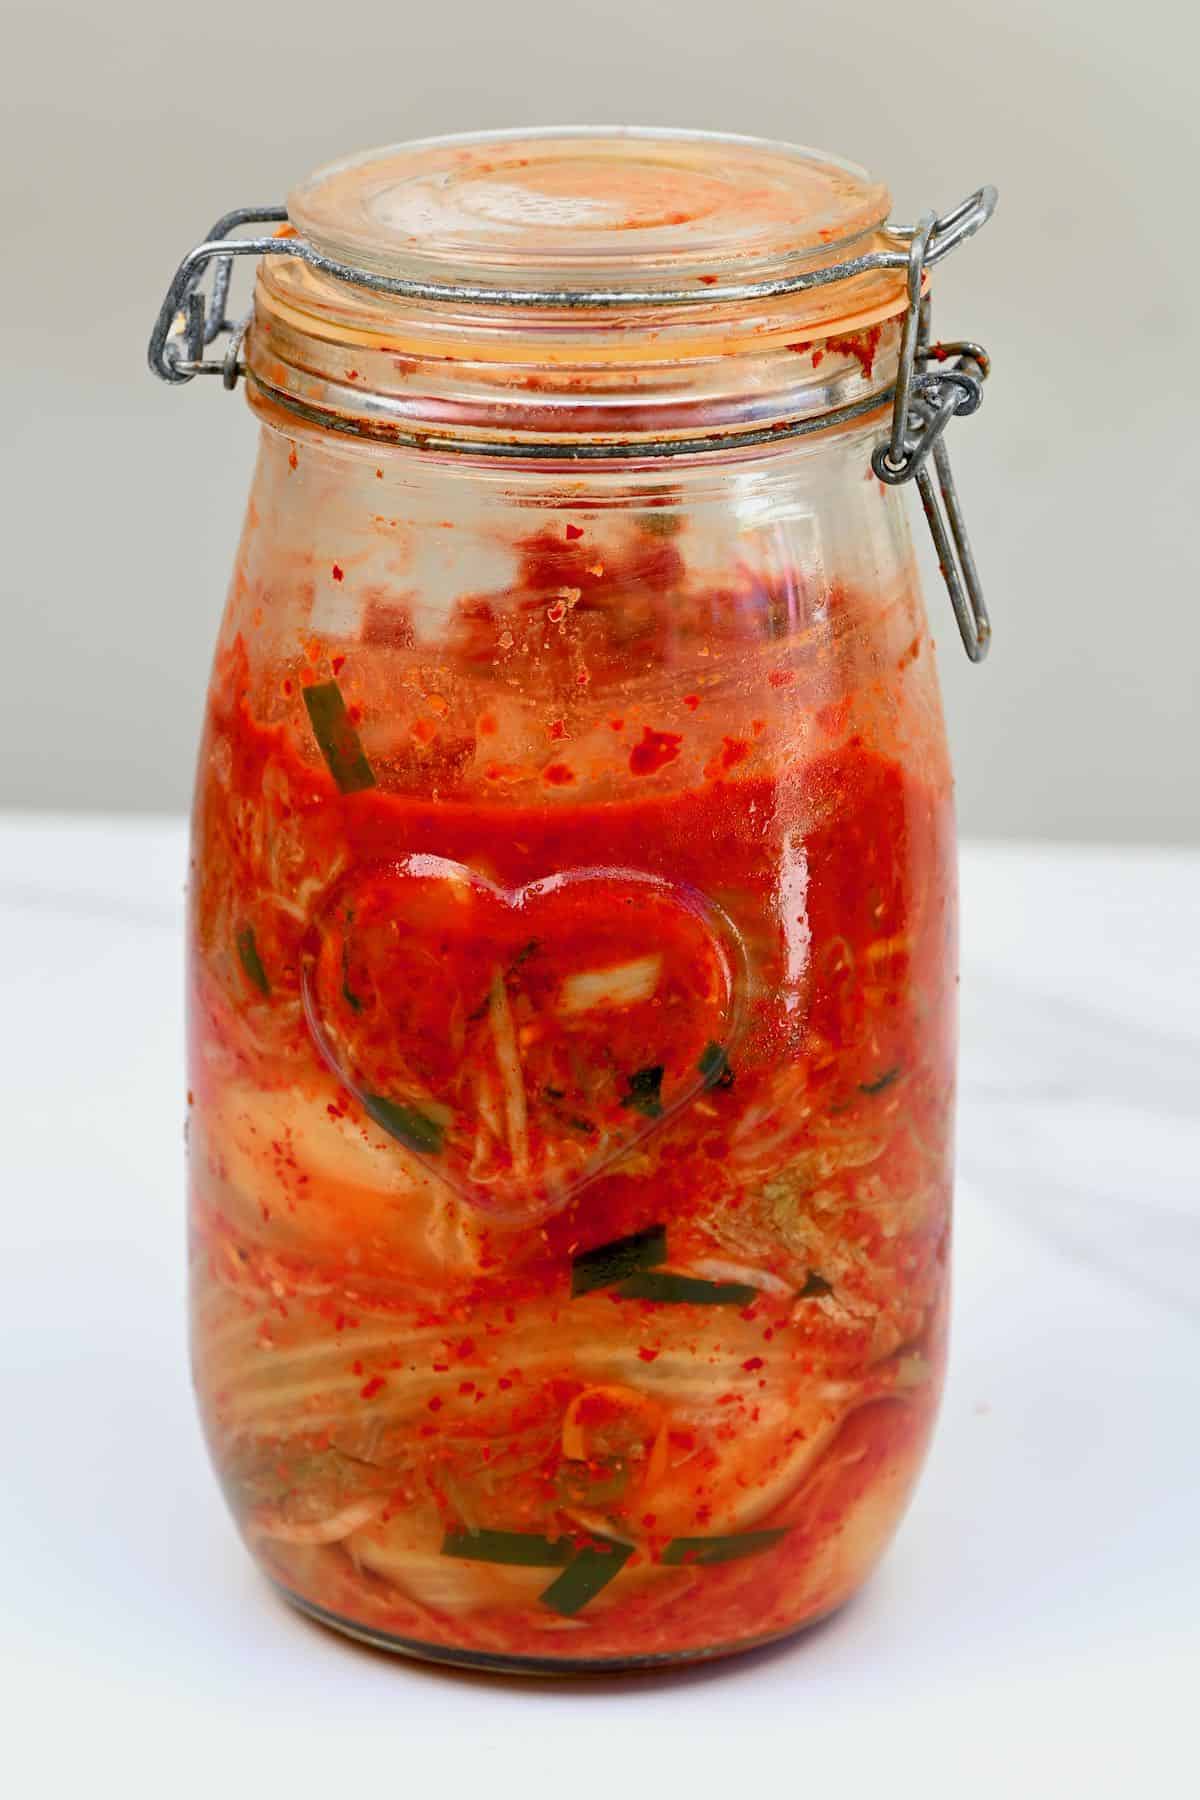
Once it’s ready, transfer the jar of cabbage kimchi to your fridge (this will slow down the fermentation process). The flavors will continue to develop over time, but you’re ready to enjoy it!
I recommend storing it in the refrigerator for at least another week (for further fermentation) before enjoying it!
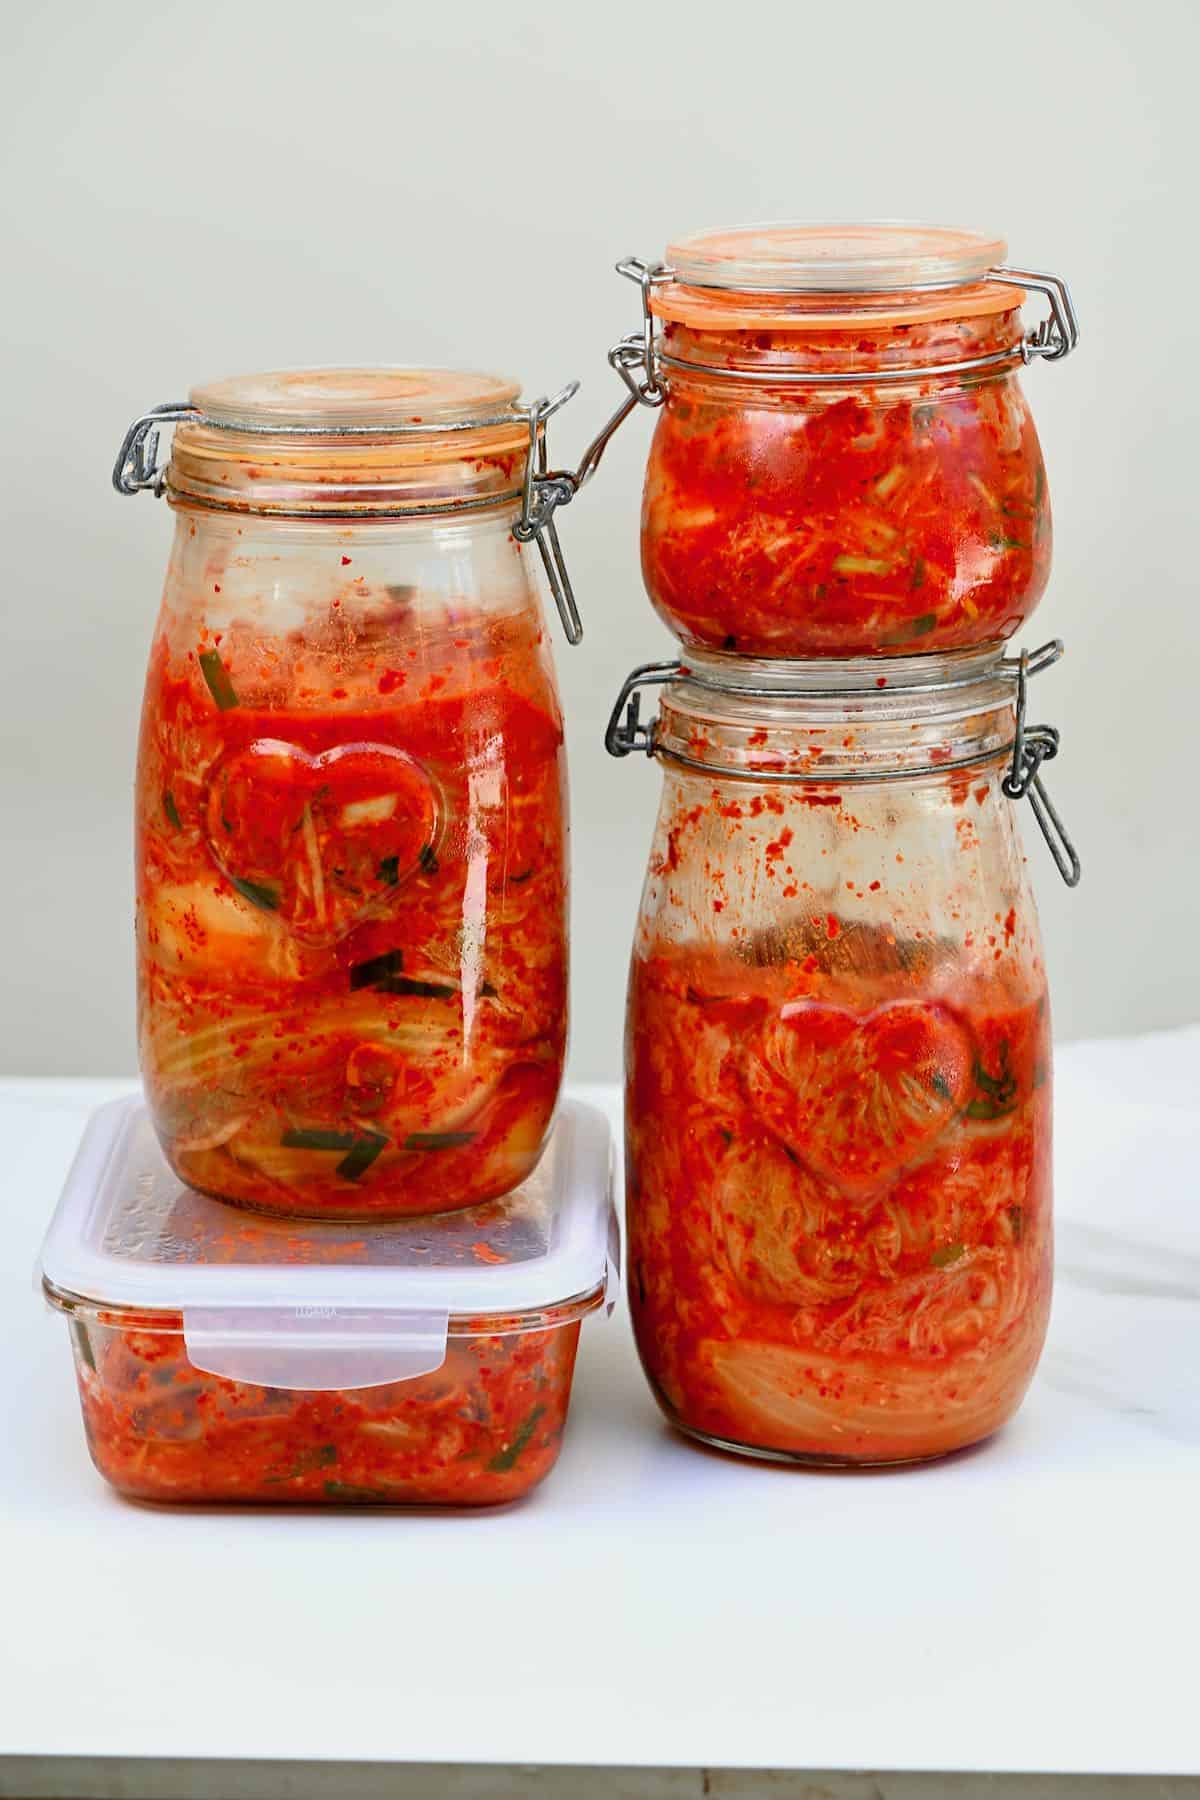
How to Store Cabbage Kimchi
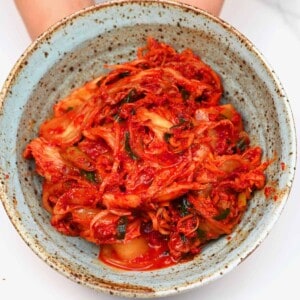
I recommend storing this cabbage kimchi in a large sterilized, airtight glass jar in the refrigerator. If stored correctly and clean utensils are used each time when serving, the cabbage kimchi will last several months this way!
I prefer the flavor best within the first 2-3 months. After that, it becomes increasingly sour, though kimchi can still be used in several dishes.
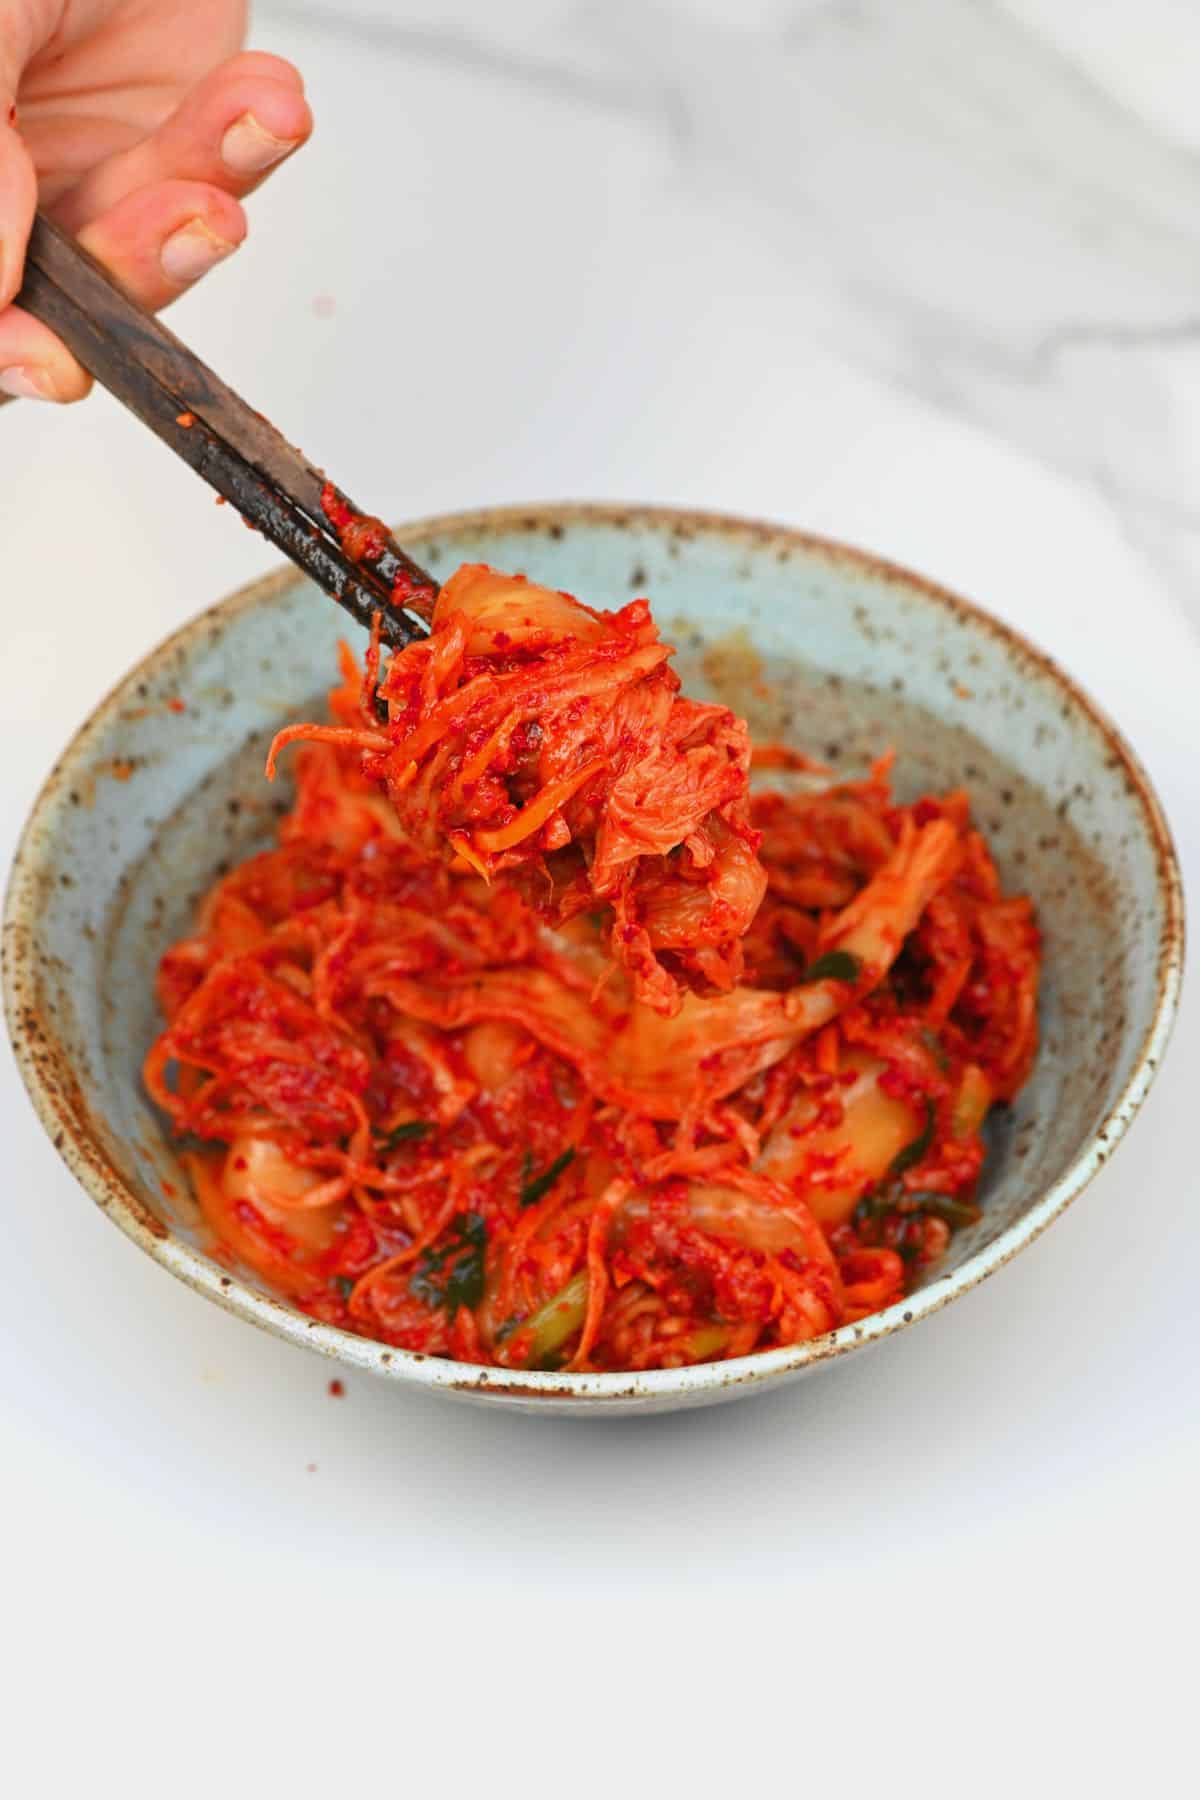
How to Eat Kimchi?
There are tons, and I mean tons, of ways to enjoy this Korean kimchi recipe, including:
- With rice or noodles – served alongside or used to make stir-fried kimchi rice.
- Mixed into Korean pancakes.
- As part of a Korean BBQ.
- Made into kimchi stew (kimchi jjigae).
- With eggs – it tastes delicious with scrambled or poached eggs on toast.
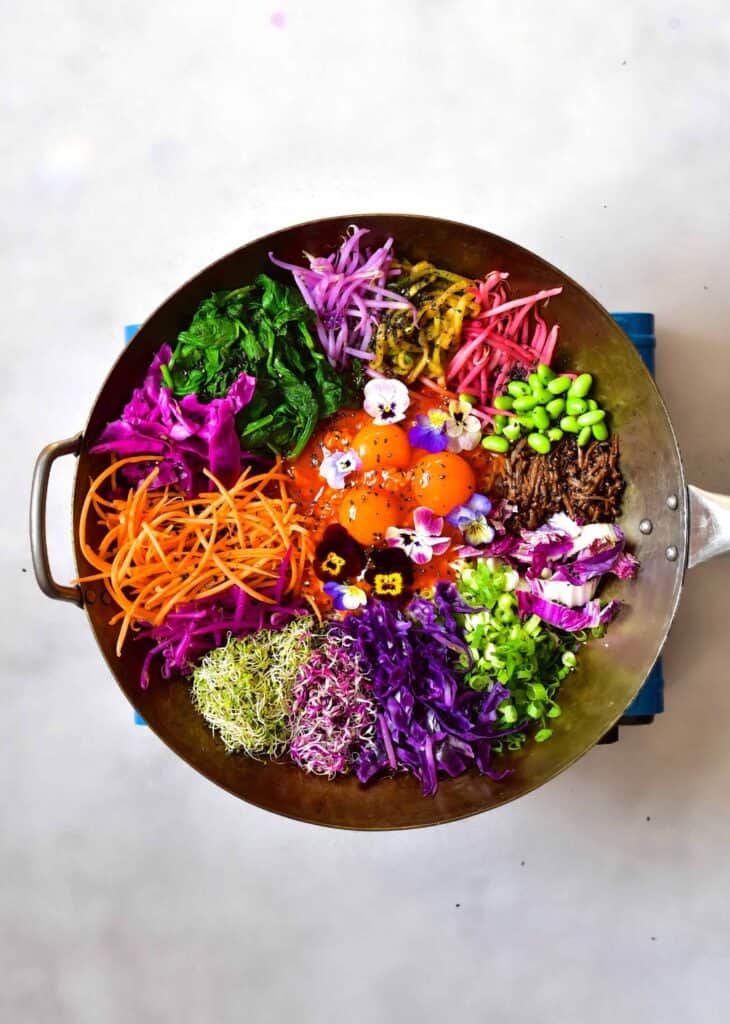
- With bibimbap. Or enjoy with BBQ pulled jackfruit.
- Served over proteins – meat, fish, or tofu.
- With mushroom dumplings.
- To serve over congee and savory oatmeal. Or add to a veggie omelette.
- Add to sandwiches and wraps or burgers.
- Added to tteokbokki (spicy rice cakes).
- Over pasta dishes – like vegan mac and cheese! Or even to top pizza.
That’s when you’re not eating it directly from the jar with a spoon, of course! The sky is the limit. Let me know in the comments what your favorite way to enjoy this cabbage kimchi is!
FAQs
No, you could also chop those sections down into smaller pieces. If you want to do so, I recommend chopping the cabbage in half lengthwise first (as in the directions). Then, slice each piece of cabbage every two inches or so for little two-inch sections.
Not only does the salting help to wilt the cabbage leaves, but it also kills certain harmful bacteria, allowing the “good” ones to remain.
While napa cabbage is the traditional option, you could use regular green cabbage in a pinch. The flavors/textures will vary slightly, but it will still be delicious cabbage kimchi!
You could even use a combination of ingredients. For example, combine one napa cabbage with some bok choy for a mixture of crunchy and tender. You could also try the dish with baby napa cabbage (putbaechu kimchi)
As with any fermented dish, this cabbage kimchi is somewhat sour with a definite “tang” and a pungency – similar to sauerkraut. However, the use of fishy ingredients and the chili makes for savory, umami, salty, and spicy (how much depends on you) layers.
The best thing about this kimchi recipe is that the flavors will continue to develop and change over time as it ferments. I prefer the flavor in the first two months; after that, it continues to become a sourer.
If you want your Korean kimchi to be less sour, then transfer it to the fridge earlier! I recommend fermenting it for a day at room temperature (in the UK climate) before moving it to the refrigerator.
Recipe Notes & Variations
- Use gloves: while this is optional, during the finals stages when you’re mixing up all the cabbage by hand, it’s a good idea to protect your hands from the spice (and smells) of the kimchi.
- Increase seasoning: you can increase the amount of shrimp/fish sauce or Korean chili flakes (gochugaru) for extra flavor.
- Vegan kimchi: to make vegan kimchi, omit the fish sauce/shrimp paste and instead use either Korean soup soy (“guk ganjang”) or kelp powder combined with water (to make up the same volume).
- Finding the ingredients: while many of the ingredients should be available in regular supermarkets if you struggle to find anything, then I recommend a local Korean grocery market or turning to online sources if you don’t have a Korean (or Asian) store nearby.
- The fermentation period: the time needed to ferment the cabbage kimchi at room temperature will vary based on the temperature and humidity. If you live somewhere hot and are trying to make this during summer, even half a day can sometimes be more than enough before transferring it to the refrigerator. It’s ready once the fermentation has started; the mixture will have some bubbles and start to smell and taste slightly sour.

This recipe was inspired by Maangchi’s YouTube video.
Related Recipes and DIYs
- Korean vegetable pancake (Buchimgae)
- Savory oatmeal
- Dalgona Latte
- How to make chili oil
- Rainbow vegetarian bibimbap


If you try this Korean kimchi recipe (cabbage kimchi), I’d love to hear your thoughts/questions below. Also, I’d appreciate a recipe card rating below, and feel free to tag me in your recipe recreations on Instagram @Alphafoodie!
Napa Cabbage Kimchi (Korean Baechu-Kimchi)
Ingredients
For the cabbage
- 7 pounds napa cabbage
- 1/2 cup sea salt or kosher salt
For the porridge
- 2 cups water
- 2 Tbsp rice glutinous flour or all-purpose flour
- 2 Tbsp sugar white, brown, turbinado
Veggies
- 1 Korean radish or daikon
- 4 carrot medium-sized
- 6 green onions
Seasoning
- 12 Asian chives buchu, or 3 extra green onions
- 15 garlic cloves
- 2 inch ginger knob
- 1 onion
- 1/3 cup fish sauce
- 1/4 cup shrimp paste
- 1-2 cups gochugaru (Korean hot pepper flakes/powder) more or less, depending on how spicy you want it
This will make about 9 pounds/4 kg of kimchi.
Instructions
Step 1: Wash the vegetables
- Wash all the vegetables (cabbage, radish, carrot, onion, green onion, chives, garlic, and ginger). I do this by soaking them in a large pot or directly in the kitchen sink.
Step 2: Prepare the napa cabbage
- Cut off the brown end of the "core" from the cabbage with a sharp knife.
- Turn the cabbage so the core is upwards and the leaves are against your surface and use a sharp knife to make an incision a few inches down into the cabbage (just enough to grip both halves). Then, with your hands, gently pull the two halves apart.
- Repeat this with the cabbage halves to create quarters – by separating the cabbage this way, the leaves remain attached.
Step 3: Salt the cabbage
- Dunk the cabbage sections into the water to get them wet, then liberally salt between each leaf, place the pieces in a large container, and then set aside.Wetting it first allows the salt to adhere better to the cabbage.
- Every 30 minutes for 2 hours (so, repeated four times), turn it over – move the cabbage section on top of the container to the bottom. This will allow all the leaves to soften and release water.Optionally, you can scoop up some of the released water and spoon it over the cabbage to further encourage softening.
- After two hours, wash the cabbage to remove excess salt and gently squeeze to remove the excess water. Let it drain well.
Step 4: Prepare the kimchi ‘porridge’
- Meanwhile, as the cabbage is being salted, you can prepare the porridge mixture. Add the water and flour to a small pot and heat over medium heat for around ten minutes, stirring occasionally.
- Once the mixture begins to bubble, add the sugar, stir, and cook for a further minute or so until the sugar has dissolved.You can optionally sieve the mixture to remove any lumps. Otherwise, simply allow it to cool down completely before using it (this is why it’s great to cook this as soon as you’ve started the cabbage salting – to give it a chance to cool before the cabbage is ready).
Step 5: Prepare the kimchi shrimp paste
- Peel and roughly chop the onion, ginger, and garlic. Then transfer them to a food processor to process into a paste. Alternatively, mince the ingredients by hand – but you’ll save so much time using a machine.
- Mix the processed ingredients with the porridge, fish sauce, shrimp paste, and Korean chili powder, and whisk well until thoroughly combined.
Step 6: Prepare the vegetables
- Peel the radish and carrots.
- Use a vegetable peeler, mandoline, or knife, if your knife skills are good enough, to shred the radish and carrot into tin noodle-like julienned pieces (around ¼ inch/0.6 cm thin maximum). Alternatively, you can cut them into matchsticks.
- Cut the green onions (scallions) and chives into small pieces. Mine were around ½-1 inch/1.3-2.5 cm each, but you could cut them even smaller.
Step 7: Combine the Korean kimchi ingredients
- In a large bowl, combine the chopped vegetables and kimchi paste and stir well. Because the radish contains a lot of water, this will naturally "thin" the paste over time.
- Add the salted (and rinsed!) cabbage sections. Using one section at a time, fold some of the kimchi mixture into the cabbage, making sure to spread some of the paste over every leaf, so it’s thoroughly coated.
- Roll the cabbage into a circle to fit your jar and lay it at the bottom of the jar and top with a few spoonfuls more of the kimchi paste.Instead of a jar, you can use any other air-tight container.You could also use a traditional onggi for the fermentation (a type of Korean earthenware crockpot dish).
- Repeat this with the remaining cabbage and kimchi paste until the jar is ¾ full – making sure to leave a couple of inches at the top. This is because the cabbage will expand slightly from the fermentation.Your napa cabbage kimchi is ready to enjoy immediately. However, it’s best to allow it to ferment first.
Step 8: Ferment the cabbage kimchi
- Leave the jar to ferment for several days at room temperature (2-3 at least, up to 5 days) away from direct sunlight. Burp the jar from time to time (open the lid just for a moment) to allow any built-up gases to release so the jar doesn’t shatter. I do this 1-2 times per day, pressing lightly on the fermenting cabbage to ensure it stays beneath the kimchi "brine."You may start to notice bubbling inside the jar during this time – that is the gases from the fermentation building up and is completely normal.
- Once it’s ready, transfer the jar of cabbage kimchi to your fridge (this will slow down the fermentation process) – the flavors will continue to develop over time, but you’re ready to enjoy it!I actually recommend storing it in the refrigerator for another week at least (for further fermentation) before enjoying it!
How to Store Cabbage Kimchi
- I recommend storing this cabbage kimchi in a large sterilized, airtight glass jar in the refrigerator. If stored correctly and clean utensils are used each time when serving, the cabbage kimchi will last several months this way!I prefer the flavor within the first 2-3 months best. After that, it becomes increasingly sour – though that kimchi can still be used in several dishes.
Notes
- Use gloves: while this is optional, during the finals stages when you’re mixing up all the cabbage by hand, it’s a good idea to protect your hands from the spice (and smells) of the kimchi.
- Increase seasoning: you can increase the amount of shrimp/fish sauce or Korean chili flakes (gochugaru) for extra flavor.
- Vegan kimchi: to make vegan kimchi, omit the fish sauce/shrimp paste and instead use either Korean soup soy (‘guk ganjang’) or kelp powder combined with water (to make up the same volume).
- Finding the ingredients: while many of the ingredients should be available in regular supermarkets, if you struggle to find anything, then I recommend a local Korean grocery market or turning to online sources if you don’t have a Korean (or Asian) store nearby.
- The fermentation period: The time needed to ferment the cabbage kimchi at room temperature will vary based on the temperature and humidity. If you live somewhere hot and are trying to make this during summer, even half a day can sometimes be more than enough before transferring it to the refrigerator. It’s ready once the fermentation has started; the mixture will have some bubbles and start to smell and taste slightly sour.
Read the blog post for the answer to tons more FAQs!
Nutrition
Nutrition information is automatically calculated, so should only be used as an approximation.


I came upon your website today looking for a better way to do my Jasmine Rice.
My first cookbook, years ago, was Travels with a Hot Wok by Ken Hom, and his was my bible. My mom and I would watch him back in the late 60’s.
I came across your recipe, which I’ll try this week.
Then I saw your ‘cabbage rolls’ recipe, which piqued my interest. My mom made the best cabbage rolls. We relocated to the ‘States’ from NFLD, Canada many years ago, and that was one of my favourite meals by her…her Roast Beast was another story.
Then I thought I’d see if you had a good ‘Fish n Chips’ recipe…and then I ran into some of my favourite food…Korean…I just made four-pounds of ‘Mak Kimchi’; I prefer this method. I use kimchi containers that I get from Jeff Besos; we go way back. All my containers allow my indigents to ‘burp’, which is a natural occurrence in this process. My kimchi never sees the inside of my fridge, only a cool dark corner on my counter. After about 4~5 months it becomes Kimchi Stew…really good stuff!
Glad I came across your site…
r/
Mac
Hi Mac,
Thank you so much for your comment! So nice of you sharing with me lovely stories :-). I’m glad you are giving some of my recipes a try! I hope you enjoy the jasmine rice. Your kimchi method sounds amazing! I will have to give it a try!
Just made this and OMG, perfect! I had to eye some of the recipe because I didn’t quite have 7lbs and I also made some cucumber and radish kimchi to fill in the gap lol. It all came out great! I had to salt it a little bit after, but I only let the cabbage salt for about an hour and 15 minutes and I rinsed it probably a bit too much. Anyhow, it came out SO good!
Thank you so much for your comment, Leah. So happy you’ve enjoyed the kimchi!