
This post may contain affiliate links. Please read our disclosure policy.


How to make fermented garlic honey; a tasty condiment with cold and flu combatting abilities, and an impressive shelf-life; perfect for enjoying for years to come! Best of all, all you need is two ingredients and a sterilized jar!
Whether you want to consider this as fermented garlic honey or honey fermented garlic, the process and dish are the same. By combining fresh garlic with raw honey and allowing it to ferment, you end up with garlic that is sweetened and mellowed and garlic-infused honey that tastes amazing.
When it comes to garlic, in my opinion, you can never have too much. I recently posted recipes for pickled garlic and the TikTok trending spicy pickled garlic. I’ve previously shared recipes for homemade garlic confit and Lebanese garlic sauce. Now it’s the turn of this garlic fermented in honey with the ultimate shelf life.
Enjoy it when you feel a cold coming on or have a sore throat, or drizzle the honey over pizza, veggies, add into marinades and dressings, or to a whole array of other dishes (keep reading for suggestions!)
There may be a weeny bit of a learning curve when it comes to fermented products, but (in my opinion anyway), the results are worth it. Just like homemade kombucha, this fermented garlic is something I not only enjoy making but enjoy eating too (and there are so many ways to use it too!).
Not only is this honey garlic ferment shelf-stable, but unlike other methods to preserve garlic (which often carry the risk of botulism), for this method, it is improbable. The acidity of honey means that bacteria are largely unable to survive and multiply, making this honey’s shelf life potentially endless. That is if it’s stored with a tight lid on at all times when not being used.
You may also like this chili and garlic-infused honey.
The ingredients
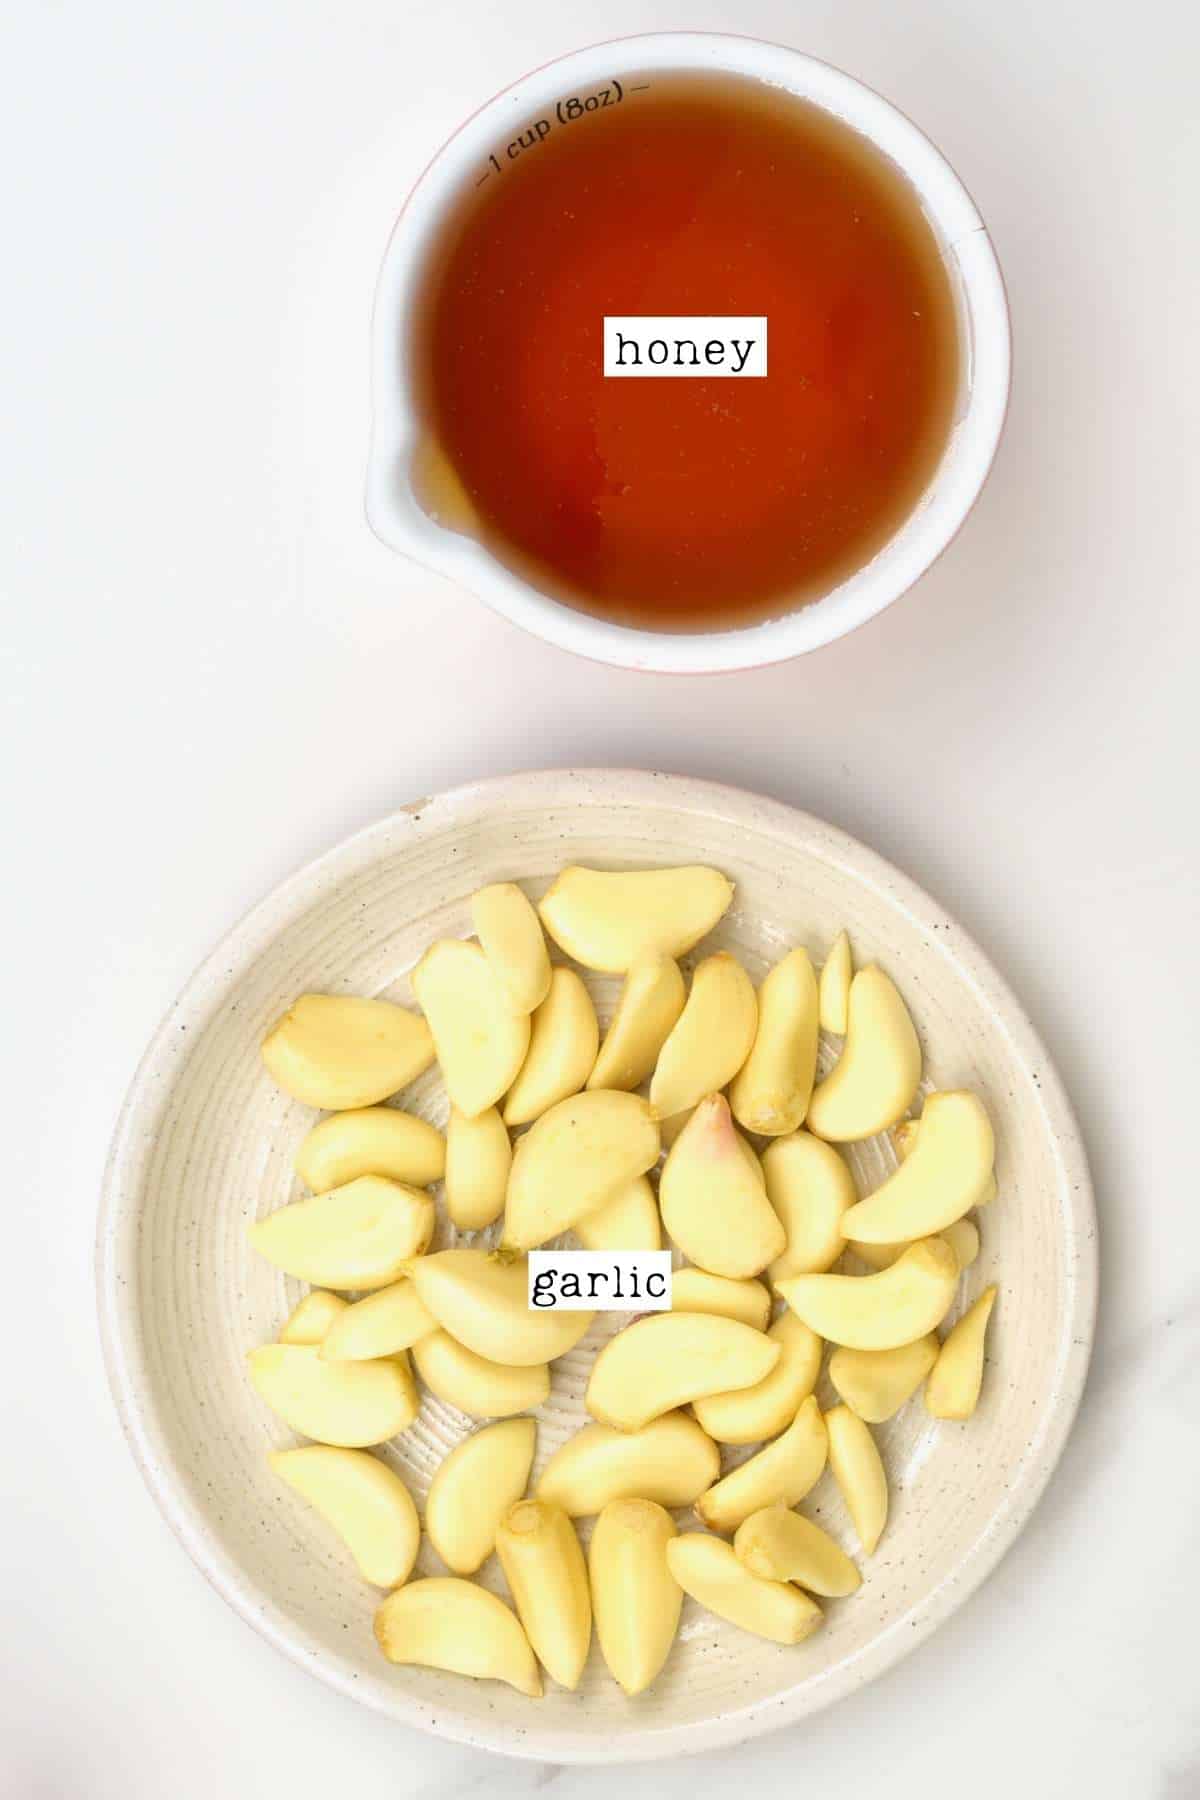
- Raw honey: make sure to use raw, unpasteurized honey. The process won’t work if it’s not raw, as the microbes will have been killed off in the pasteurization process.
- Garlic: it’s best to use the freshest garlic you can find for the quickest and best fermentation results.
How to Make Fermented Garlic Honey
Step 1: Prepare the garlic
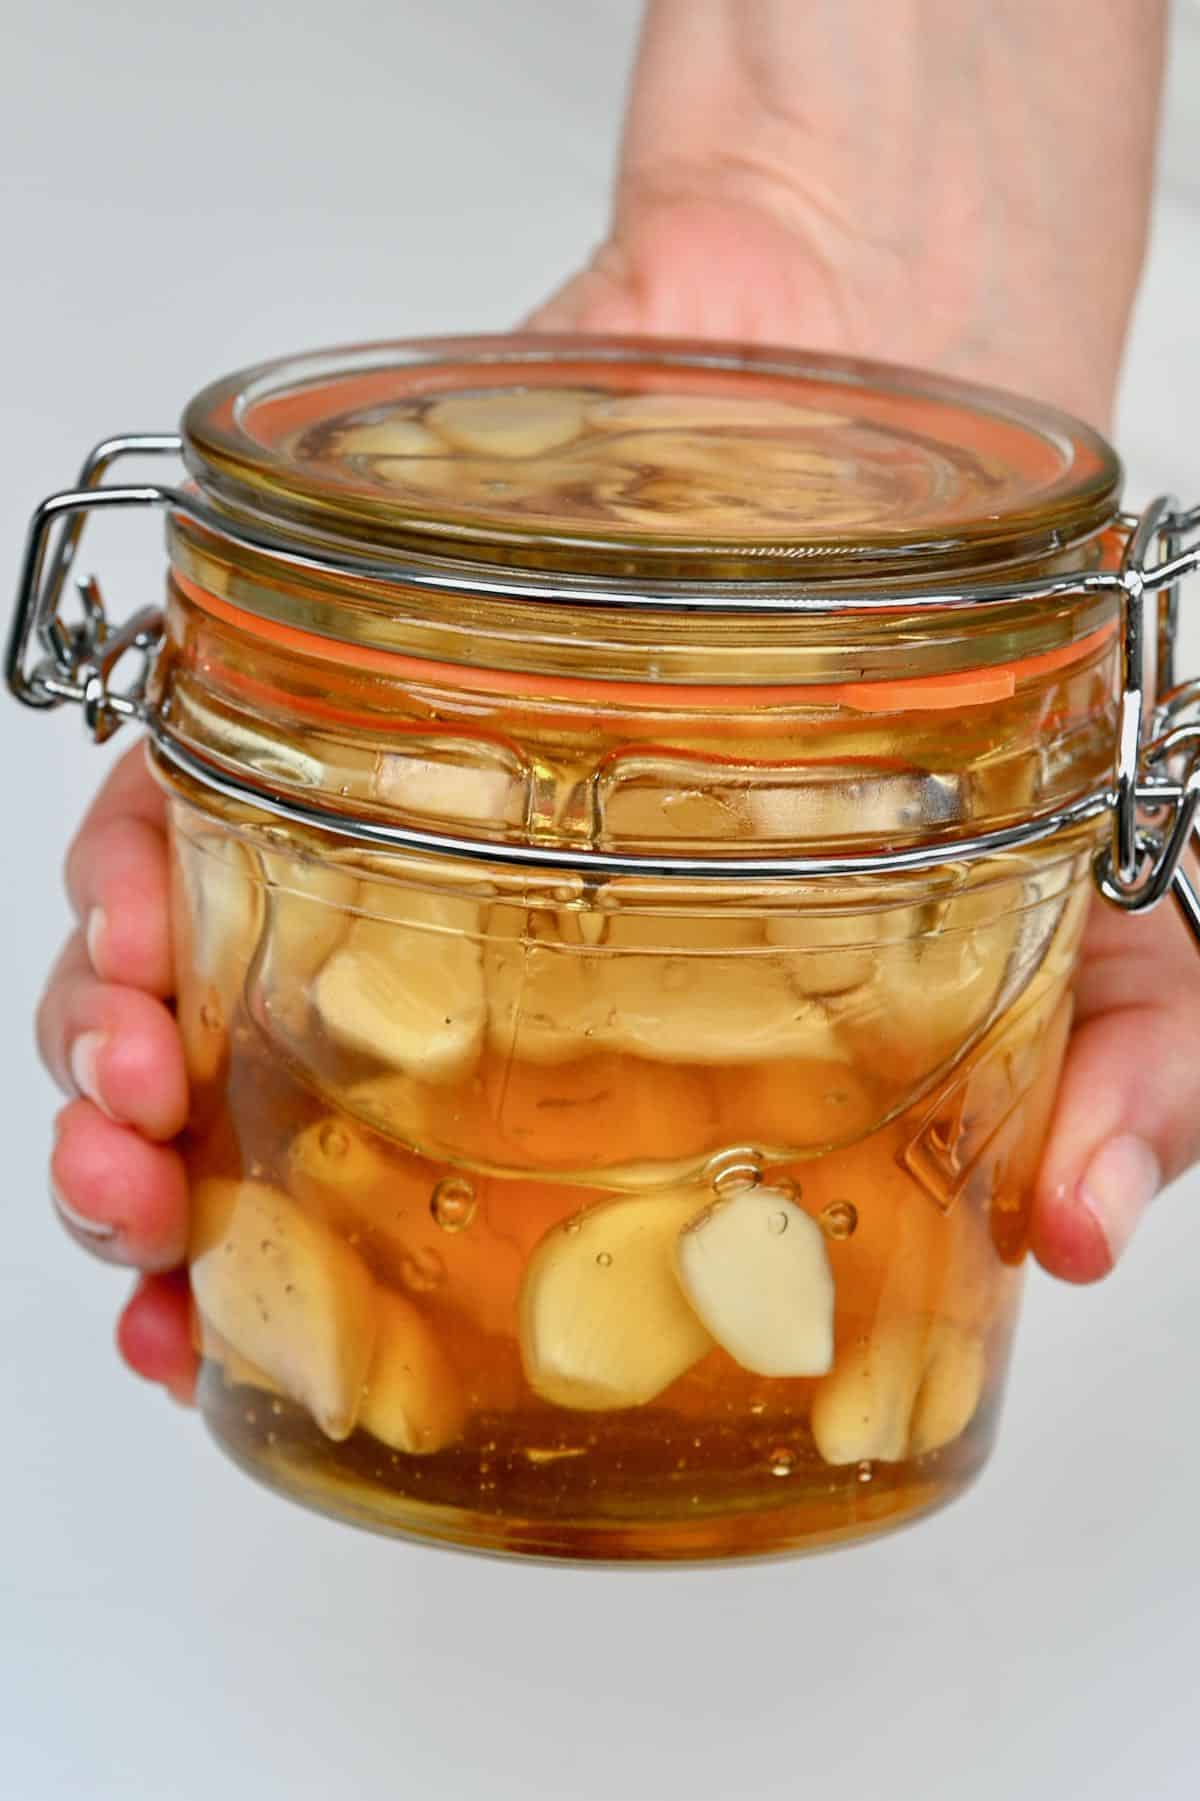
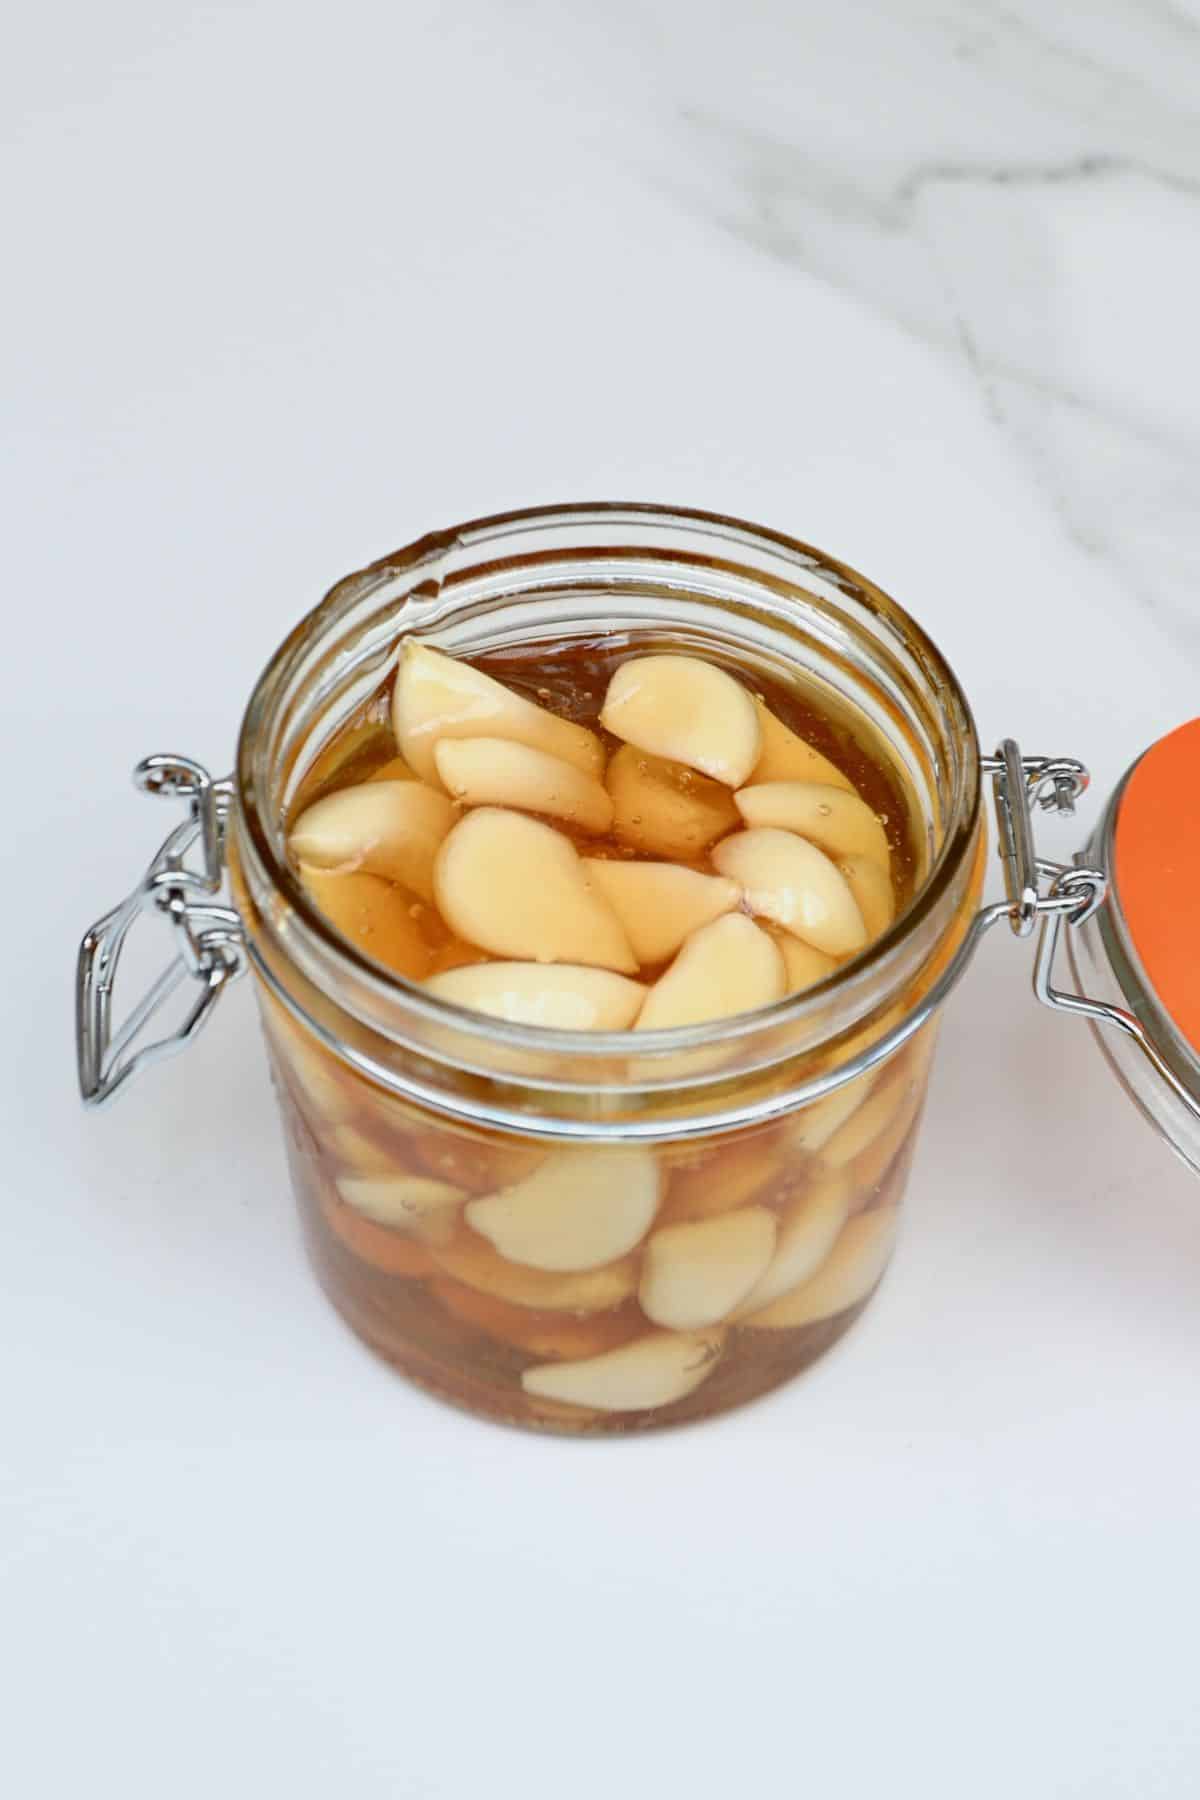
First, you’ll need to peel the garlic using one of the how to peel garlic methods. Then transfer the peeled garlic cloves to a sterilized glass jar with an airtight seal.
It’s a good idea to lightly crush or chop the cloves in half to speed up the fermentation process. Alternatively, you could prod the whole cloves a few times – to encourage the release of their juices into the honey.

Step 2: Add the honey and ferment
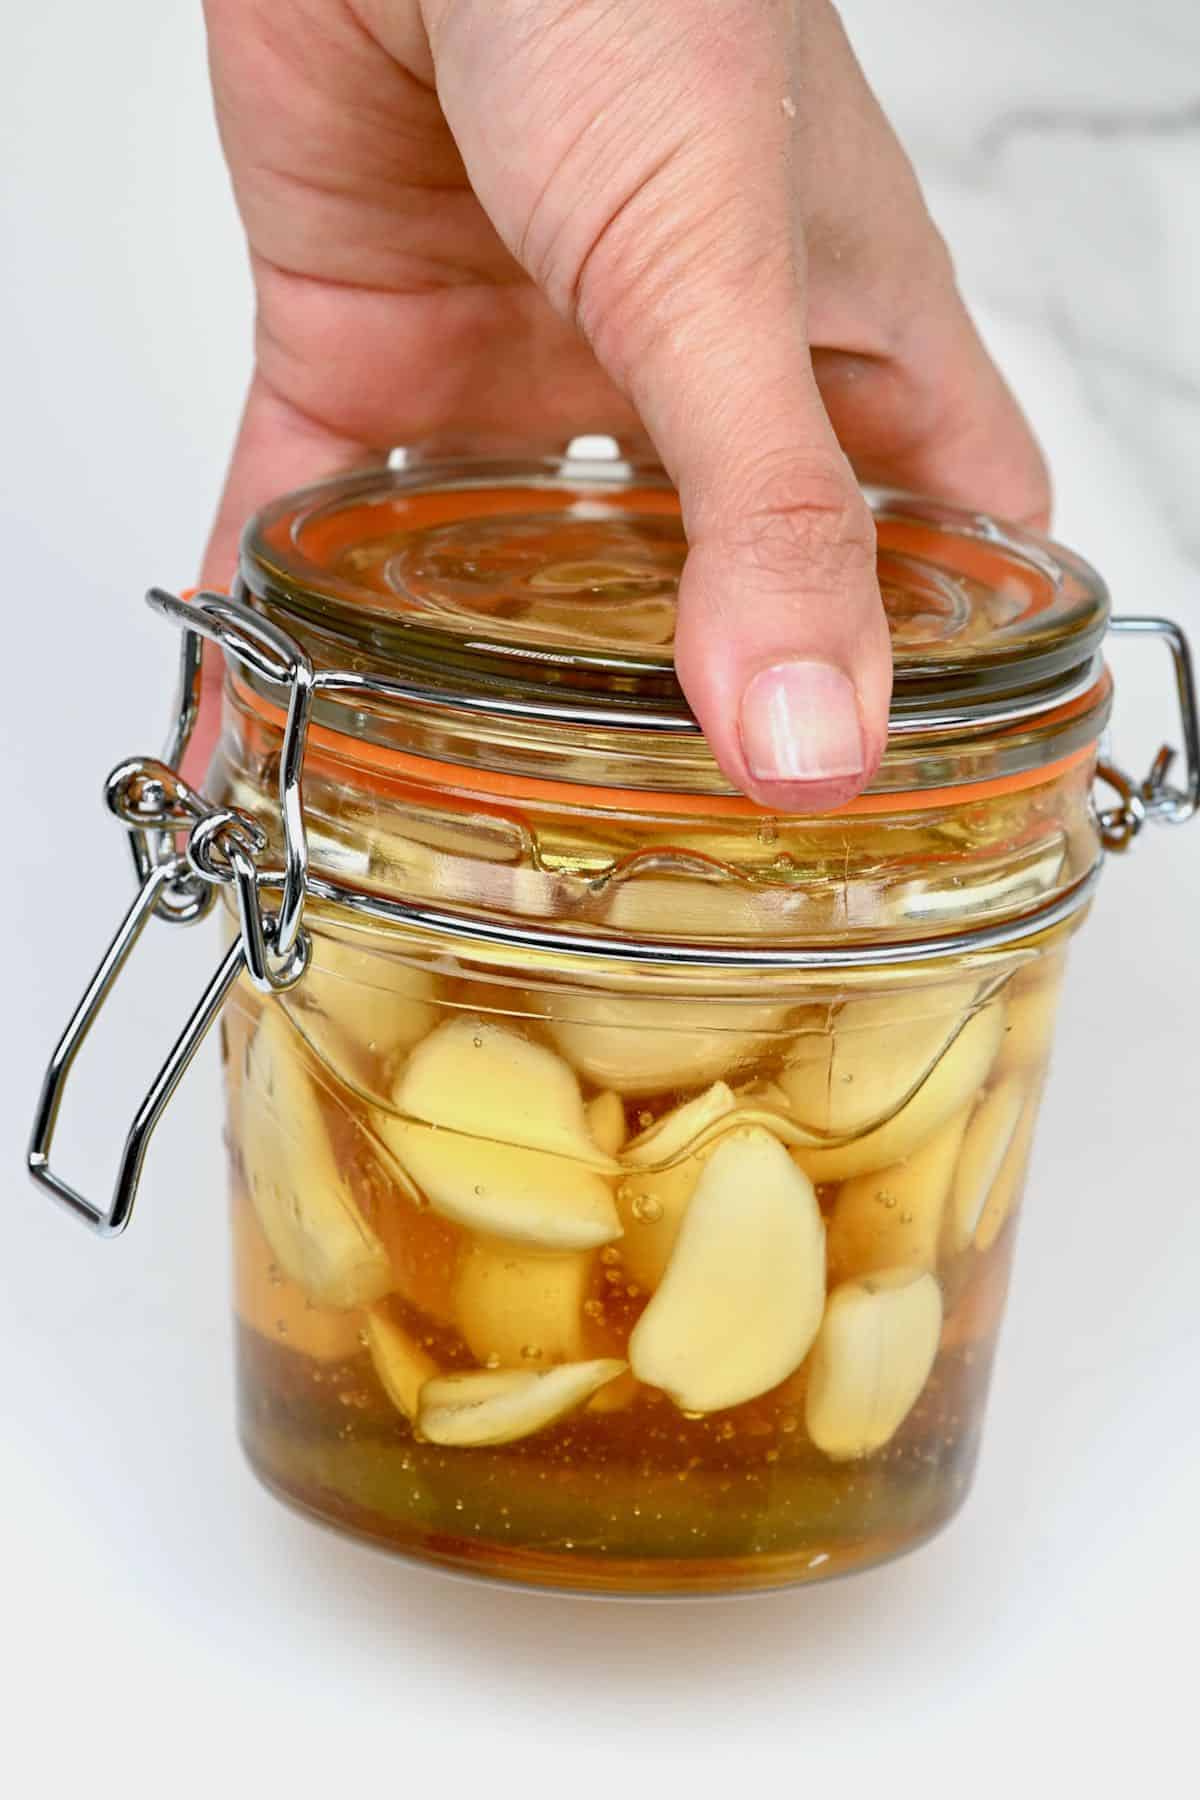
Then, fill the jar with honey, mix it, and then seal it.
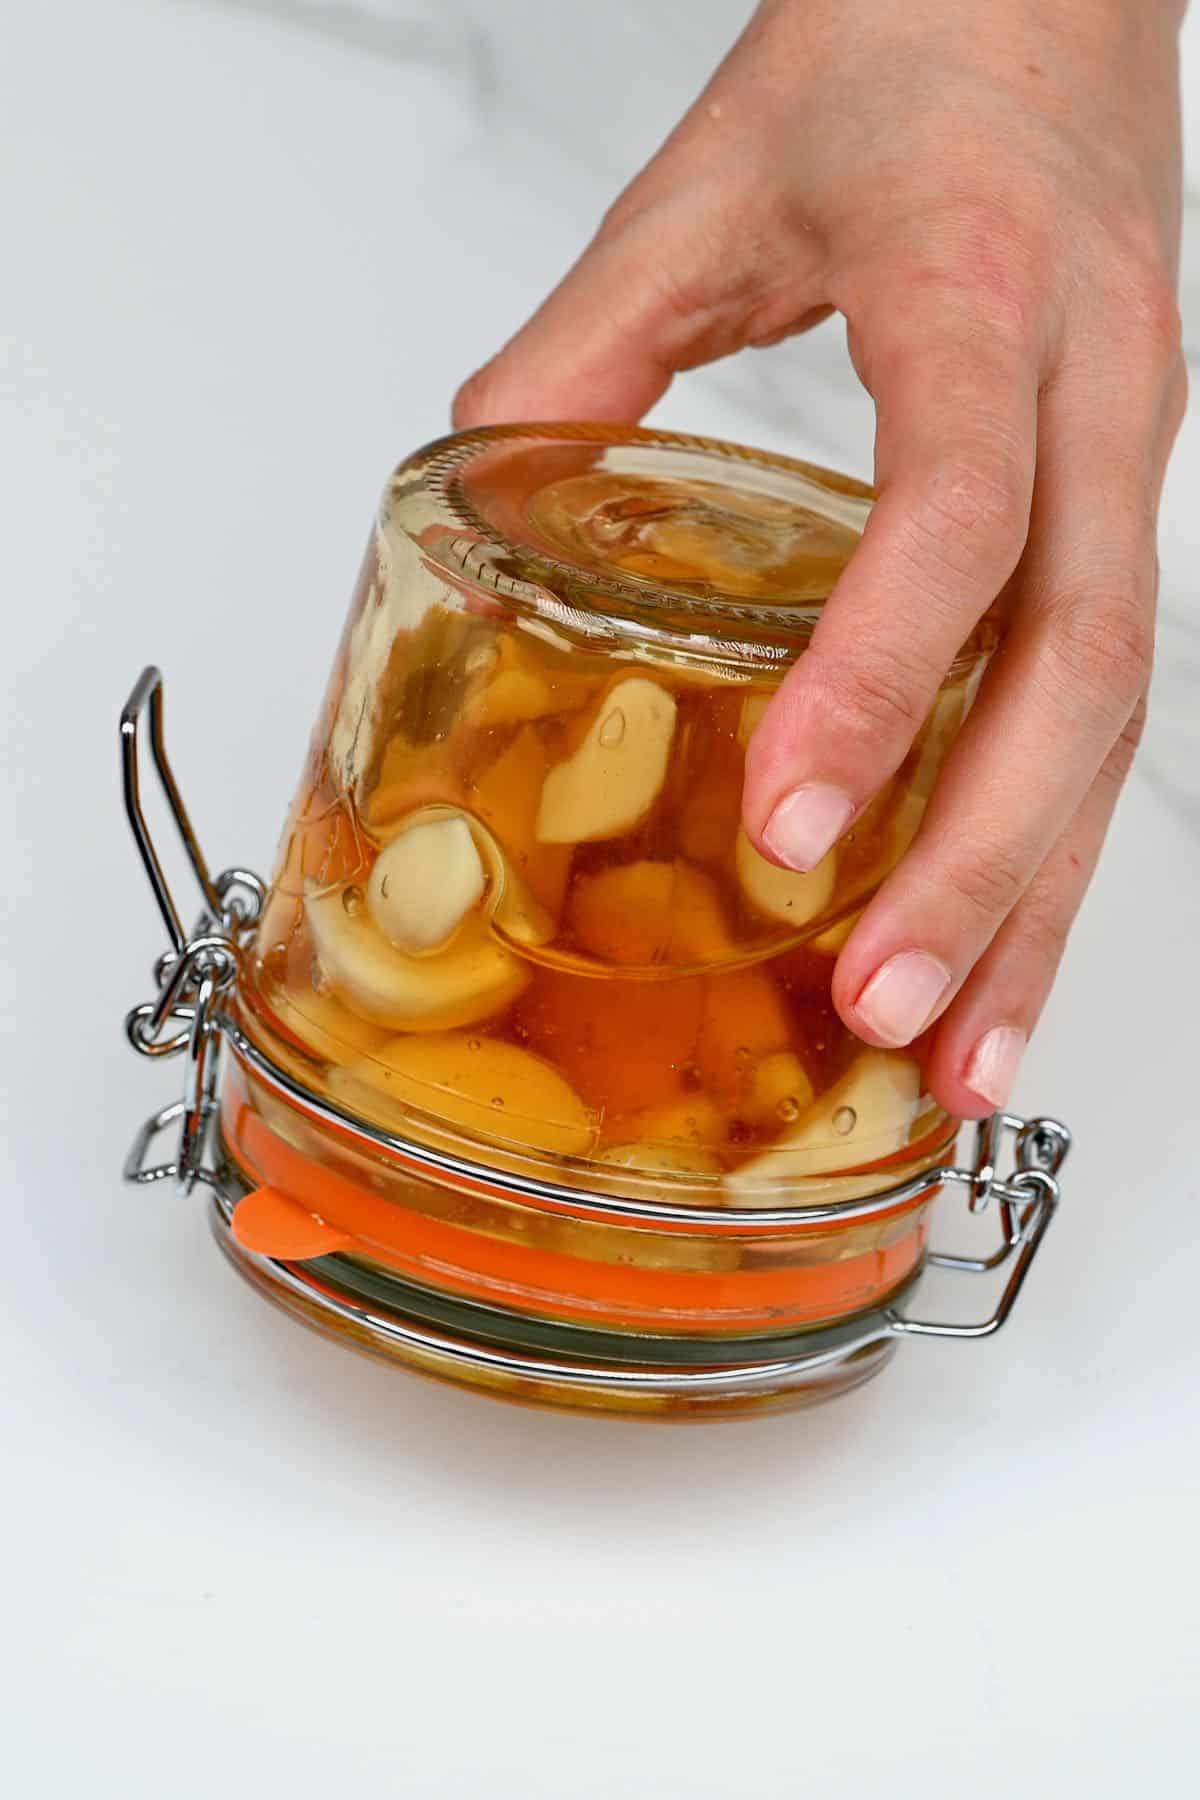
Once sealed, turn the jar upside down (this is why a good seal is essential) and set it aside. Place a plate beneath the jar, just in case, though I’ve never had issues with overspill/leaks.
For two weeks, you’ll need to ‘burp’ the jar daily. To do this, open the lid to allow any build-up of gases (CO2) to release and then close, shake (or stir it), turn upside down, and set aside again.
Be quick while doing this as too much oxygen introduced to the honey and garlic at this stage can impact the fermentation process. Just a quick opening of the lid should be enough to release the gases.

During this time, you’ll likely see “activity” in the form of foaming or bubbling within the jar. The amount can vary, and it won’t always be majorly noticeable. The honey will become more watery, too, as the garlic releases liquid into the mixture.
After two weeks, the fermented garlic is ready to enjoy, though I’d wait a month for even better results! If you don’t plan on using it very often, then it may still need burping occasionally, though the build-up of gases will slow down over time.
How to Store?
Store the jar of fermented garlic and honey in a cool dark location away from direct sunshine – like a kitchen cupboard or pantry. As long as you store the honey with an airtight lid and don’t allow any moisture to enter the jar, then the garlic honey can last for years!
Note that it’s normal for the honey and garlic to darken over time – it’s even normal for your garlic to turn blue/green (though this isn’t typical for a honey ferment) – it’s a natural reaction.
What Are the Fermented Garlic Honey Uses?
There are tons of ways to enjoy this garlic fermented in honey. Here are just a few of my top suggestions.
- Eat one of the honey-soaked garlic cloves when you feel a cold/sore throat coming on.
- Eat a spoonful of the garlic-infused honey for the same reason as above.
- Use the infused honey for salad dressings and marinades.
- Drizzle it over cheese – like homemade goat cheese, homemade ricotta, etc.
- Spread it over toast, cornbread, pretzels, and breakfast muffins, etc.
- Drizzle over pizza.
- Use as a glaze for your favorite protein: meat, fish, or homemade tofu!
- Drizzle some over roasted or stir-fried veggies.
- Use the mellowed garlic in dips like creamy hummus or this white bean dip.
Let me know in the comments how else you’d enjoy the honey, garlic, or both combined!

FAQs
While the risk is very minimal, you can test the garlic honey mixture if you are concerned. Botulism can only survive in specific environments and acidity levels. To test this, you can use a pH strip (or monitor). Any reading under 4.6 is considered safe. If it’s slightly above that, you could add a little apple cider vinegar to the mixture to lower the pH before consuming it.
Garlic can take some time to sink in the mixture as it releases its juices into the honey – usually based on how fresh it is (though usually between 1-2 months). It should eventually sink, though. The aim at the beginning is for the garlic to be covered by the honey as much as possible to prevent spoilage.
Unlike homemade yogurt, where the microbes in the ‘starter’ will help kickstart the new mixture, this doesn’t work in the same way for fermented garlic honey. The fermentation process goes through several stages, and I’m afraid that ‘skipping’ some or trying to ‘hack’ it could not only impact the ferment but possibly cause food safety issues. I don’t know this for sure – but better safe than sorry!
It’s not 100% necessary, though it can help to speed up the fermenting process. This is because the garlic releasing its liquid into the honey is part of the fermentation process. If you want to have whole cloves but still ‘quickstart’ the process, you could use a fork or knife to prod the cloves a few times.
No! Unfortunately, pasteurized honey kills off all the microbes that are needed for the fermentation process to work. Please use raw, unpasteurized honey.
This isn’t something I’ve tried so I can’t say for sure. The water content within maple is quite a bit higher than honey so that will impact its shelf life. The pH level is also a lot higher than honey and so may not be safe in terms of the risk of botulism unless extra ingredients like vinegar and other acidic elements are added to reduce the pH.
Recipe Notes and Top Tips
- To avoid manually burping the jar: you can use a self-burping bale wire jar (fido jars) or purchase jars with airlock lids or other ferment lids. Just make sure to still shake the jar to keep the garlic submerged.
- Using fermenting weights: one way to make sure the garlic stays submerged under the honey throughout is to use fermenting weights. You can buy fermenting jars that come with weights to fit those jars specifically.
- The fresher the garlic, the better: use the freshest garlic possible as it will produce the quickest and best ferment.
- Leave a little headspace: some batches may foam up more than others and cause overspill. For that reason, I always leave headspace at the top of the jar.
- The perfect fermentation period: the best time to begin enjoying your fermented garlic honey is when the main fermentation is over. It won’t be as foamy, the honey will have thinned out and started to darken, and the garlic will have sunk to the bottom of the jar. This usually takes between 4-6 weeks. Though waiting 3 months is even better. If you have the patience, I recommend waiting a year for a genuinely delicious surprise!
- How much honey to use: while it’s important to use enough honey to submerge the garlic entirely, there IS such a thing as too much honey. I recommend using around a 1:1 ratio of garlic to honey. If you use too much, then the anti-microbial properties in the honey will essentially ‘smother’ the garlic. If you want to add more honey, you may also need to add a little water to the honey to kickstart the fermentation process.
Other Preserving Recipes
You can see my complete list of ‘DIYs’ for more inspiration. However, here is just a small list of other methods I use to help preserve ingredients!
- Tomato Confit
- Pickled red onions
- Beetroot chips
- Sun-dried tomatoes
- Honey Fermented Ginger and Lemon
- Hot Honey Recipe
- Black Garlic – what it is, how to make it, and how to use it!
If you try this fermented garlic honey recipe, I’d love to hear your thoughts/questions below. Also, I’d really appreciate a recipe card rating below, and feel free to tag me in your recipe recreations on Instagram @Alphafoodie!

Fermented Garlic Honey
Ingredients
- 1 cup garlic cloves
- 1 cup raw honey
You can use more or less, just make sure the ratio is 1:1.
Instructions
Step 1: Prepare the garlic
- You’ll need to peel the garlic using one of several methods. Then transfer the peeled garlic cloves to a sterilized glass jar with an airtight seal.
- It’s a good idea to lightly crush or chop the cloves in half to speed up the fermentation process. Alternatively, you could prod the whole cloves a few times – to encourage the release of their juices into the honey.
Step 2: Add the honey and ferment
- Fill the jar with honey, mix it, and then seal it.
- Once sealed, turn the jar upside down (this is why a good seal is essential) and set it aside. Place a plate beneath the jar, just in case, though I’ve never had issues with overspill/leaks.
- For two weeks, you’ll need to ‘burp’ the jar daily. To do this, open the lid to allow any build-up of gases (co2) to release and then close, shake (or stir it), turn upside down, and set aside again.Be quick while doing this as too much oxygen introduced to the honey and garlic at this stage can impact the fermentation process. Just a quick opening of the lid should be enough to release the gases.During this time, you’ll likely see "activity" in the form of foaming or bubbling within the jar. The amount can vary, and it won’t always be majorly noticeable. The honey will become more watery, too, as the garlic releases liquid into the mixture.
- After two weeks, the fermented garlic is ready to enjoy, though I’d wait a month for even better results! If you don’t plan on using it very often, then it may still need burping occasionally, though the build-up of gases will slow down over time.
How to Store?
- Store the jar of fermented garlic and honey in a cool dark location away from direct sunshine – like a kitchen cupboard or pantry. As long as you store the honey with an airtight lid and don’t allow any moisture to enter the jar, then the garlic honey can last for years!Note that it’s normal for the honey and garlic to darken over time – it’s even normal for your garlic to turn blue/green (though this isn’t typical for a honey ferment)- it’s a natural reaction.
Notes
- To avoid manually burping the jar: You can use a self-burping bale wire jar (fido jars) or purchase jars with airlock lids or other ferment lids. Just make sure to shake the jar still to keep the honey submerged.
- Using fermenting weights: One way to make sure the garlic stays submerged under the honey even before it naturally sinks is to use fermenting weights. You can buy fermenting jars that come with weights to fit those jars specifically.
- The fresher the garlic, the better: Try to use the freshest garlic that you can as it will produce the quickest and best ferment.
- Leave a little headspace: While it’s not 100% necessary to do so, some batches may foam up more than others and cause overspill (especially with self-burping jars. For that reason, I always leave headspace at the top of the jar.
- The perfect fermentation period: The best time to begin enjoying your fermented garlic honey is when the main fermentation is over; it won’t be as foamy, the honey will have thinned out and started to darken, and the honey will have sunk to the bottom of the jar. This usually takes between 4-6 weeks. Though waiting 3 months is even better. If you have the patience, I recommend making sure some are left in the jar after a year for a genuinely delicious surprise!
- How much honey to use: While it’s important to use enough honey to submerge the garlic entirely, there IS such a thing as too much honey when it comes to fermenting. I recommend using around a 1:1 ratio of garlic to honey. If you use too much, then the anti-microbial properties in the honey will essentially ‘smother’ the garlic rather than allow it to release its juices and begin the fermentation process. If you want to add more honey, you may also need to add a little water to the honey to kickstart the fermentation process.
Please read the post for more answers to top FAQs!
Nutrition
Nutrition information is automatically calculated, so should only be used as an approximation.


Can I use a fermentation jar that has the pressure release locks/airlocks so that I don’t have to do the “burping”? Thanks.
Hi Karin,
Yes, you can use a fermentation jar with pressure-release locks or an airlock. Let me know how it goes if you try this recipe.
Is it required to keep the mason jar upside down during the fermentation process? I am keeping it in an upside down position and only turning it right side up to burp it however it is leaking all over the plate underneath it within 24 hours. Is it possible to keep it upright so that this does not leak?
Hi Michele!
No, it’s not required to keep the jar upside down throughout the fermentation. The upside-down step is usually done just to coat the garlic evenly, but if it’s leaking, it’s perfectly fine to keep it upright and gently shake or swirl it every couple of days instead. The key is to burp the jar daily (especially in the first 1-2 weeks) to release any built-up gas.