
This post may contain affiliate links. Please read our disclosure policy.
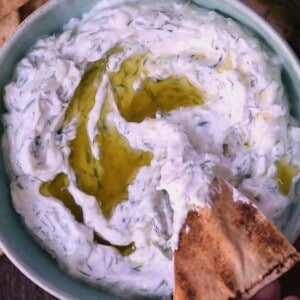
This Lebanese hummus recipe is the one I make when I want a dip that’s pale, creamy, and genuinely smooth, not grainy or heavy. Growing up in Lebanon, hummus was on our table almost every day, and my parents always cooked the chickpeas until they were extra soft for the creamiest texture. At our family restaurant, they soaked dried chickpeas and slightly overcooked them on purpose until they blended into a silky, non-crumbly hummus.

To find the best shortcut for busy home kitchens, I recently re-tested this recipe using three different methods side-by-side. I compared chickpeas straight from the can, peeled chickpeas, and canned chickpeas simmered with a bit of baking soda. The simmered version was the clear winner for the smoothest results without the exhausting work of peeling.
I love serving this authentic dip with veggies and pita bread, as a spread in sandwiches, or as part of a traditional mezze spread alongside baba ganoush, shish tawook, and Lebanese garlic sauce.
Why trust this recipe: I’m Lebanese and a cookbook author, and I recently retested this hummus three ways (straight from the can, peeled, and simmered until extra soft) to see what actually gives the smoothest texture in a basic food processor.
The method I recommend after testing 3 versions
When I remade this recently, I kept the ingredients the same and changed only the chickpea prep so I could compare texture fairly.
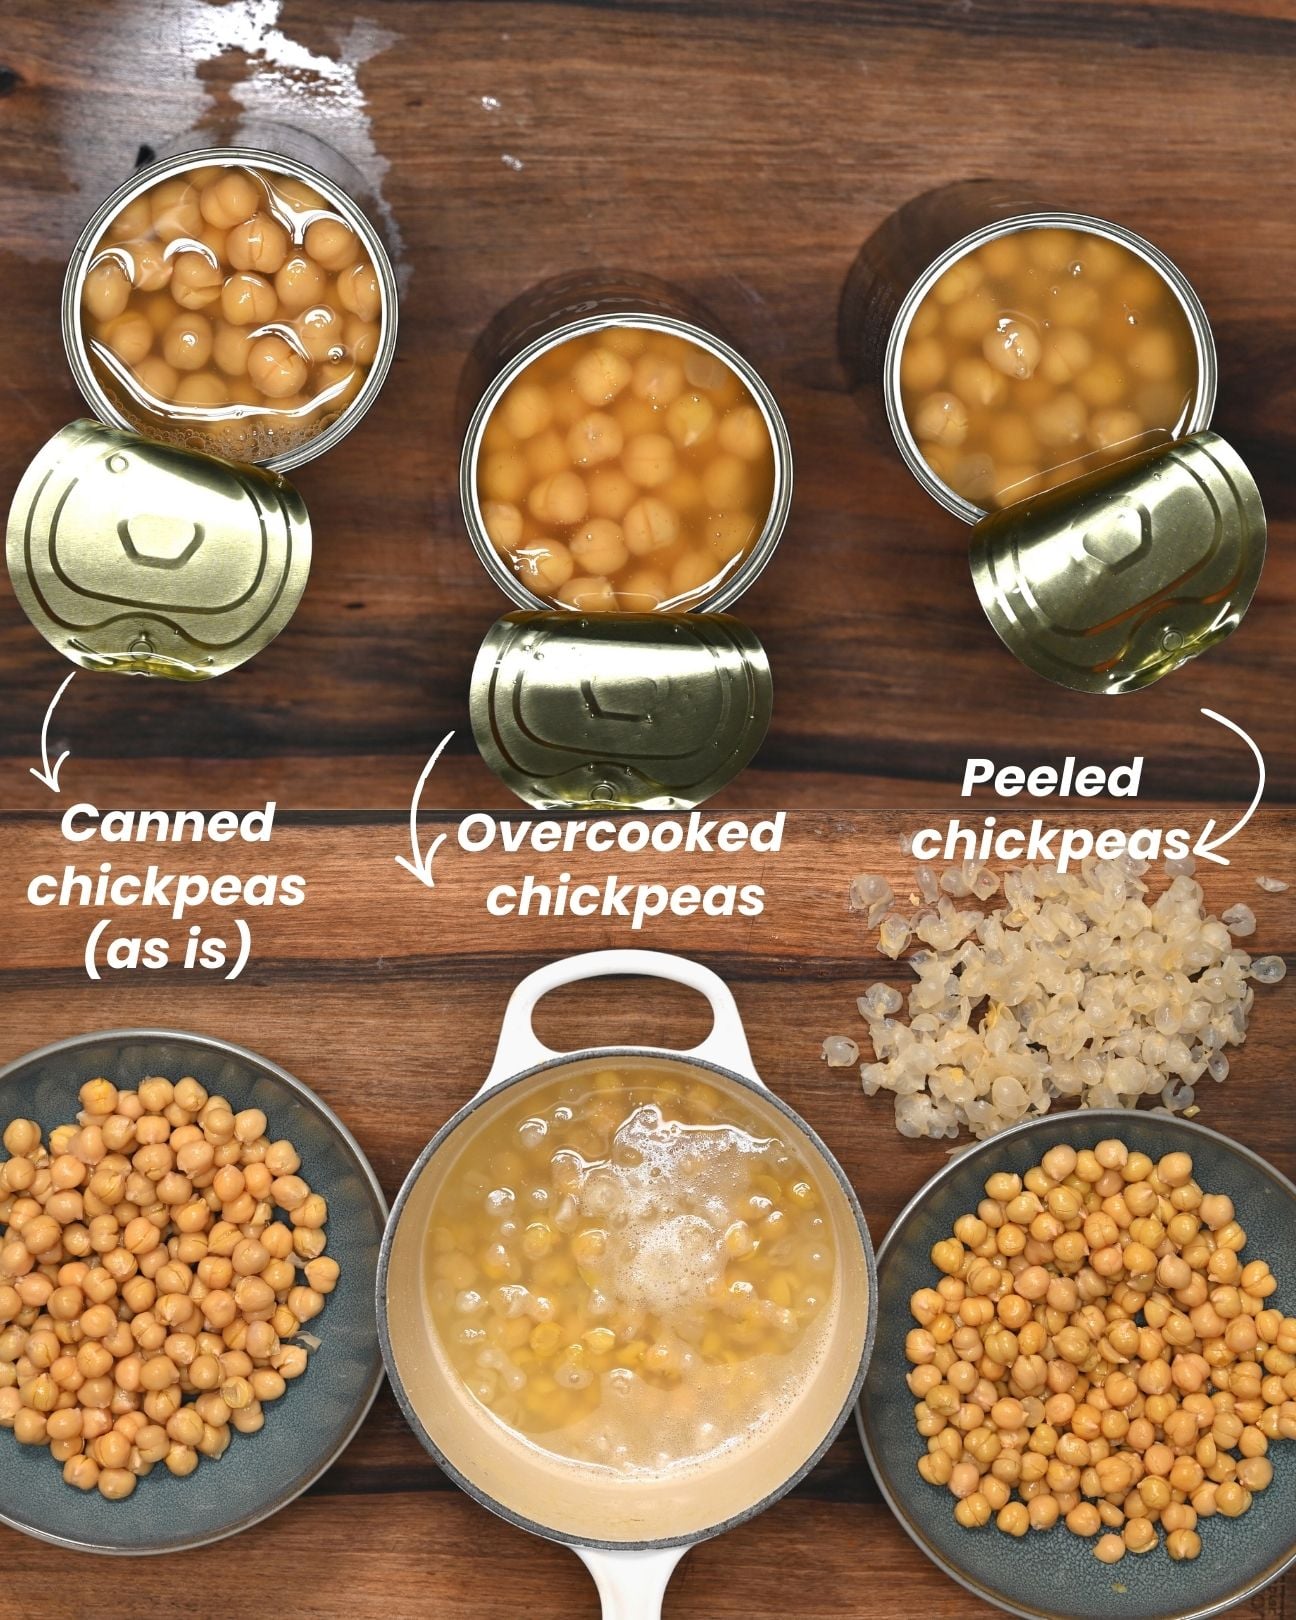
1) Straight from the can:
 Canned chickpeas
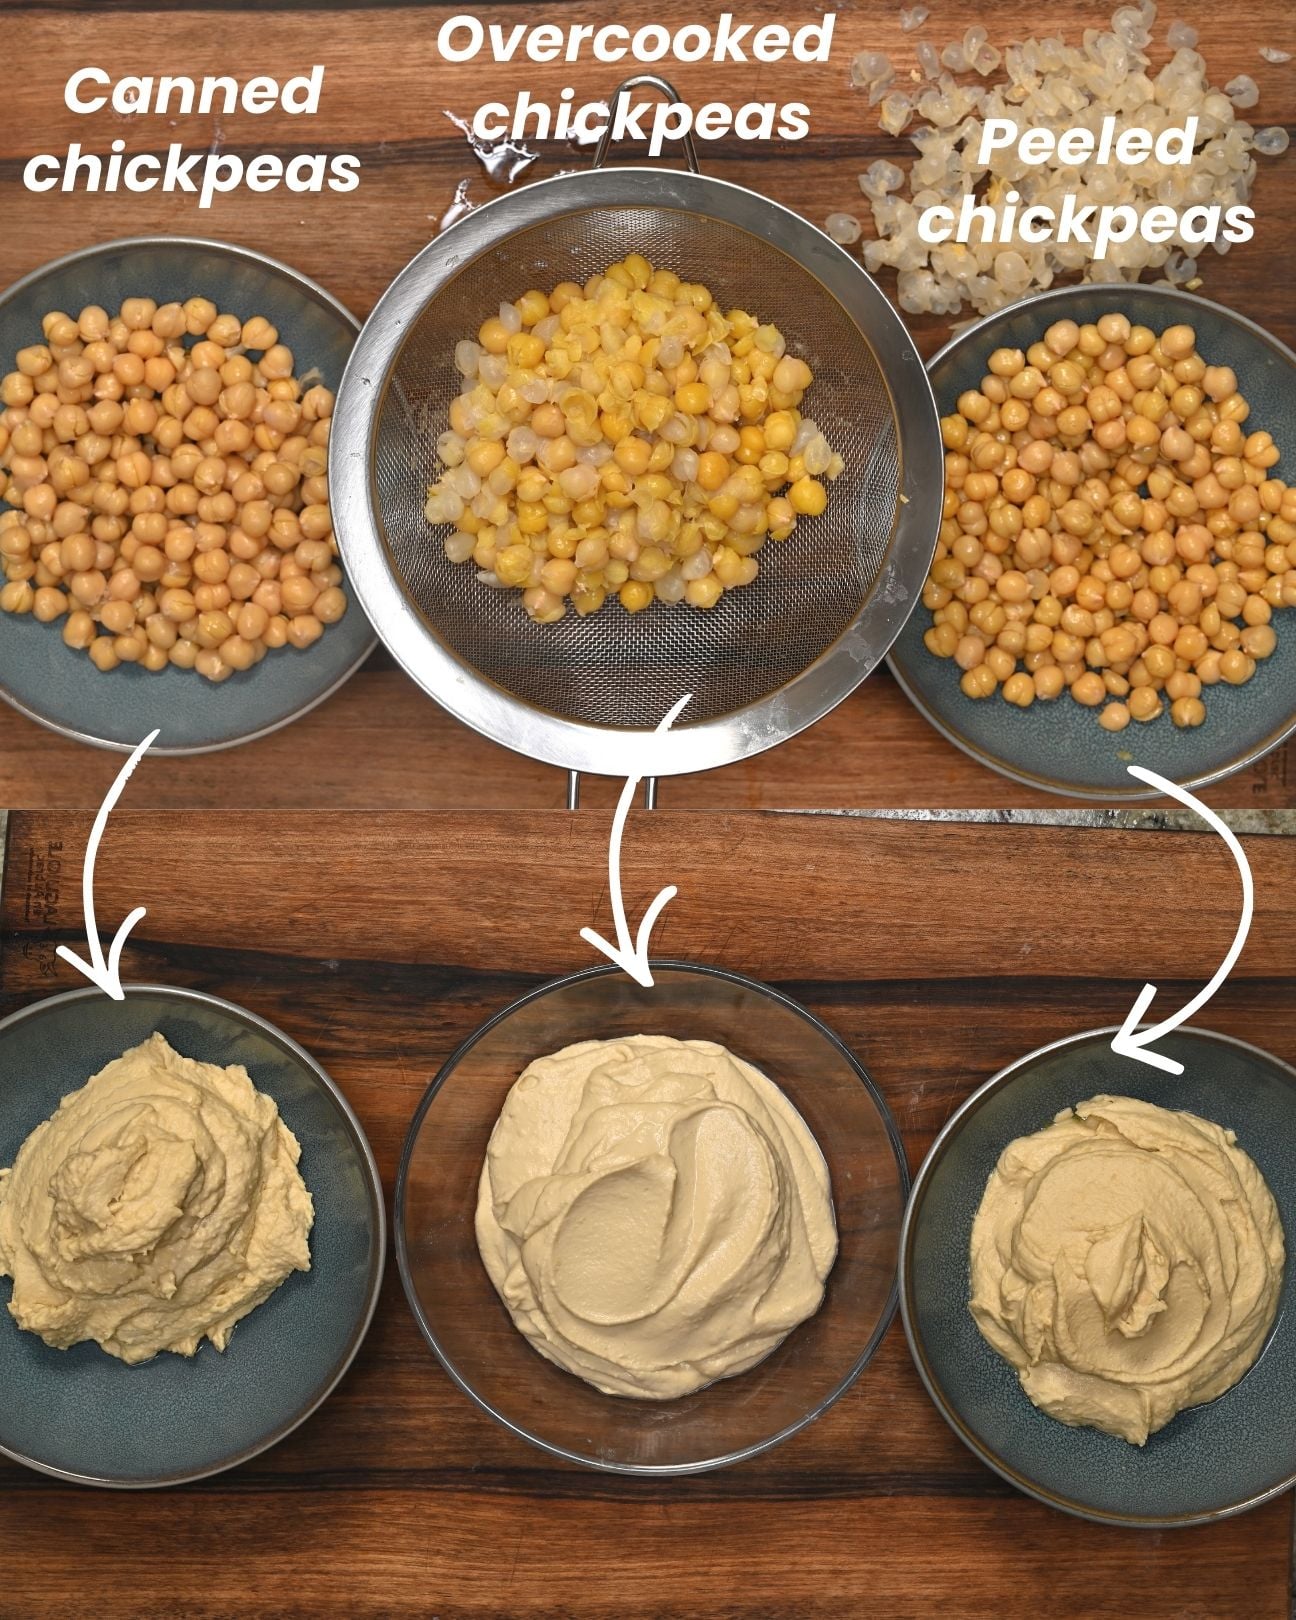
This made a good hummus with a more rustic texture. It tasted great, but the final result was slightly rougher and a little crumbly compared to the others.
2) Peeled chickpeas:
 Peeled chickpeas
Yes, this batch was smoother. But for me, the payoff was too small for the amount of time and effort it took to peel every chickpea by hand.
3) Overcooked chickpeas
 Overcooked chickpeas
This was the clear winner. The chickpeas became very soft and blended into the smoothest hummus of all, even in a basic food processor.
That’s why this is now the method I reach for when I want the best texture. If I’m making hummus quickly and don’t mind a more rustic finish, I’ll happily use chickpeas straight from the can. What I don’t bother with anymore is peeling.
Ingredients

- Chickpeas (garbanzo beans): You just need cooked chickpeas (homemade or canned). The key for creamy hummus is texture: the chickpeas should be very soft (“mushy/overcooked”). If you cook chickpeas from dried, simply cook them a little longer than usual until they crush easily. If you’re using canned chickpeas, simmer until very soft and starting to break down (see recipe card for timing).
- Tahini: I use homemade tahini. This provides the nutty depth and creamy body that defines real hummus. If you’re using store-bought, buy an unsalted, one-ingredient option.
- Lemon juice: Always use freshly squeezed lemon to keep the flavor bright and balanced. Bottled lemon juice can taste flat, and some commercial versions lean on citric acid for consistent acidity and longer shelf life, but for homemade hummus I prefer the freshness of real lemons.
- Garlic: One small clove is usually enough for a balanced flavor that does not overpower the other ingredients
- Fine sea salt: This heightens the nutty flavors of the chickpeas and tahini.
- Extra-virgin olive oil: This adds richness to the blend and is perfect for drizzling on top.
- Ice cubes / iced water: This helps cool down the cooked chickpeas and make a fluffier homemade hummus. You can also use aquafaba from the can (or the cooking liquid if using dried chickpeas).
See the printable recipe card below for full information on ingredients and quantities.
How to make hummus
Whether you’re using canned or home-cooked chickpeas, the goal is the same: they should be very soft and slightly “mushy.” This is the biggest difference between hummus that tastes good but feels grainy, and hummus that turns pale and ultra creamy.
- For canned chickpeas (fastest route): Add the drained and rinsed chickpeas to a saucepan, cover with plenty of water, and (optionally) a bit of baking soda. Simmer until the chickpeas are very soft and starting to break down, then drain well.
- For dried chickpeas: You can use my post on how to cook dried chickpeas , but cook them a little longer than usual so they’re fully soft and easy to crush between your fingers.
Make sure the chickpeas are drained really well before blending (extra liquid = runnier hummus). Add the drained chickpeas to a food processor along with the tahini, lemon juice, garlic, and salt. Blend these ingredients first until they form a thick, relatively smooth paste.
While the machine is running, slowly drizzle in the olive oil. Then, continue blending as you add the ice-cold water or aquafaba one tablespoon at a time. Finally, drop in the ice cubes one by one. The friction of the blades against the ice while the processor is running is the secret to achieving that pale, light, and professional-grade texture.
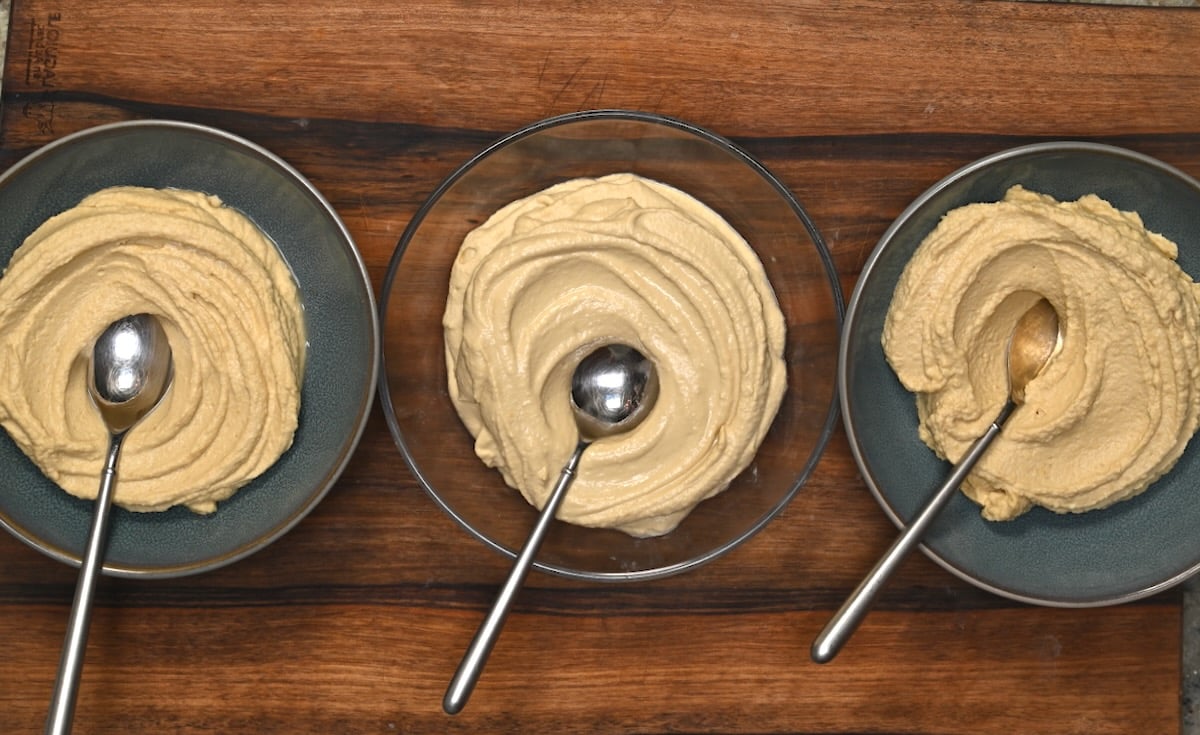
Taste and adjust with a little more lemon juice and salt as needed. Spoon into a bowl, swirl the top, then garnish with fresh parsley, a few whole chickpeas, a sprinkle of red chili powder or paprika, and a generous drizzle of olive oil.

My top tips

Make the chickpeas mushy. If your hummus feels grainy, the chickpeas were likely not soft enough. Simmer them until they are easy to crush between two fingers.
Use ice-cold water. This is a trick I learned that helps whip the blend into a light, fluffy consistency.
Skip the peeling. My testing showed that peeling every single chickpea is a tedious process with very little reward. Simmering with baking soda gives better results in much less time.
Blend longer than you think. Even if it looks done, letting the food processor run for a few extra minutes helps achieve that professional, silky texture
Hummus recipe variations
I love the classic version, but I also love playing with different flavors. If you want to switch things up, here are my favorite hummus variations — all linked recipes.


What to serve with hummus
I love it with warm pita and crunchy vegetables, but it also works beautifully as part of a full mezze spread.
- Sandwiches + mains (Lebanese style): Use it as a creamy spread inside pita bread (or wraps) for falafel, chicken shawarma, or shish tawook. And it’s also great spooned alongside grilled meats like beef shish kabobs or kofta kebabs.
- Classic dip: Serve with pita bread, homemade pita chips, and sliced cucumber, carrots, and bell peppers.
- Mezze plate: Pair it with baba ganoush, tabouli salad, fattoush salad, and toum for a simple mezze spread.
FAQs & troubleshooting
Most of the time, the chickpeas simply weren’t soft enough. For the creamiest hummus, they should be very soft and easy to crush between your fingers. Next time, simmer the chickpeas a little longer (a bit of baking soda helps), and blend longer, scraping down the bowl as needed.
First, pop it in the fridge for 30–60 minutes. Hummus naturally thickens as it chills. If it’s still too loose, blend in a bit more tahini or extra chickpeas (if you have them).
The #1 Culprit: Adding all the liquid at once! To prevent this, never dump the water or aquafaba into the bowl. Drizzle it in one tablespoon at a time while the processor is running. This allows the hummus to emulsify and stay thick. Also, ensure your chickpeas are very well drained after simmering; any trapped water in the colander will thin out your dip.
Yes. A high-speed blender can make very smooth hummus, but you may need to stop and scrape down the sides and add liquid slowly so it blends evenly. If it stalls, add a small splash of cold water and keep going.
Storage
Fridge: Store hummus in an airtight container in the refrigerator for up to 4–5 days. If it thickens, stir in a small splash of cold water (or a drizzle of olive oil) to loosen it.
Freezer: Freeze in portions for up to 2 months. Thaw overnight in the fridge, then stir well (add a splash of cold water if needed).
Make-ahead: This is a great meal-prep dip and sandwich spread. I often make a batch at the start of the week and keep it in the fridge for quick lunches and mezze plates.
More delicious dips


If you try this hummus recipe, I’d greatly love to hear how it turned out for you. Please leave a rating and a quick comment below. It means a lot to me, and it really helps other readers too.

Lebanese Hummus (Ultra Creamy, No Peeling Needed)
Equipment
Ingredients
- 1 can chickpeas 15 oz can of canned chickpeas, drained and rinsed
- ¼ cup tahini
- 3 tablespoons lemon juice freshly squeezed, plus more to taste
- 1 clove garlic peeled
- 2 tablespoons extra virgin olive oil plus more for serving
- ½ teaspoon fine sea salt plus more to taste
- 2 to 5 tablespoons ice water or aquafaba, as needed
- 1 to 2 ice cubes
- ¼ teaspoon baking soda optional, for simmering the chickpeas
Instructions
- Add the drained and rinsed canned chickpeas to a saucepan, cover with plenty of water, and add the baking soda. Simmer until very soft and starting to break down (about 10 to 15 minutes), then drain very well and rinse briefly under cold water to cool them down. If using chickpeas cooked from scratch, cook them a little longer than usual so they’re equally soft and “mushy.”
- Add the chickpeas to a food processor with the tahini, lemon juice, garlic, and salt. (Do not add the olive oil or water yet.)Blend until a thick paste forms, stopping to scrape down the bowl a couple of times.
- With the machine running, slowly drizzle in the olive oil. Then, add the ice water or aquafaba one tablespoon at a time. Do not add it all at once! If needed, add 1–2 ice cubes (one at a time), blending continuously between each addition until the hummus is pale, ultra-creamy, and holds its shape.
- Taste and adjust with a little more lemon juice and salt as needed.
- Spoon into a bowl, swirl the top, then garnish with fresh parsley, a few whole chickpeas, a sprinkle of red chili powder or paprika, and a generous drizzle of olive oil.
Video
Notes
Nutrition
Nutrition information is automatically calculated, so should only be used as an approximation.


La real receta del hummus y la mejor explicación para hacerla. Me recuerda a mi madre haciéndola y luego en la mesa todos saboreando con pan árabe. MUCHAS GRACIAS POR TUS RECETAS QUE RECUERDAN LAS MESAS LIBANESAS.
¡Muchísimas gracias, Amado! Thank you so much for your sweet comment!
Best hummus ever! I use dried and soaked chickpeas and a cup of the chickpea cooking liquid/aquafaba (minus a little) chilled instead of the cold water and add cumin, paprika and olive oil. Amazing every time, thanks!
So happy you like the recipe! Thank you for your comment!
In your book “Lebanese Cuisine” for your hummus recipe (p. 32) you use sesame taratur (p 251) instead of tahini. What is the difference?
Hi Thomas!
The main difference is that tahini is made only from ground sesame seeds. At the same time, the taratur has sesame seeds, lemon juice, and garlic. Using taratur adds a more pronounced lemony-garlicky flavor, but hummus is also delicious with just tahini.
I forgot to add the baking soda while i soaked the beans, so I put it in when I cooked them in a pressure cooker (16 minutes, manual release)… and this will be the first time in 5 tries that the beans came out mushy!!! I’m so excited. Thank you for this recipe, it is delicious!
So happy you gave this recipe a try, Jenna. Indeed, you can add baking soda when cooking them too!
Always delicious
Glad you enjoyed it, Rachel!
Made it for the first time, and followed all your tips! It’s really delicious and so simple. I had no idea I liked hummus so much
So happy to hear this, Alessia! Glad you liked it!
Do you start with two cups of dried chickpeas? Or do you only use two cups of the cooked chickpeas?
Hi Stephanie,
You need 2 cups of cooked chickpeas. As they double in size when soaking, you can start with about 1 cup of dried chickpeas.
Hi Samira!
Finally I tried your recipe. It was my first try then it turns out LIT!
I took note and pay attention to your tips and OMG my family loved it.
Thank you Samira ❤️.
Thank you so much for your comment, Dieka! So happy you tried and enjoyed the recipe 🙂
So simple, so amazingly delicious!!! The overcooked chickpeas is the best hack for the creaminess. Thanks a lot, Samira, you’re the best!
Greetings from Mexico 🙂
This is my favourite hummus recipe! I think the ‘overcooking’ tip makes a big difference. I make big batches to freeze and find it thaws and tastes great. The only difference post-thawing is the texture is slightly less creamy/incorporated. I like to top with olive oil and smoked paprika.
Thank you for your comment, Giselle! So happy you’ve enjoyed this recipe. After thawing, you can blitz it in the blender to make it more incorporated.