
This post may contain affiliate links. Please read our disclosure policy.


A beginner’s guide on how to make candles (with soy wax or beeswax) in a few simple steps. Plus, top tips, FAQs, and troubleshooting for successful DIY candles every time!
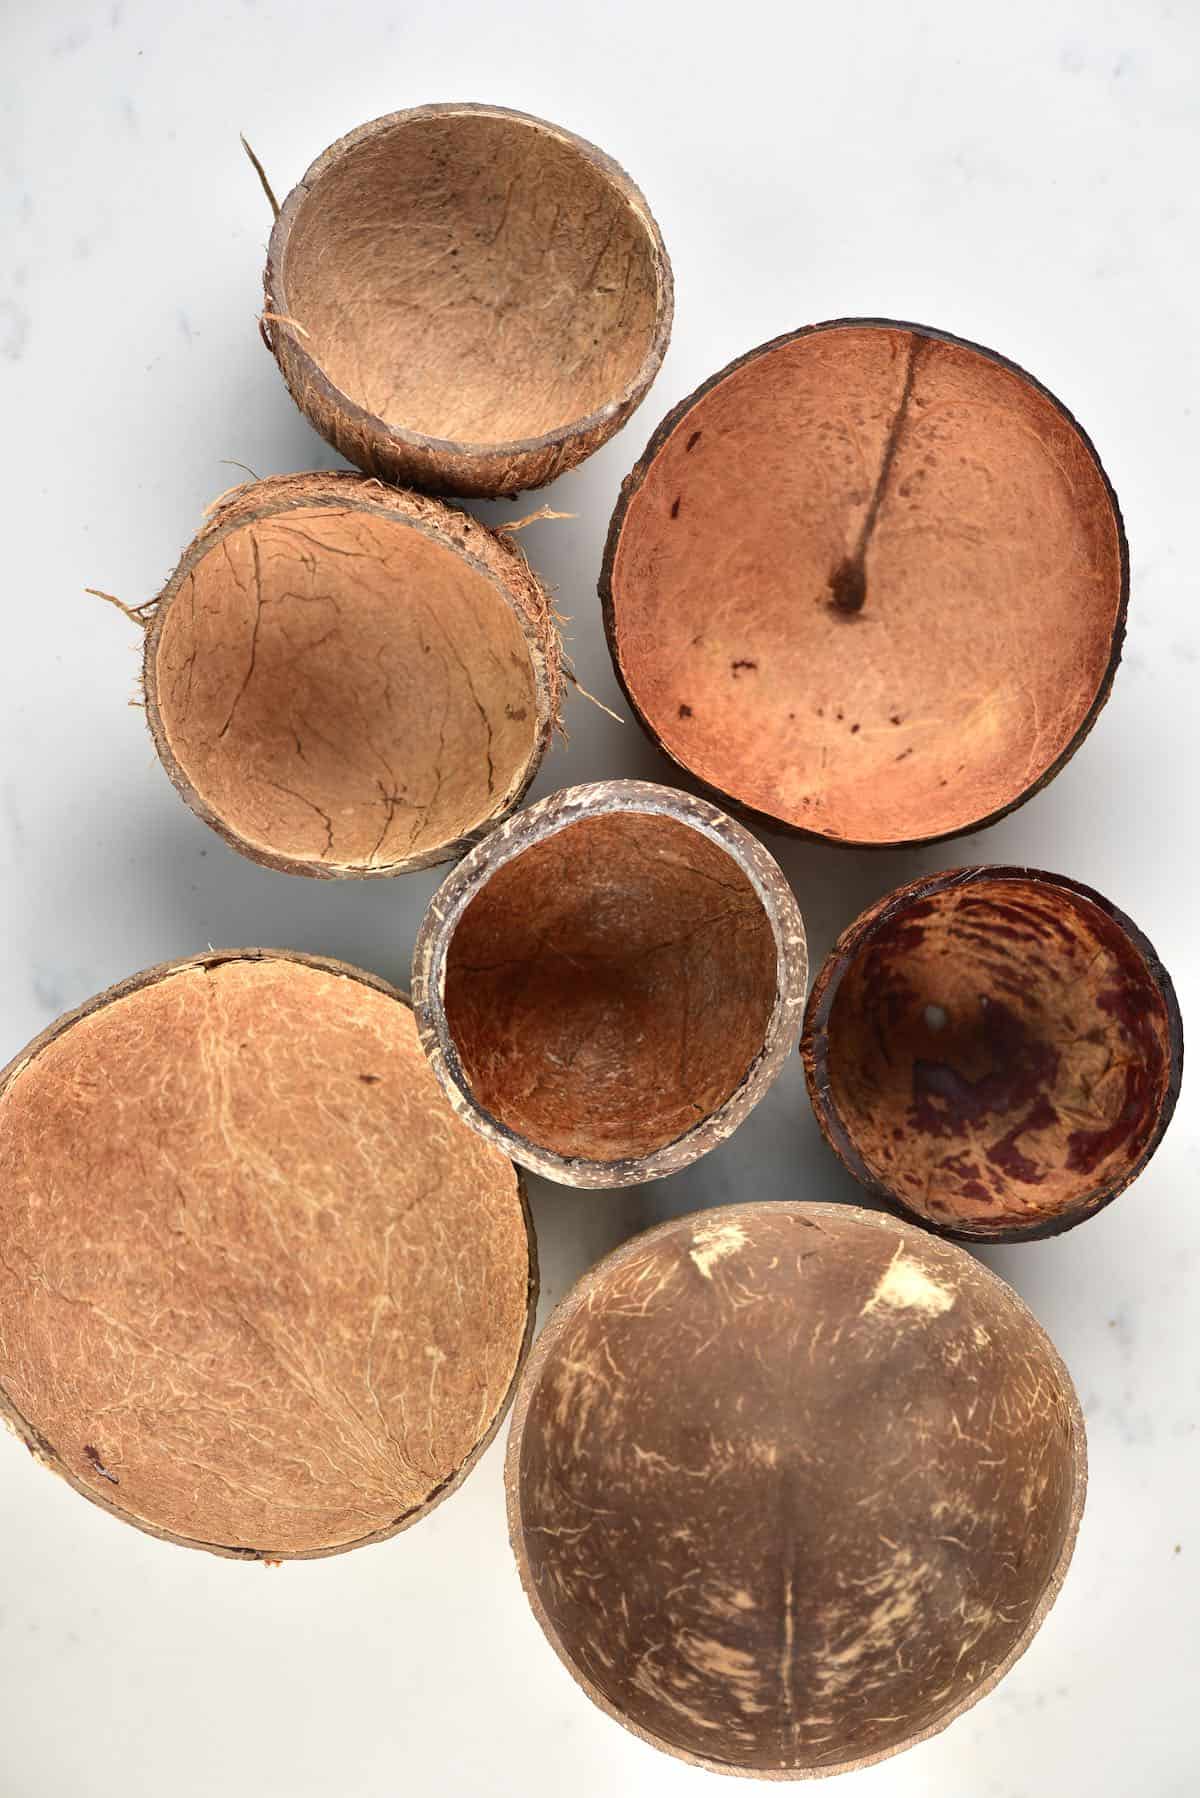
I first came across the idea of learning how to make candles at home a few years ago. Always making homemade coconut products (like virgin coconut oil, shredded coconut, coconut cream, etc.) leaves me with lots of coconut shells to spare. I turn a lot of them into coconut bowls.
And rest are often transformed into homemade candles. They are the perfect handmade gift for birthdays, Holidays (DIY Mother’s Day gift, anyone?), Christmas, etc.
Want to save this recipe?
Is It Safe to Make Your Own Candles
Yes, it’s quite safe as long as you follow the step-by-step tutorial carefully. Candle making, while an art, is also simple with the right ingredients and steps. I’ve compiled a thorough beginners’ guide on how to make candles (specifically homemade eco/natural soy candles in coconut shells). Complete with options for adding scent and color.
So you can be making candles at home in no time – perfect for yourself or gifting!
Which Wax for Candle Making
The first thing to consider when candle-making for beginners is the type of candle wax you want to use.
For many years, paraffin wax was the industry standard for candle-making. It’s cheap, can be used for molded and unmolded candles, and is best at throwing scents. However, with new studies revealing how paraffin releases harmful fumes, it’s not exactly eco-friendly. That’s where options like beeswax and soy wax have become popular.
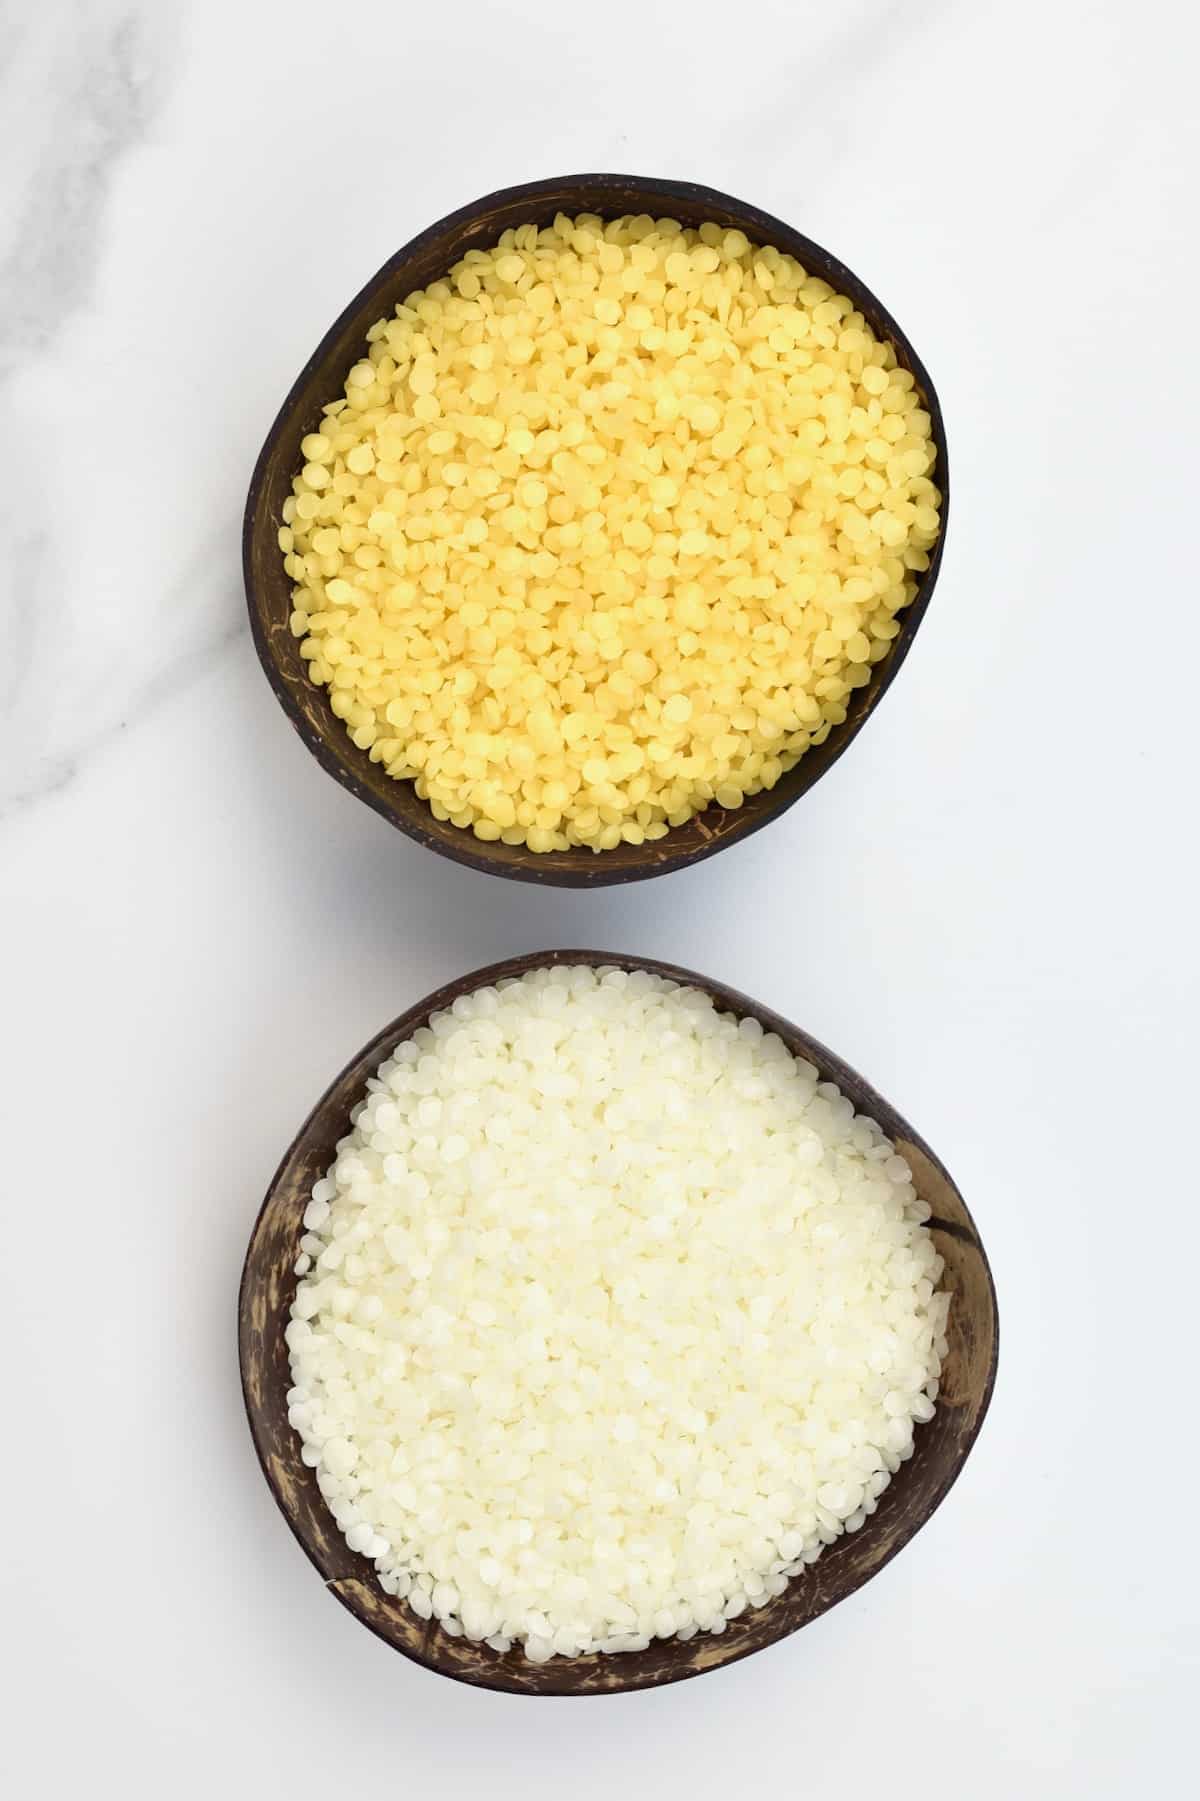
Beeswax is hard when solid, slightly sweet, and yellow. It’s great for making unscented and uncolored natural candles either in jars or molded (as pillars). Some believe the flame is brighter and lasts longer than soy wax. However, as it derives from bees and their hives, it’s not vegan-friendly.
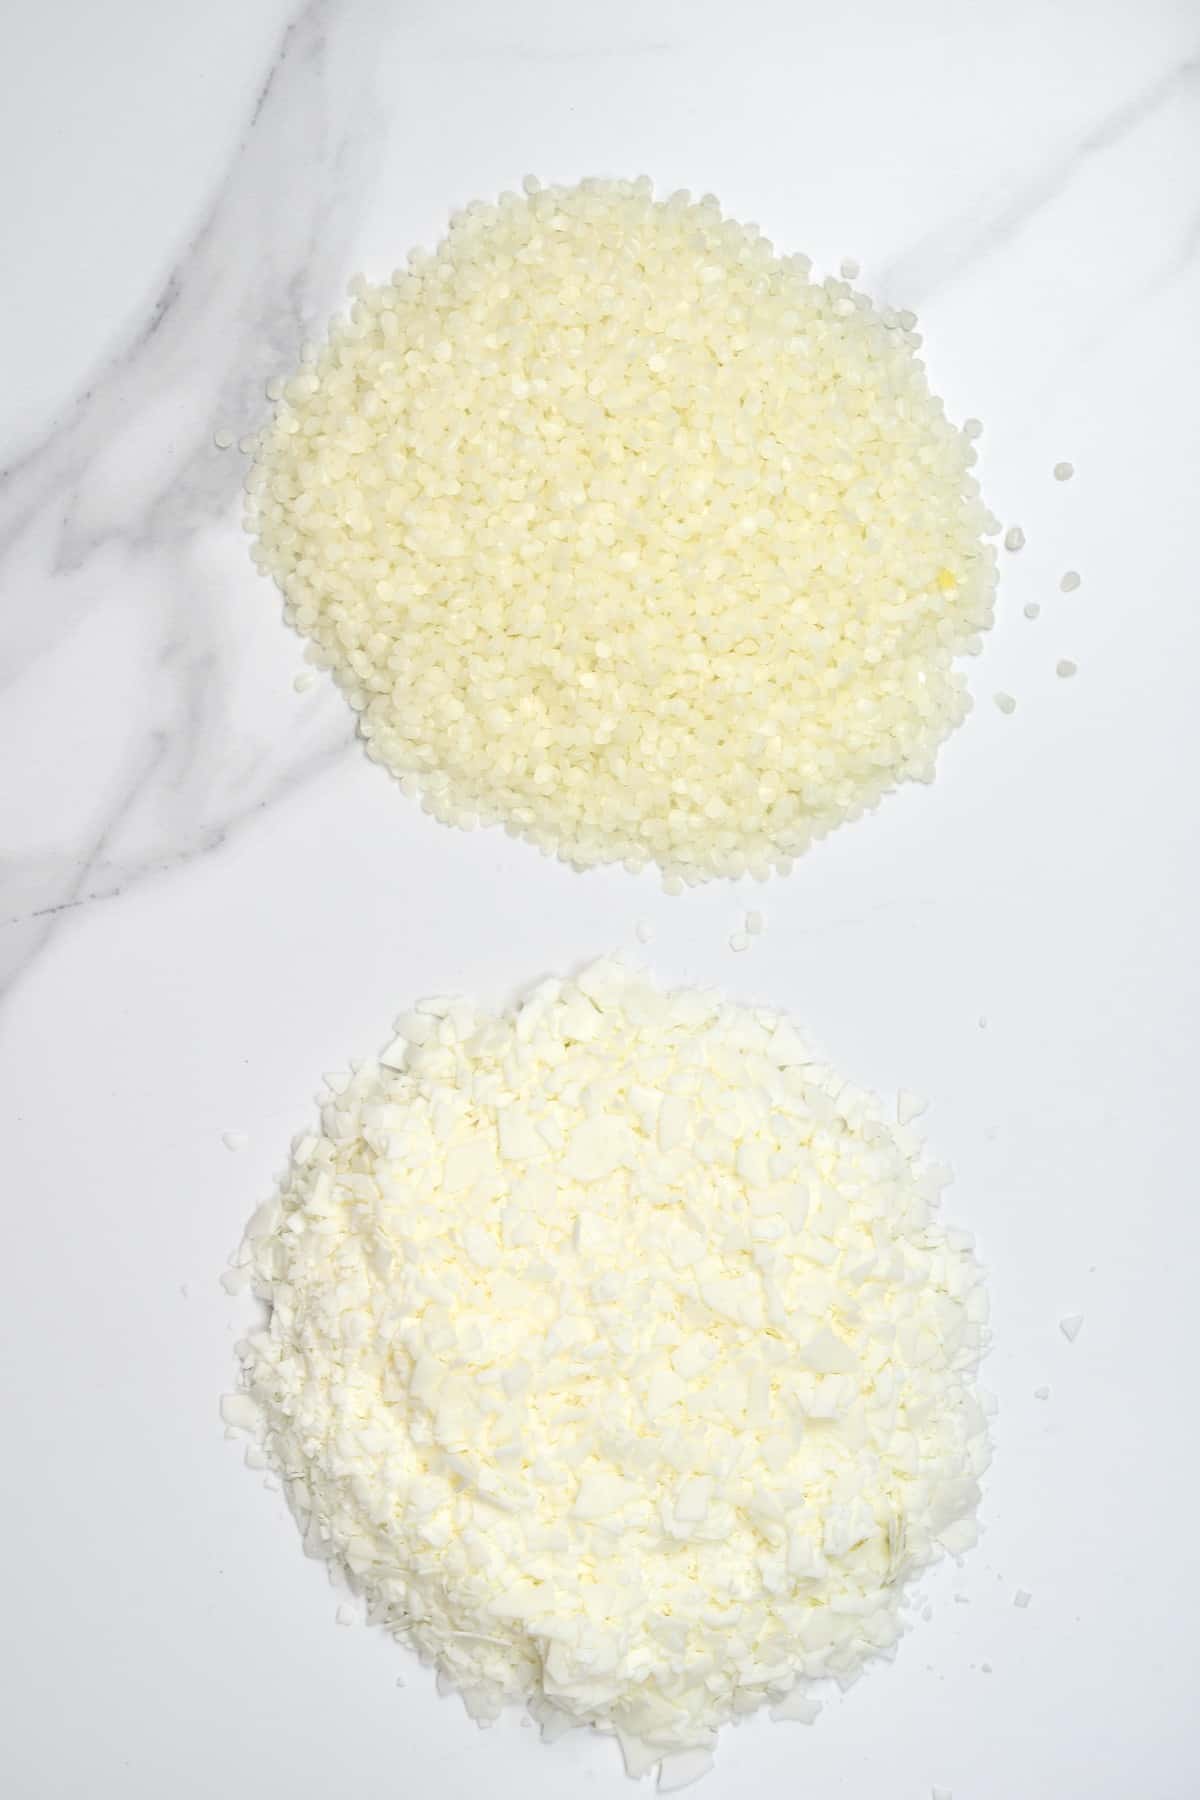
In comparison, soy wax (which you can purchase as pellets or flakes) is a healthy, renewable, and biodegradable material. It’s white when solid, burns clear, and carries scents better than beeswax, so best for colored and scented candles. It also burns up to 50% longer than paraffin wax. However, it is softer than beeswax, so not as great for pillar candles without added paraffin wax.
Soy wax is also naturally vegan. Deriving from soybeans. It also produces less soot than many other wax types (including beeswax). More so, soy wax is cheaper to produce than beeswax AND is water-soluble (great for clean-up).
If you want the most environmentally friendly option, look out for non-GMO, US-grown soy wax (if you’re based in the US; otherwise, wherever is closest to where you live).
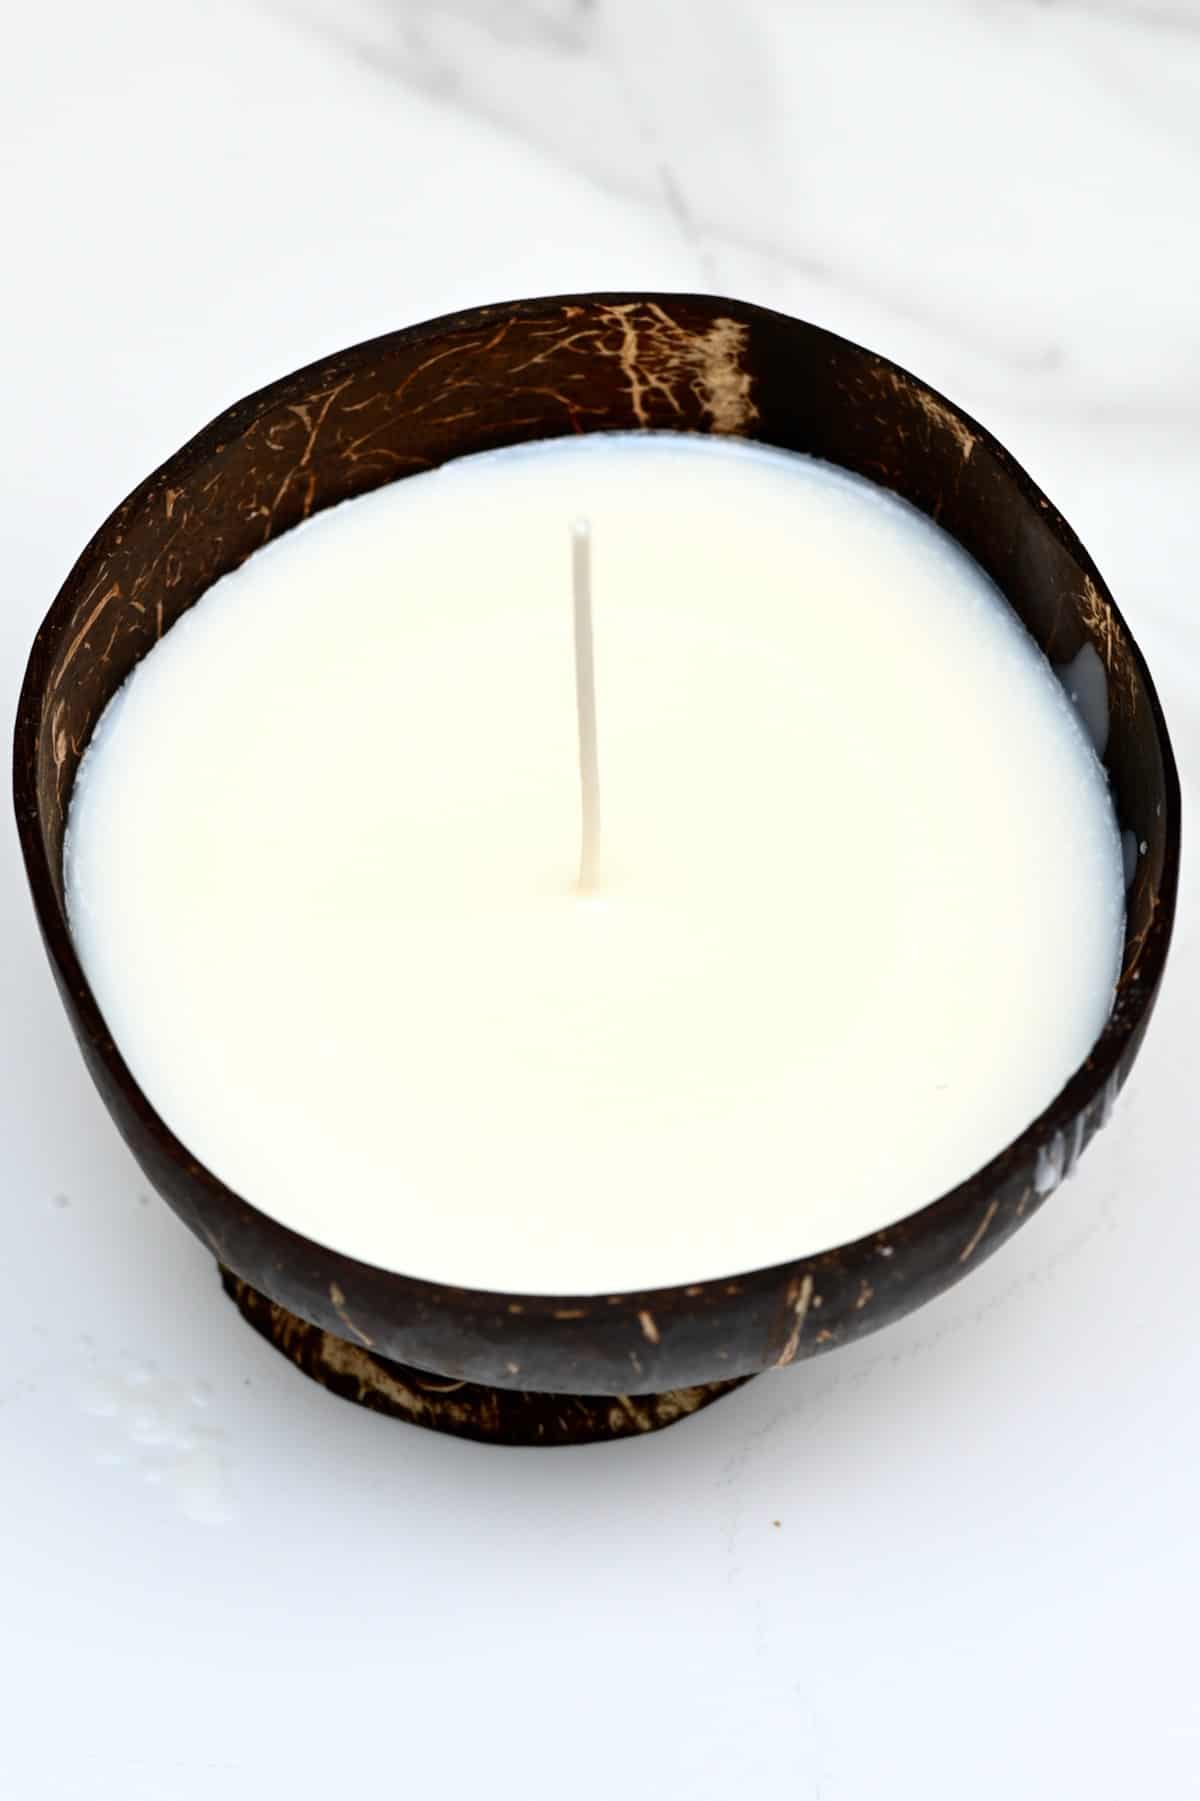
For these DIY candles, I made homemade soy wax candles.
What You’ll Need to Make Candles
There are just a few essential basics you need to make your own candles, including:
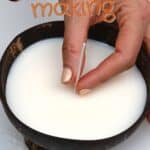
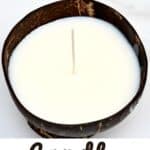
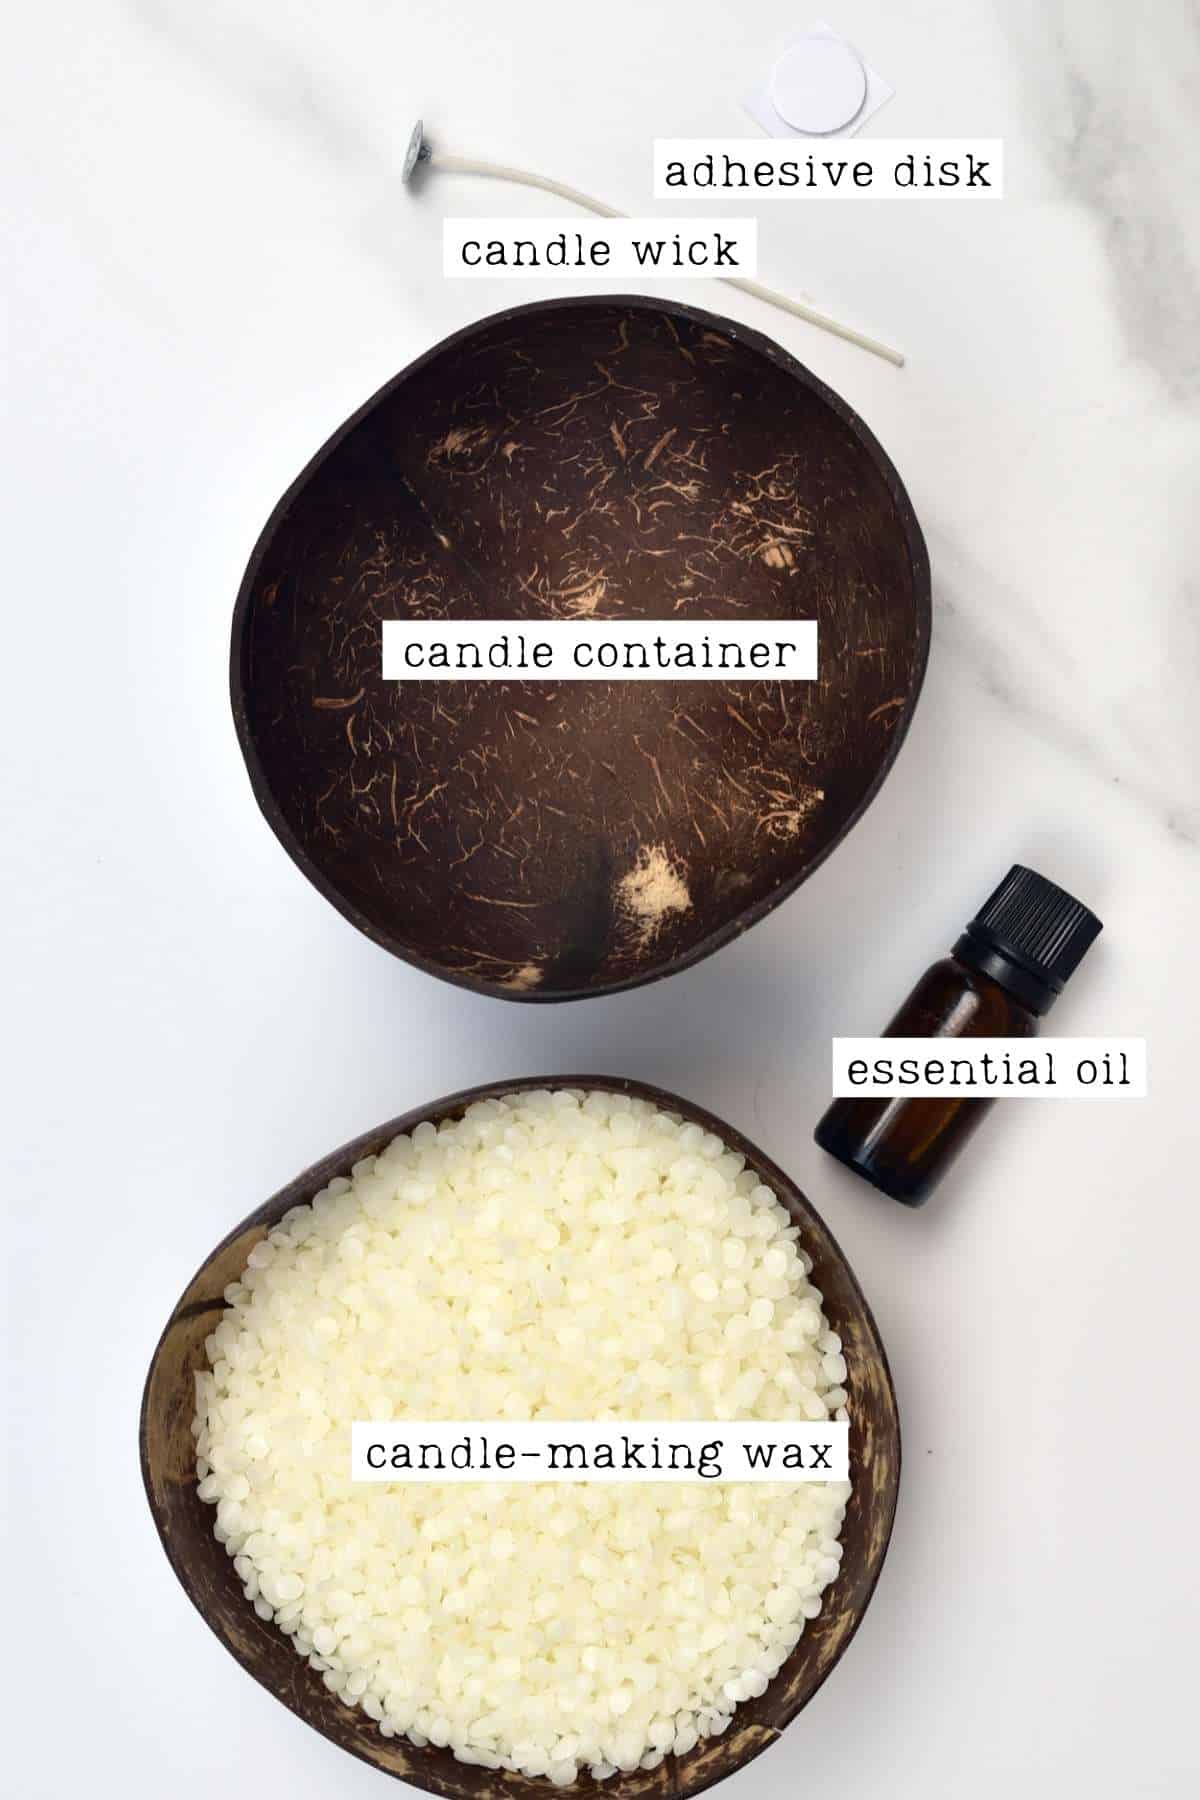
- Candle holder: Make sure to use a heat-proof vessel. I.e., glass jars/pots/ glassware (with a thick base and even walls), ceramic (including teacups), metal, etc. I’ve used coconut shells that I prepared myself for natural eco candles. I don’t recommend plastic, terra cotta, or wood.
- Candle wax: I use natural soy wax flakes to make eco-soy candles.
- Fragrance: Use the essential oil of your choosing to create DIY scented candles. I used lavender oil. Avoid perfumes/colognes as they contain flammable ingredients.
- Candlewick & Adhesive disk: I used a cotton wick, but there are various types you can buy, including paper core or a wood wick (like popsicle sticks). If you don’t have an adhesive disk (glue dot), you could also use a glue gun or a drop of candle wax.
The wick size, length, and type you’ll need will vary based on the wax you’re using and the size of your candle. If it’s too small, the entire diameter of the candle won’t burn, and it can affect the scent throw, for example.
- Color: This is optional, but if you want colored DIY soy candles, use soy dye for the best results.
You’ll also need a double boiler (small saucepan and glass bowl), an instant-read thermometer, scissors, a wooden or silicone spoon/spatula, and either two chopsticks or pencils (or a clothes peg) to make these natural candles.
How to Make Candles
First, prepare the containers/vessels, ensuring they’re thoroughly cleaned (with hot water and soap) and dry. If you want, you can also make homemade coconut shell candles.
Measure the Wax
To measure how much wax you need for your container, fill it (leaving at least ½ inch at the top) with the unmelted wax, and then double the amount of wax.
You can also keep these measurements in mind:
- 1 lb soy wax, once melted will be about 18 fl oz (in liquid form),
- 1 lb beeswax, once melted will be about 16 fl oz (about 1 cup).
To do this before purchasing wax, you can pour water into your vessel of choice to know the volume of the container. This is how much melted wax you’ll need (double this for the volume of wax flakes).
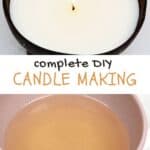
How To Melt Wax For Candles?
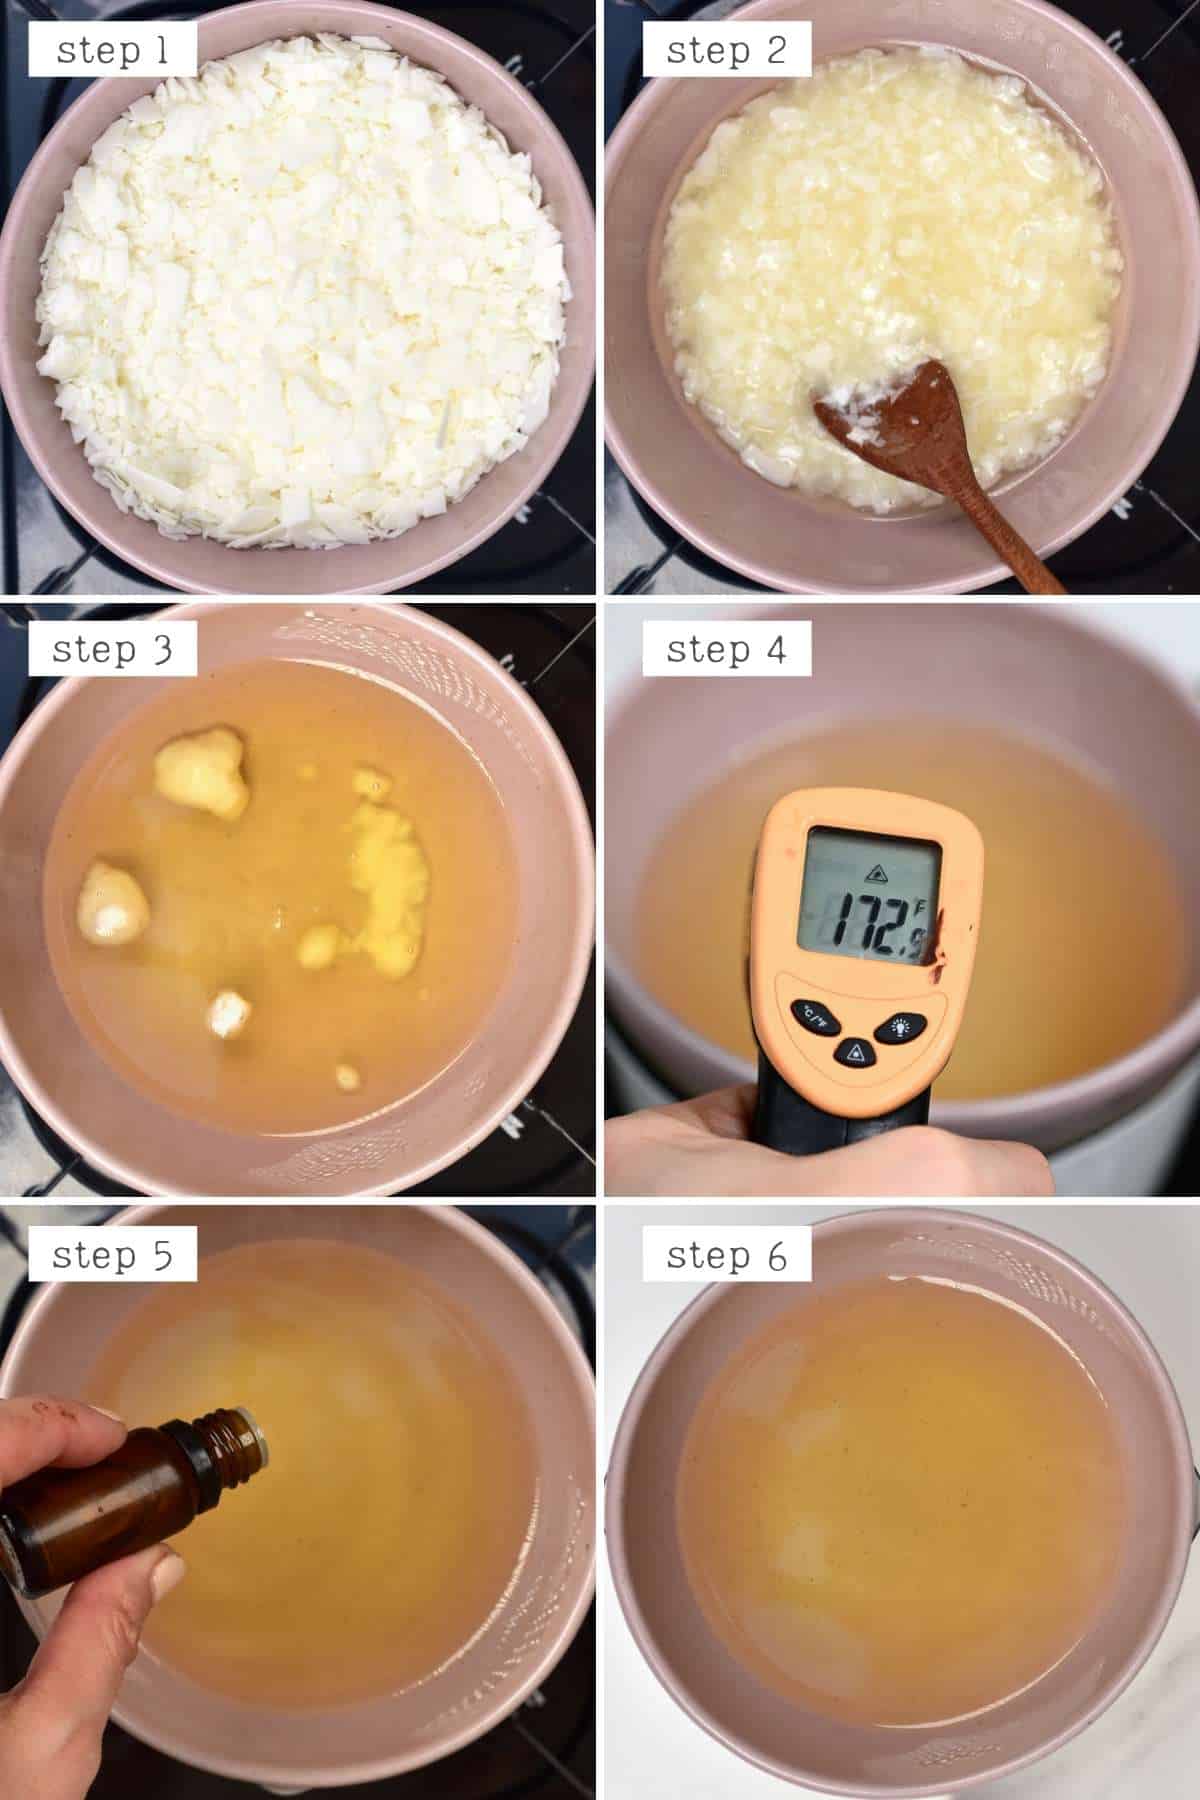
My favorite, simple way to melt candle wax is using the double boiler method. First, place a heat-proof bowl over a small saucepan filled with a couple of inches of water, simmering. Ensure the water isn’t touching the bottom of your bowl.
Add the wax to the bowl and stir it frequently to help it melt evenly. Heat the wax to between 158ºF/70ºC and 175ºF/80ºC (use an instant-read thermometer to check). It might take about 10-15 minutes for the wax to melt, though time varies based on the batch size.
Avoid overheating the wax (not above 200ºF/95ºC for soy wax), as it will affect the quality of your DIY soy candles. For example, it can cause yellow discoloration and cracking, weakened fragrance, frosting, etc.
How To Make Scented Candles?
After melting, allow the temperature of the wax to cool down to 135ºF/57ºC, then proceed to adding fragrance with your preferred essential oil. The amount needed will vary based on the candle size and how strong you wish the scent to be.
As a general guideline: start with 6% (1oz) fragrance per 1lb soy wax. Don’t go above 10% fragrance load.
Once the scent is added, stir the wax consistently for at least 1-2 minutes to properly distribute it throughout the wax.
Be aware that every wax has a maximum “fragrance oil load.” Beyond that, it can cause separation in the wax and even lead to a potential fire hazard.
How To Color Candle Wax? (Optional)
I decided to leave these coconut candles white (to mimic coconut flesh within the bowl). Here are several options you might be interested in (added to the double boiler when melting).
- Soy dye comes in several forms, including liquid dyes, dye blocks, and dye flakes (the latter is my preferred option). This is the best way to color homemade candles as the dye will dissolve into the wax and won’t clog the wick. I like to use around 1/4 tsp per 1lb wax for a medium shade or 1/2 tsp for a darker shade.
- Crayons are a cheap option if already in your house. However, they can clog the wick, so they aren’t recommended. If you want to try them, use minimal amounts for a very pastel shade.
- Micah powder is a popular option for coloring wax melts, so you may assume it’s great for homemade candles. However, the pigment can cause a clogged wick, and the color can redistribute and settle after burning.
When making coconut candles, teacup candles, and other options where only the top is seen, you can sprinkle or brush the top of the candles with mica. You’ll still get color that way and the pretty effervescence when it melts, but it’s far less likely to clog the wick.
If you want to color the DIY candles naturally, several options are available:
- You could add some flower petals to the wax while it melts (i.e., red roses, lavender, hibiscus, safflowers, etc.), so the color leeches out into the wax. This method will take some experimentation to learn how much you need to make specific shades. But it is great for natural coloring, especially if you’re making floral-scented candles.
- You could also naturally infuse colors into the candles using several herbs and whole spices like alkanet, Cinnamon, madder root, and peppermint. Turmeric and saffron will also work well for orange/golden colors.
Avoid food coloring, which often contains ingredients that won’t bond with the wax.
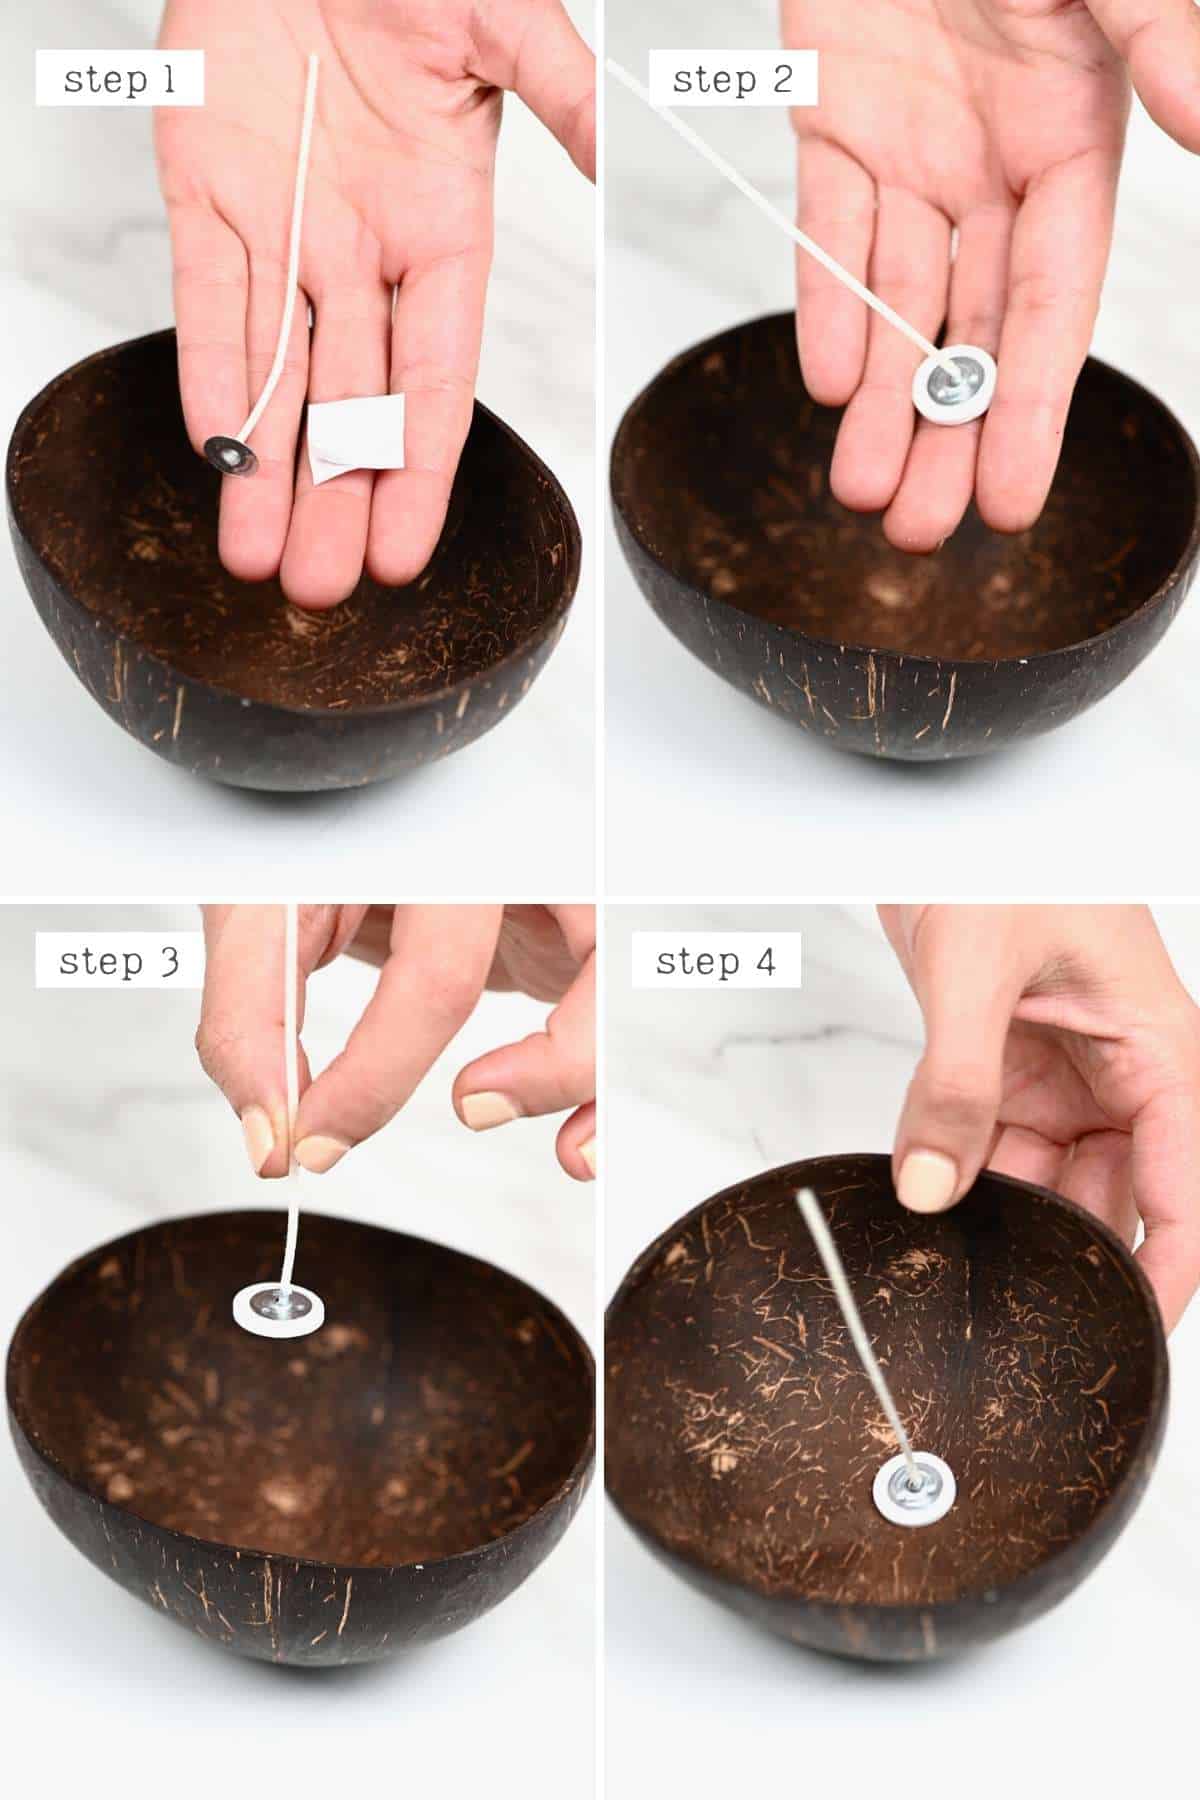
How To Add The Wick?
There are several ways to adhere the wick to the bottom of the DIY candles. I used a small adhesive disk that I attached to the end of the wick and then within my container, where I wanted the wick to be.
Alternatively, you could also use a few drops of melted wax and press the wick into it. Then hold the wick and wait a few minutes for it to dry and harden. You could also use heat-proof glue.
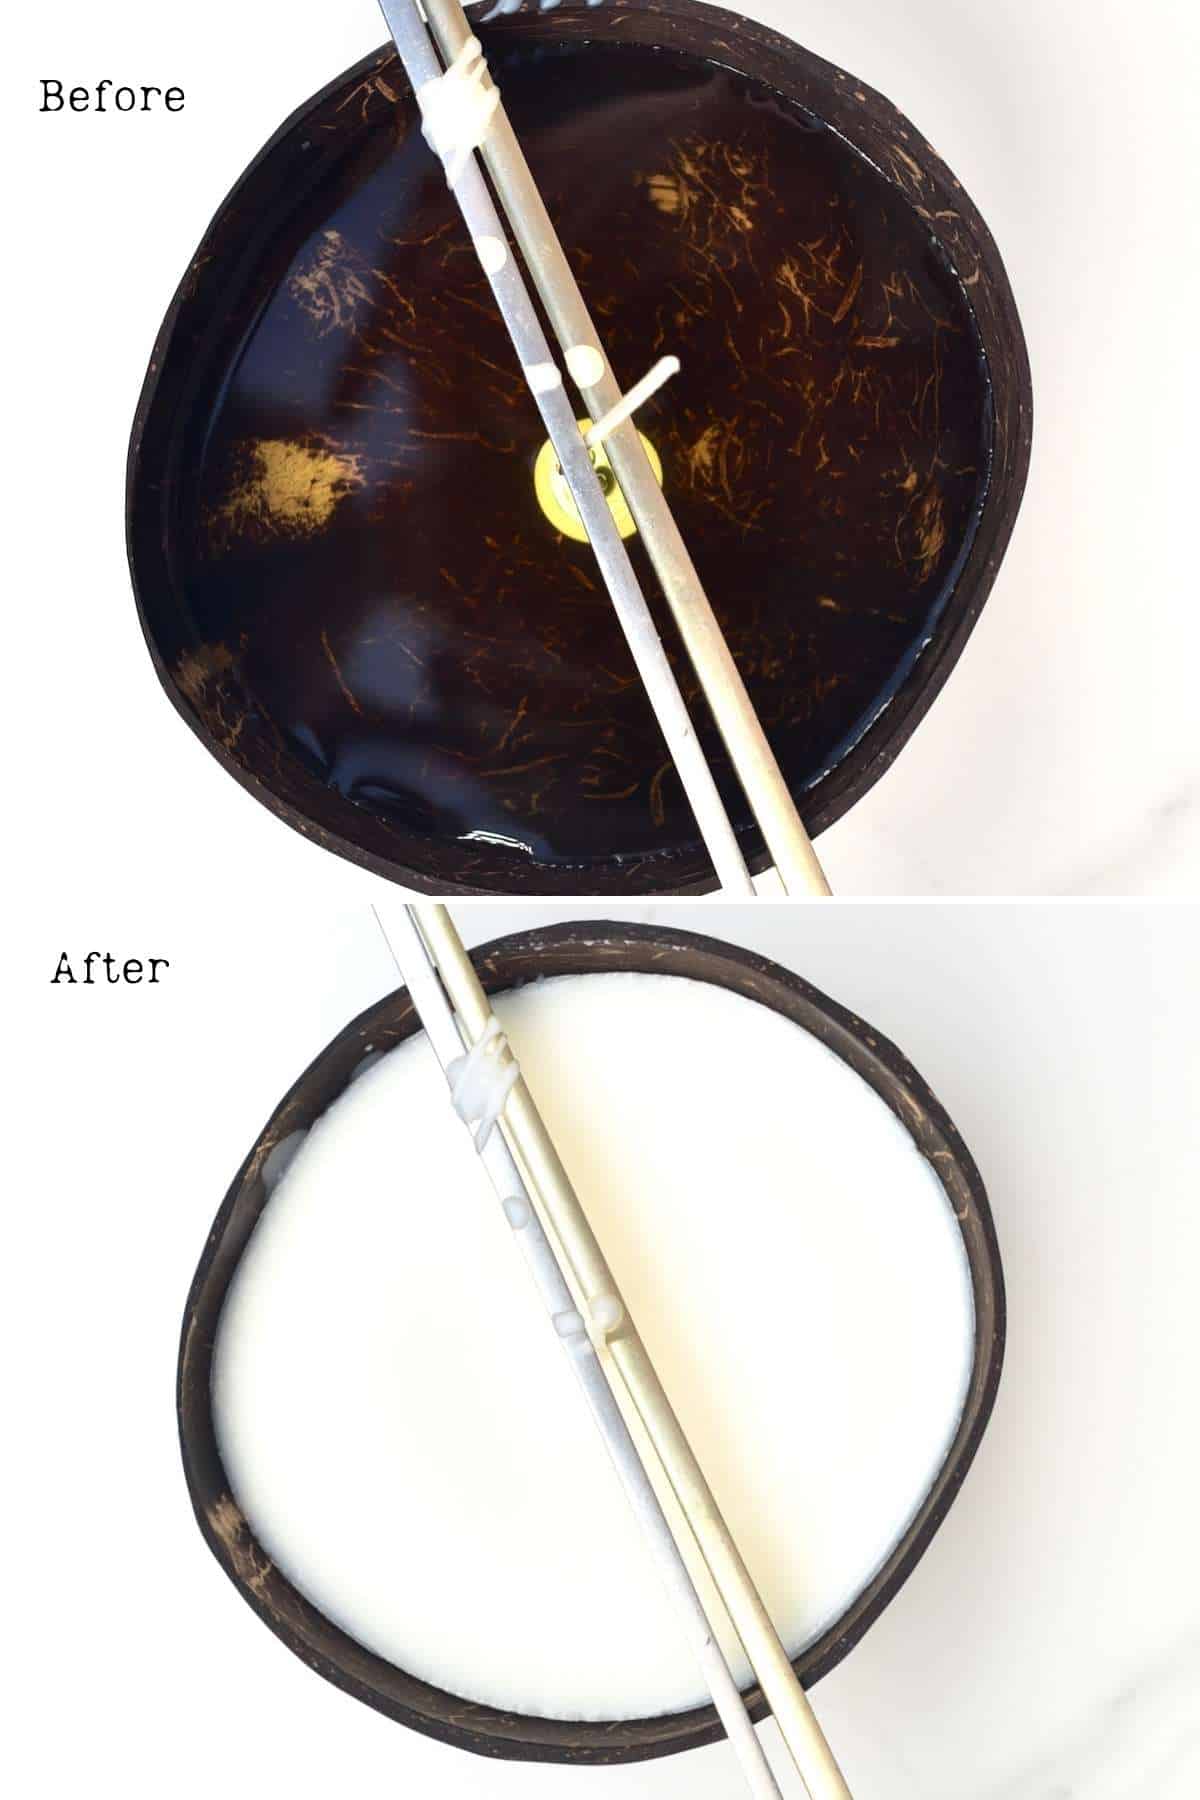
To ensure it stays upright and in position while pouring the candle/s, use a pair of chopsticks or pencils to hold it in place. Optionally secure it further by taping the two together (or using rubber bands). A clothes peg would also work.
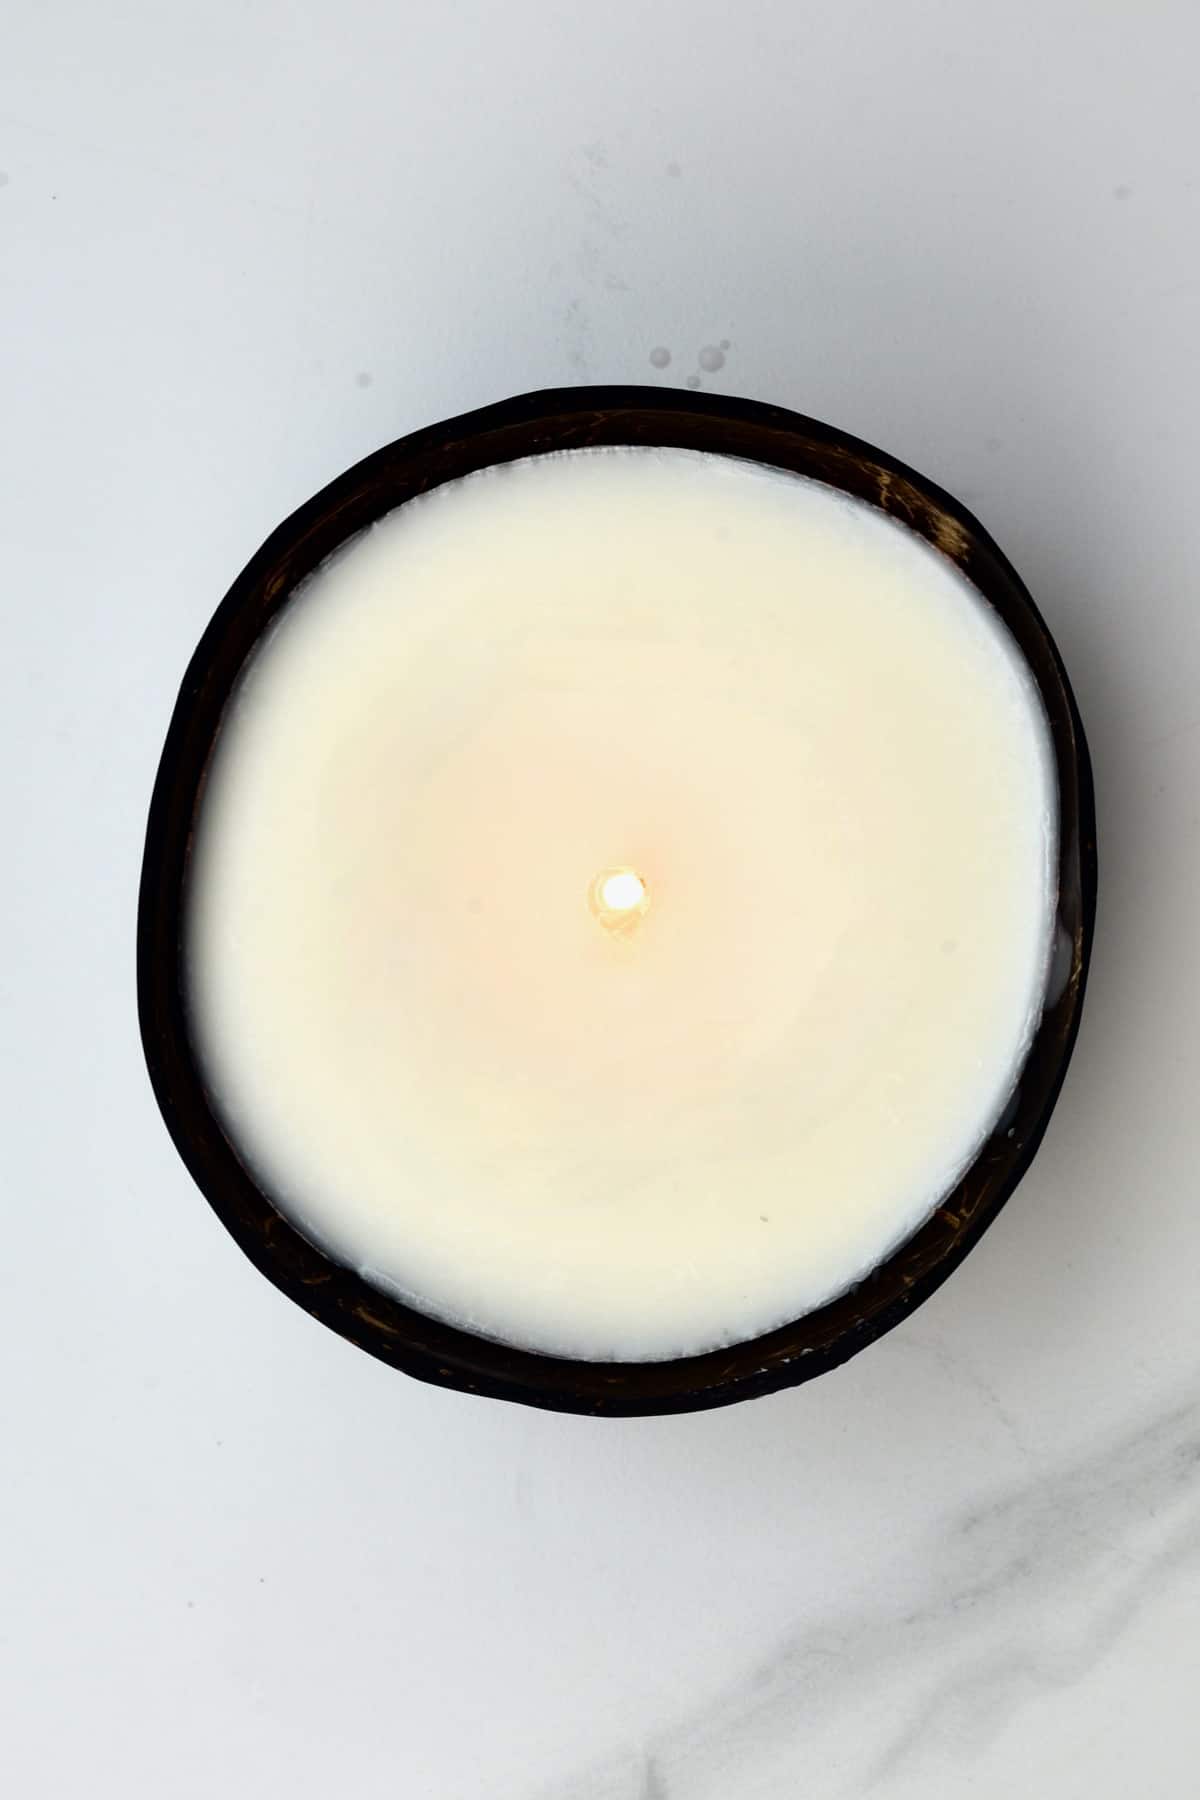
How To Pour Soy Candles?
Then, carefully pour the wax into your container of choice (steady and slowly to avoid air bubbles and splashes). Allow it to cool and harden naturally over several hours, but best overnight.
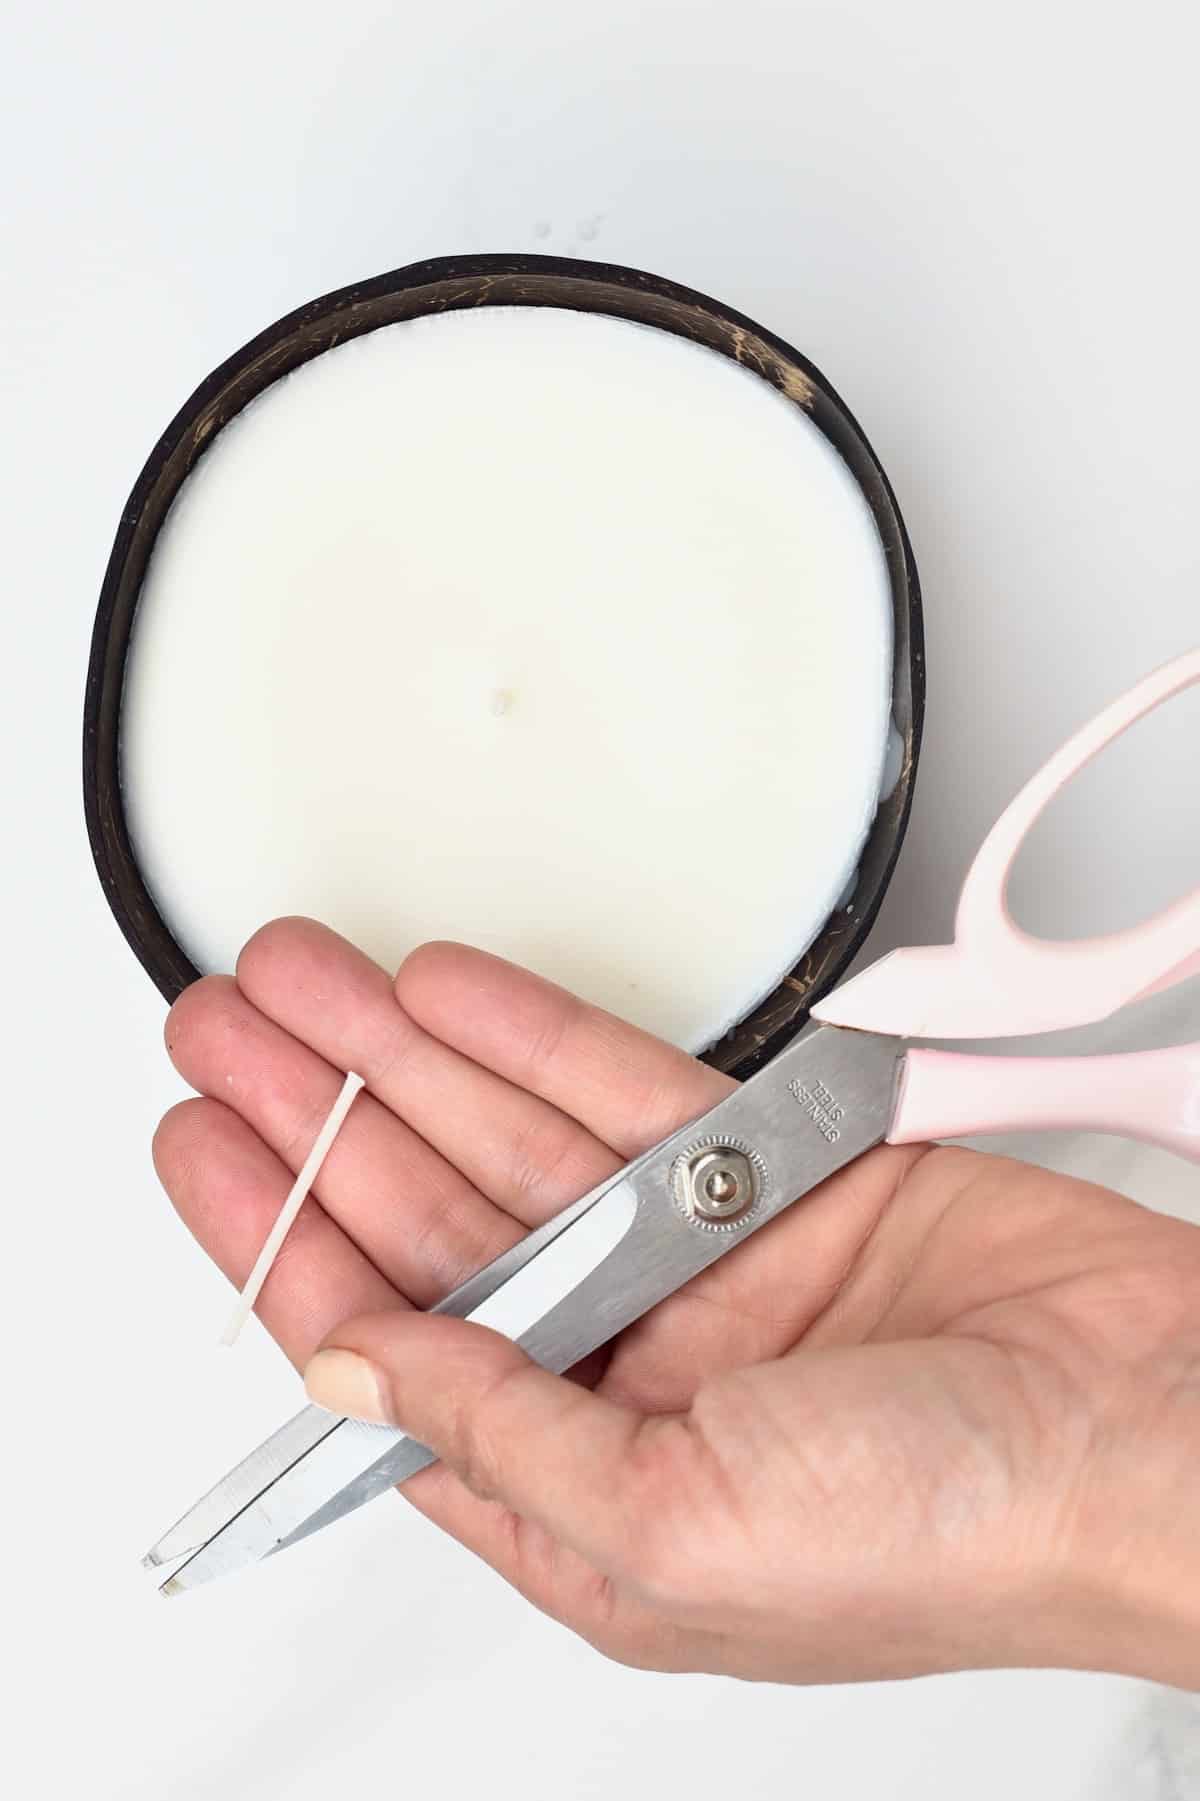
How to Trim the Wick?
Finally, use some scissors to trim the wick so it’s between 1/4-1/2 inch above your candle, and voila – the homemade candles are ready!
As you burn the candle, you’ll need to continue to trim the wick, so it doesn’t become a tall flame.
How Do You Store Handmade Candles
Store them away from direct light and breezes.
Note that some dyes are UV light-sensitive, so it’s best to keep these away from direct light, like windowsills. Otherwise, you might want to add a UV inhibitor to the candle.
FAQs
It’s technically possible if you’re just making the candles for personal usage (and don’t mind any imperfections). But I don’t recommend it otherwise. Specific temperatures are required for various steps during candle-making for optimal results.
It’s possible to use undyed cotton string/twine for a DIY candle wick. Connect it to a wick tab, dip it in candle wax, hold it straight, and allow it to dry. Repeat the wax coat a second time if preferred.
Once you’ve allowed the wax to cool to 135ºF/57ºC (so the fragrance doesn’t smoke), add the fragrance off the heat source.
I recommend using isopropyl alcohol and paper towels to clean up any wax spills and messes. Hot soapy water is also great for candle-making clean-up.
It’s best to light the candles within a year, especially if they are scented. However, if you’ve made them correctly and are storing them well (away from direct light and breezes), they won’t lose their color or scent for several years.
More Fun DIY Handmade Gifts
- Beginners guide to making soap at home
- Homemade all-natural skin balm
- Non-toxic natural all-purpose citrus cleaner
- DIY coconut oil sugar scrub
- How to make coconut bowls
- Homemade rose extract
If you try this method for how to make candles at home, let me know how it goes in the comments below. I’d appreciate a recipe card rating and would love to see your recipe recreations – tag me on Instagram @Alphafoodie!

Candle Making for Beginners
Equipment
- Infrared Thermometer or another high heat thermometer
- 2 Chopsticks or pensils or a clothes peg
Ingredients
- 1 lb candle-making wax beeswax or soy wax flakes or pellets – or use as much as wanted
- 4 candle containers 4 oz each or bigger/smaller as wanted; use coconut shells or small jars or glasses; avoid plastic, terra cotta, or wood
- 4 candlewick twine or wood-based wick
- 4 adhesive stick glue dot OR glue gun
- few drops Essential oil (fragrance) optional, choose your favorite, eg. lavender essential oil
- few drops color optional; soy wax dye is best; see blog post for alternative options
Instructions
- Prepare the containers/ vessels, ensuring they’re thoroughly cleaned (with hot water and soap) and dry. If you want to make homemade coconut shell candles, prepare the shells using this method.Also, set up your working area – it's best to cover it with newspaper, parchment paper, or some towels.
Measure the Wax
- To measure how much wax you need for your container, fill it (leaving at least ½ inch at the top) with the unmelted wax, and then double that amount.You can also keep these measurements in mind:– 1 lb soy wax, once melted will be about 18 fl oz (in liquid form),– 1 lb beeswax, once melted will be about 16 fl oz (about 1 cup).To do this before purchasing wax, you can pour water into your vessel of choice to know the volume of the container. This is how much melted wax you’ll need (double this for the volume of wax flakes).
Melt the Wax
- Use the double boiler method. First, place a heat-proof bowl over a small saucepan filled with a couple of inches of water, simmering (ensure the water isn't touching the bottom of your bowl).
- Add the wax to the bowl and stir it frequently to help it melt evenly. The goal is to reach between 158ºF/70ºC and 175ºF/80ºC (use an instant-read thermometer to check). It might take about 10-15 minutes for the wax to melt, though time varies based on the batch size.Avoid overheating the wax (not above 200ºF/95ºC for soy wax), as it will affect the quality of your DIY soy candles. For example, it can cause yellow discoloration and cracking, weakened fragrance, frosting, etc.
Add Scent (Optional)
- After melting, allow the temperature of the wax to cool down to 135ºF/57ºC, then add your preferred essential oil. The amount needed will vary based on the candle size and how strong you wish the scent to be.As a general guideline: start with 6% (1oz) fragrance per 1lb soy wax. Don’t go above 10% fragrance load.Be aware that every wax has a maximum ‘fragrance oil load.’ Beyond that, it can cause separation in the wax and even lead to a potential fire hazard.
- Once the scent is added, stir the wax consistently for at least 1-2 minutes to properly distribute it throughout the wax.
Add Color (Optional)
- I recommend using soy dye (which comes in liquid, block, and flake form). I like to use around ¼ tsp per 1lb wax for a medium shade or ½ tsp for a darker shade. Add it when melting the candle wax and stir to incorporate fully. Alternatively, when making coconut candles, teacup candles, and other options where only the top is seen, you can sprinkle or brush the top of the candles with mica. You'll still get color that way and the pretty effervescence when it melts, but it’s far less likely to clog the wick.There are several ways to naturally infuse the wax with color too. I,e, with spices, flower petals, etc. (check the blog post for the full list of colorants and notes). How to test your candle color? Place a small amount of the colored wax onto a piece of paper and allow it to cool for a minute or two. You’ll then be able to see what the color will look like in the finished set candle.
Add The Wick
- There are several ways to adhere the wick to the bottom of the DIY candles. I used a small adhesive disk that I attached to the end of the wick and then in my container, where I wanted the wick to be.Alternatively, you could also use a few drops of melted wax, press the wick into it, and wait a few minutes for it to dry and harden. You could also use heat-proof glue.To ensure it stays upright and in position while pouring the candle/s, use a pair of chopsticks or pencils to hold it in place. Optionally secure it further by taping the two together (or using rubber bands). A clothes peg would also work.
Pour the Melted Wax
- Simply pour the melted hot wax slowly and carefully (to avoid air bubbles and splashes) into your container of choice and allow it to cool and harden naturally over several hours, but best overnight.Don’t be tempted to speed up the cooling process with a cold water bath or refrigerator, as it will affect adhesion and candle quality.
Trim the Wick
- Use scissors to trim the wick so it’s between 1/4-1/2 inch above your candle, and voila – the homemade candles are ready!As you burn the candle, you’ll need to continue to trim the wick, so it doesn't become a tall flame.
How to Store Handmade Candles
- It's best to light the candles within a year, especially if they are scented. However, if you've made them correctly and are storing them well (away from direct light and breezes), they won't lose their color or scent for several years.
Notes
What else could I add to soy candles? While there are plenty of options to choose from, here are just a couple to get started with.
- Flowers: For jar candles, you could dip petals into the wax and press them against the side of the glass for decoration. You can also add dried flowers like lavender buds and roses to the sides of the jar and sprinkled within/on top. However, note they are flammable, so don’t go overboard.
- Coffee beans: Pour layers of wax with coffee beans into your container of choice OR pour in ¾ the candle, allow it to cool, and then pour in the remaining amount with coffee beans to coat the top of the candle. This smells amazing while burning.
- Experiment with pouring the candles at slightly higher or lower temperatures to see if there is an improvement (this may vary based on climate and temperature throughout the year).
- Preheat the glassware before pouring the soy wax and/or ensure the candles are kept in a draft-free area on a wire cooling rack to cool more slowly and evenly.
- Don’t use old wax flakes. It’s best to use them within one year of manufacture.
- Try stirring less when adding the fragrance to the melted wax.
- Some people add a small amount of fractionated coconut oil to the wax to reduce frosting and increase adhesion. Note that this will affect how much fragrance you can add, as it counts in the ‘oil load.’


Exploring candle making classes in Houston has been on my list for a while, and your post brought up things I hadn’t considered—like checking if classes allow experimenting with soy vs paraffin. It’s cool how creative you can get with simple materials in the right setting
Thank you so much, Leo! I’m glad the post gave you some helpful things to think about. Candle making is such a fun, creative outlet 🙂