
This post may contain affiliate links. Please read our disclosure policy.
Make desiccated coconut easily at home and add rich tropical flavor and texture to baked goods, coconut balls, and more. Whether sweetened or unsweetened, this fresh and versatile ingredient will enhance your favorite recipes.
I love how versatile coconuts are! With just one mature coconut, you can make so many homemade goodies like coconut oil, homemade coconut milk, coconut yogurt, coconut cream, and coconut butter. One of my favorites is desiccated coconut (sometimes referred to as shredded coconut). And best of all—you only need a coconut, a grater, and an oven (or a dehydrator if you prefer).
I use desiccated coconut a lot in my kitchen. Not only is it so delicious, but it’s also keto, low-carb, gluten-free, nut-free, and grain-free—it’s a fantastic allergen-friendly pantry staple. I love using it for quick chocolate coconut balls, in baking, or even to sprinkle over dishes.
And while store-bought versions are convenient, they’re not always easy to find, especially unsweetened ones. Plus, when you make it a home, it always tastes fresher, and you can customize it exactly how you like—sweetened or unsweetened, fine or coarse. Once you try this, you’ll never go back to store-bought!
Watch the video tutorial
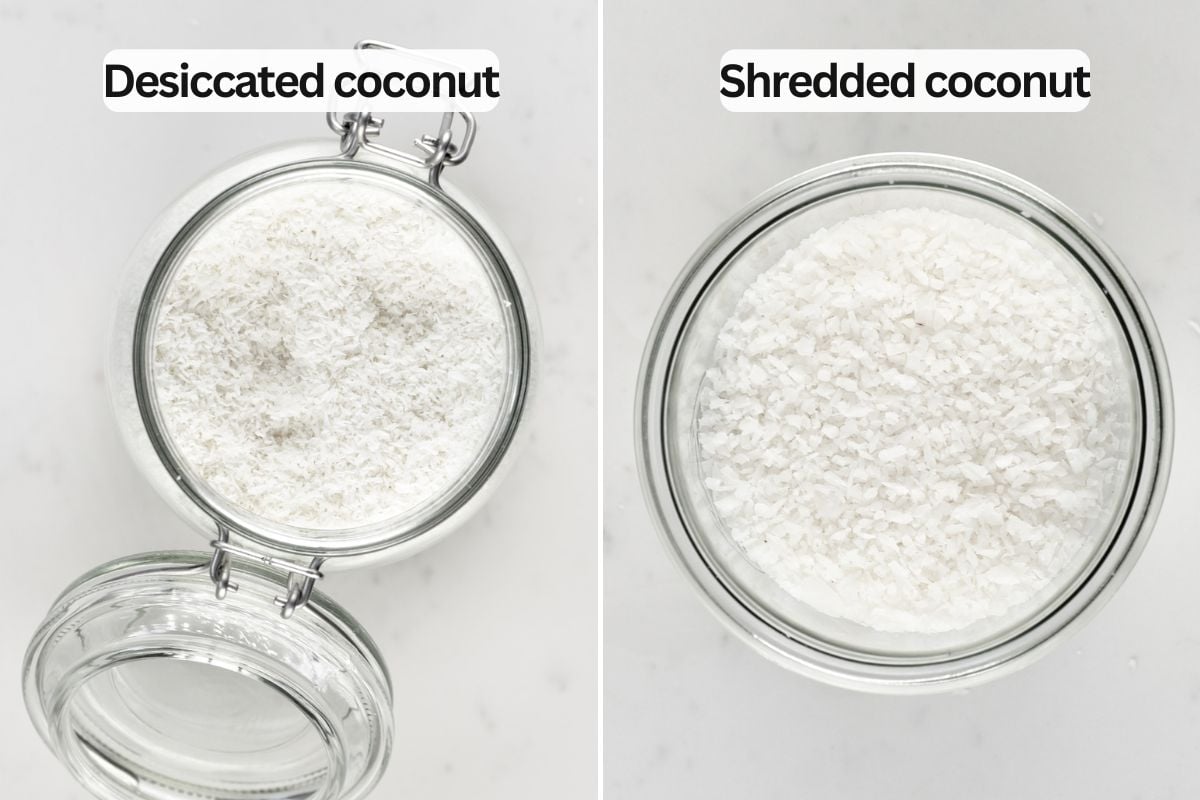
Desiccated vs. shredded coconut: what’s the difference?
I often use these two terms interchangeably. But technically, they refer to two different products:
- Desiccated coconut is more finely ground, almost like coarse crumbs, and is typically drier than shredded coconut. Unlike coconut flour, it still contains the natural fats from the coconut, so the two aren’t interchangeable in recipes.
- Shredded coconut consists of grated coconut in thin, long strands. It’s dried but retains more moisture than desiccated coconut, giving it a slightly chewy texture. And if you prefer an even coarser texture, you can use a vegetable peeler to make coconut flakes.
What you need
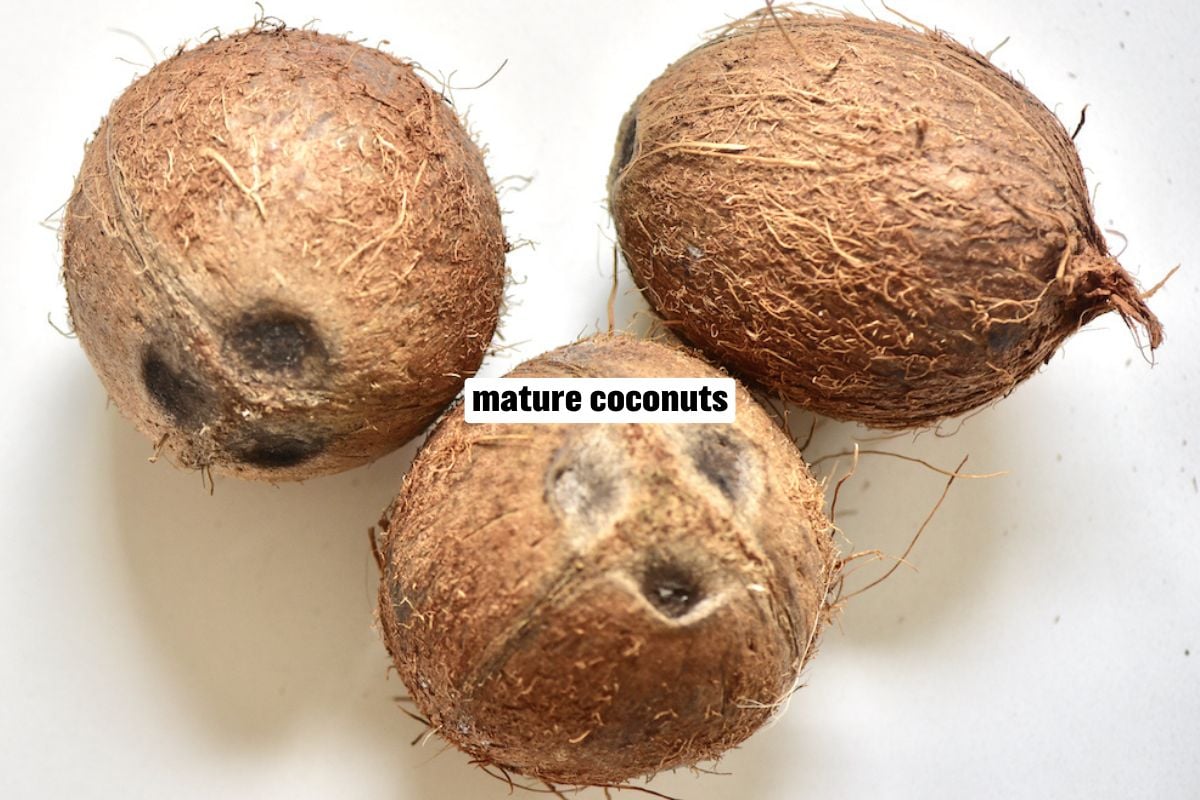
- Whole coconuts: Choose mature coconuts because they have firm, low-moisture meat that grates and dehydrates better. Young coconuts don’t work as well because their meat is soft, jelly-like, and has higher water content, making it harder to dry out.
See the printable recipe card below for full information on ingredients and quantities.
How to make desiccated coconut
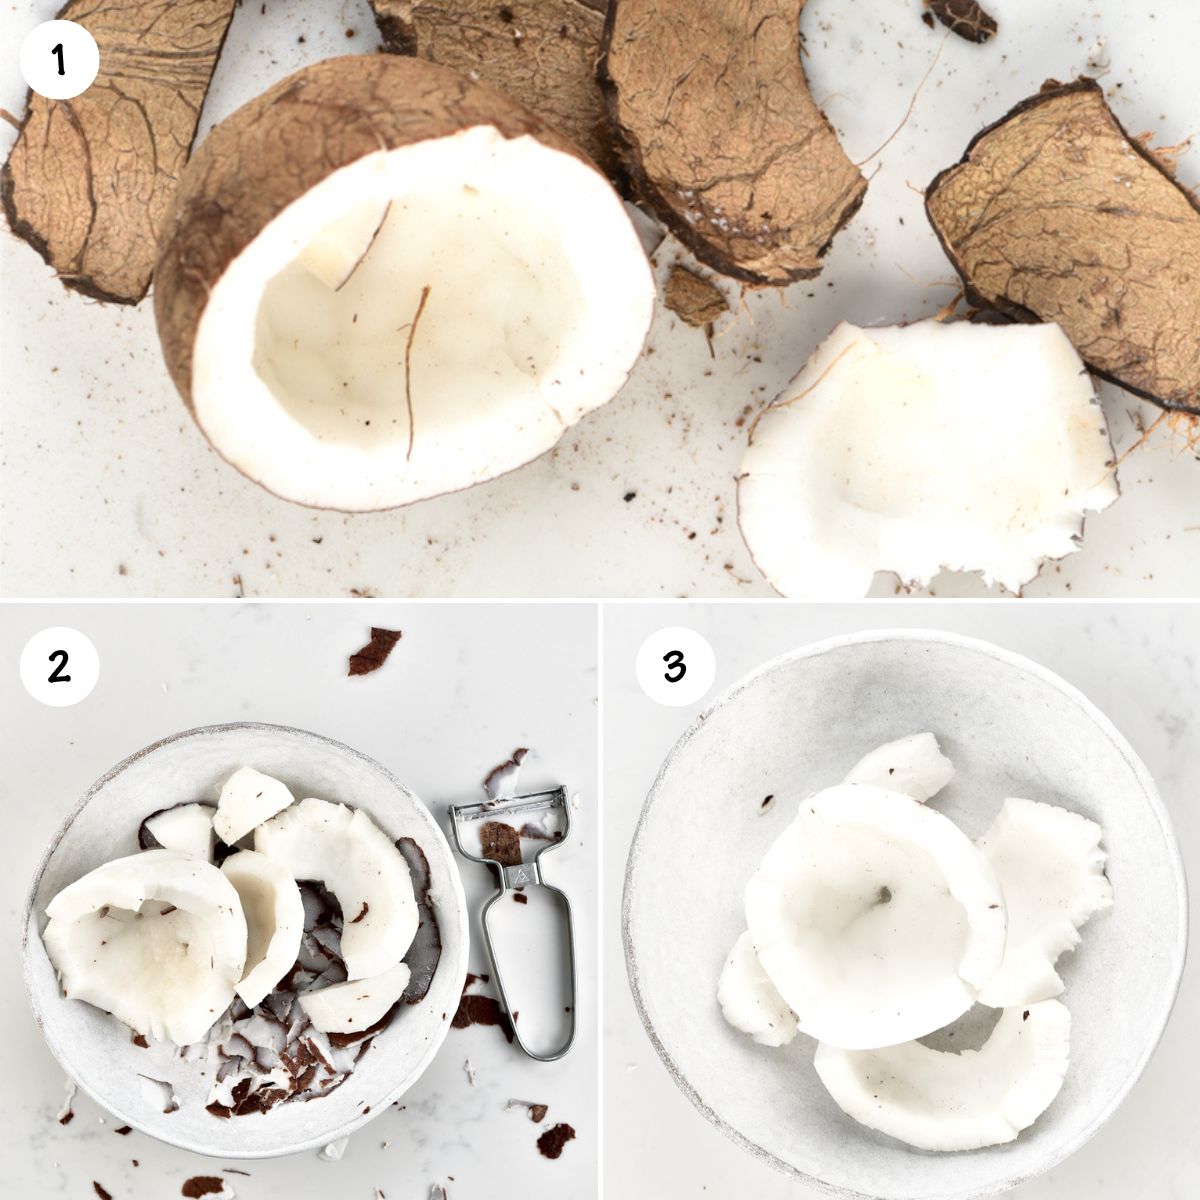
Prepare the Coconut: First, you have to crack open the coconut. I have an entire post on how to open a coconut. You can use one of 4 different methods depending on whether or not you want to keep the shells to make coconut bowls.
The easiest for me is to use a hammer and hit along the middle of the coconut, twisting it as I hit. The coconut will start to crack, and you can then pull it open. Open it over a bowl to drain the coconut water (which you can drink straight or add to smoothies).
Then, remove the meat from the shell with a spoon or a butter knife or with a specialized coconut tool. Once the first few bits become free, then it’s usually easier to pull apart the rest. Alternatively, place the coconut halves in the oven at 175ºF/80ºC for 10-15 minutes, and the meat will begin to separate from the shell. OR, if you have some time, place the whole coconut in the freezer overnight and then open it with a hammer—usually, the shell just chips right away from the meat.
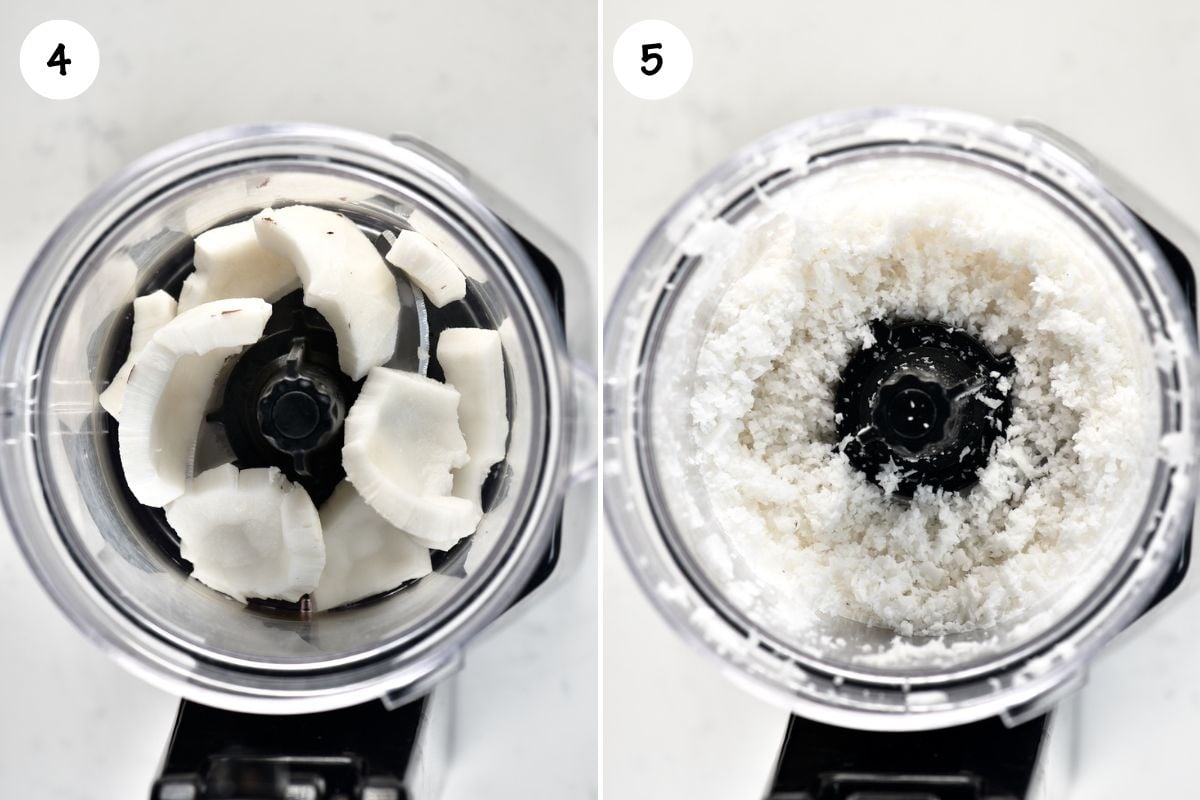
This part is optional, but I highly recommend it for having a pure white final product. Using a vegetable peeler, peel the soft brown skin from the white meat and then rinse the white part.
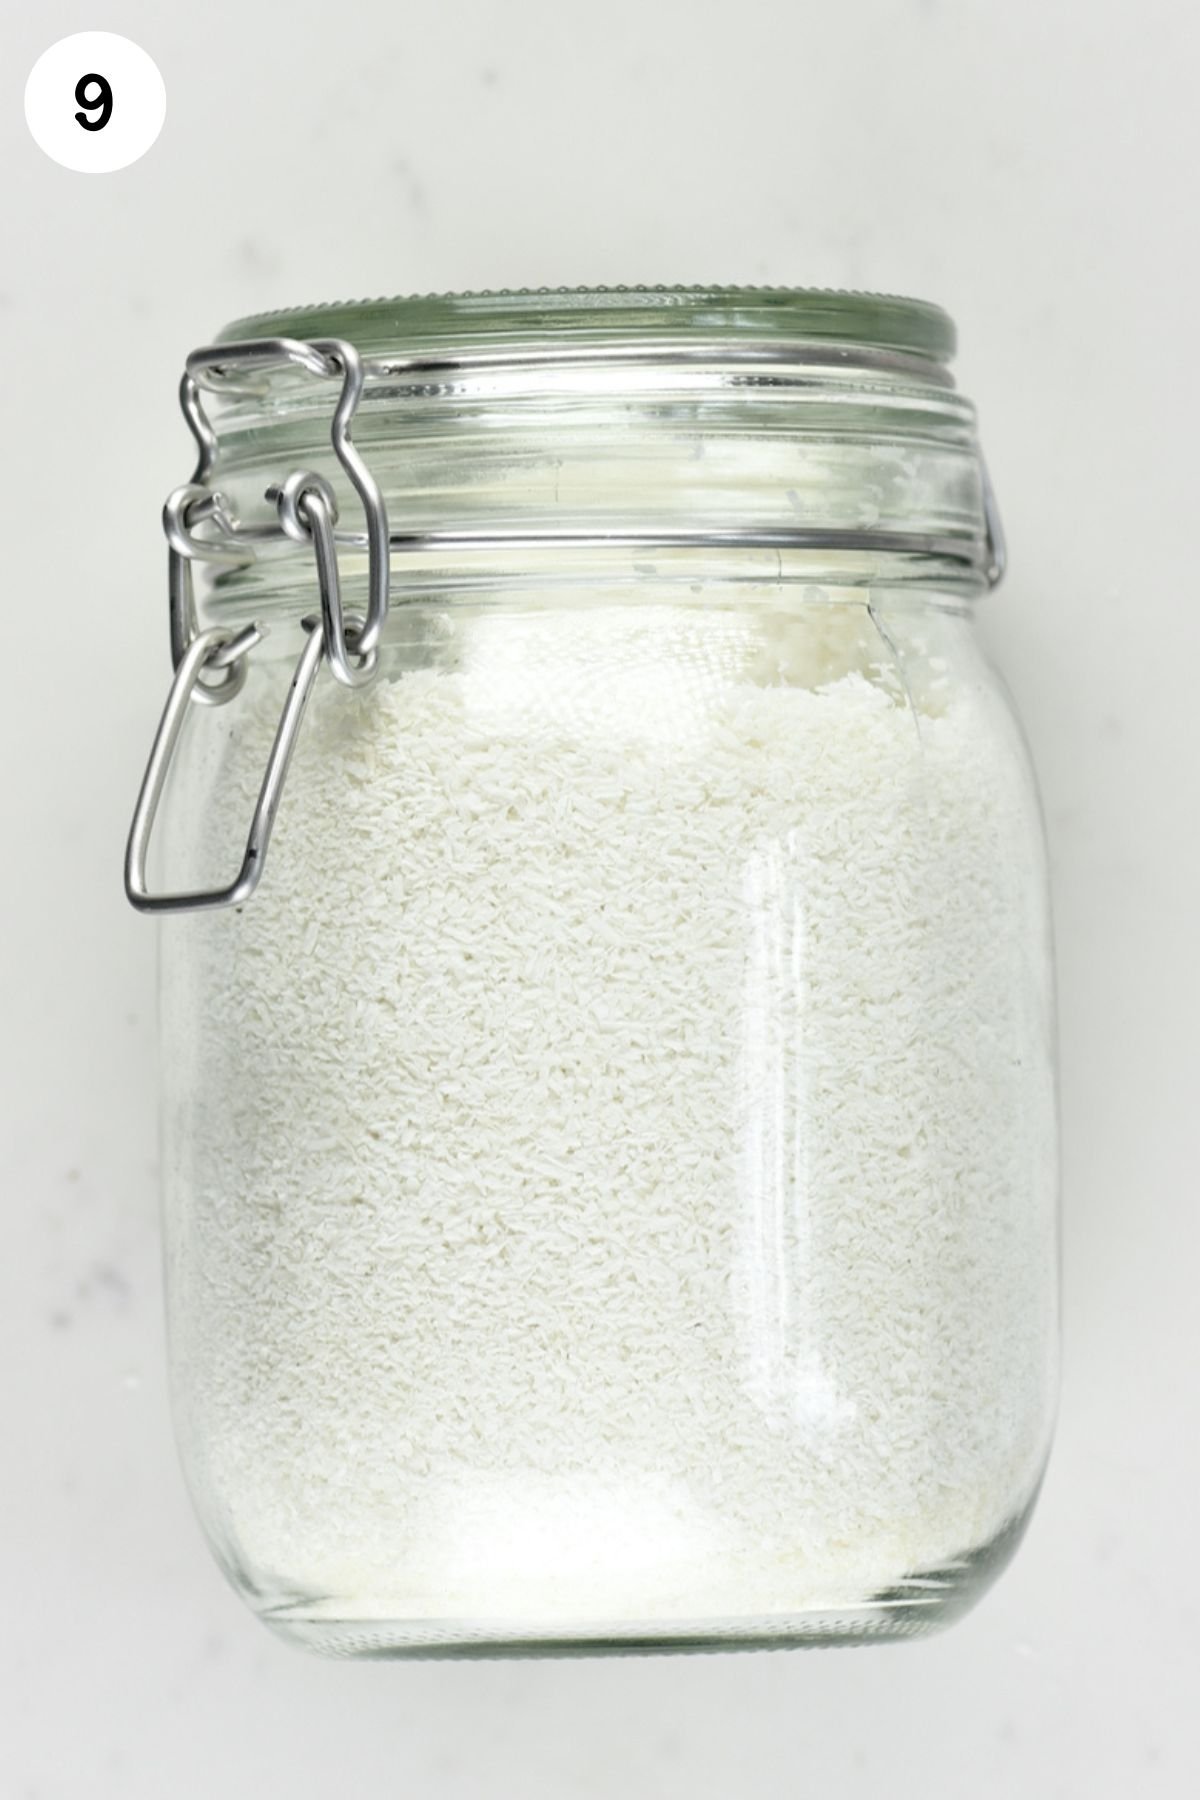
Pulse or Grate the Coconut Meat: Chop the meat into a few smaller pieces and pulse it in your blender or food processor until fine crumb consistency.
Alternatively, you can grate it with a box grater (cheese grater), using the smallest holes (the ones for spices). If preferred, to achieve a more shredded texture, use the largest holes.
Dry the Coconut: You can dry the coconut out either in the oven or by using a dehydrator. If you have patience, it’s possible to even dry it out at room temperature (best for warm, dry climates).
- In the oven: Place it in a single layer on a baking sheet and dry at 140ºF/60ºC for around an hour. It may take longer, depending on your oven and the overall freshness of the coconut. Check after 40 minutes, give them a shake, and then place them back in the oven. The desiccated coconut should be crumbly and dry. Also, you want to dry them out without actually “toasting” the coconut.
- In a dehydrator: Dry at 105ºF/40ºC for about 4-6 hours until crumbly and dry. If you have a dehydrator, it’s worth doing it this way, as you use less heat, and there’s no risk of burning the pieces.

For a Sweetened Version: Use 4 teaspoons of sugar with 1/4 cup of water per 1 cup of coconut that you want to sweeten. Combine the sugar and water in a small saucepan till the sugar dissolves into a simple syrup.
Next, add the coconut and stir it well. Remove from the heat and occasionally stir while the desiccated coconut absorbs the liquid (this may take a few minutes).
Then, spread on an oven sheet and either dry out in the oven or at room temperature before storing it. Or, for a toasted sweetened version, leave it longer in the oven till lightly browned.
You can also do this with unsweetened coconut that is already dried. Just leave the coconut to sit in the syrup for 5-10 minutes to rehydrate and soak up all the liquid.
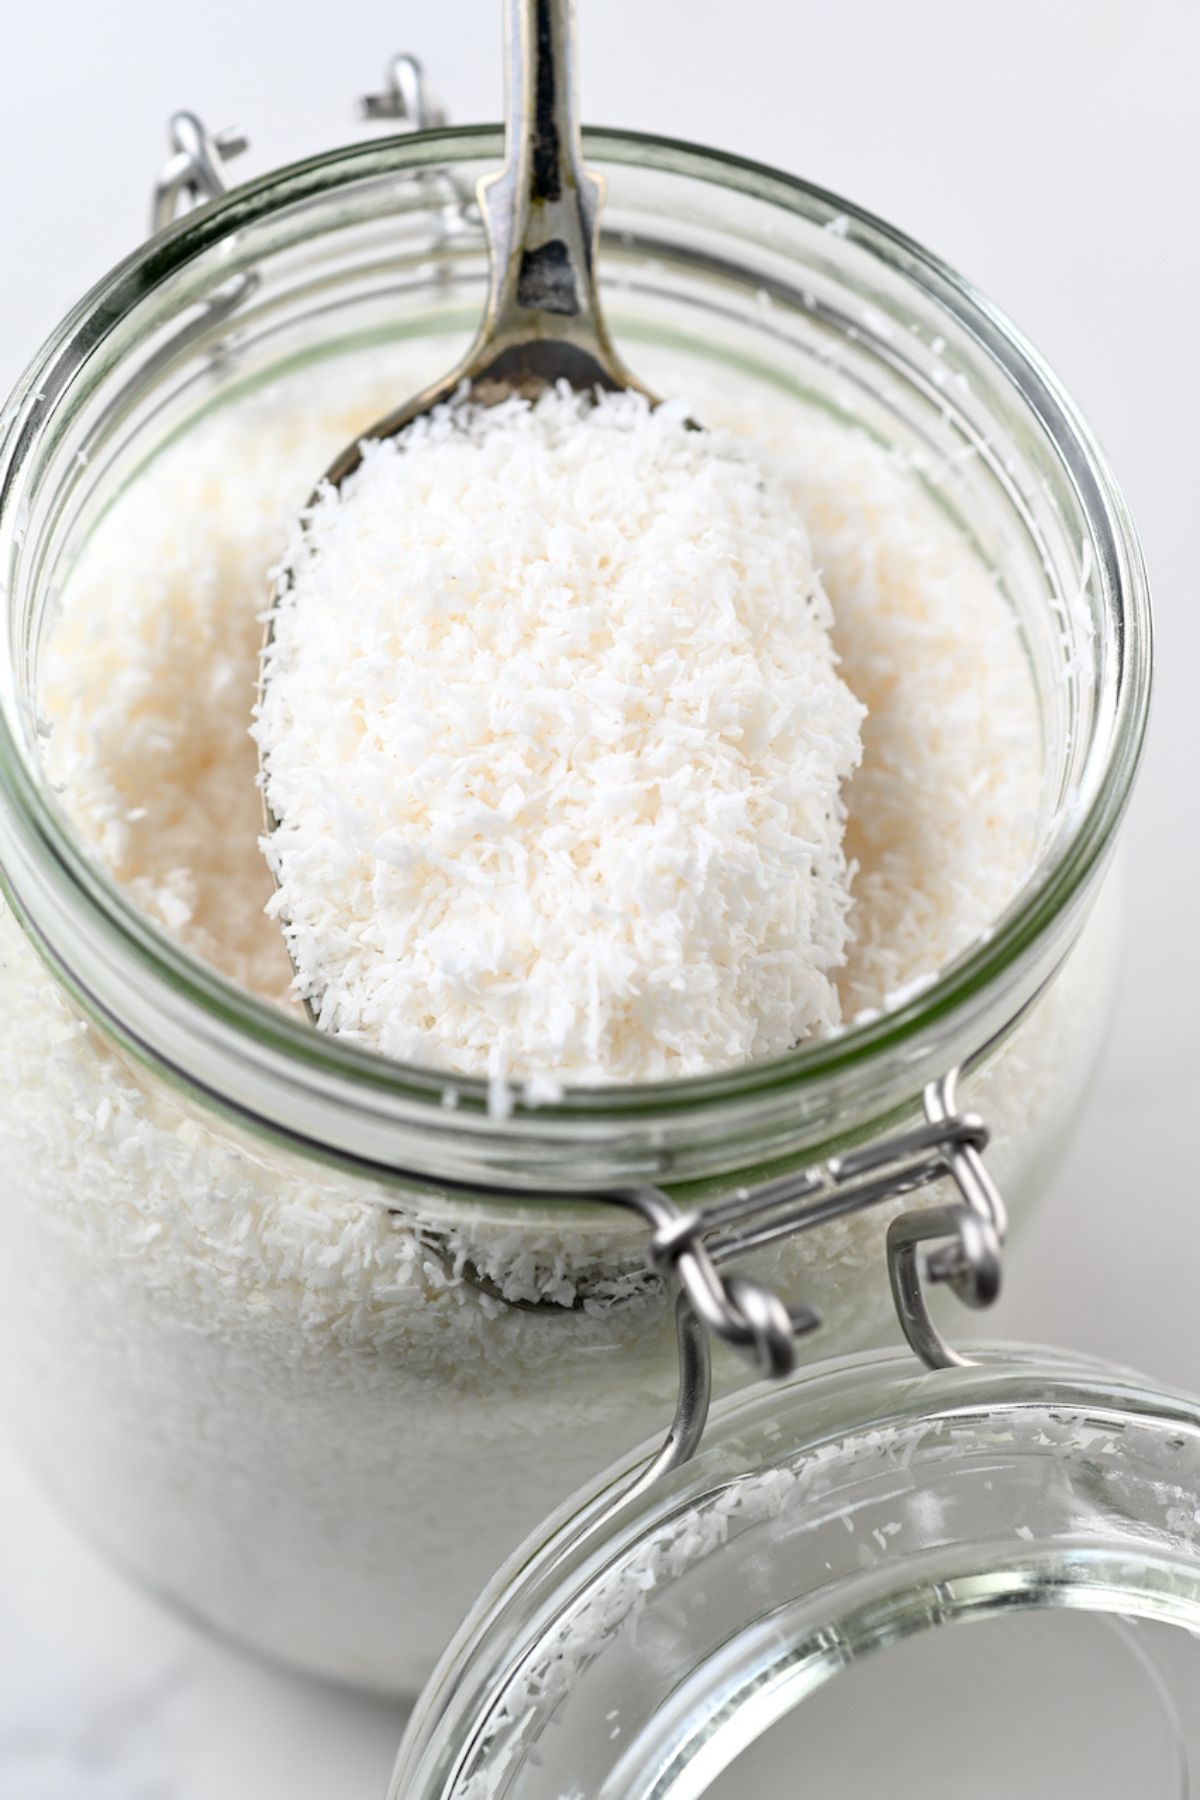
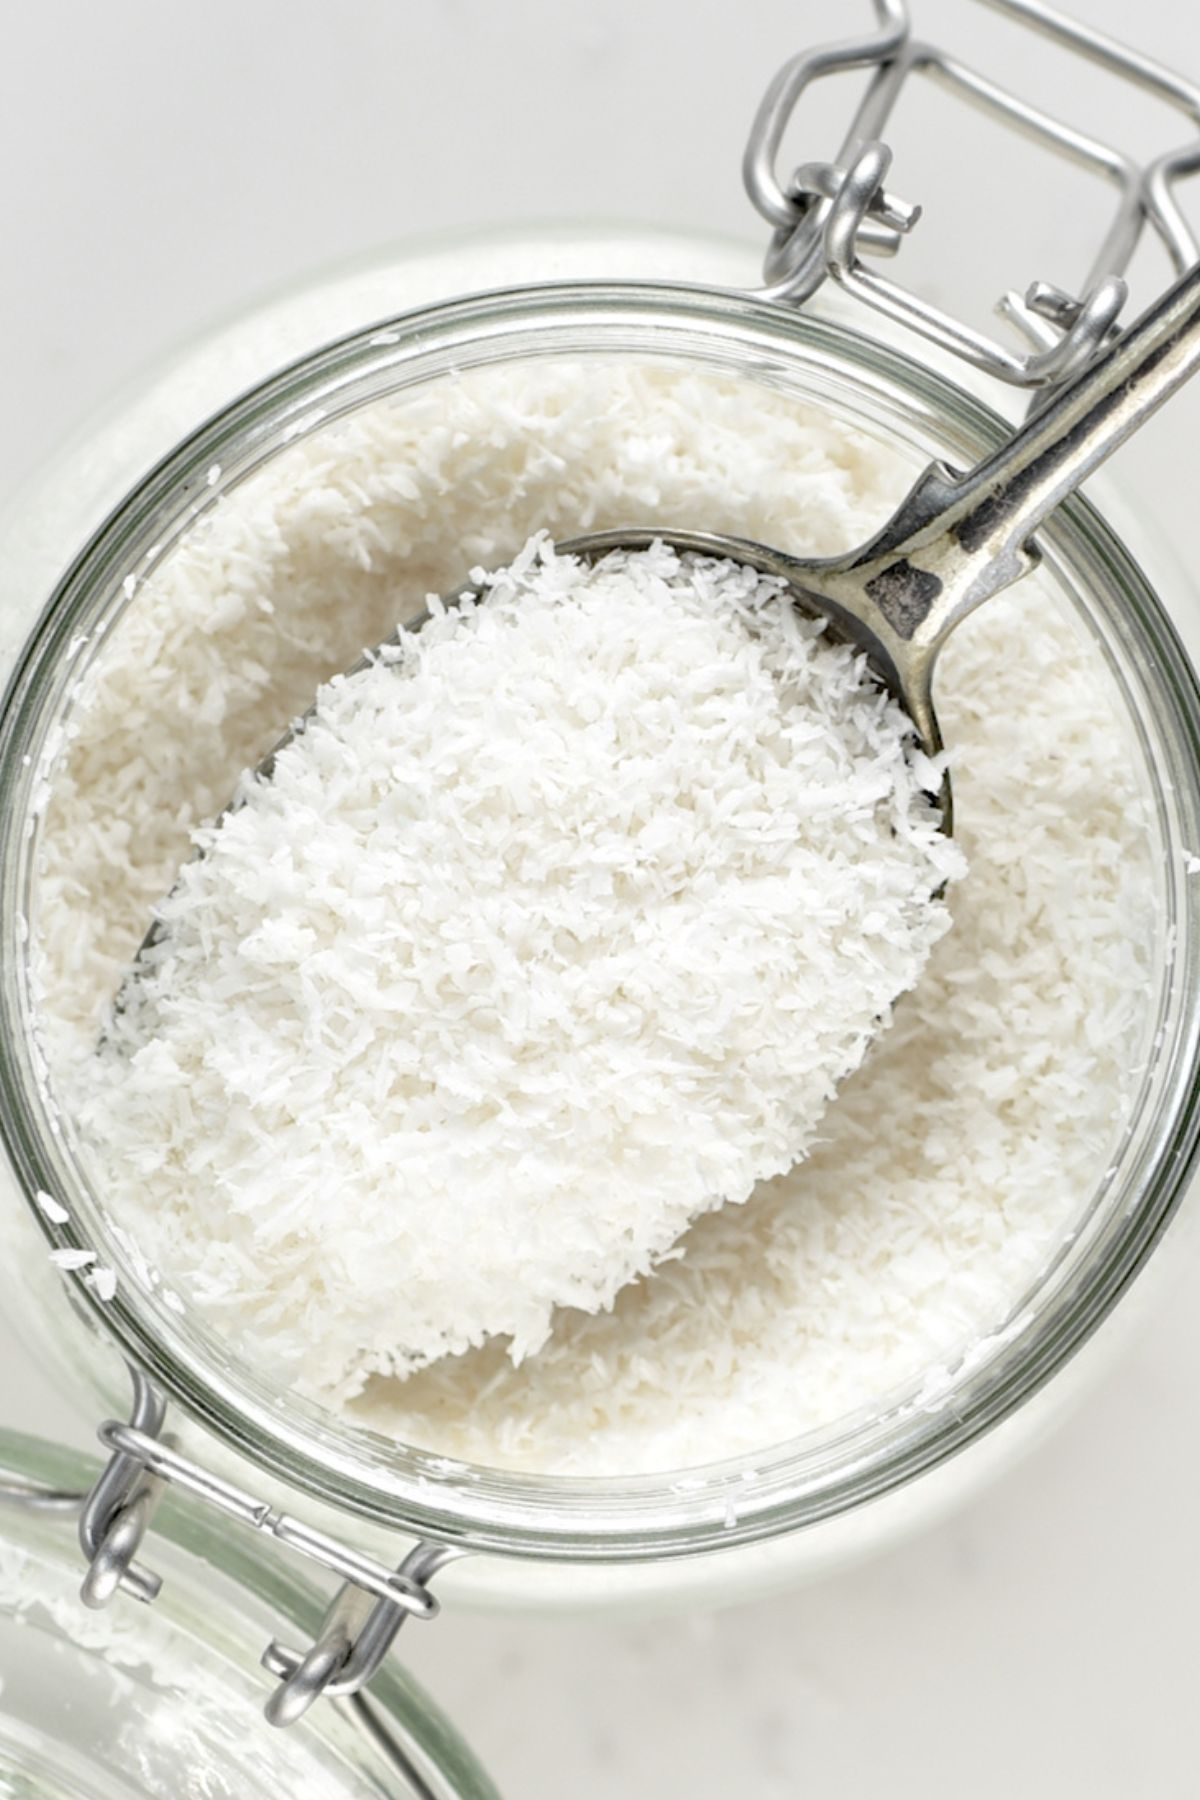
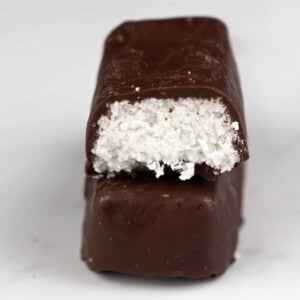
Store the Desiccated Coconut: Finally, place the desiccated coconut in an airtight container or a glass jar. Store it in a dark place like your cupboard or pantry. Enjoy!
Tips and notes
- Use mature coconuts, not young ones. The meat of the young ones is jelly-like with a higher water content, and it won’t dry easily.
- Fully dry the coconut to avoid spoilage. Dehydrate it until fully dry and crumbly and all the water content has evaporated.
- If the coconut browns too quickly in the oven, place it lower in the oven or use a pan above to shield it.
- Coconut pulp left from making coconut milk takes longer to dry. It has a lower fat content compared to fresh coconut meat.
- The brown skin of the coconut is edible. Use it in smoothies, salads, or sprinkled on porridge.

Recipes with desiccated coconut


If you try this desiccated coconut recipe, let me know how it goes in the comments below. I’d appreciate a recipe card rating and would love to see your recipe recreations – tag me on Instagram @Alphafoodie!

Desiccated Coconut Recipe
Ingredients
- 2 mature coconuts
This will yield about 1 cup of desiccated coconut
Instructions
- Crack open your coconuts. The easiest is to use a hammer and hit along the middle of the coconut, twisting it as you go until it cracks open. Open it over a bowl to drain the coconut water. Alternatively, you might want to use another method for opening a coconut (especially if you are going to keep the shells for making coconut bowls).
- Collect the fresh coconut meat. Use a spoon, a knife, or a specialized coconut tool to pry the meat away from the shell. Once the first few bits are free, the rest is easy to pull away.Alternatively, bake the coconut halves in the oven at 175ºF/80ºC for 10-15 minutes, and the meat will begin to separate from the shell. OR, freeze the whole coconut in the freezer overnight and then open it with a hammer—usually, the shell just chips right away from the meat.
- Peel the coconut meat (optional but recommended for white final product). Peel the brown soft brown skin from the white meat with a vegetable peeler. Rinse the white parts.
- Pulse or grate: Cut the coconut meat into a few pieces and pulse it in your blender or food processor until fine crumb consistency.Alternatively, grate with a box grater (cheese grater), using the smallest holes (the ones for spices). For a more shredded coconut texture, use the largest holes.
- Dehydrate the coconut until thoroughly dried and crumbly.In the oven: Dry them in a single layer on a baking sheet at 140ºF/60ºC for about an hour (the time can vary). After 40 minutes, check them, shake them, and then return them to the oven until crumbly and dry. In a dehydrator: Dry at 105ºF40ºC for about 4-6 hours until crumbly and dry.
- Store the Desiccated Coconut: Transfer it to an airtight container or a glass jar and store it in a dark place like your cupboard or pantry. Enjoy!
For a sweetened version
- To sweeten coconut, use 4 teaspoons of sugar and 1/4 cup of water per 1 cup of coconut. In a small saucepan, dissolve the sugar in the water. Add the coconut and stir it well. Remove from the heat and occasionally stir while the desiccated coconut absorbs the liquid (this may take a few minutes).Spread on a baking sheet and either dry out in the oven or at room temperature before storing. For a toasted sweetened version, leave it longer in the oven until lightly browned. You can also do this with unsweetened, dried coconut. Let the coconut sit in the syrup for 5-10 minutes to rehydrate and soak up all the liquid.
Video
Notes
Nutrition
Nutrition information is automatically calculated, so should only be used as an approximation.


Thank you for sharing your recipe. It’s nice to know that you can make healthly treats to enjoy.
Hi Eunice! Thanks for your kind words. Yes, we can make a lot of healthy treats using coconut!
Hi Samira, I tried the frozen suggestion to break open the endosperm. But I had a hard time removing the coconut itself.
I drained the coconut water by putting out all in the eyes first delicious. The meat is still stubborn. Are wanted to make flakes to put in homemade vanilla extract. I unfroze in the fridge. I even tried short spurts in microwave. Used an oyster knife tho I could not wiggle out the coconut. Ended up using a pairing knife and got enough out for my purpose.
Can you advise how I may remove the other Half? Thank you. Good info on your site. Would like to try chips. Thanking you in advance. By
Hey Barb! It sounds like you’re doing all the right things, but coconuts can definitely be stubborn! Freezing helps the meat contract, but if it’s still stuck, baking the whole coconut can help loosen it further. Once cooled slightly, tapping the shell with a mallet or the back of a heavy knife can create cracks, making it easier to pry the meat out.
For a step-by-step guide with more detailed methods, check out this post: How to Open a Coconut(https://www.alphafoodie.com/how-to-open-a-coconut/). It covers multiple ways to remove the coconut meat more easily. Hope that helps, and I’d love to hear how it goes!
This “tutorial” was so helpful. It was exactly what I needed in order to understand “desiccated” coconut that I will need for a recipe. And all the bonus info you put in about uses, avoiding toasting, storage, the edible brown skin — I appreciated the thoroughness. Thank you for demystifying this process for me!
Thank you so much for your comment, Dawn! Glad you found it helpful 🙂
I’ve got the Sri Lanka type coconuts that do not have the hard fibrous dark brown inner shell. Have you worked with these? I’m not getting the results that you cite above by baking for 10-14 minutes at 175 degrees F.
Hi Charles,
Are you not able to remove the coconut flesh from the shell? I’ve tried different types of coconuts and baking them always seems to help.
I took a bag of regular unsweetened shredded coconut and put it in the food processor. Worked great, and only took 2 mins.
Thank you for your feedback, I’m happy to hear that. 🙂
Thank you! I have 4 coconut palms in my yard and while we eat the coconut I’ve wanted to know what the processes are to use up more of them rather than throw them away.
Thank you for your comment! You can also make coconut flakes/chips – the recipe is also here on the blog. https://www.alphafoodie.com/how-to-make-coconut-flakes-coconut-chips/
Enjoy!
Thanks for sharing
Totally awesome and wonderful recipes you have. I’m going to try it very very soon. Thanks for the knowledge.
Thanks for this. Will be trying it out today.
Yes, totally Excellent!
Thank you for your comment. 🙂
Thanks for sharing. I made a coconut but I use knife and shopping board to shred it and I use gas to made it. I put a p9t on the gas and I pour the coconut then put some sugar and start steering until it turn brown.
Thank you for your comment and tips 🙂