
This post may contain affiliate links. Please read our disclosure policy.


How to make tempeh at home using just three ingredients and a simple fermentation process!
If you eat a plant-based diet, then chances are you may have already tried tempeh before or, at least, are aware of it. Along with tofu and soy milk, tempeh is another soy-based product that is often used as a plant-based source of protein. Best of all, did you know that learning how to make tempeh at home isn’t too difficult?
In fact, all you need is just some soybeans, tempeh starter, and vinegar. Plus, once you get used to this method, you can even experiment with using other types of legumes too.
Now, I’m not going to lie – the process takes a while, it’s not far cheaper than buying it from a store, and the process can have a bit of a learning curve. However, as is the case with lots of these DIYs, the homemade version DOES taste better!
And, since I’m all for simplicity – this method requires NO de-hulling of the soybeans – that’s 30-40 minutes saved right there! I’ve tried this method with and without and realized it’s simply unnecessary to create successful tempeh.
Want to save this recipe?
Tofu Vs. Tempeh
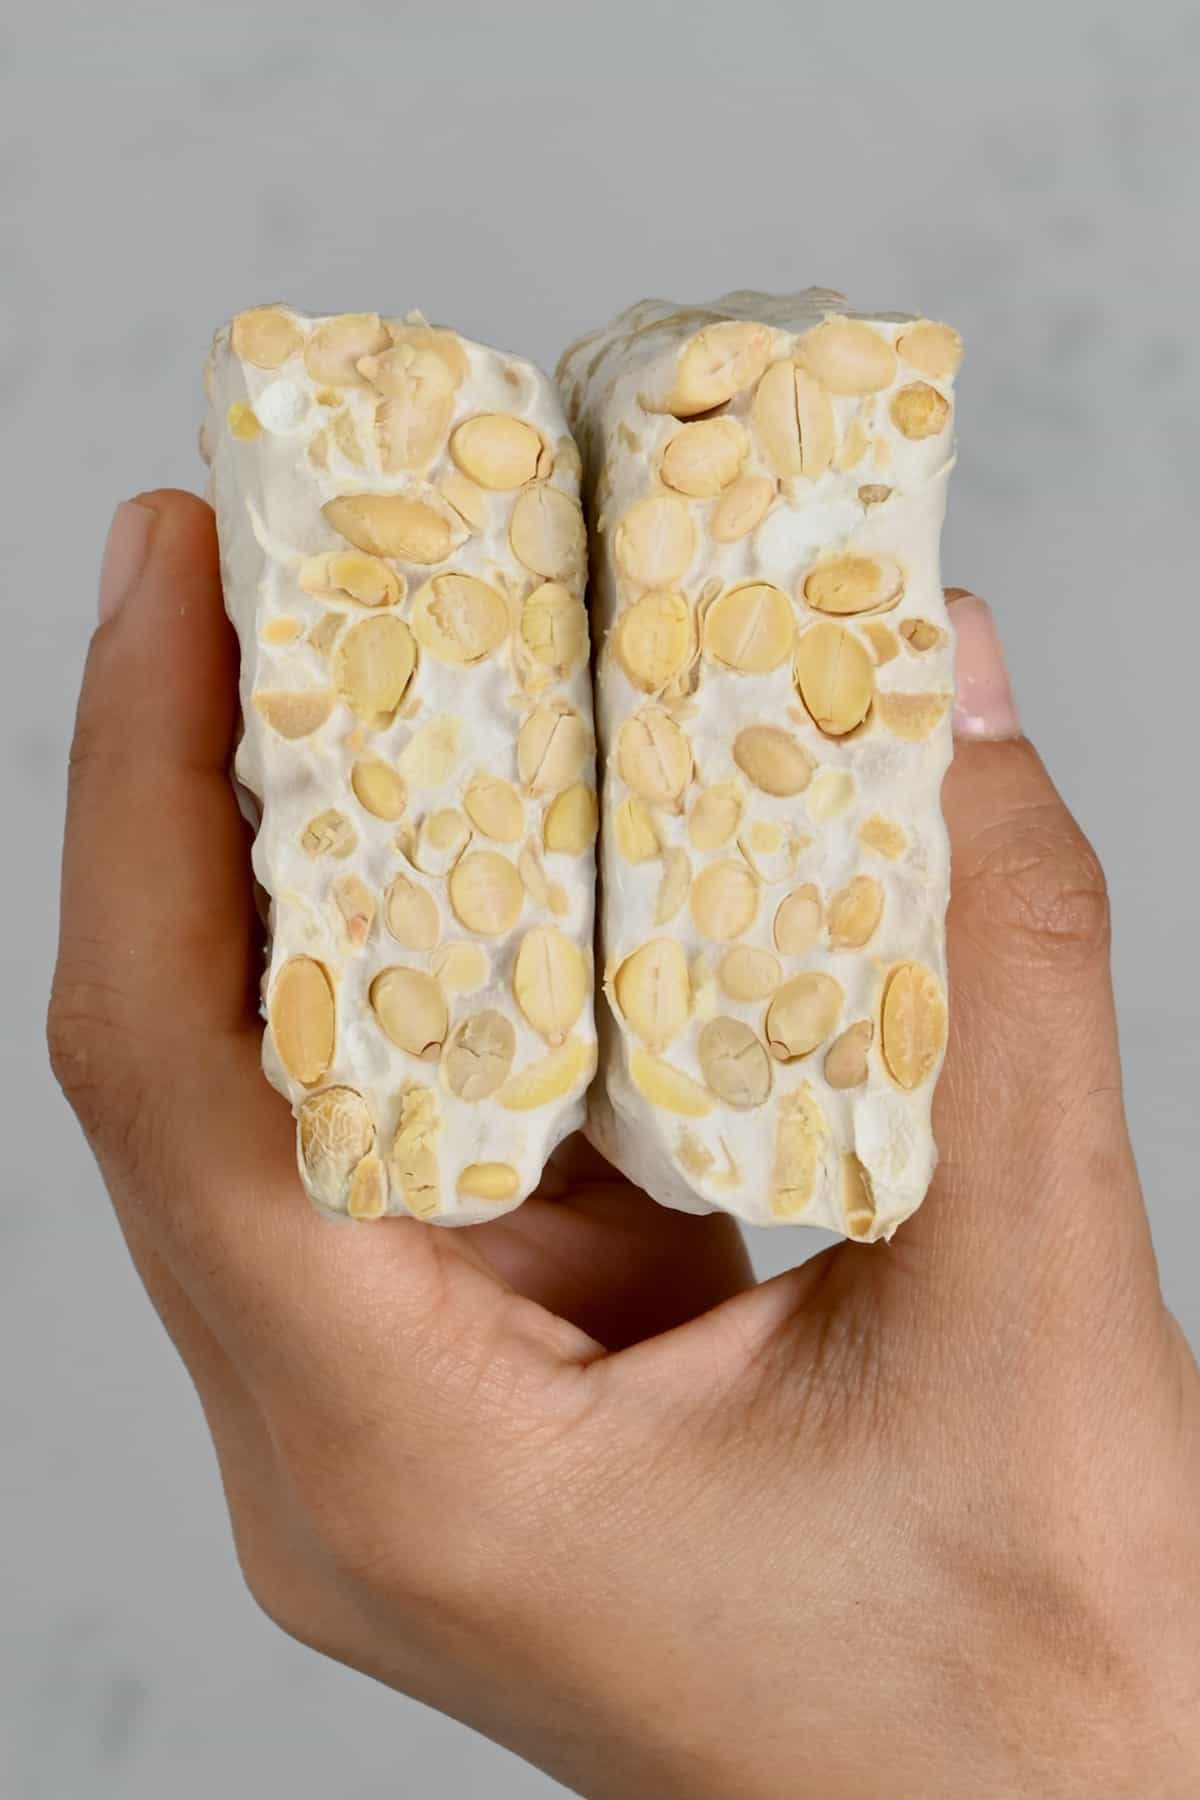
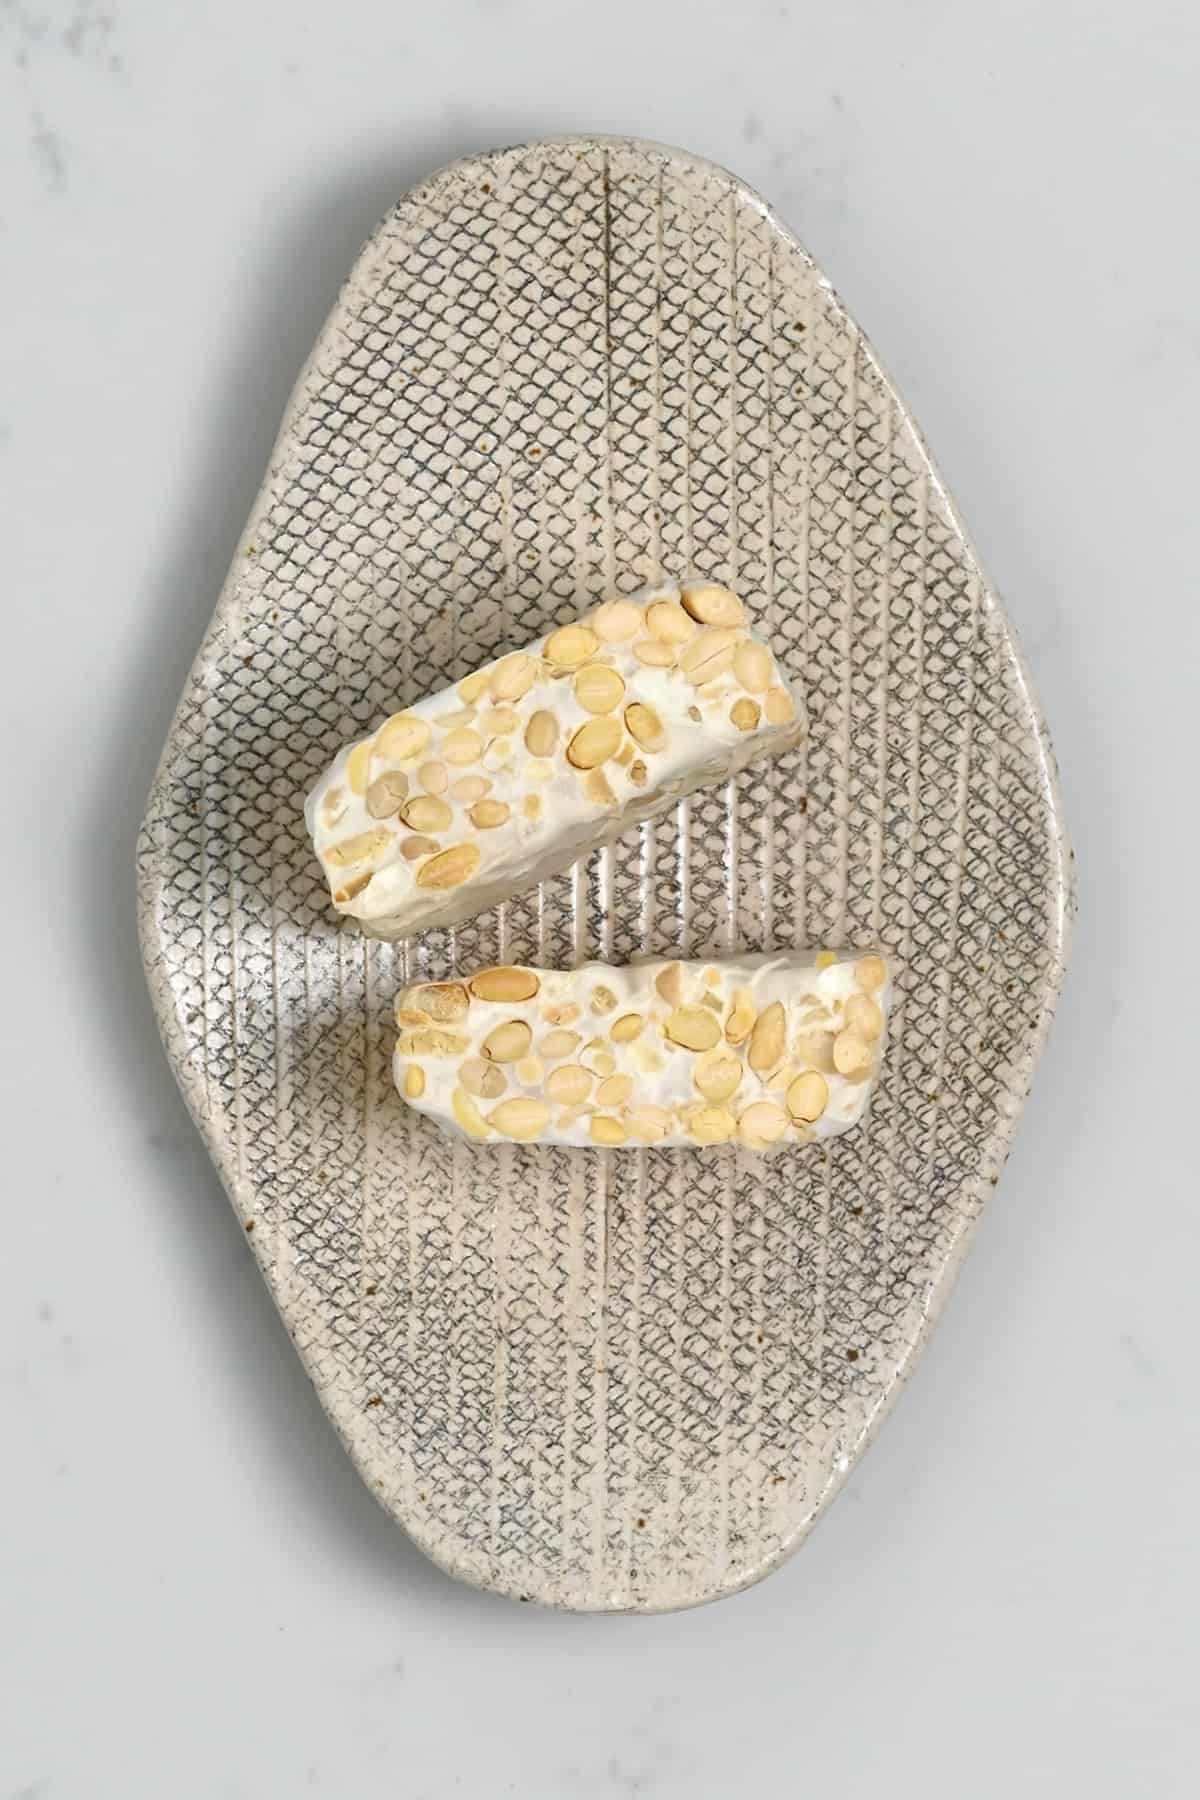
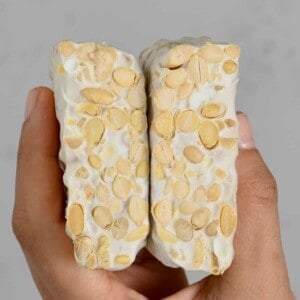
I suppose the first question to answer would be, what is tempeh? Tempeh is a type of fermented soybean “cake”/loaf. The flavor is nutty and slightly savory, with a texture that has a slight bite without being too firm.
Tempeh is made with whole soybeans and bound together into a “loaf” during the fermentation period, where mold grows. But don’t worry, it’s a beneficial mold that’s safe to eat.
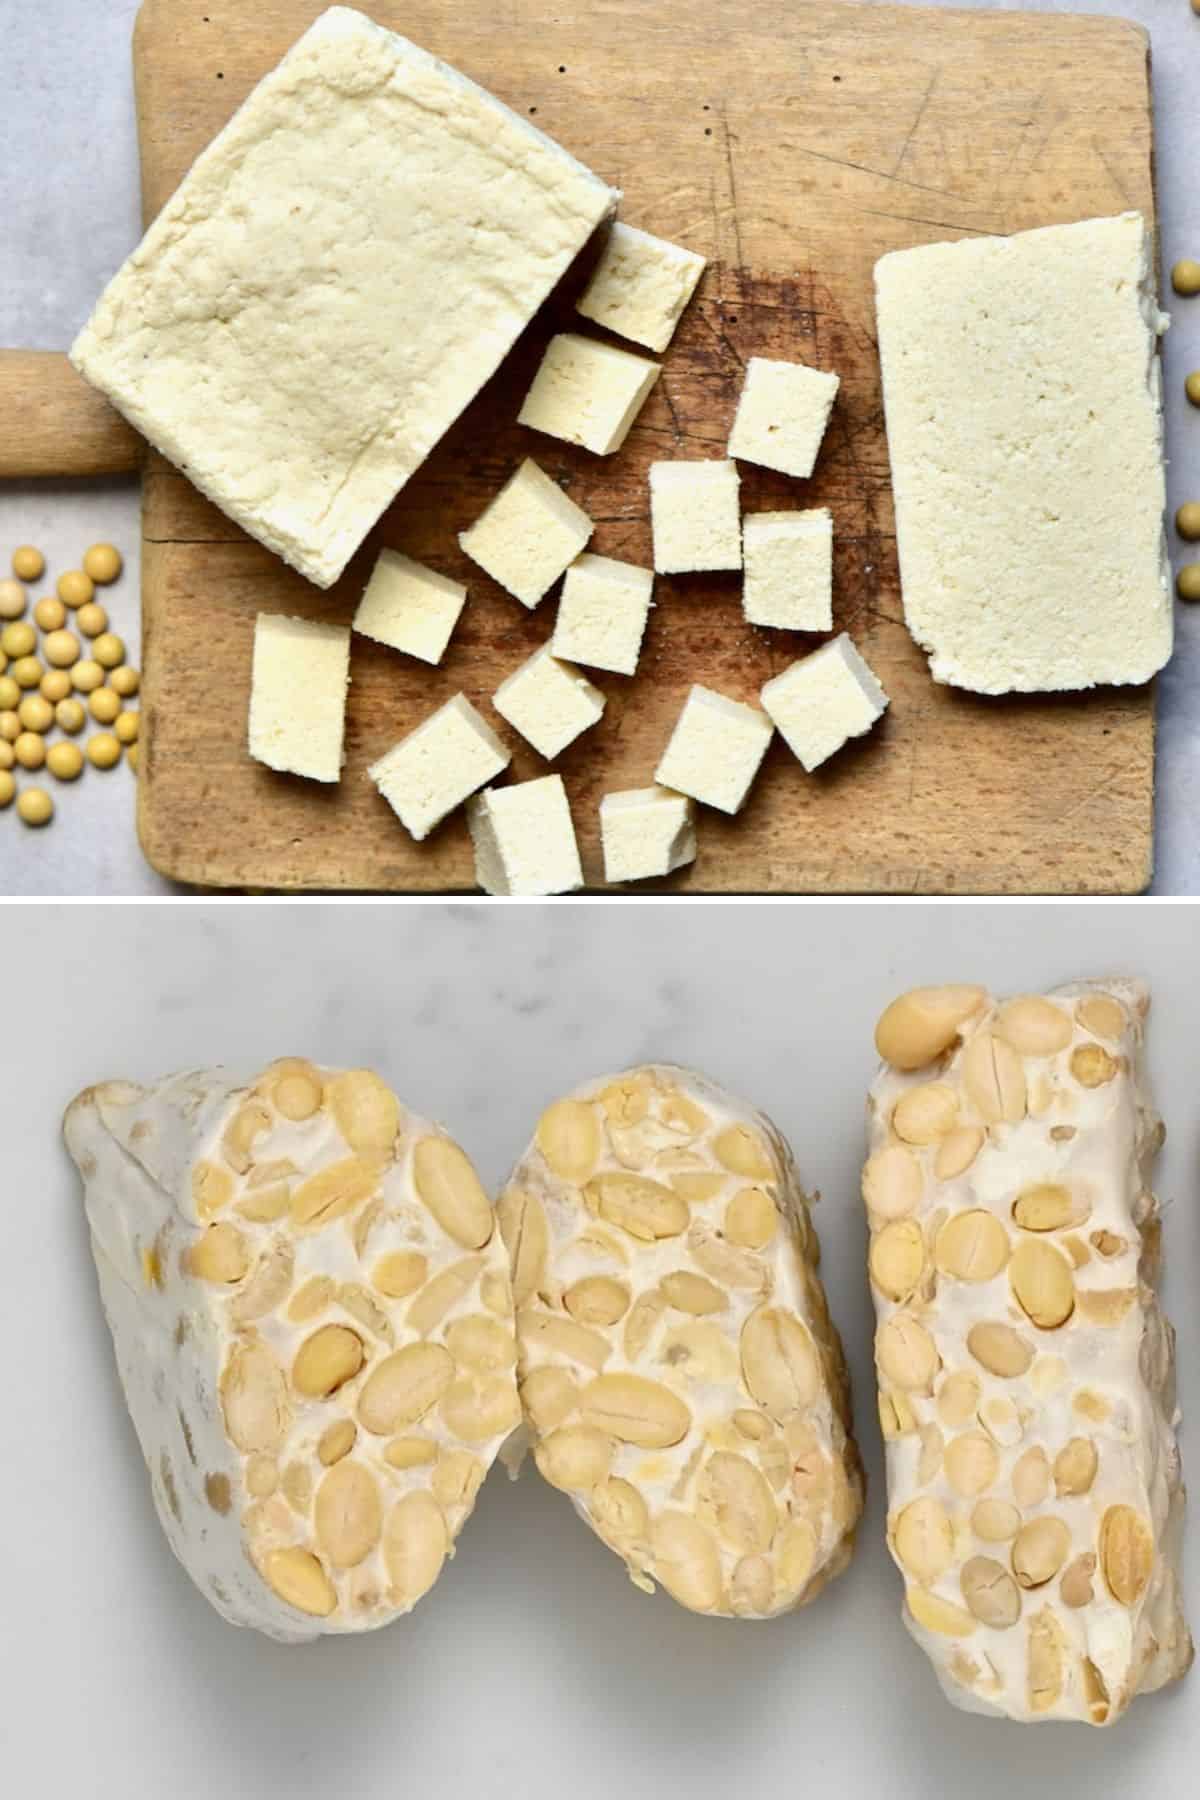
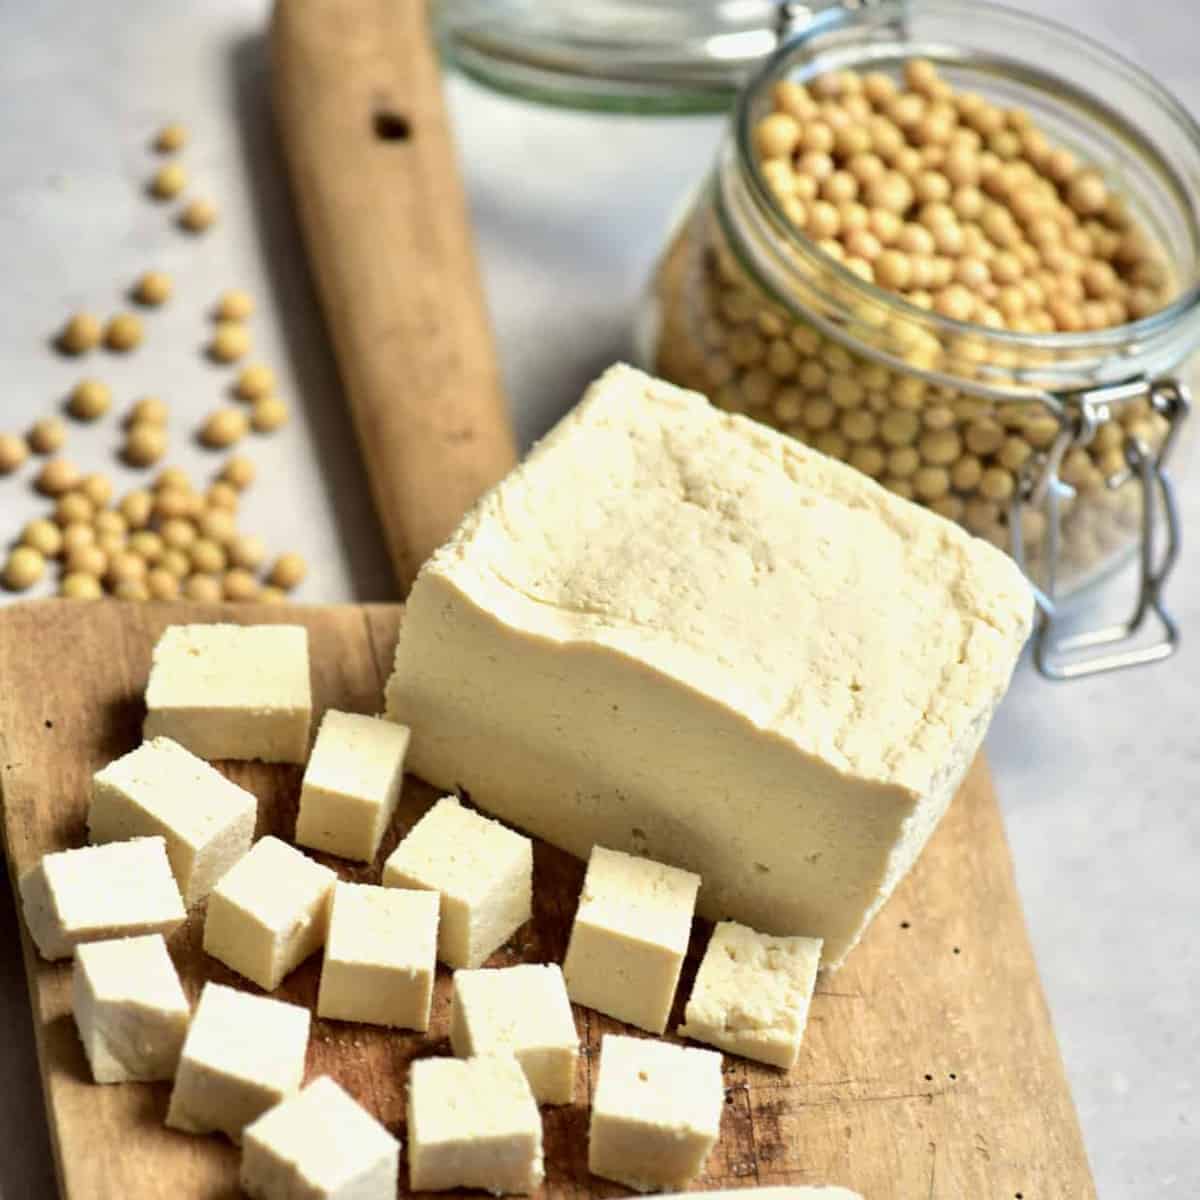
In comparison, tofu is made with soybean curds and pressed, in a similar way that cheese is made from milk curds.
Both have become staples to meat-free/vegan cuisine and can be marinated, baked, fried, etc.
The Ingredients

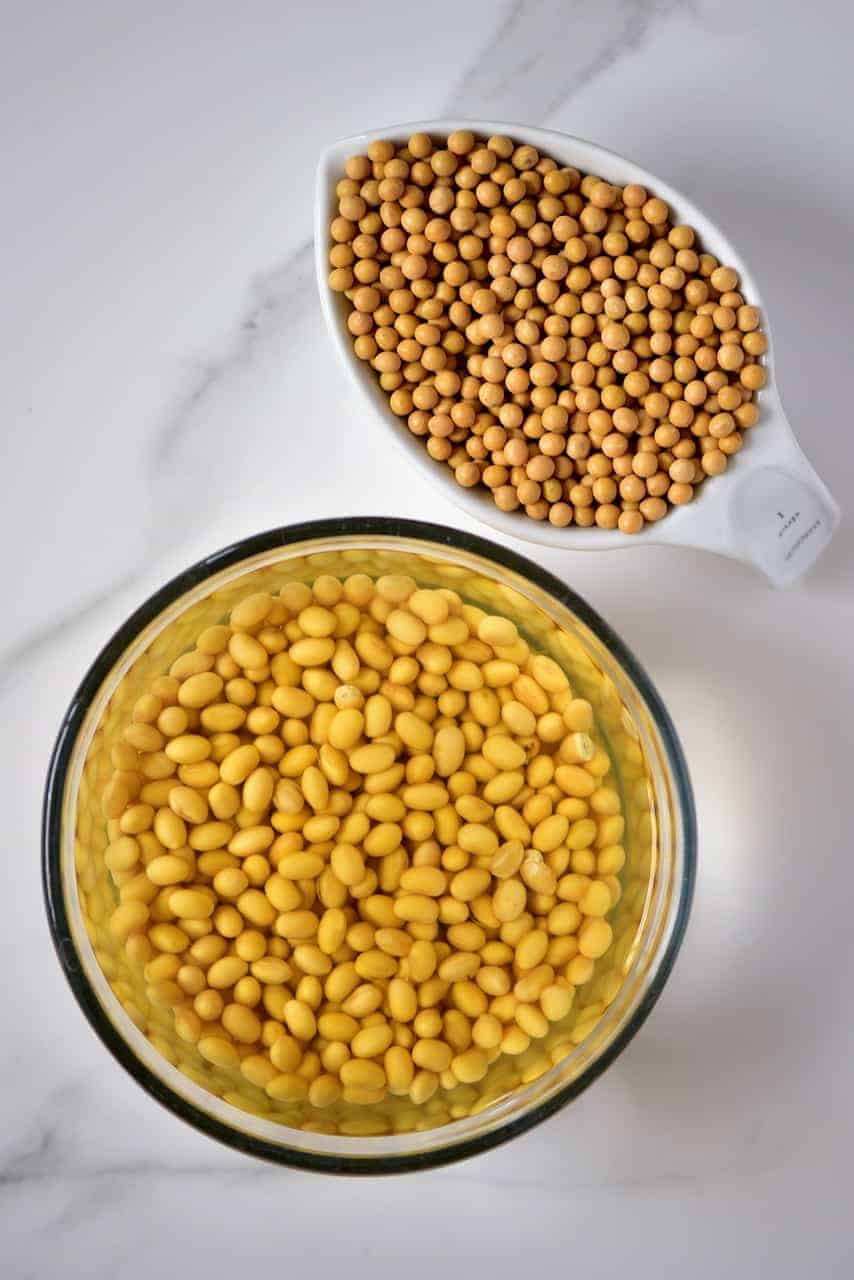
- Soybeans: within this post, I’m making traditional tempeh, which is made with soybeans. It’s best to use organic, non-GMO soybeans when possible for the best flavor and health effects.
- Tempeh starter: just like yogurt (another product that needs to ferment), homemade tempeh requires a “starter” which encourages the growth of the bacteria and the fermentation process. You can buy this online.
- Vinegar: I used red wine vinegar. However, you could also use pasteurized apple cider vinegar or another vinegar variety. It’s needed for the acidity to encourage mold growth while preventing ‘bad’ mold from growing.
You’ll also need
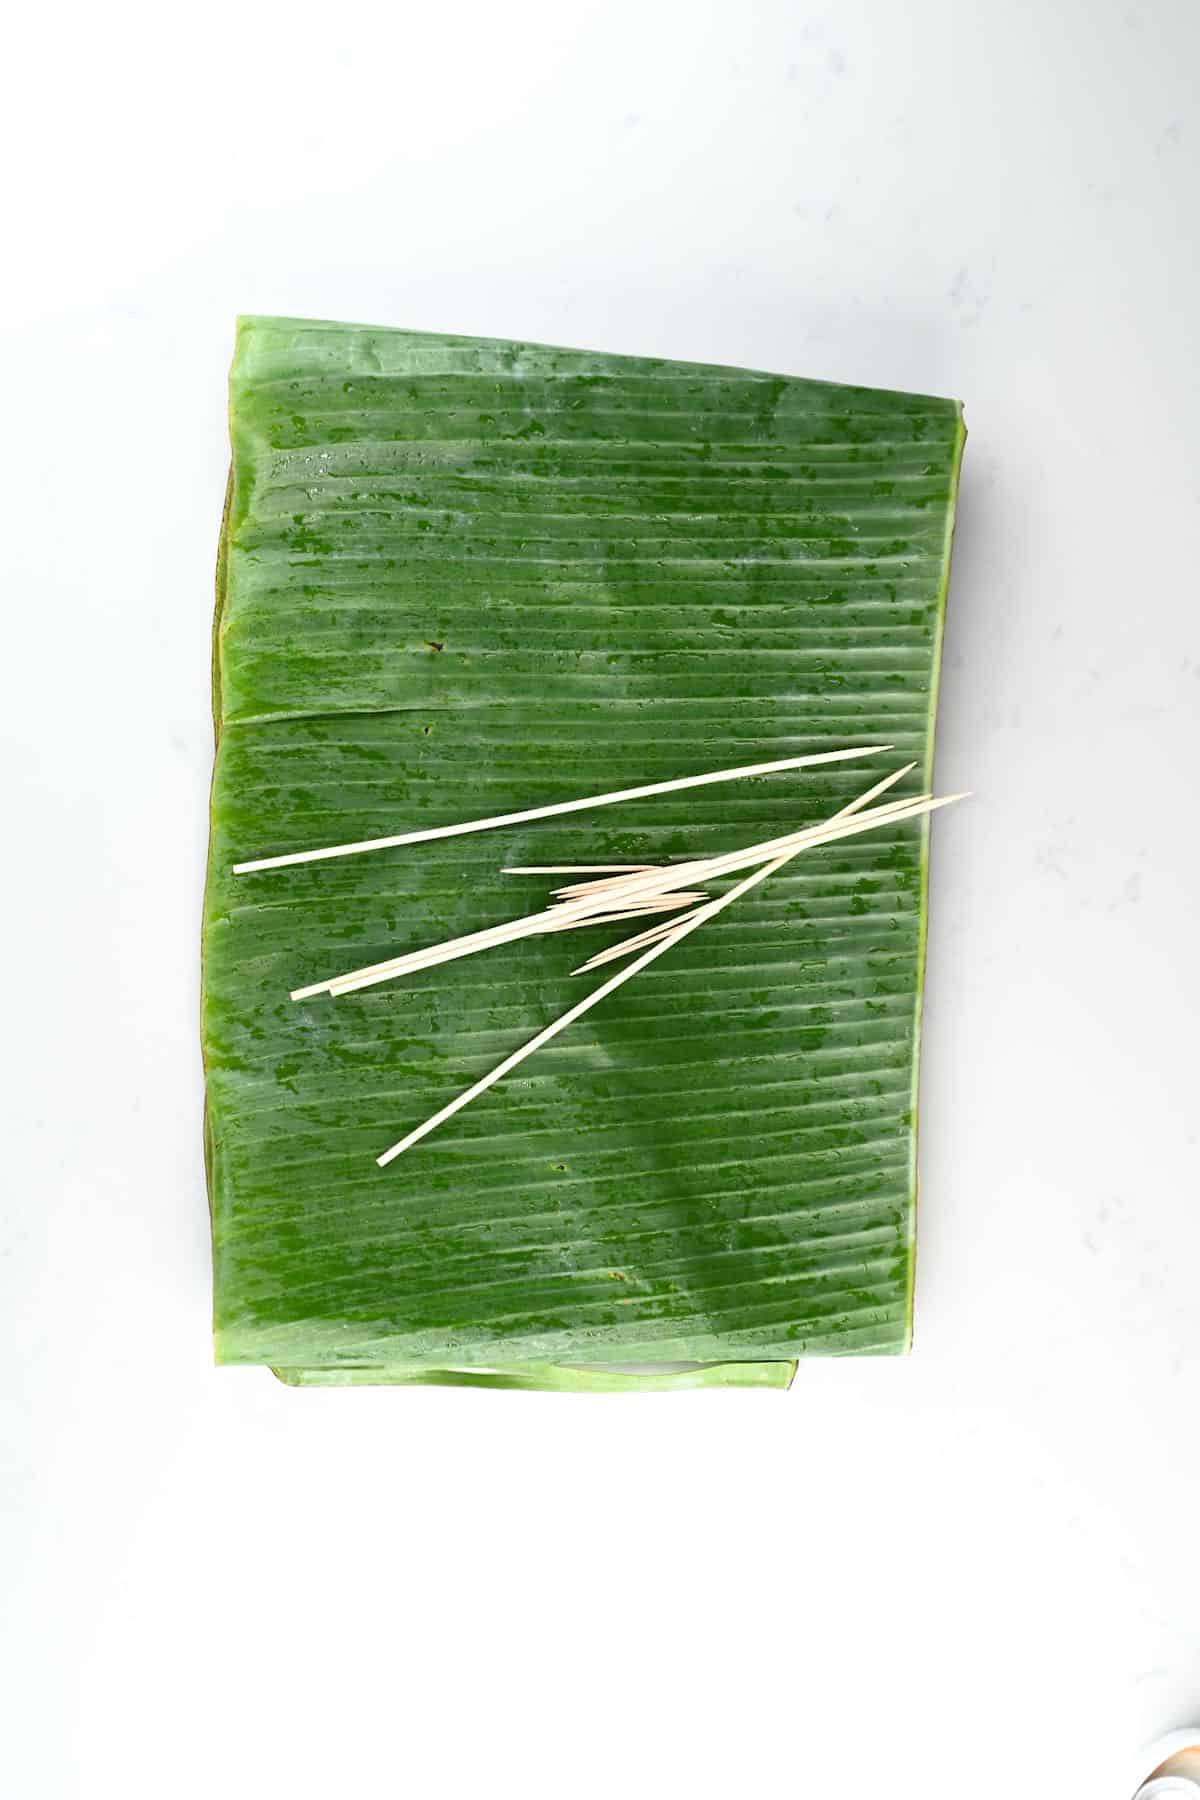
Banana leaves: the traditional way of preparing tempeh uses naturally porous banana leaves. You can find them in the frozen section in Asian stores.
While easy to make, tempeh has a couple of requirements when it comes to the container used during the fermentation process. It must have perforations or vented access to allow air to circulate all around the beans without them drying out from too much air.
You could also use (and re-use multiple times when cleaned thoroughly in-between) plastic zip-lock bags perforated evenly across the bag every 1-inch apart. To do this, you can use a toothpick or skewer and poke small holes in the bag; you may also be able to buy pre-perforated bags at the grocery store.
Toothpicks: to hold together the banana leaves or perforate the plastic bags if using them instead of leaves.
How To Make Tempeh
Step 1: Soak the soybeans
Soak the beans for at least 8 hours, or overnight then drain and rinse well.
The leftover soaking water can be used to water plants but shouldn’t be used for human consumption.
Step 2: Cook the beans
Then add the soybeans to a large pot with enough water to cover them by around an inch above the beans. Bring the mixture to a boil over medium heat, skimming any foam as needed.
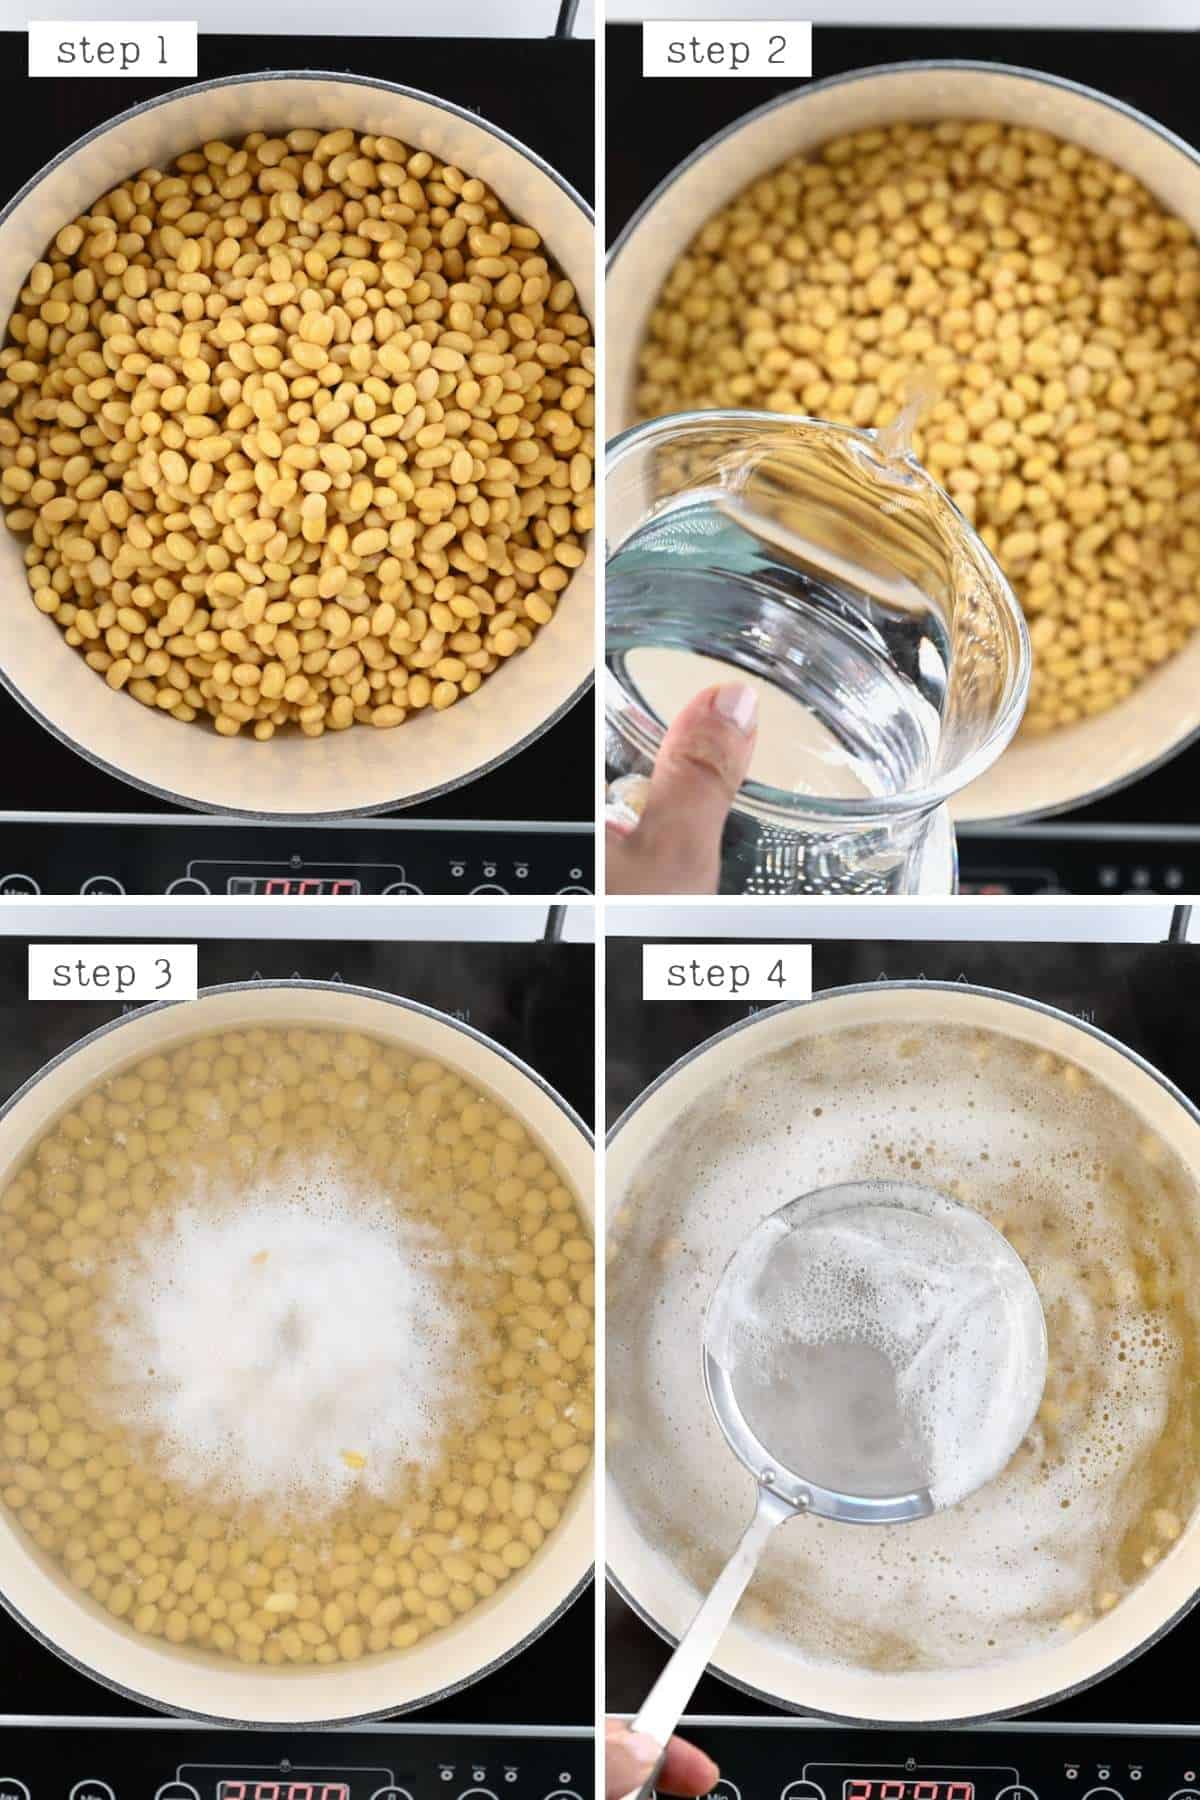
Then, lower the heat, cover with a lid, and simmer for around 35-40 minutes – until the beans are almost ready (about 80%).
Finally, add the vinegar, and cook for a further 10-15 minutes.
You can add the vinegar at the start of the cooking process for a more infused flavor. However, the cooking process is slowed down and will take longer than I’ve mentioned.

This process may take slightly less/longer for you, so check their done-ness after this time and increase if needed. The soybeans should be tender without being “mushy.”
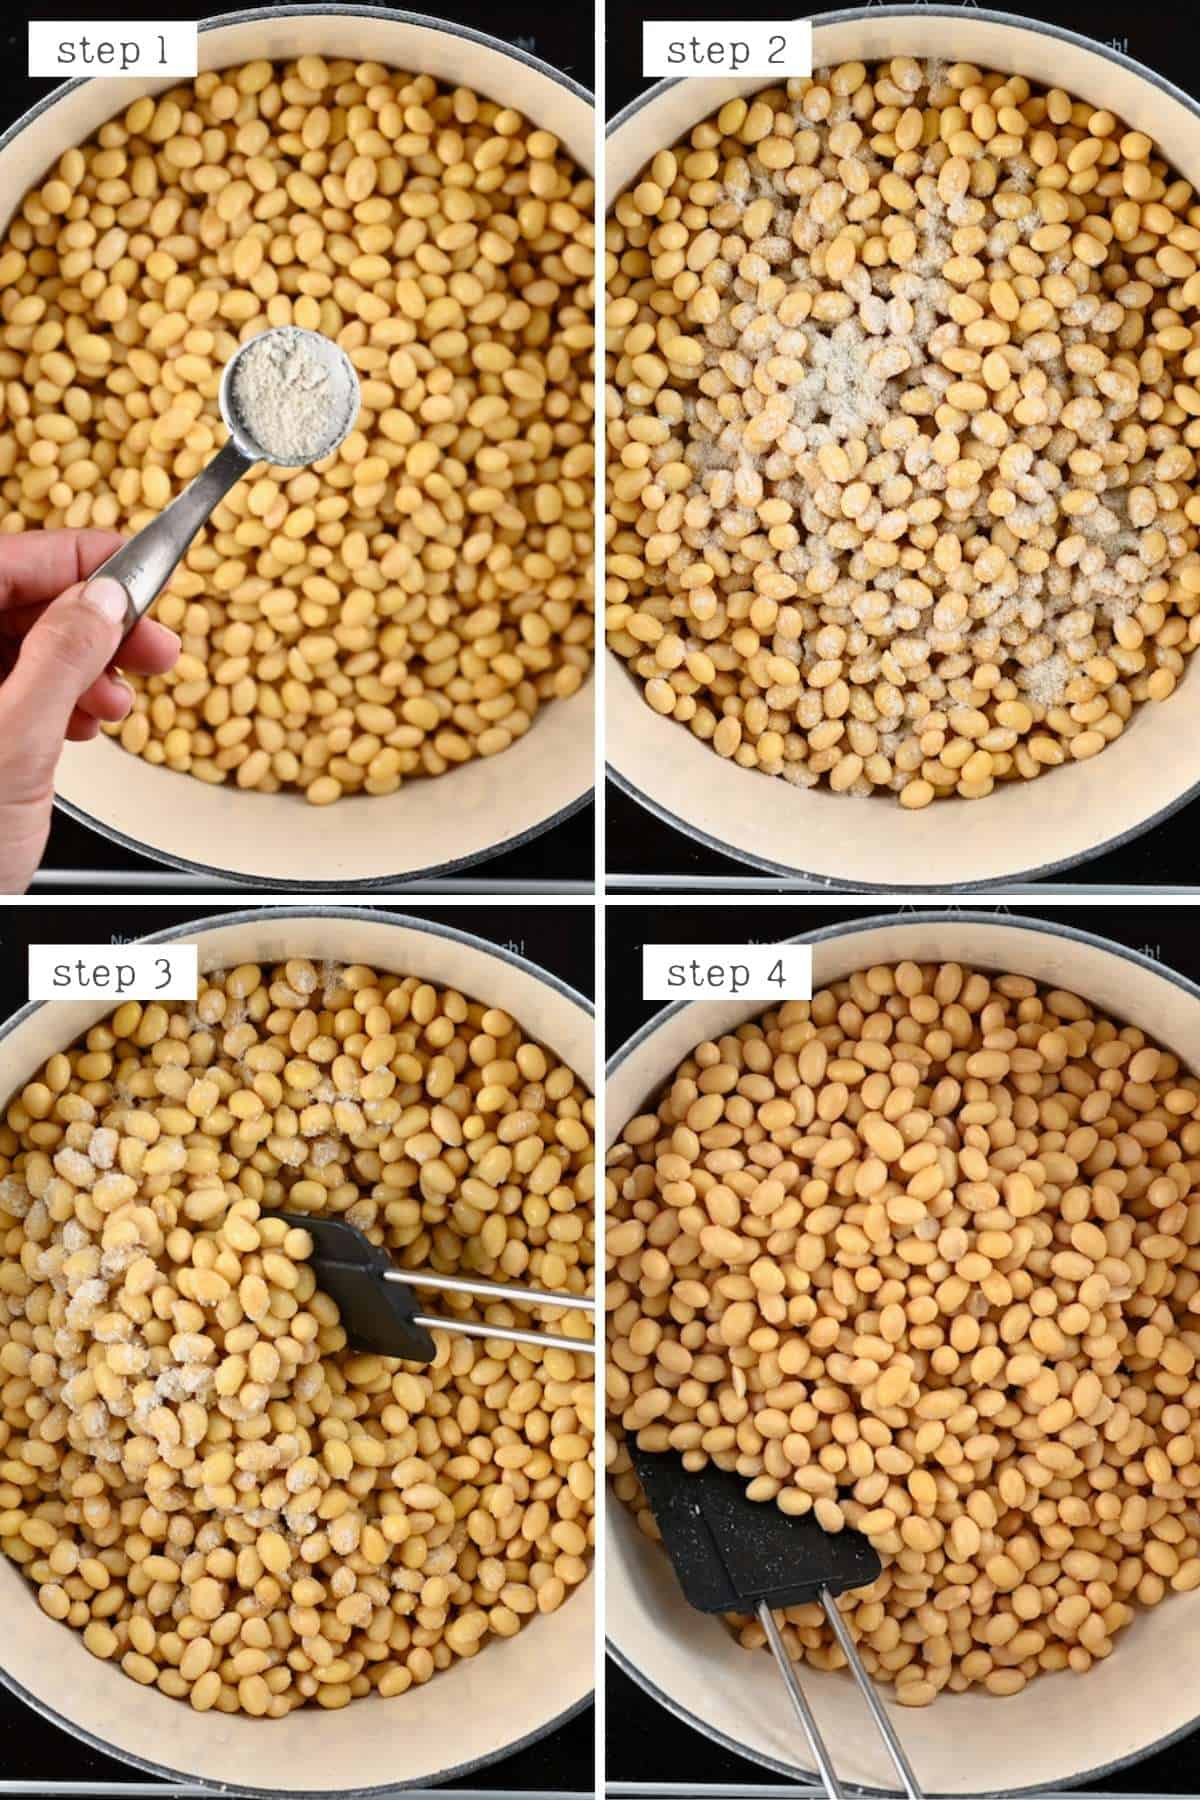
Sieve the cooked beans and allow them to cool slightly. Placed them in the pot in which you cooked them – the heat from the pot will help dry the beans, and then they will also cool down. If you have a thermometer, you want them to cool to around 95ºF/35ºC.
Then, add the tempeh starter and mix well to coat all the beans.
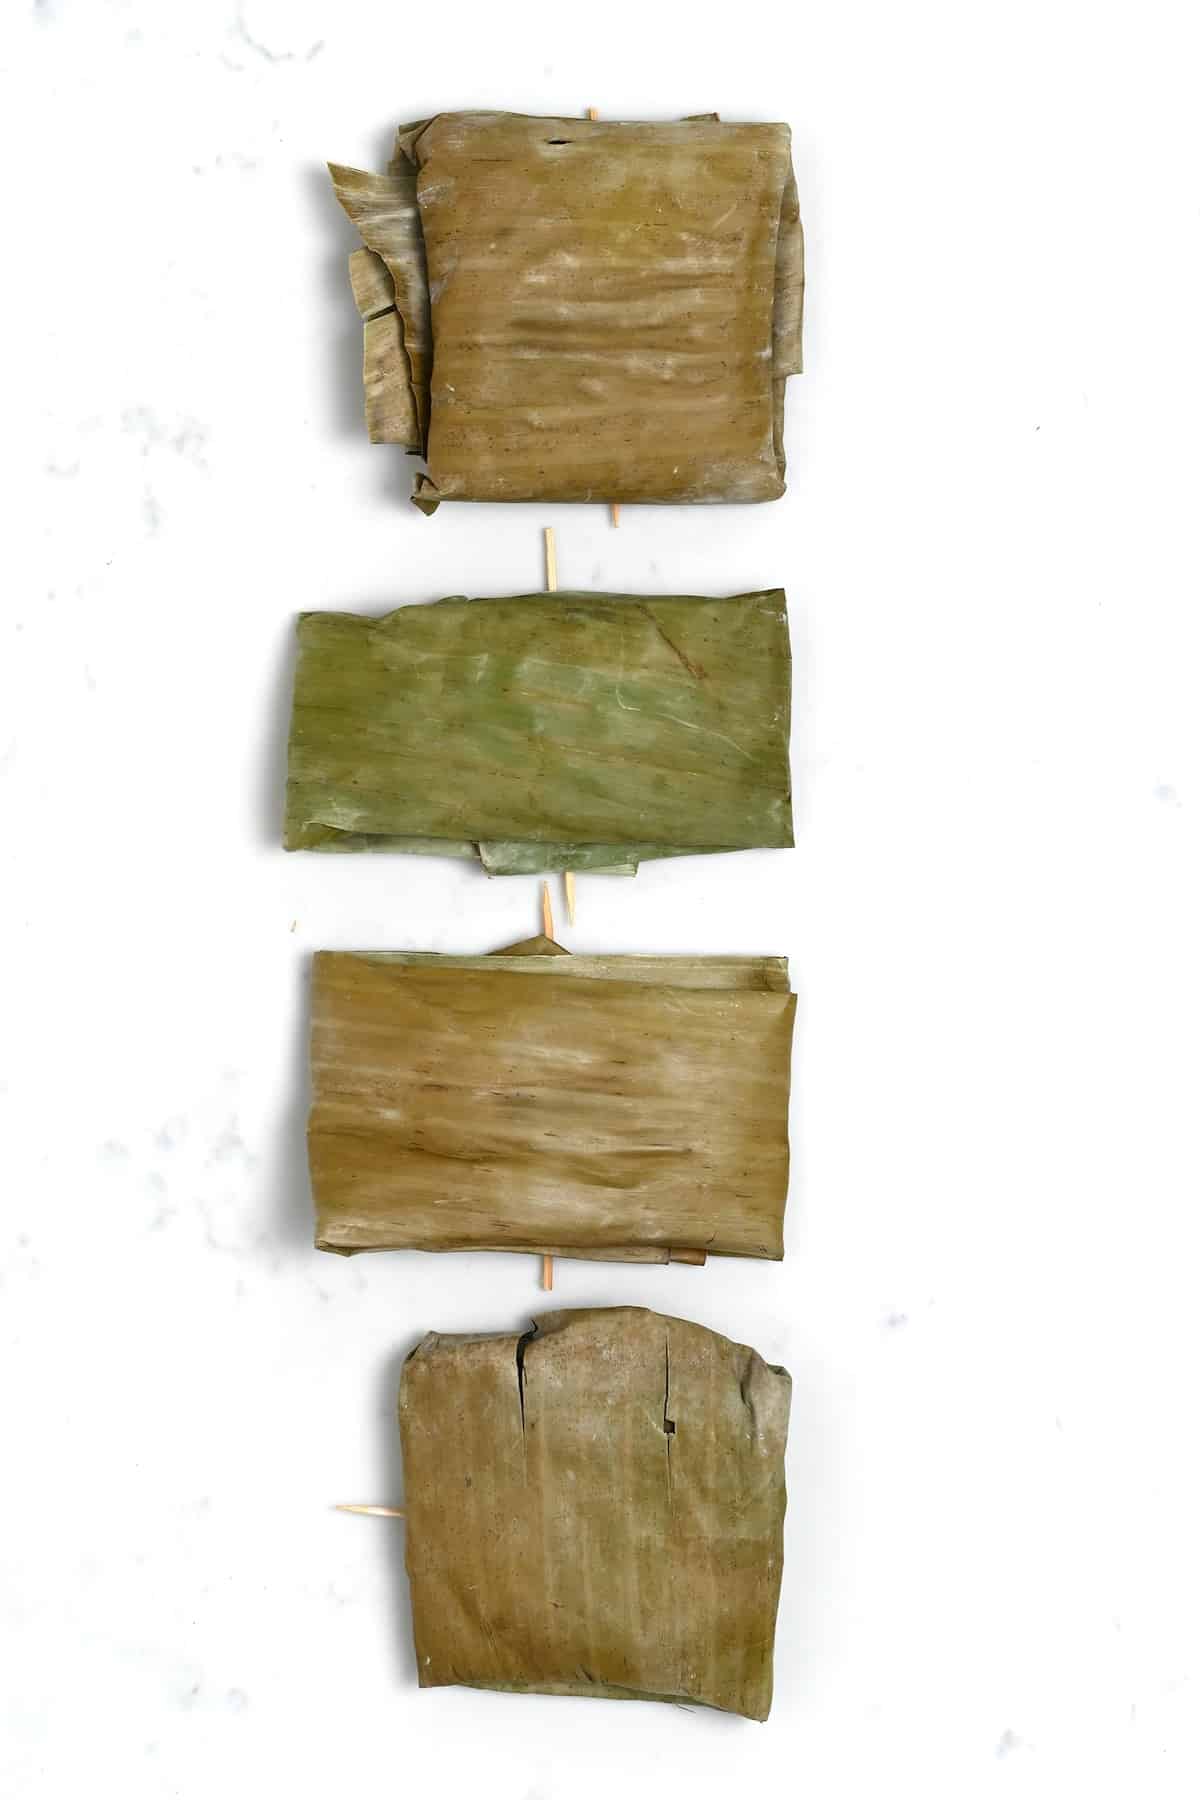
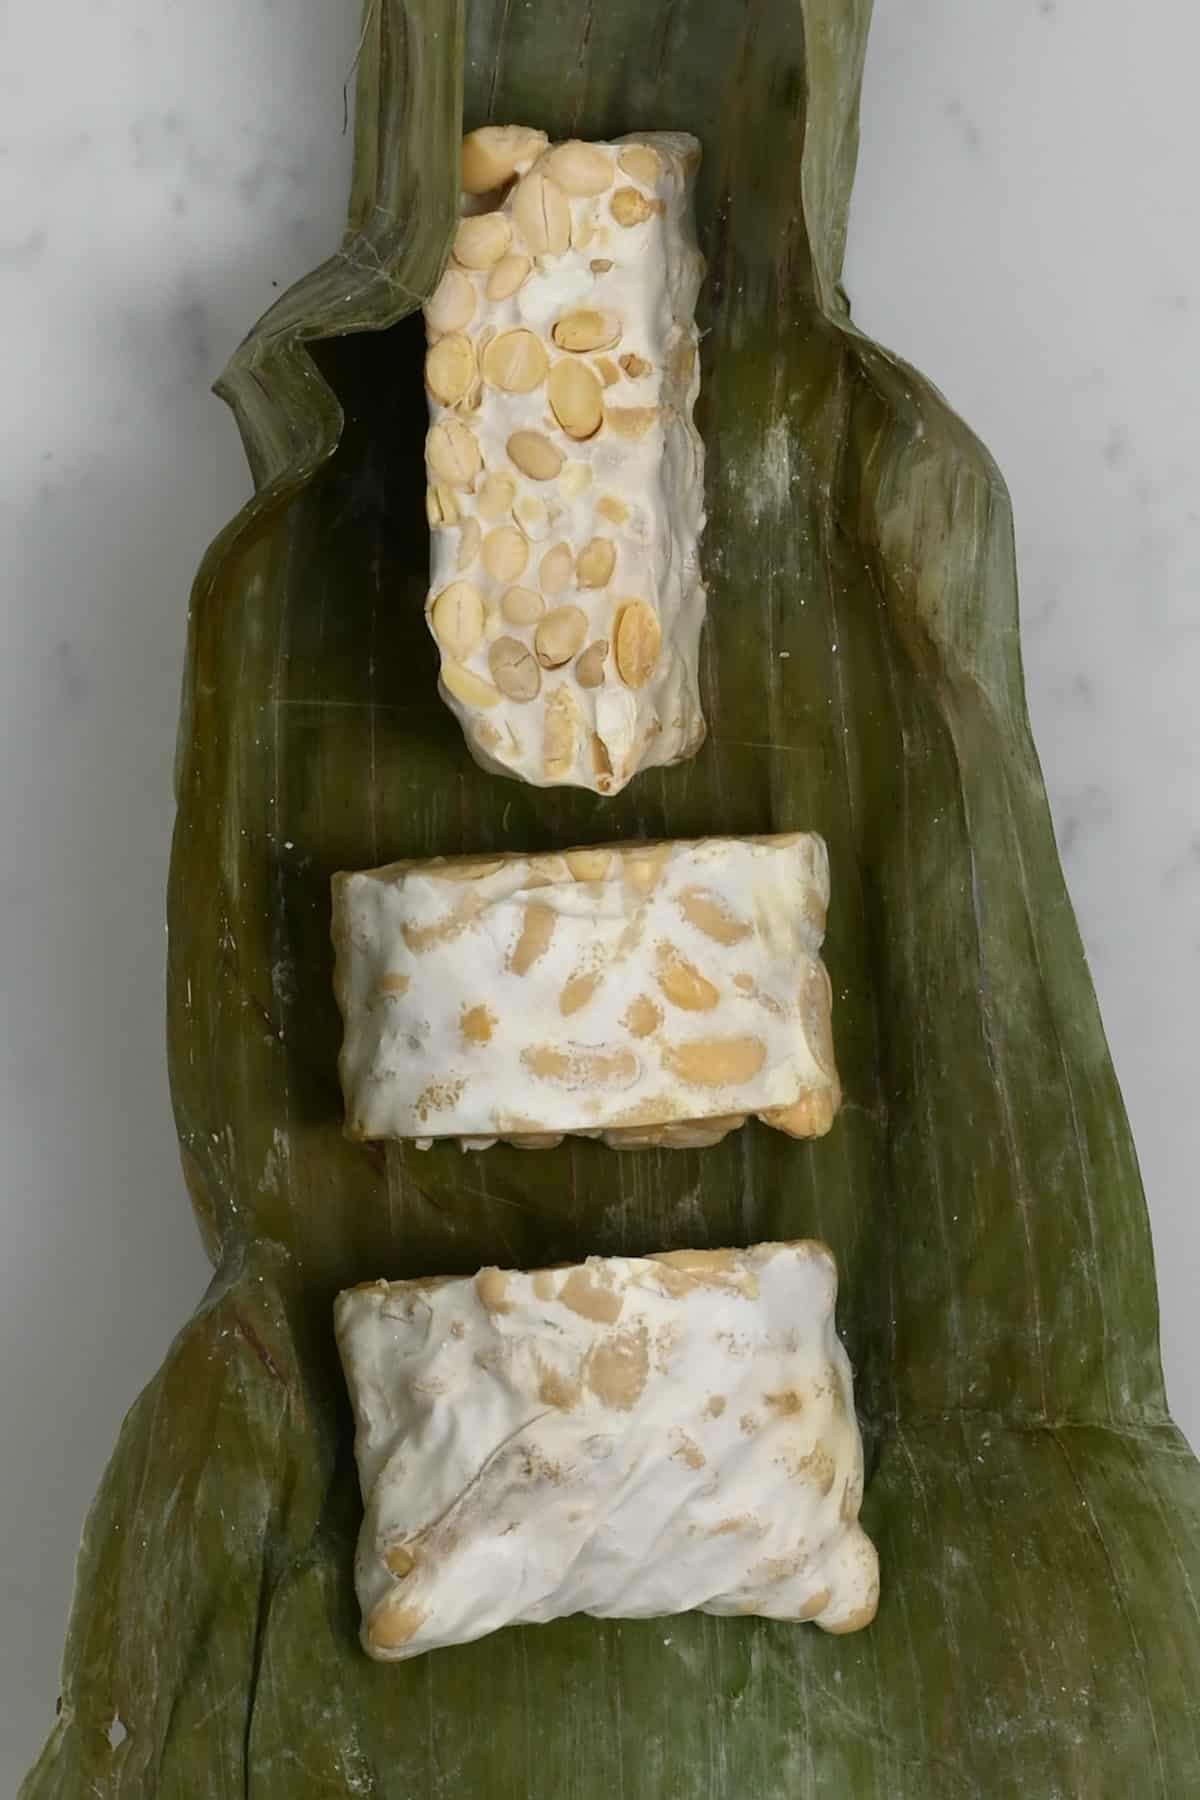
Step 3: Place the beans in the banana leaf
First, cut the leaf to the required size (enough to fold over without too much excess.
Scoop portions of the soybeans into the leave’s center and wrap them into small, tight parcels, securing them with a few toothpicks.

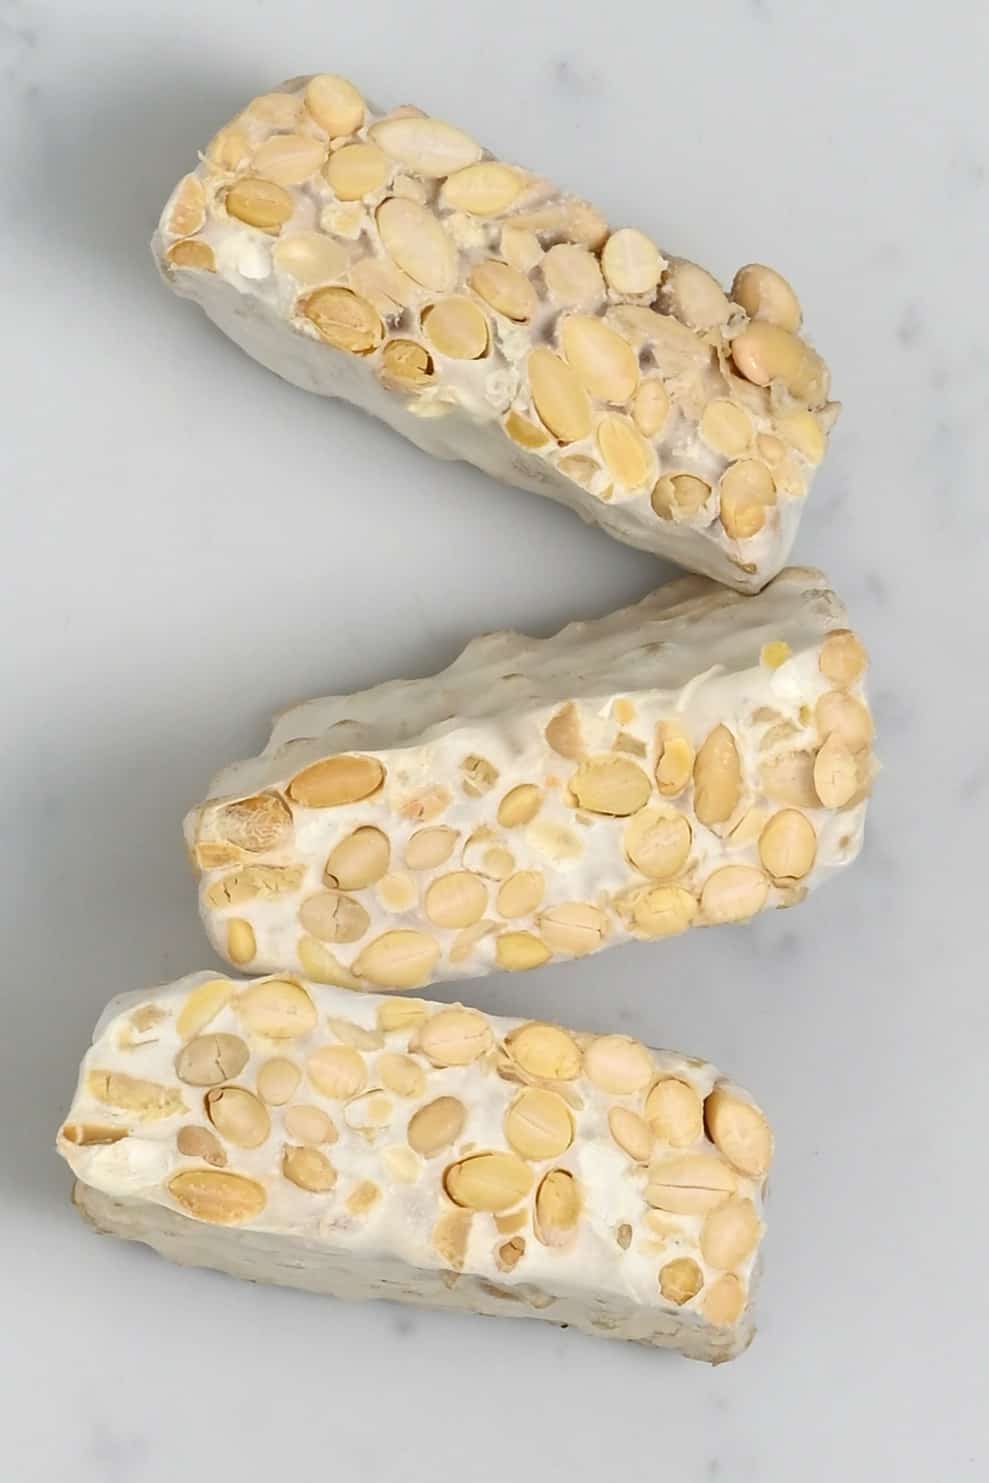
You can change the tempeh’s shape and depth based on personal preference; I usually make mine in a similar rectangular shape as a block of tofu (but obviously not as “thick” – refer to images). Depending on how tightly you wrap the leaf with change the thickness of the loaf.
You can do a similar process in perforated ziplock bags, folding the bag over to squeeze the beans into your thickness of choice. Alternatively, you can place the beans in a large glass container, fill it about halfway, and then place its lid on. Keep in mind that, if using a glass container, the tempeh will be less compact and a large layer of spores will develop on top of the beans.

Step 4: Ferment the homemade tempeh
Then, move the parcels to a warm location (or incubator) to allow for the fermentation. This can be done in an oven with the light on (remove after 12 hrs and leave in another ventilated warm area – possibly covered with a teatowel for warmth if needed), a warm cupboard, etc. Just make sure there is airflow.
Top Tip: The mycelium grows best at temperatures between 85-90ºF/29-32ºC. So, just like you would when leaving bread to rise, it’s best to incubate the fermenting soybeans somewhere warm, optionally using a thermometer.
If you’re using an external heat source, this usually is no longer needed after 12 hours, as the beans will now be producing their own heat from the fermentation process. You then need a ventilated warm area.
Within 26-48 hours, the mycelium should have grown and covered all of the beans. If not, leave for up to another day. Then, the tempeh is ready to be sliced, stored, or prepared and cooked for your recipes.
A little bit of grey/black on the mycelium is fine – but if the beans start to smell or turn completely black, then something has gone wrong during the fermentation process.
How To Store
Fridge: you can store the tempeh in the refrigerator for up to a week.
Freezer: freeze the tempeh, covered well, for up to 6 months. I freeze mine raw and then steam/boil it from frozen. It can also be pre-steamed before freezing.
FAQs
Traditional tempeh is made from soybeans (so yes, it is soy), a tempeh starter, and vinegar.
However, the method of how to make tempeh works well with other legumes and even grains: chickpeas, black beans, barley, millet, etc.
Technically, yes, you could (apparently, according to some initial research I’ve done). However, having fermented for several days, there’s a chance that some negative mold has grown within the fermentation period. By cooking the tempeh first, you avoid the potential health risks.
For that reason, I suggest you always cook it first!
Yes, it is. I would imagine that the majority of “starters” are gluten-free too, but double-check that if needed.
I suggest heating at 85ºF/29ºC for the first 2 hours then turning off the heat and leaving the dehydrator slightly “open” so that there’s airflow.
If you leave the dehydrator closed, the beans (which will be producing their own heat) may get too hot and kill the bacteria growth.
Other Notes
- To substitute the soybeans for another the process will stay the same except for how long you need to boil the legume.
- You can use the leftover soy pulp (called “okara”) from making homemade soy milk to make tempeh, too, with a couple of tweaks. Reduce the vinegar amount to 1/3 and heat the mixture to 90ºF/35ºC. Then combine with the starter and carry on with the method above.
- Please do NOT season the tempeh in any way before the fermentation, or it may interfere with the mold growth.
- The main reason that tempeh fails is due to too much moisture in the process; either the beans being too wet when the process was started (just before adding the starter), or the way you’ve incubated the beans has led to condensation. This is why it’s important to have airflow and not allow the beans to become too hot.
- If you’re using a thermometer during the fermentation process, make sure to insert it directly into the beans for an accurate reading.
- A few tiny grey or black marks on the tempeh is fine – it’s actually the same type of mold, just “older”.
Related Recipes & How-To’s
- How To Make Tofu at Home; Two Simple Methods
- Homemade Kombucha DIY: Plain & Pomegranate kombucha
- How To Make Yogurt (Natural Yogurt + Greek Yogurt)
- DIY Extra Virgin Coconut Oil (Cold-pressed Coconut Oil)
- How To Make Avocado Oil (Extra Virgin & Cold Process)
- Homemade Easy Pickled Cucumbers Recipe
- How to Make Miso Paste (Kome Miso/Shinshu Miso)


If you try this homemade tempeh method, then let me know your thoughts and questions in the comments. I’d also really appreciate a recipe rating and would love to see your recreations – just tag @AlphaFoodie.
How to Make Tempeh
Ingredients
- 30 oz dried soybeans soaked (5 cups); about 2 cups dry (14 oz/400 g)
- 1/4 cup red wine vinegar or white vinegar, pasteurized ACV, etc.
- 1 tsp tempeh starter
Instructions
Step 1: Soak the soybeans (If you haven't already)
- Soak the beans for at least 8 hours, or overnight then drain and rinse well.The leftover soaking water can be used to water plants but shouldn't be used for human consumption.
Step 2: Cook the beans
- Add the soybeans to a large pot with enough water to cover them by around an inch above the beans. Bring the mixture to a boil over medium heat, skimming any foam as needed.
- Lower the heat, cover with a lid and simmer for around 35-40 minutes – until the beans are almost ready (about 80%).
- Add the vinegar, and cook for a further 10-15 minutes.You can add the vinegar at the start of the cooking process for a more infused flavor. However, the cooking process is slowed down and will take longer than I've mentioned.This process may take slightly less/longer for you, so check their done-ness after this time and increase if needed. The soybeans should be tender without being mushy.'
- Sieve the cooked beans and allow them to cool slightly. Place them back in the pot in which they cooked so that the heat from the pot dries them out as they cool down. If you have a thermometer, you want them to cool to around 95ºF/35ºC.
- Add the tempeh starter and mix well to coat all the beans.
Step 3: Place the beans in the banana leaf
- Cut the leaf to the required size (enough to fold over without too much excess).
- Scoop portions of the soybeans into the leaves' center and wrap them into small, tight parcels, securing them with a few toothpicks.You can change the tempeh's shape and depth based on personal preference; I usually make mine in a similar rectangular shape as a block of tofu (but obviously not as 'thick – refer to the images on the blog post). Depending on how tightly you wrap the leaf with change the thickness of the loaf.You can do a similar process in perforated ziplock bags, folding the bag over to squeeze the beans into your thickness of choice. Alternatively, you can place the beans in a large glass container, fill it about halfway, and then place its lid on. Keep in mind that, if using a glass container, the tempeh will be less compact and a large layer of spores will develop on top of the beans.
Step 4: Ferment the homemade tempeh
- Move the parcels to a warm location (or incubator) to allow for the fermentation. This can be done in an oven with the light on (remove after 12 hrs and leave in another ventilated warm area, possibly covered with a teatowel for warmth if needed), a warm cupboard, etc. Just make sure there is airflow.Top Tip: The mycelium grows best at temperatures between 85-90ºF/29-32ºC. So, just like you would when leaving bread to rice, it's best to incubate the fermenting soybeans somewhere warm, optionally using a thermometer.If you're using an external heat source, this usually is no longer needed after 12 hours, as the beans will now be producing their own heat from the fermentation process. You then need a ventilated warm area.
- Within 26-48 hours, the mycelium should have grown and covered all of the beans. If not, leave for up to another day. Then, the tempeh is ready to be sliced, stored, or prepared and cooked for your recipes.A little bit of grey/black on the mycelium is fine – but if the beans start to smell or turn completely black, then something has gone wrong during the fermentation process.
How To Store
- Fridge: You can store the tempeh in the refrigerator for up to a week.Freezer: Freeze the tempeh, covered well, for up to 6 months. I freeze mine raw and then steam/boil it from frozen. It can also be pre-steamed before freezing.
Notes
- To substitute the soybeans for another the process will stay the same except for how long you need to boil the legume.
- You can use the leftover soy pulp (called “okara”) from making homemade soy milk to make tempeh, too- with a couple of tweaks. Reduce the vinegar amount to 1/3 and heat the mixture to 90ºF/35ºC. Then combine with the starter and carry on with the method above.
- Please do NOT season the tempeh in any way before the fermentation, or it may interfere with the mold growth.
- The main reason that tempeh fails is due to too much moisture in the process; either the beans being too wet when the process was started (just before adding the starter), or the way you’ve incubated the beans has led to condensation. This is why it’s important to have airflow and not allow the beans to become too hot.
- If you’re using a thermometer during the fermentation process, make sure to insert it directly into the beans for an accurate reading.
- A few tiny grey or black marks on the tempeh is fine – it’s actually the same type of mold, just “older”.
Nutrition
Nutrition information is automatically calculated, so should only be used as an approximation.


Nice article, but I’d like to address one important misnomer often found in Tempeh articles. The white matter that grows between the beans is mycelium (mushroom ‘roots’). You’re NOT growing/eating ‘mold,’ just soybeans & mushrooms. It’s a fungus, not mold. The stuff foragers go out to hunt in the forests.
Maybe mycelium ‘look’s like’ mold, but it’s not. I don’t know about anyone else, but the only mold I want to eat is penicillin. It would be great if you could update your article. The ‘mold’ description probably scares many away from ever trying Tempeh. That’s a shame, because Tempeh BBQ is probably the tastiest vegan/vegetarian chewy food out there.
Thanks for your feedback, Thom! You’re totally right, mycelium is not mold. I appreciate you pointing that out. <3