
This post may contain affiliate links. Please read our disclosure policy.


This easy kimchi fried rice recipe (aka kimchi bokkeumbap) combines delicious tangy kimchi with rice (fresh or day-old leftovers) with several aromatics and tons of optional add-ins for a quick and simple, sour, spicy, savory breakfast, lunch, or dinner in under 15 minutes! Plus, it’s gluten-free and can be made vegetarian or even vegan!
Kimchi fried rice (aka kimchi bokkeumbap/ 볶음밥) is to Korea what beans on toast is to the UK – a cheap, easy meal ready in practically minutes and a classic “students’ food” for those very reasons. However, this Korean fried rice dish is packed with layers of tangy, sweet, spicy, savory flavor. It combines day-old fluffy Jasmine rice with tangy napa cabbage kimchi and several aromatics for a perfect, tasty, quick breakfast (similar to this breakfast fried rice with egg), lunch, or dinner.
Having previously shared a rainbow vegetarian bibimbap recipe, which takes quite a bit more prep time, I’m absolutely loving the simplicity of this Korean fried rice dish. Even better, though, just like veggie lo-mein, this kimchi fried rice is one of those dishes that’s perfect for the end of the week to throw in all the leftover veggies sitting at the back of your crisper draw and leftover proteins in your fridge.
Below is a perfect “base” recipe. However, I’ve also included a long list of suggested add-ins based on what you have available and the season! The resulting dish is a wonderfully wholesome, comforting breakfast (like this savory oatmeal) or quick lunch/dinner!
Want to save this recipe?
The Ingredients
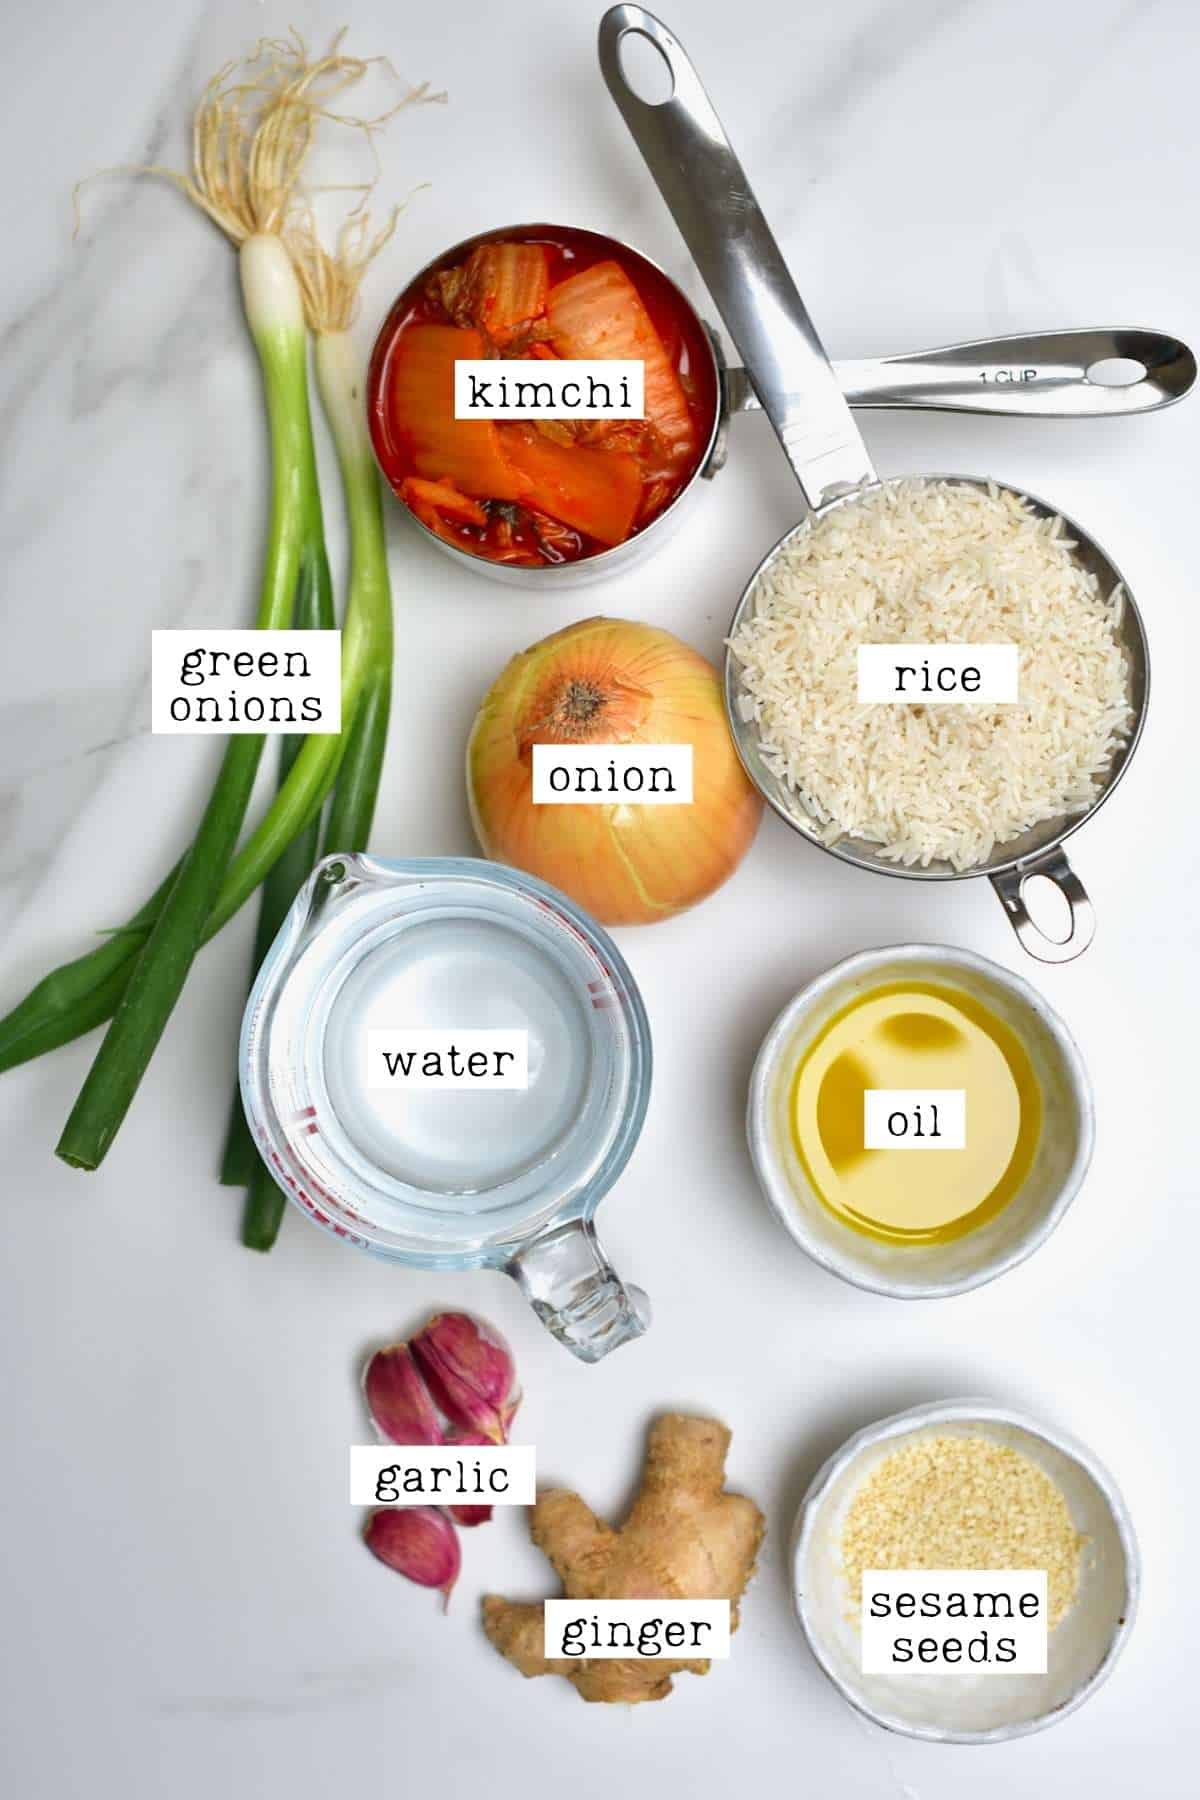
- Kimchi: I used homemade napa cabbage kimchi with some of the juice from the jar (I recommend squeezing all the juice from the kimchi to measure it separately). For vegetarian kimchi fried rice, make sure to prepare your kimchi without the fish products or use a store-bought vegetarian option. This recipe is made best with slightly over-ripened kimchi.
- Rice (and water to cook it): I used jasmine rice. Traditionally short-grain rice is used, though medium and long-grain will also work. This recipe is perfect for leftover Jasmine rice, though – so there’s no need to cook it from scratch if you have some in your fridge already. You can also use cooked frozen rice – just thaw it in the refrigerator overnight (or in the microwave).
- Aromatics: I used a simple combination of garlic (or garlic paste), ginger (or ginger paste), green onions, and yellow onion (or shallot) as my main flavorings/aromatics/ We don’t need to overly complicate it, as kimchi is our primary source of flavor.
- Oil: I used olive oil, but feel free to use the cooking oil of your choice. A little sesame oil can be used to add extra flavor to the dish.
- Sesame seeds: you can use white or black sesame seeds, raw or toasted.
- Sugar: optional – just a pinch of sugar will help balance the pungent kimchi and neutral rice flavors.
Optional add-ins and variations
This kimchi fried rice recipe is an excellent “base,” perfect for adding in proteins, extra veggies, and more. Below are some of my top suggestions.
- Vegetables: some of the most traditional add-ins include carrots, mushrooms (enoki works very well), zucchini, and peppers. Bok choy, kale, spinach, broccoli, peas, cabbage, and edamame would also work.
- Proteins: mix out the protein based on what you eat. Spam and pork are apparently the most common additions (I eat neither, though). However, you can also add beef, chicken, tuna, shrimp, ham, tempeh, or tofu(Check out simple methods of how to make tofu) .
- Egg: I’ll usually add a fried egg as a garnish, rather than mixing it into the Korean fried rice. However, either will work. You could also use scrambled tofu.
- Seaweed: otherwise referred to as “gim,” thinly shredded dried seaweed (nori) is a classic addition to any Korean fried rice dish.
- Gochujang: Gochujang sauce (a type of Korean chili paste sauce) is a popular addition to kimchi fried rice. Its sweet, spicy, umami-rich flavor helps add tons of flavor.
- Chili: you could alternatively add some extra chili powder or red pepper flakes (Gochugaru Korean pepper flakes are best) as a garnish for extra spice.
- Soy sauce: For extra saltiness, add a bit of soy sauce (use tamari for a gluten-free option).
How to Make Kimchi Fried Rice (Kimchi Bokkeumbap)
Step 1: Cook the rice
This kimchi fried rice recipe is perfect for using “day old”/leftover rice, so feel free to skip this step entirely if you have rice already.
First, wash the rice well until the water runs almost clear. I like to do this by placing the rice in a bowl and covering it with water, swishing it around with my hand, then dumping the water and refilling the bowl. I repeat this until the water is almost clear (this way, you waste less water than placing it under running water the entire time).
Add the rice and water to a medium-large pan and bring to a boil over medium-high heat. Then reduce the heat to a gentle simmer (medium heat) and cook for 12 minutes, or until tender.

Transfer the cooked rice to a wide plate to cool (to help it cool faster).
Step 2: Prepare the aromatics
While the rice cooks, thinly slice the onion and green onions (keep the latter aside for garnishing). Then mince the garlic and ginger (unless you are using garlic and ginger paste).
Optionally, you can also cut your kimchi into smaller pieces, depending on how big it is.
I also like to lightly toast the sesame seeds. Do this in a large skillet with no oil over medium-low heat until nice and fragrant – just a couple of minutes are enough, be careful so the seeds don’t burn. Then remove from the skillet and set aside.
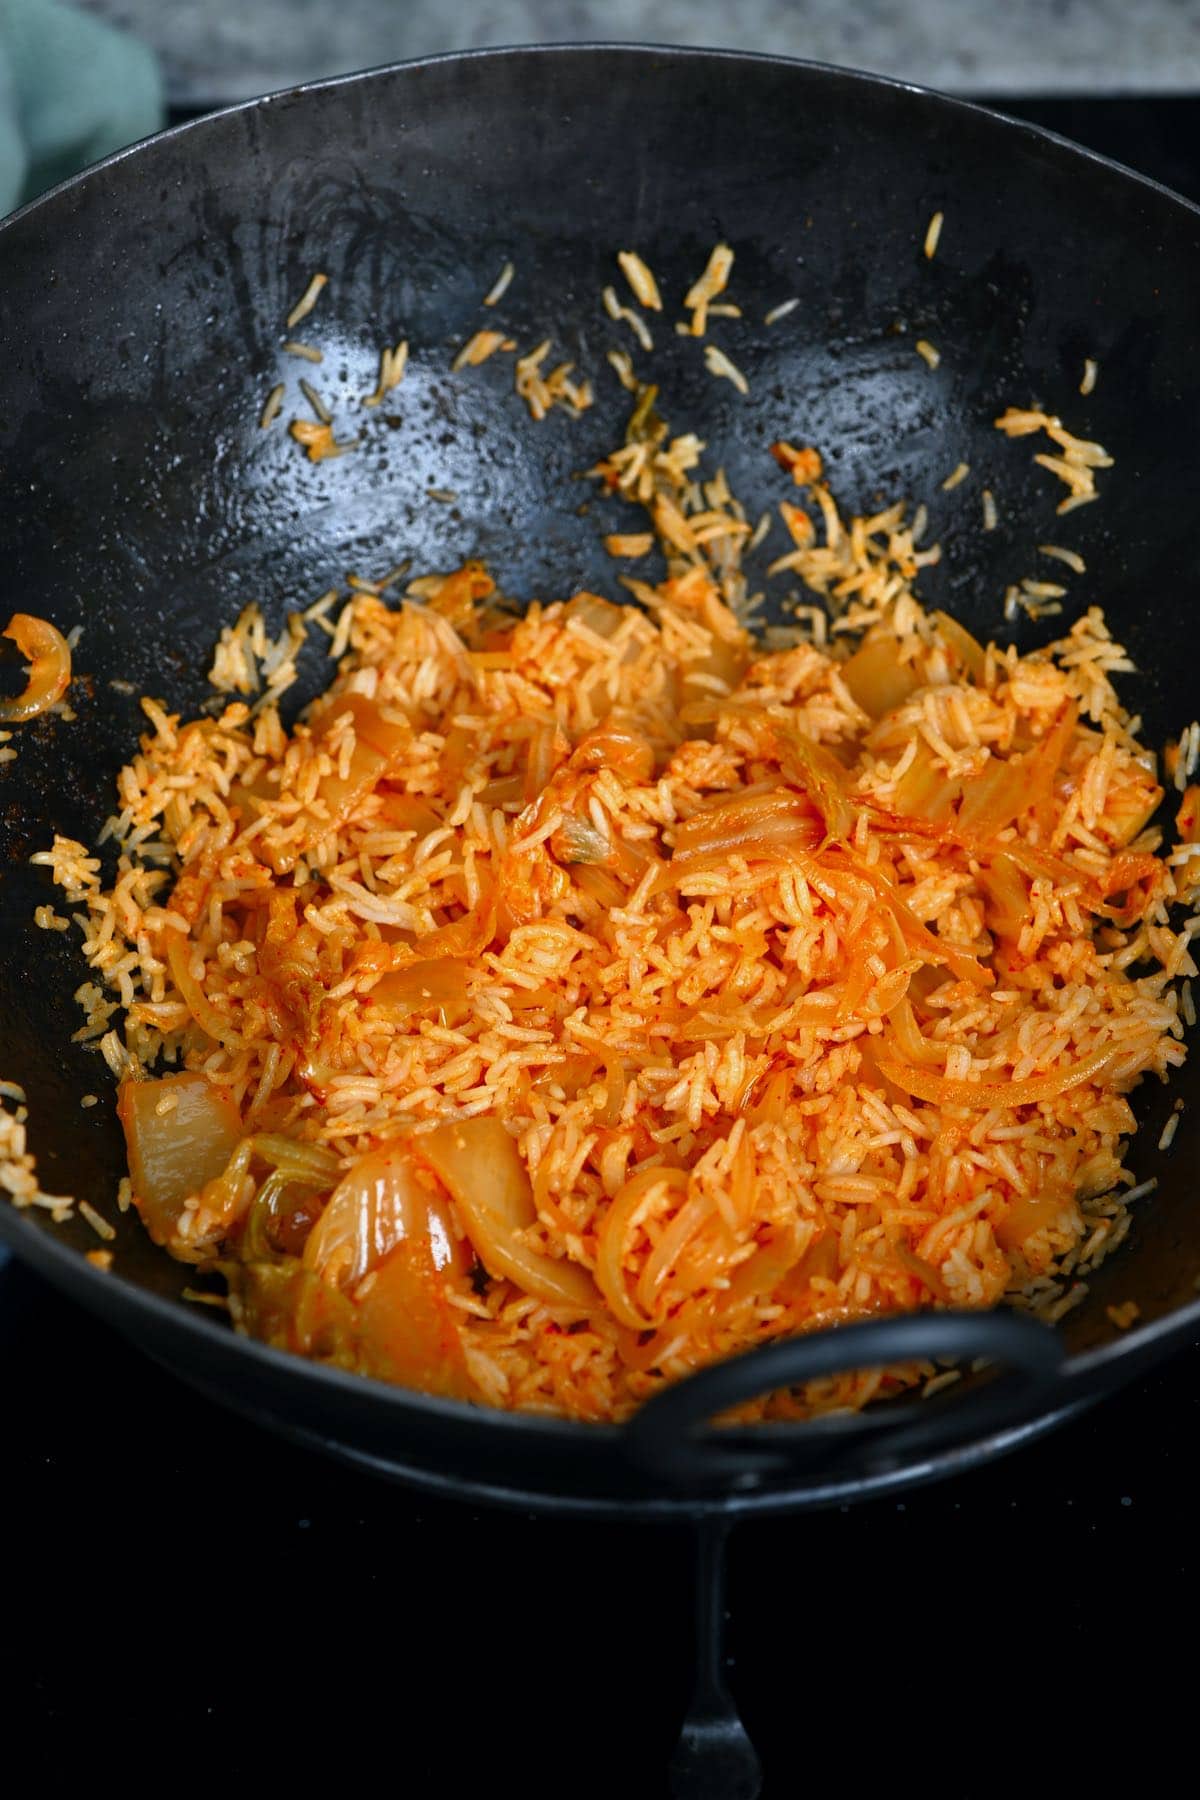
Step 3: Cook the kimchi fried rice
In the same large skillet, add the oil and wait for it to heat up. Once hot, add the sliced onion and cook for 2-3 minutes until translucent (not browned).
Then, add the kimchi, garlic, and ginger and stir well to incorporate.
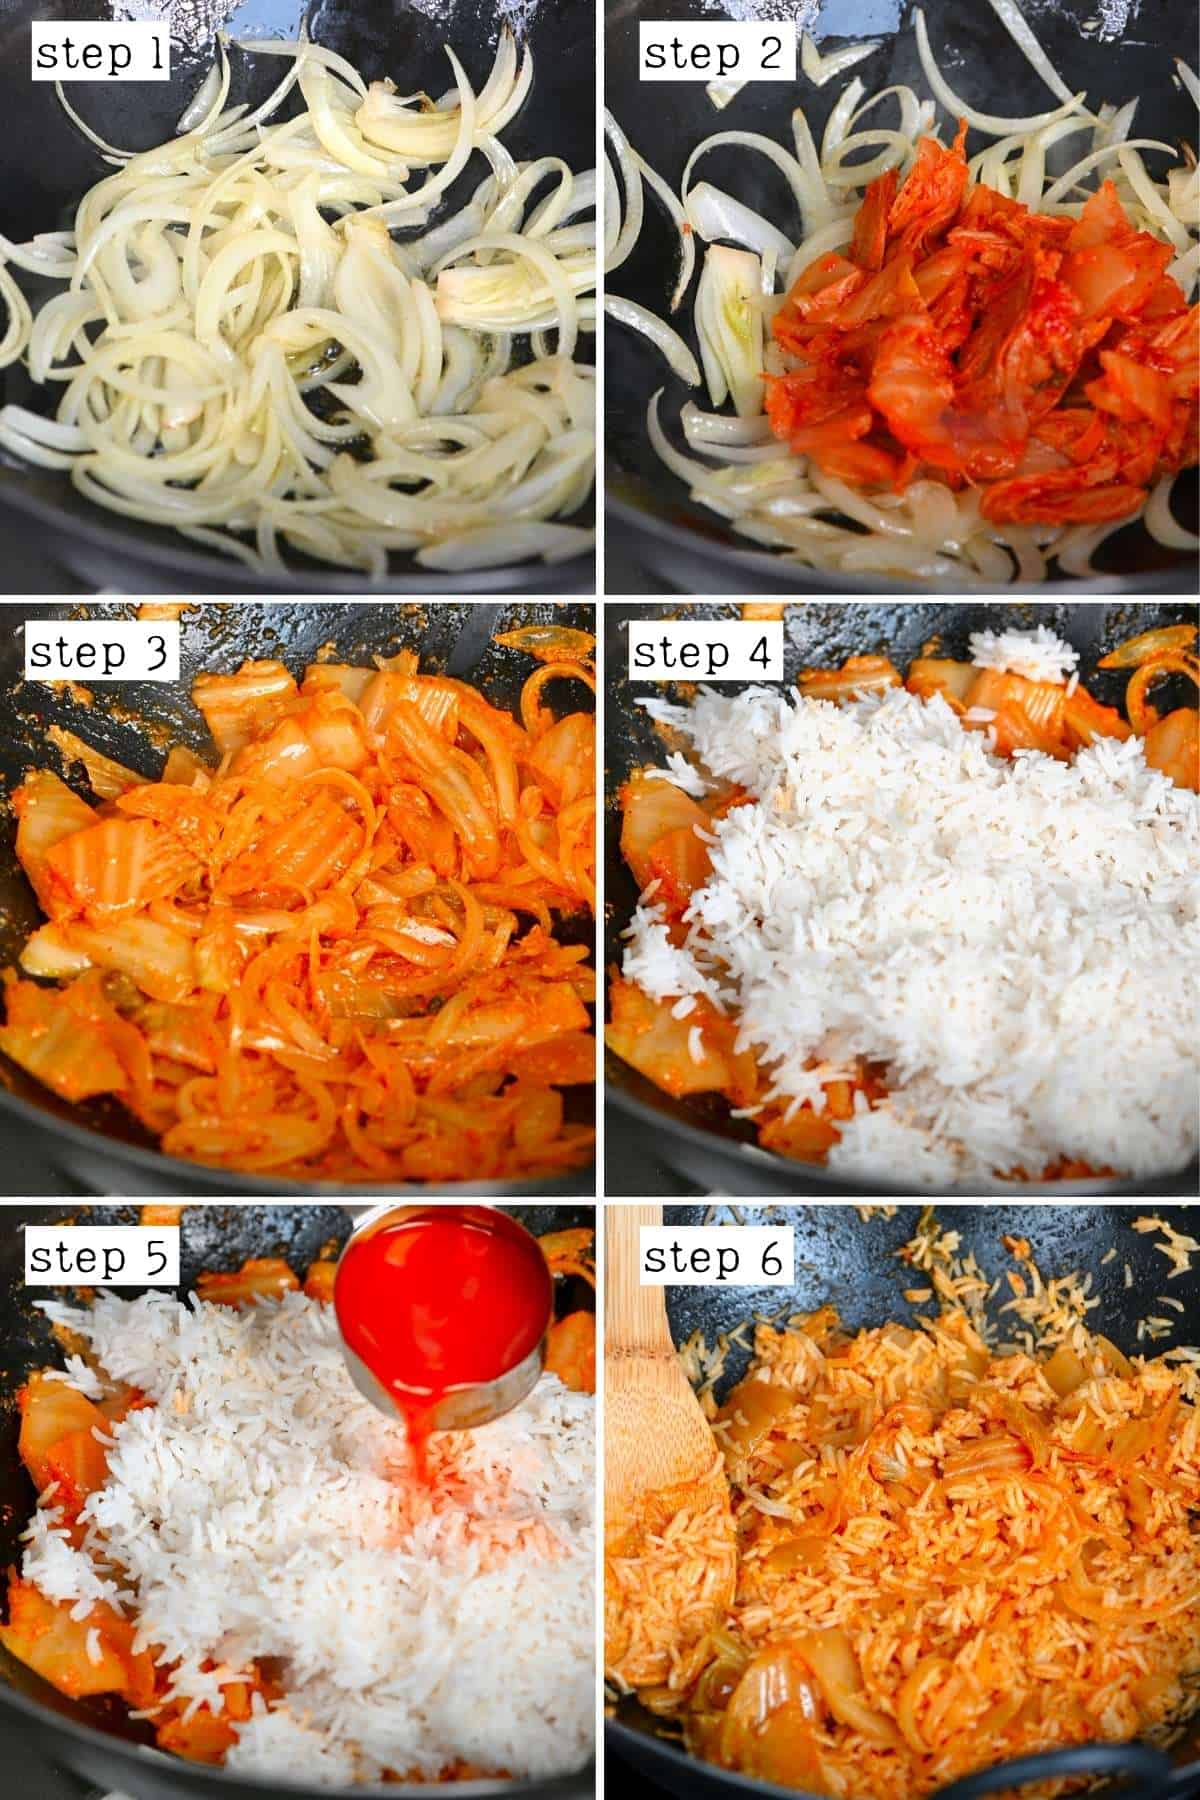
If you want the kimchi to brown slightly and caramelize, then you can fry this for a few minutes now (this works best if you’ve squeezed out the excess liquid from the kimchi first – see recipe notes) before moving on to the next step.
Finally, add the rice and enough kimchi juice to coat the rice well, stir, and cook for a further 1-2 minutes, stirring often.
For slightly crispier results, you can leave the rice to cook for 2-3 minutes, without stirring, and just lightly pressing on the rice to try and get a crispier bottom part of the kimchi fried rice before serving.
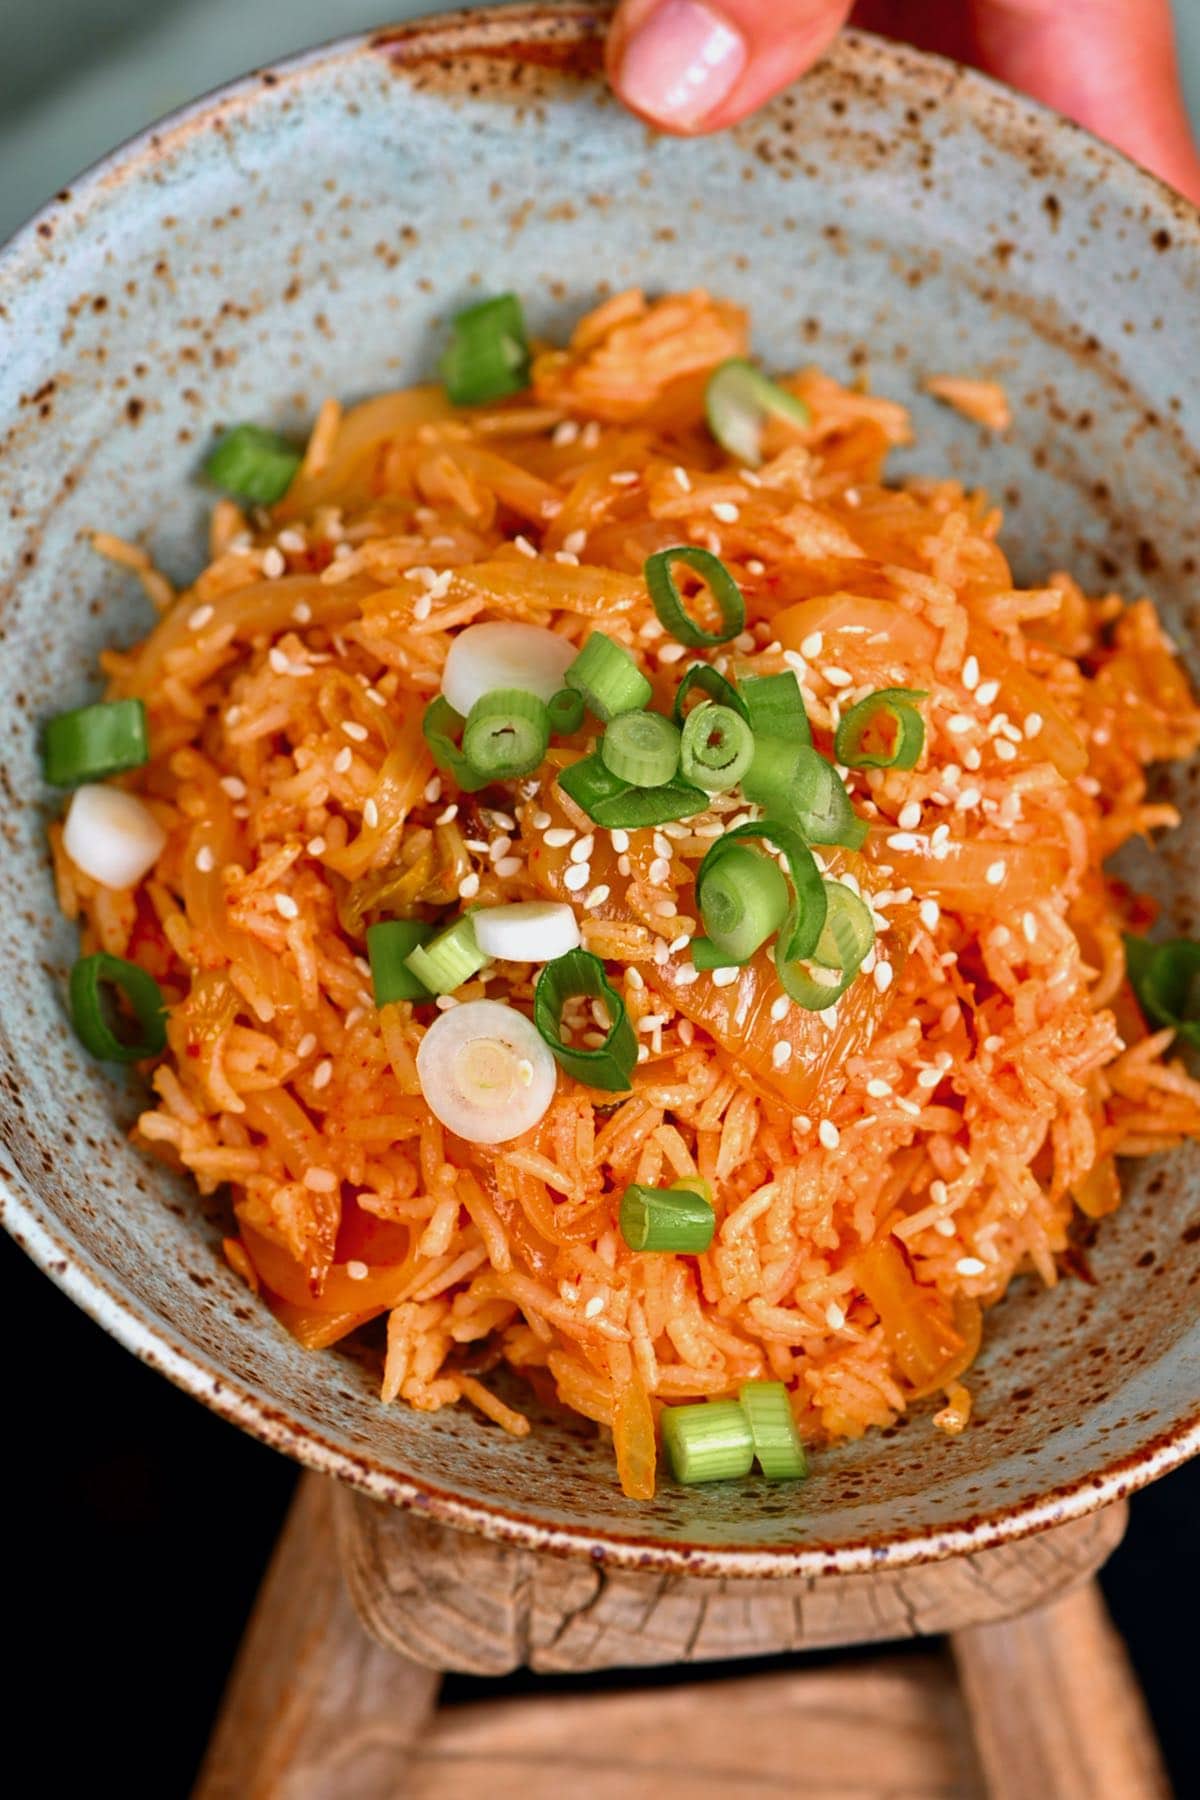
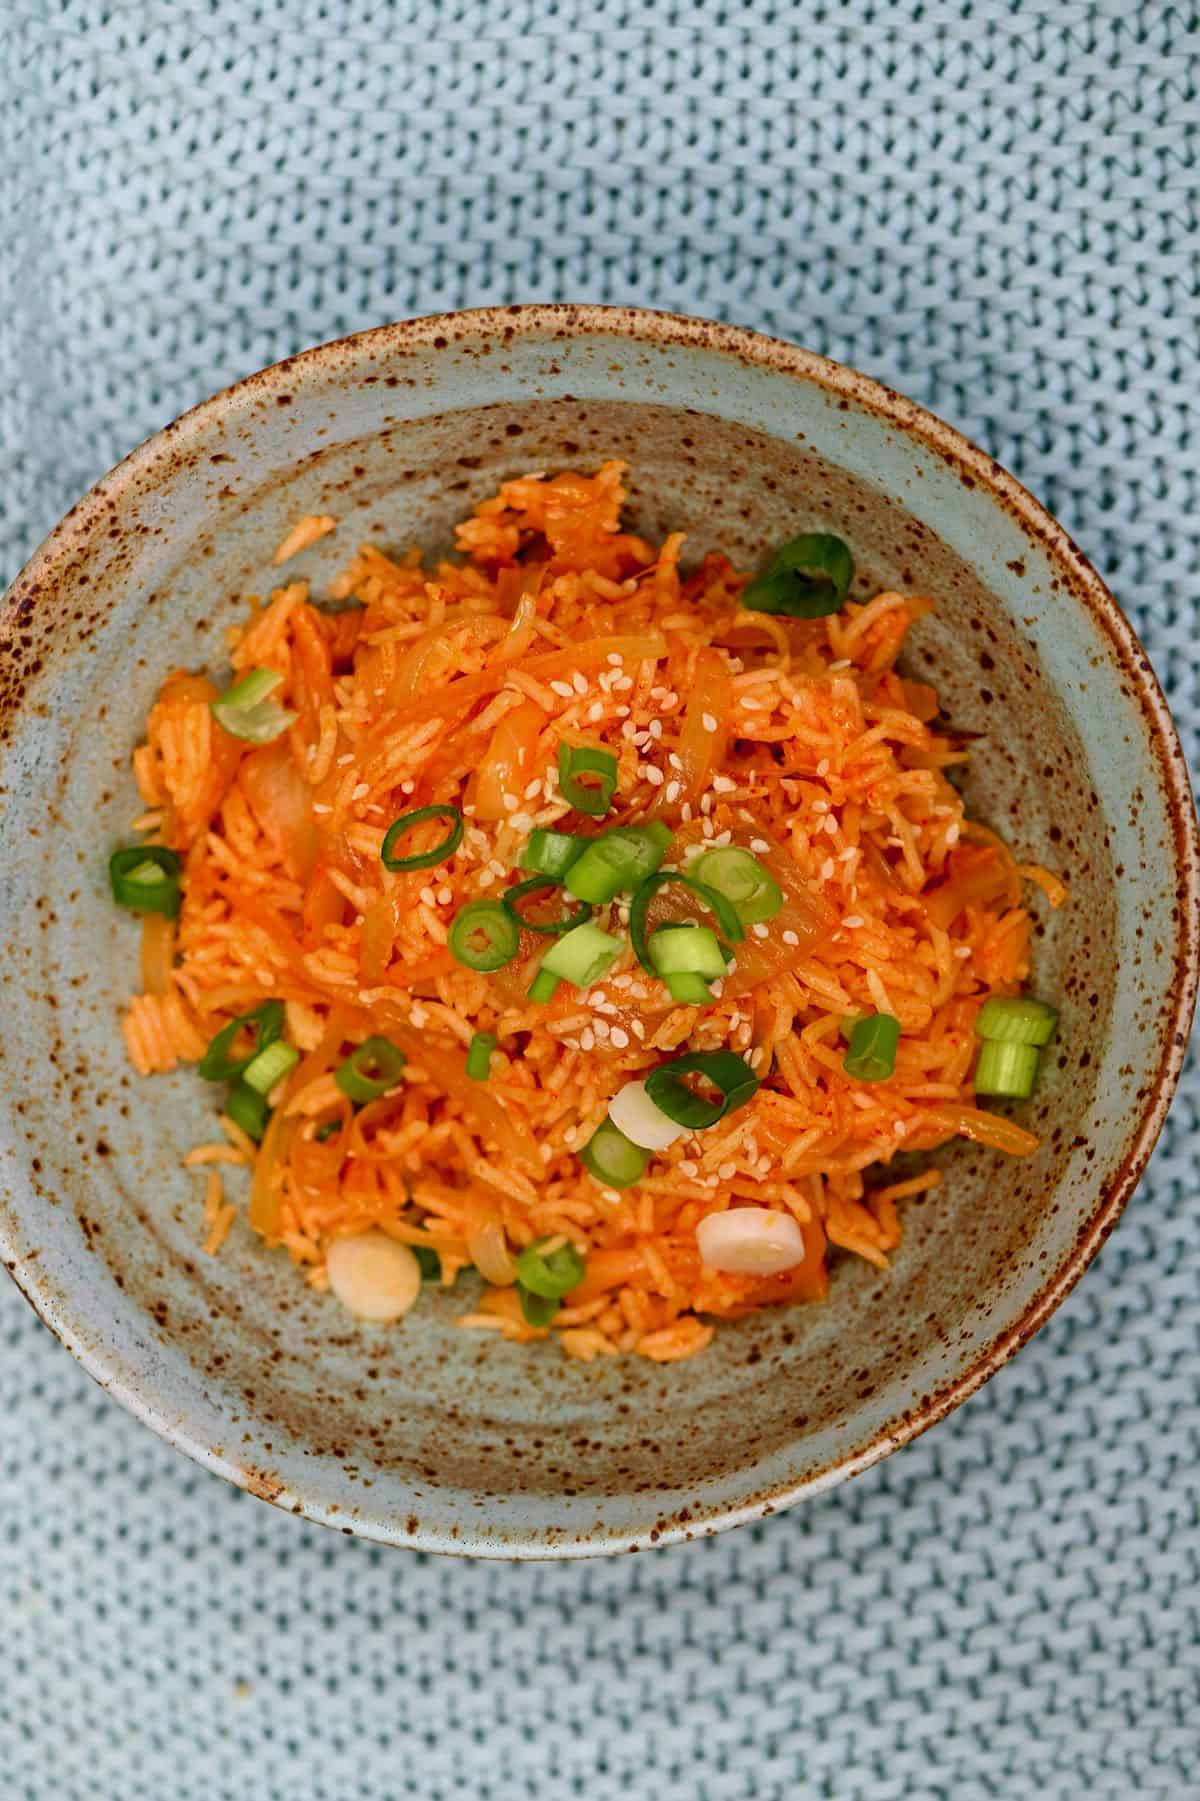
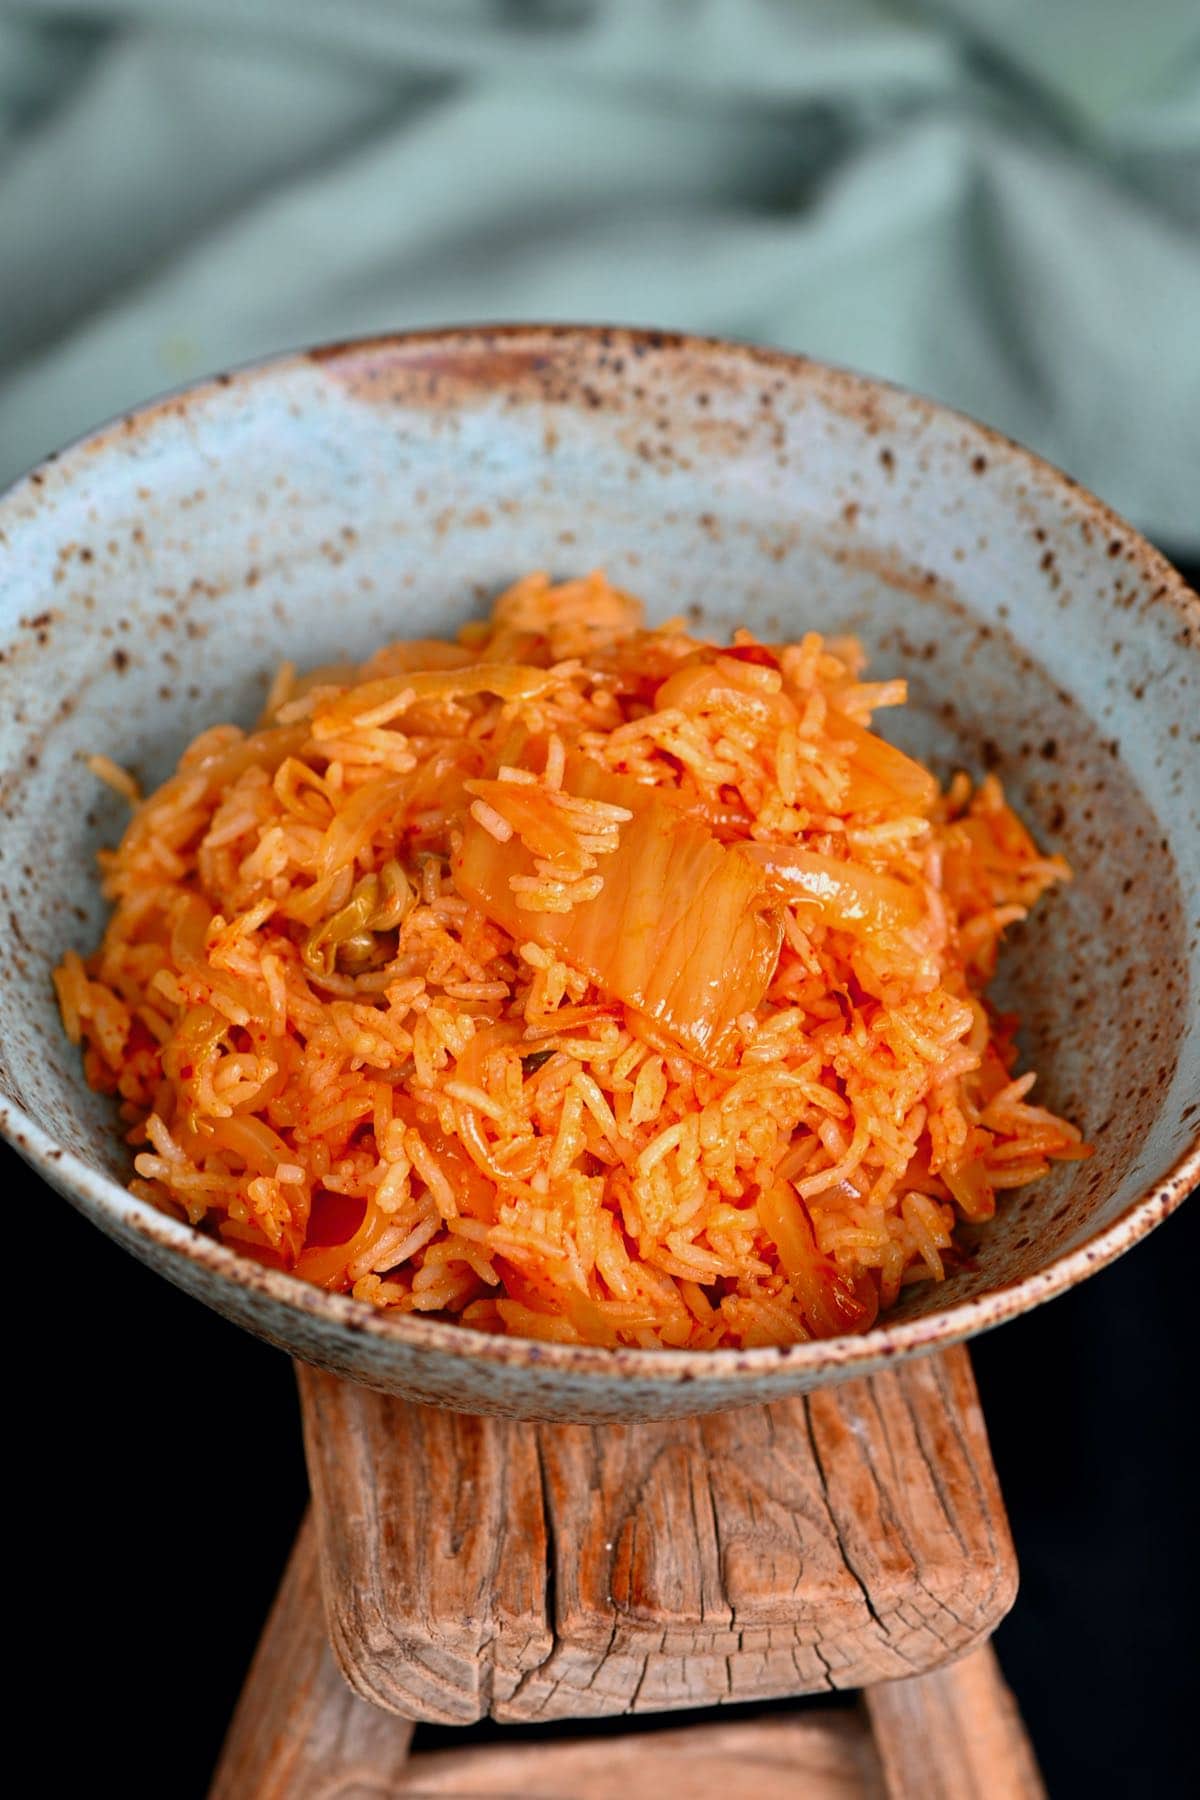
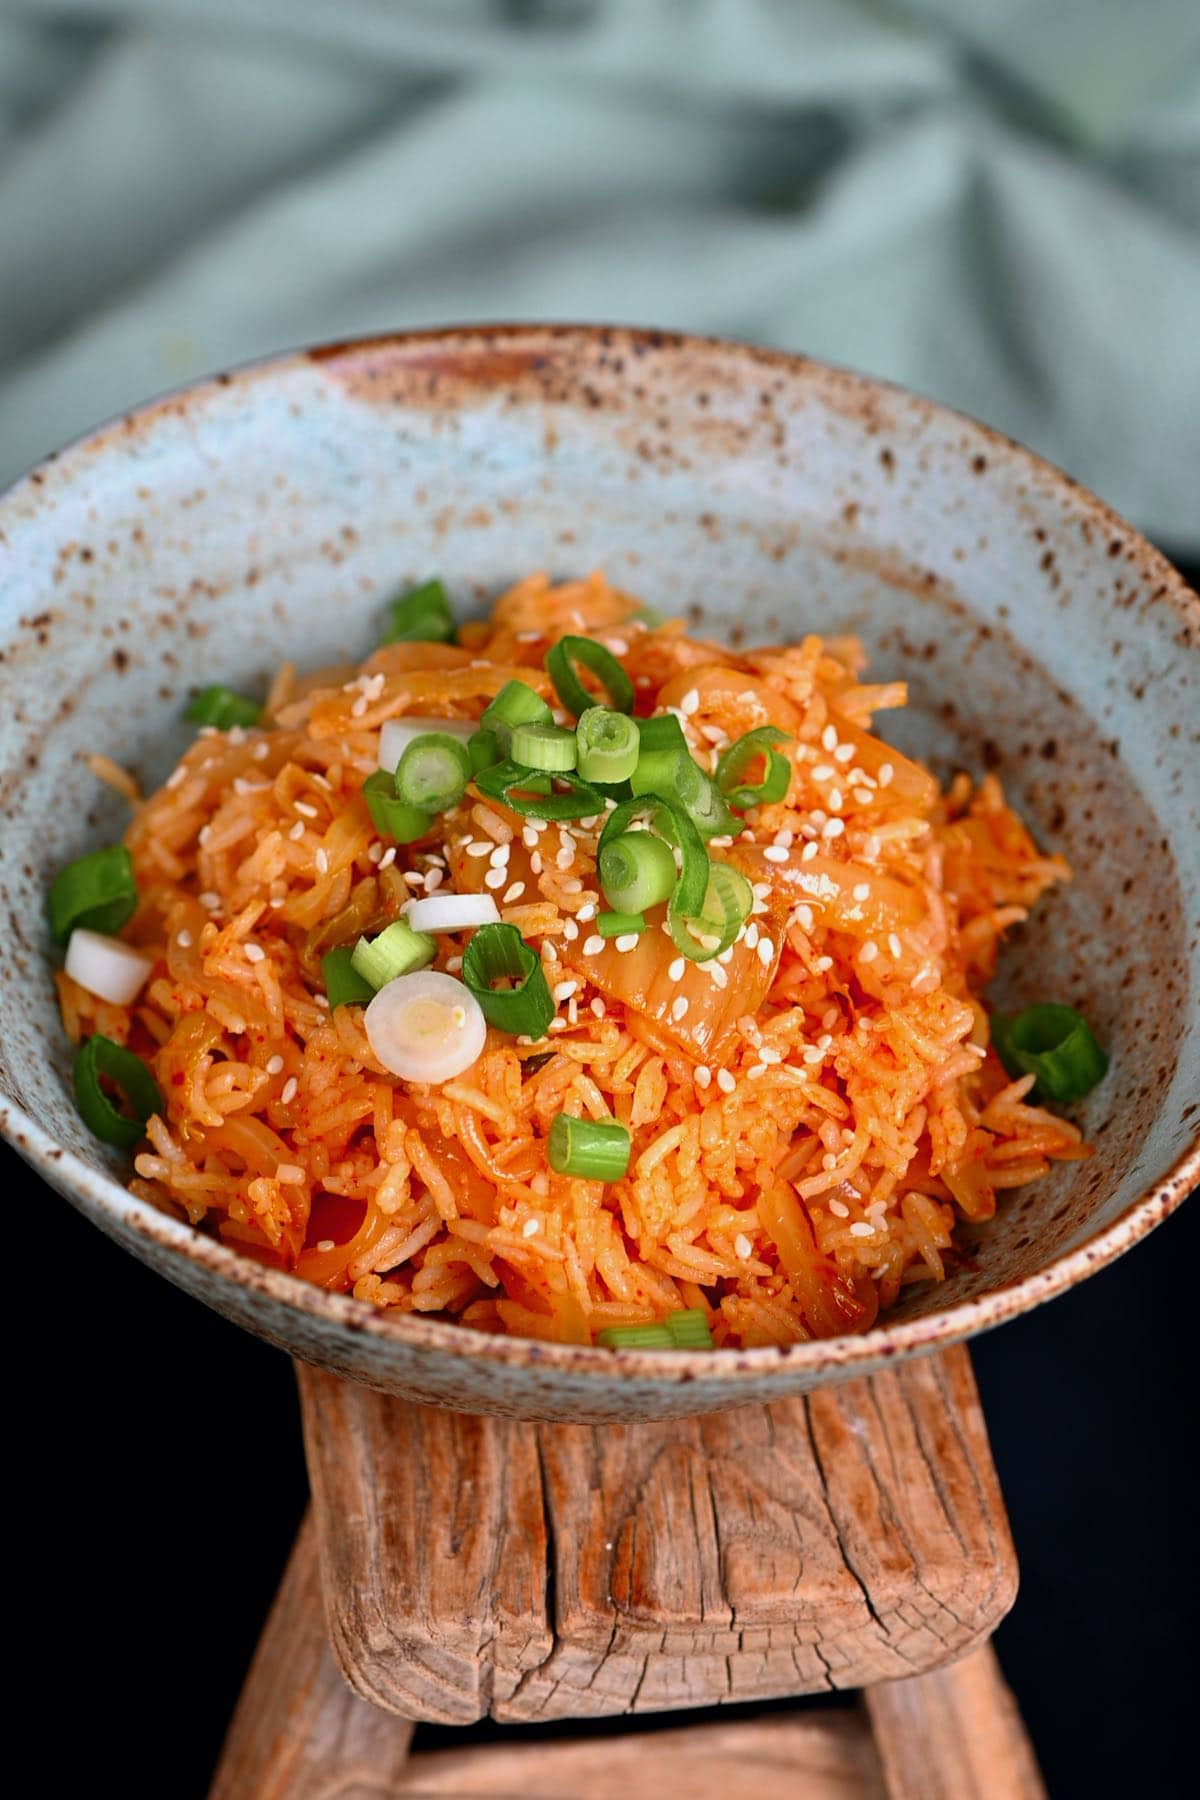
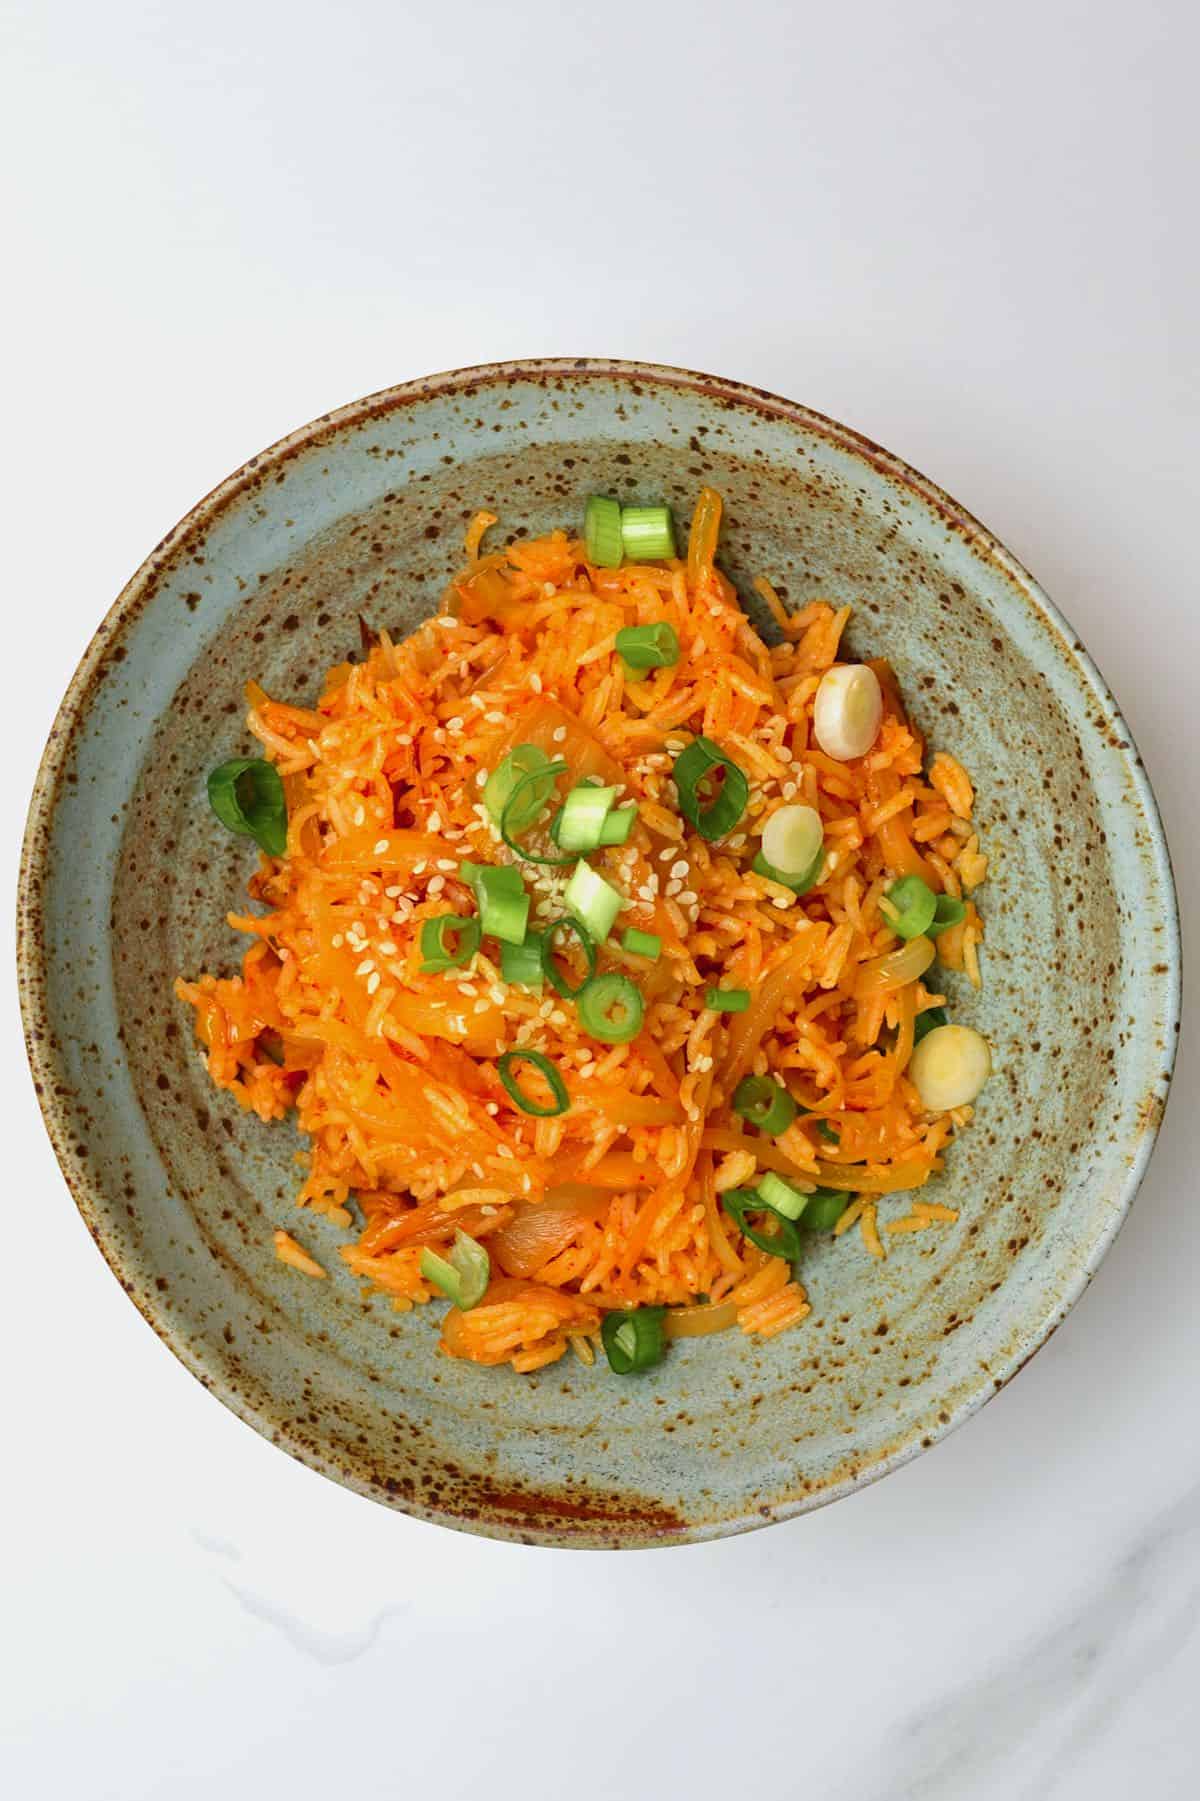
Step 4: Serve and garnish
Once ready, transfer the kimchi fried rice to a bowl and garnish with the sesame seeds and green onions – enjoy!
How to Store
Make ahead: This kimchi fried rice works best with day-old rice, so that can be prepared the day (or two days) before and saved, covered in the refrigerator.
Fridge: Since this dish often uses pre-cooked and cooled rice, I prefer to eat this kimchi bokkeumbap fresh. However, you can save the leftovers in an airtight container in the refrigerator for 1-2 days.
Reheat: Use a microwave or the stovetop to reheat the kimchi rice until warm throughout.
Recipe Notes & Variations
- Using leftover rice: the reason why day-old rice is preferred over fresh is that it has time to dry out slightly in the refrigerator overnight. This helps the rice absorb the kimchi flavors and, as it’s slightly “harder,” it won’t go “mushy” when reheating (which can happen with fresh rice.) However, you can also use less water when steaming/cooking the rice if using it fresh, which should work okay.
- Experiment with add-ins: this kimchi fried rice recipe is super versatile in that it tastes delicious on its own but also pairs well with all sorts of veggies and proteins. I basically chuck in whatever’s leftover in my fridge.
- Using over-ripened kimchi: this kimchi bokkeumbap is traditionally best prepared with over-ripened kimchi (wait for at least 2-3 weeks after preparing fresh kimchi to use it for this Kimchi fried rice recipe). However, if you use fresher kimchi, you can add a little rice vinegar for an additional tangy flavor.
- Adjust the spice: the easiest way to adjust the spice levels of this kimchi fried rice is to use kimchi with your preferred spice level (mild, medium, or hot). When using homemade kimchi, this is easy to do. However, most stored-selling kimchi should have a spice range.
- For vegan kimchi fried rice: make sure to use vegan kimchi as some have seafood products (including my homemade version(napa cabbage kimchi)– though I’ve included notes on making it vegan).
- Measuring the kimchi juice: I recommend squeezing the juice out of the kimchi into a separate container to measure it. This way, the kimchi loses some of its wetness, so it’s more likely to “brown” and caramelize for a “deeper” flavor.
Other Healthy Asian-Inspired Recipes
- Steamed mushroom dumpling
- Korean Cucumber Salad
- Japanese ramen
- Miso-glazed Eggplant (Nasu Dengaku)
- Japchae Korean Glass Noodles (Veggie Japchae/Chapchae)
If you try this kimchi fried rice recipe, I’d love to hear your thoughts/questions below. Also, I’d appreciate a recipe card rating below, and feel free to tag me in your recipe recreations on Instagram @Alphafoodie!

Kimchi Fried Rice (Kimchi Bokkeumbap)
Ingredients
- 5.4 oz rice 1 cup, I used jasmine, use short-grain if preferred
- 8.5 floz water 1 cup
- 7.6 oz kimchi 1 cup, pressed to remove juice
- 1.7 oz kimchi juice ¼ cup
- 3.6 oz onion 1 medium onion or ½ large
- 4 garlic cloves paste or minced garlic (1 Tbsp)
- 0.35 oz ginger paste or minced ginger (½ Tbsp)
- 1.4 oz green onions 2 stalks
- 1 floz sesame oil 2 Tbsp
- 0.5 oz sesame seeds 1.5 Tbsp
- 0.15 oz sugar 1 tsp – optional
Instructions
Step 1: Cook the rice
- This kimchi fried rice recipe is perfect for using "day old"/leftover rice, so feel free to skip this step entirely if you have rice already.
- Wash the rice well until the water runs almost clear. I like to do this by placing the rice in a bowl and covering it with water, swishing it around with my hand, then dumping the water and refilling the bowl. I repeat this until the water is almost clear (this way, you waste less water than placing it under running water the entire time).
- In a medium-large pan, add the rice and water and bring to a boil over medium-high heat. Then reduce the heat to a gentle simmer (medium heat) and cook for 12 minutes, or until tender.
- Transfer the cooked rice to a wide plate to cool (to help it cool faster).
Step 2: Prepare the aromatics
- While the rice cooks, thinly slice the onion and green onions (keep the latter aside for garnishing). Then mince the garlic and ginger (unless you are using garlic and ginger paste).Optionally, you can also cut your kimchi into smaller pieces, depending on how big it is.
- Optional – lightly toast the sesame seeds. Do this in a large skillet with no oil over medium-low heat until nice and fragrant – just a couple of minutes are enough, be careful so the seeds don’t burn. Then remove from the skillet and set aside.
Step 3: Cook the kimchi fried rice
- In the same large skillet, add the oil and wait for it to heat up. Once hot, add the sliced onion and cook for 2-3 minutes until translucent (not browned).
- Add the kimchi, garlic, and ginger and stir well to incorporate.If you want the kimchi to brown slightly and caramelize (you can also add the sugar now if using), then you can fry this for a few minutes now (this works best if you’ve squeezed out the excess liquid from the kimchi first – see recipe notes) before moving on to the next step.
- Add the rice and enough kimchi juice to coat the rice well, stir, and cook for a further 1-2 minutes, stirring often.For slightly crispier results, you can leave the rice to cook for 2-3 minutes, without stirring, and just lightly pressing on the rice to try and get a crispier bottom part of the kimchi fried rice before serving.
Step 4: Serve and garnish
- Once ready, transfer the kimchi fried rice to a bowl and garnish with the sesame seeds and green onions – enjoy!
How to Store
- Make ahead: this kimchi fried rice works best with day-old rice, so that can be prepared the day (or two days) before and saved, covered in the refrigerator.Fridge: since this dish often uses pre-cooked and cooled rice, I prefer to eat this kimchi bokkeumbap fresh. However, you can save the leftovers in an airtight container in the refrigerator for 1-2 days.Reheat: use a microwave or the stovetop to reheat the kimchi rice until warm throughout.
Notes
- Using leftover rice: the reason why day-old rice is preferred over fresh is that it has time to dry out slightly in the refrigerator overnight. This helps the rice absorb the kimchi flavors and, as it’s slightly “harder,” it won’t go “mushy” when reheating (which can happen with fresh rice.) However, you can also use less water when steaming/cooking the rice if using it fresh, which should work okay.
- Experiment with add-ins: this kimchi fried rice recipe is super versatile in that it tastes delicious on its own but also pairs well with all sorts of veggies and proteins. I basically chuck in whatever’s leftover in my fridge.
- Using over-ripened kimchi: this kimchi bokkeumbap is traditionally best prepared with over-ripened kimchi (wait for at least 2-3 weeks after preparing fresh kimchi to use it for this Kimchi fried rice recipe). However, if you use fresher kimchi, you can add a little rice vinegar for an additional tangy flavor.
- Adjust the spice: the easiest way to adjust the spice levels of this kimchi fried rice is to use kimchi with your preferred spice level (mild, medium, or hot). When using homemade kimchi, this is easy to do. However, most stored selling kimchi should have a spice range.
- For vegan kimchi fried rice: make sure to use vegan kimchi as some have seafood products.
- Measuring the kimchi juice: I recommend squeezing the juice out of the kimchi into a separate container to measure it. This way, the kimchi loses some of its wetness, so it’s more likely to “brown” and caramelize for a “deeper” flavor.
Nutrition
Nutrition information is automatically calculated, so should only be used as an approximation.


Nice quick dish!
Thank you for your comment, Franzi.