
This post may contain affiliate links. Please read our disclosure policy.
Simple homemade oat pasta made with just 3 ingredients and a simple process – a delicious, whole grain, high fiber, gluten-free pasta. Plus, this recipe takes no time at all to prepare and can be used immediately or frozen/dried for later!
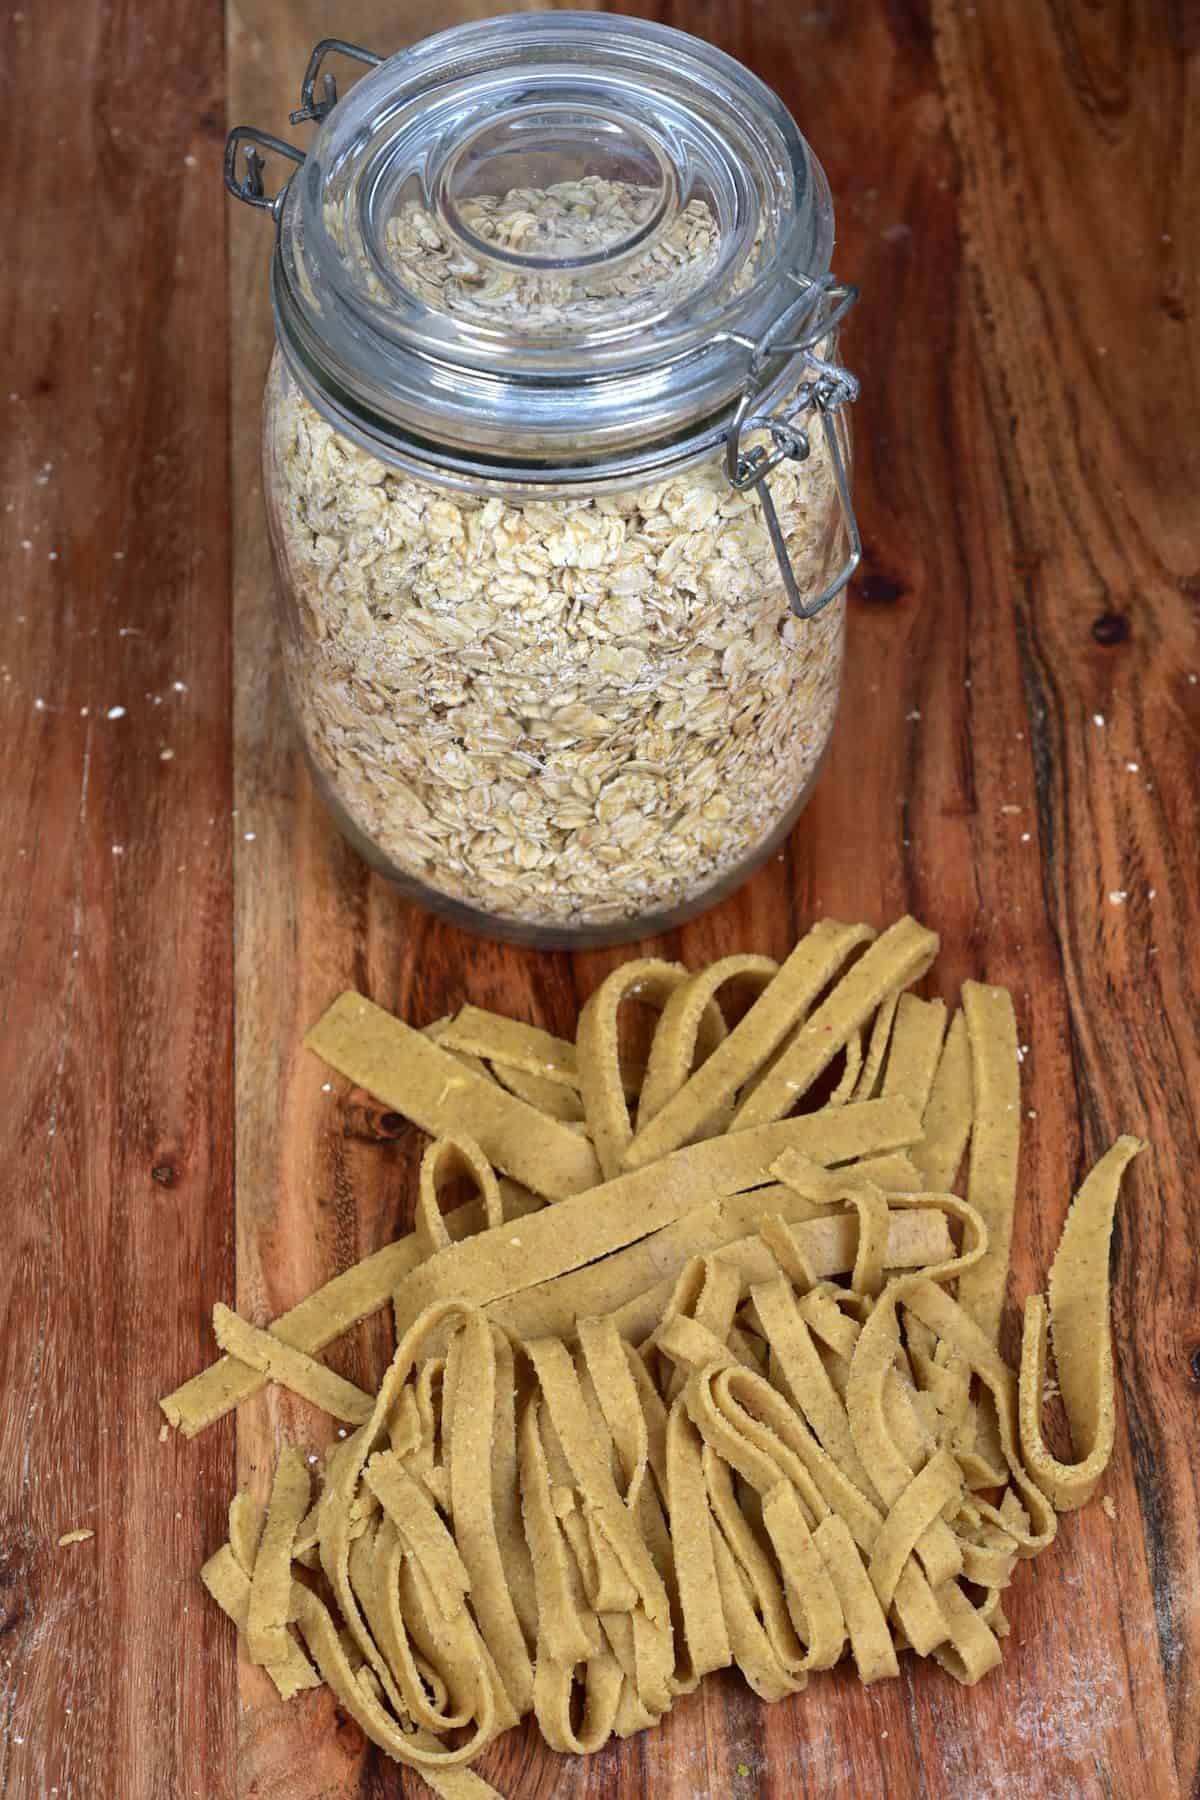
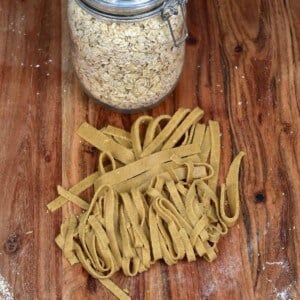
Oat flour is a really useful pantry staple for all kinds of sweet and savory uses- but, did you know that you can make oat pasta too? While you may have seen popular gluten-free pasta options like green pea or lentil pasta on your grocery store shelves, oat pasta is still fairly new to the scene – but definitely worth giving a go as a gluten-free, high-fiber, whole grain pasta option!
All you need for this oat flour pasta is just three ingredients; oat flour, olive oil, and eggs. The result is an incredibly cost-effective, high-fiber, nutritious wheat-free pasta.
Pair this whole-grain pasta with your favorite pasta sauce, some veggies, and protein – like this homemade tofu or ‘Shroom balls (vegan meatballs) – and you have a delicious, nutritious meal. And since homemade gluten-free pasta can be a bit fiddly to deal with – check out some top tips for dealing with gluten-free pasta, here.
Want to save this recipe?
The Ingredients
- Oat Flour – I use homemade oat flour
- Eggs – for a vegan version, you may be able to use flaxseed eggs though the dough is likely to be more brittle.
- Olive oil – or another fairly neutral cooking oil, like avocado oil.
How To Make Oat Pasta
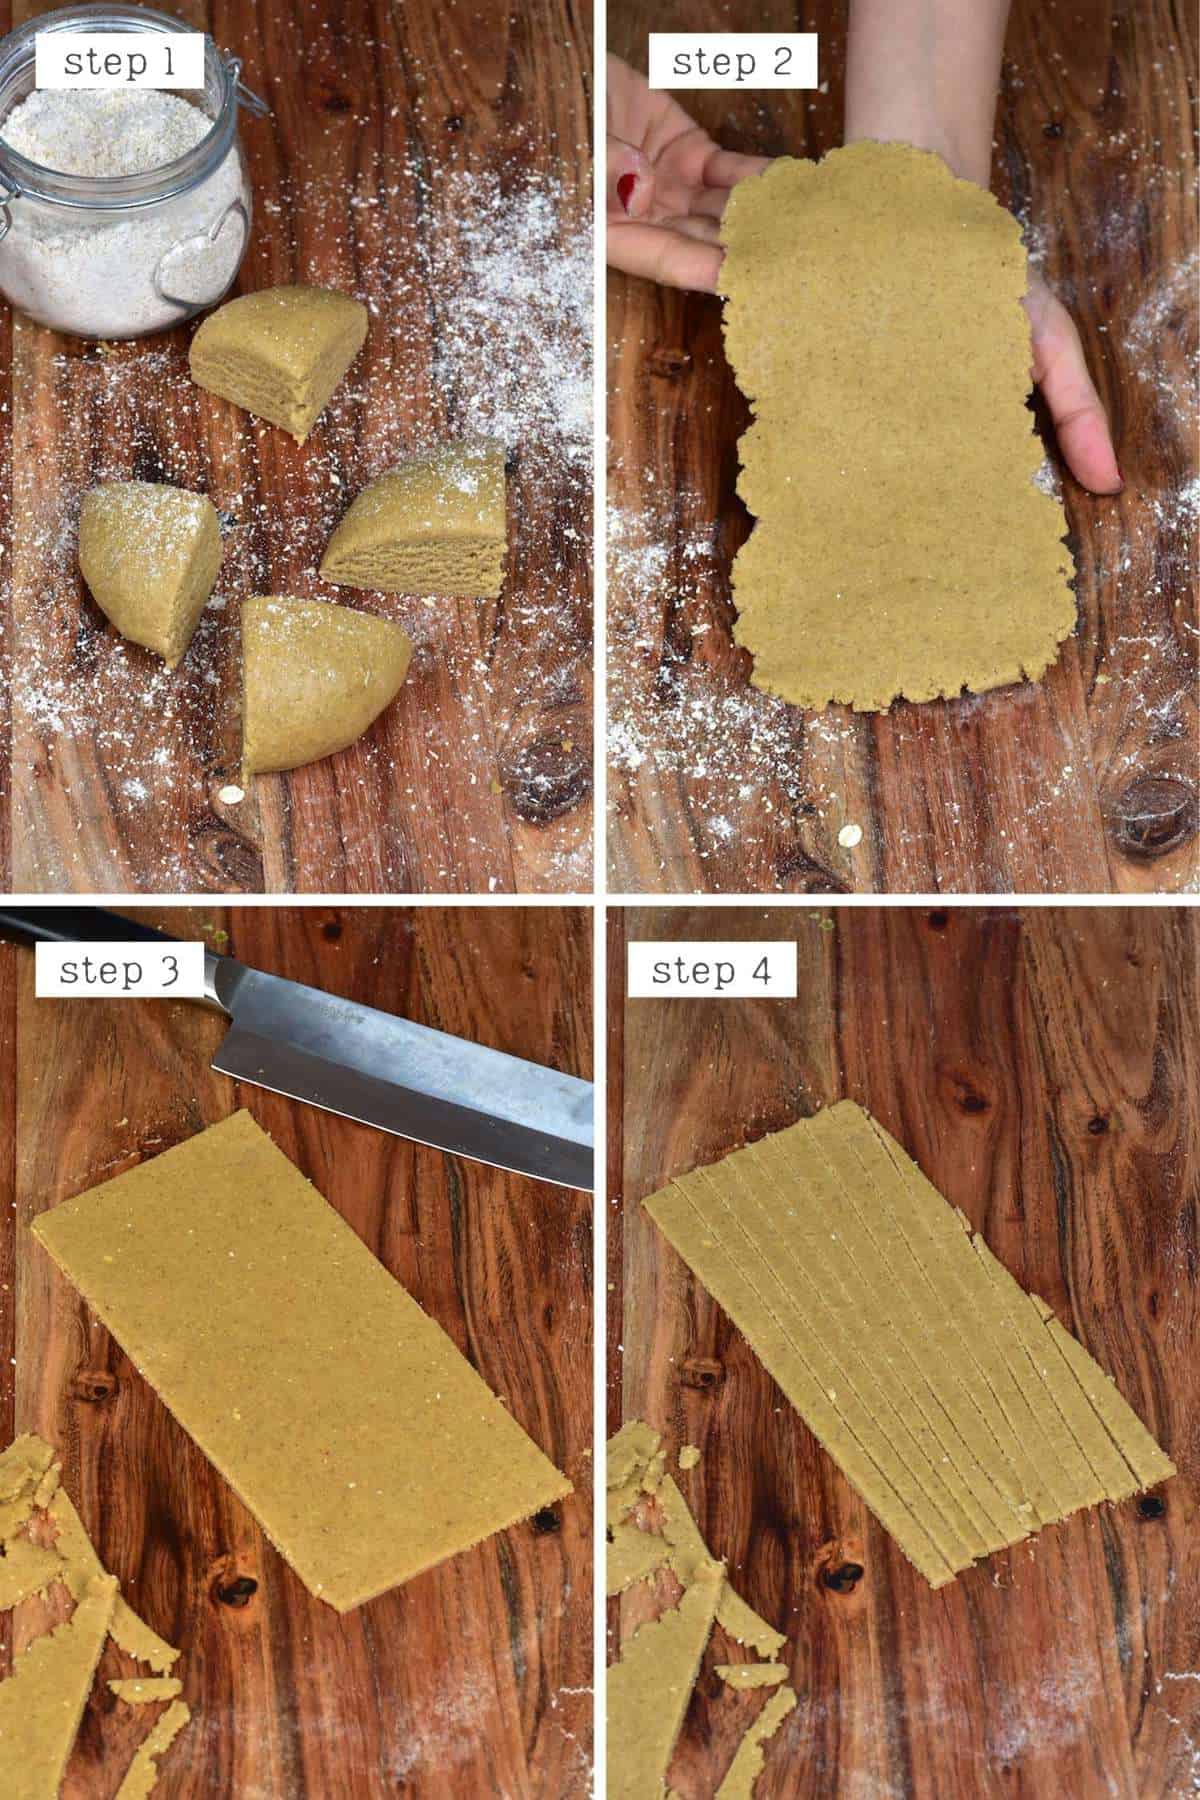
Step 1: prepare the Oat Pasta dough
You can do this process on a work surface, within a bowl, or even with a stand mixer.
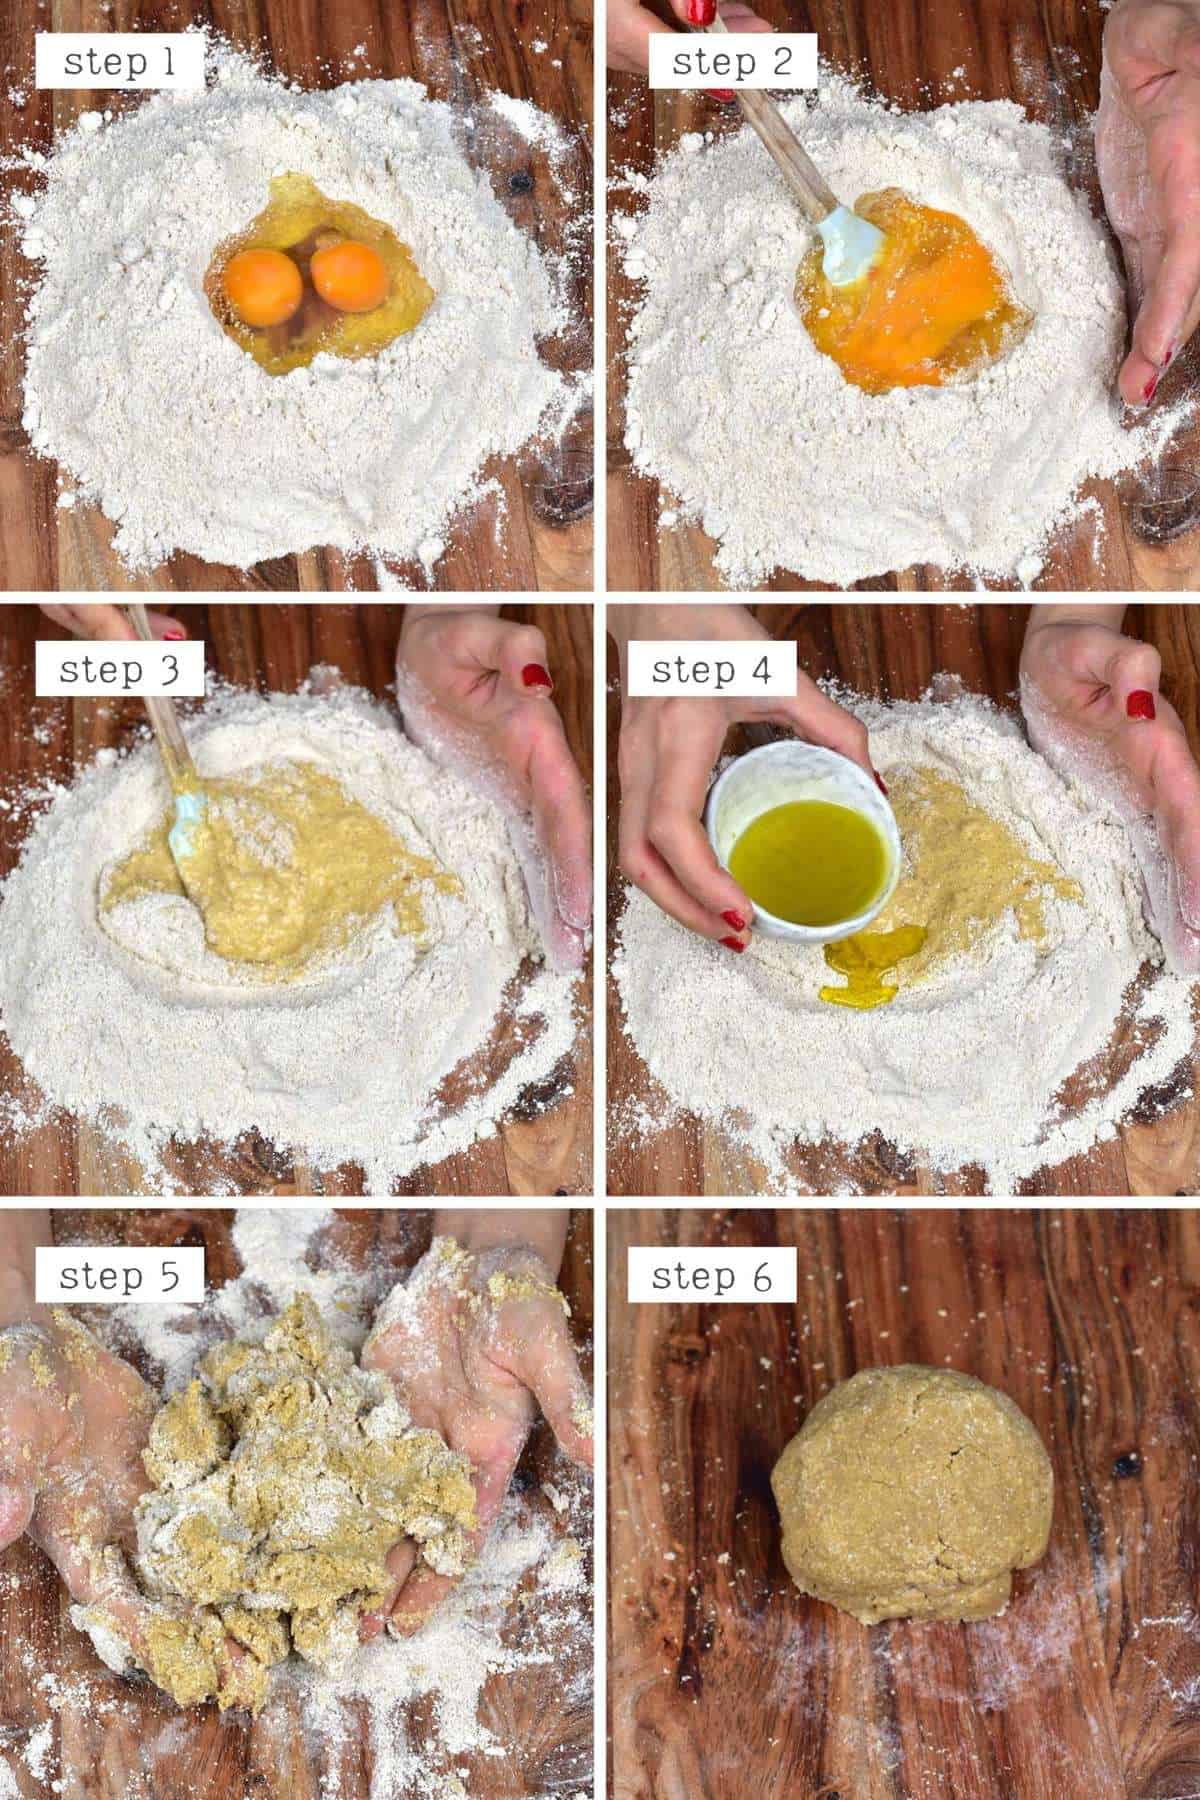
Create a mound of your oat flour on a clean work surface (or in a bowl/stand mixer), making a well in the center. Add the eggs and oil to the well and then slowly begin to incorporate all of the ingredients together. Eventually, you’ll form a rough dough.
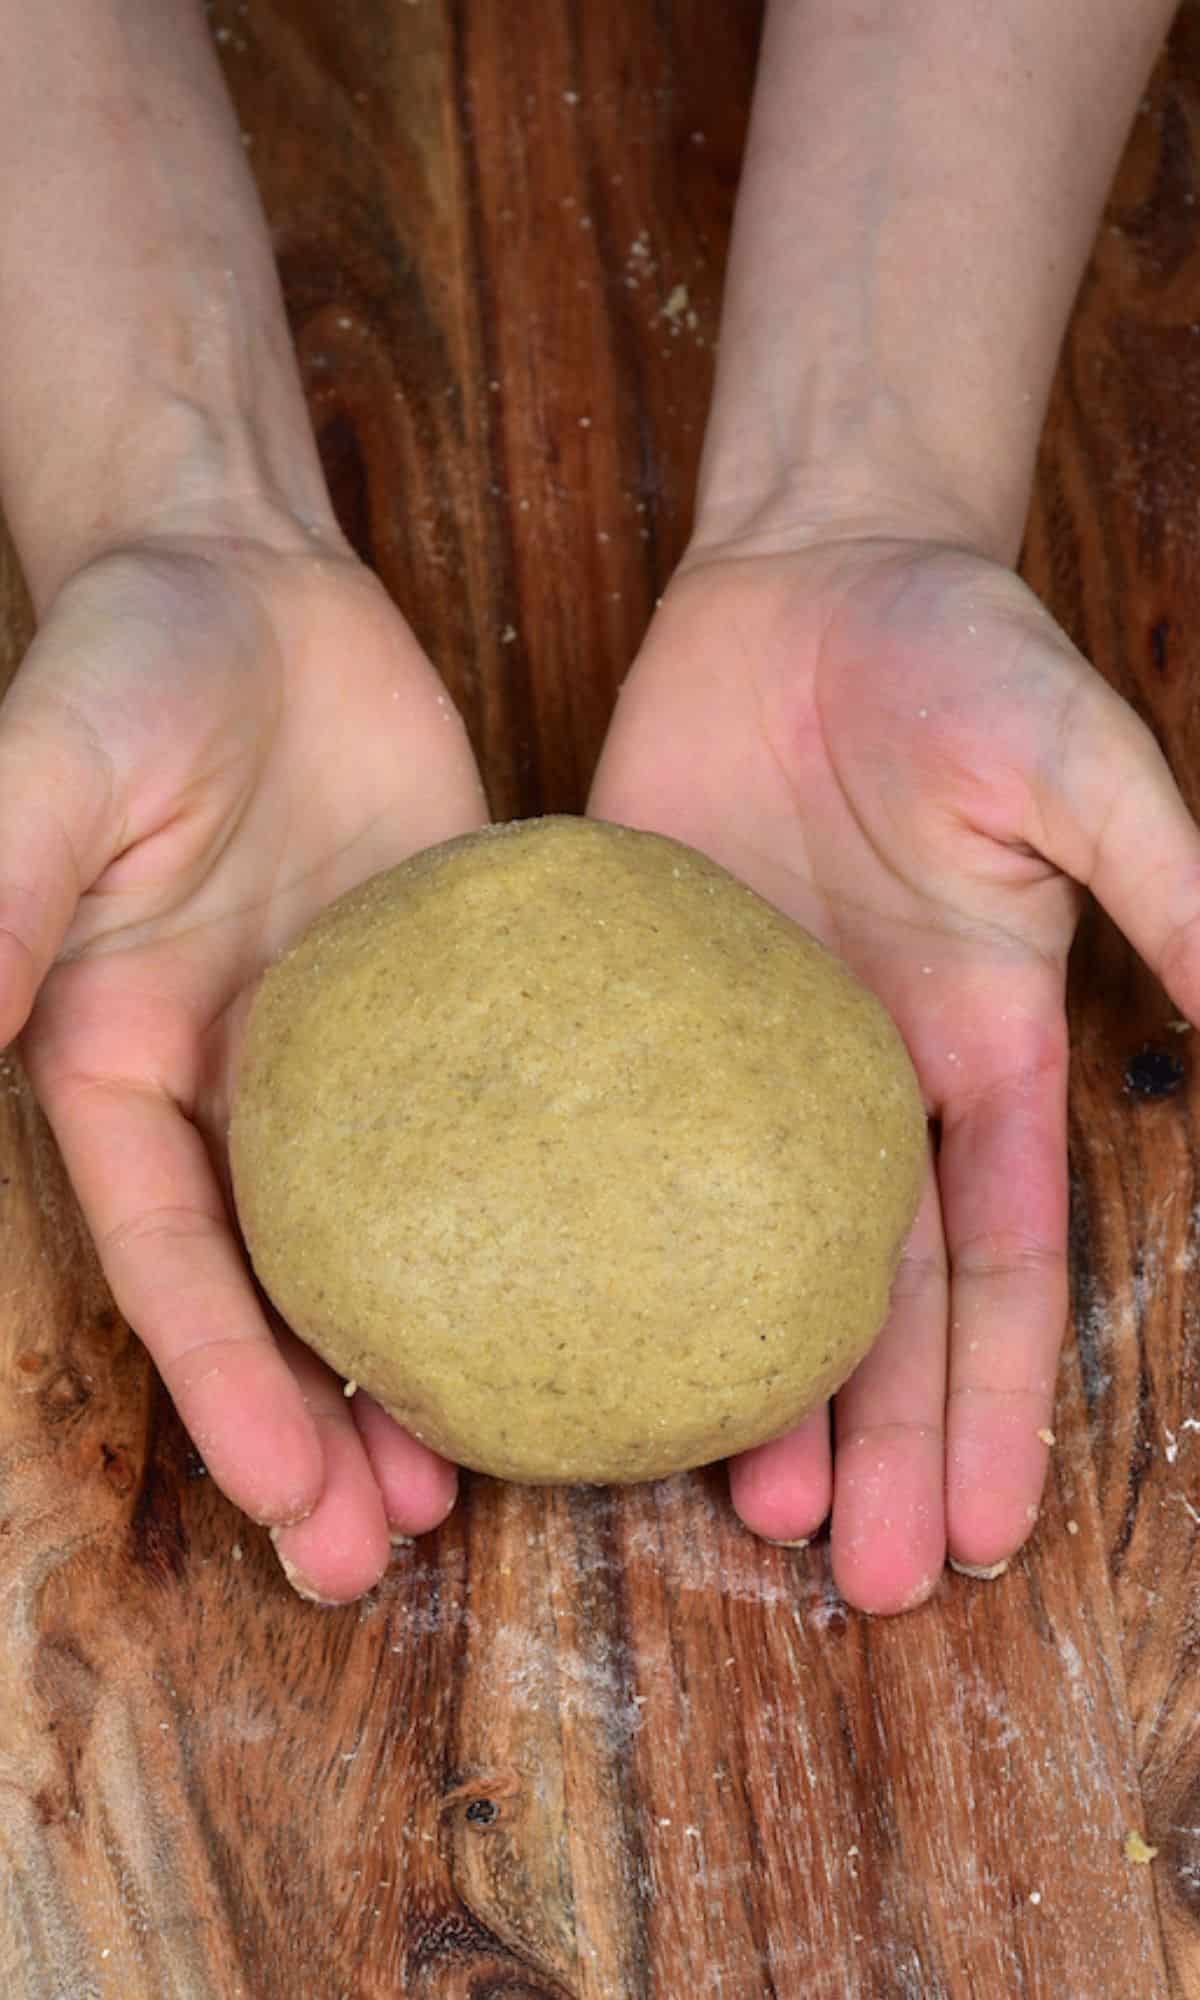
Knead the dough until you have a smooth dough. There’s no need to knead for long periods of time, since the pasta is gluten-free.
Set the dough aside in a bowl/in cling film for 30 minutes, to rest. This will make it easier to manage/shape into pasta.
If you find that the dough is a little too crumbly, then you can add some water. Add one tablespoon at a time until it forms a dough. This tends to make the dough easier to manage but does affect the texture of the final pasta , so I usually avoid it.
Step 2: Shape/Chop your homemade pasta
You can shape/chop the oat flour pasta either by hand with a rolling pin, or with a pasta machine.
First, divide the dough into a few, more manageable, pieces. I divided it into four.
By Hand:
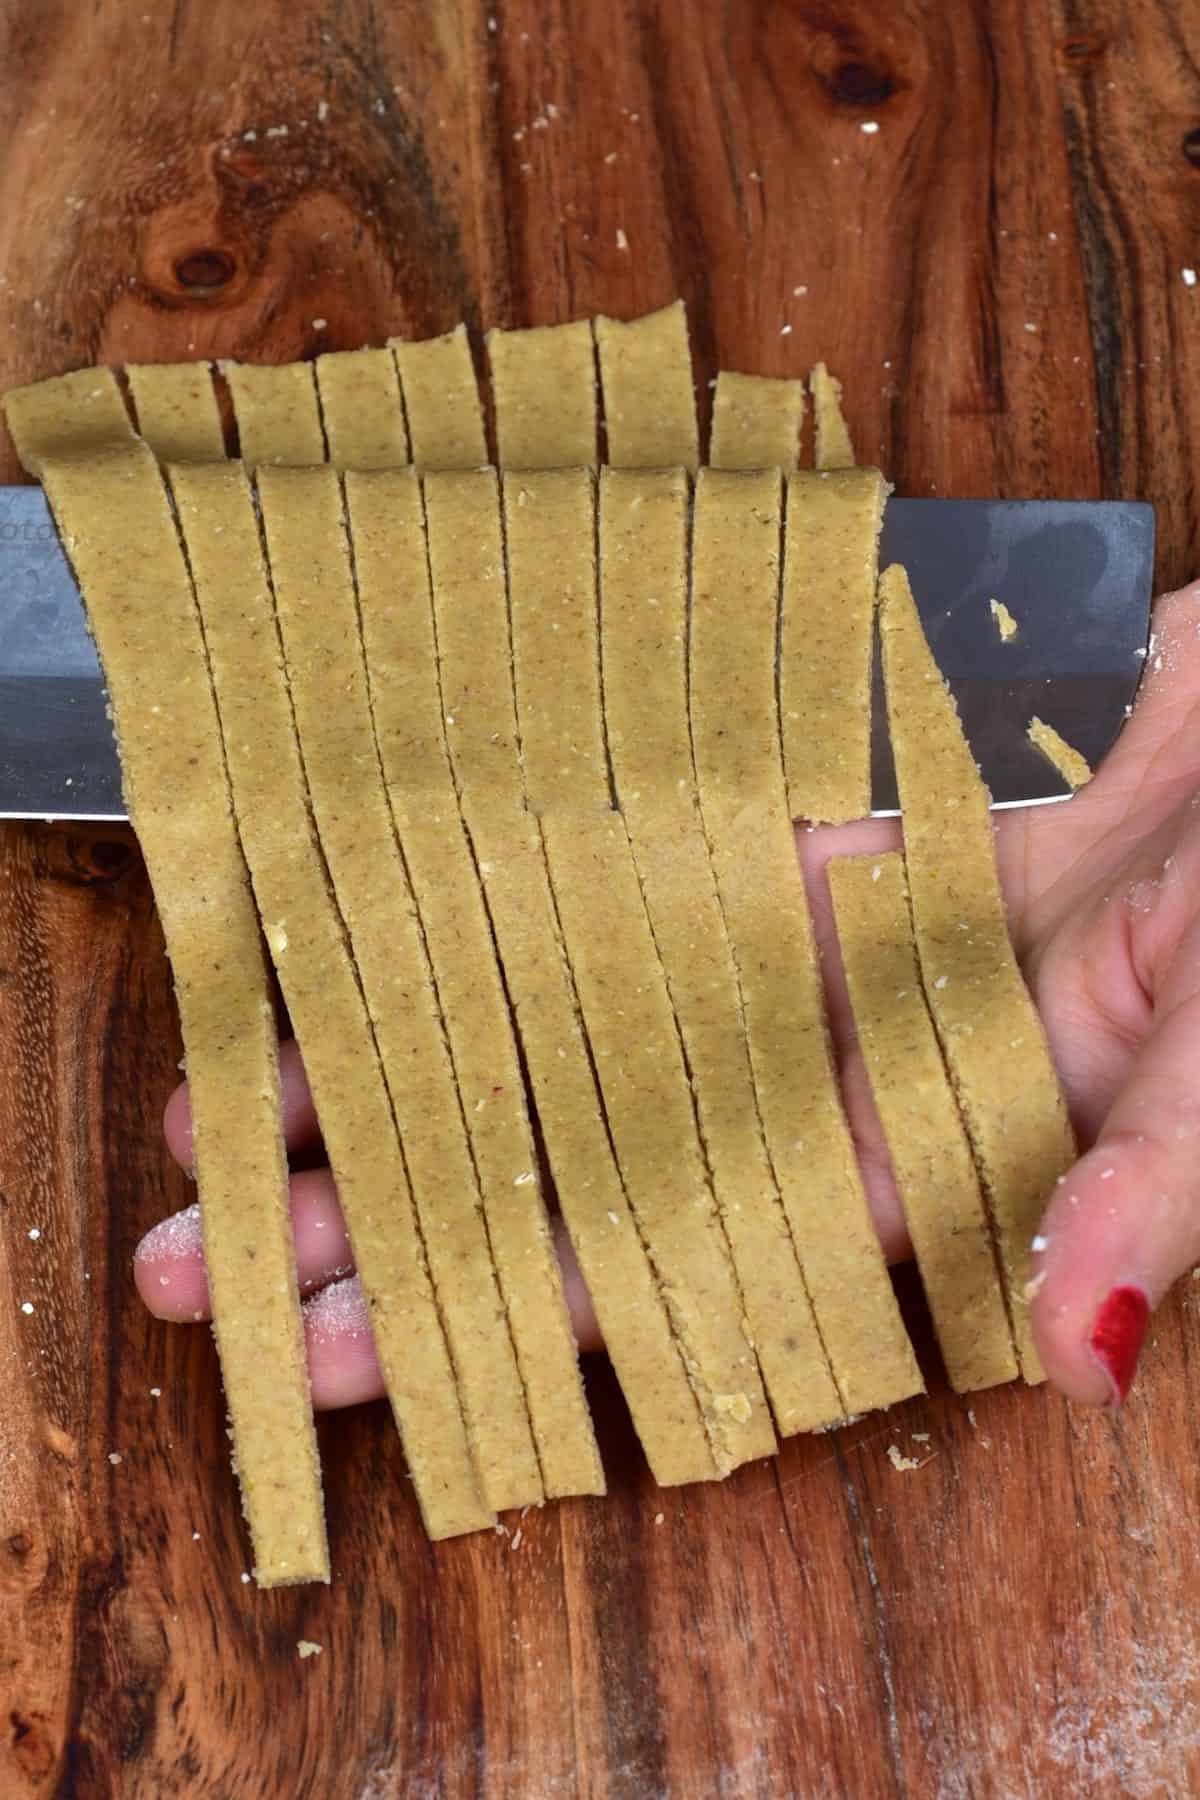
Dust your work surface with a little additional oat flour then use a rolling pin to roll out the pasta dough as thin as you’d like it.
I usually aim for somewhere around 3mm when doing it by hand. Roll it into a long thin sheet of dough. If you want the noodles to be more ‘precise,’ you can cut off the ‘scraggly’ edges and then use a knife to cut the pasta into long strips as thin/thick as you’d like- for tagliatelle/pappardelle.
Alternatively, if you add xanthan gum to the oatmeal pasta dough, you can dust the pasta with oat flour, roll it up lengthwise (so it’s long and thin when rolled rather than shorter and fatter), and then slice the roll into individual noodles. Dust with a little more oat flour again if needed.
Using a pasta machine/press:
Begin by rolling out each piece of dough slightly, so it’s thin enough to fit through your pasta machine’s widest setting. Feed it through the machine 2-3 times, folding it like an envelope as you do, to get a cleaner shape.
Then reduce the setting, making it thinner, and feeding it through 1-2 times, reducing the thickness until you achieve your perfect level.
Then use the machine to cut it into pasta ribbons/noodles.
Alternatively, you can press the dough through a pasta press to make noodles, macaroni, penne, etc. You can also use a potato ricer for noodles!
Be careful when handling the wheat-free pasta dough at this point. As it is gluten-free pasta, it is a lot more fragile than traditional pasta and can be crumbly.
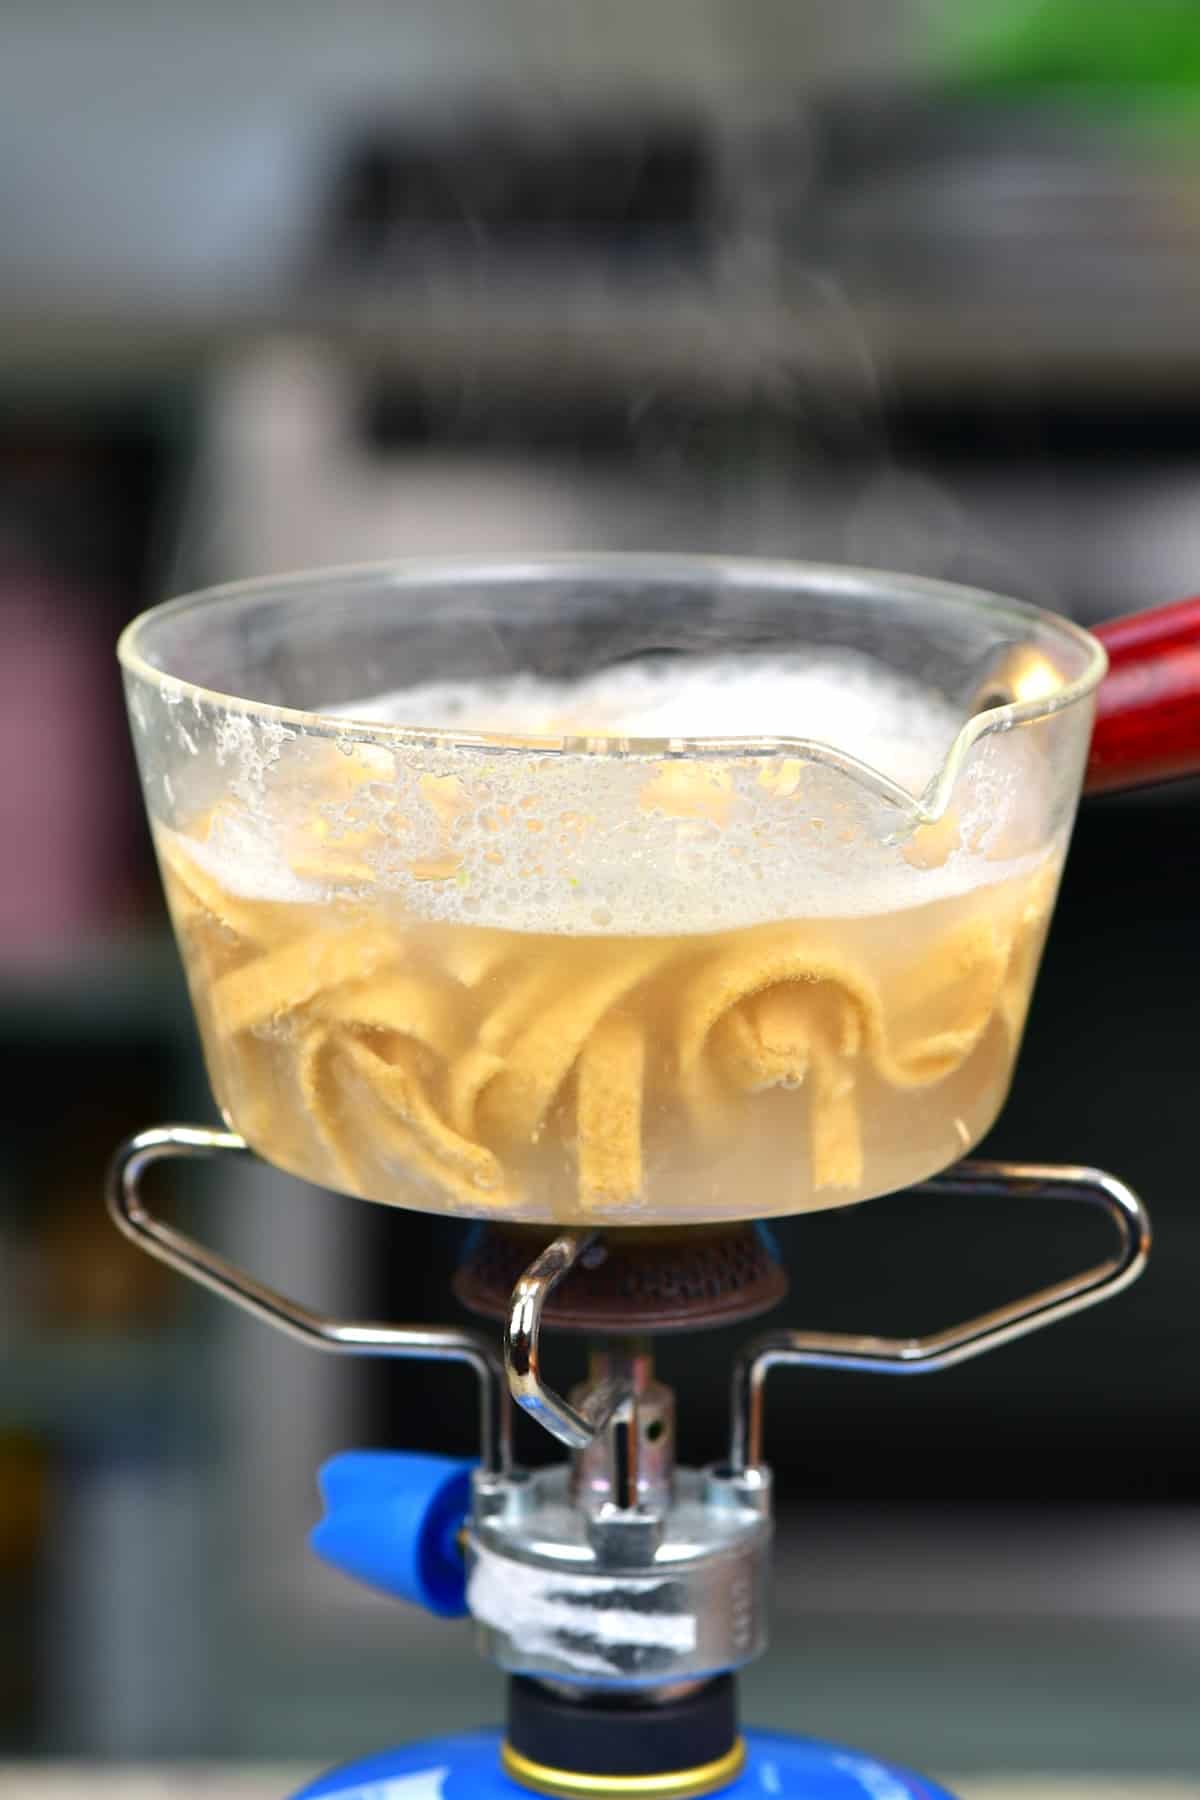
Step 3: Cook the Oat flour pasta
Dust the cut pasta with a little extra oat flour so they don’t stick together. You can then either cook the pasta immediately or store it for later.
To cook the pasta, place it in a large pot of salted boiling water, bring it back to a boil, and cook for 3-4 minutes, stirring every 30 seconds to make sure the pasta doesn’t stick together.
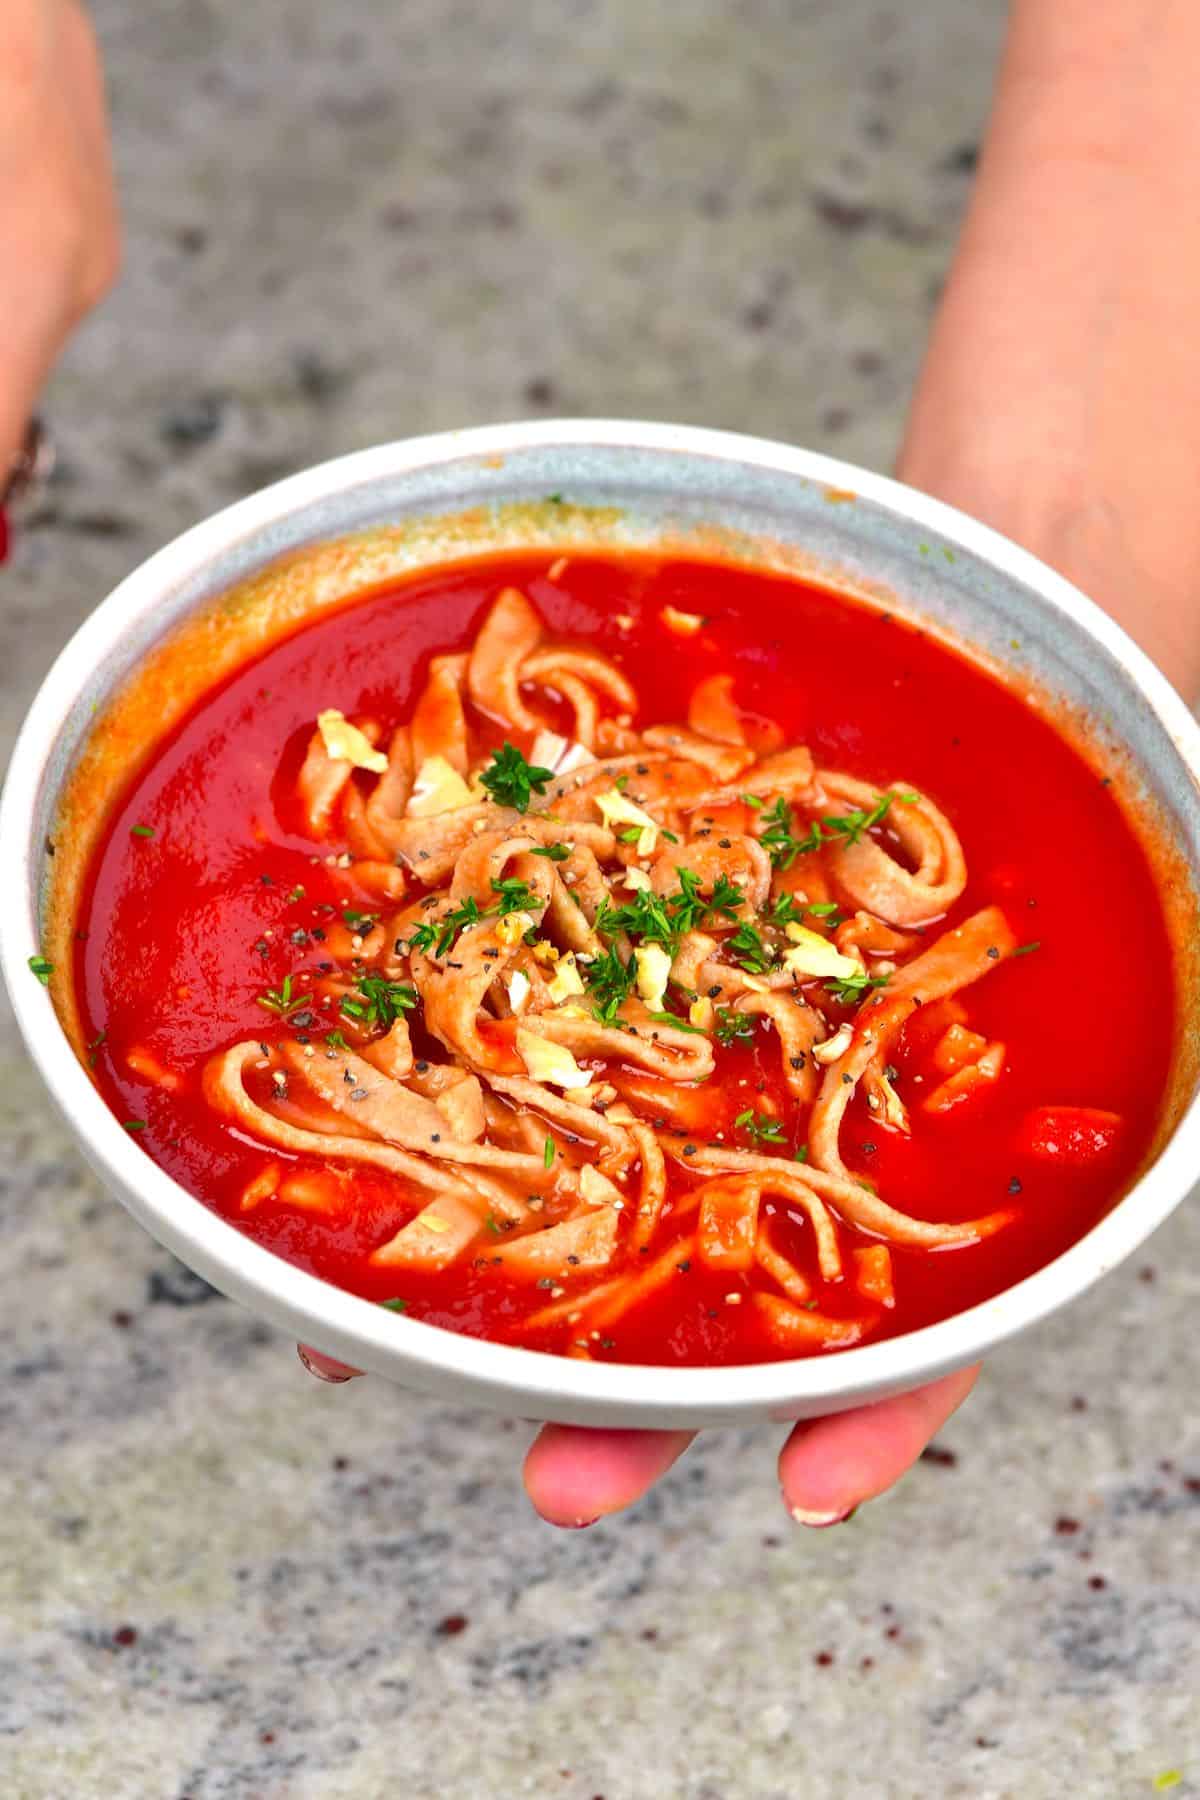
Once cooked, drain, and enjoy your homemade gluten-free pasta with your choice of sauce and any toppings. Below I used marinara sauce, topped with fresh herbs and some garlic flakes.
The leftover salty pasta water can be cooled and then poured into an ice-cube tray to use within stocks and soups.
How To Serve
Serve this homemade gluten-free oat pasta as you would any other pasta- along with your favorite sauces and toppings. Here are some of my favorite sauce pairings.
- Simple Roasted Red Pepper Sauce
- Super Creamy Vegan Mushroom Sauce Pasta
- Easy And Delicious Marinara Sauce Recipe
- Vegan Wild Mushroom Ragu
- Delicious Vegan Basil Pesto (with pistachios)
- Carrot Leaf Pesto: Waste reduction pesto recipe
- Homemade Basil Pesto (Pesto Alle Genovese)
I also love to use leftover dips as quick and easy pasta sauces, like:
- Simple Creamy Homemade Hummus Recipe (+ FAQs)
- Rainbow Hummus 6 ways – Rainbow veggie platter idea
- Muhammara Dip
How To Make Ahead & Store
Store the fresh oat pasta in an airtight container in the fridge for 1-2 days, or freeze it for between 2-3 months.
I haven’t yet tried to dry this oat pasta, though I can’t see why it wouldn’t work like any of my other pasta recipes (read recipe notes for method*). Store the dried whole grain pasta in an airtight container in a cool location and use it within a month. You can also freeze the dried pasta for up to six months.
Recipe Notes
- To dry the pasta: You can use pasta drying racks, a dehumidifier, or lay the pasta out on a large tray in a well-ventilated area. With noodle,s begin by drying them laid flat for 1-2 hours then, while the pasta is firm but still pliable, form it into loose nests of around a portion each. Depending on the climate and humidity, the drying time will vary. If you live in a very humid area, I probably wouldn’t attempt to dry the pasta.
- Optional: Add around 1/3 tsp xanthan gum to your gluten-free pasta dough. It will help make sure that your dough is flexible enough to shape however you’d like (since gluten-free pasta dough is infamously more crumbly and difficult to work with). Alternatively, you could try the recipe with about 1tsp of tapioca starch – I haven’t tried this, but it also helps to provide a ‘stretchy’ quality, so it should work.
- Collect any pasta dough scraps and re-roll into new shapes. You can also roll it into thin ropes, chop them into 1/2-inch pieces then press each piece with your thumb to create ‘Orecchiette’ pasta – perfect for adding to soups and stews.
Related Recipes
If you try this oat pasta recipe, then let me know your thoughts and questions in the comments. I’d also really appreciate a recipe rating and would love to see your recreations – just tag @AlphaFoodie.
How To Make Oat pasta (Gluten-free, Whole-Grain Pasta)
Equipment
- Pasta machine -OR-
Ingredients
- 200 grams oat flour
- 2 eggs
- 2 tbsp olive oil or avocado oil
Instructions
Step 1: prepare the Oat Pasta dough (You can do this process on a work surface, within a bowl, or even with a stand mixer.)
- Create a mound of your oat flour on a clean work surface (or in a bowl/stand mixer), making a well in the center. Add the eggs and oil to the well and then slowly begin to incorporate all of the ingredients together. Eventually, you’ll form a rough dough.
- Knead the dough until you have a smooth dough.If you find that the dough is a little too crumbly, then you can add some water. Add one tablespoon at a time until it forms a dough. This tends to make the dough easier to manage but does affect the texture of the final pasta, so I usually avoid it.
- Set the dough aside in a bowl/in cling film for 30 minutes, to rest. This will make it easier to manage/shape into pasta.
Step 2: Shape/Chop your homemade pasta (You can shape/chop the oat pasta either by hand with a rolling pin, or with a pasta machine.)
- First, divide the dough into a few, more manageable, pieces. I divided it into four.
By Hand:
- Dust your work surface with a little additional oat flour then use a rolling pin to roll out the pasta dough as thin as you'd like it.I usually aim for somewhere around 3mm when doing it by hand. Roll it into a long thin sheet of dough. If you want the noodles to be more 'precise,' you can cut off the 'scraggly' edges and then use a knife to cut the pasta into long strips as thin/thick as you'd like- for tagliatelle/pappardelle.
- Alternatively, you can dust the pasta with oat flour, roll it up lengthwise (so it’s long and thin when rolled rather than shorter and fatter), and then slice the roll into individual noodles. Dust with a little more oat flour again if needed.
Using a pasta machine/press:
- Begin by rolling out each piece of dough slightly, so it's thin enough to fit through your pasta machine's widest setting. Feed it through the machine 2-3 times, folding it like an envelope as you do, to get a cleaner shape.Then reduce the setting, making it thinner, and feeding it through 1-2 times, reducing the thickness until you achieve your perfect level.Then use the machine to cut it into pasta ribbons/noodles.
- Alternatively, you can press the dough through a pasta press to make noodles, macaroni, penne, etc. You can also use a potato ricer for noodles!Be careful when handling the dough at this point. As it is gluten-free pasta, it is a lot more fragile than traditional pasta and can be crumbly.
Step 3: Cook the Oat pasta
- To cook the pasta, place it in a large pot of salted boiling water, bring it back to a boil, and cook for 3-4 minutes, stirring every 30 seconds to make sure the pasta doesn’t stick together.
- Once cooked, drain the pasta and serve it with your choice of sauce and any toppings. Below I used marinara sauce, topped with fresh herbs and some garlic flakes.The leftover salty pasta water can be cooled and then poured into an ice-cube tray to use within stocks and soups.
How To Make-Ahead & Store
- Store the fresh oat pasta in an airtight container in the fridge for 1-2 days, or freeze it for between 2-3 months.I haven't yet tried to dry this oat pasta, though I can't see why it wouldn't work like any of my other pasta recipes (read recipe notes for method*). Store the dried whole grain pasta in an airtight container in a cool location and use it within a month. You can also freeze the dried pasta for up to six months.
Video
Notes
- To dry the pasta: You can use pasta drying racks, a dehumidifier, or lay the pasta out on a large tray in a well-ventilated area. With noodle,s begin by drying them laid flat for 1-2 hours then, while the pasta is firm but still pliable, form it into loose nests of around a portion each. Depending on the climate and humidity, the drying time will vary. If you live in a very humid area, I probably wouldn’t attempt to dry the pasta.
- Optional: Add around 1/3 tsp xanthan gum to your gluten-free pasta dough. It will help make sure that your dough is flexible enough to shape however you’d like (since gluten-free pasta dough is infamously more crumbly and difficult to work with). Alternatively, you could try the recipe with about 1tsp of tapioca starch – I haven’t tried this, but it also helps to provide a ‘stretchy’ quality, so it should work.
- Collect any pasta dough scraps and re-roll into new shapes. You can also roll it into thin ropes, chop them into 1/2-inch pieces then press each piece with your thumb to create ‘Orecchiette’ pasta – perfect for adding to soups and stews.
Nutrition
Nutrition information is automatically calculated, so should only be used as an approximation.


I just made the ravioli but next time I would make a double batch because I only made like a batch of 14. this is a great recipe excited to eat it.
Doubling the batch is a good idea, especially for ravioli. Glad you’re enjoying the recipe, Teresa!
Sounds yummy. Im assuming this eould work to make ravioli also would just need to be careful not to tear it and also make a lil thicker maybe. Has anyone else tried usingg this recipe for ravioli yet?
Hi there,
Indeed, while oat pasta works great for regular pasta shapes, it might be a little trickier for ravioli. Let me know how it goes if you give it a try!
With your oat, red lentil and chickpea noodle recipes, would adding the recommended xanthum gum amounts make the pasta hold up as lasagna sheets when baked? Thank you!
Hey Daniella!
Yes, adding the recommended amount of xanthan gum can help improve the structure of oat, red lentil, and chickpea pasta, making it more stable for lasagna sheets.
Xanthan gum acts as a binder, helping to mimic some of the elasticity that gluten provides in traditional pasta. It helps hold the dough together, reduces breakage, and improves moisture retention, preventing the sheets from becoming too brittle when baked. However, since these flours don’t have gluten, the pasta may still be a bit more delicate than wheat-based lasagna.
For the best results, I’d recommend rolling the sheets slightly thicker and ensuring they are well-coated in sauce when baking to keep them from drying out. Let me know if you try it—I’d love to hear how it turns out!
Thanks so much for this great recipe, Samira! I had a bag of oat flour, so I used that, and it worked out very nicely. After the ball of dough had sat, it was dry so I did need the addition of water at that point, and it incorporated very nicely. It rolled out beautifully and kept its shape…and tasted very good!! I am so grateful to have a recipe that doesn’t need any emulsifiers like xanthan gum. Many thanks!
Thank you, Kari! Glad you liked it!
i made this pasta and dried it in an air fryer in 5-15 min per batch of noodles at 400 degrees depending on thickness mine were pretty much 1/8 to 1/4 inch thick and the 1/4 inch thick ones took 15-18 min to dry and the 1/8 inch thick noodles took 5-10 min to dry and this recipie from start to finish took 3-4 hrs but that included grinding the oatmeal,converting the measurements making rolling out and drying the pasta.
Thank you for your comment, Lisa!
I really wanted this to work, Nut mine was soooo tough and dry! I’m not sure what I did wrong.
Hey Savannah! Sorry to hear that! If the dough was too tough and dry, it might have needed a little more moisture. Oat flour absorbs liquid differently than wheat flour, so depending on the brand and humidity, you may need to add a little extra water (or oil) gradually until the dough is pliable.
Also, make sure to knead it just enough to bring it together without overworking it, as that can make it feel tougher. Let me know if you’d like any troubleshooting tips—I’d love to help!
Easy to make and soooo sooo good! I have a gluten sensitivity so it’s great to have such simple but delicious recipes like this! I served it with spinach, tomatoes, pesto, feta, and a bit of balsamic vinegar.
Hi Alexis, thank you so much for the feedback! So glad you like it. Your version sounds amazing 🙂