
12+ Dessert Tortilla Wraps (Viral Tortilla Trend)
This post may contain affiliate links. Please read our disclosure policy.


12+ ideas for dessert tortilla wraps using the current viral tortilla trend. From jaffa cake and Turkish delight fillings to banoffee and s’mores – there are tons of ways to enjoy dessert wraps today!
I’m at it again with the viral tortilla trend. I’ve already shared 20+ Globally Inspired wrap fillings, but now it’s time for a 100% sweet edition with these 12+ dessert tortilla/wrap options!
Just like last time, there are several ways to enjoy your tortilla dessert wraps – some omit the tortilla entirely in place of homemade crepes (yum!).
If you spend any time at all on social media, then it’s likely that you’ve already come across the viral wrap hack that is whirling up a storm online with its major virality. As the very first (as far as I’m aware) to post this method online, I’ve been loving sharing some of my top ways to fill your wraps.
Want to save this recipe?
How To Wrap A Tortilla The Best Way?
I already spent quite a lot of time discussing the details of the viral tortilla hack in my previous wrap post and exactly how it works. Feel free to check it out over there. With that in mind, I’ll keep things brief here.
There are just four steps (and one of those is optional!) to creating a delicious ‘hacked’ dessert tortilla wrap, which are as follows:
- Make a cut – from the center of the tortilla to the edge.
- Decide the number of sections you want & add the fillings. Whether you want 3 or 4 will change how you layout your fillings (and how many fillings you have). To add the fillings, divide the wrap’s visual area by the number of fillings you want.
If you imagine the wrap to be like a clock-face and have the cut facing down towards 6 pm, then for 4 layers 1-3,3-6,6-9, and 9-12 will be the separate sections (with 6-12, i.e., the half on the left of the cut as your two outer layers). For three parts, then, 6-10, 10-2, and 2-6 will be where the layers are (with 10-6 as the outer layers). Use the images/video as a reference. - Fold The Tortilla – begin by folding the wrap upwards from the right side of the cut you made until it covers an entire section of filling and then repeat until you have a completely folded tortilla.
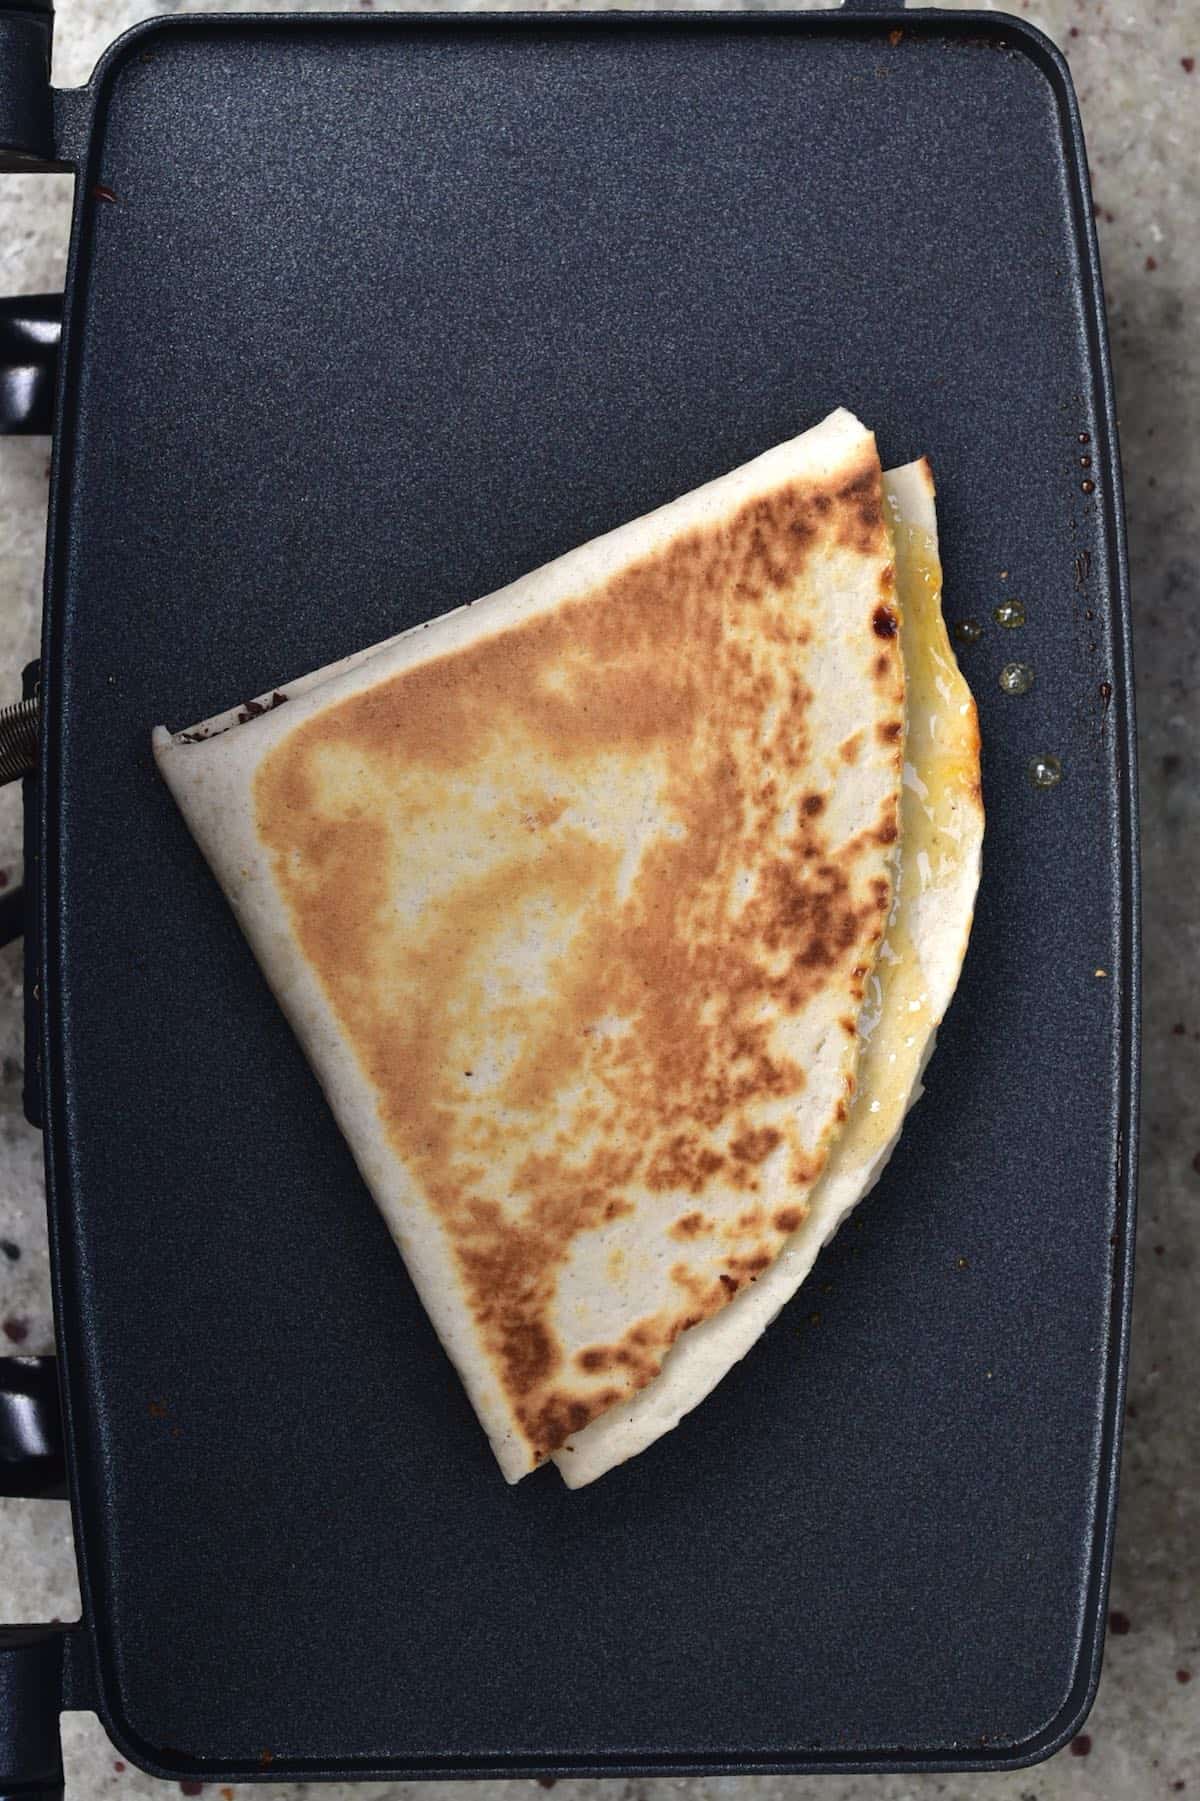
4. Optional – heat the dessert tortilla – by placing it in a sandwich press/grill pan or a large skillet/pan.
Don’t worry, if you’re still confused, simply follow my picture or video guidance!
Top Tips For Dessert Wraps
- Top Tip: be strategic when placing your fillings! If you plan on making a heated quesadilla style tortilla hack wrap, then be sure to place any ingredients you want to melt on the ‘outer’ layers of the wrap. i.e., chocolate or marshmallows, or butter. Other ingredients, such as fruit, can then remain in the center, so they don’t receive as much heat.
- Nearly all of the dessert tortillas/wraps below will pair AMAZINGLY with vanilla ice-cream or other ice-cream for a full-on dessert!
- You may be able to meal-prep several of these dessert wraps and store them, wrapped tightly, in the fridge or freezer. To reheat, simply pop in a toaster-friendly bag in the toaster (from frozen or chilled), microwave (chilled only), or lightly pan fry (chilled only).
The Tortilla Desserts
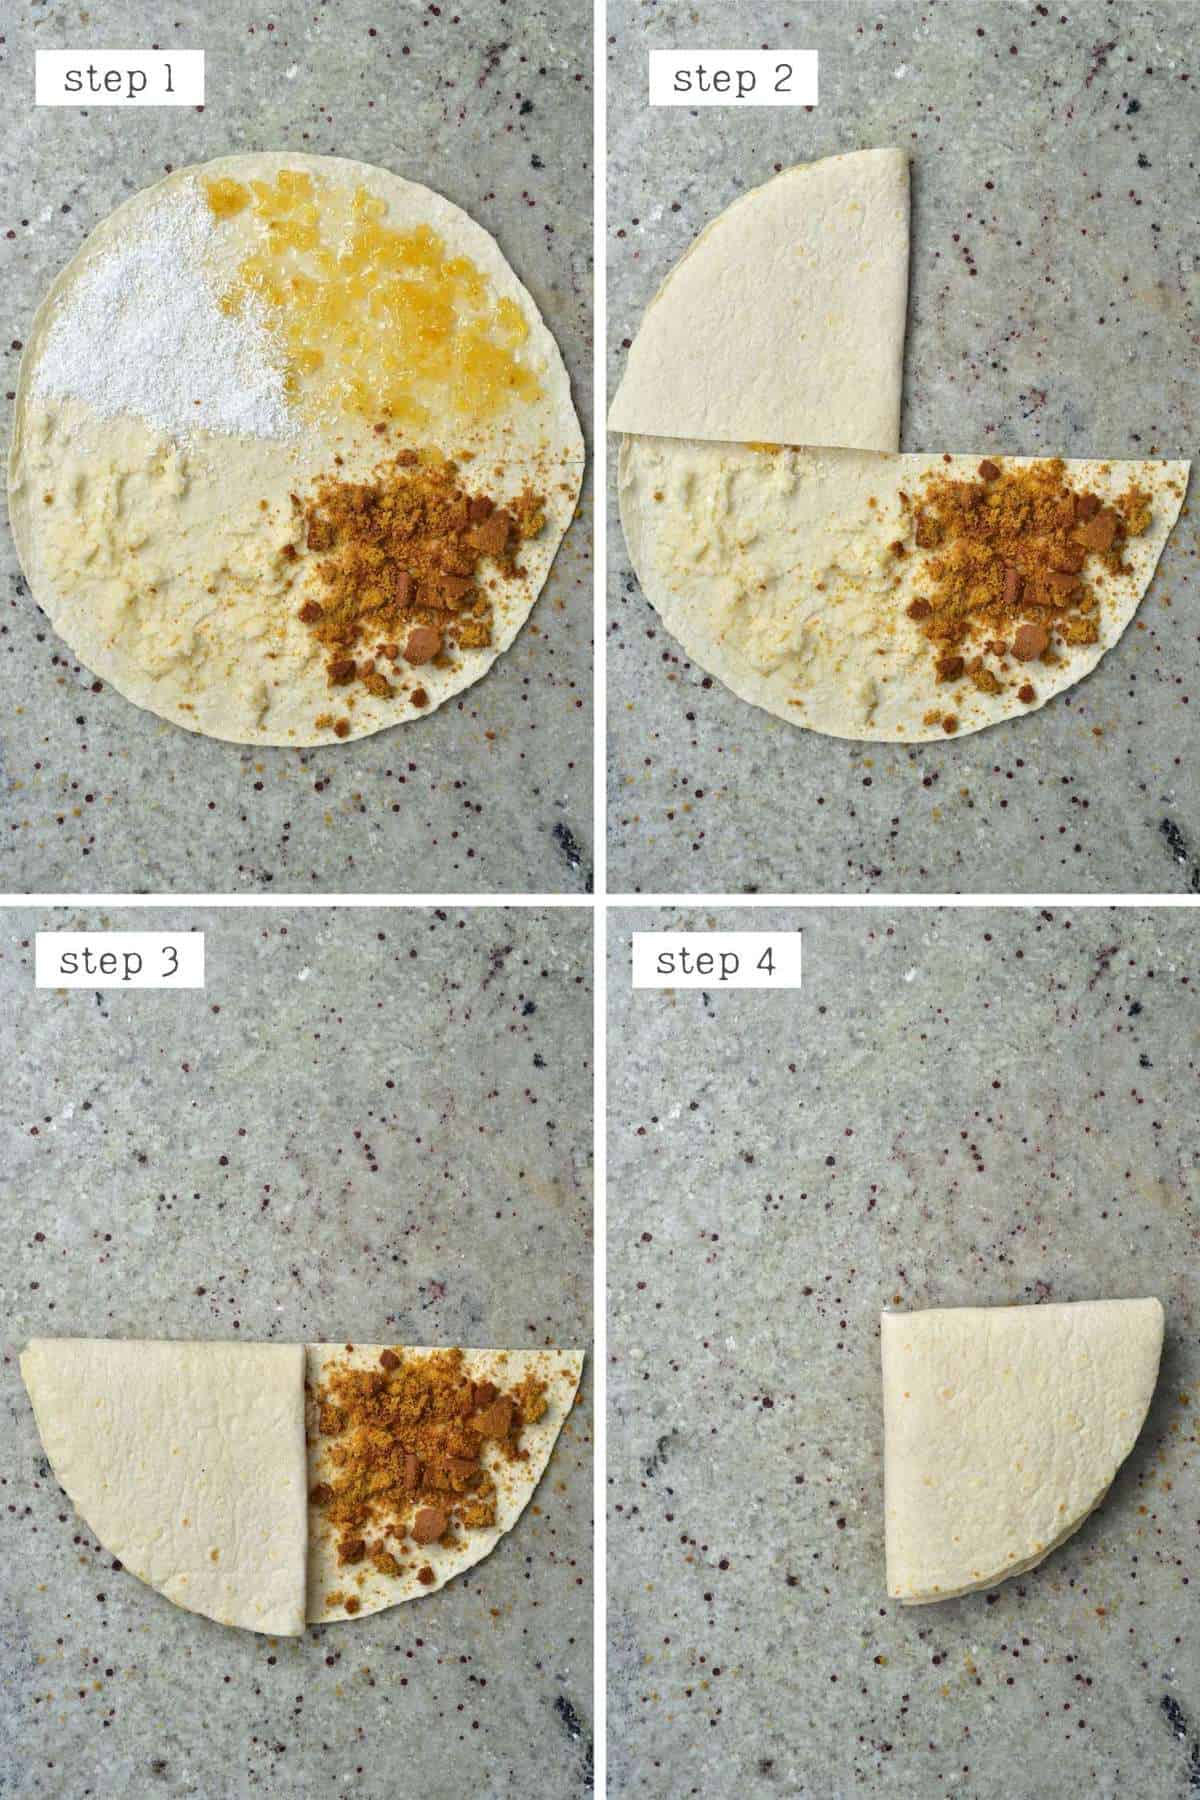
1. Cinnamon Bun Wrap
Who doesn’t love a cinnamon bun with the buttery, cinnamony, sugary deliciousness? Well, now you can have all that in minutes – with this cinnamon bun inspired dessert tortilla wrap.
- Use a tortilla of your choice (GF, Vegan, etc.)
- Brown Sugar (muscovado)
- Butter & cinnamon
- (Optional) cream cheese frosting – like I’ve used for this carrot cake. Alternatively, a mixture of icing sugar (confectioners sugar) and your milk of choice can be combined to create a quick icing.
If you decide to create an icing and don’t have piping bags, then use a sandwich bag and make a small snip in the corner to drizzle over the cinnamon bun tortillas wrap/s. I just did a really simple 2-fold for this wrap (and you even don’t need to cut it), but feel free to alternate the fillings and do 3-4 folds.

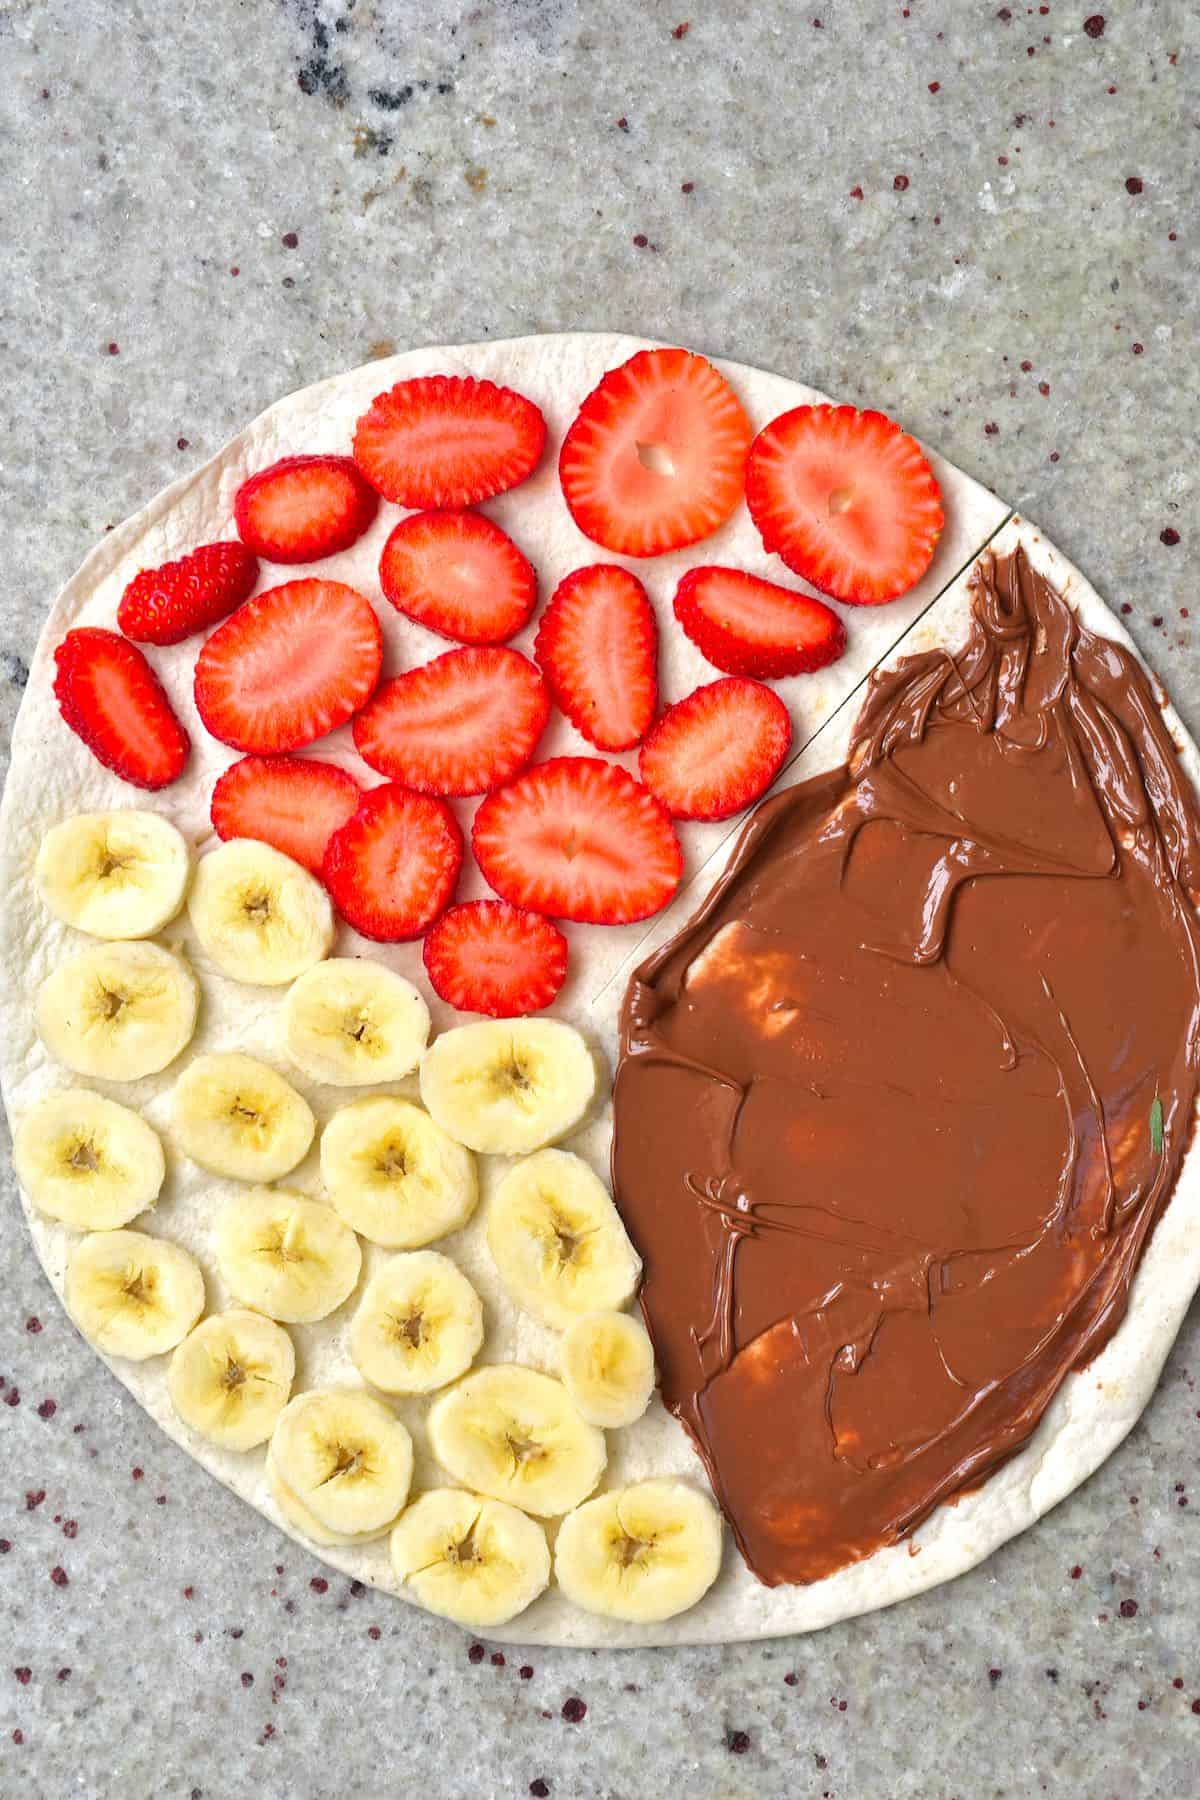
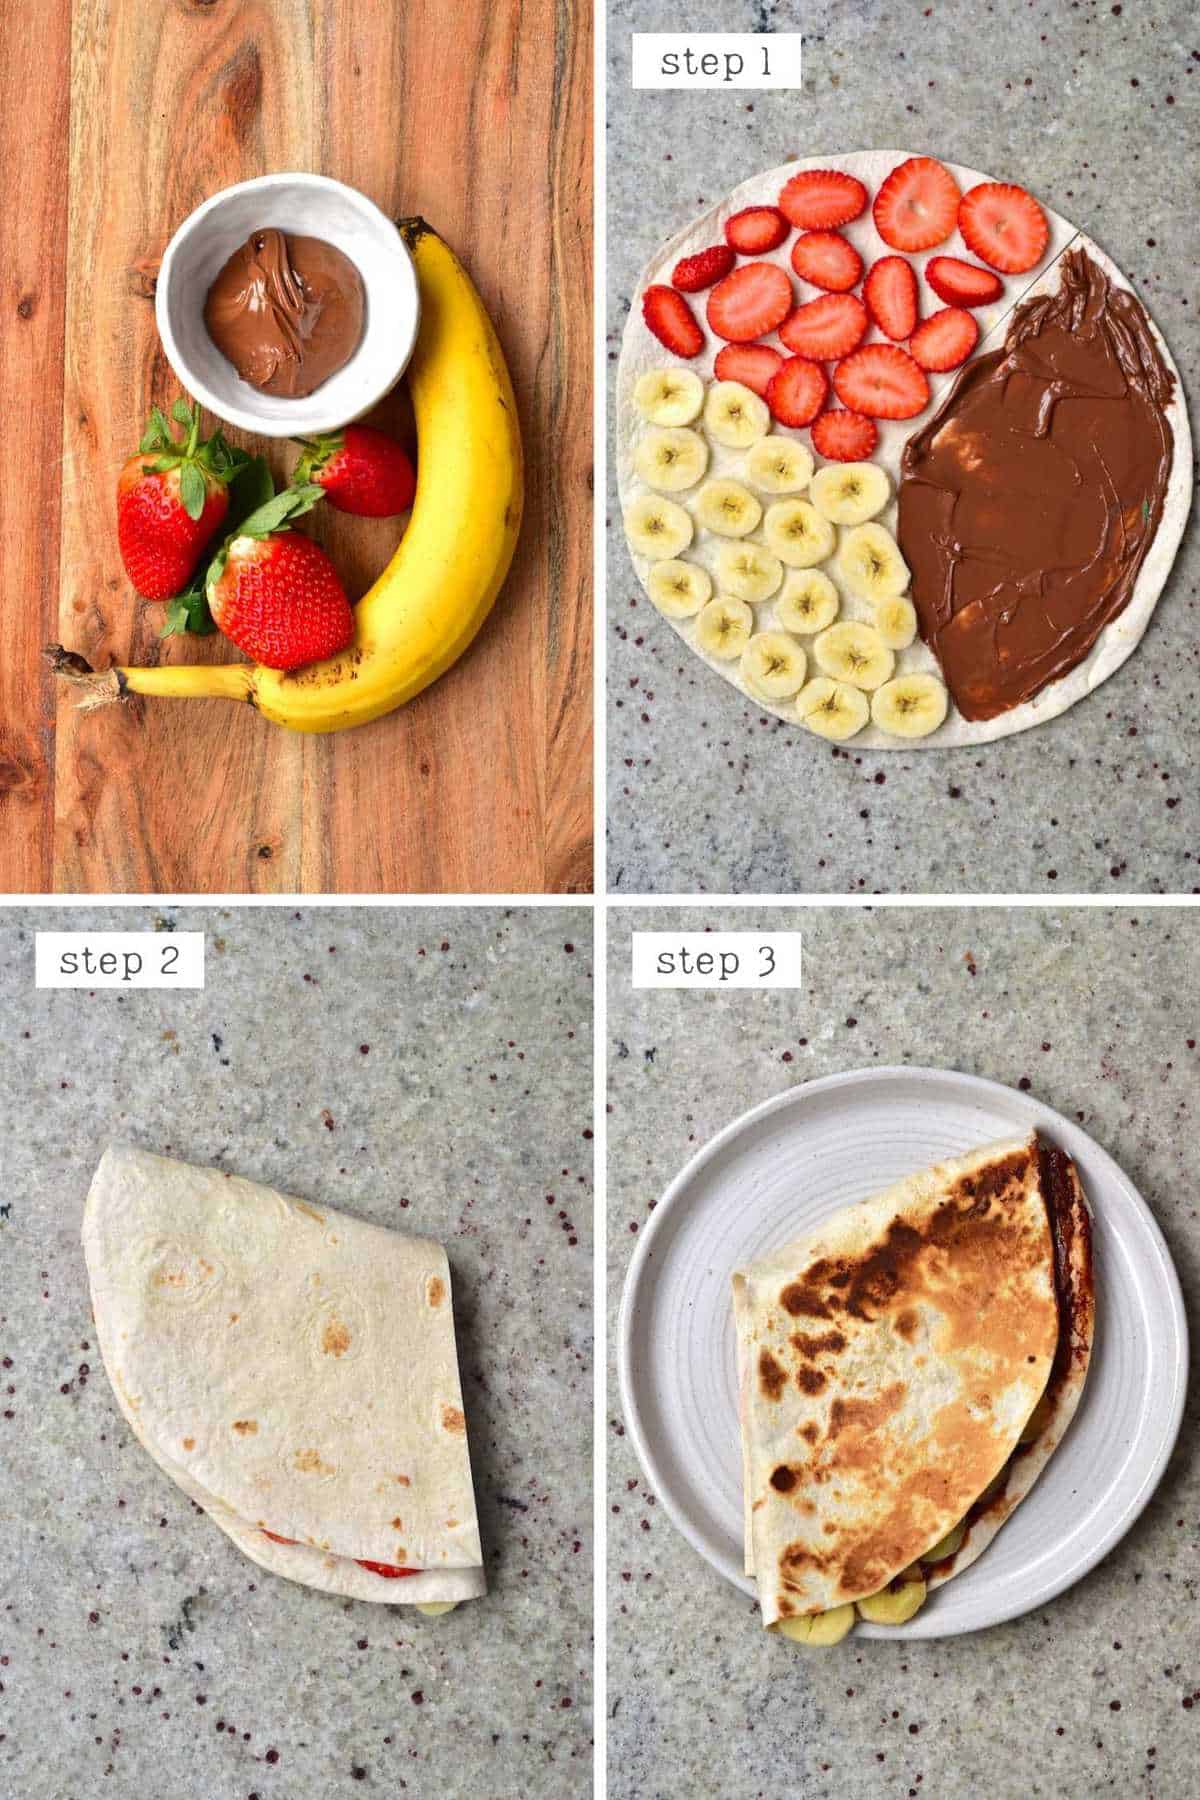
2. Nutella Crepe
We may all have had a Nutella stuffed crepe before – but possibly not wrapped quite like this.
- Use a tortilla or crepe
- Homemade Nutella spread (vegan) or Nutella or melted chocolate.
- Banana slices and Strawberry slices (or fruits of your choice).
- OPTIONAL – top with a drizzle of this chocolate syrup or strawberry syrup
It’s best to use a warm crepe for this, so then no further heating is necessary. Otherwise, use a pre-prepared crepe, fill, and wrap it – then place it back in a pan or microwave to heat through and make the Nutella deliciously melty.
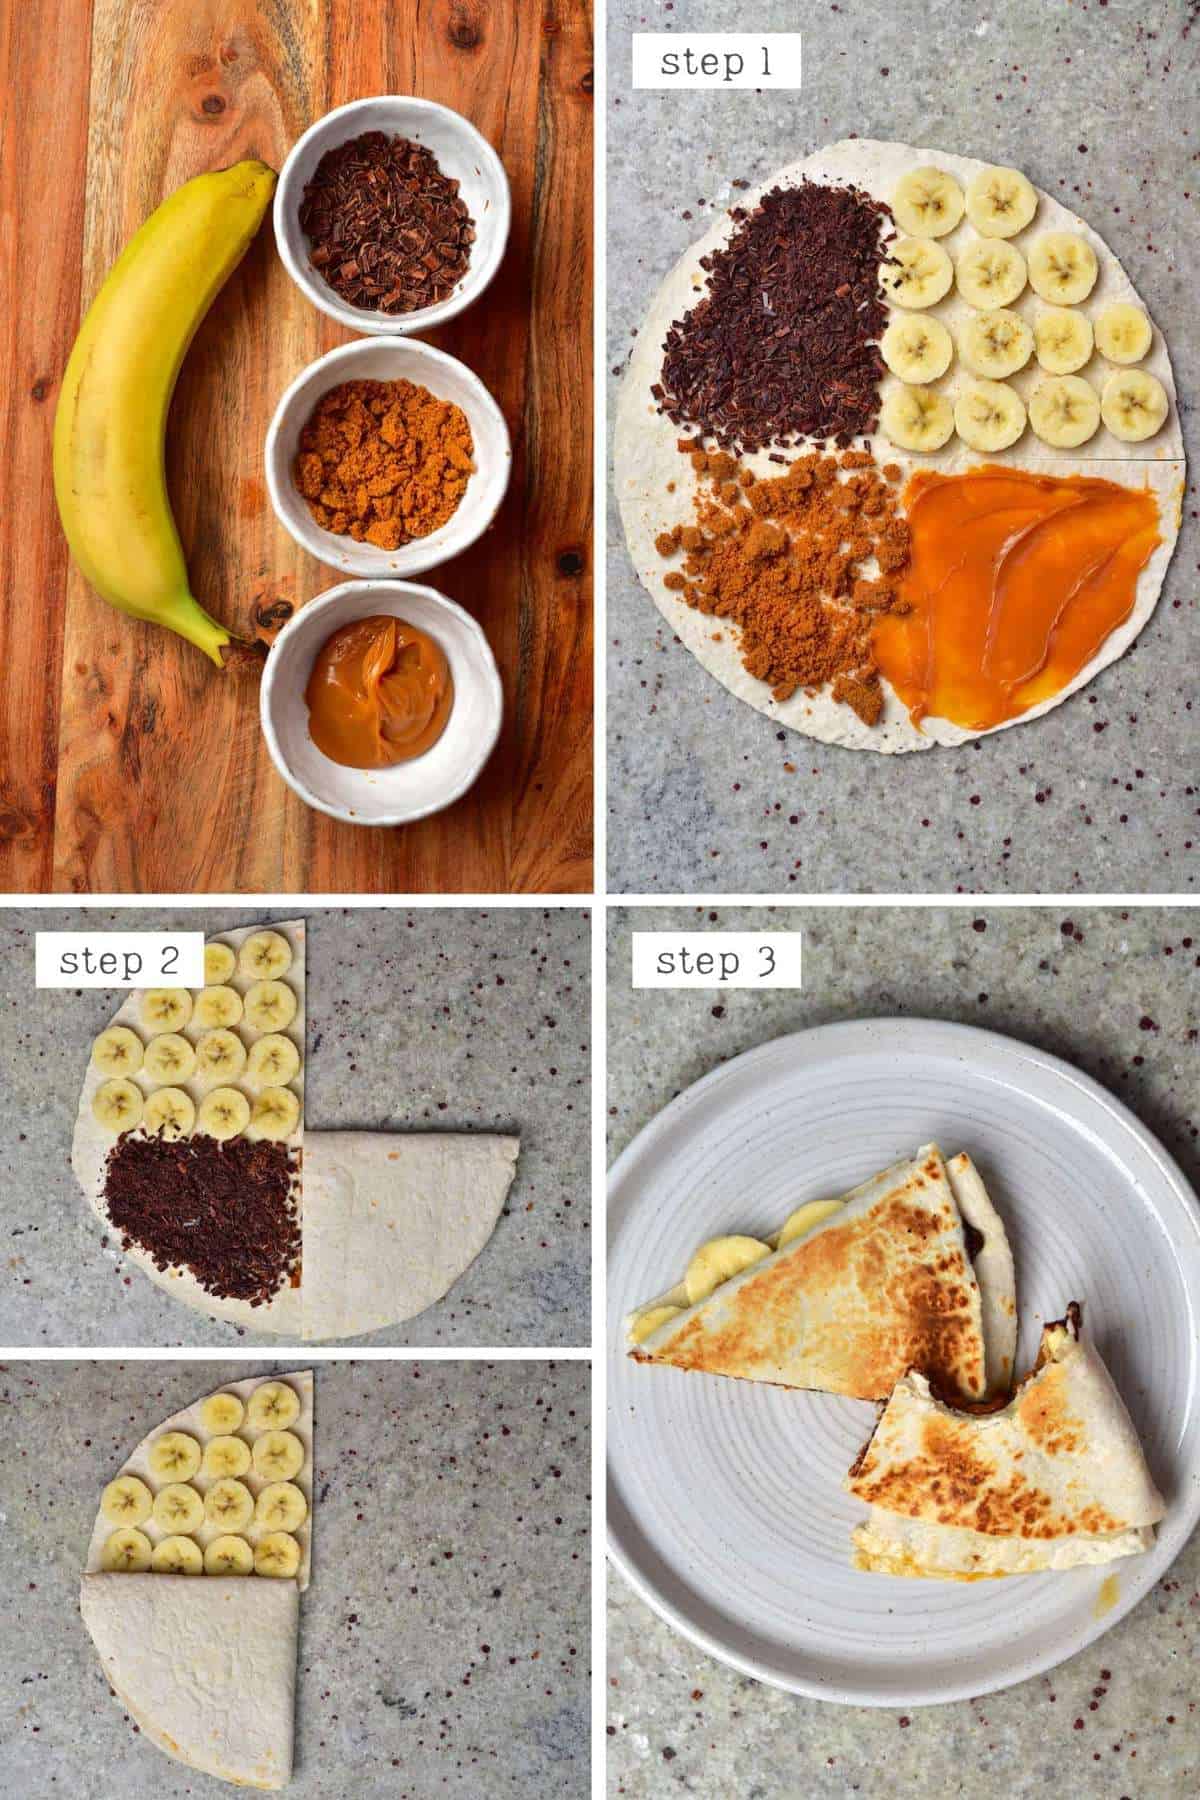
3. Dulce De Leche Biscoff Wrap
If you’re as obsessed with Biscoff as the rest of the world seems to be (myself included), then this is definitely one to try.
- Tortilla wrap or crepe
- Dulce de leche – as little or as much as you’d like – it’s delish!
- Lotus Biscoff – crush the cookies for easier wrapping
- Chocolate – to make it easier to melt, use grated or finely chopped chocolate
- Banana – thinly sliced
Place the chocolate and dulce de leche in the outer layer for optimal ‘meltage’. Optionally, serve with some Coconut Whipped Cream/whipped cream.
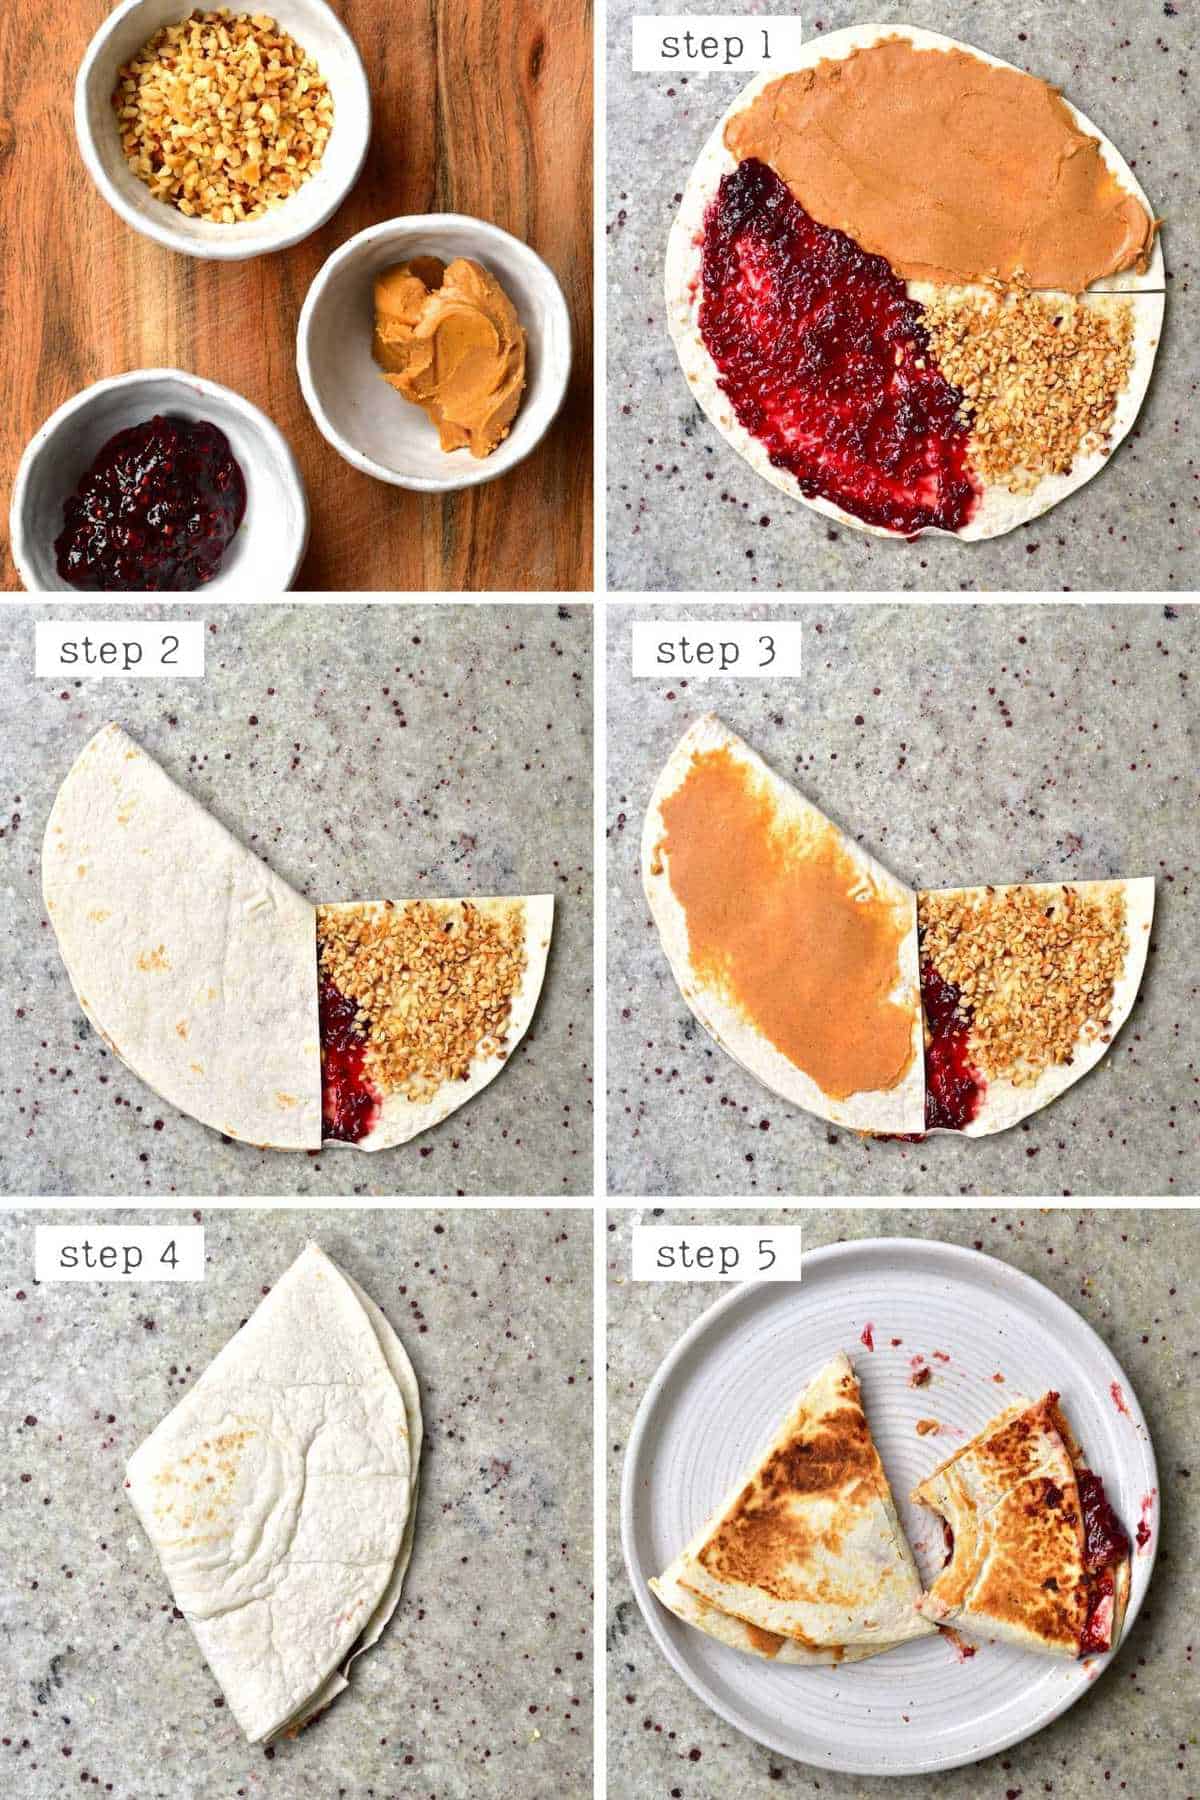
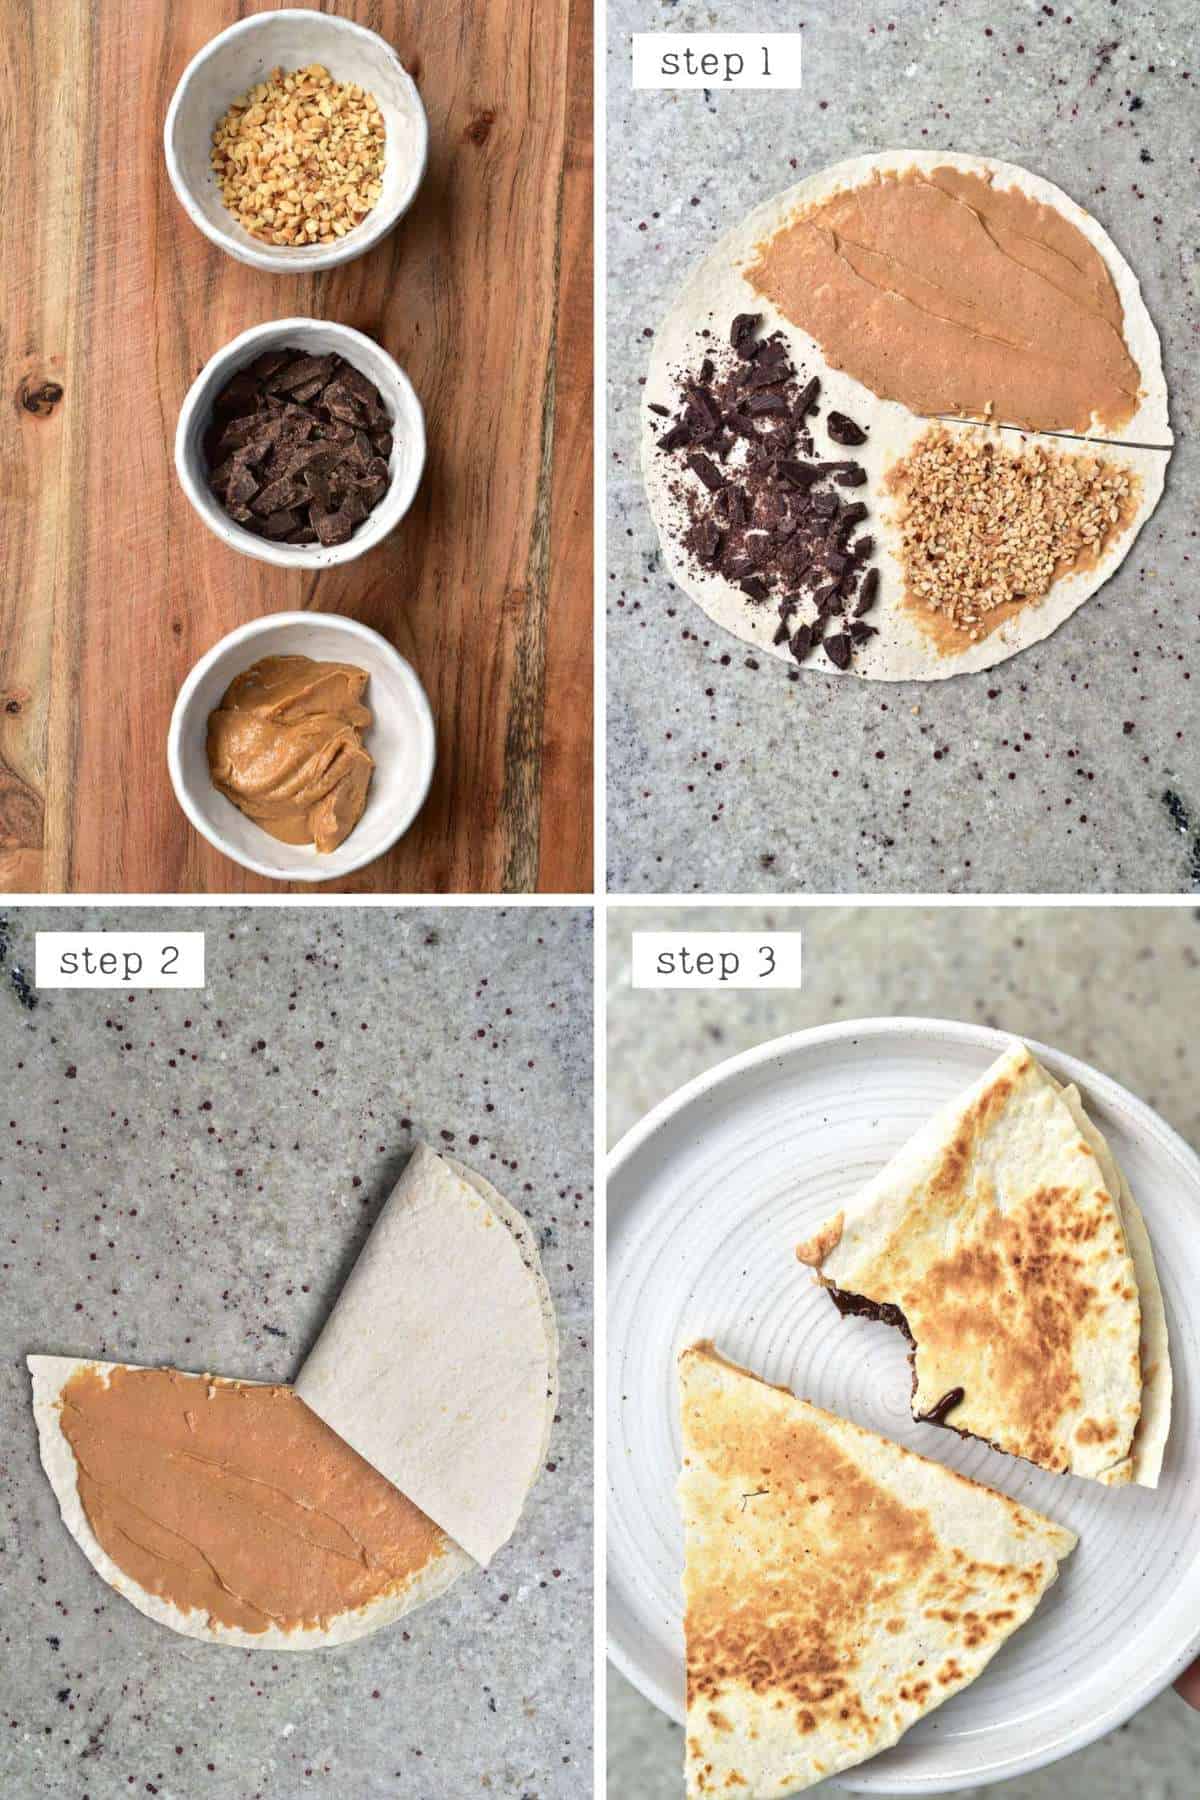
4. PB & J Tortilla Filling
Peanut butter and jelly is a classic filling for a reason and HAS to be appreciated as a tortilla dessert option!
- Tortilla wrap or crepe
- Homemade Peanut butter – or sub this for almond butter or another favorite nut butter.
- Crushed peanuts
- ‘Jelly’ – For the jelly, you can use any jelly/jam such as raspberry jam, strawberry jam, grape, blackberry jam, etc.
As you can see below, I didn’t equally divide the wrap space for this wrap as I found that I preferred the quantities with less of the crushed nuts than the spreadable materials. In step 3, I added a further thin layer of peanut butter to help the wrap ‘stick’ together when folding the remaining sections.
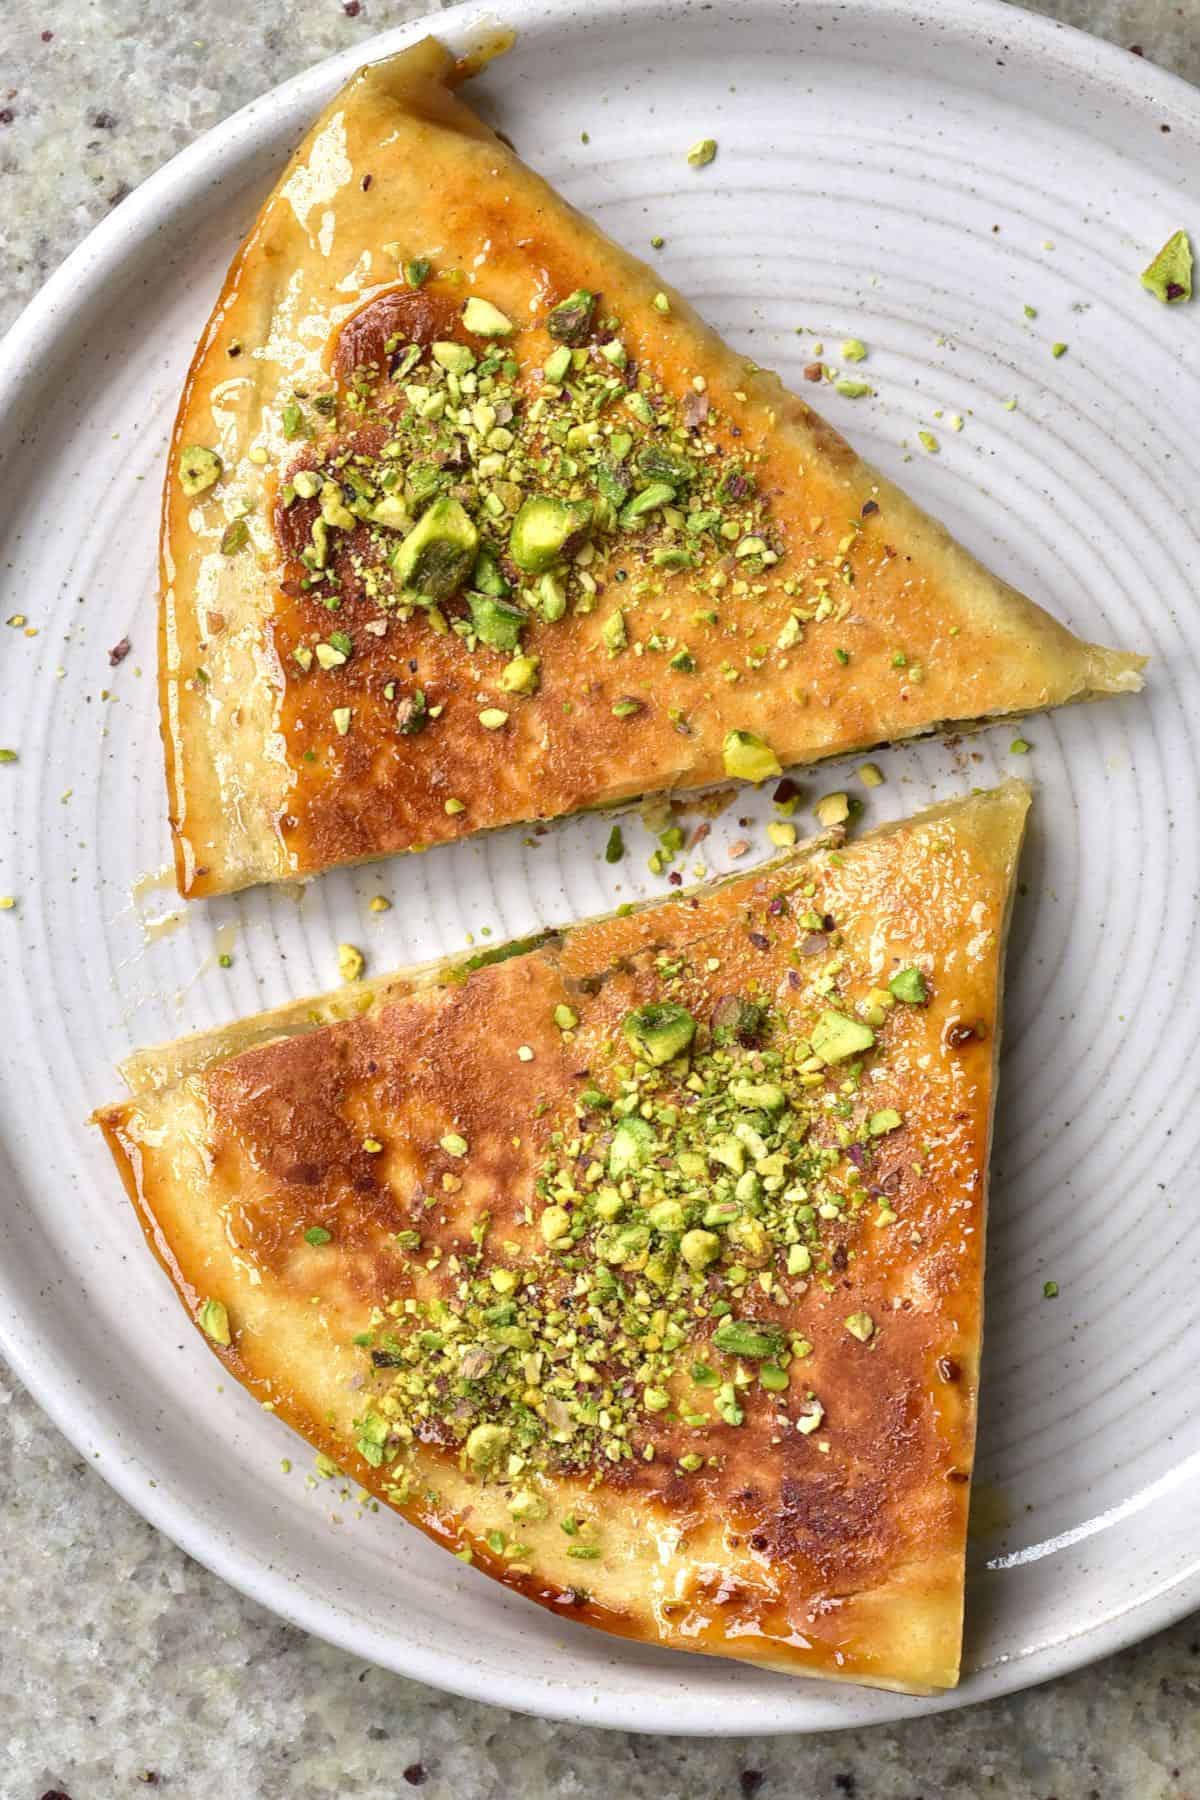
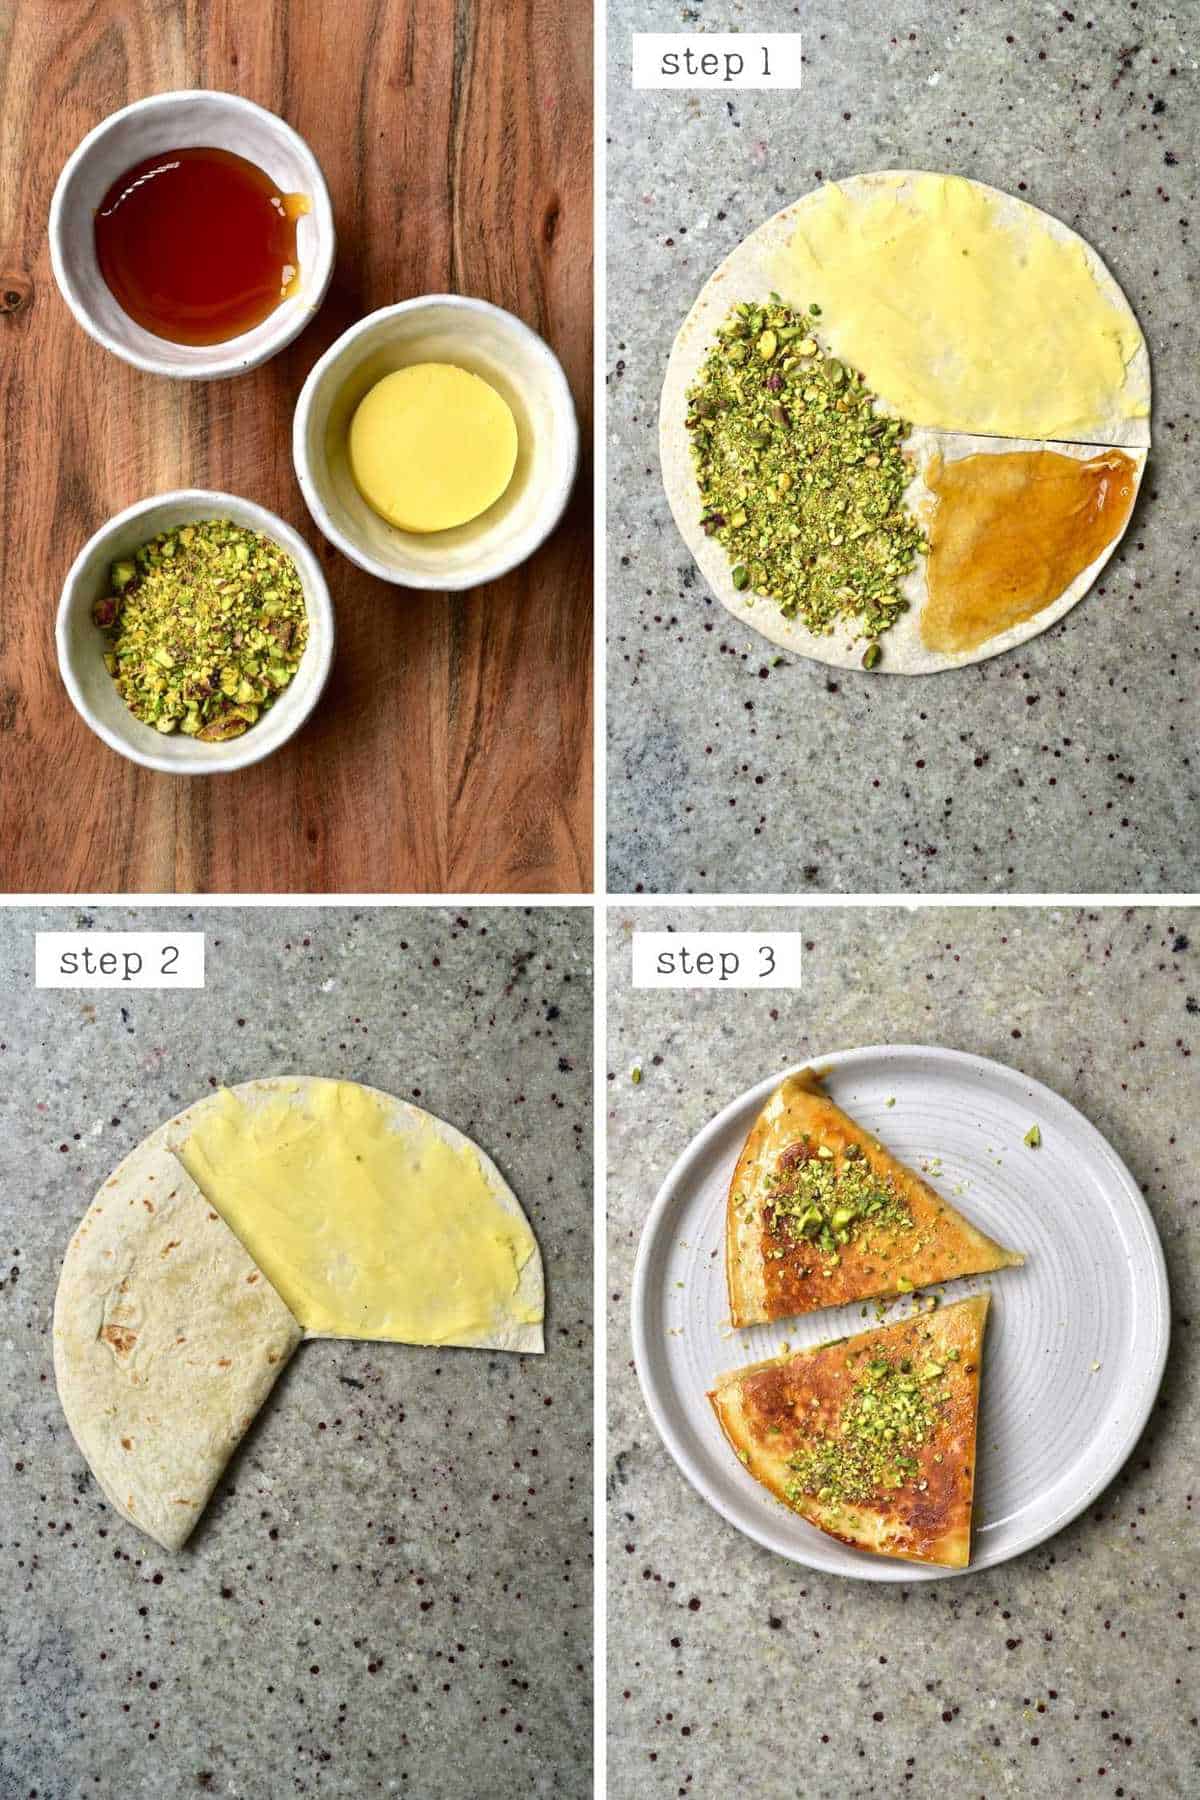
5. Baklava-Inspired Tortilla
This Baklava tortilla combines all the best parts of my favorite baklava recipe into a handy dessert tortilla: crushed nuts, honey, and butter – with optional extras for even more flavor.
- Tortilla Wrap or Crepe
- Crushed Pistachios – or other nuts like walnuts.
- Honey – optionally add a little orange blossom or rose water to the honey for an even more traditional baklava flavor. Use a vegan syrup if preferred, though it will affect the flavor.
- Butter – I use homemade butter.
- (Optional) Cinnamon and/or melted chocolate are both options you could add to imitate different types of baklava.
You can serve this as a warm wrap alongside delicious vanilla ice-cream. And you’ll never look back! To take this dessert tortilla to another level, then you could even sprinkle it with crushed phyllo dough pieces for true baklava vibes.
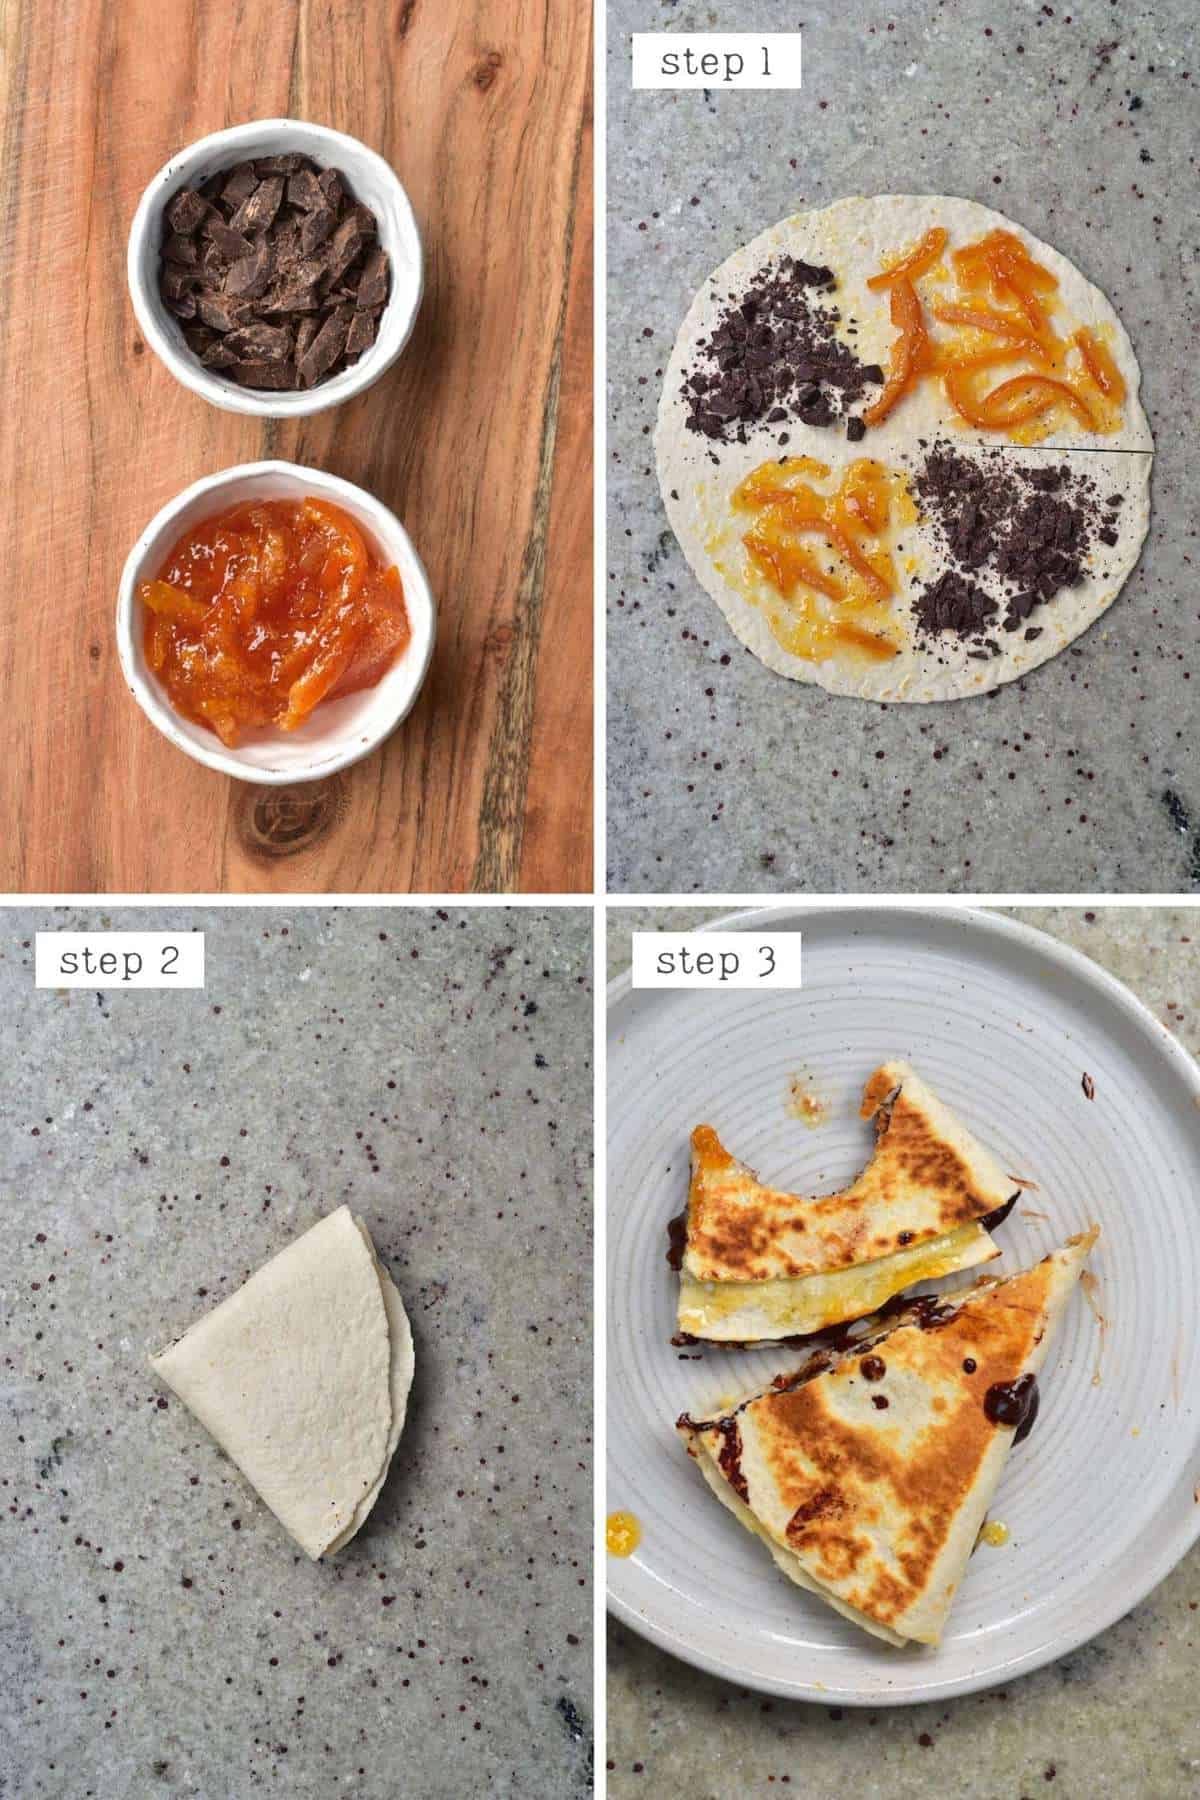
6. Jaffa Cake Dessert Tortilla
This Jaffa cake dessert option doubles up on the orange and chocolate fillings for truly decadent jaffa vibes. It also allows you to still take advantage of 4 sections for better wrapping.
- Tortilla Wrap or Crepe
- Orange Marmalade – You could also make a lime twist by using a lime marmalade instead.
- Chocolate – I use homemade dark chocolate that is just slightly sweetened.
Optionally serve with some mandarin or orange segments for a little extra ‘freshness.’ This should also definitely be eaten warm along with melting vanilla ice-cream – trust me!
7. ‘Reese’s Cups’ PB & Chocolate tortilla
Is what it says – a decadent combination of peanut butter and chocolate for a dessert wrap similar to a peanut butter cup.
- Tortilla Wrap or Crepe
- Peanut butter- I use homemade 2-ingredient peanut butter.
- Chocolate – I use homemade dark chocolate that is just slightly sweetened. Feel free to use milk chocolate though, if preferred.
- Caramel sauce – not 100% necessary but it takes this dessert wrap to another level!
- Crushed nuts – a sprinkle of peanuts.
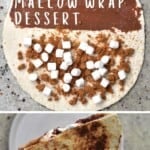
8. S’mores wrap dessert
Who doesn’t love a traditional s’more? I’ve done a s’more-esque dessert once before, but it definitely isn’t something I utilize nearly enough. Now you can enjoy all the elements of a s’more, without the campfire!
- Tortilla Wrap or Crepe
- Crushed graham crackers – or digestive biscuits
- Chocolate – I use homemade Nutella. You can also use melted dark or milk chocolate. Keep in mind that you need something that you can spread so that the tortilla will stick and stay closed (so you can’t use just chocolate chips).
- Marshmallows – it’s best to use mini marshmallows and place these in an outer layer so they melt. Alternatively, you can use marshmallow fluff.
You can do this with 2-4 layers, alternating if preferred. And if doing only 2 layers/sides, like on the photos below, no need to make the cut from the center, as you will close the tortilla in two.

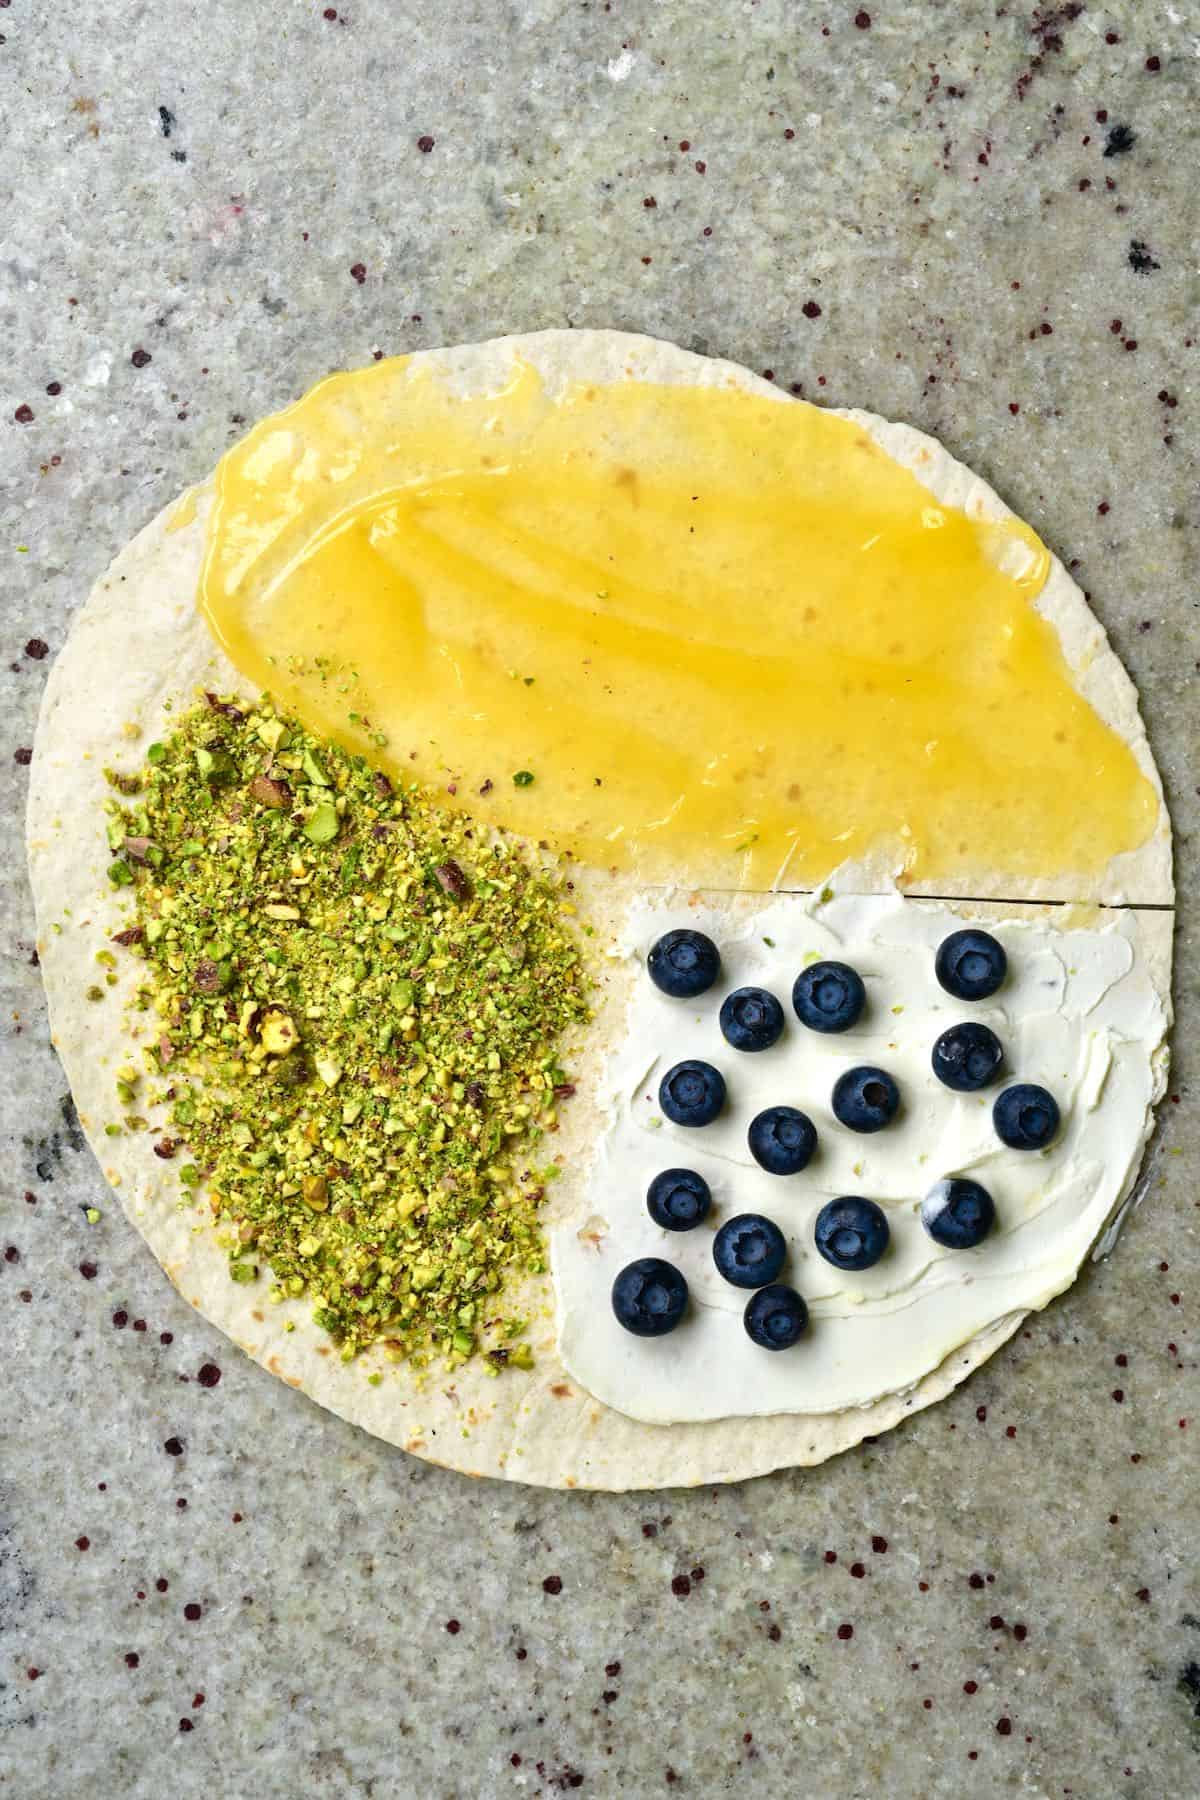
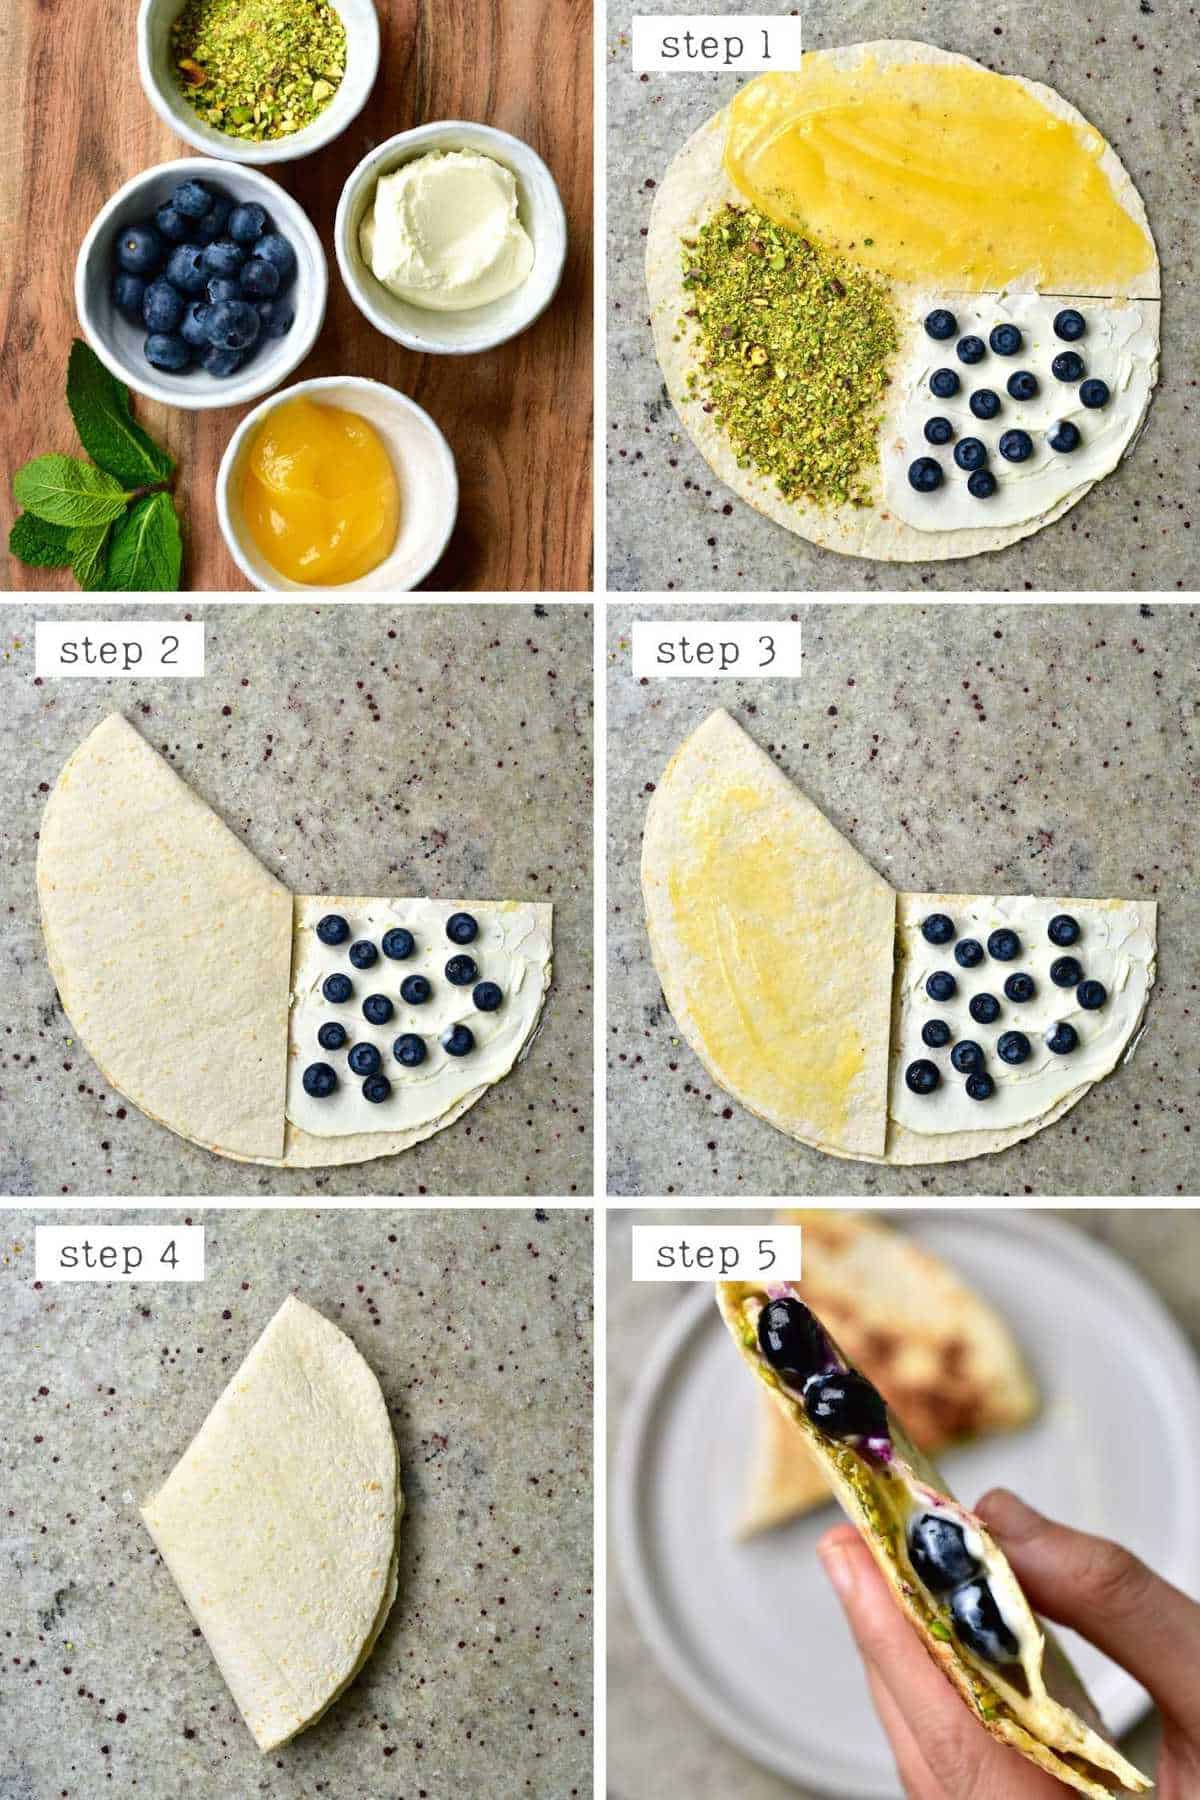
9. Lemon Curd ‘cheesecake’ filling
I struggled with what to call this one – other than straight-up AH-MAZING. The combination of lemon curd and mascarpone makes for a cheesecake-like filling. Meanwhile, the mint, pistachio, and blueberries just bring this 10/10 to a 100/10!
- Tortilla Wrap or Crepe
- Lemon Curd
- Mascarpone Cheese – or even neutral ricotta cheese makes for a great addition to desserts for their ‘cheesecake’ vibes.
- Pistachios
- Mint leaves (optional), shredded and mixed in with the mascarpone or curd.
- Blueberries – which I usually use with the mascarpone layer.
Optionally, you can add an extra thin layer of lemon curd to help the tortilla “stick” when the final layer with the blueberries is folded (step 3 in the photos below).
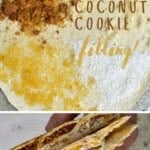
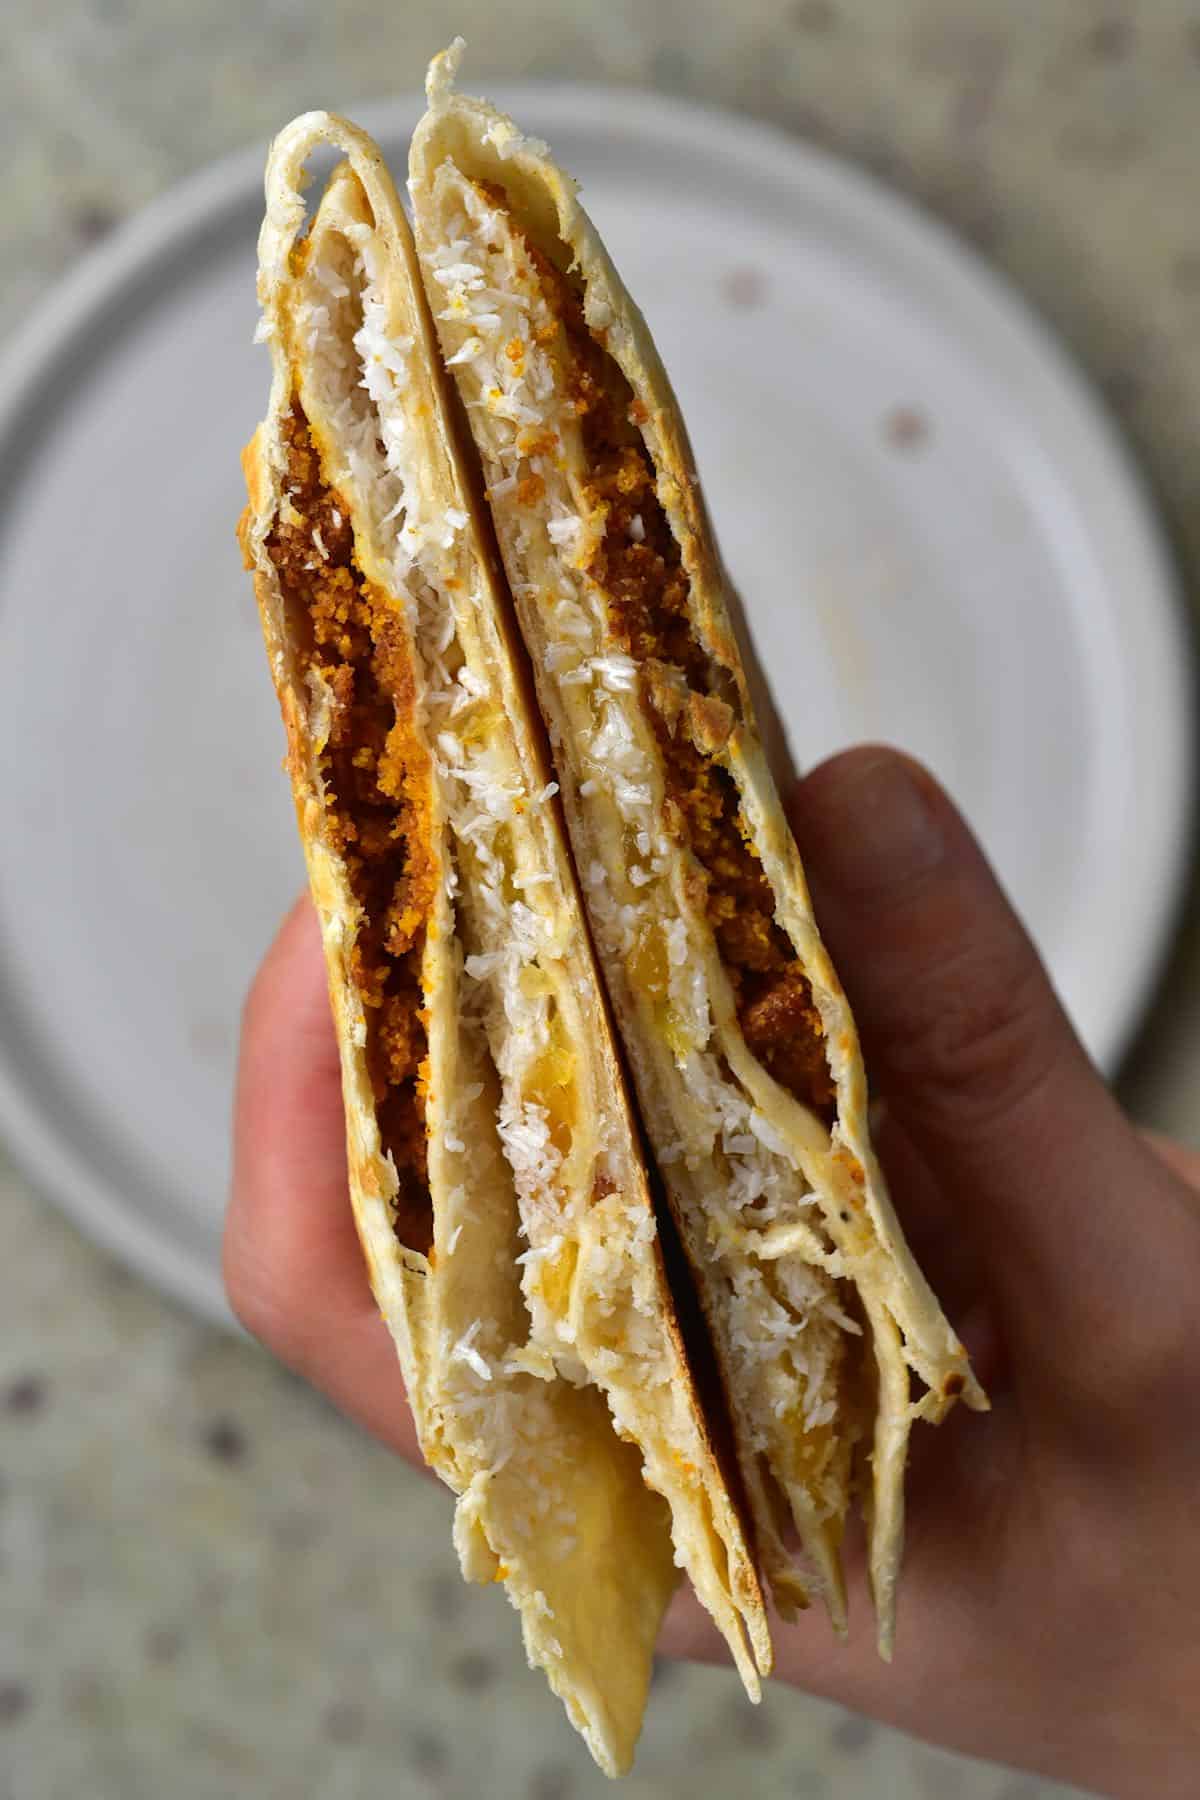
10. Ginger Coconut Cookie Filling
This one might sound a little iffy to some, but give it a try, and you’ll get it – it’s delicious! The combination of ginger with shredded coconut is a true treat. Optionally, serve with cream or custard.
- Tortilla Wrap or Crepe
- Ginger jam – I use homemade ginger marmalade.
- Shredded coconut – optionally mixed with some coconut butter for extra richness or in two separate layers (as shown below).
- Crushed Ginger cookies – like homemade gingerbread

11. Banoffee Tortilla
Is it even possible to have any dessert post without banoffee making an appearance?! This idea combines fresh banana slices with toffee or caramel sauce and cream for a delicious treat!
- Tortilla Wrap or Crepe
- Sliced bananas
- Caramel sauce – or a toffee sauce
- Chocolate – A dark chocolate works best to balance the sweetness of the other flavors.
- Optional – possibly chocolate syrup to drizzle over the banoffee wrap. Or cream – you can use coconut whipped cream or dairy cream.

12. Turkish Delight Tortilla
Recreate a Western-style Turkish delight chocolate treat with a combination of rose jam and chocolate.
- Tortilla Wrap or Crepe
- Rose jam – I use homemade rose petal jam minus the petals.
- Chocolate – dark chocolate works best, but you could also use milk or white.
- Crushed Nuts – pistachios are my favorites for Turkish delight. Hazelnuts or walnuts also work.
Related Recipes
- Viral Tortilla Hack (20+ Global Filling Ideas + Low-carb, veggie, vegan Options!)
- 7+ Healthy Breakfast Quesadillas (Viral Tortilla Hack for Breakfast Wraps)
- Fluffy Japanese Style Pancake Cake
- How To Make Healthy Dark Chocolate
- How To Make Milk Chocolate
- Homemade White Chocolate
If you try any of these dessert tortilla/wrap fillings, then let me know your thoughts and questions in the comments. I’d also really appreciate a recipe rating and would love to see your recreations – just tag @AlphaFoodie.


I recently bought the TJs cinnamon bun spread – what combinations would you add with this to create a wrap? Coconut, apple, banana? I’m not sure what to try first.
Thank you.
Hi Francesca,
I’ve never tried this spread but it sounds like it goes great with apples or bananas. I hope you find a combination you like!
Going to try this for Iftaar tonight with leftover wraps. Thank you for the recipes!
Hope you liked it 🙂
I missed this trend but made one today with banana, peanut butter and chocolate chips. It was amazing! Thank you
Thank you for your comment, Erica! So happy you enjoyed the tortilla 🙂
It all looks amazing!!!
Thank you for your comment, Bianca.