
This post may contain affiliate links. Please read our disclosure policy.
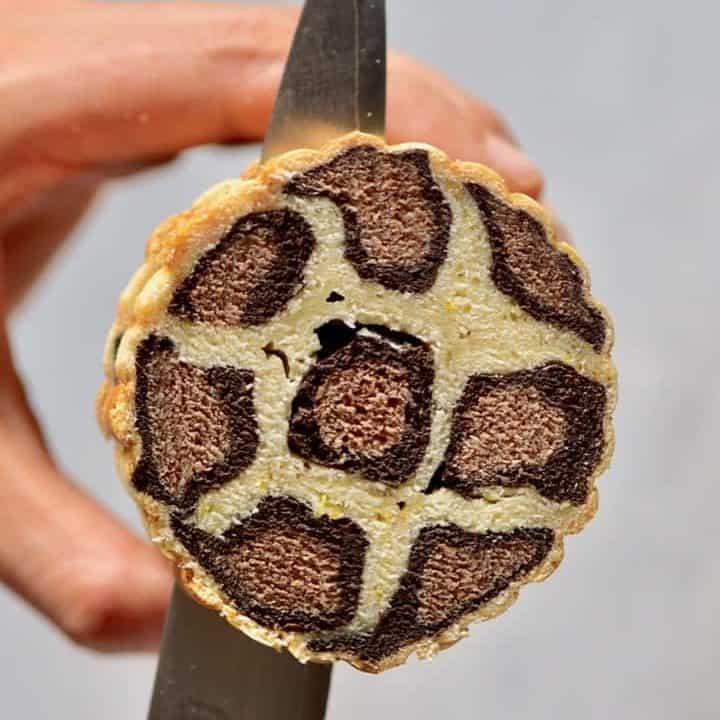
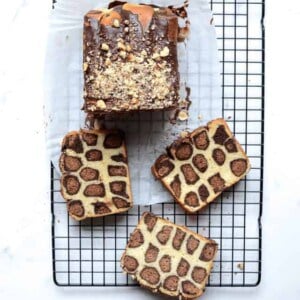
This leopard print chocolate bread (brioche loaf style) is fluffy, light, buttery, egg-free, and has a delicious chocolate orange flavor. What looks like a regular loaf from the outside displays beautiful leopard print when sliced into – for a sweet bread to impress. Plus, while this recipe may take some time to prepare, it’s not actually very difficult at all and is definitely worth the results when you want to bake something special!

Back when I’d barely had any experience of bread-making (okay, I admit it, I had none!), I suddenly became inspired to make a leopard print pattern and so had the crazy decision to jump right in and make this sweet brioche recipe with a chocolate orange leopard print pattern.
If there’s any ringing endorsement that anyone can do this – it should be that. What may take some time to perfect ends up becoming this gorgeous loaf that, when cut into, displays a wonderful leopard print bread pattern.
The different parts of the leopard spots are made with chocolate brioche bread dough. Meanwhile, the plain dough gets a little orange zest for a subtle but delicious chocolate orange bread.
When I decided to make a loaf of sweet bread, I knew instantly that brioche was the way to go. Brioche bread is French in origin and is known as a sweet pastry bread. The high egg and butter content gives it a really rich and buttery texture with a tender crumb.
In fact, after this recipe, I fell in love with bread-making and have since made various ‘bread’ – check out the related recipes section below for a list.
In fact, in you check out my vegan version of this recipe, you’ll see that I’ve had lots of fun experimenting with bread patterns. Here is a sneak peek of some of the ideas I’ve made so far.

I’ve also had lots of fun experimenting with this loaf in different shaped tins. This round version is a personal favorite!
Pop a loaf in with a gift to friends or family (without telling them what’s inside), and they’ll get a lovely surprise when they slice into the loaf to discover the hidden secret.
Want to save this recipe?
The Ingredients
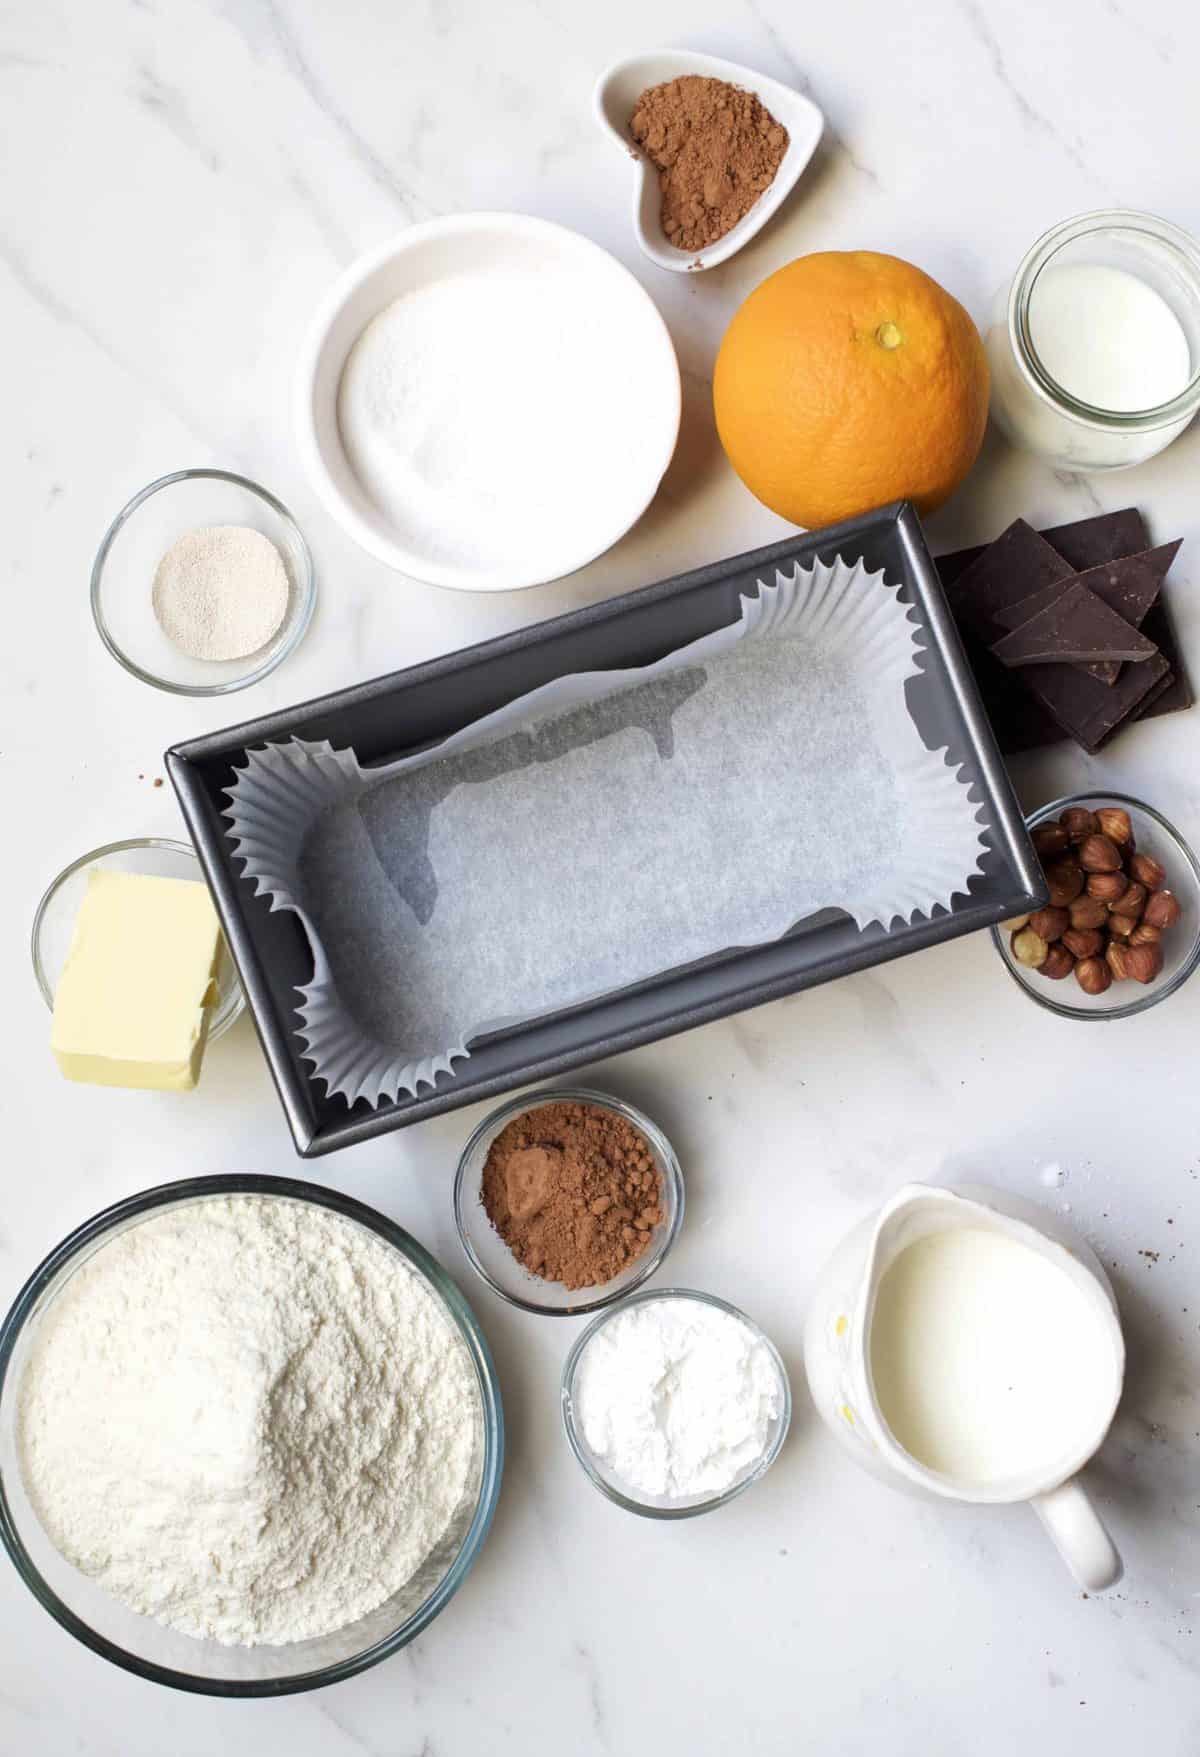
For the brioche bread base
- Cornstarch
- Milk of choice (dairy or non-dairy depending on personal preference)
- Butter (use vegan butter for vegan option)
- Orange
- Sugar – feel free to use the sugar of your choice
- Dry yeast
- All-purpose flour
For the Dark & Light brown
- Cocoa powder, unsweetened
- Milk (dairy or non-dairy)
For the Topping (optional)
- Dark chocolate (around 70% or similar vegan option) – You could also use homemade dark chocolate (sugar-free)
- Milk (dairy or non-dairy)
- Hazelnuts
The Step-By-Step Instructions
Step 1. Prepare the dough
In a saucepan, combine the cornstarch and milk with a whisk. Bring to a boil, stirring constantly.
The mixture will thicken suddenly. When it does, remove it from the heat, add the butter, and mix well.
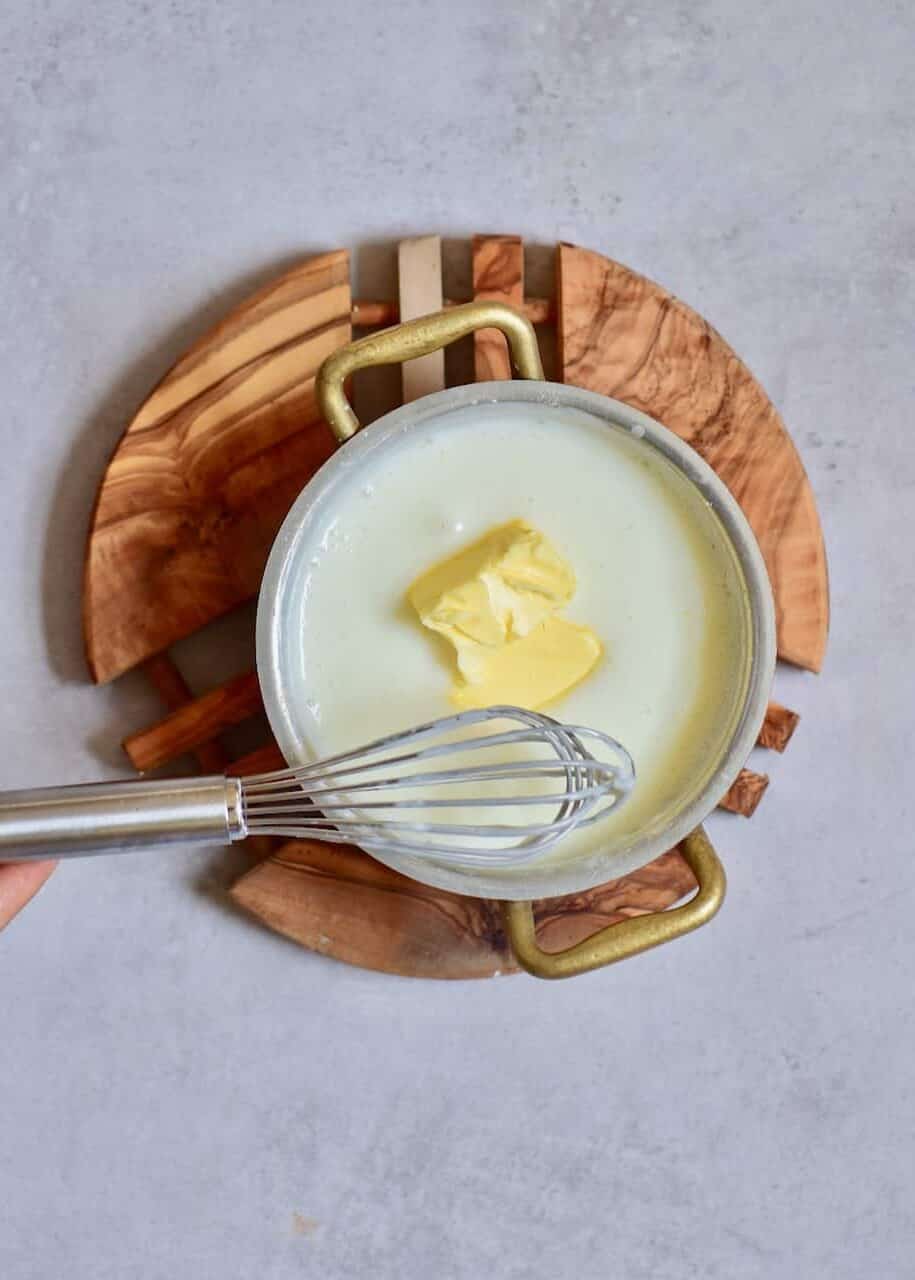

Transfer the mixture to a cold container and allow it to cool for about 20 minutes. The temperature needs to fall below 50°C/120ºF before adding the yeast, so as not to “kill” the yeast.
If you have a food thermometer, then it’s best to use that here. However, I’ve found that allowing it to cool for at least 20 minutes is more than enough for it to cool down adequately.
Once cooled, add the flour, sugar, and active dry yeast. Mix into a dough and then leave to stand for 10 minutes for the yeast to activate.
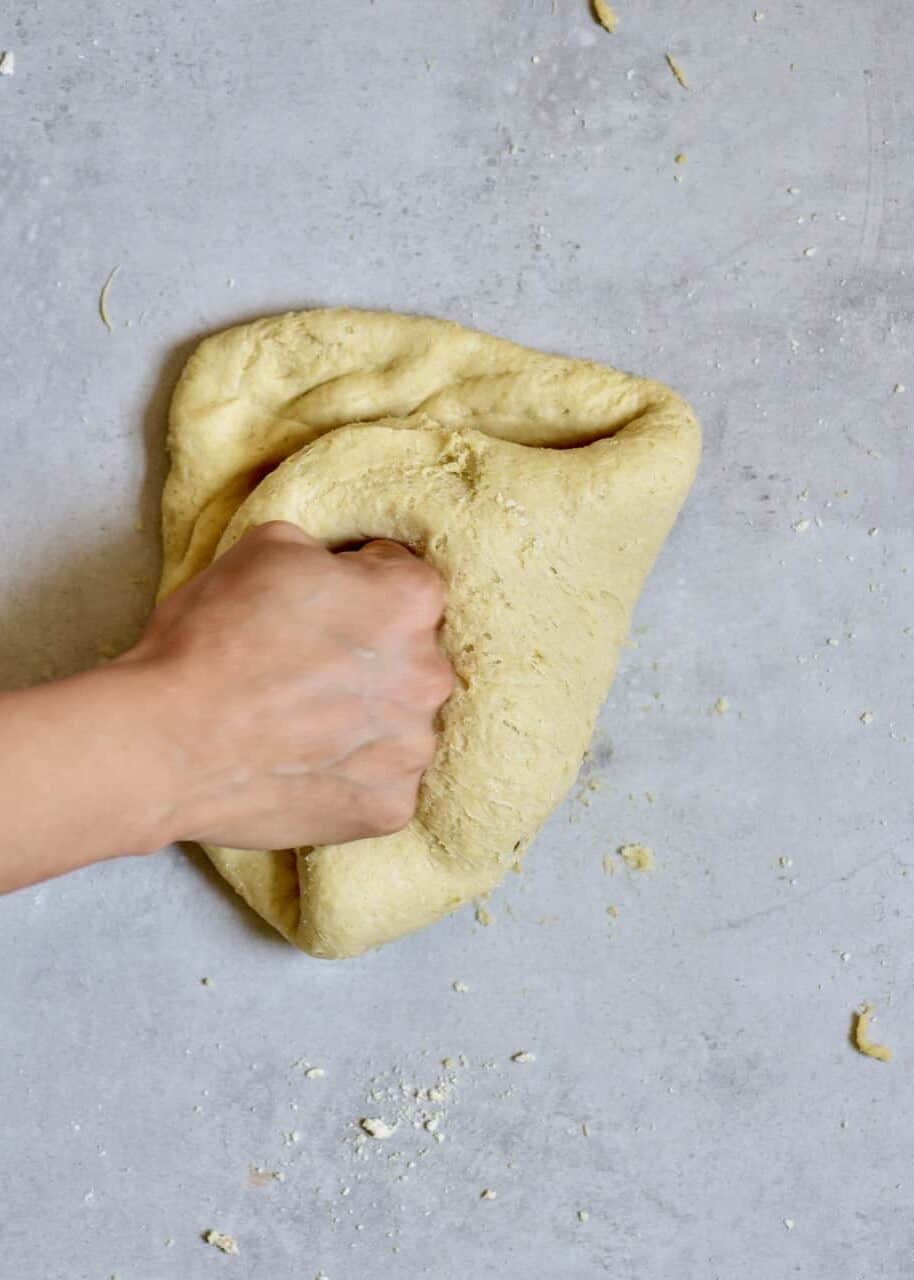
Step 2. Knead & Flavor the dough
Knead the dough for about ten minutes, until the dough is soft and elastic.
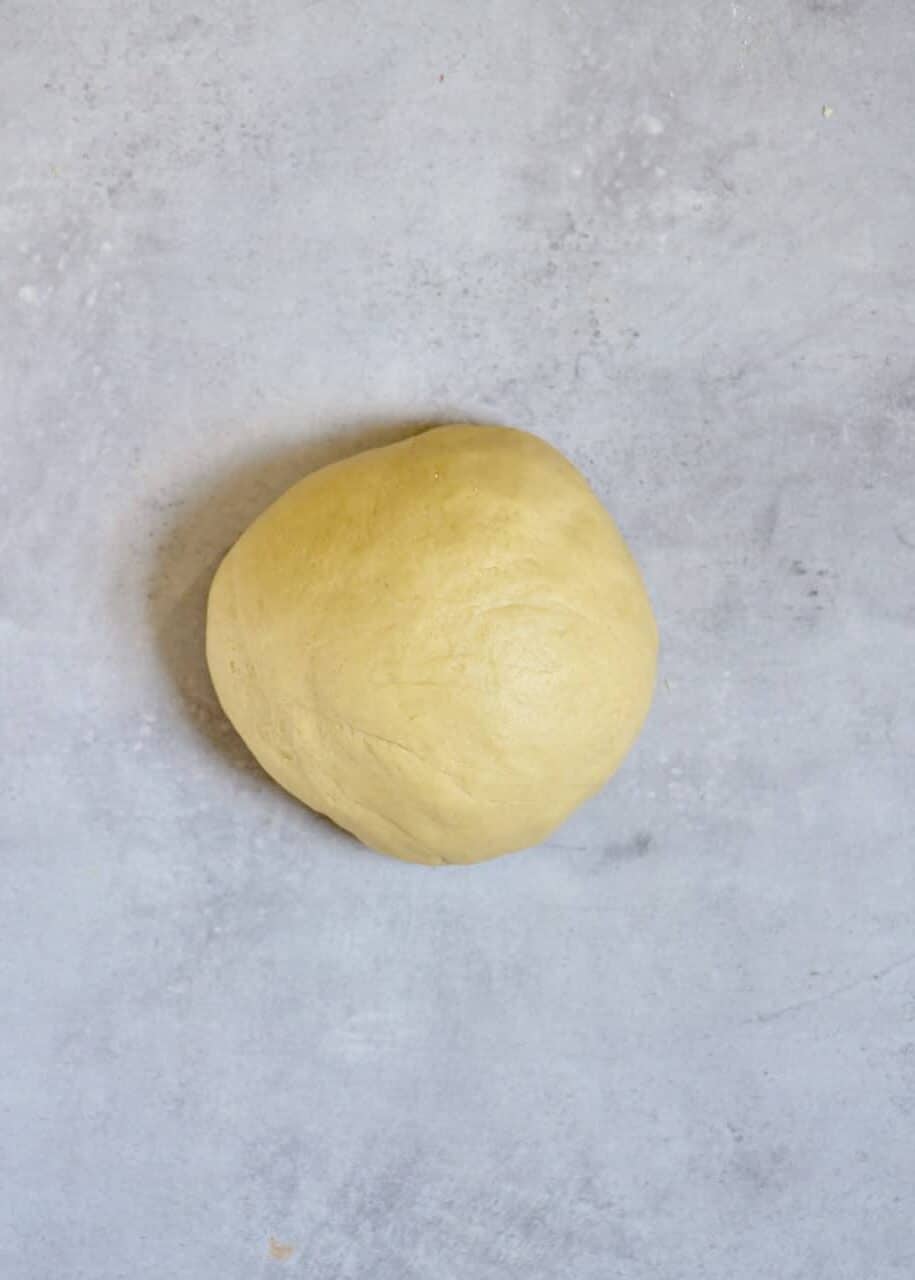
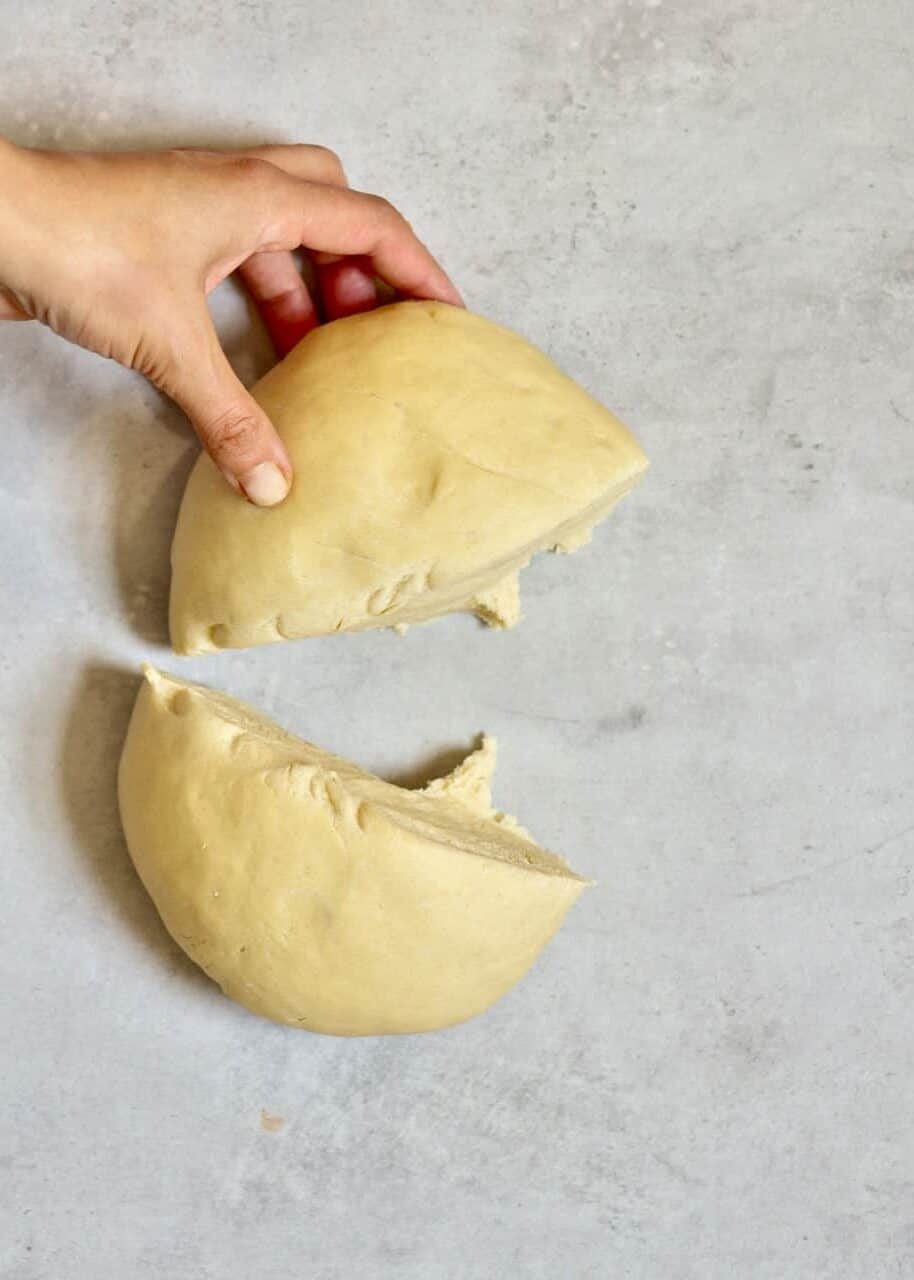
Once ready, cut the dough in two halves. In one half, add the zest of the orange and set it to one side under a cloth. This will be your white dough.
Cut the remaining half into another two equal pieces (you can weigh them if you want complete accuracy).
For the dark brown, mix the 15g of cocoa powder and milk into the dough and knead until the color is even throughout the dough. Repeat this with the remaining dough and the 5g cocoa and milk mix.
Form each color into seven balls of around the same size. I have to admit I ‘eyed’ this, though you can be 100% accurate by weighing the dough balls.

Step 3. Allow the dough to rise
Flour the dough balls lightly and place them in airtight containers at room temperature for an hour and a half to rise and almost double in size.
Step 4. Shape the brioche leopard prints
To create the leopard spots is actually fairly easy to do, but fairly tricky to explain, I’ve realized. So hopefully, with my directions and the images, it’ll be easy peasy!
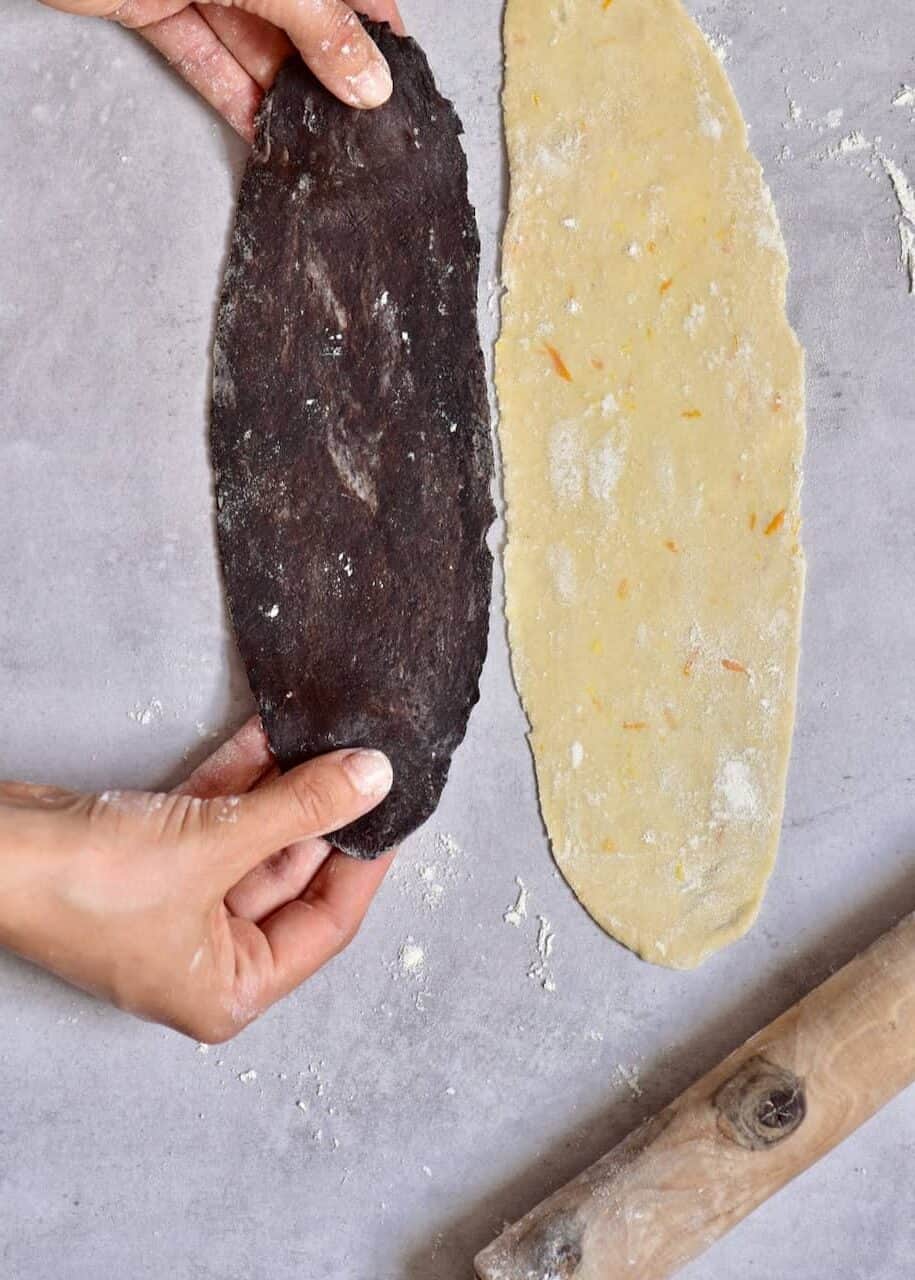
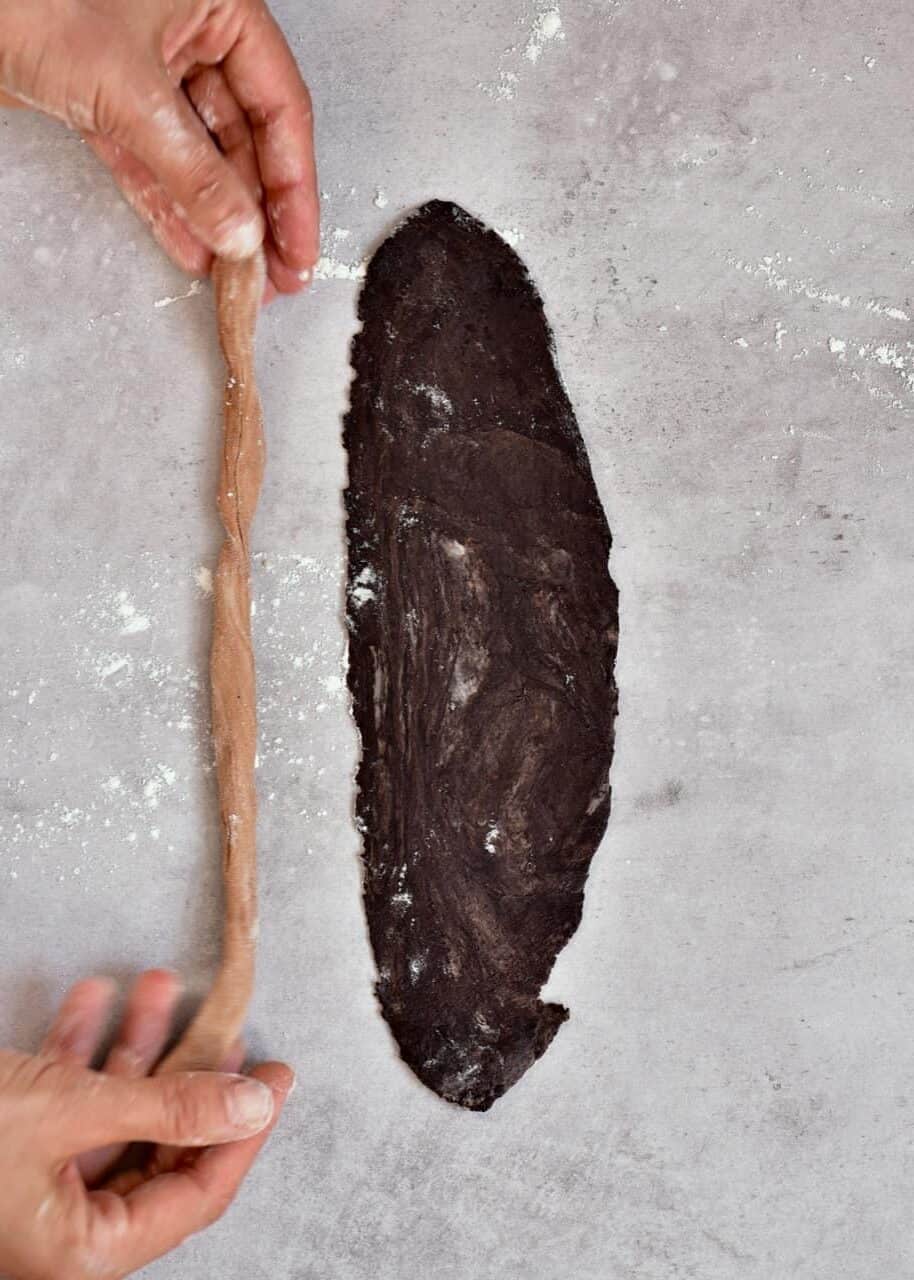
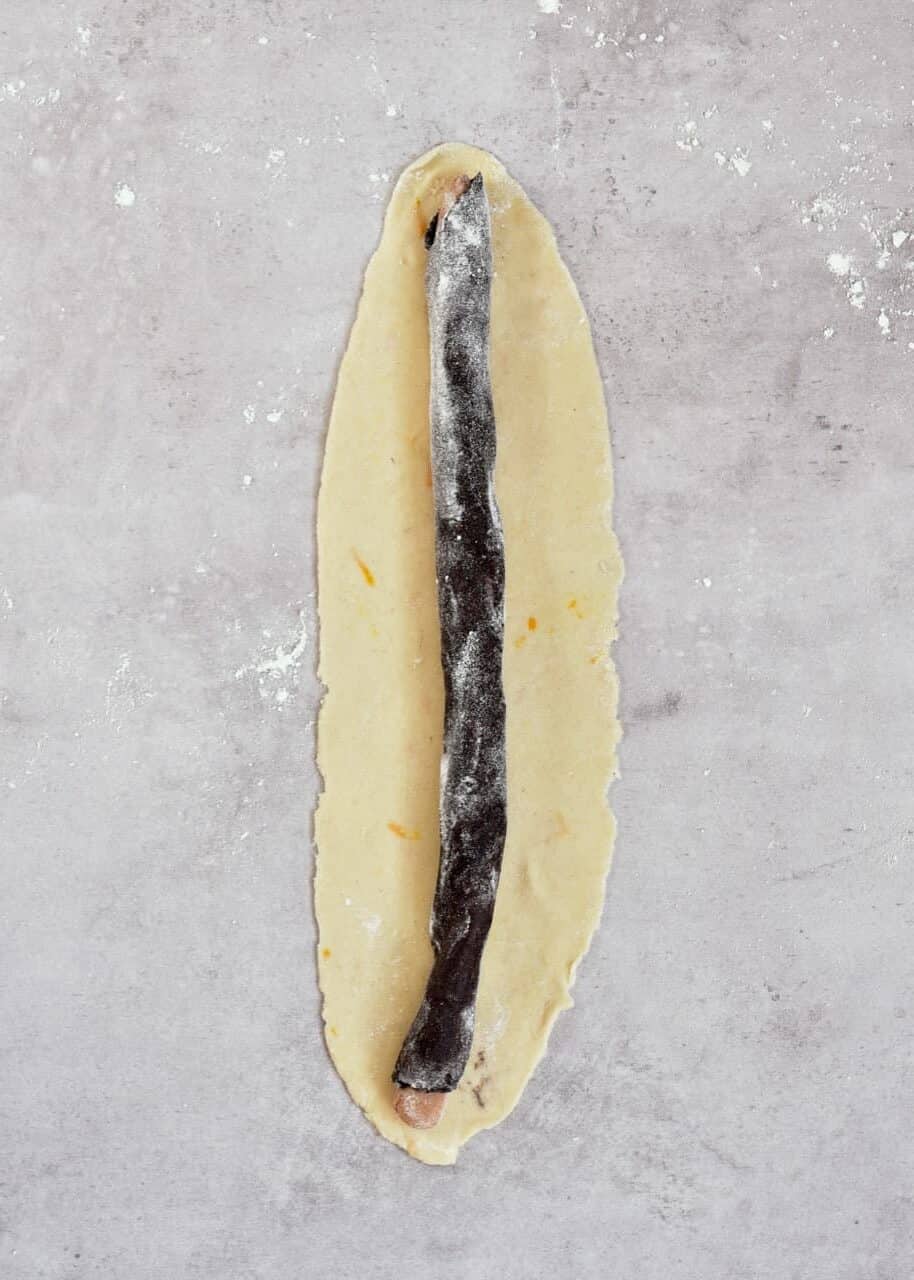
First, take a piece of light brown dough. Roll this into a thin rope, slightly less than the length of your bread tin.
Next, take a piece of dark brown dough and white dough and flatten them with a rolling pin to the length of the cake tin.
You want these to be slightly longer than the light brown bit so that they can enclose it on either end – so no-one can see the pattern on the outside of the bread.
To make a leopard spot, simply place the light brown dough rope onto the center of the darker piece and roll it to wrap around the rope. Don’t worry if they don’t all surround it completely, as it’ll make for slightly different spots – which I like.
In fact, any differences in dough thickness and shape will all make for unique leopard spots for a more interesting design.
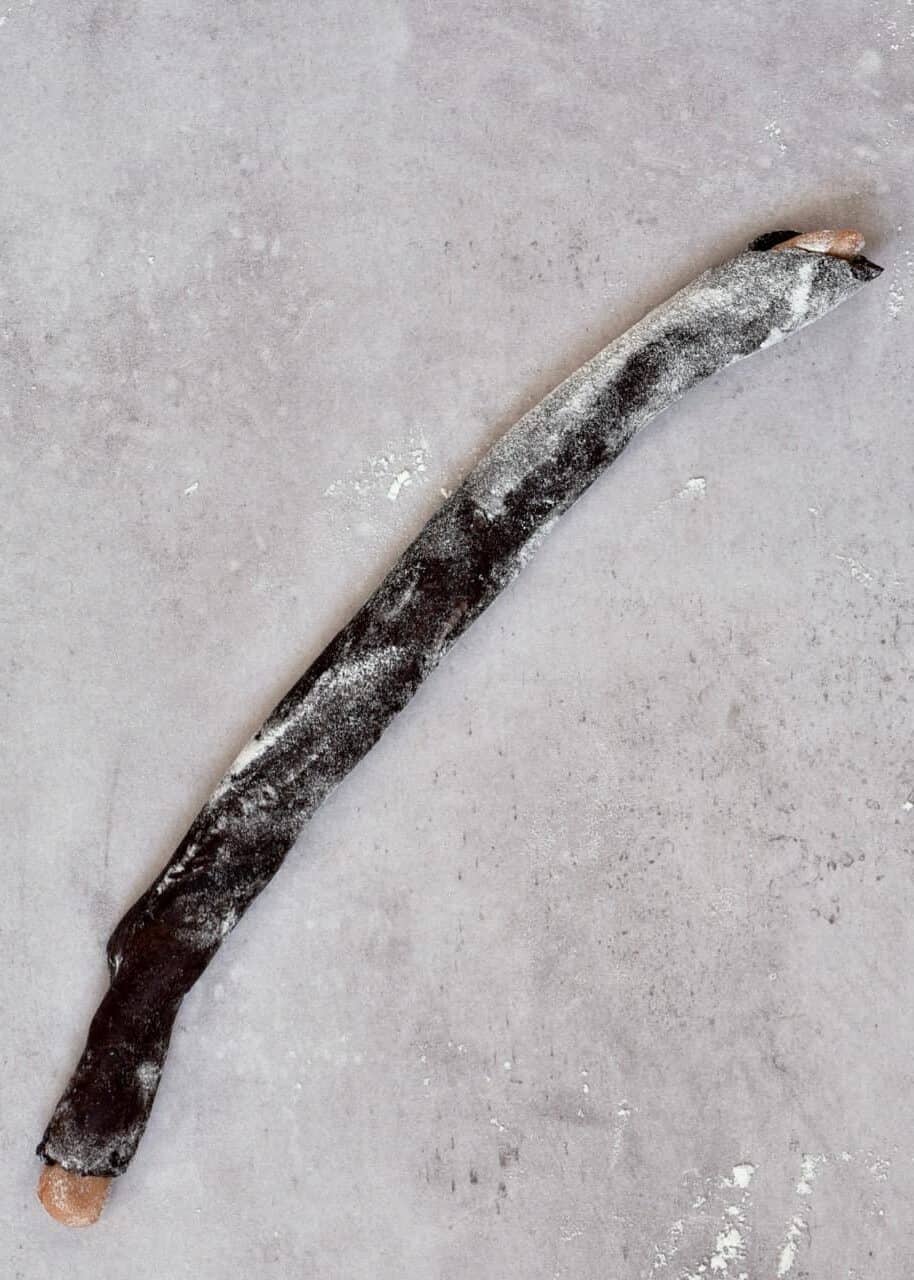
Then, take this rope and place it onto the light dough and roll once more, making sure that the piece is thoroughly closed this time, pinching the ends together too.
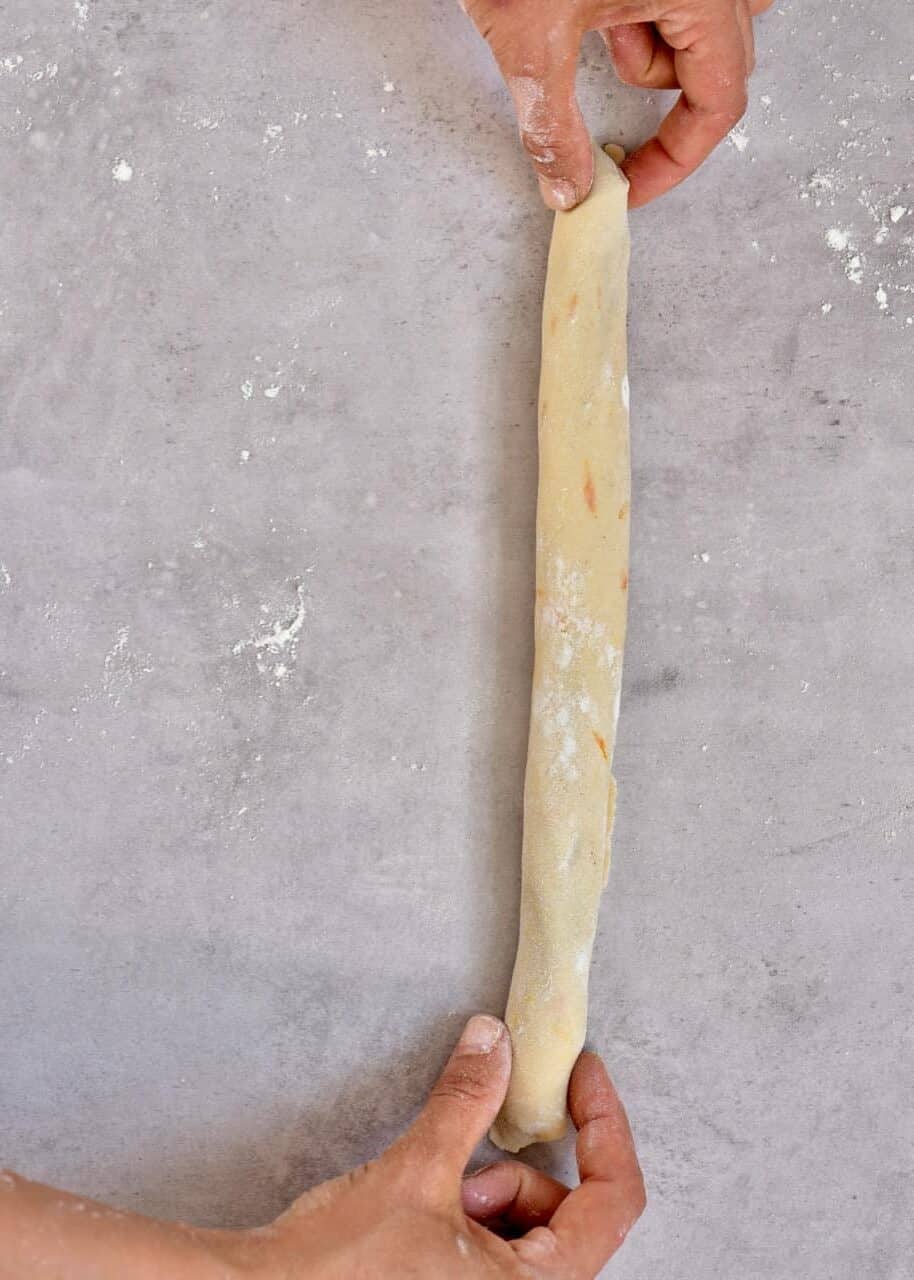
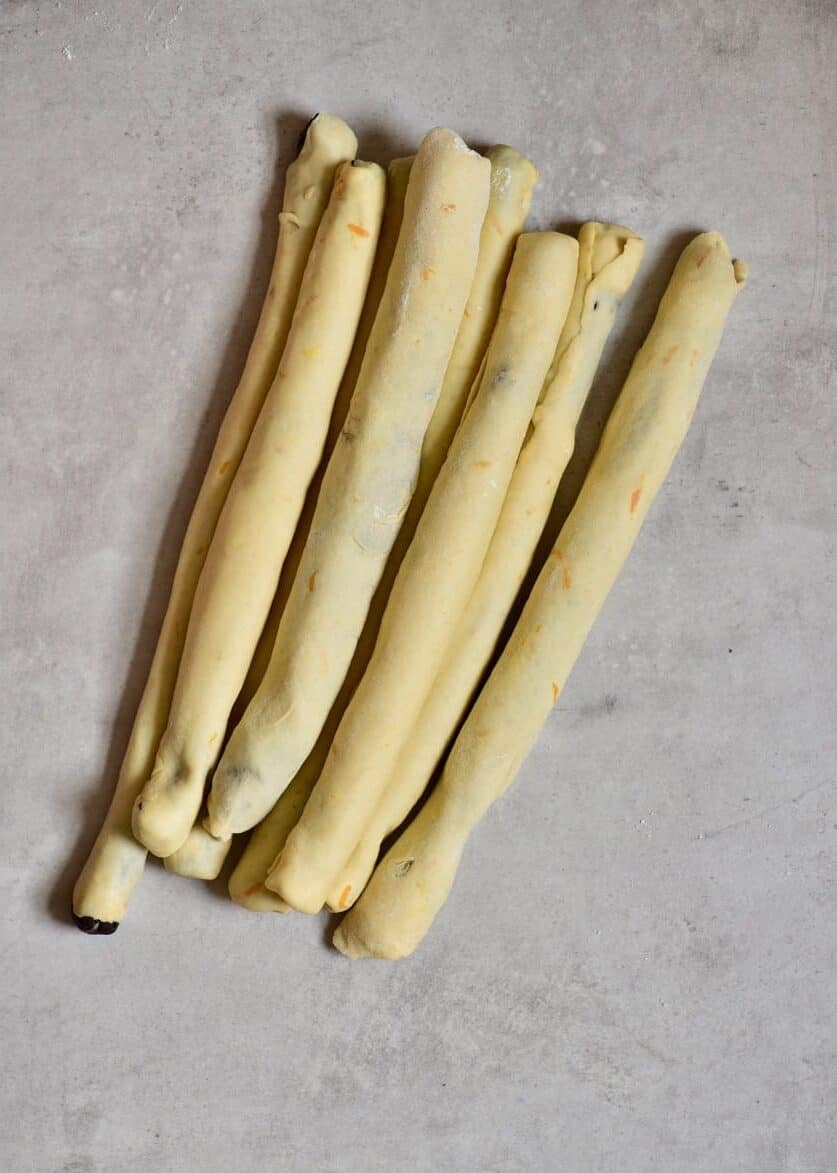
Voila – you have your first leopard spot! Repeat this with the remaining dough to form six more ‘ropes.’
Step 5. Allow rising once more
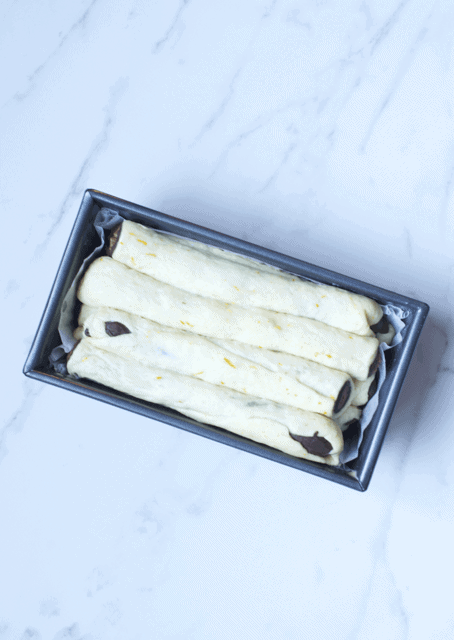
Place the ropes into a bread tin (loaf pan) lined with baking paper or buttered/oiled then over with a clean cloth and allow to stand for around 2 hours at room temperature. This will allow the dough to rise for further time and double in volume.
Chef’s Note: as you can see in the image below, I didn’t make sure the white dough fully enclosed each rope, meaning you could see darker bits on the outside of the baked dough. For a ‘hidden’ center, make sure the white dough fully encases the darker one.
Step 6. Bake the chocolate bread
Towards the end of the second rising time, preheat the oven to 200°C/400ºF, with a container of water at the bottom of the oven (I put water in an oven pan).
Brush the bread with a little milk or egg wash, then place in the oven and immediately lower the temperature to 170°C/325ºF.
Bake for 35-40 minutes, then allow it to cool on a wire rack.
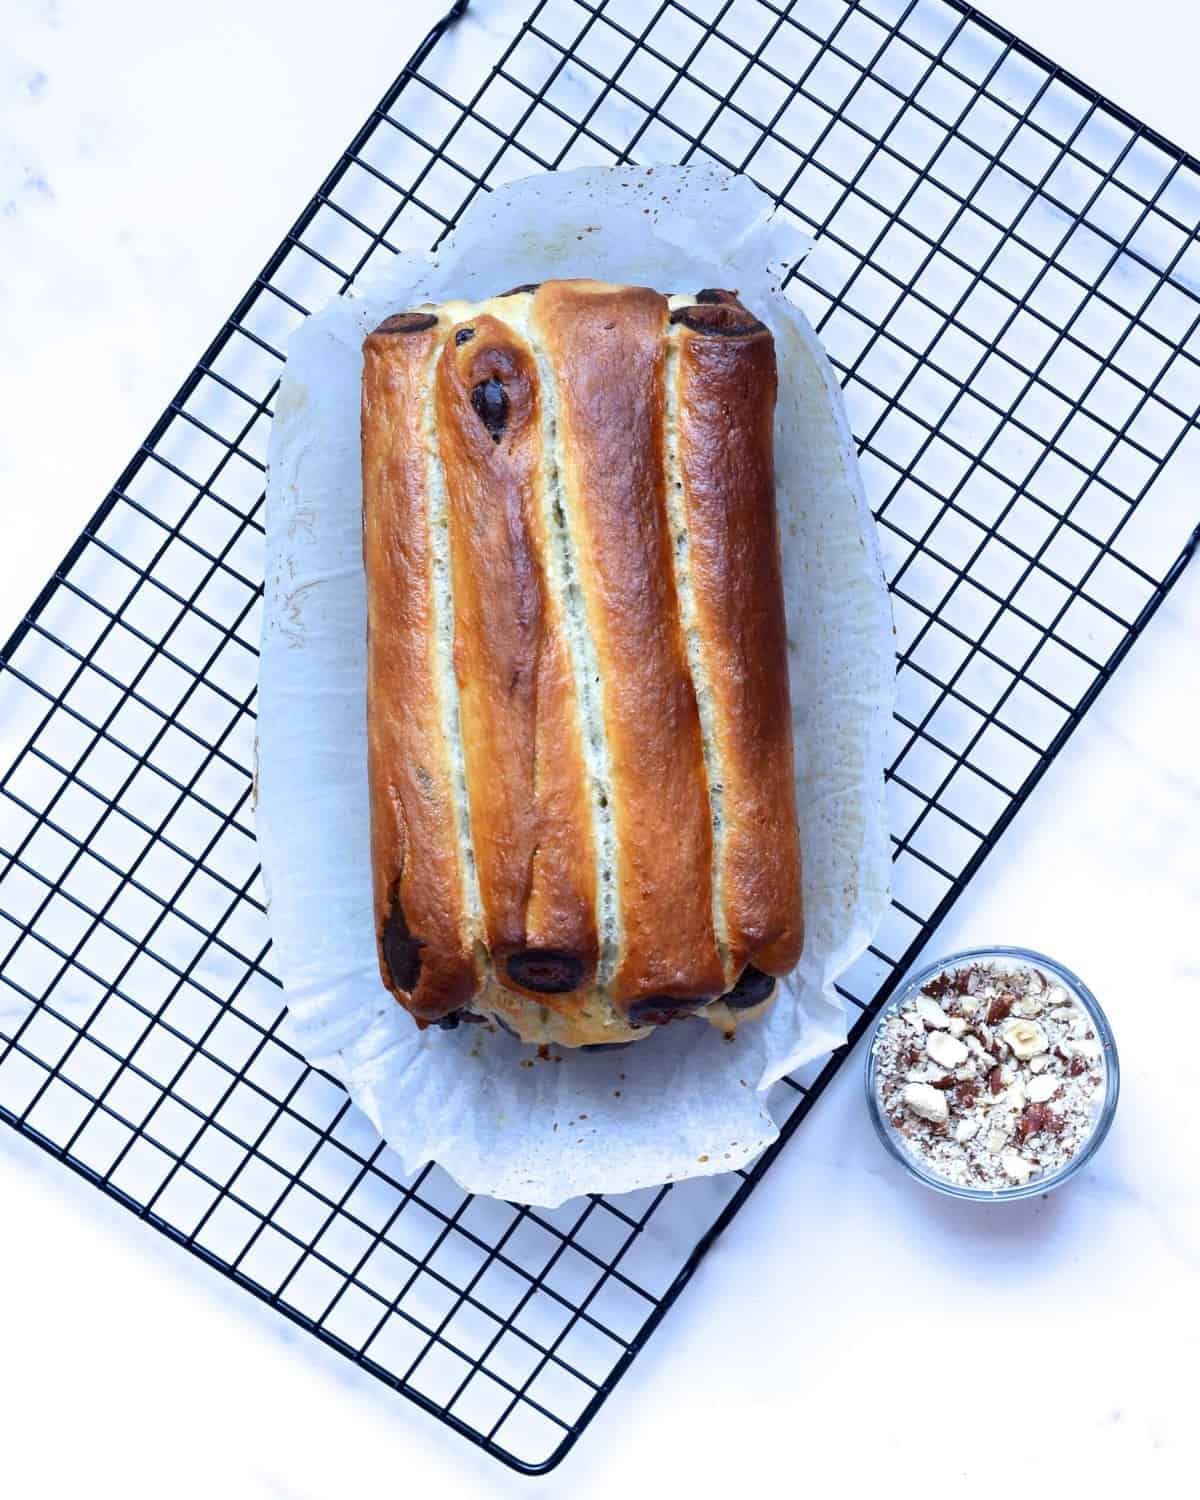
Step 7. Decorate (Optional)
Melt the chocolate with the milk and mix well. Feel free to add a little orange extract for extra citrus flavor. Then pour over the brioche bread and sprinkle with some crushed hazelnuts.
How To Store
Like most fresh bread recipes, this brioche bread is best eaten within a few days, 3-4 at the most, but sometimes up to 5 if you’re lucky.
Store tightly wrapped in an airtight bag/wrap to retain the moisture within the bread and stop it from drying out.
You can also freeze this bread for up to two months. When freezing, I like to pre-slice the bread, so I can grab out just enough pieces that I need each time.
Top Tip: You can use leftover brioche that’s beginning to go stale to make a delicious French toast bake.
How To Serve:
Serve this sweet bread toasted as is or with lashings of butter. Also, feel free to top with any of your favorite spreads like
- DIY Homemade Vegan Nutella
- Simple Ginger Marmalade (Ginger Jam) or an orange marmalade
- Top with another jam of your choice: Strawberry Jam, Blackberry Jam, Raspberry Jam, or even Rose Petal Jam,
- Toasted, buttered, and with a scoop of ice-cream
- Use it for french toast and serve with ice-cream – like this Yogurt And Raspberry Ice Cream.
Related Recipes
- The Best Authentic Homemade Pita Bread
- Simple Homemade Multigrain Bread Recipe
- How to make Whole Wheat Bread at home
- Simple Lemon Blueberry Loaf Cake
- Healthy Banana Bread (Naturally Sweetened)
- Simple Gluten-Free Banana Bread Recipe
If you give this leopard print brioche chocolate bread recipe a try, then let me know your thoughts and any questions in the comments. Also, feel free to tag me in your recreations @AlphaFoodie.
Chocolate Leopard Brioche Cake Recipe
Ingredients
Main cake/bread:
- 3 cups all-purpose flour
- 1 cup milk of choice + a bit more to brush dairy or non-dairy depending on personal preference
- 1/3 cup sugar
- 1/4 cup butter use vegan butter for vegan option
- 5 tsp cornstarch
- 1.5 Tbsp dry yeast
- 1 orange zest
For dark brown paste:
- 3 Tbsp milk dairy or non-dairy
- 6 tsp cocoa powder unsweetened
For the lighter brown paste:
- 1 Tbsp milk dairy or non-dairy
- 2 tsp cocoa powder unsweetened
For the glazing (optional):
- 1/2 cup dark chocolate around 70% or similar vegan option
- 2 Tbsp milk dairy or non-dairy
- 2-3 Tbsp hazelnuts
Instructions
Step 1. Prepare the dough
- In a saucepan, combine the cornstarch and milk with a whisk. Bring to a boil, stirring constantly.
- The mixture will thicken suddenly. When it does, remove it from the heat, add the butter, and mix well.
- Transfer the mixture to a cold container and allow it to cool for about 20 minutes. The temperature needs to fall below 50°C/120ºF before adding the yeast, so as not to "kill" the yeast. *
- Once cooled, add the flour, sugar, and active dry yeast. Mix into a dough and then leave to stand for 10 minutes for the yeast to activate.
Step 2. Knead & Flavor the dough
- Knead the dough for about ten minutes, until the dough is soft and elastic.
- Once ready, cut the dough in two halves. In one half, add the zest of the orange and set it to one side under a cloth. This will be your white dough.
- Cut the remaining half into another two equal pieces (you can weigh them if you want complete accuracy).
- For the dark brown, mix the 15g of cocoa powder and milk into the dough and knead until the color is even throughout the dough. Repeat this with the remaining dough and the 5g cocoa and milk mix.
- Form each color into seven balls of around the same size. I have to admit I 'eyed' this, though you can be 100% accurate by weighing the dough balls.
Step 3. Allow the dough to rise
- Flour the dough balls lightly and place them in airtight containers at room temperature for an hour and a half to rise and almost double in size.
Step 4. Shape the brioche leopard prints
- To create the leopard spots is actually fairly easy to do. First, Take a piece of light brown dough. Roll this into a thin rope, slightly less than the length of your bread tin.
- Next, take a piece of dark brown dough and white dough and flatten them with a rolling pin to the length of the cake tin.You want the white dough to be slightly longer than the others so that it encloses them on either end – so no-one can see the pattern on the outside of the bread.
- To make a leopard spot, simply place the light brown dough rope onto the center of the darker piece and roll it to wrap around the rope. Don't worry if they don't all surround it completely, as it'll make for slightly different spots – which I like.In fact, any differences in dough thickness and shape will all make for unique leopard spots for a more interesting design.
- Then place this rope and place it onto the light sough and roll once more, making sure that the piece is thoroughly closed this time, pinching the ends together too.Voila- you have your first leopard spot! Repeat this with the remaining dough to form six more 'ropes.'
Step 5. Allow rising once more
- Place the ropes into a bread tin (loaf pan) lined with baking paper or buttered/oiled then over with a clean cloth and allow to stand for around 2 hours at room temperature. This will allow the dough to rise for further time and double in volume.
Step 6. Bake the chocolate bread
- Towards the end of the second rising time, preheat the oven to 200°C/400ºF, with a container of water at the bottom of the oven (I put water in an oven pan).
- Brush the bread with a little milk or egg wash, then place in the oven and immediately lower the temperature to 170°C/325ºF.Bake for 35-40 minutes, then allow it to cool on a wire rack.
Step 7. Decorate (Optional)
- Melt the chocolate with the milk and mix well. Feel free to add a little orange extract for extra citrus flavor. Then pour over the brioche bread ad sprinkle with some crushed hazelnuts.
How To Store
- Like most fresh bread recipes, this brioche bread is best eaten within a few days 3-4 at the most, but sometimes up to 5 if you're lucky. Store tightly wrapped in an airtight bag/ wrap to retain the moisture within the bread and stop it from drying out.You can also freeze this bread for up to two months. When freezing, I like to pre-slice the bread, so I can grab out just enough pieces that I need each time.
Notes
- While it seems it takes hours to make this cake, most of the time is passive as the dough needs to rise. The “hands-on time” is about 40 minutes, split into several shorter periods.
- * If you have a food thermometer, then it’s best to use that here. However, I’ve found that allowing it to cool for at least 20 minutes is more than enough for it to cool down adequately.
- Make sure that the white dough encloses the rope of lighter and dark brown dough for the pattern to be hidden from the outside of the baked loaf.
- Top Tip: You can use leftover brioche that’s beginning to go stale to make a delicious french toast bake
- Check the blog post for serving suggestions!
Nutrition
Nutrition information is automatically calculated, so should only be used as an approximation.


