
This post may contain affiliate links. Please read our disclosure policy.
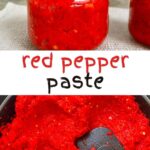

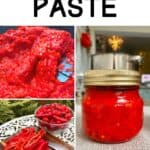

How to make red chili paste using just 4 ingredients, including a home canning method for long-term storage! This red pepper paste makes for a versatile condiment/ingredient to add to meals, sauces, marinades, and spreads!
While this post is quite a few months late, finally I’m sharing my method for how to make chili paste (and water bath can it for a year of storage!). Having previously shared a method for raw chili sauce, I promised a homemade red chili paste, but it took a bit of experimenting to make it canning-safe – but we’re finally here!
If you’re a spice head (i.e. love your spicy foods) then simple DIYs like chili oil, red pepper flakes, garlic and chili infused honey, and this red pepper paste are a must-try! Making this simple red chili paste at home is perfect for anyone who grows their own peppers or just likes to experiment; swap out the peppers and experiment to find your perfect flavor and spice level so you’re never disappointed by a commercial version again.
Even better, this 4-ingredient homemade chili paste is often more cost-effective than buying store-bought versions too, especially for the superior quality! Just like some people put hot sauce “over” everything, this paste is great for putting “in” everything: sauces, marinades, spreads – it’s the ultimate condiment for any spice lover!
Best of all, this red chili paste recipe is gluten-free, sugar-free, naturally vegan, and contains no chemicals or unnatural preservatives!
Want to save this recipe?
Table of Contents
- What is chili paste (vs. chili sauce)?
- Mild Vs. Hot Chili Paste
- The Red Pepper Paste Ingredients
- How to Make Chili Paste
- How to Store
- How To Use Chili Paste (Red Pepper Paste)?
- Recipe Notes & Variations
- How to Stop Burning Skin After Touching Chilies?
- Related Recipe
- How to Make Red Chili Paste (+ Water Bath Can It) Recipe
What is chili paste (vs. chili sauce)?
Chili pepper paste is a staple in Asian and Mexican cuisine – a condiment that can be added to tons of recipes for extra heat and peppery flavor. Unlike chili sauce, it is far thicker in texture and has minimal ingredients added. It can be made from fresh or dried and reconstitutes chilies, which are then ground into a paste and optionally cooked in a little oil for longer-term storage.
Fresh, heatless chili paste is fresh and peppery. Meanwhile, the heated version creates a deeper flavor and darker color – cooked over low-medium heat for well over an hour to really develop.
Homemade chili pastes can also be easily customized in terms of heat level (through the peppers you decide to use) and with a set of additional seasonings – like garlic, ginger, shallots, and various spices. I often keep mine super simple to use with as many dishes as possible (the ultimate all-purpose spicy condiment!).
Mild Vs. Hot Chili Paste
The type of peppers/chili you use for your homemade chili paste will affect the heat levels. So, feel free to experiment to find your perfect match.
Peppers are scored according to Scoville heat units, with the higher the number, the higher the heat (aka, the higher the amount of capsaicinoids, the hotter it is).
There are tons of varieties out there, so I can’t possibly go through them all. But here are a few example types of chili at each level:
- Mild: Bell pepper (no heat), Friggitello, Anaheim
- Medium: Poblano, Guajillo
- Hot chili paste: Jalapeno, Chipotle, Serrano, Cayenne peppers
- Very Hot: Thai chili (also called Bird’s eye), Scotch Bonnet, Habanero
- SUPER Hot: Ghost pepper, Scorpion pepper.
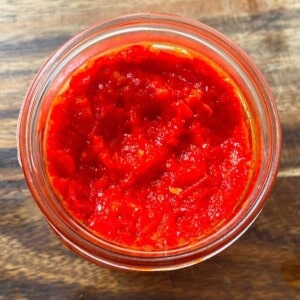
The Red Pepper Paste Ingredients
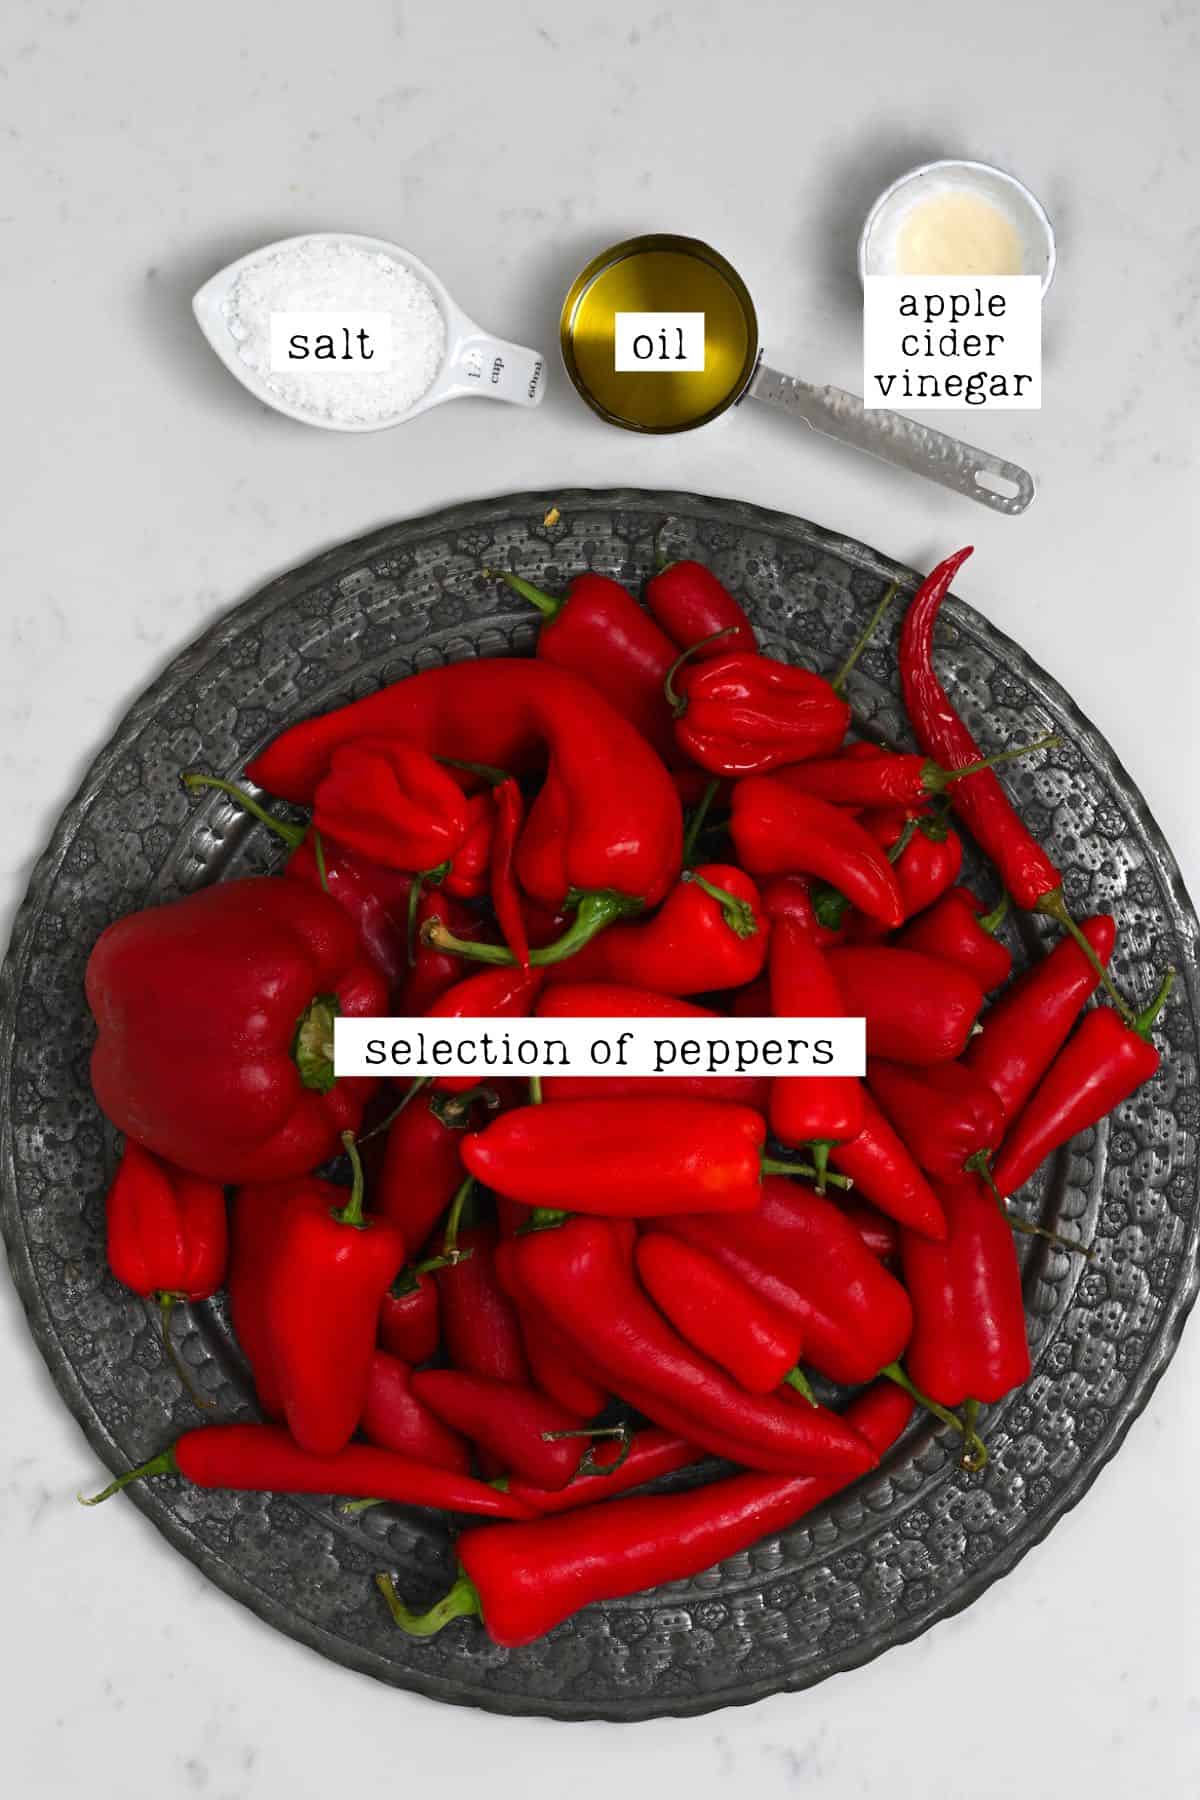
- Red Chilies: use a combination of chilies based on what you have available and how hot you’d like the red chili paste to be. I like to combine a small amount of hot/very hot chilies with a base of milder ones – though this changes from batch to batch.
- Olive Oil.
- Salt: Will act as a natural preservative.
- Vinegar: I use apple cider vinegar. You could also use lemon/lime juice. Each will affect the flavor differently and help to extend the shelf life.
How to Make Chili Paste
Step 1: Prepare the peppers
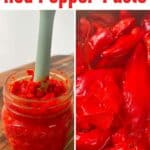
First, wash and pat dry the peppers of your choice. Then, slice the peppers in half and remove the stems and seeds (I like to keep some included, to add extra spice – so adjust this to personal preference. Any unwanted seeds can be left to dry out and be planted). Then rinse the sliced peppers.
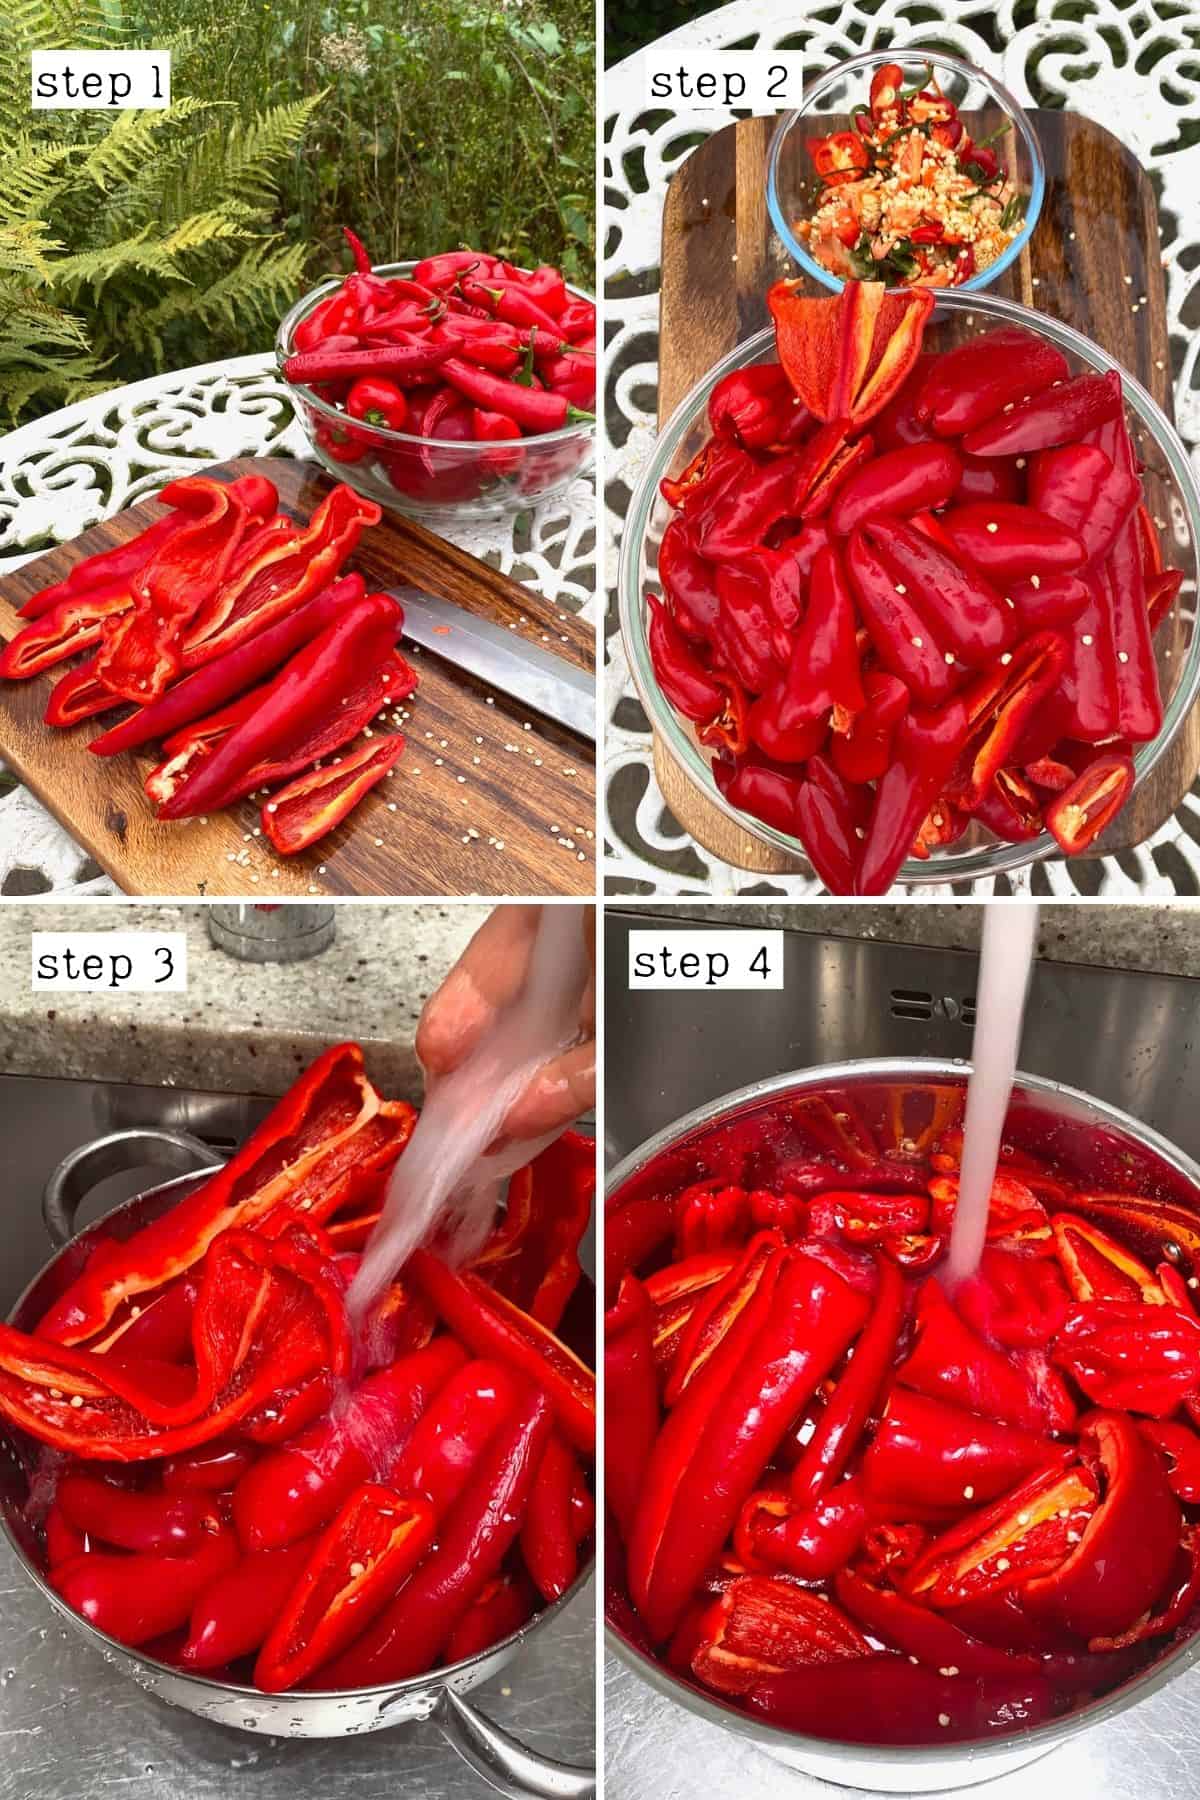
Make sure to wear gloves when dealing with peppers and avoid touching your eyes, nose, and mouth area when dealing with chilies. If you have no gloves, at least oil your hands before using them, which can create a slight natural barrier.
Step 2: Boil the peppers
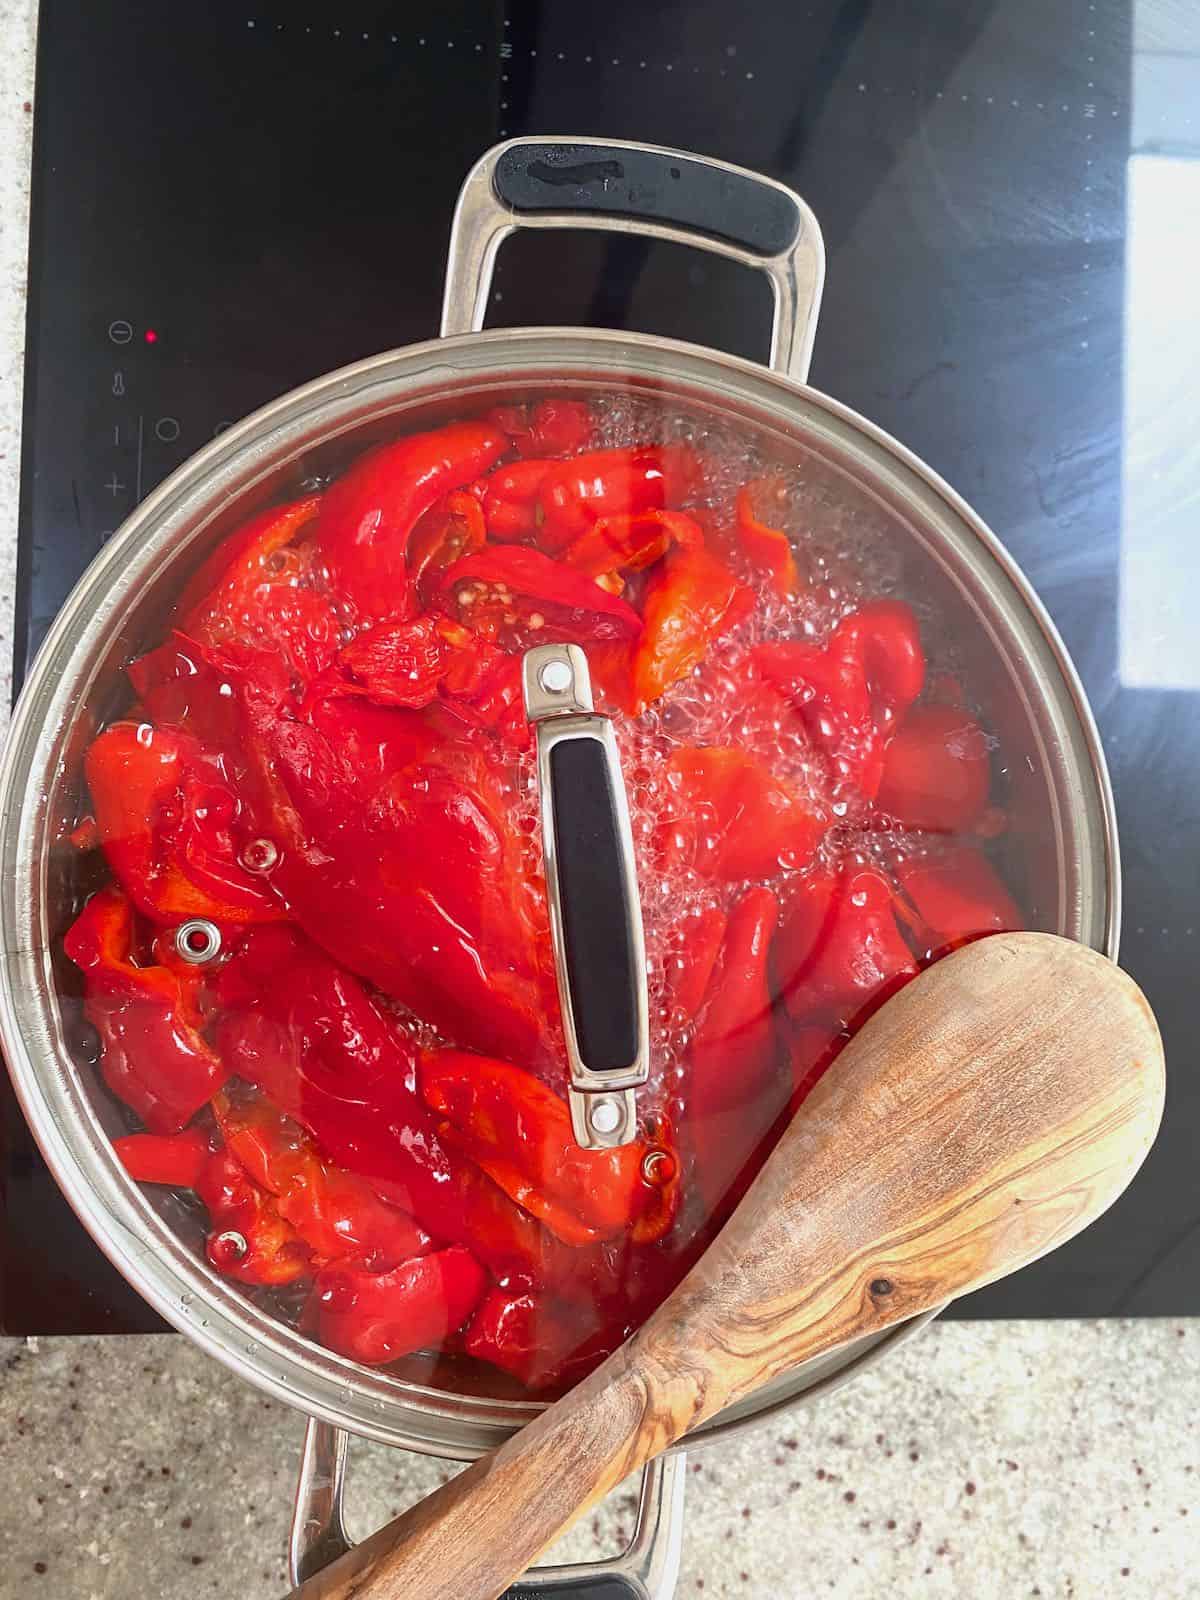
Transfer the peppers to a large pot covered in water and bring to a boil then cook over high, covered, for 25-30 minutes.
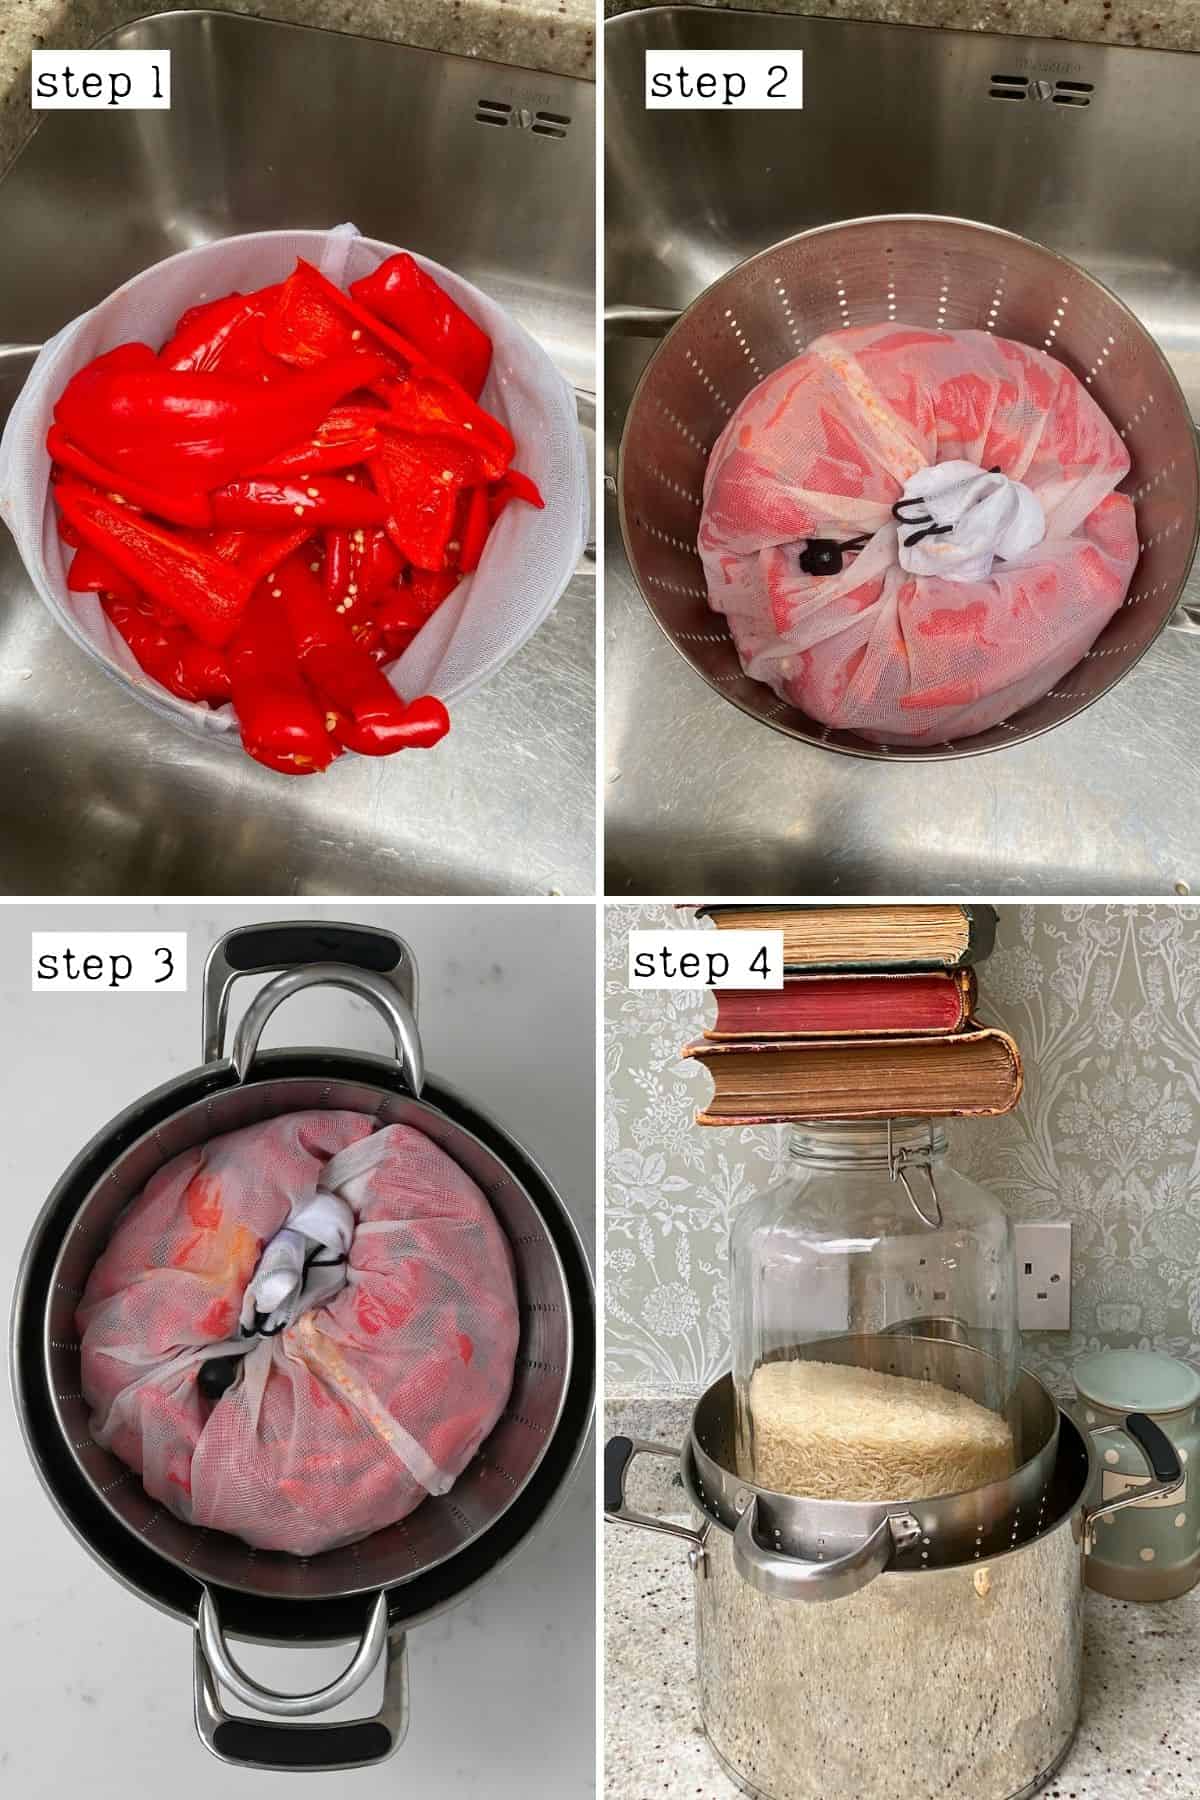
When the peppers are cooked, drain them thoroughly then squeeze out any excess liquid. I like to do this by adding the peppers to a nut milk bag inside a sieve and then place something as a weight over the peppers to naturally press out the excess liquid. I used a large jar filled with rice (after cleaning the bottom of the jar) topped with a couple of books.
Allow it to drain naturally for several hours (or leave overnight).
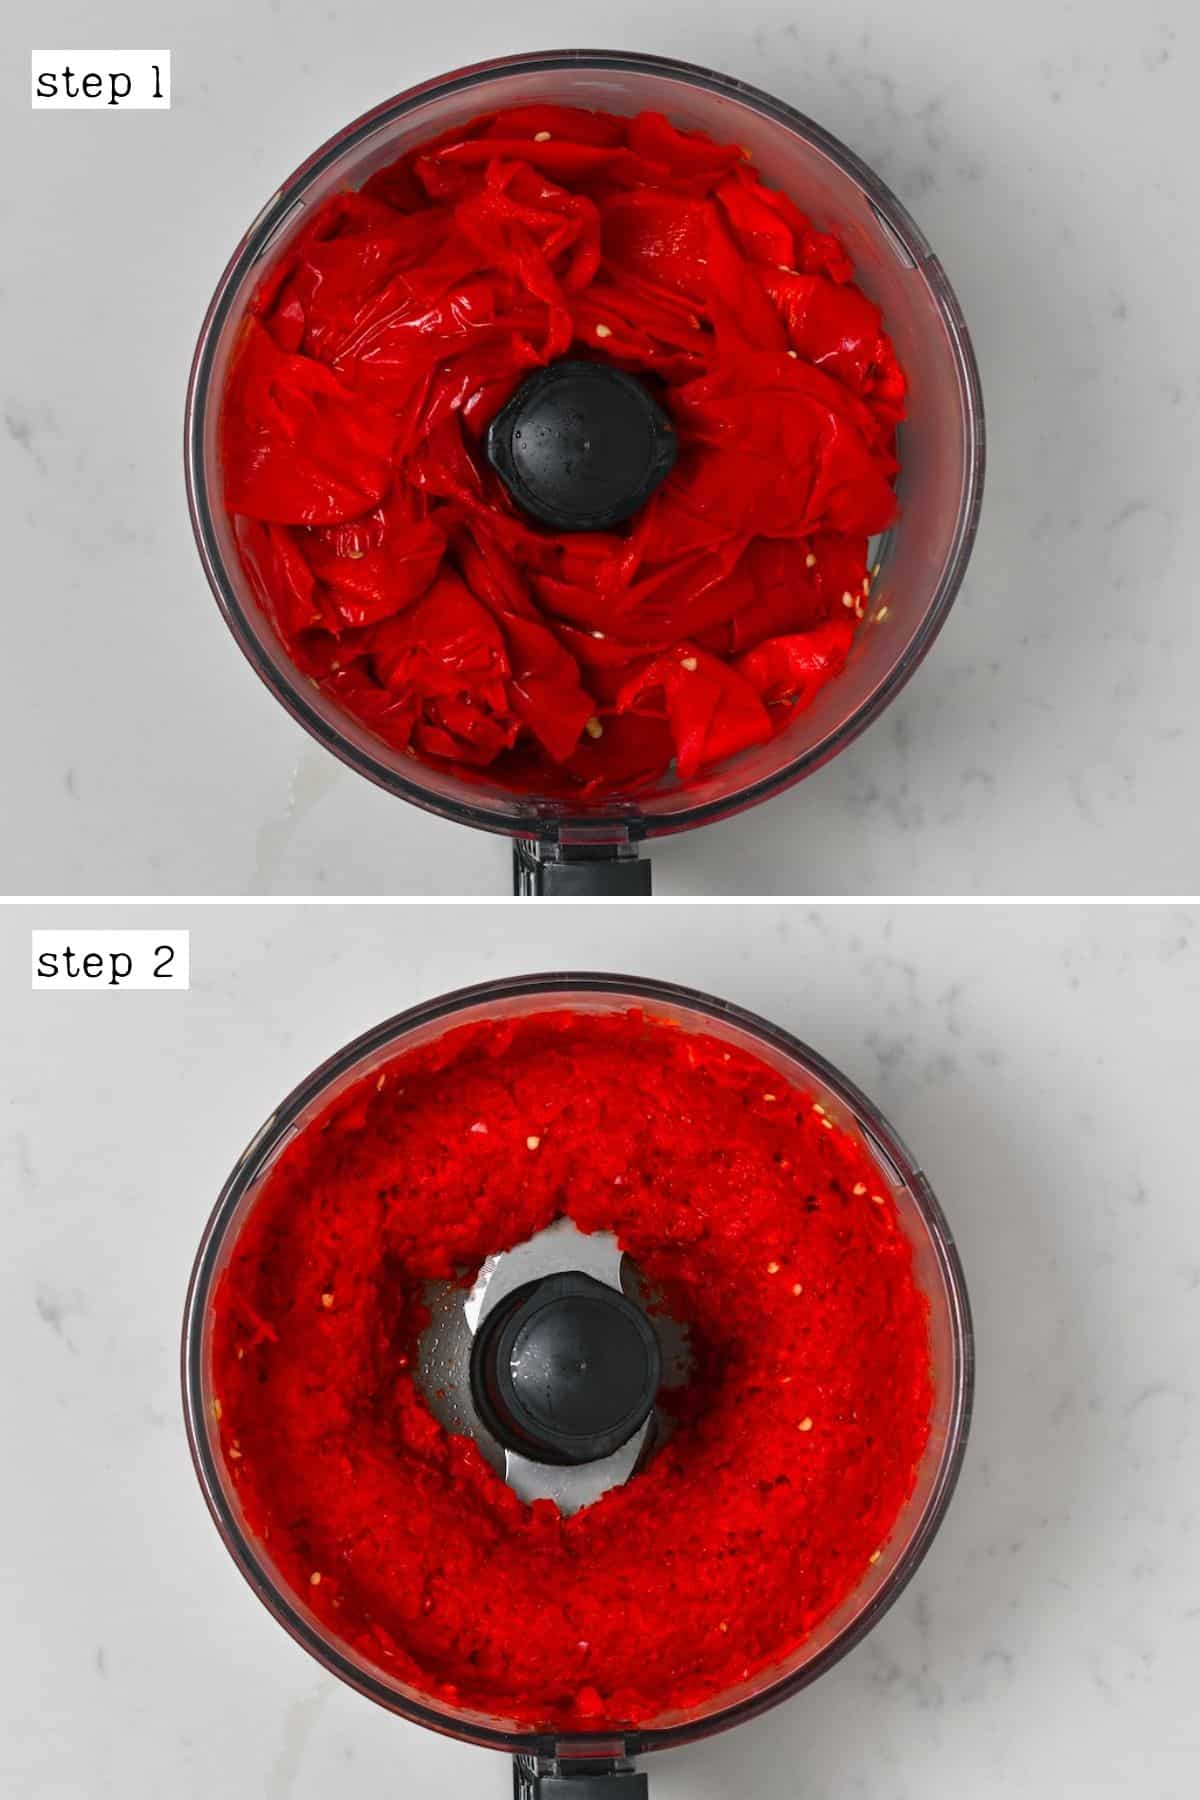
Step 3: Process the peppers
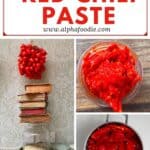
Transfer the pressed peppers to a food processor, blender, or even meat grinder/food mill and process into a paste. I pulsed just a few times into a slightly chunky paste – but feel free to make it completely smooth.
If you want to remove the skins, do so before processing and they should come off fairly easily. Alternatively, if using a meat grinder/ mill, it will automatically filter out the skins. Note that 4.4 lb/2 kg raw peppers, once cooked and drained, yields about 1.67 lb/760 g).
Meanwhile, sterilize your glass jar/s – wash it in hot soapy water and then either place in the oven for about 10 minutes at 165ºC/325ºF to fully dry OR leave to boil for 10 minutes in your canning pot (then dry out with a clean kitchen towel before adding the chili paste).
Step 4: Heat the pepper paste
Transfer the red chili paste to a large pan with the salt, oil, and vinegar. Then heat, stirring often (with a sterilized nonreactive spoon), to bring the mixture to 167ºF/75ºC. This step is important to kill off any remaining bacteria and make this red pepper paste safe for water bath canning (raw chili peppers must either be pickled or will need to be pressure canned, so don’t skip this step if you plan on canning the chili pepper paste).
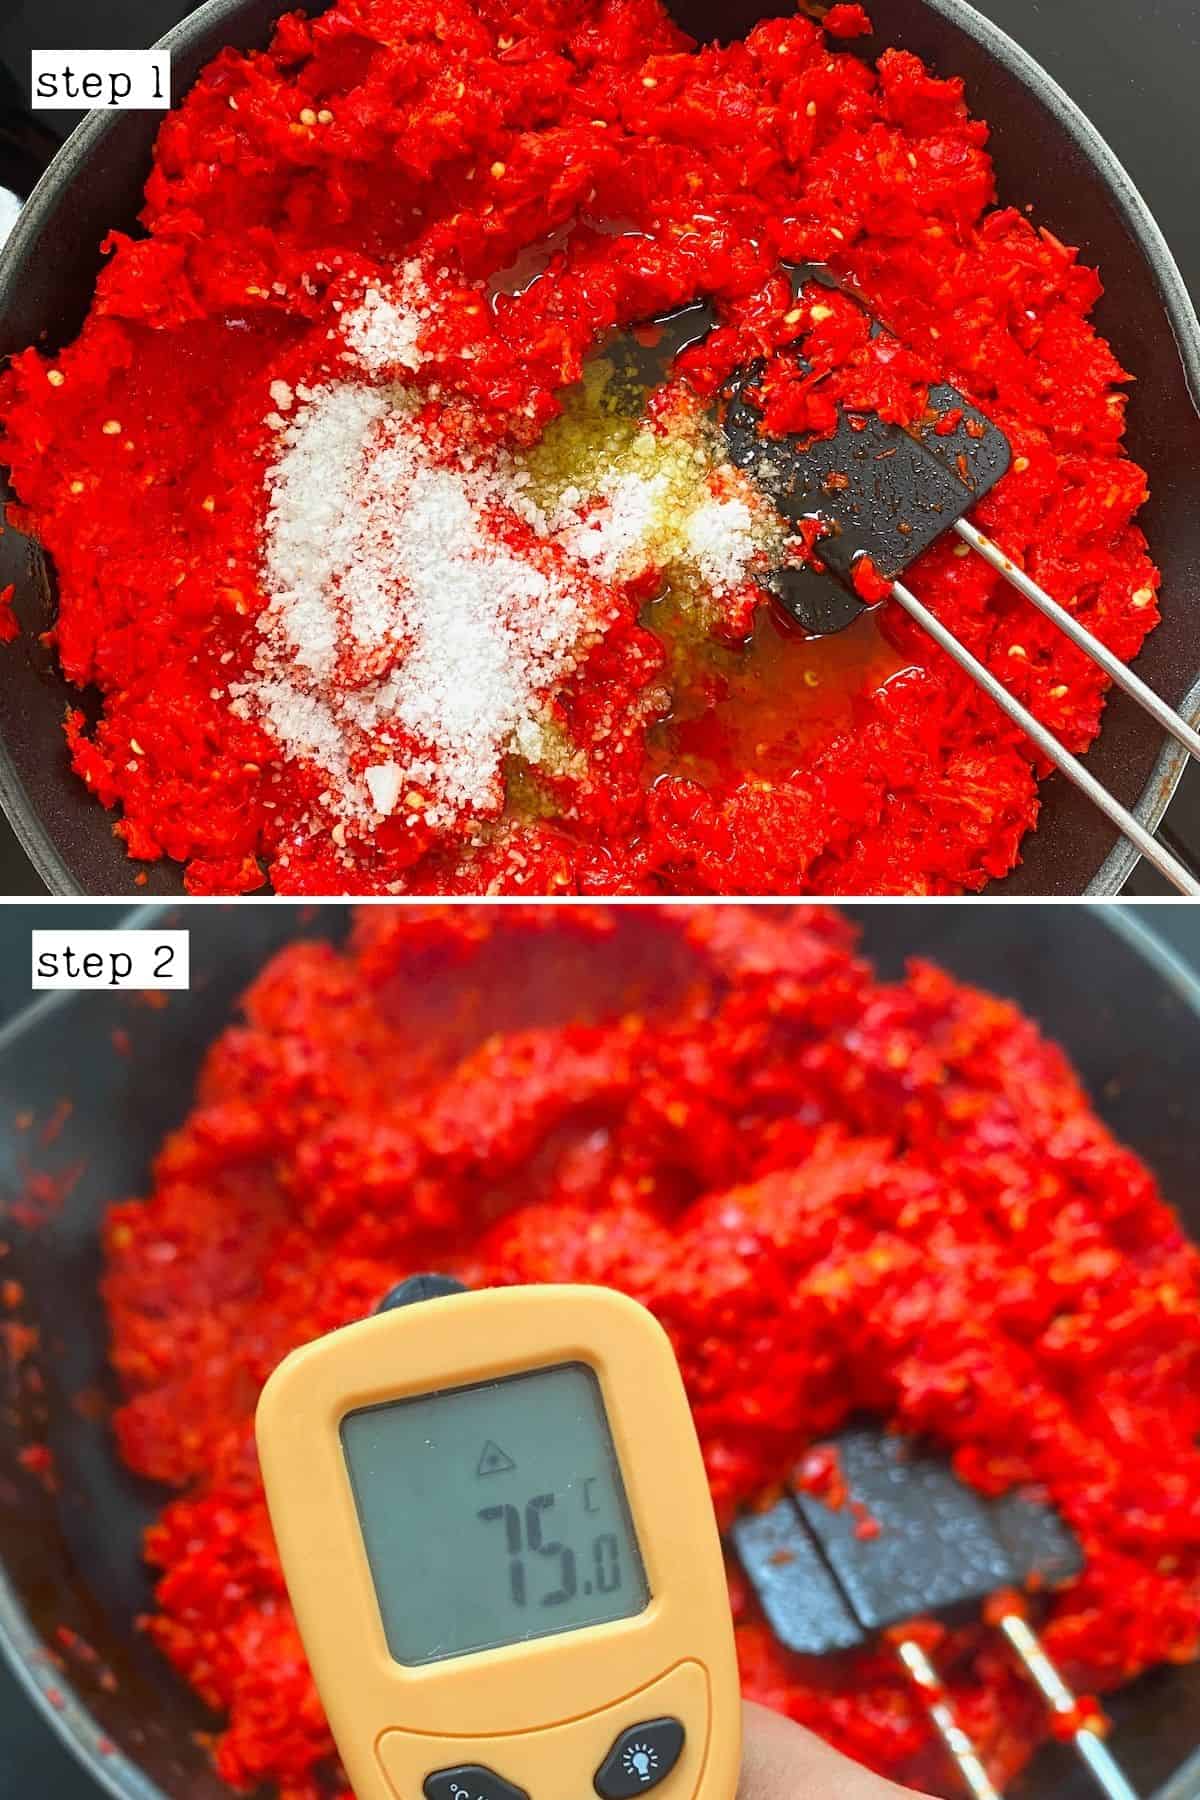
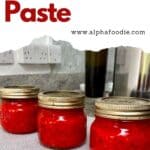
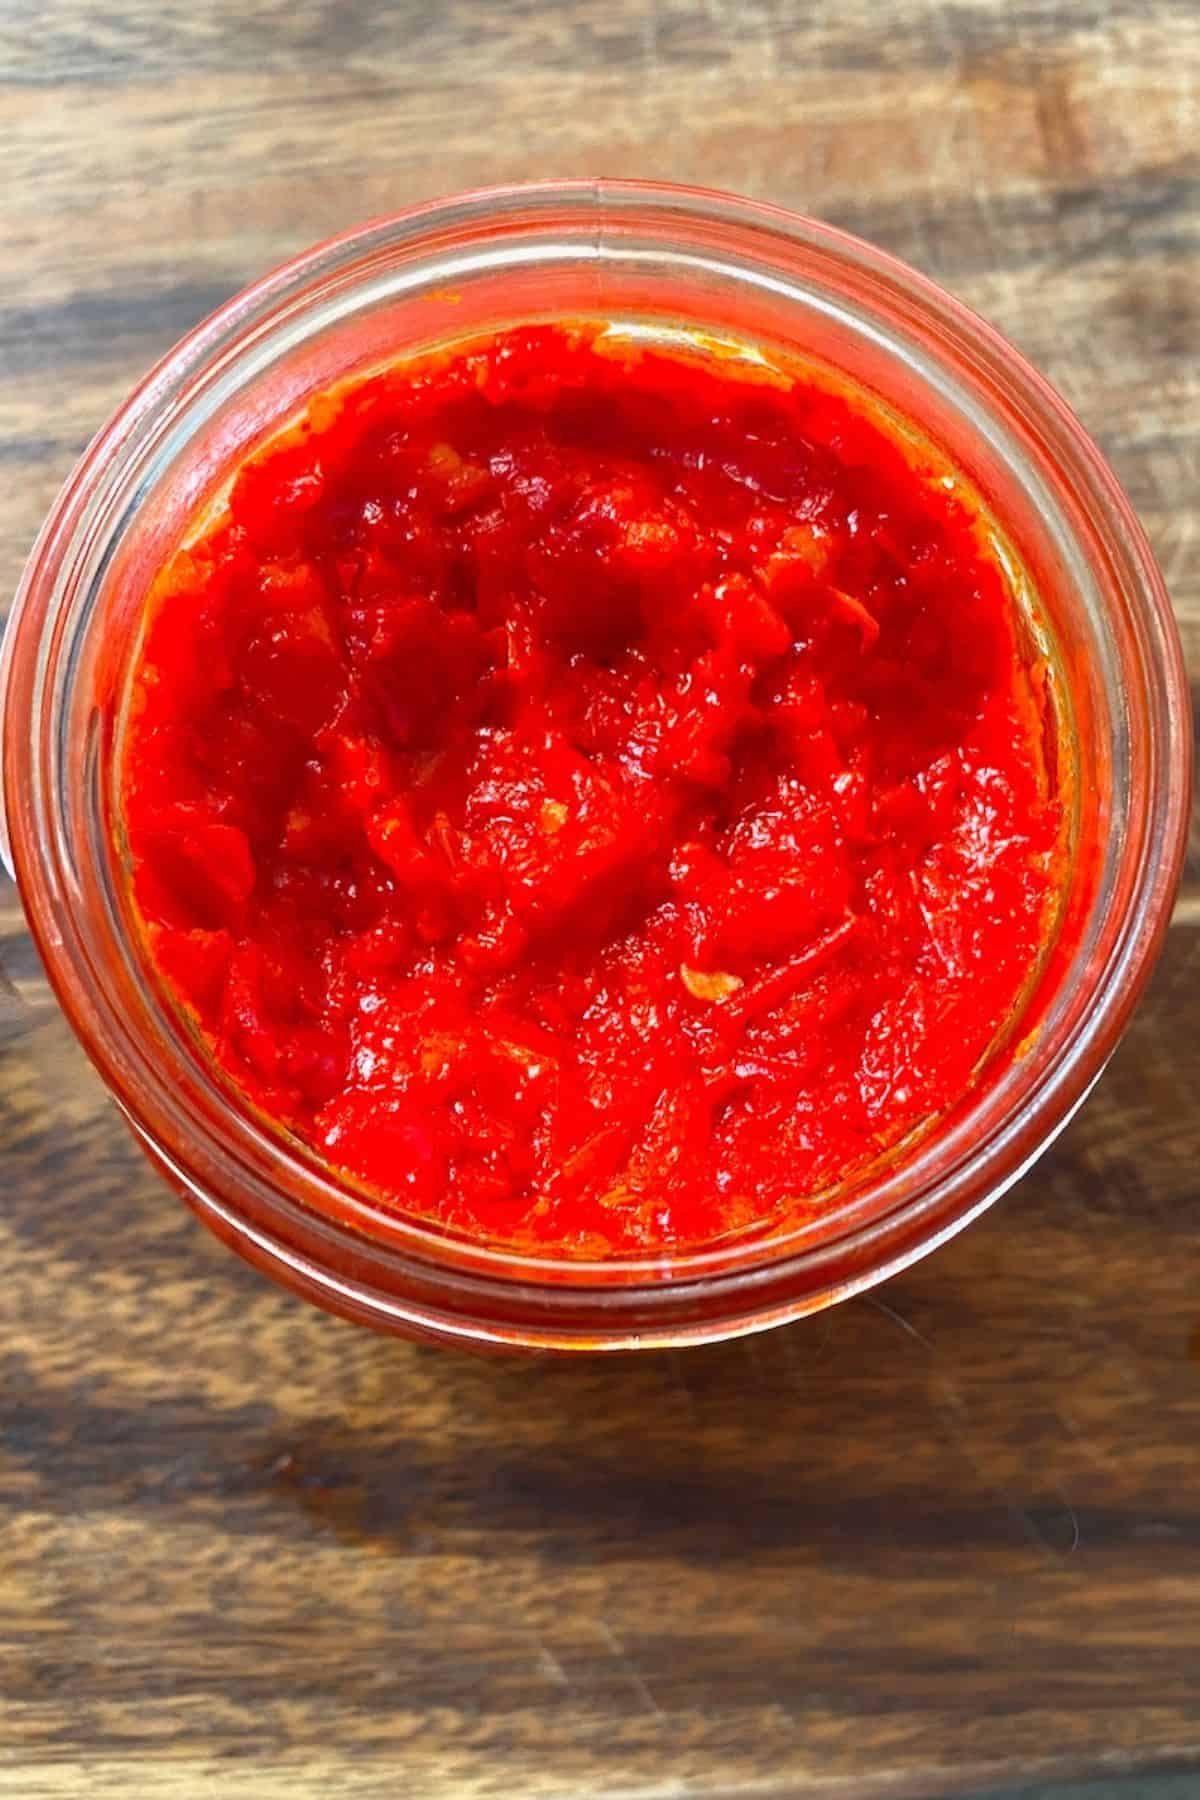
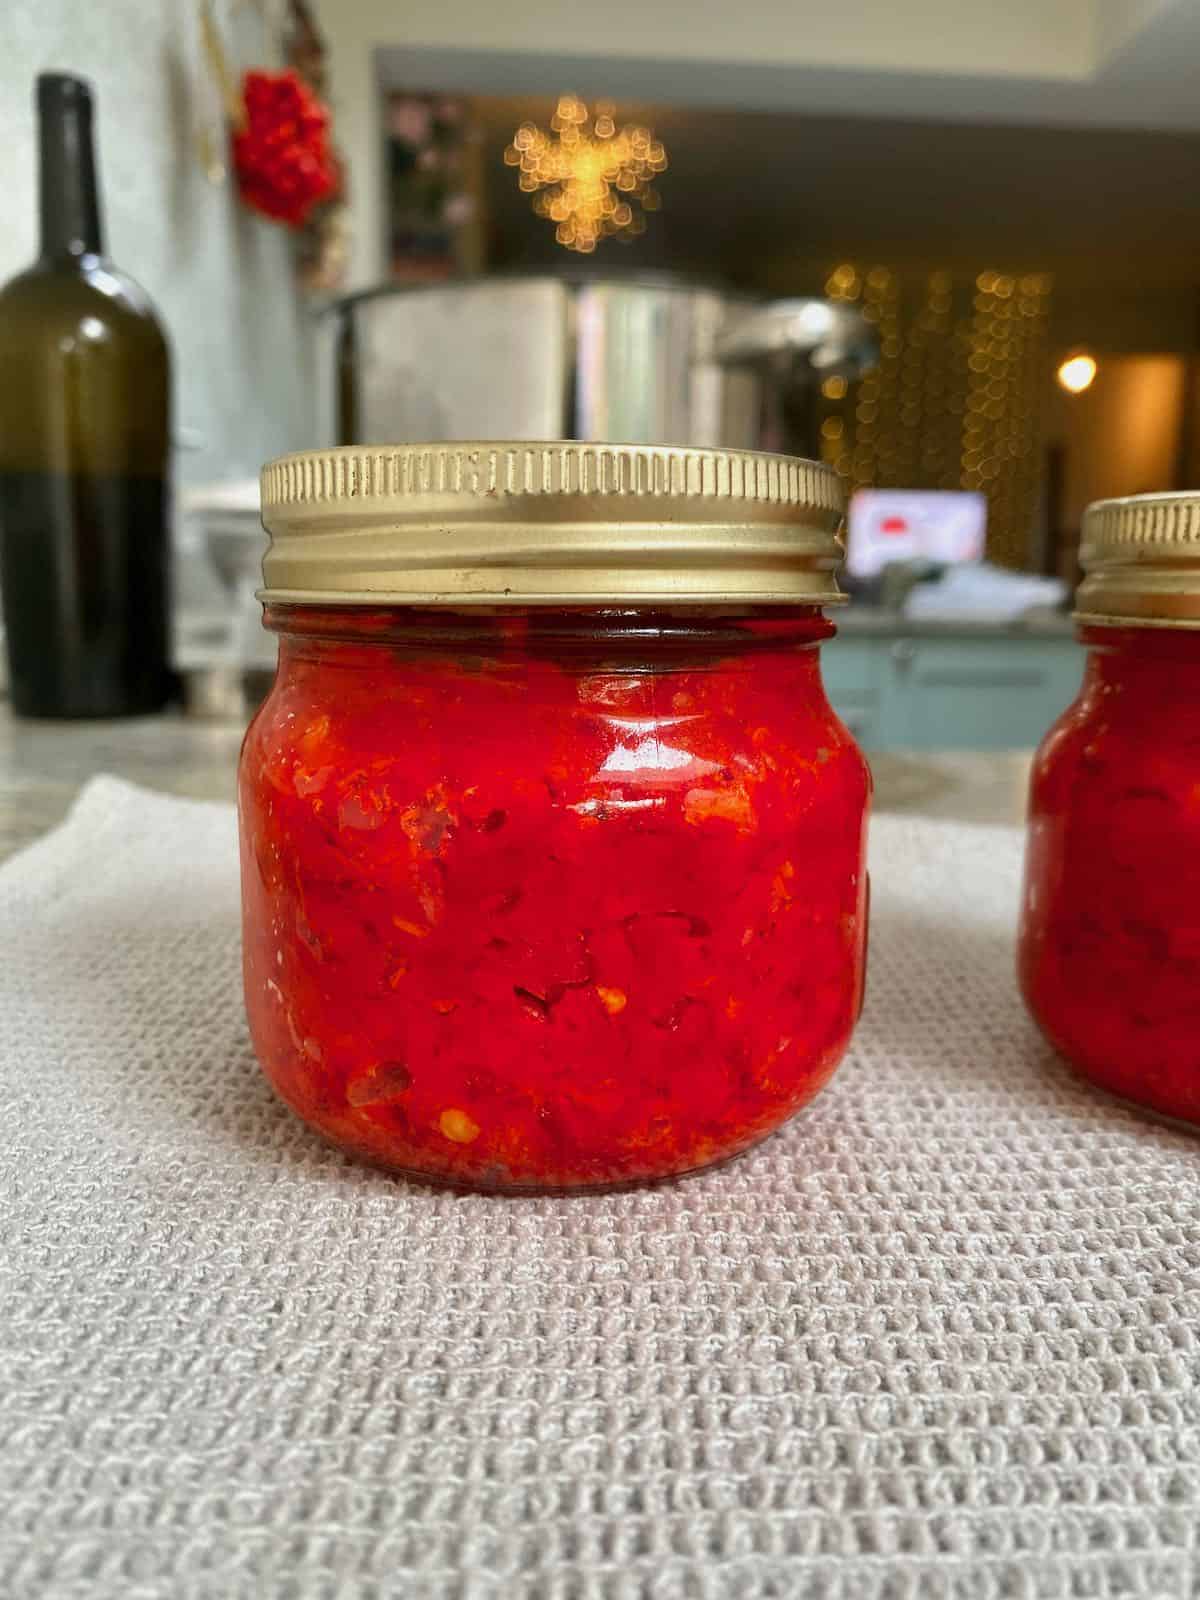
At this point, the red pepper paste is ready to use immediately and transfer to the fridge or go through a water bath canning process for 12 months of shelf-stable storage.
Step 5: Water bath can the red chili paste (optional)
Once ready, follow the steps for canning (read the post for all the top tips and details for best results): transfer the chili pepper paste to the sterilized and dried jars, wipe off the lip to make sure it’s completely clean, and close the jars.
Then transfer to a large canning pot with a rack and half-filled with boiling water. Add the jars (making sure there is an inch of water above the jars – top up with boiled kettle water if needed), bring back to a rolling boil. and then allow to process in the boiling water for 10 minutes. Then turn off the heat and allow the jars to rest for a further 5 minutes.
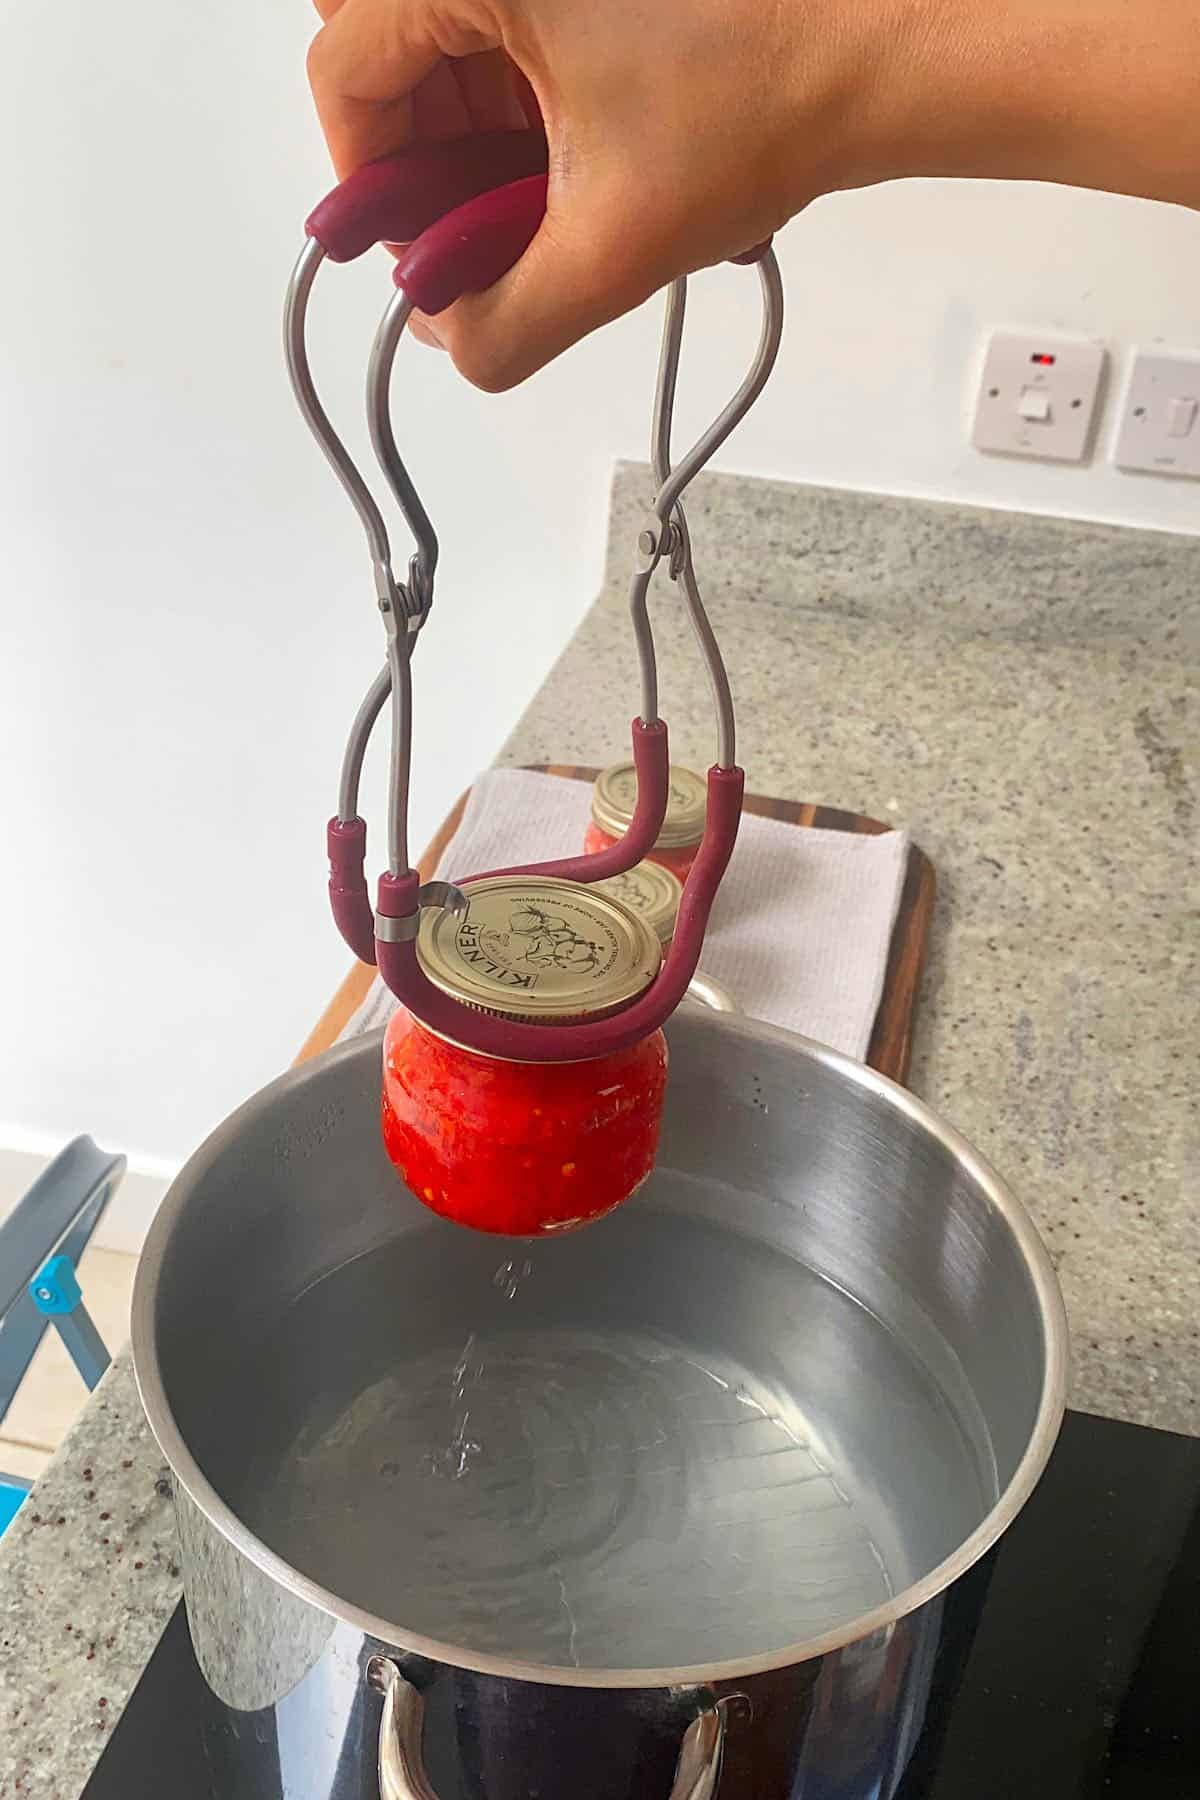
Finally, carefully remove the jars from the canner, placing on a kitchen towel-lined surface, and allow them to sit undisturbed for 24 hours (don’t touch them at all during this time, especially the lid area).
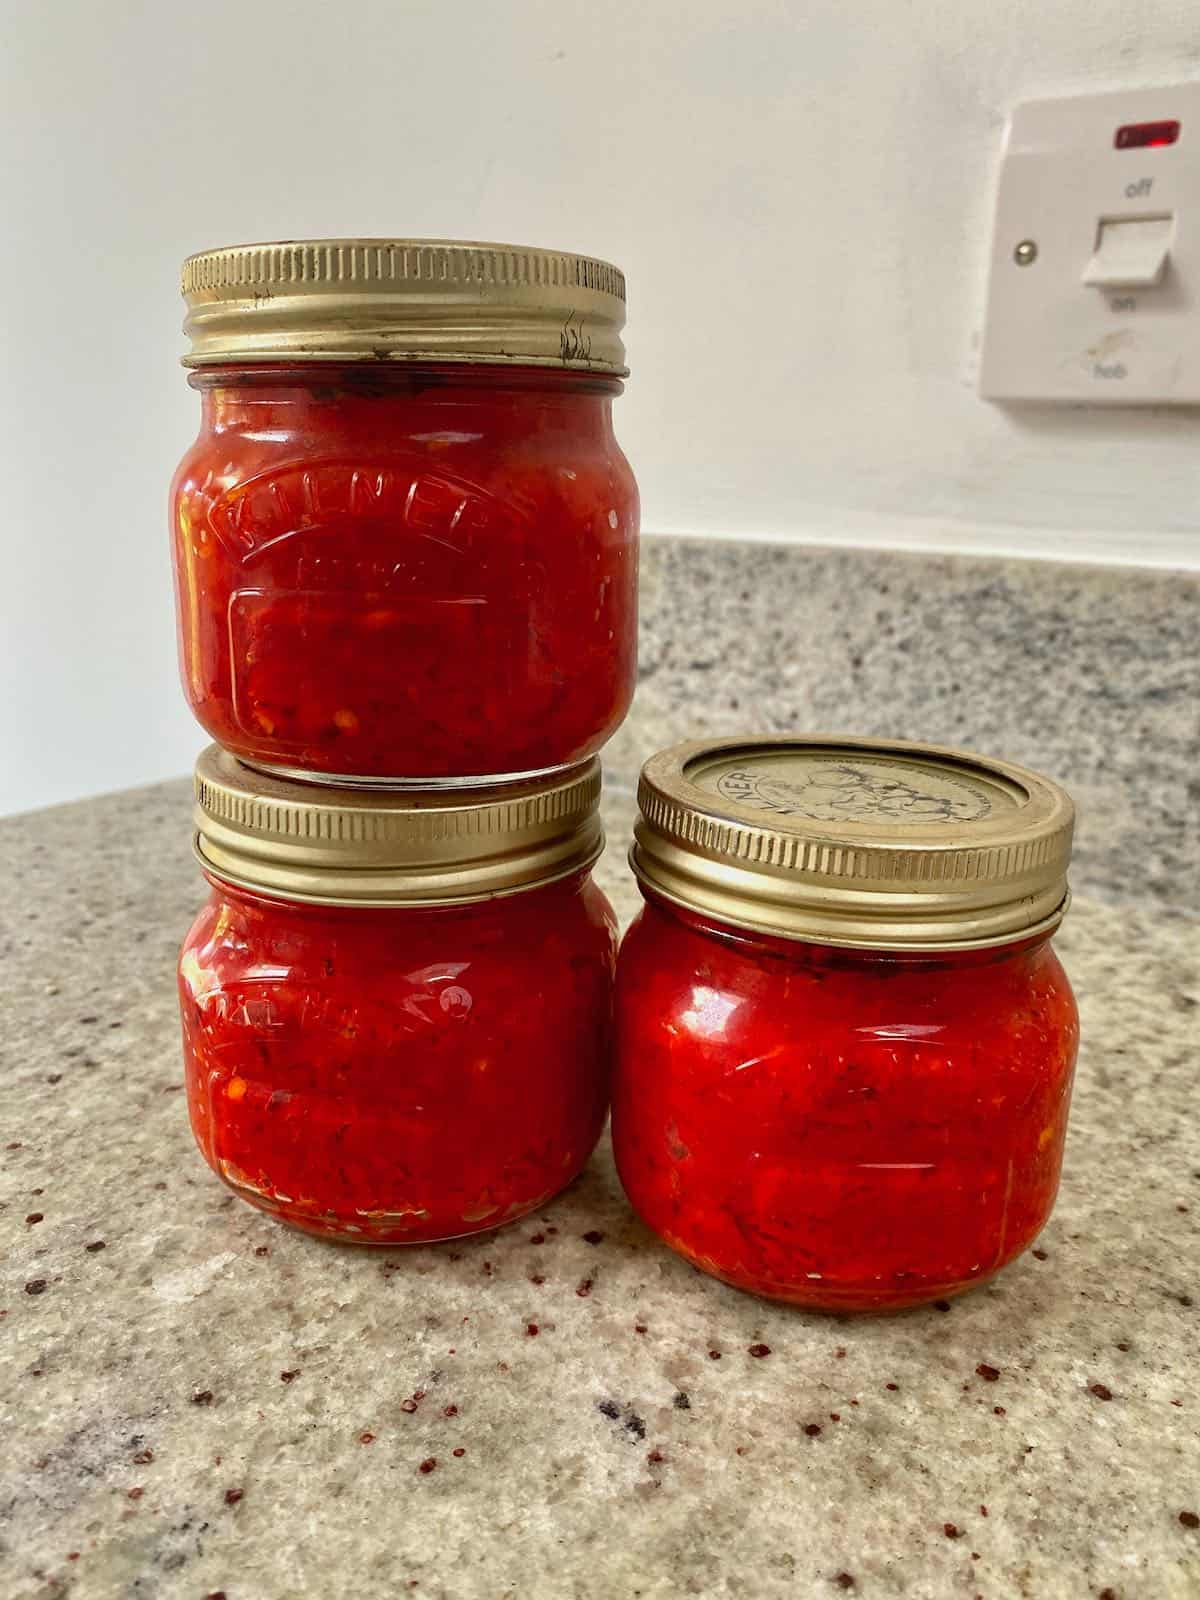
After 24 hours, remove the lid rings from the jars and check that they’re all fully sealed then label and store in a cool, dark location.
Non-Canned versions
There are two methods I’ve used for non-canned chili paste including a raw and reduced version. While you can follow the above method and simply store in the fridge, for non-canned versions, you can follow a process that’s even simpler (and avoid boiling and pressing the peppers).
Raw: For a raw version of this, you can use this method for chili sauce – (called sauce as the consistency is thinner).
Cooked: After blending the paste for the raw method, heat some oil in a large pan and then add the chili paste, cooking over medium for a few minutes. Reduce the heat to low and cook for at least an hour, stirring every 10-15 minutes. (This will last 1-2 weeks in the fridge).
Either way, still add the red pepper paste to a sterilized jar for the best shelf-life.
How to Store
Canned version: For the canned red pepper paste, you can store the processed and sealed jars in a cool, dark kitchen cupboard or pantry for up to a year!
If you don’t want to can this version, you can store it in the fridge for between 1-2 weeks.
Non-Canned versions: These will last in a sterilized jar in the fridge for between 1-2 weeks (the shelf life is improved with salt and vinegar). You can also top the jars with a thin layer of olive oil to help improve shelf-life further.
You can also freeze the hot chili paste for between 3-4 months, stored either in a freezer-safe jar, portioned into an ice cube tray, or even in a ziplock bag (excess air removed).
How To Use Chili Paste (Red Pepper Paste)?
This red pepper paste makes for the ultimate ingredient for those who love spice. Below is a list of suggested uses for chili paste recipes:
- Mix into sauces for some extra heat – like this Simple Roasted Red Pepper Sauce.
- Add to soups and stews – like this Lebanese Green Beans (Loubieh Bi Zeit)
- Combine with mayonnaise (try this easy homemade mayonnaise), yogurt (homemade yogurt works great too), or sour cream for a quick sauce or dip.
- Add to dips for some extra spice and flavor – Roasted Red Pepper Dip, or Rainbow Hummus 6 ways.
- Spread a little over sandwiches and wraps (like wraps made with falafels),
- Or burgers (Sweet Potato Black Bean Burger or Pumpkin Bean Burger With Spicy Mayo Sauce)
- Use as part of a marinade for your favorite protein – like this homemade tofu.
- Add it to salad dressings – for general salads or even a little into this potato salad, for some heat.
- Into ramen and noodle dishes – like this Simple Vegetable Lo Mein (Chili Garlic Noodles)
- Add to vegan chili and curries.
- Into a whole manner of stir fry dishes.
Recipe Notes & Variations
- Wear gloves when handling chilies: I always get negative comments when wearing gloves on social media, so recently I took the risk and went gloveless when dealing with hot chilie. BIG mistake – my skin was burning (ouch!). Capsaicin in peppers can cause skin discomfort and burning and can linger on skin for days. Though burning will usually subsize after a day, the symptoms can last weeks for some- it’s not worth it; wear gloves! If you haven’t and are now dealing with burning skeep read the below section.
- For a super spicy version: use peppers such as Habanero or Bird’s eye (Thai chili).
- Adjust the amount of seeds: doing so will adjust the spice of your homemade chili paste.
- For canning top tips: refer to my canning guide post for the full method details, top tips, and FAQs.
- For more flavor variation: you could add some tomato in place of all peppers. Try to use less ‘juicy’ tomatoes or remove the juicy seed section (and use for something else).
- Experiment with other add-ins: such as ginger, garlic, lemongrass, paprika, and other herbs and spices. Adjust to taste – or leave plainand season each dish individually (for a more all-purpose chili pepper paste.
- You can use dried chilies: You’ll need to rehydrate them in boiling water for 20-30 minutes before processing to make the homemade chili paste.
- Using vinegar in the recipe: Part of the reason this chili paste recipe took so long was to make sure I was making it water-bath canning safe. This method is used for high-acid foods (like pickles, preserves,jams, etc., which chilies are not. Usually these ingredients would then need to be pressure canned (which heats the jars to a higher temperature to kill all the bacteria that water pressure canning could not.) There are two ways to overcome this; the first is to heat the mixture to kill off the germs manually, and the second would be to add an acid to the recipe to reduce the pH to below 4.6 and make it safe for water bath canning. By adding the vinegar, you get both.
How to Stop Burning Skin After Touching Chilies?
Some very helpful Instagram followers sent in their top tips for reducing the burning including:
- Soak in milk/yogurt: This was my favorite method so makes the top of the list. Simply add some milk or yogurt to a bowl and let your hands soak for several minutes.
- Dishwasher soap: Lather the dishwasher soap into your skin and allow it to sit there for several minutes before washing off. For extra protection, then rub vegetable or olive oil into the skin, leave for a minute, then wash off with more dishwasher soap.
- Toothpaste: Make a paste with toothpaste and water, allow to sit for a few minutes then wash off.
Related Recipe
- Easy Thai Green Curry Paste
- Easy Thai Red Curry Paste (5-Minute)
- Simple Turmeric Paste (Golden Paste)
- How to Make Tomato Purée/ Paste
- How To Make Date Paste
- Simple Turmeric Honey Paste (+ Uses)
- Simple two-ingredient Black Sesame Paste
If you try this homemade red chili paste recipe, then let me know your thoughts in the comments. I’d also really appreciate a recipe rating and would love to see your recreations – just tag @AlphaFoodie.
How to Make Red Chili Paste (+ Water Bath Can It)
Ingredients
- 4.4 lb chili peppers use your choice of peppers based on how spicy you want the paste to be (check notes)
- 1/4 cup salt
- 1/3 cup olive oil
- 2 Tbsp vinegar I use apple cider vinegar, which is slightly sweet
Instructions
Step 1: Prepare the peppers
- Wash and pat dry the peppers of your choice.
- Slice the peppers in half and remove the stems and seeds (I like to keep some included, to add extra spice – so adjust this to personal preference. Any unwanted seeds can be left to dry out and be planted).Make sure to wear gloves when dealing with peppers and avoid touching your eyes, nose, and mouth area when dealing with chilies. If you have no gloves, at least oil your hands before using them, which can create a slight natural barrier.Then rinse the sliced peppers.
Step 2: Boil the peppers
- Transfer the peppers to a large pot covered in water and bring to a boil. Then cook over high, covered, for 25-30 minutes.
- When the peppers are cooked, drain them thoroughly then squeeze out any excess liquid. I like to do this by adding the peppers to a nut milk bag inside a sieve and then place something as a weight over the peppers to naturally press out the excess liquid. I used a large jar filled with rice (After cleaning the bottom of the jar) topped with a couple of books.Allow it to drain naturally for several hours (or leave overnight).
Step 3: Process the peppers
- Transfer the pressed peppers to a food processor, blender, or even meat grinder/food mill and process into a paste. I pulsed just a few times into a slightly chunky paste – but feel free to make it completely smooth.If you want to remove the skins, do so before processing and they should come off fairly easily. Alternatively, if using a meat grinder/ mill, it will automatically filter out the skins. Note that 4.4 lb/2 kg raw peppers, once cooked and drained, yield about 1.67 lb/760 g).
- Meanwhile, sterilize your glass jar/s – wash it in hot soapy water and then either place in the oven for about 10 minutes at 165ºC/325ºF to fully dry OR leave to boil for 10 minutes in your canning pot (then dry out with a clean kitchen towel before adding the chili paste).
Step 4: Heat the pepper paste
- Transfer the red chili paste to a large pan with the salt, oil, and vinegar. Then heat, stirring often (with a sterilized nonreactive spoon), to bring the mixture to 167ºF/75ºC. This step is important to kill off any remaining bacteria and make this red pepper paste safe for water bath canning (raw chili peppers must either be pickled or will need to be pressure canned, so don't skip this step if you plan on canning the chili pepper paste).
- At this point, the red pepper paste is ready to use immediately and transfer to the fridge or go through a water bath canning process for 12 months of shelf-stable storage.
Step 5: Water bath can the red chili paste (optional)
- Once ready, follow the steps for canning (read the post for all the top tips and details for best results): transfer the chili pepper paste to the sterilized and dried jars, wipe off the lip to make sure it's completely clean, and close the jars.
- Transfer to a large canning pot with a rack and half-filled with boiling water. Add the jars (making sure there is an inch of water above the jars – top up with boiled kettle water if needed), bring back to a rolling boil. Allow to process in the boiling water for 10 minutes. Then turn off the heat and allow the jars to rest for a further 5 minutes.
- Carefully remove the jars from the canner, placing them on a kitchen towel-lined surface, and allow them to sit undisturbed for 24 hours (don't touch them at all during this time, especially the lid area).
- After 24 hours, check that the jars are all fully sealed then label and store in a cool, dark location.
Non-Canned versions
- There are two methods I've used for non-canned chili paste including a raw and reduced version. While you can follow the above method and simply store it in the fridge, for non-canned versions, you can follow a process that's even simpler (and avoid boiling and pressing the peppers).Raw: for a raw version of this, you can use this method for chili sauce – called sauce as the consistency is thinner.Cooked: after blending the paste for the raw method, heat some oil in a large pan and then add the chili paste, cooking over medium for a few minutes. Reduce the heat to low and cook for at least an hour, stirring every 10-15 minutes. This will last 1-2 weeks in the fridge.Either way, still add the red pepper paste to a sterilized jar for the best shelf-life.
How to Store
- Canned version: for the canned red pepper paste, you can store the processed and sealed jars in a cool, dark kitchen cupboard or pantry for up to a year!If you don't want to can this version, you can store it in the fridge for between 1-2 weeks.Non-Canned versions: these will last in a sterilized jar in the fridge for between 1-2 weeks (the shelf life is improved with salt and vinegar). You can also top the jars with a thin layer of olive oil to help improve shelf-life further.You can also freeze the hot chili paste for between 3-4 months, stored either in a freezer-safe jar, portioned into an ice cube tray, or even in a ziplock bag (excess air removed).
Notes
- Wear gloves when handling chilies: I always get negative comments when wearing gloves on social media, so recently I took the risk and went gloveless when dealing with hot chilies. BIG mistake – my skin was burning (ouch!). Capsaicin in peppers can cause skin discomfort and burning and can linger on the skin for days. Though burning will usually subside after a day, the symptoms can last weeks for some – it’s not worth it; wear gloves! If you haven’t and are now dealing with burning, keep reading the below section.
- For a super spicy version: use peppers such as Habanero or Bird’s eye (Thai chili).
- Adjust the amount of seeds: doing so will adjust the spice of your homemade chili paste.
- For canning top tips: refer to my canning guide post for the full method details, top tips, and FAQs.
- For more flavor variation: you could add some tomato in place of all peppers. Try to use less “juicy” tomatoes or remove the juicy seed section (and use it for something else).
- Experiment with other add-ins: such as ginger, garlic, lemongrass, paprika, and other herbs and spices. Adjust to taste – or leave plain and season each dish individually (for a more all-purpose chili pepper paste).
- You can use dried chilies: you’ll need to rehydrate them in boiling water for 20-30 minutes before processing to make the homemade chili paste.
- Using vinegar in the recipe: part of the reason this chili paste recipe took so long was to make sure I was making it water-bath canning safe. This method is used for high-acid foods (like pickles, preserves, jams, etc., which chilies are not). Usually, these ingredients would then need to be pressure canned which heats the jars to a higher temperature to kill all the bacteria than water bath canning could not. There are two ways to overcome this; the first is to heat the mixture to kill off the germs manually, and the second would be to add an acid to the recipe to reduce the pH to below 4.6 and make it safe for a water bath canning. By adding the vinegar, you get both.
Nutrition
Nutrition information is automatically calculated, so should only be used as an approximation.


Hi Samira
Thanks for the recipe. Can you share the process of canning through video. Does the pressure cooker works instead of the canning pot?
You’re very welcome! 🙂 A pressure canner can definitely be used instead of a water bath canning pot, especially for low-acid foods like chili paste without vinegar. However, if you’re following this recipe with vinegar, the water bath method is enough since the acidity is adjusted to be safe for canning. I’ll be adding a video tutorial soon to show the process in detail!
Can I pressure can this? And if so, how long would I process it for? Thanks!
Yes, you can pressure can this, especially if you’re making a version without vinegar. Generally, you’d process it at 10 PSI (or adjust for altitude) for 1 hour and 15 minutes for pint jars and 1 hour and 30 minutes for quart jars. If you’re at a higher elevation, just adjust the PSI a bit.
Hi ! When you say tested the recipe, does it mean you tested the PH with strips to make sure it was adequate ? Just making sure 🙂
Hi, Melanie. Thanks for asking! In this case, I didn’t use pH strips. The recipe includes vinegar, which helps ensure the acidity level is safe for water bath canning. 🙂
Hi!
This recipe is really nice, how much ginger garlic can I add safely for canning in this recipe? Also could I add some tamrind to this ?
You can try adding ginger and garlic; around 1 tablespoon should be fine. As for tamarind, I haven’t tested its effect on the acidity for canning safety, so I’d recommend testing the pH afterward to make sure it stays below 4.6 to be safe.
Hi!
How much tomato, ginger and garlic or any dried spices can be added to this?
Thanks
Tanu
You can add tomatoes, ginger, and garlic while boiling the chili to let them cook through. For dried spices, adjust them to taste based on your preference.
Hi,
What is the purpose for the olive oil in this paste? Will it spoil in canned goods over time?
Hi Louise,
The olive oil will help enhance the flavor and it won’t spoil if you follow my recipe step by step. I hope this helps.
When adding some tomato’s for a more of a sambal texture do you adjust the vinegar by adding more ?
Hi Michele,
Yes, you can adjust the vinegar slightly.
Hi!
Could you please tell how much ginger, garlic and onion can be added to your mentioned recipe safely. Also can I add soya sauce to this recipe? Instead of the olive oil can I add sesame oil?
Thanks
Hi, Tanu. You can add about 1 tablespoon of garlic and ginger to the recipe. For the soy sauce, I haven’t tested it for canning safety, so just be careful and check the pH. And yes, sesame oil would work instead of olive oil for a different flavor!
Spectacular recipe
Thank you for your comment, Franz.